为什么要解决热点
分布式架构中各个组件的理想状态:资源利用率相对均衡
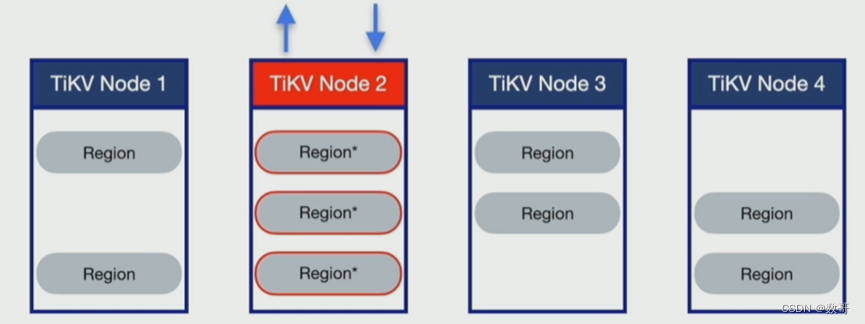
形成写热点的原因
- 高频访问的小表
- SQL执行计划不合理
- 具有顺序增长属性的索引扫描
数据组织模型

例如数据是序列递增,则有可能数据全部都集中一个region上 ,或者集中在一个节点
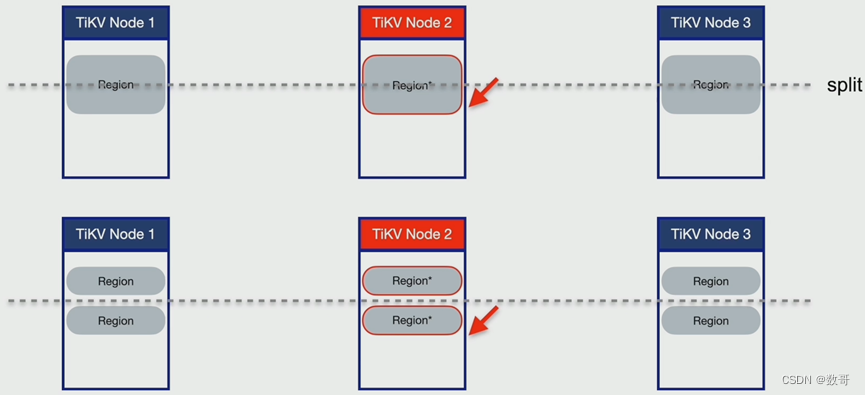
定位热点
- TiDB Dashboard
- 流量可视化页面
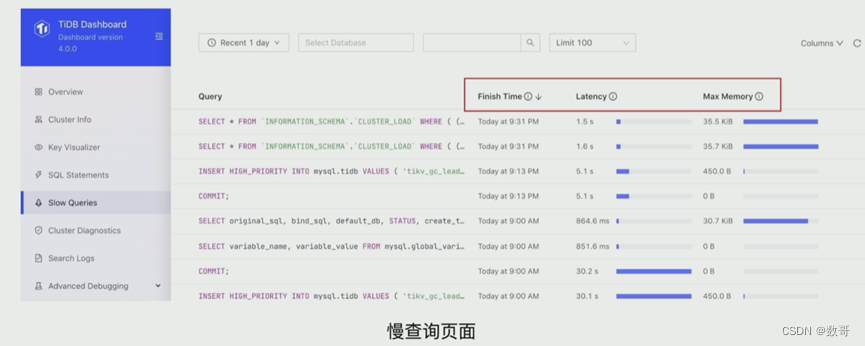
- 慢查询页面
- SQL 语句分析
- Grafana监控
- TiKV - Trouble Shooting
- TiKV - Details
- PD
TiDB Dashboard流量可视化
- 总览
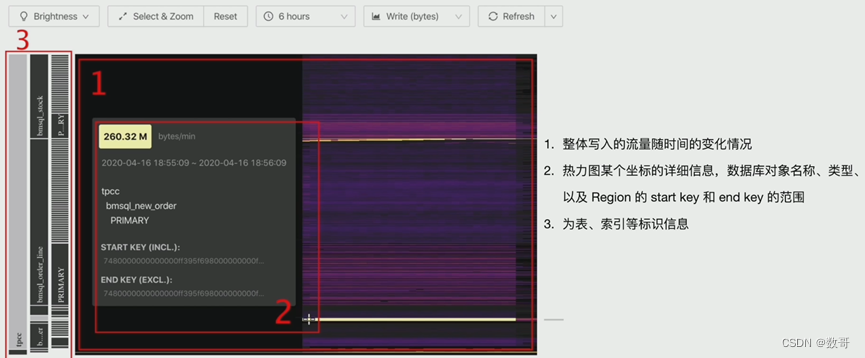
语句执行情况

写热点打散
表结构
shard_row_id_bits 和 pre_split_regions

create table t(c int) shard_row_id_bits = 4;
alter table t shard_row_id_bits =4 ;
auto_random
create table t(a bigint primary key auto_random,b varchar(255));

索引
split table table_name index idx_name between () and () regions n
系统变量
tidb_scatter_region: 作用域是global,默认值是off. 它的作用是预先在不同的节点上分配空region
写热点打散 - 业务运行过程中
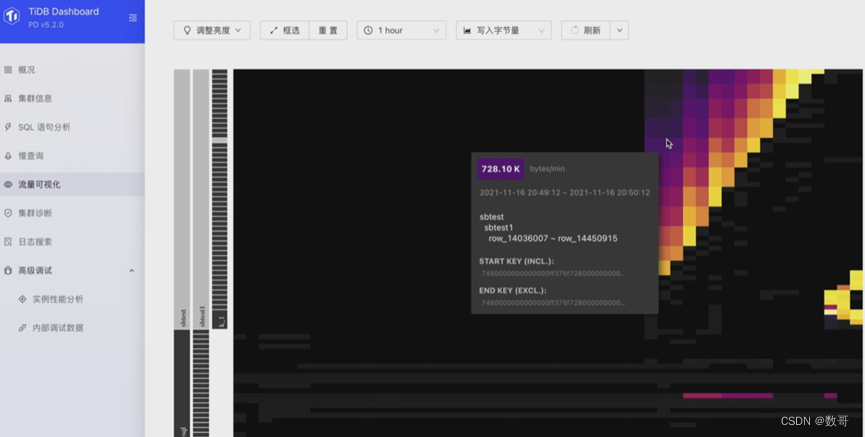
步骤1: TiDB Dashboard流量可视化页面,观测写流量的情况
- 判断流量明亮情况
- 记录有效信息
步骤2: Dashboard慢查询页面& SQL语句分析,确认对应数据库对象DML的操作类型
步骤3: show create table …
步骤4: 热点打散
insert
| 数据类型 | 操作类型 | 自增主键 | 打散方式 |
|---|---|---|---|
| 行数据 | insert | 无 | alter table tbl_name shared_row_id_bits=n; |
| 行数据 | insert | 有 | alter table t modify a bigint auto_random(5); v4.0.13起支持 |
update/delete
| 数据类型 | 操作类型 | 打散方式 |
|---|---|---|
| 行数据 | update/delete | 如下 |
- 通过流量可视化菜单,可以定位菜单目标Region ID
- pd-ctl region key {start_key}
- 分裂reggion
- pd-ctl operator add split-region {region_id} --polict=approximate
- pd-ctl operator add split-region {region_id} --polict=approximate
- transfter 分裂出新region 到其他store
- 通过pd.log 过滤出新split后的新region id
- transfter 到资源利用率相对较低的store
- operator add add-peer {new_region_id} {target_store_id}
- operator add transfer-leader {new_region_id} {target_store_id}
- operator add remove-peer {new_region_id} {target_store_id}
- alter table t modify a bigint auto_random(5); v4.0.13起支持
索引
| 数据类型 | 打散方式 |
|---|---|
| 索引数据 | 如下 |
- 通过流量可视化菜单,可以定位菜单目标Region ID
- pd-ctl region key {start_key}
- 分裂reggion
- pd-ctl operator add split-region {region_id} --polict=approximate
- transfter 分裂出新region 到其他store
- 通过pd.log 过滤出新split后的新region id
- transfter 到资源利用率相对较低的store
- operator add add-peer {new_region_id} {target_store_id}
- operator add transfer-leader {new_region_id} {target_store_id}
- operator add remove-peer {new_region_id} {target_store_id}
- split table tbl_name index index_name between () and () regions n;
读热点打散
步骤1: TiDB Dashboard 流量可视化页面观测读流量的情况
- 判断流量明亮情况
- 记录有效信息
步骤2: TiDB Dashboard 慢查询页面& SQL语句分析,确认问题时间段数据库中SQL: - 执行的频次
- 执行计划: 扫描数据的行数
小表频繁访问引起热点
解决方案 load base ,它会自动打散,通常不需要人工干预
- 方式1
qps超过3000或者流量超过30M/s 自动分裂 自动打散- set config tikv split.qps-threshold=3000
- set config tikv split.byte-threshold=30
mysql> set config tikv split.qps-threshold=4000;
Query OK, 0 rows affected (0.02 sec)

mysql> show config where name like '%qps-threshold%';
+------+---------------------+---------------------+-------+
| Type | Instance            | Name                | Value |
+------+---------------------+---------------------+-------+
| tikv | 192.168.16.13:20160 | split.qps-threshold | 4000  |
+------+---------------------+---------------------+-------+
1 row in set (0.01 sec)
- 方式2
curl -X POST "http://192.168.16.13:20180/config" -H "accept: application/json" -d '{"split.qps-threshold":"3000"}'# 20180 : 修改是tikv参数,这个对应的是是TiKV的status portcurl -X POST "http://192.168.16.13:20180/config" -H "accept: application/json" -d '{"split.byte-threshold":"30"}'# 20180 : 修改是tikv参数,这个对应的是是TiKV的status port
[root@tidb2 ~]# curl -X POST "http://192.168.16.13:20180/config" -H "accept: application/json" -d '{"split.byte-threshold":"40"}'

mysql> show config where name like '%byte-threshold%';
+------+---------------------+----------------------+-------+
| Type | Instance            | Name                 | Value |
+------+---------------------+----------------------+-------+
| tikv | 192.168.16.13:20160 | split.byte-threshold | 40    |
+------+---------------------+----------------------+-------+
1 row in set (0.02 sec)
SQL执行计划不合理
- 缺少索引,出现不必要全表扫描
- 多个索引,但优化器选择错误
- 检查目标表统计信息的健康程度
- 干预优化器
顺序增长属性字段索引范围扫描
-
方式1
qps超过3000或者流量超过30M/s 自动分裂 自动打散- set config tikv split.qps-threshold=3000
- set config tikv split.byte-threshold=30
curl -X POST "http://192.168.16.13:20180/config" -H "accept: application/json" -d '{"split.qps-threshold":"3000"}'# 20180 : 修改是tikv参数,这个对应的是是TiKV的status portcurl -X POST "http://192.168.16.13:20180/config" -H "accept: application/json" -d '{"split.byte-threshold":"30"}'# 20180 : 修改是tikv参数,这个对应的是是TiKV的status port
-
方式2
- split table tbl_name index idx_name between () and () regions n;
实验
使用sysbench 工具模拟数据的并发插入,并采用auto_random选项来尝试打散热点
1、 安装sysbench
wget https://codeload.github.com/akopytov/sysbench/tar.gz/1.0.17
mv 1.0.17 sysbench-1.0.17.tar.gz
tar -zxvf sysbench-1.0.17.tar.gz -C /usr/local/
yum install automake libtool –y
cd /usr/local/sysbench-1.0.17/
[root@tidb2 sysbench-1.0.17]# ./autogen.sh
[root@tidb2 sysbench-1.0.17]# ./configure
[root@tidb2 sysbench-1.0.17]# make -j
[root@tidb2 sysbench-1.0.17]# make install
[root@tidb2 sysbench-1.0.17]# sysbench --version
sysbench 1.0.17
2、 配置sysbench 配置文件
[root@tidb2 ~]# more config_new
mysql-host=192.168.16.13
mysql-port=4000
mysql-user=root
mysql-db=sbtest
time=600
threads=32
report-interval=10
db-driver=mysql
3、创建sysbench测试数据库sbtest
[root@tidb2 ~]# mysql -uroot -p -h192.168.16.13 -P 4000
mysql> create database sbtest;
4、采用sysbench模拟并发批量写入数据,此过程时间较长(15 min)左右,如下:
[root@tidb2 ~]# sysbench /usr/local/share/sysbench/oltp_common.lua --config-file=config_new --tables=1 --table-size=20000000 --mysql-password=Aa123ab! prepare
5、实验用的表是自增主键的聚簇索引表
mysql> show create table sbtest1;
+---------+----------------------------------------------------------------------------------------------------------------------------------------------------------------------------------------------------------------------------------------------------------------------------------------------------------------------------+
| Table   | Create Table                                                                                                                                                                                                                                                                                                               |
+---------+----------------------------------------------------------------------------------------------------------------------------------------------------------------------------------------------------------------------------------------------------------------------------------------------------------------------------+
| sbtest1 | CREATE TABLE `sbtest1` (
  `id` int(11) NOT NULL AUTO_INCREMENT,
  `k` int(11) NOT NULL DEFAULT '0',
  `c` char(120) NOT NULL DEFAULT '',
  `pad` char(60) NOT NULL DEFAULT '',
  PRIMARY KEY (`id`) /*T![clustered_index] CLUSTERED */
) ENGINE=InnoDB DEFAULT CHARSET=utf8mb4 COLLATE=utf8mb4_bin AUTO_INCREMENT=2000001 |
+---------+----------------------------------------------------------------------------------------------------------------------------------------------------------------------------------------------------------------------------------------------------------------------------------------------------------------------------+
1 row in set (0.11 sec)
6、 查看热力图,流量可视化
7、修改测试脚本,将自增主键调整为auto_random
mysql> show create table sbtest1;
+---------+----------------------------------------------------------------------------------------------------------------------------------------------------------------------------------------------------------------------------------------------------------------------------------------------------------------------------+
| Table   | Create Table                                                                                                                                                                                                                                                                                                               |
+---------+----------------------------------------------------------------------------------------------------------------------------------------------------------------------------------------------------------------------------------------------------------------------------------------------------------------------------+
| sbtest1 | CREATE TABLE `sbtest1` (
  `id` int(11) NOT NULL AUTO_RANDOM(5),
  `k` int(11) NOT NULL DEFAULT '0',
  `c` char(120) NOT NULL DEFAULT '',
  `pad` char(60) NOT NULL DEFAULT '',
  PRIMARY KEY (`id`) /*T![clustered_index] CLUSTERED */
) ENGINE=InnoDB DEFAULT CHARSET=utf8mb4 COLLATE=utf8mb4_bin |
+---------+----------------------------------------------------------------------------------------------------------------------------------------------------------------------------------------------------------------------------------------------------------------------------------------------------------------------------+
1 row in set (0.11 sec)
8、清理之前实验数据
[root@tidb2 ~]# sysbench /usr/local/share/sysbench/oltp_common.lua --config-file=config_new --mysql-password=Aa123ab! cleanup
9、再次采用sysbench模拟并发并批量写入数据
[root@tidb2 ~]# sysbench /usr/local/share/sysbench/oltp_common.lua --config-file=config_new --tables=1 --table-size=20000000 --mysql-password=Aa123ab! prepare
10、 查看热力图,流量可视化

