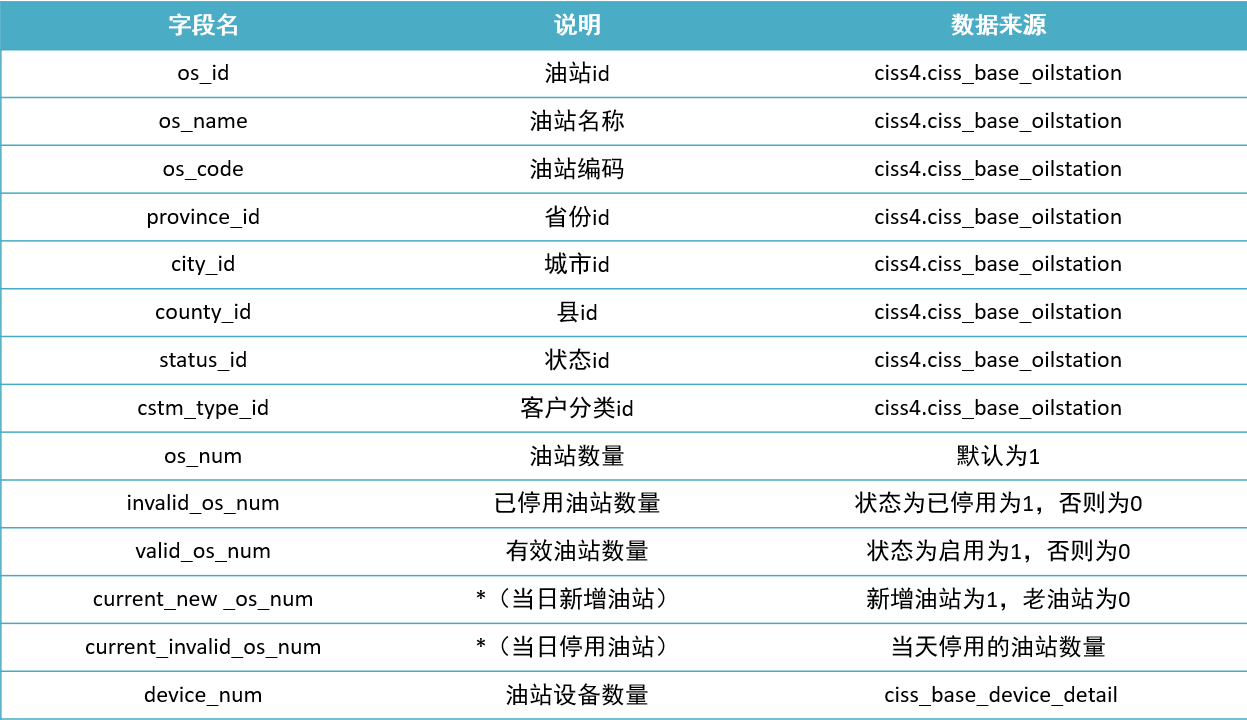
前言
我们知道开发spring boot项目,在启动类上添加注解@SpringBootApplication ,然后引入要自动注入的组件依赖,然后现application.properties中加上相应配置就可以自动注入这个组件,那么下面看看自动注入组件是如何实现的
一、@SpringBootApplication 注解
1、查看SpringBootApplication 类如下:
@Target({ElementType.TYPE})
@Retention(RetentionPolicy.RUNTIME)
@Documented
@Inherited
@SpringBootConfiguration
@EnableAutoConfiguration
@ComponentScan(
    excludeFilters = {@Filter(
    type = FilterType.CUSTOM,
    classes = {TypeExcludeFilter.class}
), @Filter(
    type = FilterType.CUSTOM,
    classes = {AutoConfigurationExcludeFilter.class}
)}
)
public @interface SpringBootApplication {
}
2、查看@EnableAutoConfiguration类
@Target({ElementType.TYPE})
@Retention(RetentionPolicy.RUNTIME)
@Documented
@Inherited
@AutoConfigurationPackage
@Import({AutoConfigurationImportSelector.class})
public @interface EnableAutoConfiguration {
    String ENABLED_OVERRIDE_PROPERTY = "spring.boot.enableautoconfiguration";

    Class<?>[] exclude() default {};

    String[] excludeName() default {};
}
这个类又通过@Import({AutoConfigurationImportSelector.class}) 导入了
3、AutoConfigurationImportSelector这个bean,查看这个bean
public class AutoConfigurationImportSelector
		implements DeferredImportSelector, BeanClassLoaderAware, ResourceLoaderAware,
		BeanFactoryAware, EnvironmentAware, Ordered {
		}
4、这个AutoConfigurationImportSelector类继承了DeferredImportSelector最终继承了ImportSelector,重写这个类的selectImports方法可以快速导入一个bean,查看selectImports方法
@Override
	public String[] selectImports(AnnotationMetadata annotationMetadata) {
		if (!isEnabled(annotationMetadata)) {
			return NO_IMPORTS;
		}
		AutoConfigurationMetadata autoConfigurationMetadata = AutoConfigurationMetadataLoader
				.loadMetadata(this.beanClassLoader);
		AnnotationAttributes attributes = getAttributes(annotationMetadata);
		List<String> configurations = getCandidateConfigurations(annotationMetadata,
				attributes);
		configurations = removeDuplicates(configurations);
		Set<String> exclusions = getExclusions(annotationMetadata, attributes);
		checkExcludedClasses(configurations, exclusions);
		configurations.removeAll(exclusions);
		configurations = filter(configurations, autoConfigurationMetadata);
		fireAutoConfigurationImportEvents(configurations, exclusions);
		return StringUtils.toStringArray(configurations);
	}
5、查看List<String> configurations = getCandidateConfigurations(annotationMetadata, attributes);
这个方法
protected List<String> getCandidateConfigurations(AnnotationMetadata metadata,
			AnnotationAttributes attributes) {
		List<String> configurations = SpringFactoriesLoader.loadFactoryNames(
				getSpringFactoriesLoaderFactoryClass(), getBeanClassLoader());
		Assert.notEmpty(configurations,
				"No auto configuration classes found in META-INF/spring.factories. If you "
						+ "are using a custom packaging, make sure that file is correct.");
		return configurations;
	}
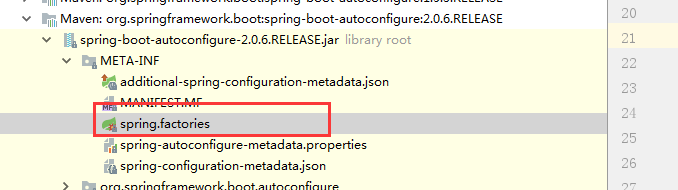
6、这个方法最终会调用loadSpringFactories方法,这个方法把META-INF/spring.factories定义的类全部读到出来
# Auto Configure
org.springframework.boot.autoconfigure.EnableAutoConfiguration=\
org.springframework.boot.autoconfigure.admin.SpringApplicationAdminJmxAutoConfiguration,\
org.springframework.boot.autoconfigure.aop.AopAutoConfiguration,\
org.springframework.boot.autoconfigure.amqp.RabbitAutoConfiguration,\
org.springframework.boot.autoconfigure.batch.BatchAutoConfiguration,\
private static Map<String, List<String>> loadSpringFactories(@Nullable ClassLoader classLoader) {
        MultiValueMap<String, String> result = (MultiValueMap)cache.get(classLoader);
        if (result != null) {
            return result;
        } else {
            try {
                Enumeration<URL> urls = classLoader != null ? classLoader.getResources("META-INF/spring.factories") : ClassLoader.getSystemResources("META-INF/spring.factories");
                LinkedMultiValueMap result = new LinkedMultiValueMap();

                while(urls.hasMoreElements()) {
                    URL url = (URL)urls.nextElement();
                    UrlResource resource = new UrlResource(url);
                    Properties properties = PropertiesLoaderUtils.loadProperties(resource);
                    Iterator var6 = properties.entrySet().iterator();

                    while(var6.hasNext()) {
                        Entry<?, ?> entry = (Entry)var6.next();
                        List<String> factoryClassNames = Arrays.asList(StringUtils.commaDelimitedListToStringArray((String)entry.getValue()));
                        result.addAll((String)entry.getKey(), factoryClassNames);
                    }
                }

                cache.put(classLoader, result);
                return result;
            } catch (IOException var9) {
                throw new IllegalArgumentException("Unable to load factories from location [META-INF/spring.factories]", var9);
            }
        }
    }
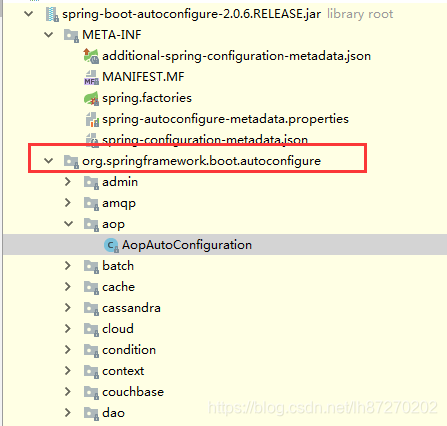
7、最终spring会根据这些组件中定义的注入条件将这些组件自动注入,org.springframework.boot.autoconfigure下放了所有自动注入的组件,以aop这个组件为例:
@Configuration
//条件注入,当有 `EnableAspectJAutoProxy.class, Aspect.class, Advice.class,`这些class存在时才注入,也就是说当引入相关依赖包时注入
		AnnotatedElement.class
@ConditionalOnClass({ EnableAspectJAutoProxy.class, Aspect.class, Advice.class,
		AnnotatedElement.class })
//当配置文件中有spring.aop 配置时才注入
@ConditionalOnProperty(prefix = "spring.aop", name = "auto", havingValue = "true", matchIfMissing = true)
public class AopAutoConfiguration {

	@Configuration
	@EnableAspectJAutoProxy(proxyTargetClass = false)
	@ConditionalOnProperty(prefix = "spring.aop", name = "proxy-target-class", havingValue = "false", matchIfMissing = false)
	public static class JdkDynamicAutoProxyConfiguration {

	}

	@Configuration
	@EnableAspectJAutoProxy(proxyTargetClass = true)
	@ConditionalOnProperty(prefix = "spring.aop", name = "proxy-target-class", havingValue = "true", matchIfMissing = true)
	public static class CglibAutoProxyConfiguration {

	}

}
二、spring boot内嵌tomcat
最简单的tomcat集成
1、添加pom文件
<dependencies>

        <!--Java语言操作tomcat -->
        <dependency>
            <groupId>org.apache.tomcat.embed</groupId>
            <artifactId>tomcat-embed-core</artifactId>
            <version>8.5.16</version>
        </dependency>

        <!-- tomcat对jsp支持 -->
        <dependency>
            <groupId>org.apache.tomcat</groupId>
            <artifactId>tomcat-jasper</artifactId>
            <version>8.5.16</version>
        </dependency>

    </dependencies>
2、新建一个servlet文件
public class IndexServlet extends HttpServlet {

    @Override
    protected void doGet(HttpServletRequest req, HttpServletResponse resp) throws ServletException, IOException {
        doPost(req, resp);
    }

    @Override
    protected void doPost(HttpServletRequest req, HttpServletResponse resp) throws ServletException, IOException {
        resp.getWriter().print("this is index... tomcat");
    }

}
3、新建一个启动类
public class DTomcat {

    private static int PORT = 8080;
    private static String CONTEX_PATH = "/clock";
    private static String SERVLET_NAME = "indexServlet";

    public static void main(String[] args) throws LifecycleException, InterruptedException {

        // 创建tomcat服务器
        Tomcat tomcatServer = new Tomcat();
        // 指定端口号
        tomcatServer.setPort(PORT);
        // 是否设置自动部署
        tomcatServer.getHost().setAutoDeploy(false);
        // 创建上下文
        StandardContext standardContex = new StandardContext();
        standardContex.setPath(CONTEX_PATH);
        // 监听上下文
        standardContex.addLifecycleListener(new Tomcat.FixContextListener());
        // tomcat容器添加standardContex
        tomcatServer.getHost().addChild(standardContex);

        // 创建Servlet
        tomcatServer.addServlet(CONTEX_PATH, SERVLET_NAME, new IndexServlet());
        // servleturl映射
        standardContex.addServletMappingDecoded("/index", SERVLET_NAME);
        tomcatServer.start();
        System.out.println("tomcat服务器启动成功..");
        // 异步进行接收请求
        tomcatServer.getServer().await();

    }
}
4、运行main,在浏览器输入:
http://localhost:8080/clock/index
spring boot内嵌tomcat
1、启动一个spring boot项目,查看控制台最下的日志:
可以看出spring boot在启动的时候,启动一个tomcat,实际上它启动的方式也是上面那么启动方式

2、tomcat加载流程
tomcat也是一个组件,那么它的引入方式也是通过spring.factories文件注入的

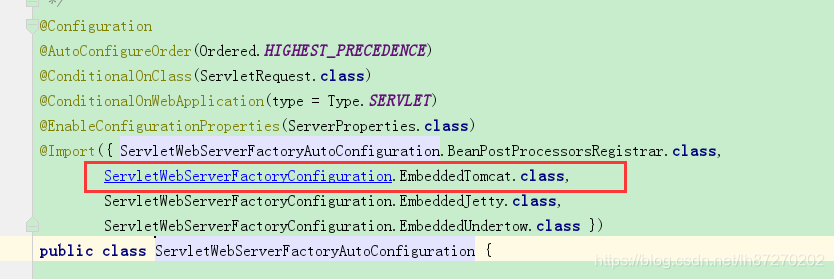
3、查看ServletWebServerFactoryAutoConfiguration这个类
ServletWebServerFactoryAutoConfiguration这个类用@import快速导入了EmbeddedTomcat类
4、查看EmbeddedTomcat类
这个类注入了TomcatServletWebServerFactory这个bean
@Configuration
	@ConditionalOnClass({ Servlet.class, Tomcat.class, UpgradeProtocol.class })
	@ConditionalOnMissingBean(value = ServletWebServerFactory.class, search = SearchStrategy.CURRENT)
	public static class EmbeddedTomcat {

		@Bean
		public TomcatServletWebServerFactory tomcatServletWebServerFactory() {
			return new TomcatServletWebServerFactory();
		}

	}
4、查看TomcatServletWebServerFactory类
这个类有一个getWebServer方法如下:
这个方法启动了一个tomcat,那么这个方法是在哪个地方调用的?可以在这个方法上打上断点,查看它的调用链
public WebServer getWebServer(ServletContextInitializer... initializers) {
        Tomcat tomcat = new Tomcat();
        File baseDir = this.baseDirectory != null ? this.baseDirectory : this.createTempDir("tomcat");
        tomcat.setBaseDir(baseDir.getAbsolutePath());
        Connector connector = new Connector(this.protocol);
        tomcat.getService().addConnector(connector);
        this.customizeConnector(connector);
        tomcat.setConnector(connector);
        tomcat.getHost().setAutoDeploy(false);
        this.configureEngine(tomcat.getEngine());
        Iterator var5 = this.additionalTomcatConnectors.iterator();

        while(var5.hasNext()) {
            Connector additionalConnector = (Connector)var5.next();
            tomcat.getService().addConnector(additionalConnector);
        }

        this.prepareContext(tomcat.getHost(), initializers);
        return this.getTomcatWebServer(tomcat);
    }
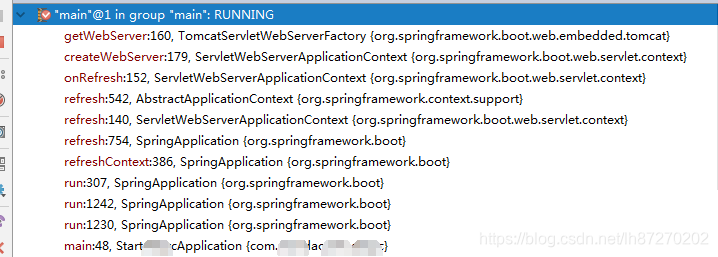
5、在getWebServer()方法,打断点,然后启动spring boot的main方法,查看调用链如下:
6、启动流程分析
查看main里面的run方法,
这个方法主要new 了一个SpringApplication对象,然后执行了run方法
public static ConfigurableApplicationContext run(Class<?>[] primarySources, String[] args) {
    return (new SpringApplication(primarySources)).run(args);
 }
SpringApplication结构方法:
加载了相关类,没有执行
public SpringApplication(ResourceLoader resourceLoader, Class<?>... primarySources) {
		this.resourceLoader = resourceLoader;
		Assert.notNull(primarySources, "PrimarySources must not be null");
		//保存主类
		this.primarySources = new LinkedHashSet<>(Arrays.asList(primarySources));
		//判断当前是什么类型项目
		this.webApplicationType = WebApplicationType.deduceFromClasspath();
	//从类路径下找到META-INF/spring.factories配置的所有ApplicationContextInitializer
		setInitializers((Collection) getSpringFactoriesInstances(
				ApplicationContextInitializer.class));
	//从类路径下找到META-INF/spring.factories配置的所有ApplicationListener
		setListeners((Collection) getSpringFactoriesInstances(ApplicationListener.class));
		this.mainApplicationClass = deduceMainApplicationClass();
}
run方法:
public ConfigurableApplicationContext run(String... args) {
	StopWatch stopWatch = new StopWatch();
	stopWatch.start();
	ConfigurableApplicationContext context = null;
	Collection<SpringBootExceptionReporter> exceptionReporters = new ArrayList<>();
	configureHeadlessProperty();
	//从类路径下META‐INF/spring.factories,取得SpringApplicationRunListeners;
	SpringApplicationRunListeners listeners = getRunListeners(args);
//回调所有的获取SpringApplicationRunListener.starting()方法
	listeners.starting();
	try {
	    //封装命令行参数
		ApplicationArguments applicationArguments = new DefaultApplicationArguments(
				args);
	    //准备环境
		ConfigurableEnvironment environment = prepareEnvironment(listeners,
				applicationArguments);
		configureIgnoreBeanInfo(environment);
           //创回调SpringApplicationRunListener.environmentPrepared();
//表示环境准备完成

		//打印Banner
		Banner printedBanner = printBanner(environment);
           //根据环境创建context
		context = createApplicationContext();
	    //错误的异常报表
		exceptionReporters = getSpringFactoriesInstances(
				SpringBootExceptionReporter.class,
				new Class[] { ConfigurableApplicationContext.class }, context);
            //准备上下文环境;
           //将environment保存到ioc中;
           //applyInitializers()调用所有的ApplicationContextInitializer的initialize方法
//调用所有的SpringApplicationRunListener的contextPrepared();
		prepareContext(context, environment, listeners, applicationArguments,
				printedBanner);
//SpringApplicationRunListener的contextLoaded
//刷新容器
//扫描,创建,加载所有组件;
		refreshContext(context);
		afterRefresh(context, applicationArguments);
		stopWatch.stop();
		if (this.logStartupInfo) {
			new StartupInfoLogger(this.mainApplicationClass)
					.logStarted(getApplicationLog(), stopWatch);
		}
		//所有的SpringApplicationRunListener回调started方法
		listeners.started(context);
		//获取所有的ApplicationRunner和CommandLineRunner进行调用
		callRunners(context, applicationArguments);
	}
	catch (Throwable ex) {
		handleRunFailure(context, ex, exceptionReporters, listeners);
		throw new IllegalStateException(ex);
	}

	try {
		//所有的SpringApplicationRunListener的running();
		listeners.running(context);
	}
	catch (Throwable ex) {
		handleRunFailure(context, ex, exceptionReporters, null);
		throw new IllegalStateException(ex);
	}
	return context;
}
三、spring boot内嵌tomcat,修改web容器
从spring boot启动日志看,我们知道spring boot内嵌的web容器是tomcat,那么如果我们不想用tomcat 也可以换别的web容器
1、修改pom
排除tomcat,引入undertow容器
<dependencies>
        <dependency>
            <groupId>org.springframework.boot</groupId>
            <artifactId>spring-boot-starter-web</artifactId>
            <exclusions>
                <exclusion>
                    <groupId>org.springframework.boot</groupId>
                    <artifactId>spring-boot-starter-tomcat</artifactId>
                </exclusion>
            </exclusions>
        </dependency>
        <dependency>
            <groupId>org.springframework.boot</groupId>
            <artifactId>spring-boot-starter-undertow</artifactId>
        </dependency>
    </dependencies>
这个再启动spring boot项目用的就是undertow容器