本文从开发者的角度深入解析了基于netty的通信模块, 并通过简易扩展实现微服务化通信工具雏形, 适合于想要了解netty通信框架的使用案例, 想了解中间件通信模块设计, 以及微服务通信底层架构的同学。希望此文能给大家带来通信模块架构灵感。

概述
网络通信是很常见的需求,
对于传统web网页工具短连接场景,浏览器和服务器交互,常见为浏览器通过http协议请求Tomcat服务器;
对于长连接场景, 比如即时通讯,或中间件等实时性要求高的场景,一般采用tcp协议的长连接进行全双工实时通信;
对于java开发者来说,使用原生socket进行tcp开发,效率是比较低的,稳定性可靠性等也不好保障,一般选择网络通信框架netty加快开发效率。
对于上层应用来说,netty的标准使用方式依然比较繁琐,未能很好的适配一些业务使用场景,比如rocketMq根据netty包装了一层业务框架:通信模块remoting。
该模块可用性高,稳定性好,易扩展,经过了中间件产品长期高并发的质量验证, 值得信任,并广泛用于其他点对点(指定ip)通信场景,如dleger(raft的java实现)。
有相关通信需求的同学也都可以参考该通信模块,相信有很多的灵感,或直接使用该通信模块,带来开发效率的提升。
本文从一个普通java开发者的视角,去解析该通信模块
如何用 - 常见使用方式
实现原理 - 数据流转链路
设计关键点 - 为什么要如此设计
模块升级 - 实现简易的微服务化通信工具
本文代码版本:
<parent>
  <groupId>org.apache.rocketmq</groupId>
  <artifactId>rocketmq-remoting</artifactId>
  <version>5.0.1-PREVIEW-SNAPSHOT</version>
</parent>
如何用
编写简单易懂的测试demo,实现server client的交互流程。
简单示例 协议code 为写死 0 1 5 9,输入测试信息,输出使用sysout。
▐ 启动server 注册服务监听
import com.alibaba.fastjson.JSON;
import io.netty.channel.ChannelHandlerContext;
import org.apache.rocketmq.remoting.RemotingServer;
import org.apache.rocketmq.remoting.netty.NettyRemotingServer;
import org.apache.rocketmq.remoting.netty.NettyRequestProcessor;
import org.apache.rocketmq.remoting.netty.NettyServerConfig;
import org.apache.rocketmq.remoting.protocol.RemotingCommand;
import java.util.concurrent.ArrayBlockingQueue;
import java.util.concurrent.ExecutorService;
import java.util.concurrent.ThreadPoolExecutor;
import java.util.concurrent.TimeUnit;
public class Server {
    public static void main(String[] args) throws Exception {
        NettyServerConfig nettyServerConfig = new NettyServerConfig();
        // 配置端口
        nettyServerConfig.setListenPort(8888);
        // 配置线程数 netty workGroup 线程池 处理io等低耗时
        nettyServerConfig.setServerSelectorThreads(2);
        // 配置线程数 netty eventGroup 线程池 处理自定义hander/长耗时等
        nettyServerConfig.setServerWorkerThreads(8);
        NettyRemotingServer remotingServer = new NettyRemotingServer(nettyServerConfig, null);


        // 支持共用或独立的业务处理线程池
        ExecutorService poolA = new ThreadPoolExecutor(4, 4, 0, TimeUnit.SECONDS, new ArrayBlockingQueue<>(1024));
        ExecutorService poolB = new ThreadPoolExecutor(4, 4, 0, TimeUnit.SECONDS, new ArrayBlockingQueue<>(1024));


        // 业务处理器
        NettyRequestProcessor processA = new NettyRequestProcessor() {
            @Override
            public RemotingCommand processRequest(ChannelHandlerContext ctx, RemotingCommand request) throws Exception {
                System.out.println("received from client, remark:" + request.getRemark() + ", coe:" + request.getCode());
                RemotingCommand response = RemotingCommand.createResponseCommand(0, "server");
                switch (request.getCode()) {
                    case 0:
                        response.setBody(new String("hello sync 0").getBytes());
                    case 1:
                        response.setBody(new String("hello sync 1").getBytes());
                    default:
                        break;
                }
                return response;
            }
            @Override
            public boolean rejectRequest() {
                return false;
            }
        };
        // 业务处理器
        NettyRequestProcessor processB = new NettyRequestProcessor(){
            @Override
            public RemotingCommand processRequest(ChannelHandlerContext ctx, RemotingCommand request) throws Exception {
                System.out.println("received from client, remark:" + request.getRemark() + ", coe:" + request.getCode());
                RemotingCommand response = RemotingCommand.createResponseCommand(0, "server");
                switch (request.getCode()) {
                    case 9:
                        response.setBody(new String("hello sync 9").getBytes());
                    default:
                        break;
                }
                return response;
            }
            @Override
            public boolean rejectRequest() {
                return false;
            }
        };
        // 注册 协议 - 对应的处理器, 类似web url 路由到对应的class
        remotingServer.registerProcessor(0, processA, poolA);
        remotingServer.registerProcessor(1, processA, poolA);
        remotingServer.registerProcessor(9, processB, poolB);


        remotingServer.start();


        System.out.println("start ok " + JSON.toJSONString(nettyServerConfig));
        System.in.read();
    }
}
▐ 启动client 发起调用
import io.netty.channel.ChannelHandlerContext;
import org.apache.rocketmq.remoting.InvokeCallback;
import org.apache.rocketmq.remoting.netty.NettyClientConfig;
import org.apache.rocketmq.remoting.netty.NettyRemotingClient;
import org.apache.rocketmq.remoting.netty.NettyRequestProcessor;
import org.apache.rocketmq.remoting.netty.ResponseFuture;
import org.apache.rocketmq.remoting.protocol.RemotingCommand;
import java.util.concurrent.ArrayBlockingQueue;
import java.util.concurrent.ExecutorService;
import java.util.concurrent.ThreadPoolExecutor;
import java.util.concurrent.TimeUnit;
public class Client {
    public static void main(String[] args) throws Exception {
        NettyClientConfig nettyServerConfig = new NettyClientConfig();
        // 配置线程数 netty eventGroup 线程池 处理自定义hander/耗时长等
        nettyServerConfig.setClientWorkerThreads(8);
        NettyRemotingClient remotingClient = new NettyRemotingClient(nettyServerConfig, null);


        // 支持共用或独立的业务处理线程池
        ExecutorService poolA = new ThreadPoolExecutor(4, 4, 0, TimeUnit.SECONDS, new ArrayBlockingQueue<>(1024));


        // 监听服务端发过来的请求
        remotingClient.registerProcessor(5, new NettyRequestProcessor() {
            @Override
            public RemotingCommand processRequest(ChannelHandlerContext ctx, RemotingCommand request) throws Exception {
                System.out.println("receive from server : " + request.getCode());
                return null;
            }
            @Override
            public boolean rejectRequest() {
                return false;
            }
        }, poolA);


        remotingClient.start();


        // 主动发起远程调用
        {
            // 同步调用
            RemotingCommand request = RemotingCommand.createRequestCommand(0, null);
            request.setRemark("sync");
            RemotingCommand response = remotingClient.invokeSync("127.0.0.1:8888", request, 30 * 1000L);
            System.out.println("call sync ok remark:" + response.getRemark() + " body:" + new String(response.getBody()));
        }
        {
            // 异步调用
            RemotingCommand request = RemotingCommand.createRequestCommand(1, null);
            request.setRemark("async");
            remotingClient.invokeAsync("127.0.0.1:8888", request, 30 * 1000L, new InvokeCallback() {
                @Override
                public void operationComplete(ResponseFuture responseFuture) {
                    RemotingCommand response = responseFuture.getResponseCommand();
                    System.out.println("call async ok remark:" + response.getRemark() + " body:" + new String(response.getBody()));
                }
            });
        }
        {
            // 单向调用
            RemotingCommand request = RemotingCommand.createRequestCommand(9, null);
            request.setRemark("oneway");
            remotingClient.invokeOneway("127.0.0.1:8888", request, 30 * 1000L);
            System.out.println("call oneway ok ");
        }
        System.in.read();
    }
}该点对点调用,是需要手动指定目标服务器的ip和端口的,不同于hsf拥有注册中心进行协调撮合提供目标ip。
▐ 日志输出
Connected to the target VM, address: '127.0.0.1:57381', transport: 'socket'
start ok {"listenPort":8888,"serverAsyncSemaphoreValue":64,"serverCallbackExecutorThreads":0,"serverChannelMaxIdleTimeSeconds":120,"serverOnewaySemaphoreValue":256,"serverPooledByteBufAllocatorEnable":true,"serverSelectorThreads":2,"serverSocketRcvBufSize":65535,"serverSocketSndBufSize":65535,"serverWorkerThreads":8,"useEpollNativeSelector":false}
received from client, remark:sync, coe:0
received from client, remark:async, coe:1
received from client, remark:oneway, coe:9
Connected to the target VM, address: '127.0.0.1:57385', transport: 'socket'
call sync ok remark:server body:hello sync 1
call oneway ok
call async ok remark:server body:hello sync 1
实现原理
关于netty如何封装java基础nio socket不做展开。
这里分析通信模块是如何封装netty,扩展调用协议规范的部分,重点描述其中关键的设计要点。
▐ server 启动 监听请求
作为服务端,需绑定端口,监听请求,这里采用标准netty服务端模式。
remotingServer.start();
@Override
    public void start() {
        ...
        ServerBootstrap childHandler =
            this.serverBootstrap.group(this.eventLoopGroupBoss, this.eventLoopGroupSelector)
                .channel(useEpoll() ? EpollServerSocketChannel.class : NioServerSocketChannel.class)
                .option(ChannelOption.SO_BACKLOG, 1024)
                .option(ChannelOption.SO_REUSEADDR, true)
                .option(ChannelOption.SO_KEEPALIVE, false)
                .childOption(ChannelOption.TCP_NODELAY, true)
                .childOption(ChannelOption.SO_SNDBUF, nettyServerConfig.getServerSocketSndBufSize())
                .childOption(ChannelOption.SO_RCVBUF, nettyServerConfig.getServerSocketRcvBufSize())
                .localAddress(new InetSocketAddress(this.nettyServerConfig.getListenPort()))
                .childHandler(new ChannelInitializer<SocketChannel>() {
                    @Override
                    public void initChannel(SocketChannel ch) throws Exception {
ch.pipeline()
.addLast(defaultEventExecutorGroup, HANDSHAKE_HANDLER_NAME, handshakeHandler)
.addLast(defaultEventExecutorGroup,
    encoder,
    new NettyDecoder(),
    new IdleStateHandler(0, 0, nettyServerConfig.getServerChannelMaxIdleTimeSeconds()),
    connectionManageHandler,
    serverHandler
);
                    }
                });
        ...
        ChannelFuture sync = this.serverBootstrap.bind().sync();
        InetSocketAddress addr = (InetSocketAddress) sync.channel().localAddress();
        ...
    }
关注涉及几个线程池的地方:
bossGroup -> eventLoopGroupBoss 固定线程数1
workerGroup -> eventLoopGroupSelector 若linux采用epoll实现 否则使用nio实现, 线程数可配置
eventGroup -> defaultEventExecutorGroup 普通实现的 handler 工作线程池, 线程数可配置
另外就是传统艺能:心跳, 解码器 NettyEncoder,编码器 NettyDecoder,连接管理器 connectionManageHandler,和最终的业务处理器 serverHandler
▐ server 注册业务处理器
业务线程池配置
请求协议code关联业务处理器
// 支持共用或独立的业务处理线程池
        ExecutorService poolA = new ThreadPoolExecutor(4, 4, 0, TimeUnit.SECONDS, new ArrayBlockingQueue<>(1024));
        ExecutorService poolB = new ThreadPoolExecutor(4, 4, 0, TimeUnit.SECONDS, new ArrayBlockingQueue<>(1024));


        // 业务处理器
        NettyRequestProcessor processA = new NettyRequestProcessor() {
            @Override
            public RemotingCommand processRequest(ChannelHandlerContext ctx, RemotingCommand request) throws Exception {
                System.out.println("received from client, remark:" + request.getRemark() + ", coe:" + request.getCode());
                RemotingCommand response = RemotingCommand.createResponseCommand(0, "server");
                switch (request.getCode()) {
                    case 0:
                        response.setBody(new String("hello sync 0").getBytes());
                    case 1:
                        response.setBody(new String("hello sync 1").getBytes());
                    default:
                        break;
                }
                return response;
            }
            @Override
            public boolean rejectRequest() {
                return false;
            }
        };
        // 业务处理器
        NettyRequestProcessor processB = new NettyRequestProcessor(){
            @Override
            public RemotingCommand processRequest(ChannelHandlerContext ctx, RemotingCommand request) throws Exception {
                System.out.println("received from client, remark:" + request.getRemark() + ", coe:" + request.getCode());
                RemotingCommand response = RemotingCommand.createResponseCommand(0, "server");
                switch (request.getCode()) {
                    case 9:
                        response.setBody(new String("hello sync 9").getBytes());
                    default:
                        break;
                }
                return response;
            }
            @Override
            public boolean rejectRequest() {
                return false;
            }
        };
        // 注册 协议 - 对应的处理器, 类似web url 路由到对应的class
        remotingServer.registerProcessor(0, processA, poolA);
        remotingServer.registerProcessor(1, processA, poolA);
        remotingServer.registerProcessor(9, processB, poolB);
不同业务独立线程池的必要性
在复杂业务场景中,比如商品管理链路,订单交易链路,将所有的请求堆积在一个线程池中,快请求和慢请求公用一个赛道,无法避免资源分配不均问题
通信模块设计为可手动配置每个业务的处理线程池
注册路由和线程池关系
@Override
    public void registerProcessor(int requestCode, NettyRequestProcessor processor, ExecutorService executor) {
        ExecutorService executorThis = executor;
        if (null == executor) {
            executorThis = this.publicExecutor;
        }


        Pair<NettyRequestProcessor, ExecutorService> pair = new Pair<NettyRequestProcessor, ExecutorService>(processor, executorThis);
        this.processorTable.put(requestCode, pair);
    }
建立 code - processor - pool 的三者映射关系,在后续收到请求后,可查找注册关系进行路由唤起processor
▐ client 启动 发起请求
NettyRemotingClient remotingClient = new NettyRemotingClient(nettyServerConfig, null);


        remotingClient.start();


// 主动发起远程调用
        {
            // 同步调用
            RemotingCommand request = RemotingCommand.createRequestCommand(0, null);
            request.setRemark("sync");
            RemotingCommand response = remotingClient.invokeSync("127.0.0.1:8888", request, 30 * 1000L);
            System.out.println("call sync ok remark:" + response.getRemark() + " body:" + new String(response.getBody()));
        }
        {
            // 异步调用
            RemotingCommand request = RemotingCommand.createRequestCommand(1, null);
            request.setRemark("async");
            remotingClient.invokeAsync("127.0.0.1:8888", request, 30 * 1000L, new InvokeCallback() {
                @Override
                public void operationComplete(ResponseFuture responseFuture) {
                    RemotingCommand response = responseFuture.getResponseCommand();
                    System.out.println("call async ok remark:" + response.getRemark() + " body:" + new String(response.getBody()));
                }
            });
        }
        {
            // 单向调用
            RemotingCommand request = RemotingCommand.createRequestCommand(9, null);
            request.setRemark("oneway");
            remotingClient.invokeOneway("127.0.0.1:8888", request, 30 * 1000L);
            System.out.println("call oneway ok ");
        }
启动客户端client后,即处于长连接状态,双向通信及时性有保障
三种调用模式
作为通信组件,需要适配多种调用场景,同步异步调用已是基本操作,oneway用于不关心是否返回的场景。
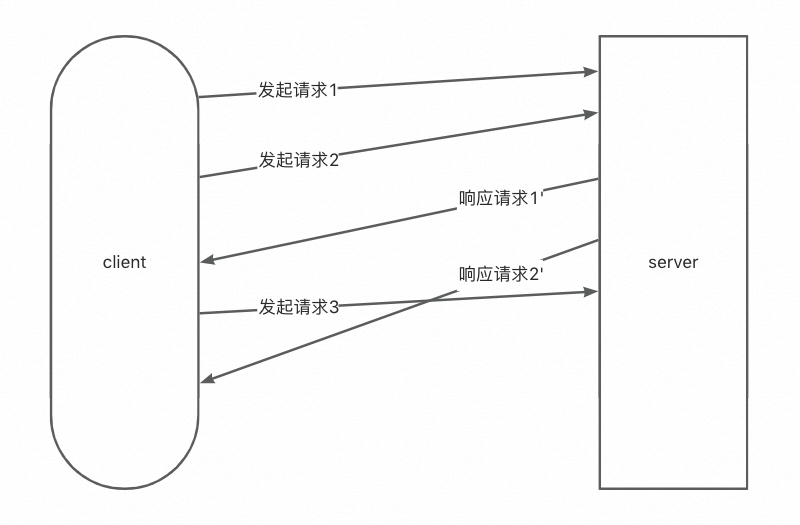
试想一下,在全双工双向异步通信的背景下,如何能像http一样实现同步调用,发出一个请求,收到一个请求后怎么跟前面发出的请求关联起来,又如何实现异步等待转为同步响应。
同步调用
发起请求
public RemotingCommand invokeSyncImpl(final Channel channel, final RemotingCommand request, final long timeoutMillis)
        throws InterruptedException, RemotingSendRequestException, RemotingTimeoutException {
        // 唯一id
        final int opaque = request.getOpaque();
    ...
        final ResponseFuture responseFuture = new ResponseFuture(channel, opaque, timeoutMillis, null, null);
        // 把当前请求记录到待响应table中
        this.responseTable.put(opaque, responseFuture);
        final SocketAddress addr = channel.remoteAddress();
        channel.writeAndFlush(request).addListener(new ChannelFutureListener() {
            @Override
            public void operationComplete(ChannelFuture f) throws Exception {
                if (f.isSuccess()) {
                    //标记为写入成功
                    responseFuture.setSendRequestOK(true);
                    return;
                } else {
                    responseFuture.setSendRequestOK(false);
                }
                // 写入异常结果 并唤起wait的线程
                responseTable.remove(opaque);
                responseFuture.setCause(f.cause());
                responseFuture.putResponse(null);
                public void putResponse(final RemotingCommand responseCommand) {
                    this.responseCommand = responseCommand;
                    this.countDownLatch.countDown();
                }
                log.warn("send a request command to channel <" + addr + "> failed.");
            }
        });
        // 同步等待结果
        RemotingCommand responseCommand = responseFuture.waitResponse(timeoutMillis);
        public RemotingCommand waitResponse(final long timeoutMillis) throws InterruptedException {
            this.countDownLatch.await(timeoutMillis, TimeUnit.MILLISECONDS);
            return this.responseCommand;
        }
      ...
    }
关键设计点:每一个请求request,都分配了一个 client唯一自增的id (request.getOpaque(); requestId.getAndIncrement())。
把id和上下文存储到请求待响应table中:发送请求后(写入channel),线程等待结果响应 responseFuture.waitResponse,利用countDownLatch等待结果。
异步调用
发起请求
public void invokeAsyncImpl(final Channel channel, final RemotingCommand request, final long timeoutMillis,final InvokeCallback invokeCallback)
        // 唯一id
    final int opaque = request.getOpaque();
    ...
        final ResponseFuture responseFuture = new ResponseFuture(channel, opaque, timeoutMillis - costTime, invokeCallback, once);
        // 把当前请求记录到待响应table中
        this.responseTable.put(opaque, responseFuture);
        ...
        channel.writeAndFlush(request).addListener(new ChannelFutureListener() {
            @Override
            public void operationComplete(ChannelFuture f) throws Exception {
                if (f.isSuccess()) {
                    //标记为写入成功
                    responseFuture.setSendRequestOK(true);
                    return;
                }
                requestFail(opaque);
                log.warn("send a request command to channel <{}> failed.", RemotingHelper.parseChannelRemoteAddr(channel));
            }
        });
        ...
    }
关键设计点:每一个请求request,都分配了一个 client唯一自增的id (request.getOpaque(); requestId.getAndIncrement())。
把id和上下文存储到请求待响应table中:发送请求后,将callback传递给responseFuture,等待callback被调用。
单向调用oneway
发起请求
public void invokeOnewayImpl(final Channel channel, final RemotingCommand request, final long timeoutMillis)throws InterruptedException, RemotingTooMuchRequestException, RemotingTimeoutException, RemotingSendRequestException {
        request.markOnewayRPC();
        ...
        boolean acquired = this.semaphoreOneway.tryAcquire(timeoutMillis, TimeUnit.MILLISECONDS);
        final SemaphoreReleaseOnlyOnce once = new SemaphoreReleaseOnlyOnce(this.semaphoreOneway);
        channel.writeAndFlush(request).addListener(new ChannelFutureListener() {
            @Override
            public void operationComplete(ChannelFuture f) throws Exception {
                once.release();
                if (!f.isSuccess()) {
                    log.warn("send a request command to channel <" + channel.remoteAddress() + "> failed.");
                }
            }
        });
        ...
    }
无需监听结果
关键设计点:使用信号量Semaphore控制并发数
是通道瞬间并发度,不同于流控qps
oneway模式:不同于同步调用 异步调用 这里不关心返回值 所以无需记录id到待响应table
▐ server受理请求 路由
监听请求
class NettyServerHandler extends SimpleChannelInboundHandler<RemotingCommand> {
        @Override
        protected void channelRead0(ChannelHandlerContext ctx, RemotingCommand msg) throws Exception {
            processMessageReceived(ctx, msg);
        }
    }
    public void processMessageReceived(ChannelHandlerContext ctx, RemotingCommand msg) throws Exception {
        final RemotingCommand cmd = msg;
        if (cmd != null) {
            switch (cmd.getType()) {
                // 来自client的请求
                case REQUEST_COMMAND:
                    processRequestCommand(ctx, cmd);
                    break;
                // 来自client的响应
                case RESPONSE_COMMAND:
                    processResponseCommand(ctx, cmd);
                    break;
                default:
                    break;
            }
        }
    }
     public void processRequestCommand(final ChannelHandlerContext ctx, final RemotingCommand cmd) {
        // 路由关系 线程池配置 查询
        final Pair<NettyRequestProcessor, ExecutorService> matched = this.processorTable.get(cmd.getCode());
        final Pair<NettyRequestProcessor, ExecutorService> pair = null == matched ? this.defaultRequestProcessor : matched;
        final int opaque = cmd.getOpaque();
    ...
        Runnable run = new Runnable() {
            @Override
            public void run() {
        ...
                final RemotingResponseCallback callback = new RemotingResponseCallback() {
                    @Override
                    public void callback(RemotingCommand response) {
                        ...
                        // 非oneway模式 才需要回写response
                        if (!cmd.isOnewayRPC()) {
                            ...
                            ctx.writeAndFlush(response);
                            ...
                        }
                    }
                };
                ...
                // 使用指定的业务处理器processor处理业务
                NettyRequestProcessor processor = pair.getObject1();
                RemotingCommand response = processor.processRequest(ctx, cmd);
                callback.callback(response);
                ...
            }
        };
        ...
        // 包装为线程任务 放到配置的线程池中执行
        final RequestTask requestTask = new RequestTask(run, ctx.channel(), cmd);
        pair.getObject2().submit(requestTask);
        ...
    }
关键设计点
抽象复用:
client 和 server的 网络通信读模块是高度一致的,所以抽象出来共有的部分,复用代码,继承结构:

是一个很标准的抽象复用案例, 但需注意在两个角色(client server)中同一份代码是有不一样的解读链路
路由实现:
利用code - processor - pool 的三者映射关系方便的拿到对应业务的处理器及其独立的线程池,进行任务投递
设计理念类似观察者模式,添加观察者-业务处理器(这里仅单个观察者),当事件来了(socket消息读取)后,通知到所有观察者进行具体业务处理。
▐ client 监听响应
监听 同步调用结果
class NettyClientHandler extends SimpleChannelInboundHandler<RemotingCommand> {        @Override        protected void channelRead0(ChannelHandlerContext ctx, RemotingCommand msg) throws Exception {
            processMessageReceived(ctx, msg);
        }
    }
    public void processMessageReceived(ChannelHandlerContext ctx, RemotingCommand msg) throws Exception {
        final RemotingCommand cmd = msg;
        if (cmd != null) {
            switch (cmd.getType()) {
                // 来自server的请求
                case REQUEST_COMMAND:
                    processRequestCommand(ctx, cmd);
                    break;
                // 来自server的响应
                case RESPONSE_COMMAND:
                    processResponseCommand(ctx, cmd);
                    break;
                default:
                    break;
            }
        }
    }
     public void processResponseCommand(ChannelHandlerContext ctx, RemotingCommand cmd) {
        final int opaque = cmd.getOpaque();
         // 从待响应table中找到响应对应的请求
        final ResponseFuture responseFuture = responseTable.get(opaque);
        if (responseFuture != null) {
            responseFuture.setResponseCommand(cmd);


            responseTable.remove(opaque);
            if (responseFuture.getInvokeCallback() != null) {
                // 异步调用 回调callback
                executeInvokeCallback(responseFuture);
            } else {
                // 同步调用
                // 写入正常结果 并唤起wait的线程
                responseFuture.putResponse(cmd);
                public void putResponse(final RemotingCommand responseCommand) {
                    this.responseCommand = responseCommand;
                    this.countDownLatch.countDown();
                }
                responseFuture.release();
            }
        } else {
            log.warn("receive response, but not matched any request, " + RemotingHelper.parseChannelRemoteAddr(ctx.channel()));
            log.warn(cmd.toString());
        }
    }
关键设计点
异步协调 && 同步等待 && 唤起机制
读取到来自server响应数据的线程 -> 通过待响应table查找当前响应归属的请求 -> 操作其countDownLatch定向唤起等待结果的请求线程
同步结果唤起条件:写入异常 || 等待超时 || 读取到来自server的对应id的响应
// 同步等待结果
RemotingCommand responseCommand = responseFuture.waitResponse(timeoutMillis);
监听 异步调用结果
class NettyClientHandler extends SimpleChannelInboundHandler<RemotingCommand> {
        @Override
        protected void channelRead0(ChannelHandlerContext ctx, RemotingCommand msg) throws Exception {
            processMessageReceived(ctx, msg);
        }
    }
    public void processMessageReceived(ChannelHandlerContext ctx, RemotingCommand msg) throws Exception {
        final RemotingCommand cmd = msg;
        if (cmd != null) {
            switch (cmd.getType()) {
                // 来自server的请求
                case REQUEST_COMMAND:
                    processRequestCommand(ctx, cmd);
                    break;
                // 来自server的响应
                case RESPONSE_COMMAND:
                    processResponseCommand(ctx, cmd);
                    break;
                default:
                    break;
            }
        }
    }
     public void processResponseCommand(ChannelHandlerContext ctx, RemotingCommand cmd) {
        final int opaque = cmd.getOpaque();
         // 从待响应table中找到响应对应的请求
        final ResponseFuture responseFuture = responseTable.get(opaque);
        if (responseFuture != null) {
            responseFuture.setResponseCommand(cmd);


            responseTable.remove(opaque);
            if (responseFuture.getInvokeCallback() != null) {
                // 异步调用
                executeInvokeCallback(responseFuture);
            } else {
                // 同步调用
                // 写入结果 并唤起wait的线程
                responseFuture.putResponse(cmd);
                   public void putResponse(final RemotingCommand responseCommand) {
                this.responseCommand = responseCommand;
                this.countDownLatch.countDown();
            }
                responseFuture.release();
            }
        } else {
            log.warn("receive response, but not matched any request, " + RemotingHelper.parseChannelRemoteAddr(ctx.channel()));
            log.warn(cmd.toString());
        }
    }


  private void executeInvokeCallback(final ResponseFuture responseFuture) {
        ExecutorService executor = this.getCallbackExecutor();
    ...
        executor.submit(new Runnable() {
            @Override
            public void run() {
                try {
                    responseFuture.executeInvokeCallback();
                } catch (Throwable e) {
                    log.warn("execute callback in executor exception, and callback throw", e);
                } finally {
                    responseFuture.release();
                }
            }
        });
        ...
    }
关键设计点
异步协调 && callback机制
读取到来自server响应数据的线程 -> 通过待响应table查找当前响应归属的请求 -> 回调callback
异步结果回调callback条件:写入异常 || 等待超时 || 读取到来自server的对应id的响应
另外callback执行采用了cas机制限制仅执行一次

模块升级-微服务化通信工具
why?
从业务视角开发来看,通信模块依然是比较基础的,对于普通开发者,希望能够像hsf一样,简单的定制协议service,契合java接口实现多态机制,不希望每次都去根据code或其他url之类的手动去分发路由,显得过于原始。
how?
参考hsf系列的远程调用方式,使用动态代理规范化协议传输,使用泛化反射机制便捷调用。
封装程度跟灵活程度往往是成反比的,注意不要过度设计,尽可能保留原始通信模块的灵活。
▐ 使用方式
定义接口 和 实现
public interface ServiceHello {
    String sayHello(String a, String b);
    Integer sayHelloInteger(Integer a, Integer b);
}
import com.uext.remote.rf.service.ServiceHello;
public class ServiceHelloImpl implements ServiceHello {
@Override
public String sayHello(String a, String b) {
return "hello " + a + " " + b;
}
@Override
public Integer sayHelloInteger(Integer a, Integer b) {
return 1000 + a + b;
}
}同hsf,接口interface可打包后提供给消费者,实现类隐藏于提供者代码中
启动provider 注册服务监听
import com.alibaba.fastjson.JSON;
import com.uext.remote.rf.provider.ServiceHelloImpl;
import com.uext.remote.rf.provider.ServiceWorldImpl;
import com.uext.remote.rf.service.ServiceHello;
import com.uext.remote.rf.service.ServiceWorld;


public class TestServer {
    public static void main(String[] args) throws Exception {
        ApiProviderBean apiProviderBean = new ApiProviderBean();
        apiProviderBean.setPort(8888);
        apiProviderBean.init();
        apiProviderBean.register(ServiceHello.class, new ServiceHelloImpl());
        apiProviderBean.register(ServiceWorld.class, new ServiceWorldImpl());


        System.out.println("start ok " + JSON.toJSONString(apiProviderBean));
        System.in.read();
    }
}
启动服务端,注册一些需要暴露的服务,通过接口和接口的实现类的实例进行绑定
启动consumer 发起调用
import com.uext.remote.rf.service.ServiceHello;
import com.uext.remote.rf.service.ServiceWorld;
import org.apache.rocketmq.remoting.netty.NettyClientConfig;
import org.apache.rocketmq.remoting.netty.NettyRemotingClient;
public class TestClient {
    public static void main(String[] args) throws Exception {
        // 初始化一个连接客户端
        NettyClientConfig nettyServerConfig = new NettyClientConfig();
        NettyRemotingClient remotingClient = new NettyRemotingClient(nettyServerConfig, null);
        remotingClient.start();
        ApiConsumerBean apiConsumerBean = new ApiConsumerBean();
        apiConsumerBean.setRemotingClient(remotingClient);
        apiConsumerBean.setInterfac(ServiceHello.class);
        apiConsumerBean.setTimeOut(30000L);
        apiConsumerBean.setAddr("127.0.0.1:8888");


        ServiceHello serviceHello = apiConsumerBean.getProxy();
        ApiConsumerBean apiConsumerBean2 = new ApiConsumerBean();
        apiConsumerBean2.setRemotingClient(remotingClient);
        apiConsumerBean2.setInterfac(ServiceWorld.class);
        apiConsumerBean2.setTimeOut(30000L);
        apiConsumerBean2.setAddr("127.0.0.1:8888");
        ServiceWorld serviceWorld = apiConsumerBean2.getProxy();


        System.out.println(serviceHello.sayHello("a", "b"));
        System.out.println(serviceHello.sayHelloInteger(1, 2));
        serviceWorld.sayWorld("aa", "bb");


        System.in.read();
    }
}
初始化一个长连接客户端, 获取接口远程实现实例, 发起调用。
日志输出
Connected to the target VM, address: '127.0.0.1:49830', transport: 'socket'
start ok {"index":{"com.uext.remote.hsf.service.ServiceWorld":{"public abstract void com.uext.remote.hsf.service.ServiceWorld.sayWorld(java.lang.String,java.lang.String)":{}},"com.uext.remote.hsf.service.ServiceHello":{"public abstract java.lang.Integer com.uext.remote.hsf.service.ServiceHello.sayHelloInteger(java.lang.Integer,java.lang.Integer)":{},"public abstract java.lang.String com.uext.remote.hsf.service.ServiceHello.sayHello(java.lang.String,java.lang.String)":{}}},"port":8888,"remotingServer":{"callbackExecutor":{"activeCount":0,"completedTaskCount":0,"corePoolSize":4,"largestPoolSize":0,"maximumPoolSize":4,"poolSize":0,"queue":[],"rejectedExecutionHandler":{},"shutdown":false,"taskCount":0,"terminated":false,"terminating":false,"threadFactory":{}},"rPCHooks":[]}}
world aa bb
Connected to the target VM, address: '127.0.0.1:53211', transport: 'socket'
hello a b
1003▐ 实现方式
请求头 参数协议
import lombok.Data;
import org.apache.rocketmq.remoting.CommandCustomHeader;
import org.apache.rocketmq.remoting.exception.RemotingCommandException;
@Data
public class CommonHeader implements CommandCustomHeader{
    /**
     * com.uext.remote.hsf.service.ServiceHello
     */
    String interfaceName;
    /**
     * public abstract java.lang.String com.uext.remote.hsf.service.ServiceHello.sayHello(java.lang.String,java.lang.String)
     */
    String methodName;


    String argsJsonJson;


    @Override
    public void checkFields() throws RemotingCommandException {
    }
}
使用接口interface package url 和 方法 method的作为识别码,用以路由选择。
其中动态参数问题,需要考虑如何解决解码为方法参数对应的不同类型,本文采用简易实现(json)。
provider实现代码
import com.alibaba.fastjson.JSON;
import com.alibaba.fastjson.TypeReference;
import io.netty.channel.ChannelHandlerContext;
import lombok.Data;
import org.apache.rocketmq.remoting.netty.*;
import org.apache.rocketmq.remoting.protocol.RemotingCommand;
import java.lang.reflect.Method;
import java.lang.reflect.Parameter;
import java.util.*;
@Data
public class ApiProviderBean {
    private int port = 8888;
    // 长连接实例
    private NettyRemotingServer remotingServer;
    public void init() throws Exception {
        NettyServerConfig nettyServerConfig = new NettyServerConfig();
        nettyServerConfig.setListenPort(port);
        remotingServer = new NettyRemotingServer(nettyServerConfig, null);
        remotingServer.registerProcessor(0, new NettyRequestProcessor() {
            @Override
            public RemotingCommand processRequest(ChannelHandlerContext ctx, RemotingCommand request) throws Exception {
                // 请求数据解析
                CommonHeader commonHeader = (CommonHeader) request.decodeCommandCustomHeader(CommonHeader.class);


                // 路由查找
                Map<String/*method*/, Call> map = index.get(commonHeader.getInterfaceName());
                Call call = Objects.requireNonNull(map, "interface not exists " + commonHeader.getInterfaceName()).get(commonHeader.getMethodName());
                if(call == null){
                    throw new RuntimeException("method not exists " + commonHeader.getMethodName());
                }
                // 参数解码 todo 优化解码编码
                Parameter[] ts = call.method.getParameters();
                List<Object> args = new ArrayList<>();
                List<String> argsJson = JSON.parseObject(commonHeader.argsJsonJson, new TypeReference<List<String>>(){});
                for (int i = 0; i < argsJson.size(); i++) {
                    // 根据method规范 逐一反序列化
                    args.add(JSON.parseObject(argsJson.get(i), ts[i].getType()));
                }
                // 反射调用
                Object res = call.method.invoke(call.instance, args.toArray(new Object[0]));
                // 结果编码 回传 todo 优化解码编码
                RemotingCommand response = RemotingCommand.createResponseCommand(0, null);
                if(res != null) {
                    response.setBody(JSON.toJSONBytes(res));
                }
                return response;
            }
            @Override
            public boolean rejectRequest() {
                return false;
            }
        }, null);
        remotingServer.start();
    }
    private static class Call{
        Object instance;
        Method method;
    }
    private Map<String/*interface*/, Map<String/*method*/, Call>> index = new HashMap<>();
    /**
     * @param interfac 接口 协议
     * @param impl 实现类的实例
     */
    public synchronized <T> void register(Class<T> interfac, T impl){
        // 建立 接口-实现类-方法 路由关系
        String iname = interfac.getName();
        Map<String/*method*/, Call> map = index.get(iname);
        if(map == null){
            map = new LinkedHashMap<>();
            index.put(iname, map);
        }
        for (Method declaredMethod : interfac.getDeclaredMethods()) {
            Call call = new Call();
            call.instance = impl;
            call.method = declaredMethod;
            map.put(declaredMethod.toString(), call);
        }
    }
}
关键在于 注册协议(interface)和实现类, 维护映射路由关系。
收到channel请求的数据后,解码,根据映射路由关系进行反射调用拿到结果,编码结果,回写到channel
由于通道code 定义为int,但为了灵活配置接口及实现,不想硬编码,所以丢失了自定义不同业务线程池的特性,如果有需要可以重构通道code为string,然后把相关路由协议序列化到通道code中。
consumer实现代码
import com.alibaba.fastjson.JSON;
import lombok.Data;
import org.apache.rocketmq.remoting.netty.NettyRemotingClient;
import org.apache.rocketmq.remoting.protocol.RemotingCommand;
import java.lang.reflect.InvocationHandler;
import java.lang.reflect.Method;
import java.lang.reflect.Proxy;
import java.nio.charset.StandardCharsets;
import java.util.ArrayList;
import java.util.List;
@Data
public class ApiConsumerBean implements InvocationHandler {
    /**
     * 超时时间
     */
    private Long timeOut = 3000L;
    /**
     * 目标 ip:port
     */
    private String addr = "127.0.0.1:8888";
    /**
     * 实现类
     */
    private Class<?> interfac;
    /**
     * 长连接实例
     */
    private NettyRemotingClient remotingClient;
    /**
     * 获取协议 代理实例
     */
    public <T> T getProxy() throws IllegalArgumentException {
        return (T) Proxy.newProxyInstance(Thread.currentThread().getContextClassLoader(), new Class[]{interfac}, this);
    }
    /**
     * 规范编码协议
     */
    @Override
    public Object invoke(Object target, Method method, Object[] args) throws Throwable {
        if (Object.class.equals(method.getDeclaringClass())) {
            return method.invoke(this, args);
        }
        // 协议编码入参
        CommonHeader header = new CommonHeader();
        header.setInterfaceName(interfac.getName());
        header.setMethodName(method.toString());
        // todo 优化解码编码
        List<String> argJson = new ArrayList<>();
        for (Object arg : args) {
            argJson.add(JSON.toJSONString(arg));
        }
        header.setArgsJsonJson(JSON.toJSONString(argJson));
        // 定义通道code 0 为 远程使用
        RemotingCommand request = RemotingCommand.createRequestCommand(0, header);
        Object res = null;
        if(method.getReturnType() != null) {
            RemotingCommand response = remotingClient.invokeSync(addr, request, timeOut);
            // 协议解码结果 todo 优化解码编码
            if(response.getBody() != null && response.getBody().length > 0) {
                res = JSON.parseObject(new String(response.getBody(), StandardCharsets.UTF_8), method.getReturnType());
            }
        }else{
            remotingClient.invokeOneway(addr, request, timeOut);
        }
        return res;
    }
}
关键在于 委托接口(interface)的调用实现, 动态代理为: 根据协议编码, 包装request之后写入channel
同步等待, 所以采用了同步调用模式
收到channel响应的结果后, 解码, 返回结果
其中无返回值的接口, 不关心响应结果, 可使用oneway方式调用
▐ 更进一步 注册中心 ip自动选择
引入注册中心 zk 或 namesrv,通过中心化协调,让某一些consumer自动选择某一台provider,并同时可以支持配置中心化下放,实现服务治理,越来越像微服务(dubbo)框架了哈。
当然,在跟多业务场景中,是无法引入其他中间件的,能少依赖就少依赖,降低复杂度。
在内网环境中,绝大部分项目采用Axxx一站式发布部署,配套Nxxxxxxx集群云资源管理,是支持按应用名动态获取当前集群ip清单的。
curl http://xxxxx.xxxx
{
  "num": 164,
  "result": [
    {
      "dns_ip": "13.23.xx.xxx",
      "state": "working_online"
    },
    ...
  ],
  "start": 0,
  "total": 164
}
那么我们是否可以依赖该 ip清单,用来做本地hash ip自动选择呢?
当然可以,配合可用性心跳探测,每台机器节点自己维护一份可用性提供者消费者清单缓存,通过一致性hash等算法选择机器匹配机器。
那么就得到了一个简易版的低依赖,去中心化,高可用的微服务通信框架。

团队介绍
大淘宝技术开放平台,是淘宝天猫与外部生态互联互通的重要开放途径,通过开放的产品技术把一系列基础服务像水、电、煤一样输送给我们的商家、开发者、社区媒体以及其他合作伙伴,推动行业的定制、创新、进化,并最终促成新商业文明生态圈。
我们是一支技术能力雄厚,有着光荣历史传统的技术团队。在历年双十一战场上,团队都表现着优异的成绩。这里承载着每秒百万级的业务处理,90%的订单通过订单推送服务实时地推送到商家的ERP系统完成电商作业,通过奇门开放的ERP-WMS场景已经成为仓储行业标准。随着新零售业务的持续探索与快速发展,我们渴求各路高手加入,参与核心系统架构设计、性能调优,开放模式创新等富有技术挑战的工作。
¤ 拓展阅读 ¤
3DXR技术 | 终端技术 | 音视频技术
服务端技术 | 技术质量 | 数据算法