一、CAS(Compare And Swap)
1、CAS介绍
CAS原理:假设有三个值,E(旧值)、U(需要更新的值)、V(内存中真实的值),具体参照下图:

作用:解决线程轻微竞争场景,同一时间只有一个线程能进入CAS代码块中,其它线程空转循环
compareAndSwapInt()方法对不同系统CAS指令的包装,Intel的汇编指令cmpxchg,不同厂家所实现的具体算法不一样
2、举例
public class UnsafeFactory {

	/**
	 * 通过反射获取Unsafe属性
	 * @return
	 */
	public static Unsafe getUnsafe() {
		Field theUnsafe;
		try {
			theUnsafe = Unsafe.class.getDeclaredField("theUnsafe");
			theUnsafe.setAccessible(true);
			// 因为theUnsafe是静态属性 所以field.get(Object)参数传什么都可以
			return (Unsafe) theUnsafe.get(null);
		} catch (Exception e) {
			e.printStackTrace();
		}
		return null;
	}

	/**
	 * 找到指定类属性在内存中偏移的地址
	 * @param clazz
	 * @param fieldName
	 * @return
	 */
	public static long getFieldOffset(Class clazz, String fieldName) {
		try {
			return getUnsafe().objectFieldOffset(clazz.getDeclaredField(fieldName));
		} catch (Exception e) {
			throw new Error(e);
		}
	}
}

public class CASTest {

	public static void main(String[] args) {
		Entity entity = new Entity();

		Unsafe unsafe = UnsafeFactory.getUnsafe();

		long fieldOffset = UnsafeFactory.getFieldOffset(Entity.class, "x");
		System.out.println(fieldOffset);

		System.out.println(unsafe.compareAndSwapInt(entity, fieldOffset, 0, 1));

		System.out.println(unsafe.compareAndSwapInt(entity, fieldOffset, 1, 2));

		// 这个时候内存中的值已经改成2,所以0改成3是不能改成功的
		System.out.println(unsafe.compareAndSwapInt(entity, fieldOffset, 0, 3));
	}
}

class Entity {
	// markword占8字节 klasspointer默认开启指针压缩占4字节 x属性的偏移量就是12
	int x;
}
打印结果:
12
true
true
false
3、存在问题
1)激烈竞争线程空转导致性能下降
如果存在大量线程竞争一个变量,必然导致其它线程资源,或者长期CAS失败的线程,都会给CPU调度产生性能问题
2)ABA问题

可以加一个版本号区分究竟做了多少次版本的修改
3)只能对一个值做原子操作
当对一个共享变量执行操作时,我们可以使用循环CAS的方式来保证原子操作,但对多个共享变量操作时,循环CAS无法保证操作的原子性,这个时候可以用锁
二、Atomic原子操作类
1、使用
在java.util.concurrent.atomic包里提供了一组原子操作类:
- 基本类型:AtomicInteger、AtomicLong、AtomicBoolean;
- 引用类型:AtomicReference、AtomicStampedRerence、AtomicMarkableReference;
- 数组类型:AtomicIntegerArray、AtomicLongArray、AtomicReferenceArray
- 对象属性原子修改器:AtomicIntegerFieldUpdater、AtomicLongFieldUpdater、 AtomicReferenceFieldUpdater
- 原子类型累加器(jdk1.8增加的类):DoubleAccumulator、DoubleAdder、 LongAccumulator、LongAdder、Striped64
1)原子基本类型
public class AtomicIntegerTest {

	static AtomicInteger atomicInteger = new AtomicInteger();

	public static void main(String[] args) throws InterruptedException {
		for (int i = 0; i < 10; i++) {
			Thread thread = new Thread() {
				@Override
				public void run() {
					for (int j = 0; j < 10000; j++) {
						atomicInteger.incrementAndGet();
					}
				}
			};
			thread.start();
			thread.join();
		}
		System.out.println(atomicInteger.get());
	}
}
打印结果:100000


incrementAndGet()方法就是通过CAS循环读取AtomicInteger类的value属性在内存中的值,直到加1成功,跳出while循环,返回旧值
2)原子更新数组类型
public class AtomicIntegerArrayTest {

	static int[] array = {10, 21, 9, 32, 99};
	static AtomicIntegerArray atomicIntegerArray = new AtomicIntegerArray(array);

	public static void main(String[] args) {
		// 设置下标为0的元素为100
//		atomicIntegerArray.set(0, 100);
		int andSet = atomicIntegerArray.getAndSet(0, 100);
		// 这里返回原值 实际值是100
		System.out.println(andSet);
		int i = atomicIntegerArray.get(0);
		System.out.println(i);
		int andAdd = atomicIntegerArray.getAndAdd(1, 9);
		// 这里也是一样 返回的是原值 实际是加9之后的值
		System.out.println(andAdd);
		int j = atomicIntegerArray.get(1);
		System.out.println(j);
	}
}
打印结果:
10
100
21
30
3)原子更新引用类型
public class AtomicReferenceTest {

	public static void main(String[] args) {
		User user1 = new User("张三", 11);
		User user2 = new User("李四", 18);
		User user3 = new User("王五", 15);

		AtomicReference<User> atomicReference = new AtomicReference<User>();
		atomicReference.set(user1);
		System.out.println(atomicReference.get());

		// 都是和AtomicInteger一样 先比较user1,然后设置user2
		atomicReference.compareAndSet(user1, user2);
		System.out.println(atomicReference.get());

		atomicReference.compareAndSet(user1, user3);
		System.out.println(atomicReference.get());

	}
}
@Data
@AllArgsConstructor
// 上面两个注解需要lombok插件
class User {
	private String name;
	private Integer age;

}
打印结果:
User(name=张三, age=11)
User(name=李四, age=18)
User(name=李四, age=18)
4)对象属性原子修改器
public class AtomicIntegerFieldUpdaterTest {

    public static class Candidate {

        volatile int score = 0;

        AtomicInteger salary = new AtomicInteger();

    }

    public static final AtomicIntegerFieldUpdater<Candidate> aifu = AtomicIntegerFieldUpdater.newUpdater(Candidate.class, "score");

    public static AtomicInteger realScore = new AtomicInteger(0);

    public static void main(String[] args) throws InterruptedException {

        final Candidate candidate = new Candidate();

        Thread[] threads = new Thread[10000];

        for (int i = 0; i < 10000; i++) {
            threads[i] = new Thread(() -> {
                if (Math.random() > 0.4) {
                    candidate.salary.incrementAndGet();
                    aifu.incrementAndGet(candidate);
                    realScore.incrementAndGet();
                }
            });
            threads[i].start();
        }

        for (int i = 0; i < 10000; i++) {
            threads[i].join();
        }
        System.out.println("AtomicIntegerFieldUpdater Score="+candidate.score);
        System.out.println("AtomicInteger salary="+candidate.salary.get());
        System.out.println("realScore="+realScore.get());
    }
}
打印结果:
AtomicIntegerFieldUpdater Score=6057
AtomicInteger salary=6057
realScore=6057
对于AtomicIntegerFieldUpdater 的使用稍微有一些限制和约束,约束如下:
- 字段必须是volatile类型的,在线程之间共享变量时保证立即可见.eg:volatile int value = 3
- 字段的描述类型(修饰符public/protected/default/private)与调用者与操作对象字段的 关系一致。也就是说调用者能够直接操作对象字段,那么就可以反射进行原子操作。但是对于父 类的字段,子类是不能直接操作的,尽管子类可以访问父类的字段。
- 只能是实例变量,不能是类变量,也就是说不能加static关键字。
- 只能是可修改变量,不能使final变量,因为final的语义就是不可修改。实际上final的语义和 volatile是有冲突的,这两个关键字不能同时存在。
- 对于AtomicIntegerFieldUpdater和AtomicLongFieldUpdater只能修改int/long类型的字 段,不能修改其包装类型(Integer/Long)。如果要修改包装类型就需要使用AtomicReferenceFieldUpdater。
2、LongAdder/DoubleAdder详解
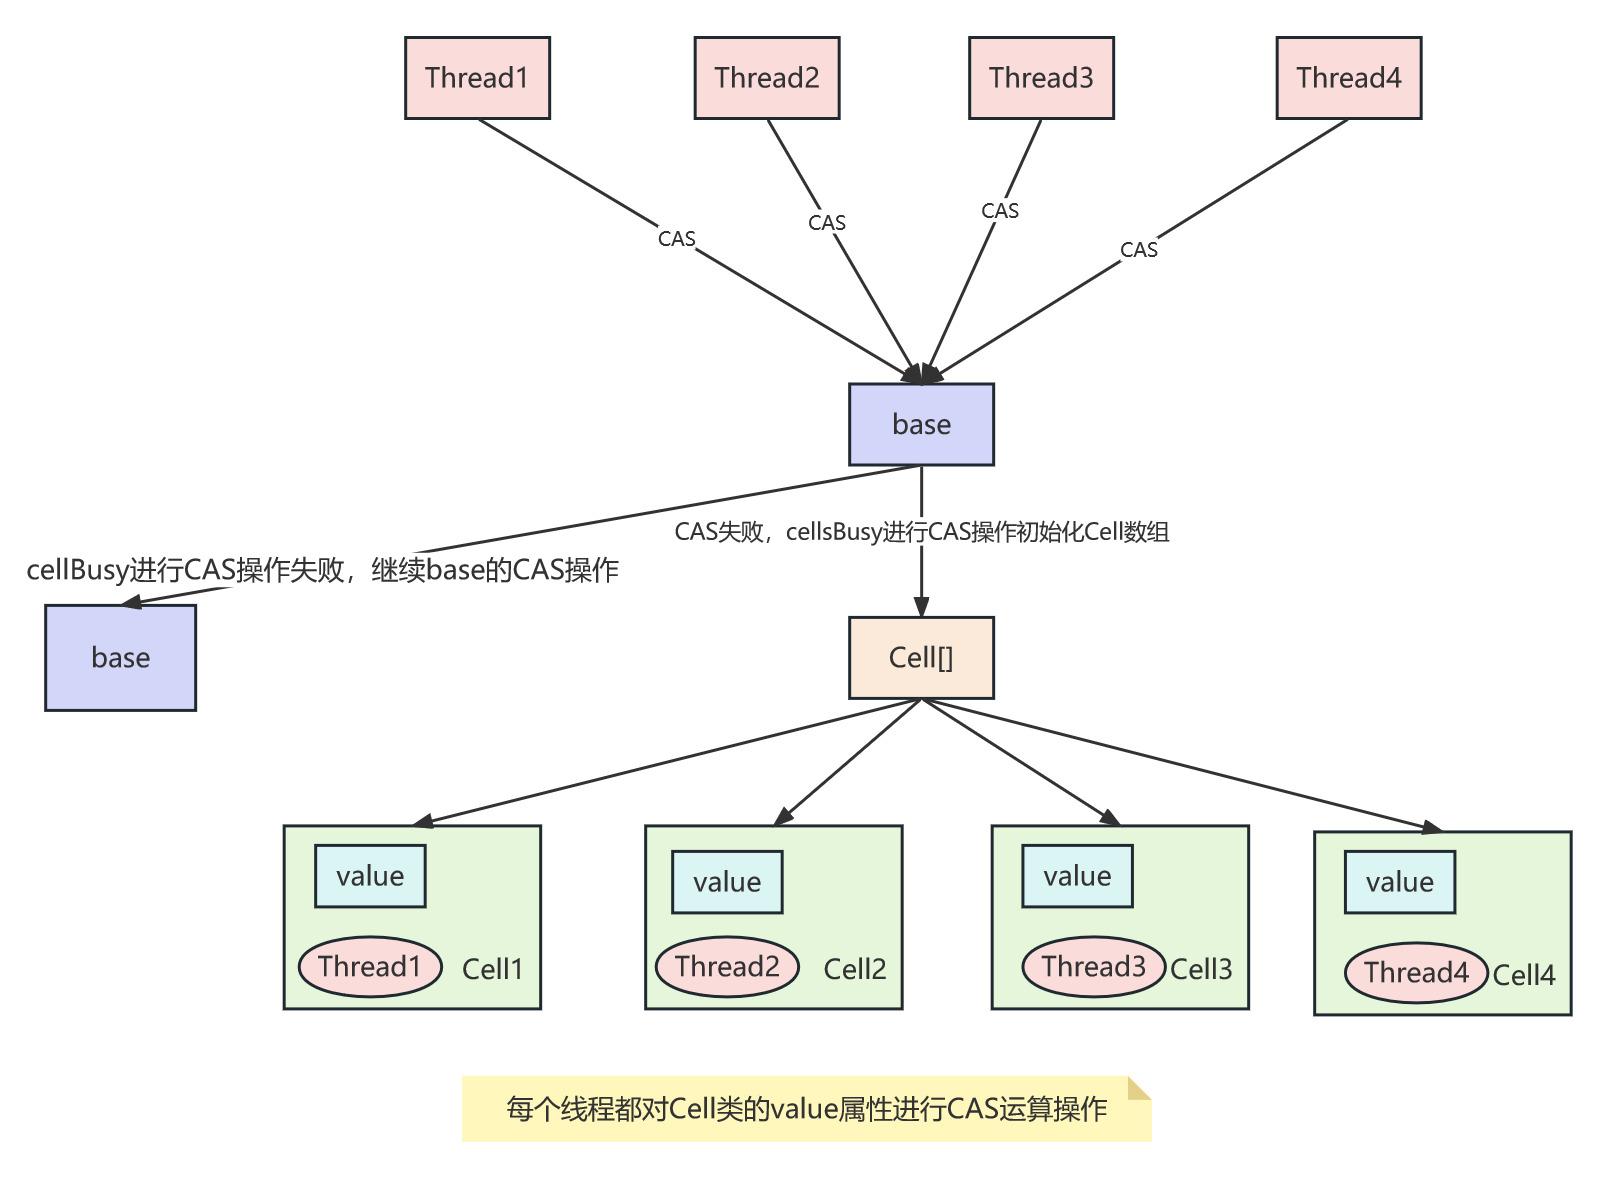
解决高并发环境下AtomicInteger, AtomicLong的自旋瓶颈问题,引入了LongAdder,LongAdder类是继承Striped64类的
1)使用
/**
 * LongAdder为了解决高并发情况下自旋瓶颈
 * 原来的是单个值CAS,LongAdder是先根据base进行CAS,CAS失败再根据CPU线程数创建Cell数组,每个线程操作的是Cell数组的Cell对象value值进行累加,最后进行汇总
 * 这样就相当于开设了多个共享变量进行CAS操作
 * @author gaopu
 * @Time 2023年5月19日 下午3:39:30
 */
public class LongAdderTest {

	public static void main(String[] args) {
		// 10个线程 每个线程都自增10000次
		testAtomicLongVSLongAdder(10, 10000);
		testAtomicLongVSLongAdder(10, 200000);
		testAtomicLongVSLongAdder(100, 200000);
	}

	static void testAtomicLongVSLongAdder(final int threadCount, final int times) {
		try {
			long start = System.currentTimeMillis();
			testLongAdder(threadCount, times);
			long end = System.currentTimeMillis() - start;
			System.out.println("线程数:"+threadCount+",单线程操作自增次数:"+times+",LongAdder总自增次数:"+(threadCount*times)+",总耗时:"+end);

			long start2 = System.currentTimeMillis();
			testAtomicLong(threadCount, times);
			long end2 = System.currentTimeMillis() - start2;
			System.out.println("线程数:"+threadCount+",单线程操作自增次数:"+times+",AtomicLong总自增次数:"+(threadCount*times)+",总耗时:"+end2);
		} catch (InterruptedException e) {
			e.printStackTrace();
		}
	}

	static void testAtomicLong(final int threadCount, final int times) throws InterruptedException {
		CountDownLatch countDownLatch = new CountDownLatch(threadCount);
		AtomicLong atomicLong = new AtomicLong();
		for (int i = 0; i < threadCount; i++) {
			new Thread(() -> {
				for (int j = 0; j < times; j++) {
					atomicLong.incrementAndGet();
				}
				countDownLatch.countDown();
			}, "thread"+i).start();
		}
		countDownLatch.await();
	}

	static void testLongAdder(final int threadCount, final int times) throws InterruptedException {
		CountDownLatch countDownLatch = new CountDownLatch(threadCount);
		LongAdder longAdder = new LongAdder();
		for (int i = 0; i < threadCount; i++) {
			new Thread(() -> {
				for (int j = 0; j < times; j++) {
					longAdder.add(1);
				}
				countDownLatch.countDown();
			}).start();
		}
		countDownLatch.await();
	}
}
打印结果:
线程数:10,单线程操作自增次数:10000,LongAdder总自增次数:100000,总耗时:59
线程数:10,单线程操作自增次数:10000,AtomicLong总自增次数:100000,总耗时:4
线程数:10,单线程操作自增次数:200000,LongAdder总自增次数:2000000,总耗时:14
线程数:10,单线程操作自增次数:200000,AtomicLong总自增次数:2000000,总耗时:40
线程数:100,单线程操作自增次数:200000,LongAdder总自增次数:20000000,总耗时:37
线程数:100,单线程操作自增次数:200000,AtomicLong总自增次数:20000000,总耗时:358
由此可见,随着线程数和自增次数增加, LongAdder的优势就体现出来了
2)分析
具体实现思想如下图:
https://www.processon.com/view/link/64c0dc6ef208ef32d3e43abd
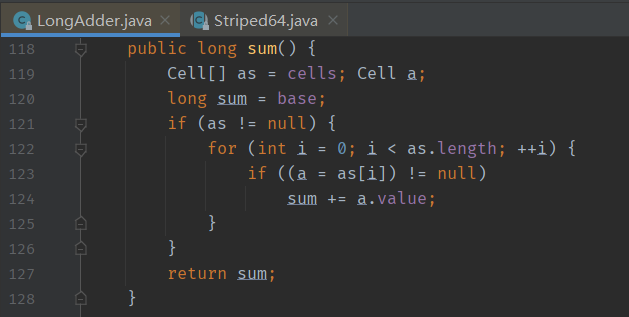
LongAdder的sum()放存在线程不安全问题,调用sum()方法获取的结果不一定就是最终的结果 ,有可能base和Cell类的value属性正在参与运算
3)自定义计算函数
public class LongAccumulatorTest {

	public static void main(String[] args) throws InterruptedException {
        // 累加 x+y
        LongAccumulator accumulator = new LongAccumulator((x, y) -> x + y, 0);

        ExecutorService executor = Executors.newFixedThreadPool(8);
        // 2到10累加
        IntStream.range(2, 11).forEach(i -> executor.submit(() -> accumulator.accumulate(i)));

        Thread.sleep(2000);
        System.out.println(accumulator.getThenReset());
    }
}
打印结果:54
三、并发安全问题
1、线程封闭
就是把对象封装到一个线程里,只有这一个线程能看到此对象。那么这个对 象就算不是线程安全的也不会出现任何安全问题。
1)栈封闭
多个线程访问一个方法,此方法中的局部变量都会被拷贝一份到 线程栈中。所以局部变量是不被多个线程所共享的,也就不会出现并发问题。所 以能用局部变量就别用全局的变量,全局变量容易引起并发问题。
2)ThreadLocal
ThreadLocal 是实现线程封闭的最好方法。ThreadLocal 内部维护了一个 Map, Map 的 key 是每个线程的名称,而 Map 的值就是我们要封闭的对象。每个线程 中的对象都对应着 Map 中一个值,也就是 ThreadLocal 利用 Map 实现了对象的 线程封闭。
2、无状态的类
没有任何成员变量的类,就叫无状态的类;方法中含有其它对象导致的线程不安全,那就是方法参数中这个类的问题
3、让类不可变
让状态不可变,加 final 关键字,对于一个类,所有的成员变量应该是私有 的,同样的只要有可能,所有的成员变量应该加上 final 关键字,但是加上 final, 要注意如果成员变量又是一个对象时,这个对象所对应的类也要是不可变,才能 保证整个类是不可变的。
但是要注意,一旦类的成员变量中有对象,上述的 final 关键字保证不可变 并不能保证类的安全性,为何?因为在多线程下,虽然对象的引用不可变,但是 对象在堆上的实例是有可能被多个线程同时修改的,没有正确处理的情况下,对 象实例在堆中的数据是不可预知的。
4、加锁和CAS
我们最常使用的保证线程安全的手段,使用 synchronized 关键字,使用显式 锁,使用各种原子变量,修改数据时使用 CAS 机制等等。
5、死锁
一个锁资源肯定是不会发生死锁,最少是两个线程去争抢两个资源,争抢的顺序不对,并且抢不到就一直抢而导致死锁,在Java中可以通过jps命令,jvisualvm打开可视化界面分析什么原因导致死锁
6、活锁
两个线程在尝试拿锁的机制中,发生多个线程之间互相谦让,不断发生同一 个线程总是拿到同一把锁,在尝试拿另一把锁时因为拿不到,而将本来已经持有 的锁释放的过程(比如A、B两个线程同时进行,A线程尝试拿锁1,B线程尝试拿锁2,此时都要拿对象持有的锁资源,A线程拿不到锁2就释放了锁1,线程B拿不到锁1就释放了锁2,这样一直循环往复就永远相互等待)。
解决办法:每个线程休眠随机数,错开拿锁的时间。
7、线程饥饿
低优先级的线程,总是拿不到执行时间
8、单例模式
1)基于DCL线程安全的懒汉单例模式
public class SingletonTest {

	private SingletonTest() {}

	private static volatile SingletonTest singletonTest = null;

	public static SingletonTest get() {
		if (singletonTest == null) {
			synchronized (SingletonTest.class) {
				// 这里为什么还要判断(DCL双重检查 为了防止等待锁的线程进来没有判断又创建一个对象)
				if (singletonTest == null) {
					// java创建对象不是原子的
					// 1、申请内存空间
					// 2、对象初始化
					// 3、指向内存空间的地址
					// 要加上volatile关键字防止指令重排序返回没有初始化完的对象
					singletonTest = new SingletonTest();
				}
			}
		}
		return singletonTest;
	}

	public static void main(String[] args) {
		System.out.println(SingletonTest.get());
	}
}
2)虚拟机保证线程安全的单例模式
- 懒汉单例模式
public class SingleLazy {

	private SingleLazy() {}

	private static class InstanceHolder {
		// 静态属性在类加载期间就初始化好了
		private static SingleLazy lazy = new SingleLazy();
	}

	public static SingleLazy getInstance() {
		return InstanceHolder.lazy;
	}
}- 饿汉单例模式
public class SingleHungry {

	private SingleHungry() {}
	private static SingleHungry hungry = new SingleHungry();
}