文章目录
- 前言
- 1.CubeMx的配置步骤
- 1.配置RCC
- 2.配置按键IO口
- 3.测试代码
- 总结
前言
H750的最高主频可以达到480Mhz但是一开始在CubeMx配置过程中发现主频达到480Mhz时会报错,以下将会介绍解决办法以及按键移植。
1.CubeMx的配置步骤
1.配置RCC
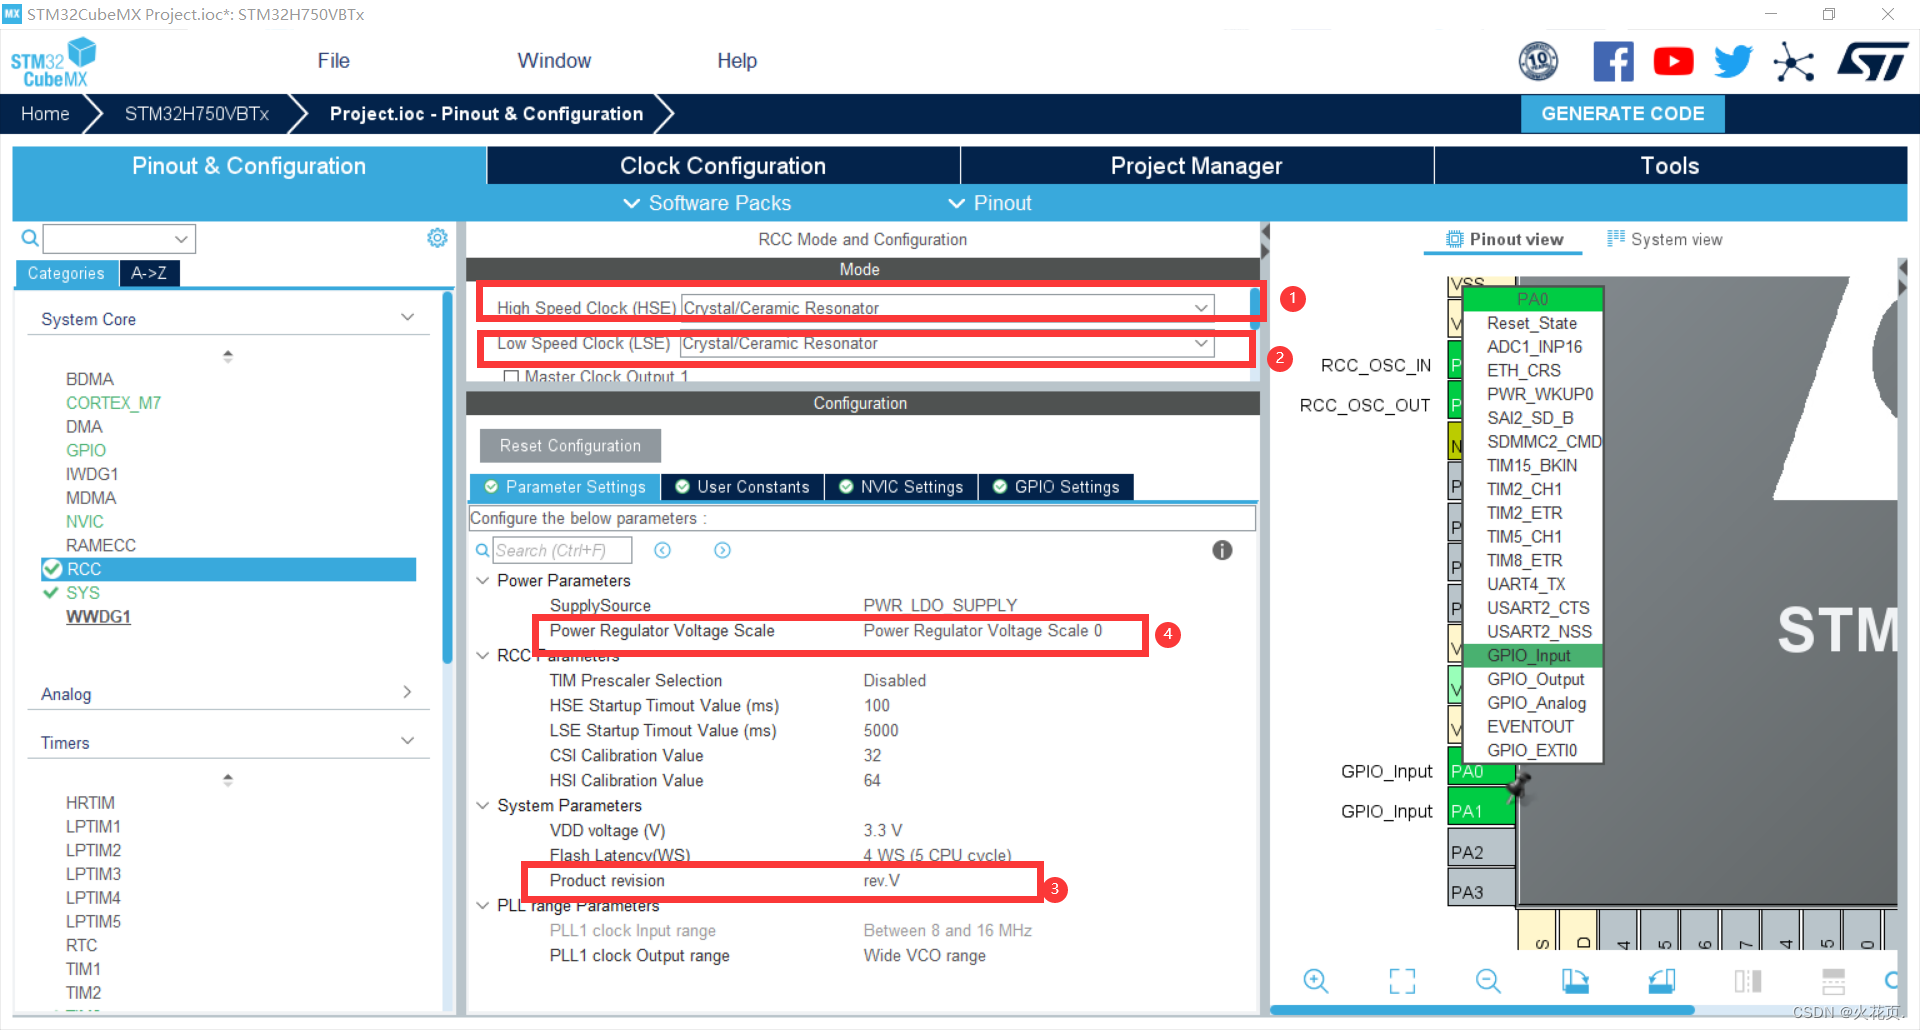
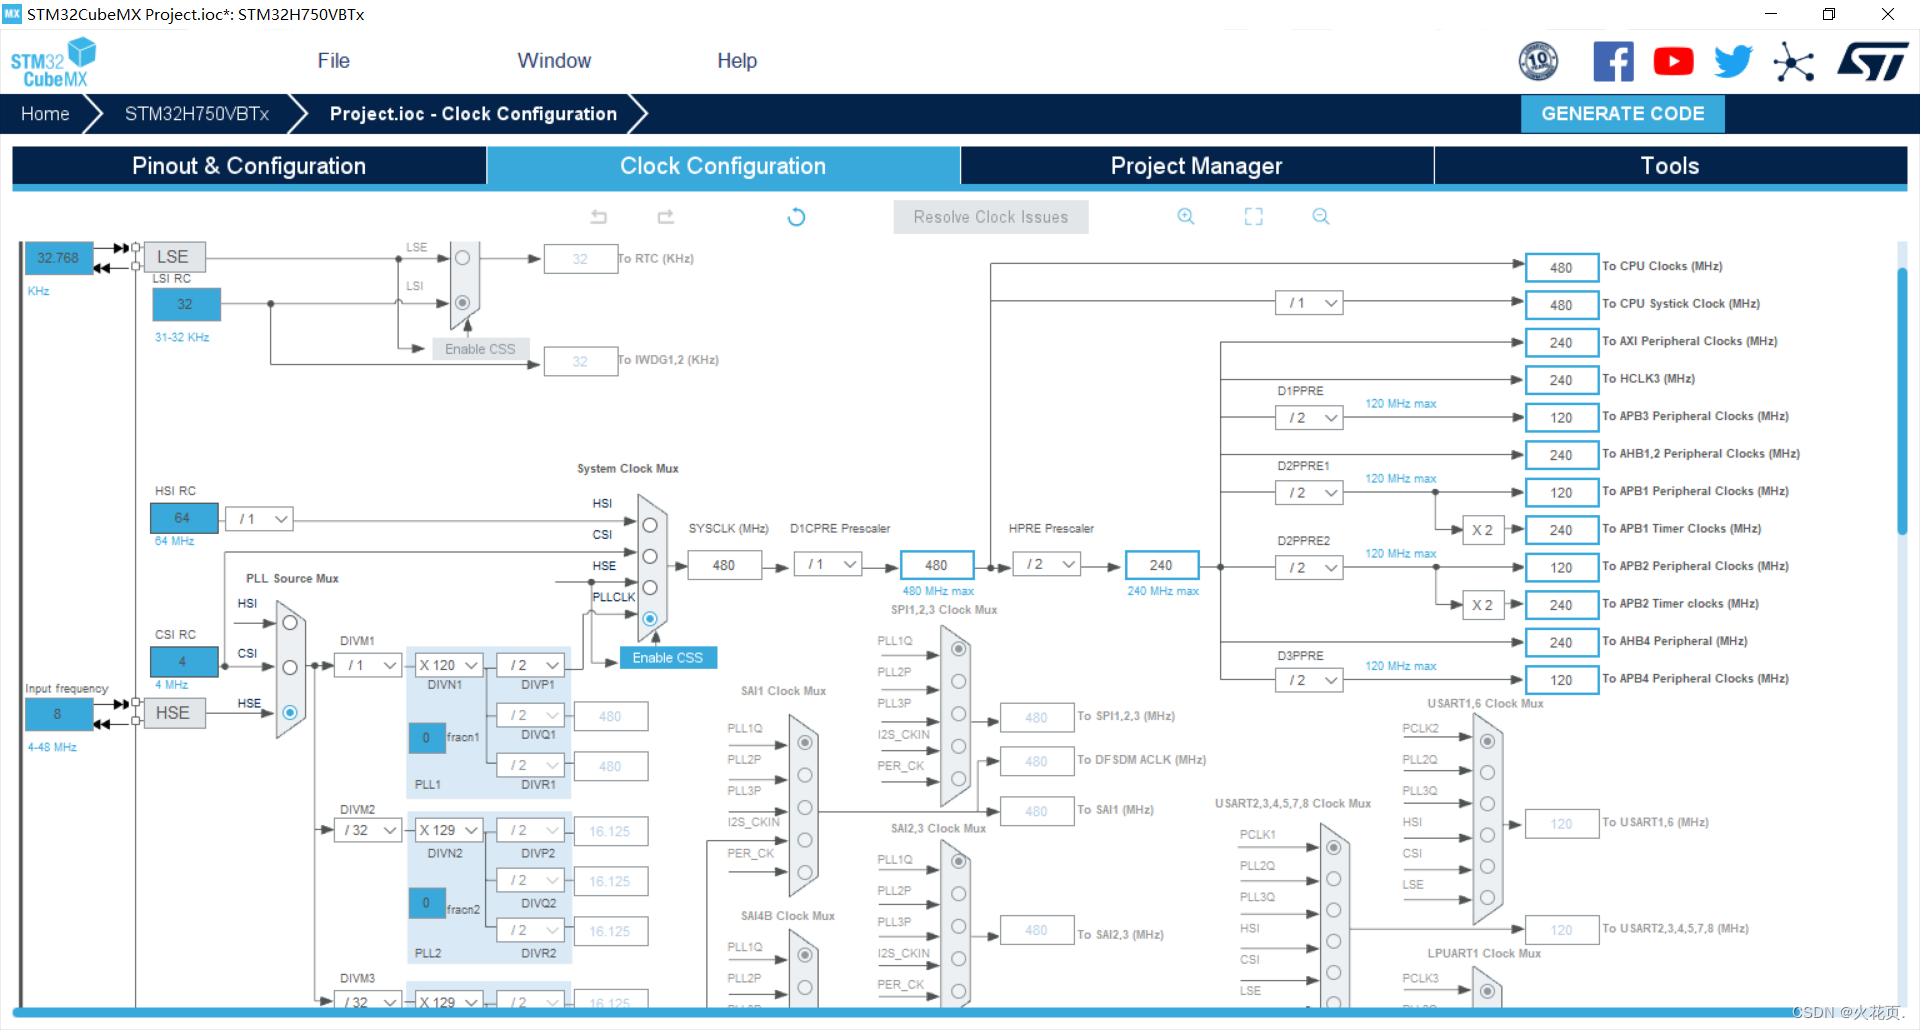
完成上述步骤配置时钟到480Mhz时将不会报错
2.配置按键IO口
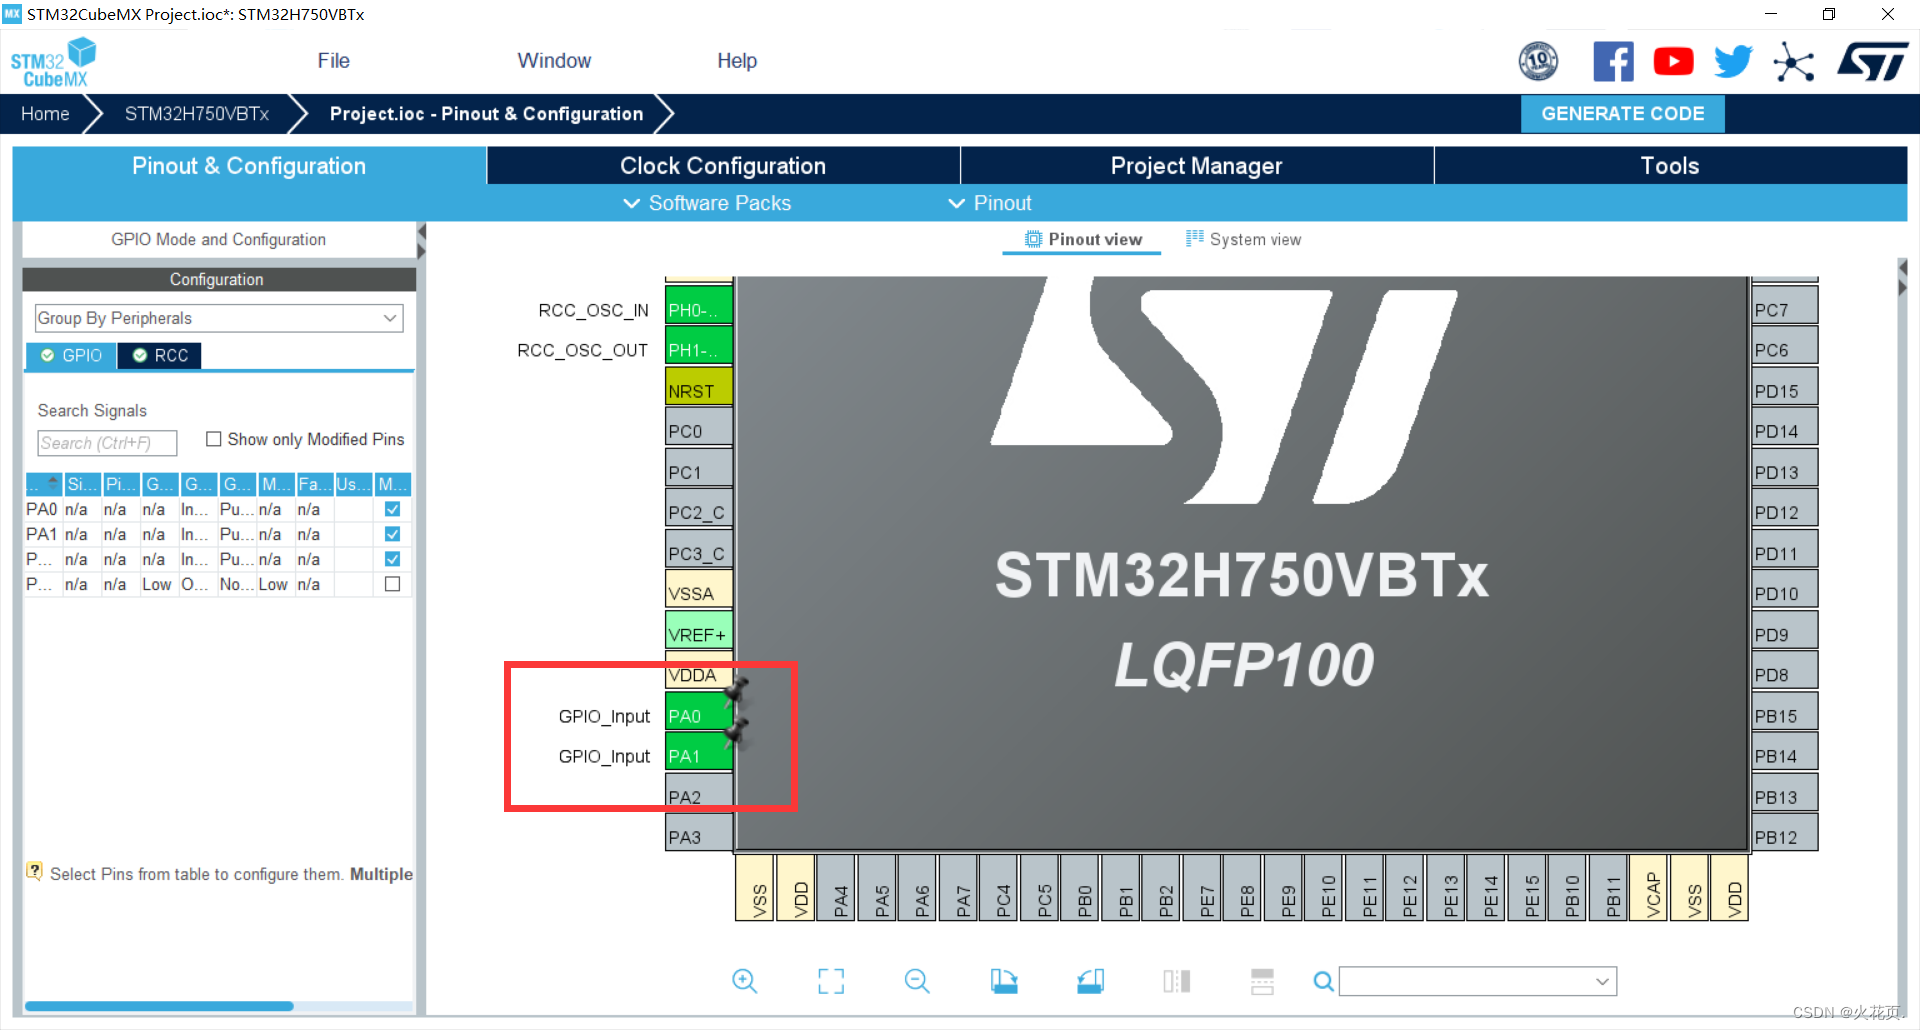
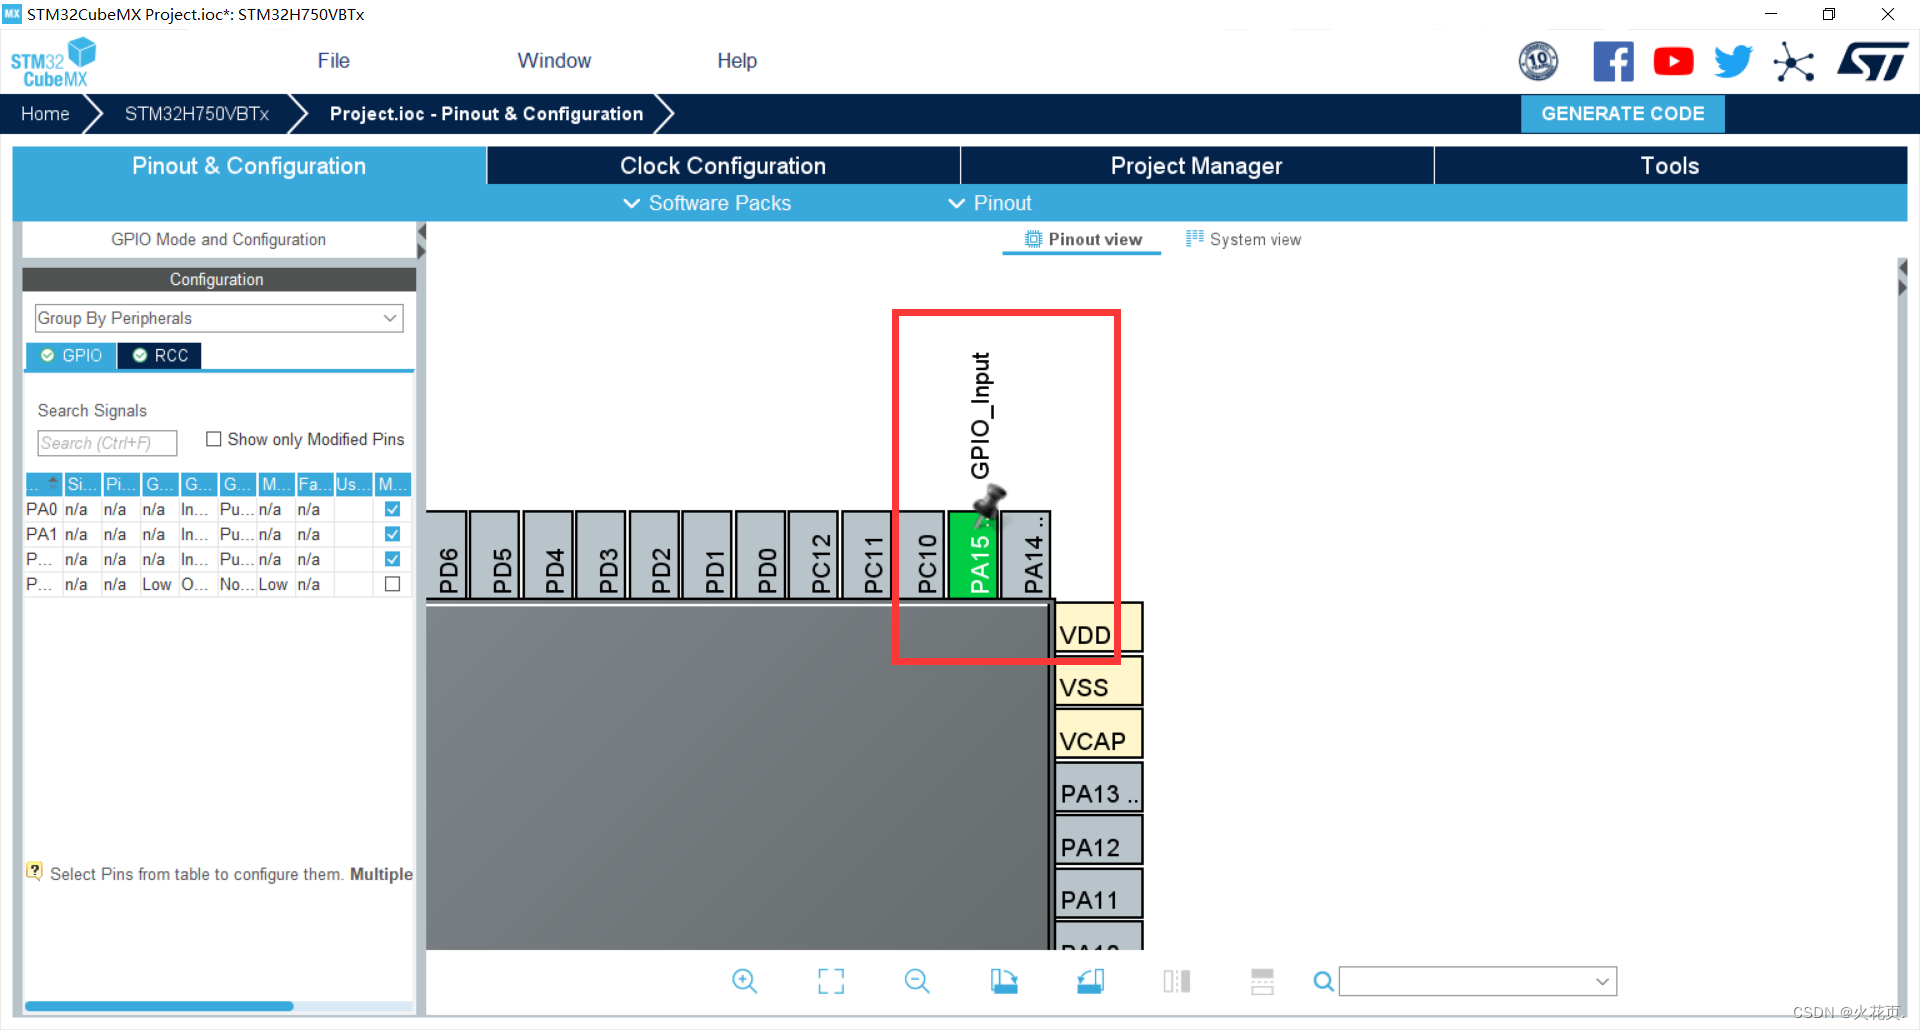
3个按键的IO口
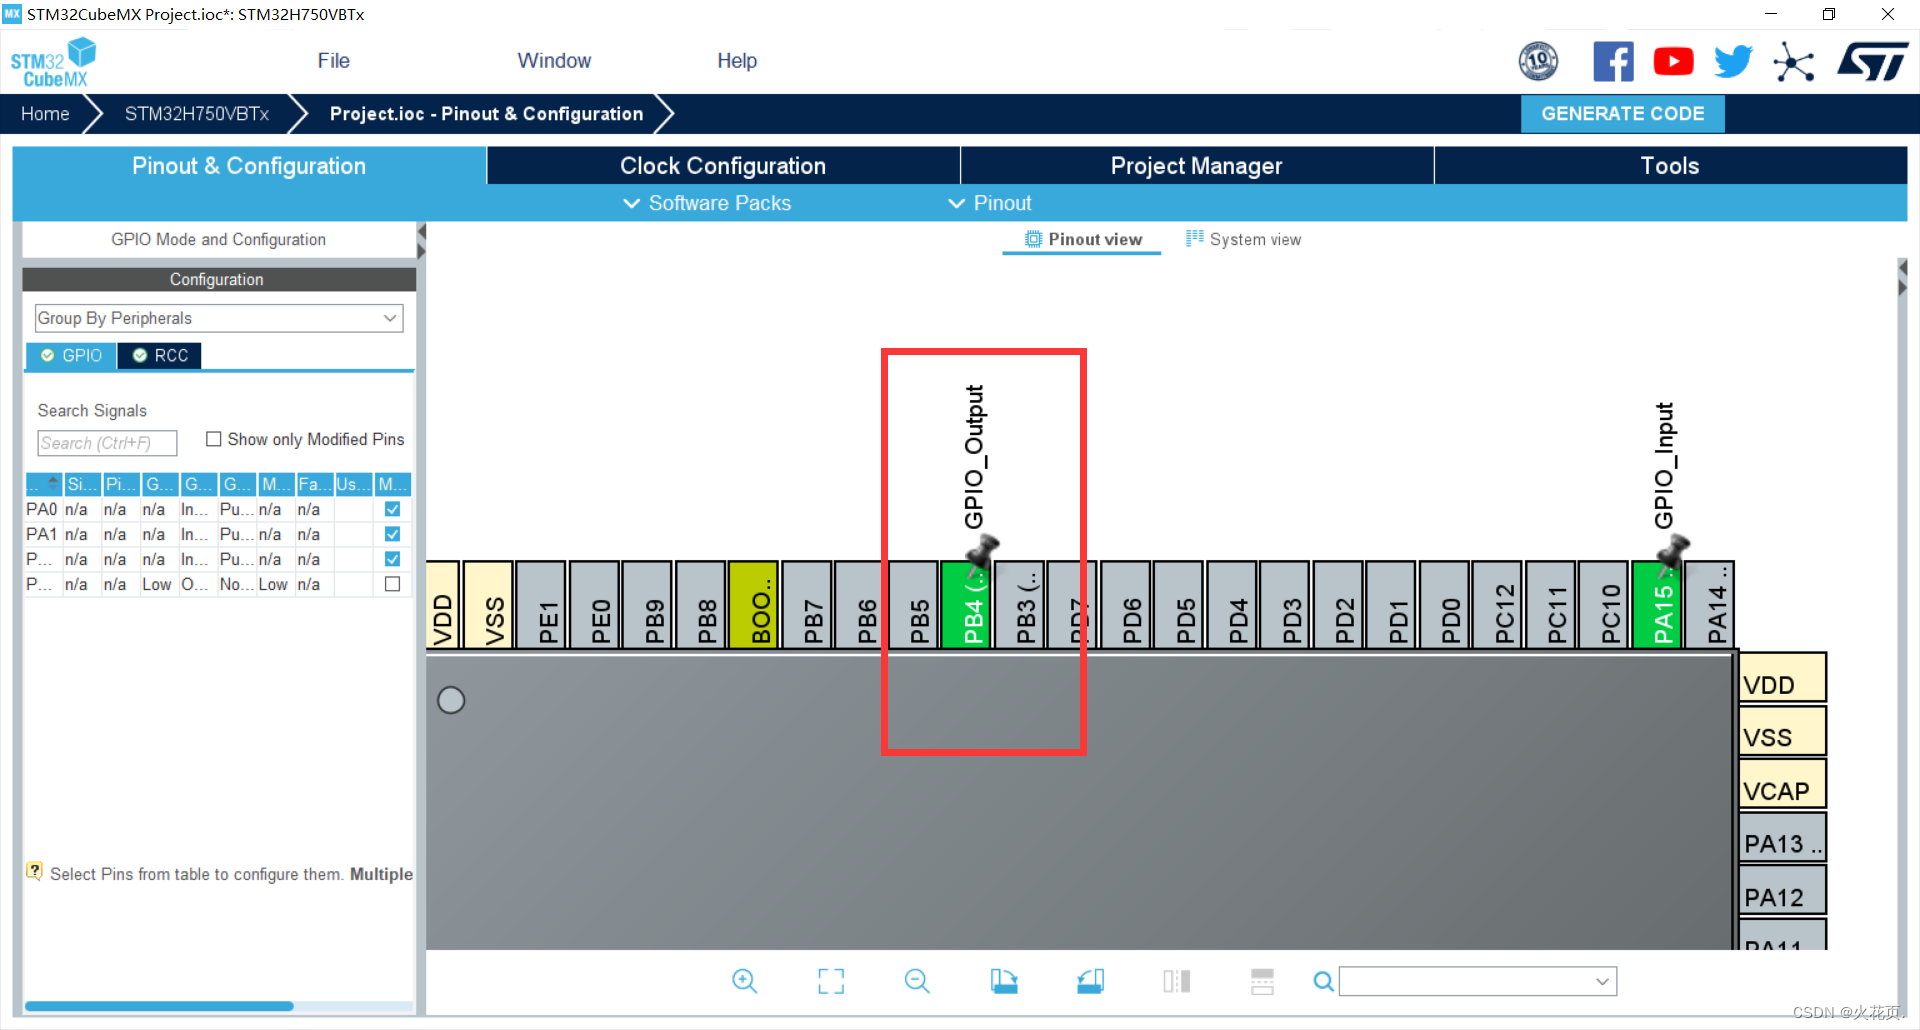
配置一个红灯的IO口以便观察现象
由于正点原子的按键是没有帮我们设置上拉或者下拉电阻的所以在IO口这里我们要自己配置好上下拉
以下是三个按键IO口的上下拉配置
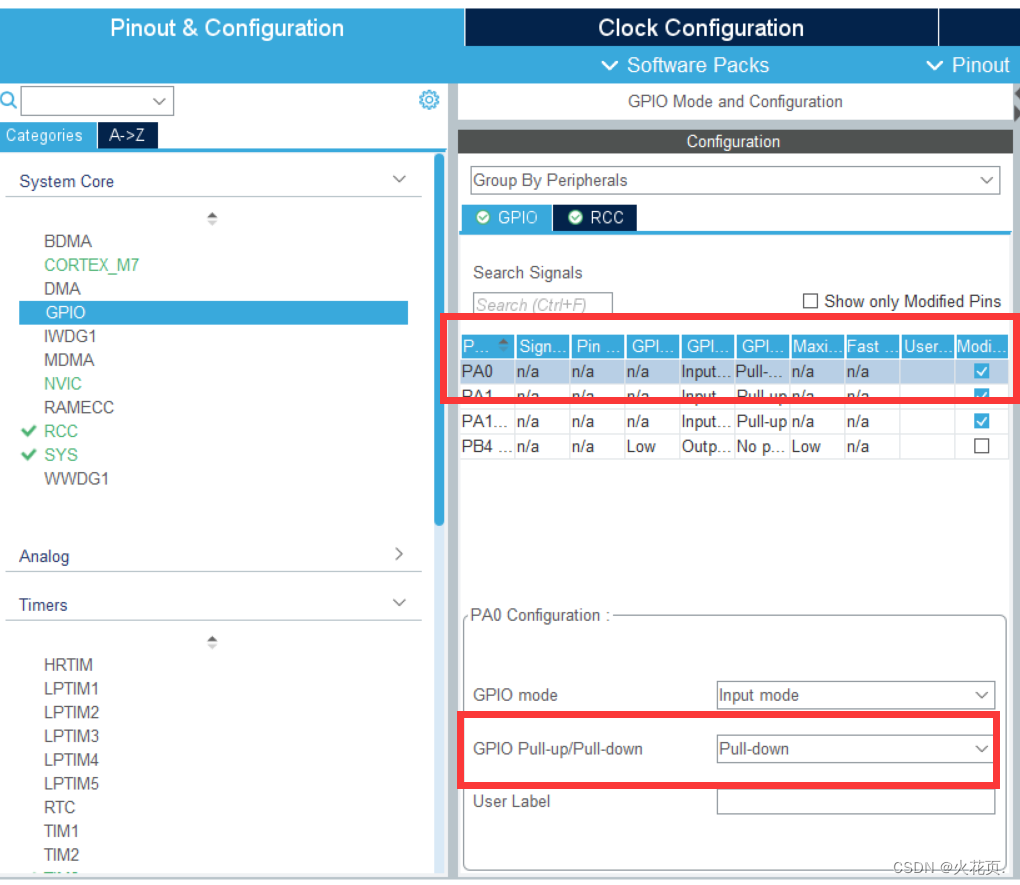
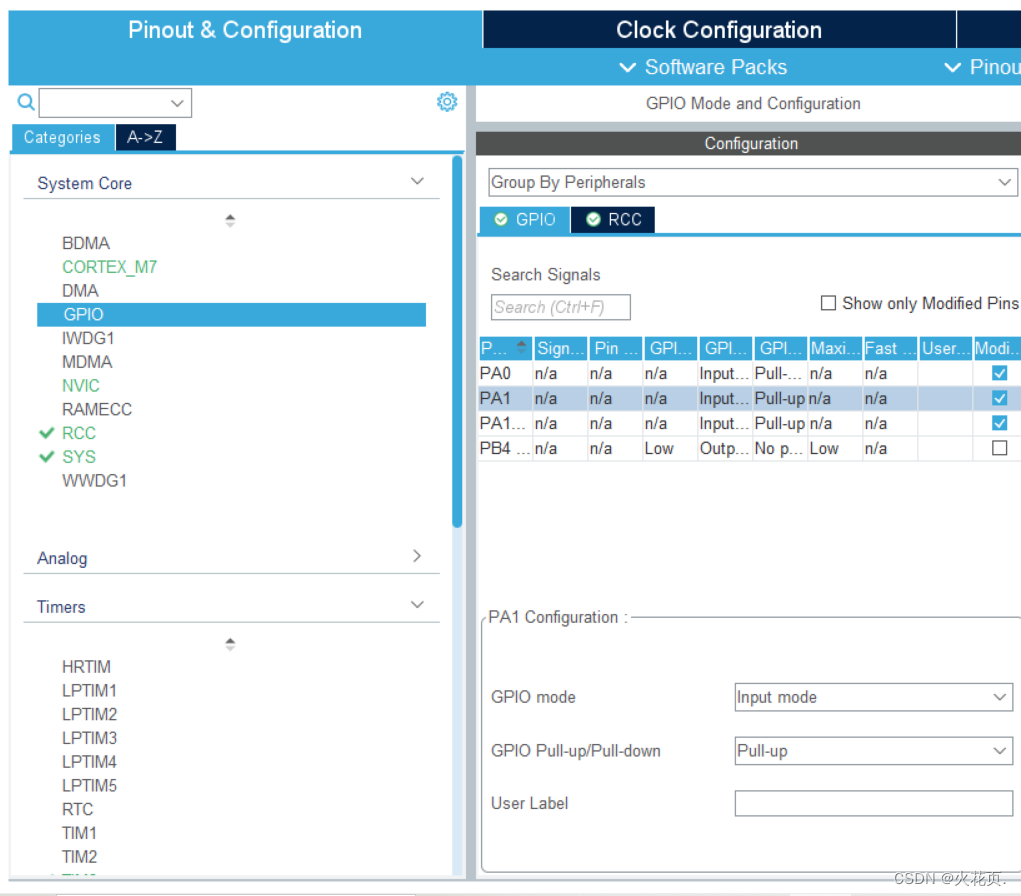
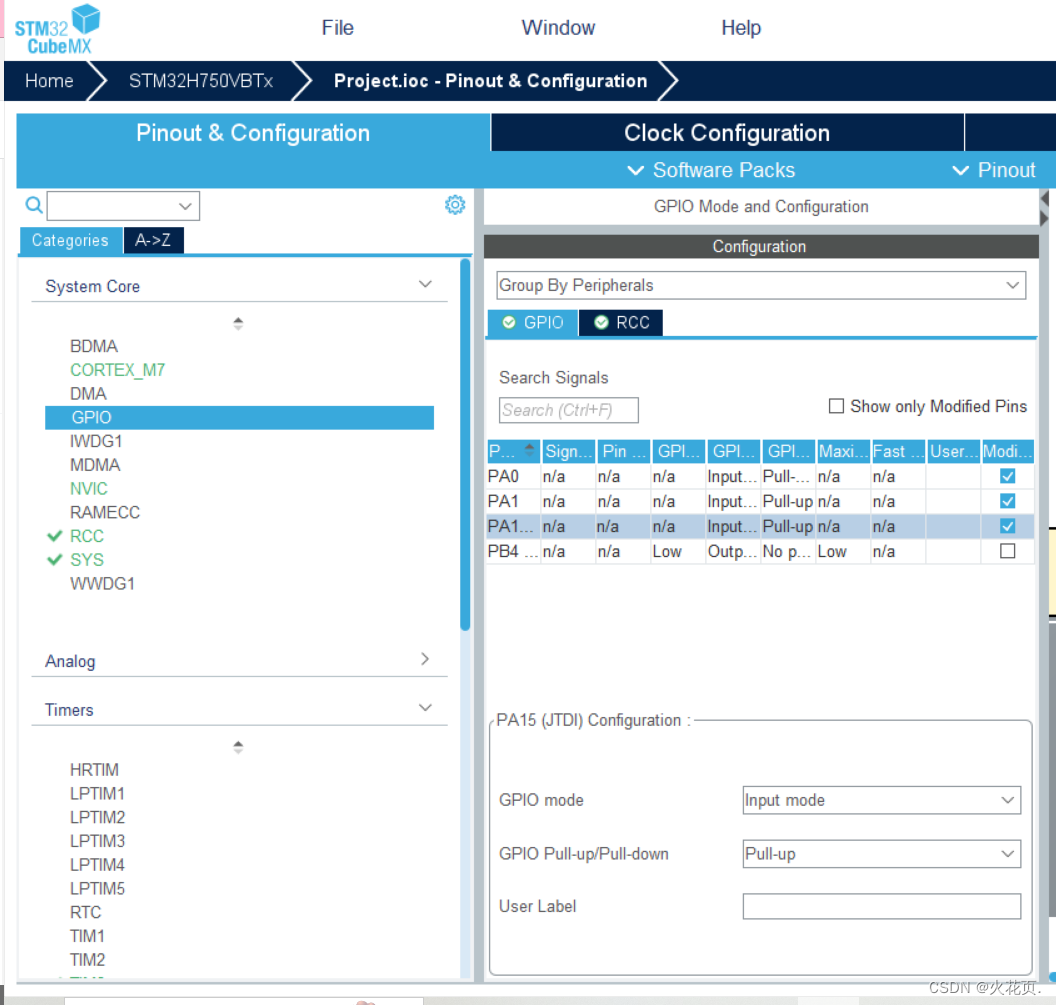
点击GENERATE CODE生成代码
至此工程就建立完毕了。
3.测试代码
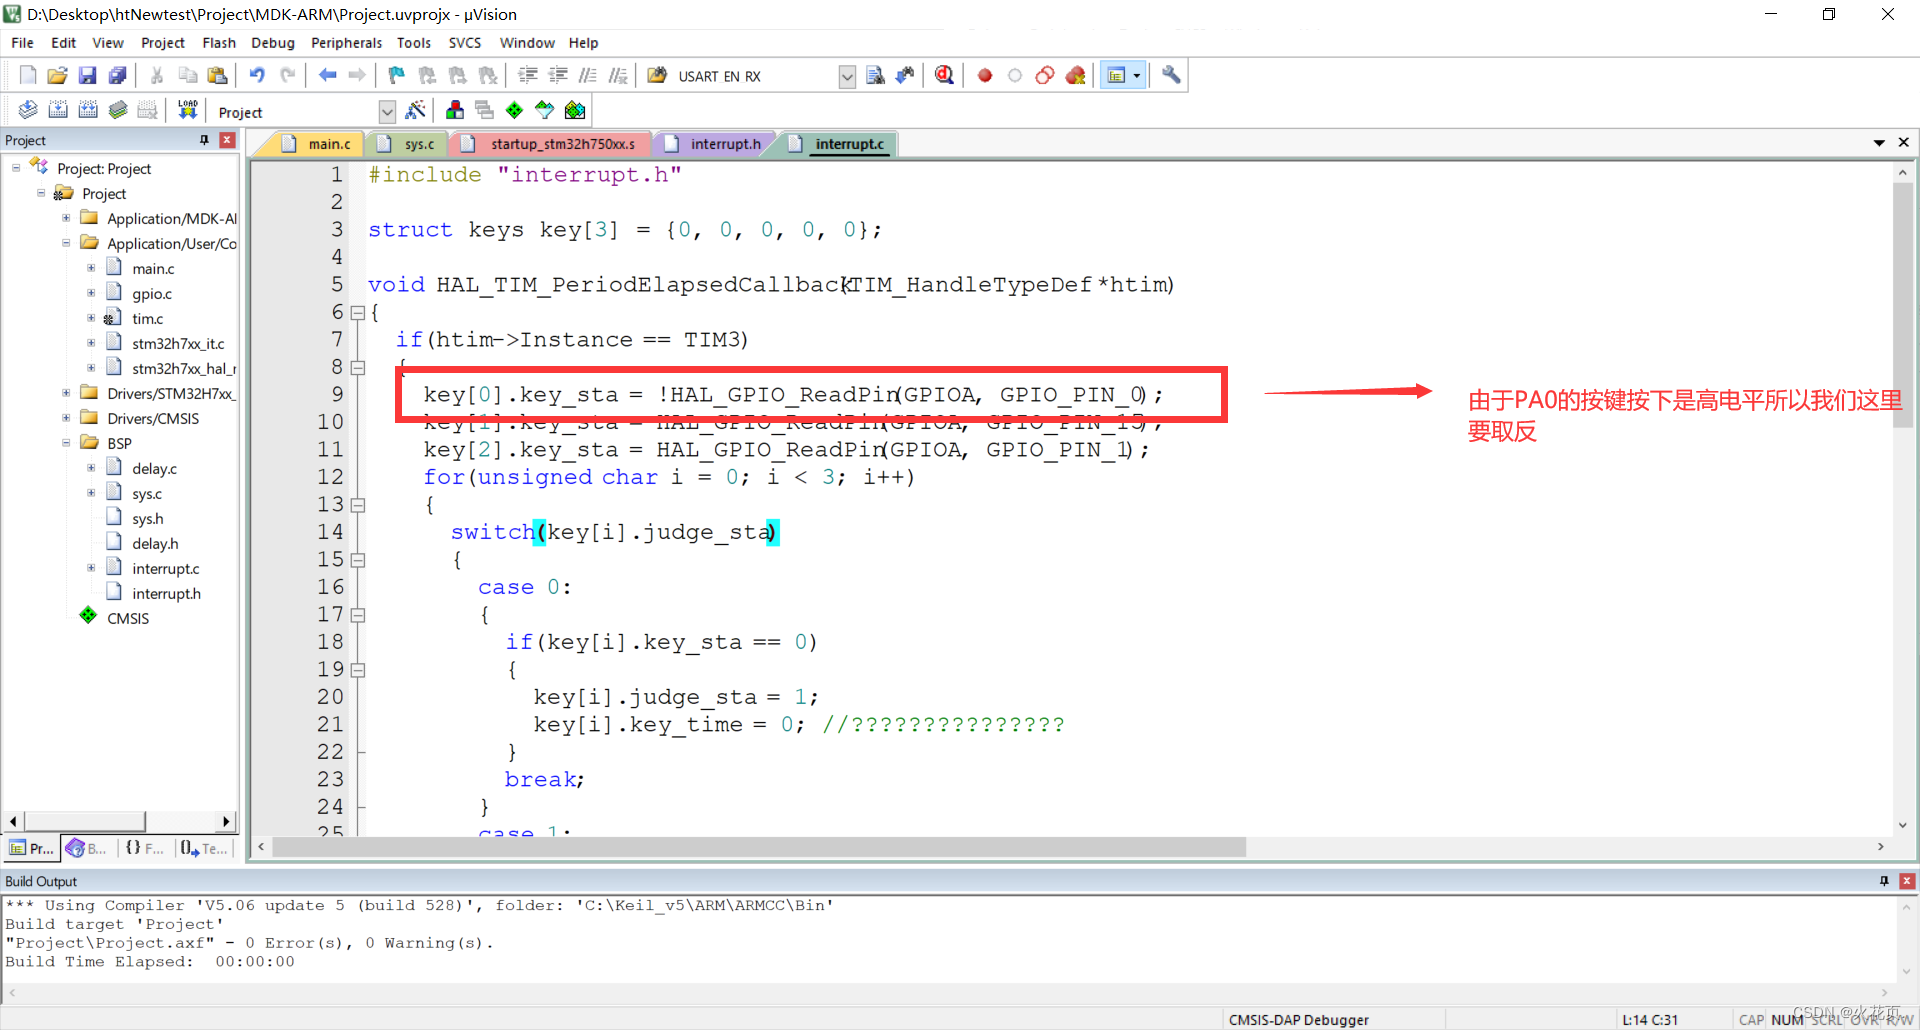
其他地方就没有什么好注意的了
main.h没有做修改
main.c:
/* USER CODE BEGIN Header */
/**
  ******************************************************************************
  * @file           : main.c
  * @brief          : Main program body
  ******************************************************************************
  * @attention
  *
  * Copyright (c) 2023 STMicroelectronics.
  * All rights reserved.
  *
  * This software is licensed under terms that can be found in the LICENSE file
  * in the root directory of this software component.
  * If no LICENSE file comes with this software, it is provided AS-IS.
  *
  ******************************************************************************
  */
/* USER CODE END Header */
/* Includes ------------------------------------------------------------------*/
#include "main.h"
#include "tim.h"
#include "gpio.h"

/* Private includes ----------------------------------------------------------*/
/* USER CODE BEGIN Includes */
#include "delay.h"
#include "sys.h"
#include "interrupt.h"
/* USER CODE END Includes */

/* Private typedef -----------------------------------------------------------*/
/* USER CODE BEGIN PTD */

/* USER CODE END PTD */

/* Private define ------------------------------------------------------------*/
/* USER CODE BEGIN PD */
/* USER CODE END PD */

/* Private macro -------------------------------------------------------------*/
/* USER CODE BEGIN PM */

/* USER CODE END PM */

/* Private variables ---------------------------------------------------------*/

/* USER CODE BEGIN PV */
extern struct keys key[3];
/* USER CODE END PV */

/* Private function prototypes -----------------------------------------------*/
void SystemClock_Config(void);
static void MPU_Config(void);
/* USER CODE BEGIN PFP */
void DisposeKey(void);
/* USER CODE END PFP */

/* Private user code ---------------------------------------------------------*/
/* USER CODE BEGIN 0 */

/* USER CODE END 0 */

/**
  * @brief  The application entry point.
  * @retval int
  */
int main(void)
{
  /* USER CODE BEGIN 1 */

  /* USER CODE END 1 */

  /* MPU Configuration--------------------------------------------------------*/
  MPU_Config();

  /* MCU Configuration--------------------------------------------------------*/

  /* Reset of all peripherals, Initializes the Flash interface and the Systick. */
  HAL_Init();

  /* USER CODE BEGIN Init */

  /* USER CODE END Init */

  /* Configure the system clock */
  SystemClock_Config();

  /* USER CODE BEGIN SysInit */

  /* USER CODE END SysInit */

  /* Initialize all configured peripherals */
  MX_GPIO_Init();
  MX_TIM3_Init();
  /* USER CODE BEGIN 2 */
//	sys_stm32_clock_init(240, 2, 2, 4);
	delay_init(480);
	HAL_TIM_Base_Start_IT(&htim3);
  /* USER CODE END 2 */

  /* Infinite loop */
  /* USER CODE BEGIN WHILE */
  while (1)
  {
    /* USER CODE END WHILE */

    /* USER CODE BEGIN 3 */
		DisposeKey();
//		HAL_GPIO_TogglePin(GPIOB, GPIO_PIN_4);
//		HAL_Delay(1000);
  }
  /* USER CODE END 3 */
}

/**
  * @brief System Clock Configuration
  * @retval None
  */
void SystemClock_Config(void)
{
  RCC_OscInitTypeDef RCC_OscInitStruct = {0};
  RCC_ClkInitTypeDef RCC_ClkInitStruct = {0};

  /** Supply configuration update enable
  */
  HAL_PWREx_ConfigSupply(PWR_LDO_SUPPLY);

  /** Configure the main internal regulator output voltage
  */
  __HAL_PWR_VOLTAGESCALING_CONFIG(PWR_REGULATOR_VOLTAGE_SCALE1);

  while(!__HAL_PWR_GET_FLAG(PWR_FLAG_VOSRDY)) {}

  __HAL_RCC_SYSCFG_CLK_ENABLE();
  __HAL_PWR_VOLTAGESCALING_CONFIG(PWR_REGULATOR_VOLTAGE_SCALE0);

  while(!__HAL_PWR_GET_FLAG(PWR_FLAG_VOSRDY)) {}

  /** Initializes the RCC Oscillators according to the specified parameters
  * in the RCC_OscInitTypeDef structure.
  */
  RCC_OscInitStruct.OscillatorType = RCC_OSCILLATORTYPE_HSE;
  RCC_OscInitStruct.HSEState = RCC_HSE_ON;
  RCC_OscInitStruct.PLL.PLLState = RCC_PLL_ON;
  RCC_OscInitStruct.PLL.PLLSource = RCC_PLLSOURCE_HSE;
  RCC_OscInitStruct.PLL.PLLM = 1;
  RCC_OscInitStruct.PLL.PLLN = 120;
  RCC_OscInitStruct.PLL.PLLP = 2;
  RCC_OscInitStruct.PLL.PLLQ = 2;
  RCC_OscInitStruct.PLL.PLLR = 2;
  RCC_OscInitStruct.PLL.PLLRGE = RCC_PLL1VCIRANGE_3;
  RCC_OscInitStruct.PLL.PLLVCOSEL = RCC_PLL1VCOWIDE;
  RCC_OscInitStruct.PLL.PLLFRACN = 0;
  if (HAL_RCC_OscConfig(&RCC_OscInitStruct) != HAL_OK)
  {
    Error_Handler();
  }

  /** Initializes the CPU, AHB and APB buses clocks
  */
  RCC_ClkInitStruct.ClockType = RCC_CLOCKTYPE_HCLK|RCC_CLOCKTYPE_SYSCLK
                              |RCC_CLOCKTYPE_PCLK1|RCC_CLOCKTYPE_PCLK2
                              |RCC_CLOCKTYPE_D3PCLK1|RCC_CLOCKTYPE_D1PCLK1;
  RCC_ClkInitStruct.SYSCLKSource = RCC_SYSCLKSOURCE_PLLCLK;
  RCC_ClkInitStruct.SYSCLKDivider = RCC_SYSCLK_DIV1;
  RCC_ClkInitStruct.AHBCLKDivider = RCC_HCLK_DIV2;
  RCC_ClkInitStruct.APB3CLKDivider = RCC_APB3_DIV2;
  RCC_ClkInitStruct.APB1CLKDivider = RCC_APB1_DIV2;
  RCC_ClkInitStruct.APB2CLKDivider = RCC_APB2_DIV2;
  RCC_ClkInitStruct.APB4CLKDivider = RCC_APB4_DIV2;

  if (HAL_RCC_ClockConfig(&RCC_ClkInitStruct, FLASH_LATENCY_4) != HAL_OK)
  {
    Error_Handler();
  }
}

/* USER CODE BEGIN 4 */
void DisposeKey(void)
{
	if(key[0].single_flag)
	{
		HAL_GPIO_TogglePin(GPIOB, GPIO_PIN_4);
		key[0].single_flag = 0;
	}
	if(key[1].single_flag)
	{
		HAL_GPIO_TogglePin(GPIOB, GPIO_PIN_4);
		key[1].single_flag = 0;
	}
	if(key[2].single_flag)
	{
		HAL_GPIO_TogglePin(GPIOB, GPIO_PIN_4);
		key[2].single_flag = 0;
	}
}
/* USER CODE END 4 */

/* MPU Configuration */

void MPU_Config(void)
{
  MPU_Region_InitTypeDef MPU_InitStruct = {0};

  /* Disables the MPU */
  HAL_MPU_Disable();

  /** Initializes and configures the Region and the memory to be protected
  */
  MPU_InitStruct.Enable = MPU_REGION_ENABLE;
  MPU_InitStruct.Number = MPU_REGION_NUMBER0;
  MPU_InitStruct.BaseAddress = 0x0;
  MPU_InitStruct.Size = MPU_REGION_SIZE_4GB;
  MPU_InitStruct.SubRegionDisable = 0x87;
  MPU_InitStruct.TypeExtField = MPU_TEX_LEVEL0;
  MPU_InitStruct.AccessPermission = MPU_REGION_NO_ACCESS;
  MPU_InitStruct.DisableExec = MPU_INSTRUCTION_ACCESS_DISABLE;
  MPU_InitStruct.IsShareable = MPU_ACCESS_SHAREABLE;
  MPU_InitStruct.IsCacheable = MPU_ACCESS_NOT_CACHEABLE;
  MPU_InitStruct.IsBufferable = MPU_ACCESS_NOT_BUFFERABLE;

  HAL_MPU_ConfigRegion(&MPU_InitStruct);
  /* Enables the MPU */
  HAL_MPU_Enable(MPU_PRIVILEGED_DEFAULT);

}

/**
  * @brief  This function is executed in case of error occurrence.
  * @retval None
  */
void Error_Handler(void)
{
  /* USER CODE BEGIN Error_Handler_Debug */
  /* User can add his own implementation to report the HAL error return state */
  __disable_irq();
  while (1)
  {
  }
  /* USER CODE END Error_Handler_Debug */
}

#ifdef  USE_FULL_ASSERT
/**
  * @brief  Reports the name of the source file and the source line number
  *         where the assert_param error has occurred.
  * @param  file: pointer to the source file name
  * @param  line: assert_param error line source number
  * @retval None
  */
void assert_failed(uint8_t *file, uint32_t line)
{
  /* USER CODE BEGIN 6 */
  /* User can add his own implementation to report the file name and line number,
     ex: printf("Wrong parameters value: file %s on line %d\r\n", file, line) */
  /* USER CODE END 6 */
}
#endif /* USE_FULL_ASSERT */
interrupt.h:
#ifndef __INTERRUPT_H__
#define __INTERRUPT_H__

#include "main.h"
#include "stdbool.h"

struct keys
{
	unsigned char judge_sta;
	bool key_sta;
	bool single_flag;
	unsigned int key_time;
	bool long_flag;
};


#endif
interrupt.c:
#include "interrupt.h"

struct keys key[3] = {0, 0, 0, 0, 0};

void HAL_TIM_PeriodElapsedCallback(TIM_HandleTypeDef *htim)
{
	if(htim->Instance == TIM3)
	{
		key[0].key_sta = !HAL_GPIO_ReadPin(GPIOA, GPIO_PIN_0);
		key[1].key_sta = HAL_GPIO_ReadPin(GPIOA, GPIO_PIN_15);
		key[2].key_sta = HAL_GPIO_ReadPin(GPIOA, GPIO_PIN_1);
		for(unsigned char i = 0; i < 3; i++)
		{
			switch(key[i].judge_sta)
			{
				case 0:
				{
					if(key[i].key_sta == 0)
					{
						key[i].judge_sta = 1;
						key[i].key_time = 0;
					}
					break;
				}
				case 1:
				{
					if(key[i].key_sta == 0)
					{
						key[i].judge_sta = 2;
					}
					else
					{
						key[i].judge_sta = 0;
					}
					break;
				}
				case 2:
				{
					if(key[i].key_sta == 1)
					{
						key[i].judge_sta = 0;
						if(key[i].key_time <= 70)
						{
							key[i].single_flag = 1;
						}
					}
					else
					{
						key[i].key_time++;
						if(key[i].key_time > 70)
						{
							key[i].long_flag = 1;
						}
					}
				}
				break;
			}
		}
	}
}
总结
工程链接:RCC_KEY
以上就是按键以及时钟的配置过程,测试代码
参考的文章:
stm32h750vbt6,使用cubemx配置时钟不能配置480mhz解决方法
STM32CUBEMX配置STM32H750时钟480M时失败
