init+input+output
Linux环境Arduino IDE中配置ATOM S3
示例
官方示例代码:
/*
*******************************************************************************
* Copyright (c) 2022 by M5Stack
*                  Equipped with M5AtomS3 sample source code
*                          配套  M5AtomS3 示例源代码
* Visit for more information: https://docs.m5stack.com/en/core/AtomS3
* 获取更多资料请访问: https://docs.m5stack.com/zh_CN/core/AtomS3
*
* Describe: Button example.  按键示例
* Date: 2022/12/18
*******************************************************************************
Press button to display the corresponding output on the screen and
USBserial. 按下按键,在屏幕和串口上显示相应输出
*/
#include <M5AtomS3.h>
/* After M5AtomS3 is started or reset
  the program in the setUp () function will be run, and this part will only be
  run once. 在 M5AtomS3
  启动或者复位后,即会开始执行setup()函数中的程序,该部分只会执行一次。 */
void setup() {
    M5.begin(true, true, false, false);  // Init M5AtomS3.  初始化 M5AtomS3
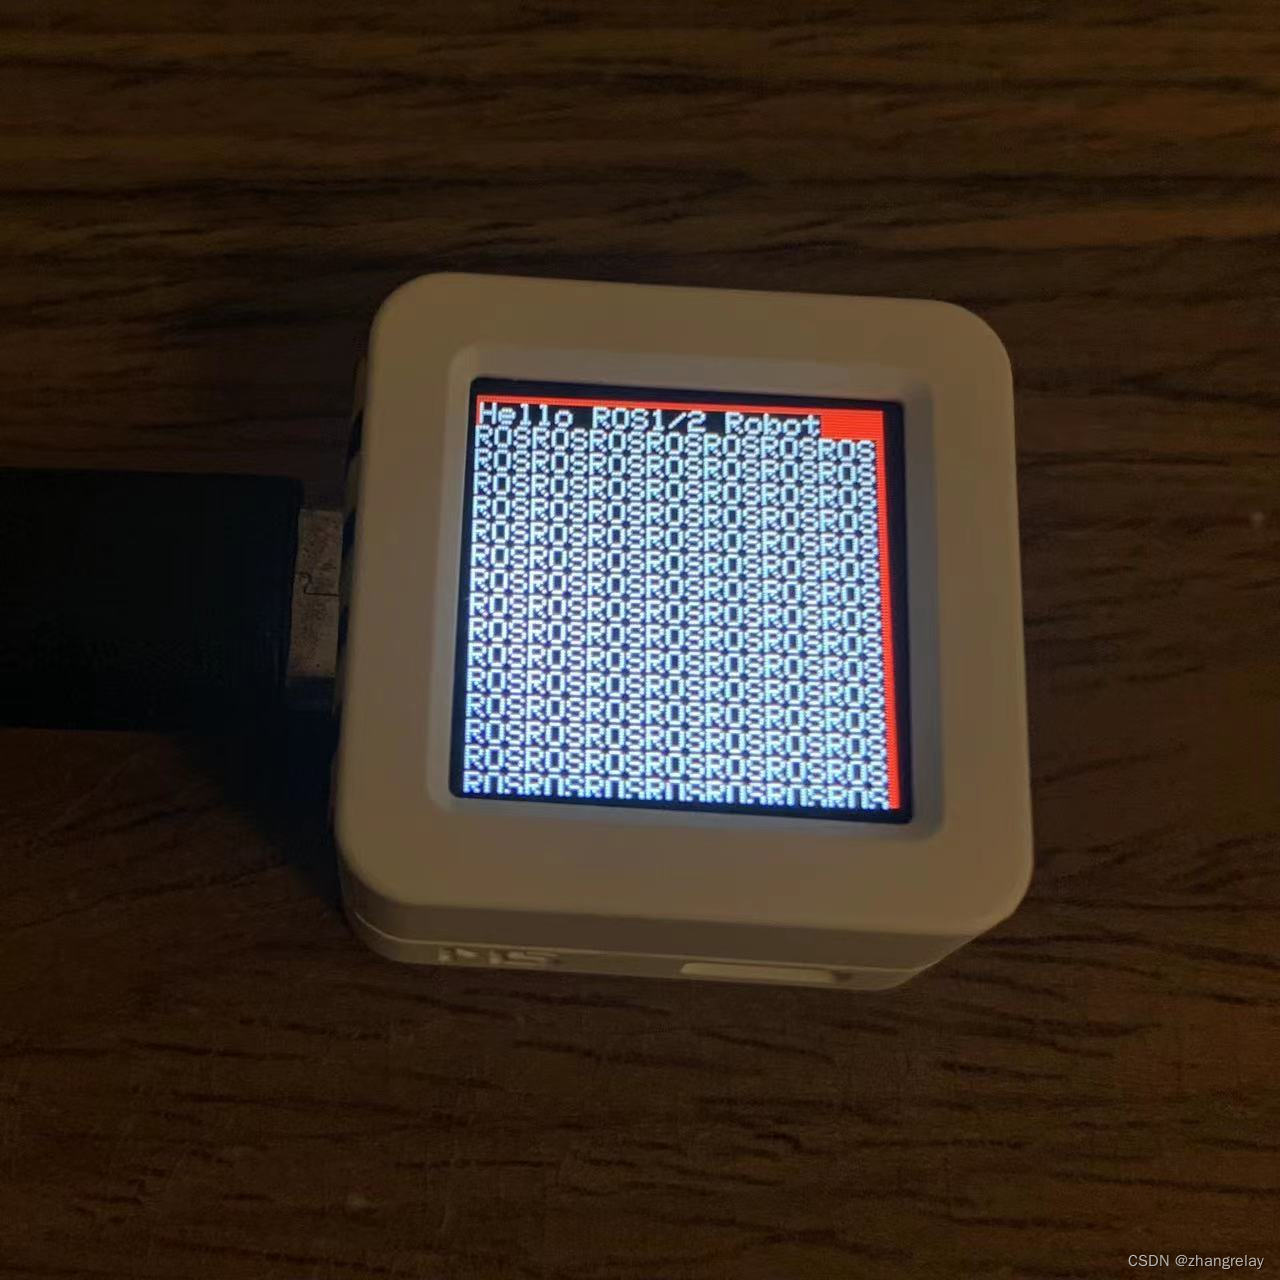
    M5.Lcd.println("Hello ROS1/2 Robot");
}

/* After the program in setup() runs, it runs the program in loop()
The loop() function is an infinite loop in which the program runs repeatedly
在setup()函数中的程序执行完后,会接着执行loop()函数中的程序
loop()函数是一个死循环,其中的程序会不断的重复运行 */
void loop() {
    M5.update();  // Read the press state of the key.  读取按键 A, B, C 的状态
    if (M5.Btn.wasReleased() || M5.Btn.pressedFor(1000)) {
        USBSerial.print('ROS');
        M5.Lcd.print("ROS");
    }
}
解析
注释是中英双语的,博客中不在重复。
#include <具体硬件版本>
M5.begin
功能:初始化
源码:
void M5AtomS3::begin(bool LCDEnable, bool USBSerialEnable, bool I2CEnable,
                     bool LEDEnable) {
    if (I2CEnable) {
        Wire1.begin(38, 39, 100000UL);
    }

    if (USBSerialEnable) {
        USBSerial.begin(115200);
        USBSerial.flush();
        delay(1200);
        USBSerial.println("M5AtomS3 initializing...OK");
    }

    Btn.begin();

    if (LCDEnable) {
        Lcd.begin();
        Lcd.clear();
        Lcd.setCursor(1, 2);
    }

    if (LEDEnable) {
        dis.begin();
    }
}
分别为LCD,Serial,I2C,LED。
示例代码为:
M5.begin(true, true, false, false);含义使用LCD和串口。
M5.Lcd
功能:输出模块
源码参考官网或者文末
可以使用案例很多
M5.Lcd.fillScreen(RED); 
M5.Btn
功能:输入模块
学习方法类似如上输出模块。
M5.update
功能:获取atoms3更新状态,如按键
void setup() {
  M5.begin();
}

void loop() {
  M5.update();    //需添加M5.update()才能读取到按键的状态,细节请见System
  if (M5.Btn.isPressed()) {    //如果按键按下
    Serial.println("Button is pressed.");
  }
  delay(20);
}
Atom S3
#ifndef Pins_Arduino_h
#define Pins_Arduino_h

#include <stdint.h>
#include "soc/soc_caps.h"

#define USB_VID 0x303a
#define USB_PID 0x1001

#define EXTERNAL_NUM_INTERRUPTS 46
#define NUM_DIGITAL_PINS        48
#define NUM_ANALOG_INPUTS       20

// Some boards have too low voltage on this pin (board design bug)
// Use different pin with 3V and connect with 48
// and change this setup for the chosen pin (for example 38)
static const uint8_t LED_BUILTIN = SOC_GPIO_PIN_COUNT + 48;
#define BUILTIN_LED    LED_BUILTIN  // backward compatibility
#define LED_BUILTIN    LED_BUILTIN
#define RGB_BUILTIN    LED_BUILTIN
#define RGB_BRIGHTNESS 64

#define analogInputToDigitalPin(p) \
    (((p) < 20) ? (analogChannelToDigitalPin(p)) : -1)
#define digitalPinToInterrupt(p) (((p) < 48) ? (p) : -1)
#define digitalPinHasPWM(p)      (p < 46)

static const uint8_t TX = 43;
static const uint8_t RX = 44;

static const uint8_t TXD2 = 1;
static const uint8_t RXD2 = 2;

static const uint8_t SDA = 38;
static const uint8_t SCL = 39;

static const uint8_t SS   = 15;
static const uint8_t MOSI = 21;
static const uint8_t MISO = -1;
static const uint8_t SCK  = 17;

static const uint8_t G0  = 0;
static const uint8_t G1  = 1;
static const uint8_t G2  = 2;
static const uint8_t G3  = 3;
static const uint8_t G4  = 4;
static const uint8_t G5  = 5;
static const uint8_t G6  = 6;
static const uint8_t G7  = 7;
static const uint8_t G8  = 8;
static const uint8_t G36 = 36;
static const uint8_t G37 = 37;
static const uint8_t G38 = 38;
static const uint8_t G39 = 39;
static const uint8_t G40 = 40;
static const uint8_t G42 = 42;

static const uint8_t ADC1 = 7;
static const uint8_t ADC2 = 8;

#endif /* Pins_Arduino_h */
LCD
begin()
功能:
初始化以供使用
函数原型:
void begin()
注意:
1.如果您不想使用M5.begin() 初始化LCD,请在使用显示器之前调用此功能
使用示例:
#include <M5Stack.h>

void setup() {
  M5.Lcd.begin();  //初始化 M5Stack
}

void loop() {
}
sleep()
功能:
将显示切换到节能模式
函数原型:
void sleep()
使用示例:
#include <M5Stack.h>

void setup() {
  M5.Lcd.begin();  //初始化 M5Stack
  M5.Lcd.sleep();    //切换至休眠模式
}

void loop() {
}
clear()
功能:
清空显示屏所显示的内容
函数原型:
void clear()
使用示例:
#include <M5Stack.h>

void setup() {
  M5.Lcd.begin();  //初始化 M5Stack
  M5.Power.begin();
  M5.Lcd.fillScreen(RED);
  delay(1000);
  M5.Lcd.clear();    //清空显示屏所显示的内容
}

void loop() {
}
wakeup()
功能:
从节能模式恢复显示
函数原型:
void wakeup()
使用示例:
#include <M5Stack.h>

void setup() {
  M5.Lcd.begin();  //初始化 M5Stack
  M5.Lcd.wakeup();    //从节能模式恢复显示
}

void loop() {
}
hight()
功能:
返回屏幕高度
函数原型:
void hight()
使用示例:
#include <M5Stack.h>

void setup() {
  M5.begin();   //初始化 M5Stack
  M5.Power.begin();
  M5.Lcd.print(M5.Lcd.height());    //在屏幕上显示屏幕的高度
}

void loop() {
}
width()
功能:
返回屏幕宽度
函数原型:
void width()
使用示例:
#include <M5Stack.h>

void setup() {
  M5.begin();   //初始化 M5Stack
  M5.Power.begin();
  M5.Lcd.print(M5.Lcd.width());    //在屏幕上显示屏幕的宽度
}

void loop() {
}
getCursorX()
功能:
获取字符末尾处的x坐标
函数原型:
int16_t getCursorX()
注意:
不适用于drawNumber()
使用示例:
#include <M5Stack.h>

void setup() {
  M5.begin();  //初始化 M5Stack
  M5.Power.begin();
  M5.Lcd.print("Hello");
  int X = M5.Lcd.getCursorX();
  M5.Lcd.print(X);
}

void loop(){
}
getCursorY()
功能:
获取字符末尾处的y坐标
函数原型:
int16_t getCursorY()
注意:
不适用于drawNumber()
使用示例:
#include <M5Stack.h>

void setup() {
  M5.begin();  //初始化 M5Stack
  M5.Power.begin();
  M5.Lcd.print("Hello");
  int X = M5.Lcd.getCursorY();
  M5.Lcd.print(Y);
}

void loop(){
}
getRotation()
功能:
返回屏幕旋转方向
函数原型:
uint8_t getRotation()
使用示例:
#include <M5Stack.h>

void setup() {
  M5.begin();  //初始化 M5Stack
  M5.Power.begin();
  M5.Lcd.print(M5.Lcd.getRotation());    //在屏幕上输出屏幕的旋转方向
}

void loop(){
}
getTextDatum()
功能:
返回文字对齐方式( 为上方列表中对齐方式的编号 )
函数原型:
textdatum_t getRotation()
使用示例:
#include <M5Stack.h>

void setup() {
  M5.begin();  //初始化 M5Stack
  M5.Power.begin();
  M5.Lcd.setTextDatum(MC_DATUM);    //设置文字的对齐方式
  M5.Lcd.drawString("hello", 160, 120, 2);    //在(160,120)处以2号字体打印字符串hello
  M5.Lcd.print(M5.Lcd.getTextDatum());    //屏幕打印获取到的文字对齐方式
}

void loop(){
}
setCursor()
功能:
设置文本光标在(x,y)处
函数原型:
void setCursor(int16_t x, int16_t y)
| 参数 | 类型 | 类型 |
|---|---|---|
| x | int16_t | x坐标(像素) |
| y | int16_t | y坐标(像素) |
使用示例:
#include <M5Stack.h>

void setup() {
  M5.begin();             //初始化 M5Stack
  M5.Power.begin();
  M5.Lcd.setCursor(0, 30);
  M5.Lcd.printf("Hello M5");
}

void loop() {}
setRotation()
功能:
旋转屏幕
函数原型:
void setRotation(uint8_t m)
| 参数 | 类型 | 描述 |
|---|---|---|
| m | uint8_t | 旋转角度 ( * 90°) |
注意:
1.旋转角度为90°的倍数
2.0至3顺时针旋转,4至7逆时针旋转(默认为1)
3.需要在显示前设置
使用示例:
#include <M5Stack.h>

void setup() {
  M5.begin();             //初始化 M5Stack
  M5.Power.begin();
  M5.Lcd.setRotation(2);  //将屏幕顺时针旋转180度(2*90)
  M5.Lcd.fillEllipse(160, 100, 60, 100, YELLOW);    //在(160,100)处创建一个长轴,短轴分别为60,100黄色椭圆
  delay(1000);
  M5.Lcd.setRotation(1);  //将屏幕恢复为默认显示状态
  M5.Lcd.fillEllipse(160, 100, 60, 100, GREEN);
}

void loop() {}
setBrightness()
功能:
设置屏幕亮度
函数原型:
void setBrightness(uint16_t voltage)
| 参数 | 类型 | 描述 |
|---|---|---|
| brightness | uint16_t | 亮度 (0: Off - 255:Full) |
使用示例:
#include <M5Stack.h>

void setup() {
  M5.begin();
  M5.Power.begin();
  M5.Lcd.fillScreen(RED);
}
void loop() {
  M5.update();
  for(int i=0; i<255;i++){
    M5.Lcd.setBrightness(i);  //每隔10ms设置一次屏幕亮度
    delay(10);
  }
  for(int i=255; i>0;i--){
    M5.Lcd.setBrightness(i);
    delay(10);
  }
}
alphaBlend()
功能:
设置透明度,混合前景和背景色.
函数原型:
uint16_t alphaBlend(uint8_t alpha, uint16_t fgc, uint16_t bgc)
| 参数 | 描述 | 类型 |
|---|---|---|
| alpha | uint8_t | 透明度 |
| fgc | uint16_t | 前景色 |
| bgc | uint16_t | 背景色 |
使用示例:
#include <M5Stack.h>

void setup() {
  M5.Lcd.begin();  //初始化 M5Stack
  M5.Power.begin();
  M5.Lcd.fillScreen(M5.Lcd.alphaBlend(128, 0X00FF00, 0XFF0000));
  //设置前景、背景色分别为0X00FF00,0XFF0000 透明度为128,并填充至整个屏幕
}

void loop() {
}
loadFont()
功能:
从VLW文件加载字体
函数原型:
void loadFont(String fontName, bool flash)
| 参数 | 类型 | 说明 |
|---|---|---|
| fontName | String | 字体名称 |
| flash | bool | 文件来源 |
使用示例:
#include <M5Stack.h>

void setup() {
  M5.begin();  //初始化 M5Stack
  M5.Power.begin();
  M5.Lcd.loadFont("filename", SD);
}

void loop() {
}
unloadFont()
功能:
卸载字体
函数原型:
void unloadFont()
使用示例:
#include <M5Stack.h>

void setup() {
  M5.begin();  //初始化 M5Stack
  M5.Power.begin();
  M5.Lcd.unloadFont();
}

void loop() {
}
fontsLoaded()
功能:
返回是否加载自己的字体
函数原型:
uint16_t fontsLoaded()
返回值:
返回显示字体的编码的16进制值
使用示例:
#include <M5Stack.h>

void setup() {
  M5.begin();  //初始化 M5Stack
  M5.Power.begin();
  M5.Lcd.print(M5.Lcd.fontsLoaded());
}

void loop() {
}
fillScreen()
功能:
以指定的颜色填充整个屏幕
函数原型:
void fillScreen(uint32_t color)
| 参数 | 类型 | 描述 |
|---|---|---|
| color | uint32_t | 颜色值 |
使用示例:
#include <M5Stack.h>

void setup() {
  M5.begin();  //初始化 M5Stack
  M5.Power.begin();
  M5.Lcd.fillScreen(RED);    //在屏幕上填充红色
}

void loop(){
}
invertDisplay()
功能:
以负/正方式反转屏幕颜色
函数原型:
void invertDisplay(boolean i)
| 参数 | 类型 | 说明 |
|---|---|---|
| i | boolean | 反转时为 true |
使用示例:
#include <M5Stack.h>

void setup() {
  M5.begin();  //初始化 M5Stack
  M5.Power.begin();
  M5.Lcd.fillScreen(RED);    //在屏幕上填充红色
}

void loop() {
  M5.Lcd.invertDisplay(1);    //开启反转
  delay(1000);
  M5.Lcd.invertDisplay(0);    //关闭反转
}
color565()
功能:
更改为函数中使用的颜色代码(RGB 565)
函数原型:
color565(uint8_t red, uint8_t green, uint8_t blue)
| 参数 | 类型 | 描述 |
|---|---|---|
| red | uint8_t | 红 |
| green | uint8_t | 绿 |
| blue | uint8_t | 蓝 |
使用示例:
#include <M5Stack.h>

void setup() {
  M5.begin();  //初始化 M5Stack
  M5.Power.begin();
  uint16_t colorvalue = 0;
  colorvalue = color565(255, 255, 255);
  M5.Lcd.fillEllipse(160, 100, 60, 100, colorvalue);
}

void loop() {}
Text
print()
功能:
在屏幕当前位置打印字符串
函数原型:
size_t print()
使用示例:
#include <M5Stack.h>

void setup() {
  M5.begin();  //初始化 M5Stack
  M5.Power.begin();
  M5.Lcd.print("this is a print text function");
}

void loop() {
}
textWidth()
功能:
返回文本所占像素宽度
函数原型:
int16_t textWidth(const String& string)
| 参数 | 类型 | 描述 |
|---|---|---|
| string | const String& | 字符串 |
使用示例:
#include <M5Stack.h>

void setup() {
  M5.begin();   //初始化 M5Stack
  M5.Power.begin();
  String text = "hello  ";
  M5.Lcd.print(text);
  M5.Lcd.print(M5.Lcd.textWidth(text));    //在屏幕上打印字符串数组text所占像素宽度
}

void loop() {}
setTextSize()
功能:
设置显示文字的大小
函数原型:
void setTextSize(uint8_t s)
| 参数 | 类型 | 描述 |
|---|---|---|
| s | uint8_t | 文字的大小 (1~7) |
使用示例:
#include <M5Stack.h>

void setup() {
  M5.begin();  //初始化 M5Stack
  M5.Power.begin();
  M5.Lcd.setTextSize(4);    //设置字体大小为4
  M5.Lcd.print("Hello M5Stack");
}

void loop() {
}
setTextColor()
功能:
设置显示文本的前景颜色和背景颜色
函数原型:
void setTextColor(uint16_t color)
void setTextColor(uint16_t color, uint16_t backgroundcolor)
| 参数 | 类型 | 描述 |
|---|---|---|
| color | uint16_t | 文本的前景颜色 |
| backgroundcolor | uint16_t | 文本的背景颜色 |
注意:
1.如果函数的 backgroundcolor 值没给出,则使用当前的背景颜色
2.若不设置文字的颜色,默认为白色
使用示例:
#include <M5Stack.h>

void setup() {
  M5.begin(); //初始化 M5Stack
  M5.Power.begin();
  M5.Lcd.setTextColor(RED,BLACK);    //设置文本的前、背景色分别为红色和黑色
  //M5.Lcd.setTextColor(RED);
}

void loop(){
}
setTextWrap()
功能:
设置自动换行功能
函数原型:
void setTextWrap(boolean wrapX, boolean wrapY)
| 参数 | 类型 | 描述 |
|---|---|---|
| wrapX | boolean | X 方向(默认开启) |
| wrapY | boolean | Y 方向 |
使用示例:
#include <M5Stack.h>

void setup() {
  M5.begin();   //初始化 M5Stack
  M5.Power.begin();
  M5.Lcd.setTextWrap(true, true);    //开启x、y轴自动换行
    M5.Lcd.print("hello M5Stack hello M5Stack hello M5Stack hello M5Stack hello M5Stack hello M5Stack hello M5Stack hello M5Stack");
}

void loop() {}
setTextPadding()
功能:
填充指定空白宽度(可帮助擦除旧的文本和数字)
函数原型:
void setTextPadding(uint16_t x_width)
| 参数 | 类型 | 描述 |
|---|---|---|
| x_width | uint16_t | 空白区域宽度 |
使用示例:
#include <M5Stack.h>

void setup() {
  M5.begin();
  M5.Power.begin();
}

void loop() {
  M5.Lcd.drawString("Orbitron 32", 160, 60, 2);
  delay(2000);
  M5.Lcd.setTextPadding(M5.Lcd.width() - 20);
  M5.Lcd.drawString("Orbitron 32 with padding", 160, 60, 2);
  delay(2000);
}
setTextDatum()
功能:
设置文本对齐方式
函数原型:
void setTextDatum(uint8_t datum)
| 参数 | 类型 | 描述 |
|---|---|---|
| TL_DATUM (0) | uint8_t | 左上角对齐(默认) |
| TC_DATUM (1) | uint8_t | 居中向上对齐 |
| TR_DATUM (2) | uint8_t | 右上角对齐 |
| ML_DATUM (3) | uint8_t | 中部左对齐 |
| MC_DATUM (4) | uint8_t | 中心对齐 |
| MR_DATUM (5) | uint8_t | 中部右对齐 |
| BL_DATUM (6) | uint8_t | 左下角对齐 |
| BC_DATUM (7) | uint8_t | 居中底部对齐 |
| BR_DATUM (8) | uint8_t | 右下角对齐 |
| L_BASELINE (9) | uint8_t | 左字符基线 |
| C_BASELINE (10) | uint8_t | 中字符基线 |
| R_BASELINE (11) | uint8_t | 右字符基线 |
注意:
不适用于print()
使用示例:
#include <M5Stack.h>

void setup() {
  M5.begin();  //初始化 M5Stack
  M5.Power.begin();
  M5.Lcd.setTextDatum(MC_DATUM);    //设置文本对齐方式为中心对齐
  M5.Lcd.drawString("hello", 160, 120, 2);    //在(160,120)处以2号字体打印字符串hello
}

void loop(){
}
Draw
drawFastHLine()
功能:
在(X,Y)处划一条长度为w的color色水平线条
函数原型:
void drawFastHLine(int32_t x, int32_t y, int32_t w, uint32_t color)
| 参数 | 类型 | 功能 |
|---|---|---|
| x | int32_t | 坐标 X |
| y | int32_t | 坐标 Y |
| w | int32_t | 宽度(像素) |
| color | uint32_t | 线条颜色 |
使用示例:
#include <M5Stack.h>

void setup() {
  M5.begin();  //初始化 M5Stack
  M5.Power.begin();
  M5.Lcd.drawFastHLine(3, 100, 255, GREEN);    //在(3,100)处划一条长度为255的绿色水平线条
}

void loop() {
}
drawFastVLine()
功能:
在(X,Y)处划一条长度为w的color色 垂直线条
函数原型:
void drawFastVLine(int32_t x, int32_t y, int32_t w, uint32_t color)
| 参数 | 类型 | 功能 |
|---|---|---|
| x | int32_t | 坐标 X |
| y | int32_t | 坐标 Y |
| w | int32_t | 宽度(像素) |
| color | uint32_t | 线条颜色(可选) |
使用示例:
#include <M5Stack.h>

void setup() {
  M5.begin();  //初始化 M5Stack
  M5.Power.begin();
  M5.Lcd.drawFastVLine(100, 0, 255, TFT_GREEN);    //在(100,0)处划一条长度为255的绿色垂直线条
}

void loop(){
}
drawString()
功能:
在(x,y)处显示字符串
函数原型:
int16_t drawString(const char *string, int32_t poX, int32_t poY, uint8_t font)
| 参数 | 类型 | 描述 |
|---|---|---|
| string | const char * | 一个字符串 |
| poX | int32_t | X坐标 |
| poY | int32_t | Y坐标 |
| font | uint8_t | 字体 |
使用示例:
#include <M5Stack.h>

void setup() {
  M5.begin();  //初始化 M5Stack
  M5.Power.begin();
  M5.Lcd.drawString("Hello M5", 160, 100, 2);    //在(160,100)处以2号字体显示字符串Hello M5
}

void loop(){
}
drawNumber()
功能:
在(x,y)处显示整数
函数原型:
void drawNumber(long long_num, int32_t poX, int32_t poY)
| 参数 | 类型 | 描述 |
|---|---|---|
| long_num | long | 数字 |
| poX | int32_t | X坐标 |
| poY | int32_t | Y坐标 |
使用示例:
#include <M5Stack.h>

void setup() {
  M5.begin();  //初始化 M5Stack
  M5.Power.begin();
  M5.Lcd.drawNumber(99, 55, 100);    //在(99,55)处显示整数100
}

void loop(){
}
drawChar()
功能:
在(X,Y)处以字体font显示字符
函数原型:
int16_t drawChar(int16_t uniCode, int32_t x, uint16_t y, uint8_t font)
| 参数 | 类型 | 描述 |
|---|---|---|
| uniCode | int16_t | 字符 |
| x | int32_t | X坐标 |
| y | uint16_t | Y坐标 |
| font | uint8_t | 字体 |
使用示例:
#include <M5Stack.h>
void setup() {
  M5.begin(); //初始化 M5Stack
  M5.Power.begin();
  M5.Lcd.drawChar('A', 160, 120, 2);    //在(160,120)处以字体2显示字符A
}
void loop(){
}
drawFloat()
功能:
在(X,Y)处显示小数点后dp位的浮点数floatNumber
函数原型:
int16_t drawFloat(float floatNumber, uint8_t dp, int32_t poX, int32_t poY)
| 参数 | 类型 | 描述 |
|---|---|---|
| floatNumber | float | 所显示的小数 |
| dp | uint8_t | 小数位数 |
| poX | int32_t | 在x处显示 |
| poY | int32_t | 在y处显示 |
使用示例:
#include <M5Stack.h>

void setup() {
  M5.begin();   //初始化 M5Stack
  M5.Power.begin();
  M5.Lcd.drawFloat(3.1415928,7,100,100);    //在(100,100)处显示小数点后7位的浮点数3.1415928
}

void loop() {}
drawPixel()
功能:
在(x,y)处画点
函数原型:
void drawPixel(int32_t x, int32_t y, uint32_t color)
参数:
| 参数 | 描述 | 类型 |
|---|---|---|
| x | int32_t | X坐标 |
| y | int32_t | Y坐标 |
| color | uint32_t | 颜色 |
使用示例:
#include <M5Stack.h>

void setup() {
  M5.begin();  //初始化 M5Stack
  M5.Power.begin();
  M5.Lcd.drawPixel(22,22,RED);    //在(22,22)处画一个红色的像素点
}

void loop() {}
drawLine()
功能:
从点(x0,y0)到点(x1,y1)以指定颜色(color)绘制直线
函数原型:
void drawLine(int32_t x0, int32_t y0, int32_t x1, int32_t y1, uint32_t color)
| 参数 | 类型 | 描述 |
|---|---|---|
| x* | int32_t | X坐标 |
| y* | int32_t | Y坐标 |
| color | uint32_t | 颜色 |
使用示例:
#include <M5Stack.h>

void setup() {
  M5.begin();  //初始化 M5Stack
  M5.Power.begin();
  M5.Lcd.drawLine(200, 0, 200,2000,GREEN);    //从点(200,0)到点(200,200)以绿色绘制直线
}

void loop(){
}
drawRect()
功能:
在(x,y)处以指定颜色绘制宽高分别为width和height的矩形线框
函数原型:
void drawRect(int32_t x, int32_t y, int32_t w, int32_t h, uint32_t color)
| 参数 | 类型 | 描述 |
|---|---|---|
| x* | int32_t | X坐标 |
| y* | int32_t | Y坐标 |
| w | int32_t | 矩形框的宽(单位: 像素) |
| h | int32_t | 矩形框的高(单位: 像素) |
| color | uint32_t | 颜色值 |
使用示例:
#include <M5Stack.h>

void setup() {
  M5.begin();  //初始化 M5Stack
  M5.Power.begin();
  M5.Lcd.drawRect(180, 12, 122, 10, BLUE);    //在(180,12)处以蓝色绘制宽高分别为122和10的矩形线框
}

void loop(){
}
fillRect()
功能:
在(x,y)处以指定颜色绘制宽高分别为width和height的填充矩形
函数原型:
void fillRect(int32_t x, int32_t y, int32_t w, int32_t h, uint32_t color)
| 参数 | 类型 | 描述 |
|---|---|---|
| x* | int32_t | X坐标 |
| y* | int32_t | Y坐标 |
| w | int32_t | 矩形框的宽(单位: 像素) |
| h | int32_t | 矩形框的高(单位: 像素) |
| color | uint32_t | 颜色值 |
使用示例:
#include <M5Stack.h>

void setup() {
  M5.begin();  //初始化 M5Stack
  M5.Power.begin();
  M5.Lcd.fillRect(150, 120, 122, 10, BLUE);    //在(150,120)处绘制一个长122、宽为10的蓝色填充矩形
}

void loop(){
}
drawRoundRect()
功能:
在(x,y)处绘制宽高分别为width、height的圆角矩形线框,圆角半径为radius,颜色为color
函数原型:
void drawRoundRect(int32_t x, int32_t y, int32_t w, int32_t h, int32_t r, uint32_t color)
| 参数 | 类型 | 描述 |
|---|---|---|
| x | int32_t | 矩形左上角的x坐标 |
| y | int32_t | 矩形左上角的Y坐标 |
| w | int32_t | 矩形(像素) |
| h | int32_t | 矩形的高度 |
| r | int32_t | 转角半径f |
| color | uint32_t | 方线的颜色 |
使用示例:
#include <M5Stack.h>

void setup() {
  M5.begin();   //初始化 M5Stack
  M5.Power.begin();
  M5.Lcd.drawRoundRect(55,55,30,50,10,GREEN);    //在(55,55)处绘制宽高分别为30、50的圆角半径为10,颜色为绿色的圆角矩形线框

void loop() {}
fillRoundRect()
功能:
在(x,y)处绘制宽高分别为width、height的圆角矩形线框,圆角半径为radius,颜色为color
函数原型:
void fillRoundRect(int32_t x, int32_t y, int32_t w, int32_t h, int32_t r, uint32_t color)
| 参数 | 类型 | 描述 |
|---|---|---|
| x | int32_t | 矩形左上角的x坐标 |
| y | int32_t | 矩形左上角的Y坐标 |
| w | int32_t | 矩形宽度(像素) |
| h | int32_t | 矩形的高度(像素) |
| r | int32_t | 转角半径f |
| color | uint32_t | 方线的颜色 |
使用示例:
#include <M5Stack.h>

void setup() {
  M5.begin();   //初始化 M5Stack
  M5.Power.begin();
  M5.Lcd.fillRoundRect(55, 55, 30, 50, 10, GREEN);//在(55,55)处绘制宽高分别为30、50的圆角半径为10,颜色为绿色的圆角矩形
}

void loop() {}
drawCircle()
功能:
在(x,y)处绘制半径为r的color色圆线框
函数原型:
void drawCircle(int32_t x0, int32_t y0, int32_t r, uint32_t color)
参数:
| 参数 | 描述 | 类型 |
|---|---|---|
| x0 | int32_t | 圆中心X坐标 |
| y0 | int32_t | 圆中心Y坐标 |
| r | int32_t | 圆的半径 |
| color | uint32_t | 圆的颜色 |
使用示例:
#include <M5Stack.h>

void setup() {
  M5.begin();   //初始化 M5Stack
  M5.Power.begin();
  M5.Lcd.drawCircle(100, 100, 50, RED);   //在(x,y)处绘制半径为50的红色圆线圈
}

void loop() {}
fillCircle()
功能:
在(x,y)处绘制半径为r的color色填充圆
函数原型:
void drawCircle(int32_t x0, int32_t y0, int32_t r, uint32_t color)
参数:
| 参数 | 描述 | 类型 |
|---|---|---|
| x0 | int32_t | 圆中心X坐标 |
| y0 | int32_t | 圆中心Y坐标 |
| r | int32_t | 圆的半径 |
| color | uint32_t | 圆的颜色 |
使用示例:
#include <M5Stack.h>

void setup() {
  M5.begin();   //初始化 M5Stack
  M5.Power.begin();
  M5.Lcd.fillCircle(100, 100, 50, RED); //在(x,y)处绘制半径为50的填充红色圆
}

void loop() {}
drawEllipse()
功能:
在(x,y)处绘制宽度、高度分别为rx,ry的椭圆线框
函数原型:
void fillEllipse(int16_t x0, int16_t y0, int32_t rx, int32_t ry, uint16_t color)
参数:
| 参数 | 类型 | 描述 |
|---|---|---|
| x0 | int16_t | 椭圆的中心X坐标 |
| y0 | int16_t | 椭圆的中心Y坐标 |
| rx | int32_t | 椭圆的宽度(像素) |
| ry | int32_t | 椭圆的高度(像素) |
| color | uint16_t | 椭圆的颜色 |
使用示例:
#include <M5Stack.h>

void setup() {
  M5.begin();   //初始化 M5Stack
  M5.Power.begin();
  M5.Lcd.drawEllipse(160, 100, 60, 100, YELLOW);//在(160,100)处绘制颜色为黄色的宽度、高度分别为60,100的椭圆轮廓线
}

void loop() {}
fillEllipse()
功能:
在(x,y)处绘制宽度、高度分别为rx,ry的填充椭圆
函数原型:
void fillEllipse(int16_t x0, int16_t y0, int32_t rx, int32_t ry, uint16_t color)
参数:
| 参数 | 类型 | 描述 |
|---|---|---|
| x0 | int16_t | 椭圆的中心X坐标 |
| y0 | int16_t | 椭圆的中心Y坐标 |
| rx | int32_t | 椭圆的宽度(像素) |
| ry | int32_t | 椭圆的高度(像素) |
| color | uint16_t | 椭圆的颜色 |
使用示例:
#include <M5Stack.h>

void setup() {
  M5.begin();  //初始化 M5Stack
  M5.Power.begin();
  M5.Lcd.fillEllipse(160, 100, 60, 100, YELLOW);    //在(160,100)处绘制颜色为黄色的宽度、高度分别为60,100的填充黄色椭圆
}

void loop() {}
drawTriangle()
功能:
以(x1, y1) (x2, y2) (x3, y3)为顶点绘制三角形线框
函数原型:
void drawTriangle(int32_t x0, int32_t y0, int32_t x1, int32_t y1, int32_t x2, int32_t y2, uint32_t color)
| 参数 | 描述 | 类型 |
|---|---|---|
| x* | int32_t | 顶点X*的x坐标 |
| y* | int32_t | 顶点Y*的x坐标 |
| color | uint32_t | 三角形的颜色 |
使用示例:
#include <M5Stack.h>

void setup() {
  M5.begin();   //初始化 M5Stack
  M5.Power.begin();
  M5.Lcd.drawTriangle(30, 30, 180, 100, 80, 150, YELLOW); //以 (30,30) (180,100) (80,150)为顶点绘制黄色三角形线框
}

void loop() {}
drawTriangle()
功能:
以(x1, y1) (x2, y2) (x3, y3)为顶点绘制填充三角形
函数原型:
void drawTriangle(int32_t x0, int32_t y0, int32_t x1, int32_t y1, int32_t x2, int32_t y2, uint32_t color)
| 参数 | 描述 | 类型 |
|---|---|---|
| x* | int32_t | 顶点X*的x坐标 |
| y* | int32_t | 顶点Y*的x坐标 |
| color | uint32_t | 三角形的颜色 |
使用示例:
#include <M5Stack.h>

void setup() {
  M5.begin();   //初始化 M5Stack
  M5.Power.begin();
  M5.Lcd.drawTriangle(30, 30, 180, 100, 80, 150, YELLOW); //以 (30,30) (180,100) (80,150)为顶点绘制填充黄色三角形
}

void loop() {}
drawXBitmap()
功能:
绘制位图
函数原型:
void drawXBitmap(int16_t x, int16_t y, const uint8_t *bitmap, int16_t w, int16_t h, uint16_t color)
| 参数 | 类型 | 描述 |
|---|---|---|
| x | int16_t | 坐标 X |
| y | int16_t | 坐标 Y |
| bitmap | const uint8_t | 所示图像 |
| w | int16_t | 宽度(像素) |
| h | int16_t | 高度(像素) |
| color | uint16_t | 颜色 |
使用示例:
见例程 sketch:M5Stack->Advanced->Display->drawXBitmap
drawBitmap()
功能:
绘制位图
函数原型:
drawBitmap(int16_t x0, int16_t y0, int16_t w, int16_t h, const uint16_t *data)
drawBitmap(int16_t x0, int16_t y0, int16_t w, int16_t h, uint16_t *data)
drawBitmap(int16_t x0, int16_t y0, int16_t w, int16_t h, const uint16_t *data, uint16_t transparent)
drawBitmap(int16_t x0, int16_t y0, int16_t w, int16_t h, const uint8_t *data)
drawBitmap(int16_t x0, int16_t y0, int16_t w, int16_t h, uint8_t *data)
| 参数 | 类型 | 描述 |
|---|---|---|
| x0 | uint16_t | 坐标 X |
| y0 | uint16_t | 坐标 Y |
| w | int16_t | 宽度 (像素) |
| h | int16_t | 高度 (像素) |
| data | uint16_t* / uint8_t* | 图像数量 |
| transparent | uint16_t | 透明色码 |
注意:
1.颜色代码由总共16位表示:红色5位,绿色6位,顶部蓝色5位
使用示例:
见例程 sketch:M5Stack->games->Tetris
drawBmpFile()
功能:
从文件中读取位图并绘制它
函数原型:
drawBmpFile(fs::FS &fs, const char *path, uint16_t x, uint16_t y)
| 参数 | 类型 | 描述 |
|---|---|---|
| fs | fs::FS | 文件流 |
| path | const char * | 文件路径(SD 、SPIFFS) |
| x | int16_t | 坐标 X |
| y | int16_t | 坐标 Y |
注意:
1.根据大小和位数可能无法扩展
2.需要提前预装 Arduino ESP32 filesystem uploader
使用示例:
#include "FS.h"
//#include "SPIFFS.h"
#include <M5Stack.h>
void setup(){
    M5.begin(true, false, false, false);
  M5.Power.begin();
  M5.Lcd.drawBmpFile(SD, "/p2.bmp",0,0);
  //M5.Lcd.drawBmpFile(SPIFFS, "/p2.bmp", 0, 0);
}
我们提供一个可以用来转换jpg图像->.c文件的脚本, 可以使用它来转换一些图片, 并使用上面的API将图像绘制到屏幕上 bin2code.py
drawJpg()
功能:
从内存中读取 JPEG 格式的图片数据并绘制它
函数原型:
void drawJpg(const uint8_t *jpg_data, size_t jpg_len, uint16_t x,uint16_t y, uint16_t maxWidth, uint16_t maxHeight,uint16_t offX, uint16_t offY, jpeg_div_t scale) {
| 参数 | 类型 | 描述 |
|---|---|---|
| jpg_data | uint8_t * | 数据顶部 |
| jpg_len | size_t | 数据长度 |
| x | uint16_t | 坐标 X |
| y | uint16_t | 坐标 Y |
| maxWidth | uint16_t | 最大宽度 (像素) |
| maxHeight | uint16_t | 最大高度 (像素) |
| offX | uint16_t | 抵消 X (像素) |
| offY | uint16_t | 抵消 Y (像素) |
| scale | jpeg_div_t | 规模 |
规格 (jpeg_div_t):
| 定义 | 功能 |
|---|---|
| JPEG_DIV_NONE | no care. |
| JPEG_DIV_2 | 1/2 |
| JPEG_DIV_4 | 1/4 |
| JPEG_DIV_8 | 1/8 |
| JPEG_DIV_MAX | MAX |
注意:
1.根据大小,位数和格式(渐进等),可能无法扩展
2. tetris_img下载
使用示例:
#include <M5Stack.h>
extern uint8_t tetris_img[];    //引用存储图像的数组,需要提前和 xxx.ino放在同一文件夹中

void setup() {
  M5.begin();  //初始化 M5Stack
  M5.Power.begin();
  M5.Lcd.drawJpg(tetris_img, 34215);    //从内存中读取名为tetris_img的jpeg文件
}
void loop(){
}
drawJpgFile()
功能:
从文件流中读取JPEG数据并绘制它
函数原型:
void drawJpgFiledrawJpgFile(fs::FS &fs, const char *path, uint16_t x,uint16_t y,uint16_t maxWidth, uint16_t maxHeight, uint16_t offX,uint16_t offY, jpeg_div_t scale)
| 参数 | 类型 | 描述 |
|---|---|---|
| fs | fs::FS | 文件流 |
| path | const char * | 文件路径 |
| x | uint16_t | 坐标 X |
| y | uint16_t | 坐标 Y |
| maxWidth | uint16_t | Max Width (像素) |
| maxHeight | uint16_t | Max Height (像素) |
| offX | uint16_t | 抵消X (像素) |
| offY | uint16_t | 抵消Y (像素) |
| scale | jpeg_div_t | 规模 |
规模(jpeg_div_t):
| 定义 | 功能 |
|---|---|
| JPEG_DIV_NONE | no care. |
| JPEG_DIV_2 | 1/2 |
| JPEG_DIV_4 | 1/4 |
| JPEG_DIV_8 | 1/8 |
| JPEG_DIV_MAX | MAX |
注意:
1.根据尺寸和格式(渐进等),可能无法扩展
progressBar()
功能:
显示显示进度的栏
函数原型:
void progressBar(int x, int y, int w, int h, uint8_t val)
| 参数 | 类型 | 描述 |
|---|---|---|
| x | int | 坐标 X |
| y | int | 坐标 Y |
| w | int | 宽度 (像素) |
| h | int | 高度(像素) |
| val | uint8_t | 进度(0-100%) |
注意:
1.进度条将用蓝色显示
使用示例:
#include <M5Stack.h>

void setup() {
  M5.begin();  //初始化 M5Stack
  M5.Power.begin();
  M5.Lcd.progressBar(0, 0, 240, 20, 20);    //在(0,0)处显示宽高分别为240,20进度为20%的进度条
}

void loop() {
}
qrcode()
功能:
创建一个二维码
函数原型:
void qrcode(const char *string, uint16_t x, uint16_t y, uint8_t width, uint8_t version)
void qrcode(const String &string, uint16_t x, uint16_t y, uint8_t width, uint8_t version)
| 参数 | 类型 | 描述 |
|---|---|---|
| val | string / String& | 要嵌入QR的字符串 |
| x | uint16_t | 坐标 X |
| y | uint16_t | 坐标 Y |
| width | uint8_t | 宽度 (像素) |
| version | uint8_t | 二维码版本 |
注意:
1.请根据字符数量选择合适的二维码版本
使用示例:
#include <M5Stack.h>

void setup() {
  M5.Lcd.begin();   //初始化 M5Stack
  M5.Power.begin();
  M5.Lcd.qrcode("http://www.m5stack.com", 50, 10, 220, 6);
}

void loop() {
}
Sprite
setColorDepth()
功能:
设置色深
函数原型:
void* TFT_eSprite::setColorDepth(int8_t b)
使用示例:
#include <M5Stack.h>
TFT_eSprite img = TFT_eSprite(&M5.Lcd);

void setup() {
    M5.begin();        // Init M5Stack.  初始化M5Stack
    M5.Power.begin();  // Init power.  初始化电源模块
    img.setColorDepth(8); // Set color depth.  设置色深
    img.setTextSize(2);
    img.createSprite(320, 240);  //Create a 320x240 canvas. 创建一块320x240的画布
}

void loop() {}
应在创建画布前设置相应的色深
createSprite()
功能:
创建一个指定宽高的画布
函数原型:
void createSprite(int16_t w, int16_t h, uint8_t frames)
| 参数 | 类型 | 描述 |
|---|---|---|
| x | int16_t | X坐标 |
| y | int16_t | Y坐标 |
| frames | uint8_t | 色深[1~2,可选] |
使用示例:
#include <M5Stack.h>

TFT_eSprite img = TFT_eSprite(&M5.Lcd);

void setup() {
    M5.begin();  //初始化 M5Stack
    M5.Power.begin();
    img.setColorDepth(8);  // Set the color depth to 8 bits. 设置颜色深度为8位
    img.createSprite(320, 240);  //Create a 320x240 canvas. 创建一块320x240的画布
    img.fillSprite(RED);         //Fill the canvas with red. 在画布上全部填充红色
    img.pushSprite(0,0);  // Push the canvas to the screen at (0,0). 把画布推送到屏幕(0,0)处
}

void loop() {}
fillSprite()
功能:
将Sprite填充指定颜色
函数原型:
void fillSprite(uint32_t color)
| 参数 | 类型 | 描述 |
|---|---|---|
| color | int32_t | filled color |
使用示例:
#include <M5Stack.h>

TFT_eSprite img = TFT_eSprite(&M5.Lcd);

void setup() {
    M5.begin();  //初始化 M5Stack
    M5.Power.begin();
    img.setColorDepth(8);  // Set the color depth to 8 bits. 设置颜色深度为8位
    img.createSprite(320, 240);  //Create a 320x240 canvas. 创建一块320x240的画布
    img.fillSprite(RED);         //Fill the canvas with red. 在画布上全部填充红色
    img.pushSprite(0,0);  // Push the canvas to the screen at (0,0). 把画布推送到屏幕(0,0)处
}

void loop() {}
}

void loop() {}
pushSprite()
功能:
推送画布到指定坐标,并设置穿透色
函数原型:
void pushSprite(int32_t x, int32_t y, uint16_t transparent)
| 参数 | 类型 | 描述 |
|---|---|---|
| x | int32_t | X坐标 |
| y | int32_t | Y坐标 |
| transparent | int16_t | 穿透色(可选) |
使用示例:
#include <M5Stack.h>
TFT_eSprite img = TFT_eSprite(&M5.Lcd);

void setup() {
  M5.begin();  //初始化 M5Stack
  M5.Power.begin();
  img.createSprite(320, 240);    //创建一块320x240的画布
  img.fillSprite(RED);    //在画布上全部填充红色
  img.fillCircle(100,100,20,GREEN);
  img.pushSprite(0, 0, GREEN);    //把画布推送到屏幕(0,0)处并设置绿色为穿透色
}

void loop() {}
height()
功能:
返回Sprite的高度
使用示例:
#include <M5Stack.h>
TFT_eSprite img = TFT_eSprite(&M5.Lcd);

void setup() {
  M5.begin();  //初始化 M5Stack
  M5.Power.begin();
  img.createSprite(320, 240);    //创建一块320x240的画布
  img.fillSprite(RED);    //在画布上全部填充红色
  img.pushSprite(0, 0, WHITE);    //把画布推送到屏幕(0,0)处并设置白色为穿透色
  M5.Lcd.print(img.height());    //屏幕打印画布的高度
}

void loop() {}
deleteSprite()
功能:
从内存中删除画布
使用示例:
#include <M5Stack.h>
TFT_eSprite img = TFT_eSprite(&M5.Lcd);

void setup() {
  M5.begin();  //初始化 M5Stack
  M5.Power.begin();
  img.deleteSprite();    //从内存中删除画布
}

void loop() {}
注意:
LCD. img.均继承于此文件 In_eSPI.h , 且用法类似
Btn
read()
功能:
读取按键状态: 0,松开; 1,按下
函数原型:
uint8_t read()
使用示例:
#include <M5Atom.h>

void setup() {
  M5.begin();
}

void loop() {
  Serial.println(M5.Btn.read());    //在Arduino打开串口监视器,波特率设置115200即可看到读取到的按键状态
    delay(20);
}
lastChange()
函数原型:
uint32_t lastChange()
功能:
返回最后一次状态发生变化的时间
注意:
1.返回的时间是从 Atom初始化的那一刻开始计时,单位为毫秒
使用示例:
#include <M5Atom.h>

void setup() {
  M5.begin();
}

void loop() {
  M5.update();
  Serial.printf("The last change at %d ms /n",M5.Btn.lastChange());    //串口输出按键状态最后一次发生变化的时间
}
Press
isPressed()
功能:
返回按键按下状态: 如果按键按下,返回 true; 否则返回 false
函数原型:
uint8_t isPressed()
使用示例:
#include <M5Atom.h>

void setup() {
  M5.begin();
}

void loop() {
  M5.update();    //需添加 M5.update()才能读取到按键的状态,细节请见 System
  if (M5.Btn.isPressed()) {    //如果按键按下
    Serial.println("Button is pressed.");
  }
  delay(20);
}
pressedFor()
功能:
返回按键按下状态: 如果按键按下超过指定时间后,返回 true; 否则返回 false
函数原型:
uint8_t pressedFor(uint32_t ms)
| 参数 | 类型 | 描述 |
|---|---|---|
| ms | uint32_t | 按键按下时间 (毫秒) |
使用示例:
#include <M5Atom.h>

void setup() {
  M5.begin();
}

void loop() {
  M5.update();
  if (M5.Btn.pressedFor(2000)) {    //如果按键按下超过2秒
    Serial.println("Button A was pressed for more than 2 seconds.");
    delay(1000);
  }
}
wasPressed()
功能:
返回按键按下状态: 如果按键按下,只会返回一次 true,否则返回 false
函数原型:
uint8_t wasPressed()
使用示例:
#include <M5Atom.h>

void setup() {
  M5.begin();
}

void loop() {
  M5.update();
  if (M5.Btn.wasPressed()) {    //如果按键按下
    Serial.println("Button is pressed.");
  }
  delay(20);
}
Released
isReleased()
功能:
返回按键释放状态: 如果按键释放,返回 true; 否则返回 false
函数原型:
uint8_t isPressed()
使用示例:
#include <M5Atom.h>

void setup() {
  M5.begin();
}

void loop() {
  M5.update();    //需添加M5.update()才能读取到按键的状态,细节请见System
  if (M5.Btn.isReleased()) {    //如果按键释放
    Serial.println("Button is released.");
  }
  delay(20);
}
releasedFor()
功能:
返回按键释放状态: 如果按键释放超过指定时间后,返回 true; 否则返回 false
函数原型:
uint8_t pressedFor(uint32_t ms)
| 参数 | 类型 | 描述 |
|---|---|---|
| ms | uint32_t | 按键释放时间 (毫秒) |
使用示例:
#include <M5Atom.h>

void setup() {
  M5.begin();
}

void loop() {
  M5.update();
  if (M5.Btn.releasedFor(2000)) {    //如果按键释放超过2秒
    Serial.println("Button A was released for more than 2 seconds.");
    delay(1000);
  }
}
wasReleased()
功能:
返回按键释放状态: 如果按键释放,只会返回一次 true,否则返回 false
函数原型:
uint8_t wasReleased()
使用示例:
#include <M5Atom.h>

void setup() {
  M5.begin();
}

void loop() {
  M5.update();
  if (M5.Btn.wasReleased()) {    //如果按键释放
    Serial.println("Button is Released.");
  }
  delay(20);
}
wasReleasefor()
函数原型:
uint8_t wasReleasefor(uint32_t ms)
功能:
返回按键释放状态: 如果按键按下,在超过指定时间后释放,只会返回一次 true,否则返回 false
| 参数 | 类型 | 描述 |
|---|---|---|
| ms | uint32_t | 按键按下时间 (毫秒) |
使用示例:
#include <M5Atom.h>

void setup() {
  M5.begin();
}

void loop() {
  M5.update();
  if (M5.Btn.wasReleasefor(3000)) {    //如果按键按下3s之后释放
      Serial.println("clear screen");
  }
}