深度学习(31)——DeformableDETR(2)
文章目录
- 深度学习(31)——DeformableDETR(2)
- 1. `backbone`——Resnet50
- 2. `neck`——Channel mapper
- 3. `DeformableDETRHead`
- 4. `DeformableDetrTransformer`
- 5. `Transformer Encoder`
- 6. `Transformer Decoder`
- 7. `loss_single`
上一篇主要记录DeformableDETR的核心理论,这一篇主要记录mmcv中DeformableDETR的实现过程
针对一个batch的图片[B,3,W,H,],设置transformer的隐层维度为256,那么将会经历backbone提取特征,Transformer_Encoder,Transformer_Decoder。
1. backbone——Resnet50
- Backbone用于提取图像特征,得到多个维度的特征
- DeformableDETR中的backbone是Resnet50, 指定输出三层特征图(分别是C3-C5得到的feature map)
- 最后输出是一个有三个特征图的列表,如下(neck的输入):
2. neck——Channel mapper

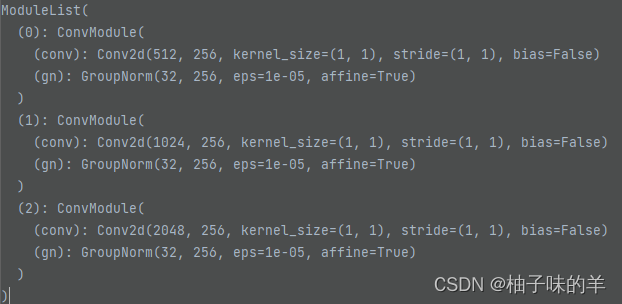
- 将三个feature map经过三个1*1卷积变换为256的特征
- 将最后一层特征 C5得到的经过3*3卷积变换成256的特征作为第四个特征

- 输出是一个tuple,其中有四个元素

3. DeformableDETRHead
- 输入是neck得到的长度为4的tuple(mlvl_feats)
- 构建feature对应的mask和position_embedding


- 中间有一个叫query_embedding的变量
4. DeformableDetrTransformer
- 输入是每一层的特征图,padding的mask和每层的position embedding。注都是一一对应的
【feature(1,256,96,125);mask(1,96,125);position_embedding(1,256,96,125)】 - 将所有feature,mask和position embedding展开(flatten)
【feature(1,96* 125,256);mask(1,96* 125);position_embedding(1,96* 125,256)】 - 除了position_embedding,每个level还有自己的level_embedding(level_embedding是可学习的),最后每个position还要加上所在level的level_embedding

- 将所有level的feature,mask和pos_level_embedding分别都cat成一个,并记录每个level特征在新矩阵中的起始位置
- 得到reference_points,可以理解为将图片分成H*W个像素点,每个像素点是一个reference_point,最后每个level都有属于自己的reference_point,将他们cat在一起就OK
- 之后将feature和pos_level_embedding转化为(H*W,b,256)进入Encoder
5. Transformer Encoder
- 有六层,每一层都是下面这样的一个block
BaseTransformerLayer(
(attentions): ModuleList(
(0): MultiScaleDeformableAttention(
(dropout): Dropout(p=0.1, inplace=False)
(sampling_offsets): Linear(in_features=256, out_features=256, bias=True)
(attention_weights): Linear(in_features=256, out_features=128, bias=True)
(value_proj): Linear(in_features=256, out_features=256, bias=True)
(output_proj): Linear(in_features=256, out_features=256, bias=True)
)
)
(ffns): ModuleList(
(0): FFN(
(activate): ReLU(inplace=True)
(layers): Sequential(
(0): Sequential(
(0): Linear(in_features=256, out_features=1024, bias=True)
(1): ReLU(inplace=True)
(2): Dropout(p=0.1, inplace=False)
)
(1): Linear(in_features=1024, out_features=256, bias=True)
(2): Dropout(p=0.1, inplace=False)
)
(dropout_layer): Identity()
)
)
(norms): ModuleList(
(0): LayerNorm((256,), eps=1e-05, elementwise_affine=True)
(1): LayerNorm((256,), eps=1e-05, elementwise_affine=True)
)
)
因为我跳不进去,模型就是上面说的。其实咱看config文件,这个6层什么的都是咱再config文件中定义好的。
encoder=dict(
                type='DetrTransformerEncoder',
                num_layers=6,
                transformerlayers=dict(
                    type='BaseTransformerLayer',
                    attn_cfgs=dict(
                        type='MultiScaleDeformableAttention', embed_dims=256),
                    feedforward_channels=1024,
                    ffn_dropout=0.1,
                    operation_order=('self_attn', 'norm', 'ffn', 'norm'))),
- 核心来了,这个multi-sacleDeformableAttention是怎么做的呢?我跳不进去,我找了官网上的代码,放下面
class MultiScaleDeformableAttention(BaseModule):
    """An attention module used in Deformable-Detr.

    `Deformable DETR: Deformable Transformers for End-to-End Object Detection.
    <https://arxiv.org/pdf/2010.04159.pdf>`_.

    Args:
        embed_dims (int): The embedding dimension of Attention.
            Default: 256.
        num_heads (int): Parallel attention heads. Default: 8.
        num_levels (int): The number of feature map used in
            Attention. Default: 4.
        num_points (int): The number of sampling points for
            each query in each head. Default: 4.
        im2col_step (int): The step used in image_to_column.
            Default: 64.
        dropout (float): A Dropout layer on `inp_identity`.
            Default: 0.1.
        batch_first (bool): Key, Query and Value are shape of
            (batch, n, embed_dim)
            or (n, batch, embed_dim). Default to False.
        norm_cfg (dict): Config dict for normalization layer.
            Default: None.
        init_cfg (obj:`mmcv.ConfigDict`): The Config for initialization.
            Default: None.
    """

    def __init__(self,
                 embed_dims: int = 256,
                 num_heads: int = 8,
                 num_levels: int = 4,
                 num_points: int = 4,
                 im2col_step: int = 64,
                 dropout: float = 0.1,
                 batch_first: bool = False,
                 norm_cfg: Optional[dict] = None,
                 init_cfg: Optional[mmcv.ConfigDict] = None):
        super().__init__(init_cfg)
        if embed_dims % num_heads != 0:
            raise ValueError(f'embed_dims must be divisible by num_heads, '
                             f'but got {embed_dims} and {num_heads}')
        dim_per_head = embed_dims // num_heads
        self.norm_cfg = norm_cfg
        self.dropout = nn.Dropout(dropout)
        self.batch_first = batch_first

        # you'd better set dim_per_head to a power of 2
        # which is more efficient in the CUDA implementation
        def _is_power_of_2(n):
            if (not isinstance(n, int)) or (n < 0):
                raise ValueError(
                    'invalid input for _is_power_of_2: {} (type: {})'.format(
                        n, type(n)))
            return (n & (n - 1) == 0) and n != 0

        if not _is_power_of_2(dim_per_head):
            warnings.warn(
                "You'd better set embed_dims in "
                'MultiScaleDeformAttention to make '
                'the dimension of each attention head a power of 2 '
                'which is more efficient in our CUDA implementation.')

        self.im2col_step = im2col_step
        self.embed_dims = embed_dims
        self.num_levels = num_levels
        self.num_heads = num_heads
        self.num_points = num_points
        self.sampling_offsets = nn.Linear(
            embed_dims, num_heads * num_levels * num_points * 2)
        self.attention_weights = nn.Linear(embed_dims,
                                           num_heads * num_levels * num_points)
        self.value_proj = nn.Linear(embed_dims, embed_dims)
        self.output_proj = nn.Linear(embed_dims, embed_dims)
        self.init_weights()

    def init_weights(self) -> None:
        """Default initialization for Parameters of Module."""
        constant_init(self.sampling_offsets, 0.)
        device = next(self.parameters()).device
        thetas = torch.arange(
            self.num_heads, dtype=torch.float32,
            device=device) * (2.0 * math.pi / self.num_heads)
        grid_init = torch.stack([thetas.cos(), thetas.sin()], -1)
        grid_init = (grid_init /
                     grid_init.abs().max(-1, keepdim=True)[0]).view(
                         self.num_heads, 1, 1,
                         2).repeat(1, self.num_levels, self.num_points, 1)
        for i in range(self.num_points):
            grid_init[:, :, i, :] *= i + 1

        self.sampling_offsets.bias.data = grid_init.view(-1)
        constant_init(self.attention_weights, val=0., bias=0.)
        xavier_init(self.value_proj, distribution='uniform', bias=0.)
        xavier_init(self.output_proj, distribution='uniform', bias=0.)
        self._is_init = True

    @no_type_check
    @deprecated_api_warning({'residual': 'identity'},
                            cls_name='MultiScaleDeformableAttention')
    def forward(self,
                query: torch.Tensor,
                key: Optional[torch.Tensor] = None,
                value: Optional[torch.Tensor] = None,
                identity: Optional[torch.Tensor] = None,
                query_pos: Optional[torch.Tensor] = None,
                key_padding_mask: Optional[torch.Tensor] = None,
                reference_points: Optional[torch.Tensor] = None,
                spatial_shapes: Optional[torch.Tensor] = None,
                level_start_index: Optional[torch.Tensor] = None,
                **kwargs) -> torch.Tensor:
        """Forward Function of MultiScaleDeformAttention.

        Args:
            query (torch.Tensor): Query of Transformer with shape
                (num_query, bs, embed_dims).
            key (torch.Tensor): The key tensor with shape
                `(num_key, bs, embed_dims)`.
            value (torch.Tensor): The value tensor with shape
                `(num_key, bs, embed_dims)`.
            identity (torch.Tensor): The tensor used for addition, with the
                same shape as `query`. Default None. If None,
                `query` will be used.
            query_pos (torch.Tensor): The positional encoding for `query`.
                Default: None.
            key_padding_mask (torch.Tensor): ByteTensor for `query`, with
                shape [bs, num_key].
            reference_points (torch.Tensor):  The normalized reference
                points with shape (bs, num_query, num_levels, 2),
                all elements is range in [0, 1], top-left (0,0),
                bottom-right (1, 1), including padding area.
                or (N, Length_{query}, num_levels, 4), add
                additional two dimensions is (w, h) to
                form reference boxes.
            spatial_shapes (torch.Tensor): Spatial shape of features in
                different levels. With shape (num_levels, 2),
                last dimension represents (h, w).
            level_start_index (torch.Tensor): The start index of each level.
                A tensor has shape ``(num_levels, )`` and can be represented
                as [0, h_0*w_0, h_0*w_0+h_1*w_1, ...].

        Returns:
            torch.Tensor: forwarded results with shape
            [num_query, bs, embed_dims].
        """

        if value is None:
            value = query

        if identity is None:
            identity = query
        if query_pos is not None:
            query = query + query_pos
        if not self.batch_first:
            # change to (bs, num_query ,embed_dims)
            query = query.permute(1, 0, 2)
            value = value.permute(1, 0, 2)

        bs, num_query, _ = query.shape
        bs, num_value, _ = value.shape
        assert (spatial_shapes[:, 0] * spatial_shapes[:, 1]).sum() == num_value

        value = self.value_proj(value) # 经过一个linear
        if key_padding_mask is not None:
            value = value.masked_fill(key_padding_mask[..., None], 0.0)
        value = value.view(bs, num_value, self.num_heads, -1)# 最后的256维度的向量分为多头进行256=4*64
        sampling_offsets = self.sampling_offsets(query).view(
            bs, num_query, self.num_heads, self.num_levels, self.num_points, 2)# 使用一个linear(in:256,out:num_heads*num_levels*num_points*2)学习得到每个reference_point的四个采样点相对于该点的偏移
        attention_weights = self.attention_weights(query).view(
            bs, num_query, self.num_heads, self.num_levels * self.num_points)# 使用linear(in:256,out:num_heads * num_levels * num_points)得到注意力机制的权重
        attention_weights = attention_weights.softmax(-1)

        attention_weights = attention_weights.view(bs, num_query,
                                                   self.num_heads,
                                                   self.num_levels,
                                                   self.num_points)
        if reference_points.shape[-1] == 2:
            offset_normalizer = torch.stack(
                [spatial_shapes[..., 1], spatial_shapes[..., 0]], -1)
            sampling_locations = reference_points[:, :, None, :, None, :] \
                + sampling_offsets \
                / offset_normalizer[None, None, None, :, None, :]
        elif reference_points.shape[-1] == 4:
            sampling_locations = reference_points[:, :, None, :, None, :2] \
                + sampling_offsets / self.num_points \
                * reference_points[:, :, None, :, None, 2:] \
                * 0.5
        else:
            raise ValueError(
                f'Last dim of reference_points must be'
                f' 2 or 4, but get {reference_points.shape[-1]} instead.')
        if ((IS_CUDA_AVAILABLE and value.is_cuda)
                or (IS_MLU_AVAILABLE and value.is_mlu)):
            output = MultiScaleDeformableAttnFunction.apply(
                value, spatial_shapes, level_start_index, sampling_locations,
                attention_weights, self.im2col_step)
        else:
            output = multi_scale_deformable_attn_pytorch(
                value, spatial_shapes, sampling_locations, attention_weights)

        output = self.output_proj(output)

        if not self.batch_first:
            # (num_query, bs ,embed_dims)
            output = output.permute(1, 0, 2)

        return self.dropout(output) + identity
附上我的浅薄理解
-
首先在encoder部分,query是feature,key和value都是None,所以在forward过程中,value直接等于query,为了后面做残差连接将query复制给了identity,之后query就要变成自身与位置编码的和了【开始变了哦,这时的query就和value不同了】
-
将query连一个linear学习得到每个reference_point的采样点偏移量(sample-offset)
-
将query连一个linear学习得到每个reference_point和四个采样点之间的相关性(attention weight)
得到这些之后就是计算了

def multi_scale_deformable_attn_pytorch(
        value: torch.Tensor, value_spatial_shapes: torch.Tensor,
        sampling_locations: torch.Tensor,
        attention_weights: torch.Tensor) -> torch.Tensor:
    """CPU version of multi-scale deformable attention.

    Args:
        value (torch.Tensor): The value has shape
            (bs, num_keys, num_heads, embed_dims//num_heads)
        value_spatial_shapes (torch.Tensor): Spatial shape of
            each feature map, has shape (num_levels, 2),
            last dimension 2 represent (h, w)
        sampling_locations (torch.Tensor): The location of sampling points,
            has shape
            (bs ,num_queries, num_heads, num_levels, num_points, 2),
            the last dimension 2 represent (x, y).
        attention_weights (torch.Tensor): The weight of sampling points used
            when calculate the attention, has shape
            (bs ,num_queries, num_heads, num_levels, num_points),

    Returns:
        torch.Tensor: has shape (bs, num_queries, embed_dims)
    """

    bs, _, num_heads, embed_dims = value.shape
    _, num_queries, num_heads, num_levels, num_points, _ =\
        sampling_locations.shape
    value_list = value.split([H_ * W_ for H_, W_ in value_spatial_shapes],
                             dim=1)
    sampling_grids = 2 * sampling_locations - 1
    sampling_value_list = []
    for level, (H_, W_) in enumerate(value_spatial_shapes):
        # bs, H_*W_, num_heads, embed_dims ->
        # bs, H_*W_, num_heads*embed_dims ->
        # bs, num_heads*embed_dims, H_*W_ ->
        # bs*num_heads, embed_dims, H_, W_
        value_l_ = value_list[level].flatten(2).transpose(1, 2).reshape(
            bs * num_heads, embed_dims, H_, W_)
        # bs, num_queries, num_heads, num_points, 2 ->
        # bs, num_heads, num_queries, num_points, 2 ->
        # bs*num_heads, num_queries, num_points, 2
        sampling_grid_l_ = sampling_grids[:, :, :,
                                          level].transpose(1, 2).flatten(0, 1)
        # bs*num_heads, embed_dims, num_queries, num_points
        sampling_value_l_ = F.grid_sample(
            value_l_,
            sampling_grid_l_,
            mode='bilinear',
            padding_mode='zeros',
            align_corners=False)
        sampling_value_list.append(sampling_value_l_)
    # (bs, num_queries, num_heads, num_levels, num_points) ->
    # (bs, num_heads, num_queries, num_levels, num_points) ->
    # (bs, num_heads, 1, num_queries, num_levels*num_points)
    attention_weights = attention_weights.transpose(1, 2).reshape(
        bs * num_heads, 1, num_queries, num_levels * num_points)
    output = (torch.stack(sampling_value_list, dim=-2).flatten(-2) *
              attention_weights).sum(-1).view(bs, num_heads * embed_dims,
                                              num_queries)
    return output.transpose(1, 2).contiguous()
- 之后就是经过FFN和LN,一个block完成,这样的过程重复6次得到output作为encoder的最终输出记为memory
- 之后处理定义的object_query,经过一个linear层得到300个object的reference_point
6. Transformer Decoder
- 进入decoder的时候query是object_query,value是encoder得到的memory
- Decoder的网络结构也是6个相同的模块
DetrTransformerDecoderLayer(
(attentions): ModuleList(
(0): MultiheadAttention(
(attn): MultiheadAttention(
(out_proj): NonDynamicallyQuantizableLinear(in_features=256, out_features=256, bias=True)
)
(proj_drop): Dropout(p=0.0, inplace=False)
(dropout_layer): Dropout(p=0.1, inplace=False)
)
(1): MultiScaleDeformableAttention(
(dropout): Dropout(p=0.1, inplace=False)
(sampling_offsets): Linear(in_features=256, out_features=256, bias=True)
(attention_weights): Linear(in_features=256, out_features=128, bias=True)
(value_proj): Linear(in_features=256, out_features=256, bias=True)
(output_proj): Linear(in_features=256, out_features=256, bias=True)
)
)
(ffns): ModuleList(
(0): FFN(
(activate): ReLU(inplace=True)
(layers): Sequential(
(0): Sequential(
(0): Linear(in_features=256, out_features=1024, bias=True)
(1): ReLU(inplace=True)
(2): Dropout(p=0.1, inplace=False)
)
(1): Linear(in_features=1024, out_features=256, bias=True)
(2): Dropout(p=0.1, inplace=False)
)
(dropout_layer): Identity()
)
)
(norms): ModuleList(
(0): LayerNorm((256,), eps=1e-05, elementwise_affine=True)
(1): LayerNorm((256,), eps=1e-05, elementwise_affine=True)
(2): LayerNorm((256,), eps=1e-05, elementwise_affine=True)
)
)
- 先经过一个普通的多头注意力机制,然后经过multi-scaleDeformerbleAttention,然后和之前encoder差不多的ffn和LN,一些常见层的叠加,没有心意,不做赘述。得到最终的结果,这里作者把刘哥block得到的结果都返回了(6,300,1,256)
- 之后对每一个block得到的结果进行处理得到每个block的结果
- cls_branches区别具体类别
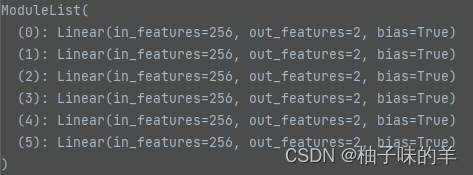
- reg_branches根据前面得到的结果得到box,由6个block组成

- 6层,每一层都会得到class和box 【注:这个结果是DETRhead应该得到的结果】
class

- 将输出和label组装好去计算loss咯,6层最后针对每一层都会输出相应的class_loss,box_loss和iou_loss

- 输出每一层的loss以及所有loss的加和,但是最关键的还是最后一层的loss
- 到这里一个完整的train过程就结束啦,但是为了加深理解,我想在后面部分记录loss的计算过程
7. loss_single
-
首先进行正样本选择
get_targets关于get_target
输入
cls_scores_list (list[Tensor]): Box score logits from a single decoder layer for each image with shape [num_query,cls_out_channels].
bbox_preds_list (list[Tensor]): Sigmoid outputs from a single decoder layer for each image, with normalized coordinate (cx, cy, w, h) and shape [num_query, 4].
gt_bboxes_list (list[Tensor]): Ground truth bboxes for each image with shape (num_gts, 4) in [tl_x, tl_y, br_x, br_y] format.
gt_labels_list (list[Tensor]): Ground truth class indices for each image with shape (num_gts, ).
img_metas (list[dict]): List of image meta information.
gt_bboxes_ignore_list (list[Tensor], optional): Bounding boxes which can be ignored for each image. Default None.
输出 tuple: a tuple containing the following targets
labels_list (list[Tensor]): Labels for all images.
label_weights_list (list[Tensor]): Label weights for all images.
bbox_targets_list (list[Tensor]): BBox targets for all images.
bbox_weights_list (list[Tensor]): BBox weights for all images.
num_total_pos (int): Number of positive samples in all images.
num_total_neg (int): Number of negative samples in all images. -
get_targets中的重要function是
get_target_single——Compute regression and classification targets for one image. -
在
get_target_single中先得到assign,pred和groundtruth之间匹配 -
需要先计算class和box等误差,class 的loss使用focal loss,还有box的回归loss 以及box的giou 作为第三个loss
-
将三个loss加权后相加得到cost【object_num* groundtruth_num】
-
对这个cost做匈牙利匹配找到300个object anchor 中与groundtruth最匹配的anchor【这里的匈牙利匹配实现使用
linear_sum_assignment,返回与之匹配的row_index和col_index】 -
根据assign得到的结果去采样得到postive index和negative index
-
根据匹配结果得到300个object anchor的label,label的weight,box的列表和label
-
根据上述得到的结果做class_loss,reg_loss和giou_loss
我今天一天终于全部搞明白了,好开心,虽然很慢,但是收获很多,算是每一步骤都懂了!RESPECT!!!


