文章目录
- 三大组件
- Channel & Buffer
- Selector
- ByteBuffer
- ByteBuffer 正确使用姿势
- ByteBuffer 内部结构
- ByteBuffer 常见方法
- 分配空间
- 向 buffer 写入数据
- 从 buffer 读取数据
- mark 和 reset
- 字符串与 ByteBuffer 互转
- Scattering Reads
- Gathering Writes
- 粘包、半包分析
- 文件编程
- FileChannel
- 两个 Channel 传输数据
- Path
- Files
- 附: ByteBuffer结构的调试工具
三大组件
Channel & Buffer
channel 有一点类似于 stream,它就是读写数据的双向通道,可以从 channel 将数据读入 buffer,也可以将 buffer 的数据写入 channel,而之前的 stream 要么是输入,要么是输出,channel 比 stream 更为底层
常见的 Channel 有
- FileChannel
- DatagramChannel
- SocketChannel
- ServerSocketChannel
buffer 则用来缓冲读写数据,常见的 buffer 有
- ByteBuffer
- MappedByteBuffer
- DirectByteBuffer
- HeapByteBuffer
- ShortBuffer
- IntBuffer
- LongBuffer
- FloatBuffer
- DoubleBuffer
- CharBuffer
⚠️Buffer 是非线程安全的
Selector
selector 单从字面意思不好理解,需要结合服务器的设计演化来理解它的用途
多线程版设计
最早在NIO没有出来之前,我们如何开发一个服务器端的程序呢?
有一种思路就是使用多线程。因为服务端的应用程序开发肯定要处理多个用户的通信,那么一个客户来了,他在我们的代码里表现就是一个Socket。我们针对这个Socket就能进行一些读写的操作。为了执行这些操作我们服务器端就会启动一个新的线程来专门为这个Socket提供服务。如果有多个客户端,那么就会有多个Socket,服务端就要开多个线程进行处理。在客户比较少的时候这种方法是可行的,但是一旦连接数变多这个方法就不适用了。因为一个客户端用一个线程去处理的话这个线程本身他就会占用一定的内存,默认的情况下比如windows就会占用1m的内存,如果来了1000个连接,那么光线程占用的内存就有1G。
⚠️ 多线程版缺点
- 内存占用高
- 线程上下文切换成本高
- 只适合连接数少的场景
线程池版设计
⚠️ 线程池版缺点
- 阻塞模式下,线程仅能处理一个 socket 连接
- 这个很好理解:线程在等待数据的过程中是被阻塞的,无法同时处理其他的连接。如果这个时候该线程去处理其他的socket了,这个时候刚好数据来了,那么这些数据就丢了。
- 仅适合短连接场景
selector 版设计
selector 的作用就是配合一个线程来管理多个 channel,获取这些 channel 上发生的事件,这些 channel 工作在非阻塞模式下,不会让线程吊死在一个 channel 上。适合连接数特别多,但流量低的场景(low traffic,就是一个channel不会频繁的发生事件)
调用 selector 的 select() 会阻塞直到 channel 发生了读写就绪事件,这些事件发生,select 方法就会返回这些事件交给 thread 来处理
ByteBuffer
有一普通文本文件 data.txt,内容为
1234567890abcd
使用 FileChannel 来读取文件内容
@Slf4j
public class ChannelDemo1 {
    public static void main(String[] args) throws IOException {
        //首先获取channel,常见的有两种方式:
        // (1)输入输出流
        // (2)随机文件流
        try (FileChannel fileChannel = new FileInputStream("data.txt").getChannel()) {
            //分配字节缓冲(一开始处于写模式)
            ByteBuffer buffer = ByteBuffer.allocate(10);

            //开始读取
            do {
                int read = fileChannel.read(buffer);

                if (read == -1) break;

                //切换到读模式
                buffer.flip();

                while (buffer.hasRemaining()) log.debug(String.valueOf((char)buffer.get()));

                //切换回写模式
                buffer.clear();
            } while (true);
        }

    }
}
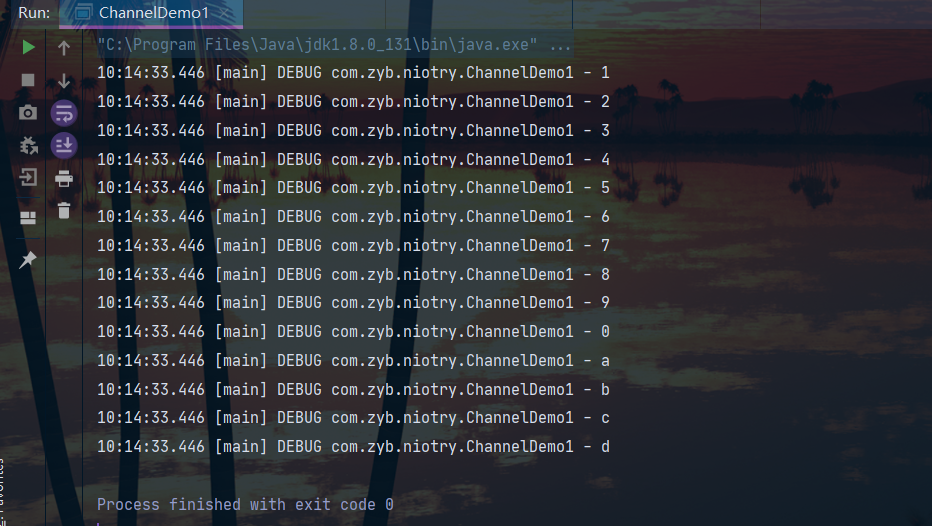
输出
ByteBuffer 正确使用姿势
- 向 buffer 写入数据,例如调用 channel.read(buffer)
- 调用 flip() 切换至读模式
- 从 buffer 读取数据,例如调用 buffer.get()
- 调用 clear() 或 compact() 切换至写模式
- 重复 1~4 步骤
ByteBuffer 内部结构
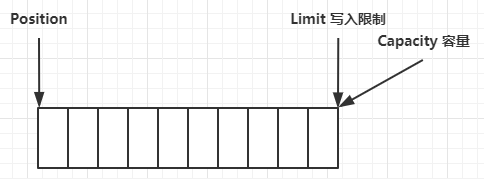
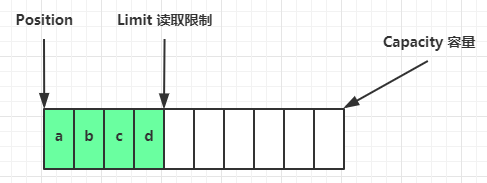
ByteBuffer 有以下重要属性
- capacity:容量
- position:代表读写指针
- limit:读写的限制
一开始
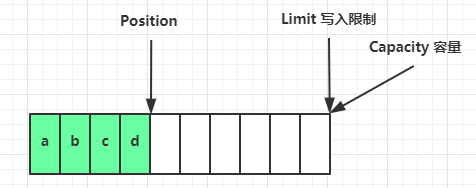
写模式下,position 是写入位置,limit 等于容量,下图表示写入了 4 个字节后的状态
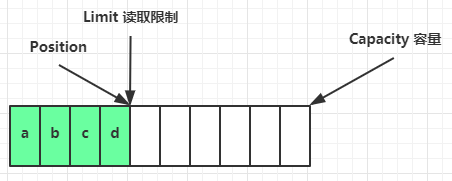
flip 动作发生后,position 切换为读取位置,limit 切换为读取限制
读取 4 个字节后,状态
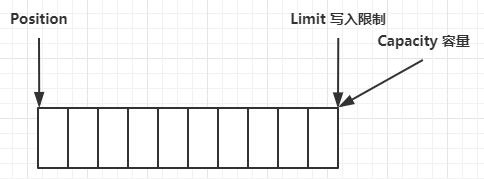
clear 动作发生后,状态
compact 方法,是把未读完的部分向前压缩,然后切换至写模式

ByteBuffer 常见方法
分配空间
可以使用 allocate 方法为 ByteBuffer 分配空间,其它 buffer 类也有该方法
Bytebuffer buf = ByteBuffer.allocate(16);
跟他相近的还有一种方法:
ByteBuffer byteBuffer = ByteBuffer.allocateDirect(16);
那么这两种方法有什么区别呢?
我们将这两个方法的返回值类型打印一下:
    @Test
    public void bufferTest(){
        System.out.println(ByteBuffer.allocate(10).getClass()); //class java.nio.HeapByteBuffer
        System.out.println(ByteBuffer.allocateDirect(10).getClass()); //class java.nio.DirectByteBuffer
    }
这两者的区别在于:
- HeapByteBuffer使用的Java堆内存,读写效率较低,收到GC的影响
- DirectByteBuffer使用的直接内存,读写效率高(少一次拷贝),不会受GC的影响(操作系统来回收,不在jvm的管辖范围),分配的效率较低(要调用操作系统的方法)
要想了解堆和直接内存的更多内容,可以看我的另一篇文章:
JVM从跨平台到跨专业Ⅰ-- 内存结构与对象探秘【含思维导图】
向 buffer 写入数据
有两种办法
- 调用 channel 的 read 方法
- 调用 buffer 自己的 put 方法
int readBytes = channel.read(buf);
和
buf.put((byte)127);
从 buffer 读取数据
同样有两种办法
- 调用 channel 的 write 方法
- 调用 buffer 自己的 get 方法
int writeBytes = channel.write(buf);
和
byte b = buf.get();
get 方法会让 position 读指针向后走,如果想重复读取数据
- 可以调用 rewind 方法将 position 重新置为 0
- 或者调用 get(int i) 方法获取索引 i 的内容,它不会移动读指针
mark 和 reset
mark 是在读取时,做一个标记,即使 position 改变,只要调用 reset 就能回到 mark 的位置
注意
rewind 和 flip 都会清除 mark 位置
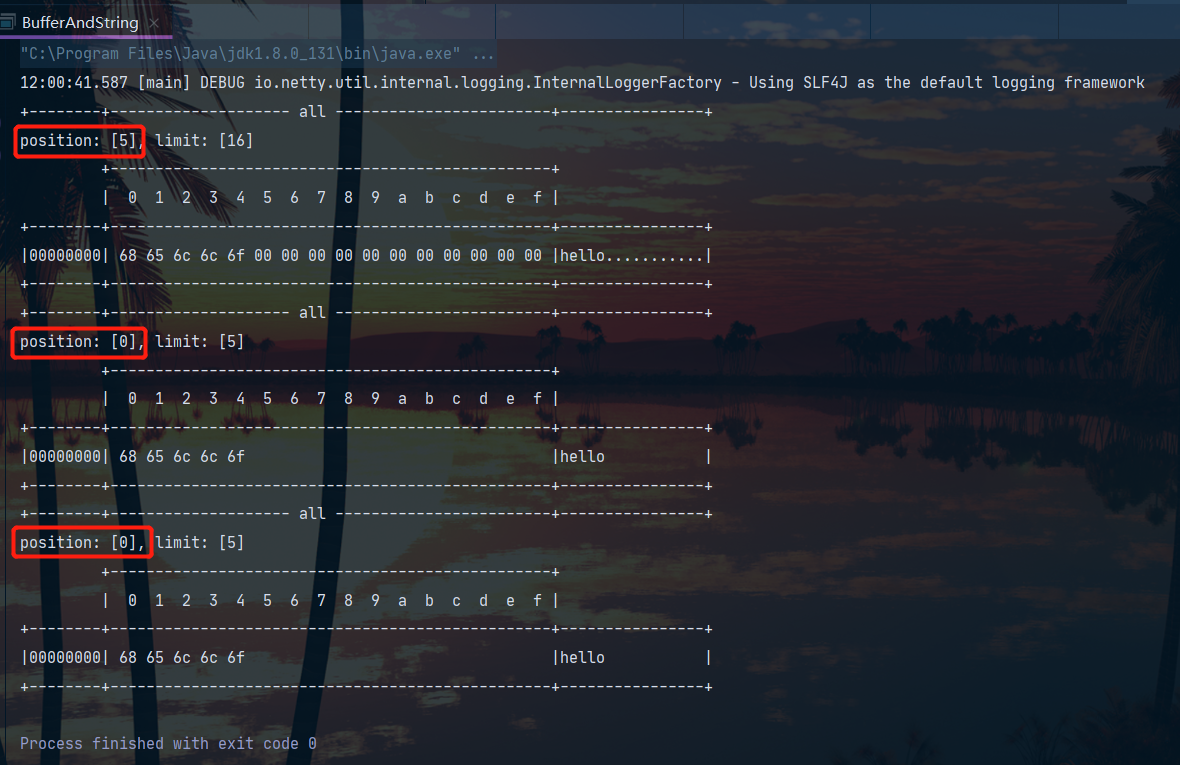
字符串与 ByteBuffer 互转
public class BufferAndString {
    public static void main(String[] args) {
         //字符串转ByteBuffer
        //方法一:注意这种情况下ByteBuffer还处于写模式,
        //指针此时处于索引5,在转化为String的时候要先切换为读模式!
        byte[] bytes = "hello".getBytes();
        ByteBuffer buffer = ByteBuffer.allocate(16);
        buffer.put(bytes);
        ByteBufferUtil.debugAll(buffer);

        //方法二:使用CharSet
        //此时ByteBuffer已经切换回了读模式指针处于0号位
        ByteBuffer buffer1 = StandardCharsets.UTF_8.encode("hello");
        ByteBufferUtil.debugAll(buffer1);


        //方法三:wrap,可以把一个字节数组包装成一个ByteBuffer
        ByteBuffer buffer2 = ByteBuffer.wrap("hello".getBytes());
        ByteBufferUtil.debugAll(buffer2);

        //至于ByteBuffer转字符串直接相反方法即可
    }
}
输出
Scattering Reads
分散读取
有一个文本文件 3parts.txt
onetwothree
使用如下方式读取,可以将数据填充至多个 buffer
try (RandomAccessFile file = new RandomAccessFile("helloword/3parts.txt", "rw")) {
    FileChannel channel = file.getChannel();
    ByteBuffer a = ByteBuffer.allocate(3);
    ByteBuffer b = ByteBuffer.allocate(3);
    ByteBuffer c = ByteBuffer.allocate(5);
    channel.read(new ByteBuffer[]{a, b, c});
    a.flip();
    b.flip();
    c.flip();
    debug(a);
    debug(b);
    debug(c);
} catch (IOException e) {
    e.printStackTrace();
}
结果
         +-------------------------------------------------+
         |  0  1  2  3  4  5  6  7  8  9  a  b  c  d  e  f |
+--------+-------------------------------------------------+----------------+
|00000000| 6f 6e 65                                        |one             |
+--------+-------------------------------------------------+----------------+
         +-------------------------------------------------+
         |  0  1  2  3  4  5  6  7  8  9  a  b  c  d  e  f |
+--------+-------------------------------------------------+----------------+
|00000000| 74 77 6f                                        |two             |
+--------+-------------------------------------------------+----------------+
         +-------------------------------------------------+
         |  0  1  2  3  4  5  6  7  8  9  a  b  c  d  e  f |
+--------+-------------------------------------------------+----------------+
|00000000| 74 68 72 65 65                                  |three           |
+--------+-------------------------------------------------+----------------+
Gathering Writes
使用如下方式写入,可以将多个 buffer 的数据填充至 channel,也就是集中写入
try (RandomAccessFile file = new RandomAccessFile("helloword/3parts.txt", "rw")) {
    FileChannel channel = file.getChannel();
    ByteBuffer d = ByteBuffer.allocate(4);
    ByteBuffer e = ByteBuffer.allocate(4);
    channel.position(11);

    d.put(new byte[]{'f', 'o', 'u', 'r'});
    e.put(new byte[]{'f', 'i', 'v', 'e'});
    d.flip();
    e.flip();
    debug(d);
    debug(e);
    channel.write(new ByteBuffer[]{d, e});
} catch (IOException e) {
    e.printStackTrace();
}
输出
         +-------------------------------------------------+
         |  0  1  2  3  4  5  6  7  8  9  a  b  c  d  e  f |
+--------+-------------------------------------------------+----------------+
|00000000| 66 6f 75 72                                     |four            |
+--------+-------------------------------------------------+----------------+
         +-------------------------------------------------+
         |  0  1  2  3  4  5  6  7  8  9  a  b  c  d  e  f |
+--------+-------------------------------------------------+----------------+
|00000000| 66 69 76 65                                     |five            |
+--------+-------------------------------------------------+----------------+
文件内容
onetwothreefourfive
粘包、半包分析
网络上有多条数据发送给服务端,数据之间使用\n进行分隔,但由于某种原因这些数据在接收时,被进行了重新组合。例如原始数据有3条为:
- Hello,world\n
- I’m zhangsan\n
- How are you?\n
变成了下面2个ByteBuffer
- Hello,world\nI’m zhangsan\nHo
- 两条消息黏在了一起,这就属于粘包现象。发生原因:效率太高
- w are you?\n
- 消息被截断了,这就属于半包现象。发生原因:服务器缓冲区的大小限制
我们现在编写程序,将错乱的数据恢复成原始的按\n分隔的数据:
public class TestByteBufferExam {
    public static void main(String[] args) {
        //构造粘包、半包现象
        ByteBuffer source = ByteBuffer.allocate(32);
        source.put("Hello,world\nI'm zhangsan\nHo".getBytes());
        split(source);
        source.put("w are you?\n".getBytes());
        split(source);
    }

    public static void split(ByteBuffer source){
        //首先切换读模式
        source.flip();

        //遍历source,找到分隔符
        for (int i = 0; i < source.limit(); i++) {
            //找到了一个完整消息
            if (source.get(i) == '\n') {
                //创建一个新的ByteBuffer存储
                int length = i - source.position() + 1;
                ByteBuffer target = ByteBuffer.allocate(length);
                for (int j = 0 ; j < length; j++) {
                    target.put(source.get());
                }

                //验证一下
                ByteBufferUtil.debugAll(target);
            }
        }

        //处理完之后切换回写模式,
        // 为了让残留的半截消息不丢失我们使用的compact方法切换为写模式
        source.compact();
    }
}
结果:
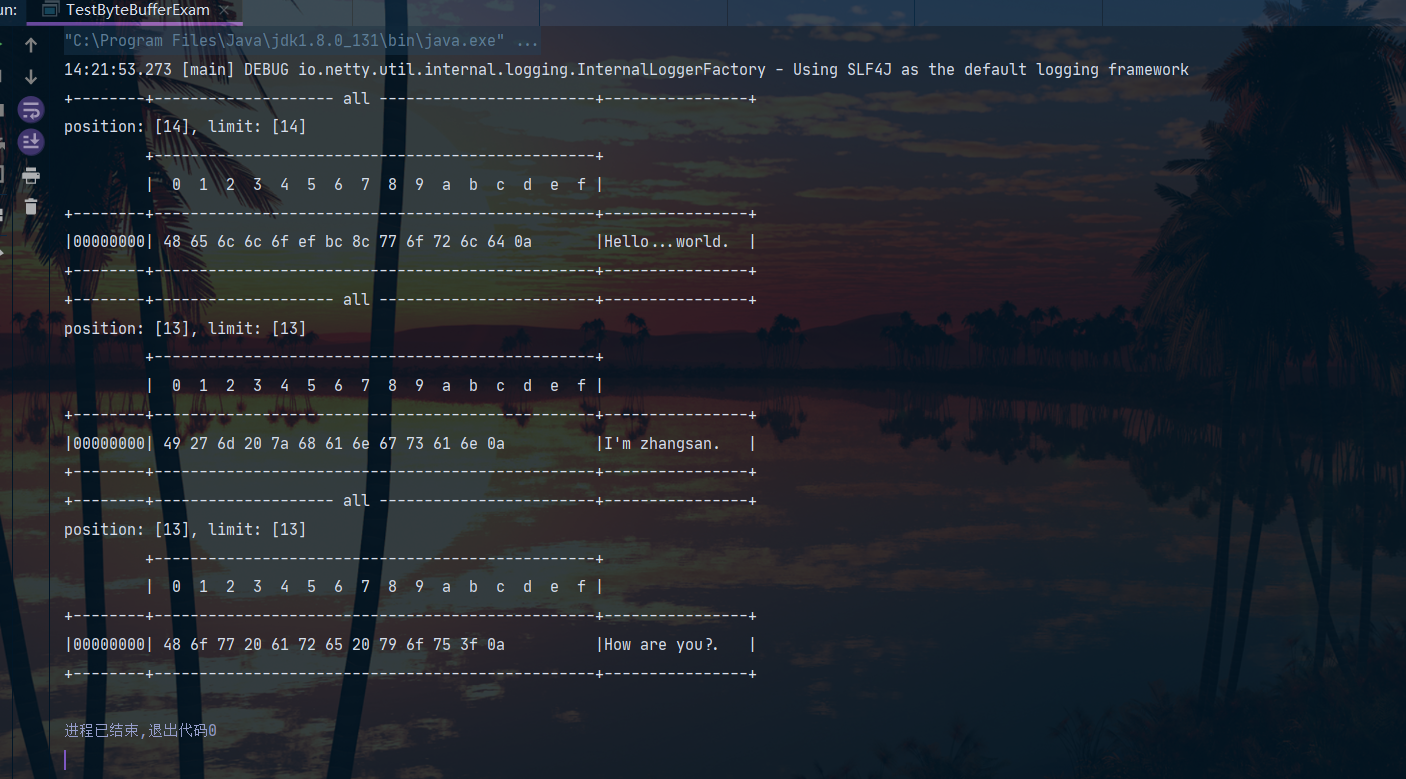
这是一种基本的解决粘包、半包的方法,当然效率并不高,后面会有更高效的处理方法。
文件编程
FileChannel
⚠️ FileChannel 工作模式
FileChannel 只能工作在阻塞模式下
获取
不能直接打开 FileChannel,必须通过 FileInputStream、FileOutputStream 或者 RandomAccessFile 来获取 FileChannel,它们都有 getChannel 方法
- 通过 FileInputStream 获取的 channel 只能读
- 通过 FileOutputStream 获取的 channel 只能写
- 通过 RandomAccessFile 是否能读写根据构造 RandomAccessFile 时的读写模式决定
读取
会从 channel 读取数据填充 ByteBuffer,返回值表示读到了多少字节,-1 表示到达了文件的末尾
int readBytes = channel.read(buffer);
写入
写入的正确姿势如下, SocketChannel
ByteBuffer buffer = ...;
buffer.put(...); // 存入数据
buffer.flip();   // 切换读模式

while(buffer.hasRemaining()) {
    channel.write(buffer);
}
在 while 中调用 channel.write 是因为 write 方法并不能保证一次将 buffer 中的内容全部写入 channel
关闭
channel 必须关闭,不过调用了 FileInputStream、FileOutputStream 或者 RandomAccessFile 的 close 方法会间接地调用 channel 的 close 方法
位置
获取当前位置
long pos = channel.position();
设置当前位置
long newPos = ...;
channel.position(newPos);
设置当前位置时,如果设置为文件的末尾
- 这时读取会返回 -1
- 这时写入,会追加内容,但要注意如果 position 超过了文件末尾,再写入时在新内容和原末尾之间会有空洞(00)
大小
使用 size 方法获取文件的大小
强制写入
操作系统出于性能的考虑,会将数据缓存,不是立刻写入磁盘。可以调用 force(true) 方法将文件内容和元数据(文件的权限等信息)立刻写入磁盘
两个 Channel 传输数据
String FROM = "helloword/data.txt";
String TO = "helloword/to.txt";
long start = System.nanoTime();
try (FileChannel from = new FileInputStream(FROM).getChannel();
     FileChannel to = new FileOutputStream(TO).getChannel();
    ) {
    from.transferTo(0, from.size(), to);
} catch (IOException e) {
    e.printStackTrace();
}
long end = System.nanoTime();
System.out.println("transferTo 用时:" + (end - start) / 1000_000.0);
输出
transferTo 用时:8.2011
超过 2g 大小的文件传输
public class TestFileChannelTransferTo {
    public static void main(String[] args) {
        try (
                FileChannel from = new FileInputStream("data.txt").getChannel();
                FileChannel to = new FileOutputStream("to.txt").getChannel();
        ) {
            // 效率高,底层会利用操作系统的零拷贝进行优化
            long size = from.size();
            // left 变量代表还剩余多少字节
            for (long left = size; left > 0; ) {
                System.out.println("position:" + (size - left) + " left:" + left);
                left -= from.transferTo((size - left), left, to);
            }
        } catch (IOException e) {
            e.printStackTrace();
        }
    }
}
实际传输一个超大文件
position:0 left:7769948160
position:2147483647 left:5622464513
position:4294967294 left:3474980866
position:6442450941 left:1327497219
Path
jdk7 引入了 Path 和 Paths 类
- Path 用来表示文件路径
- Paths 是工具类,用来获取 Path 实例
Path source = Paths.get("1.txt"); // 相对路径 使用 user.dir 环境变量来定位 1.txt

Path source = Paths.get("d:\\1.txt"); // 绝对路径 代表了  d:\1.txt

Path source = Paths.get("d:/1.txt"); // 绝对路径 同样代表了  d:\1.txt

Path projects = Paths.get("d:\\data", "projects"); // 代表了  d:\data\projects
.代表了当前路径..代表了上一级路径
例如目录结构如下
d:
	|- data
		|- projects
			|- a
			|- b
代码
Path path = Paths.get("d:\\data\\projects\\a\\..\\b");
System.out.println(path);
System.out.println(path.normalize()); // 正常化路径
会输出
d:\data\projects\a\..\b
d:\data\projects\b
Files
检查文件是否存在
Path path = Paths.get("helloword/data.txt");
System.out.println(Files.exists(path));
创建一级目录
Path path = Paths.get("helloword/d1");
Files.createDirectory(path);
- 如果目录已存在,会抛异常 FileAlreadyExistsException
- 不能一次创建多级目录,否则会抛异常 NoSuchFileException
创建多级目录用
Path path = Paths.get("helloword/d1/d2");
Files.createDirectories(path);
拷贝文件
Path source = Paths.get("helloword/data.txt");
Path target = Paths.get("helloword/target.txt");

Files.copy(source, target);
- 如果文件已存在,会抛异常 FileAlreadyExistsException
如果希望用 source 覆盖掉 target,需要用 StandardCopyOption 来控制
Files.copy(source, target, StandardCopyOption.REPLACE_EXISTING);
移动文件
Path source = Paths.get("helloword/data.txt");
Path target = Paths.get("helloword/data.txt");

Files.move(source, target, StandardCopyOption.ATOMIC_MOVE);
- StandardCopyOption.ATOMIC_MOVE 保证文件移动的原子性
删除文件
Path target = Paths.get("helloword/target.txt");

Files.delete(target);
- 如果文件不存在,会抛异常 NoSuchFileException
删除目录
Path target = Paths.get("helloword/d1");

Files.delete(target);
- 如果目录还有内容,会抛异常 DirectoryNotEmptyException
遍历目录文件
public static void main(String[] args) throws IOException {
    Path path = Paths.get("C:\\Program Files\\Java\\jdk1.8.0_91");
    AtomicInteger dirCount = new AtomicInteger();
    AtomicInteger fileCount = new AtomicInteger();
    Files.walkFileTree(path, new SimpleFileVisitor<Path>(){
        @Override
        public FileVisitResult preVisitDirectory(Path dir, BasicFileAttributes attrs)
            throws IOException {
            System.out.println(dir);
            dirCount.incrementAndGet();
            return super.preVisitDirectory(dir, attrs);
        }

        @Override
        public FileVisitResult visitFile(Path file, BasicFileAttributes attrs)
            throws IOException {
            System.out.println(file);
            fileCount.incrementAndGet();
            return super.visitFile(file, attrs);
        }
    });
    System.out.println(dirCount); // 133
    System.out.println(fileCount); // 1479
}
统计 jar 的数目
Path path = Paths.get("C:\\Program Files\\Java\\jdk1.8.0_91");
AtomicInteger fileCount = new AtomicInteger();
Files.walkFileTree(path, new SimpleFileVisitor<Path>(){
    @Override
    public FileVisitResult visitFile(Path file, BasicFileAttributes attrs)
        throws IOException {
        if (file.toFile().getName().endsWith(".jar")) {
            fileCount.incrementAndGet();
        }
        return super.visitFile(file, attrs);
    }
});
System.out.println(fileCount); // 724
删除多级目录
Path path = Paths.get("d:\\a");
Files.walkFileTree(path, new SimpleFileVisitor<Path>(){
    @Override
    public FileVisitResult visitFile(Path file, BasicFileAttributes attrs)
        throws IOException {
        Files.delete(file);
        return super.visitFile(file, attrs);
    }

    @Override
    public FileVisitResult postVisitDirectory(Path dir, IOException exc)
        throws IOException {
        Files.delete(dir);
        return super.postVisitDirectory(dir, exc);
    }
});
⚠️ 删除很危险
删除是危险操作,确保要递归删除的文件夹没有重要内容
拷贝多级目录
long start = System.currentTimeMillis();
String source = "D:\\Snipaste-1.16.2-x64";
String target = "D:\\Snipaste-1.16.2-x64aaa";

Files.walk(Paths.get(source)).forEach(path -> {
    try {
        String targetName = path.toString().replace(source, target);
        // 是目录
        if (Files.isDirectory(path)) {
            Files.createDirectory(Paths.get(targetName));
        }
        // 是普通文件
        else if (Files.isRegularFile(path)) {
            Files.copy(path, Paths.get(targetName));
        }
    } catch (IOException e) {
        e.printStackTrace();
    }
});
long end = System.currentTimeMillis();
System.out.println(end - start);
附: ByteBuffer结构的调试工具
import io.netty.util.internal.StringUtil;
import java.nio.ByteBuffer;
import static io.netty.util.internal.MathUtil.isOutOfBounds;
import static io.netty.util.internal.StringUtil.NEWLINE;

public class ByteBufferUtil {
    private static final char[] BYTE2CHAR = new char[256];
    private static final char[] HEXDUMP_TABLE = new char[256 * 4];
    private static final String[] HEXPADDING = new String[16];
    private static final String[] HEXDUMP_ROWPREFIXES = new String[65536 >>> 4];
    private static final String[] BYTE2HEX = new String[256];
    private static final String[] BYTEPADDING = new String[16];

    static {
        final char[] DIGITS = "0123456789abcdef".toCharArray();
        for (int i = 0; i < 256; i++) {
            HEXDUMP_TABLE[i << 1] = DIGITS[i >>> 4 & 0x0F];
            HEXDUMP_TABLE[(i << 1) + 1] = DIGITS[i & 0x0F];
        }

        int i;

        // Generate the lookup table for hex dump paddings
        for (i = 0; i < HEXPADDING.length; i++) {
            int padding = HEXPADDING.length - i;
            StringBuilder buf = new StringBuilder(padding * 3);
            for (int j = 0; j < padding; j++) {
                buf.append("   ");
            }
            HEXPADDING[i] = buf.toString();
        }

        // Generate the lookup table for the start-offset header in each row (up to 64KiB).
        for (i = 0; i < HEXDUMP_ROWPREFIXES.length; i++) {
            StringBuilder buf = new StringBuilder(12);
            buf.append(NEWLINE);
            buf.append(Long.toHexString(i << 4 & 0xFFFFFFFFL | 0x100000000L));
            buf.setCharAt(buf.length() - 9, '|');
            buf.append('|');
            HEXDUMP_ROWPREFIXES[i] = buf.toString();
        }

        // Generate the lookup table for byte-to-hex-dump conversion
        for (i = 0; i < BYTE2HEX.length; i++) {
            BYTE2HEX[i] = ' ' + StringUtil.byteToHexStringPadded(i);
        }

        // Generate the lookup table for byte dump paddings
        for (i = 0; i < BYTEPADDING.length; i++) {
            int padding = BYTEPADDING.length - i;
            StringBuilder buf = new StringBuilder(padding);
            for (int j = 0; j < padding; j++) {
                buf.append(' ');
            }
            BYTEPADDING[i] = buf.toString();
        }

        // Generate the lookup table for byte-to-char conversion
        for (i = 0; i < BYTE2CHAR.length; i++) {
            if (i <= 0x1f || i >= 0x7f) {
                BYTE2CHAR[i] = '.';
            } else {
                BYTE2CHAR[i] = (char) i;
            }
        }
    }

    /**
     * 打印所有内容
     * @param buffer
     */
    public static void debugAll(ByteBuffer buffer) {
        int oldlimit = buffer.limit();
        buffer.limit(buffer.capacity());
        StringBuilder origin = new StringBuilder(256);
        appendPrettyHexDump(origin, buffer, 0, buffer.capacity());
        System.out.println("+--------+-------------------- all ------------------------+----------------+");
        System.out.printf("position: [%d], limit: [%d]\n", buffer.position(), oldlimit);
        System.out.println(origin);
        buffer.limit(oldlimit);
    }

    /**
     * 打印可读取内容
     * @param buffer
     */
    public static void debugRead(ByteBuffer buffer) {
        StringBuilder builder = new StringBuilder(256);
        appendPrettyHexDump(builder, buffer, buffer.position(), buffer.limit() - buffer.position());
        System.out.println("+--------+-------------------- read -----------------------+----------------+");
        System.out.printf("position: [%d], limit: [%d]\n", buffer.position(), buffer.limit());
        System.out.println(builder);
    }

    private static void appendPrettyHexDump(StringBuilder dump, ByteBuffer buf, int offset, int length) {
        if (isOutOfBounds(offset, length, buf.capacity())) {
            throw new IndexOutOfBoundsException(
                    "expected: " + "0 <= offset(" + offset + ") <= offset + length(" + length
                            + ") <= " + "buf.capacity(" + buf.capacity() + ')');
        }
        if (length == 0) {
            return;
        }
        dump.append(
                "         +-------------------------------------------------+" +
                        NEWLINE + "         |  0  1  2  3  4  5  6  7  8  9  a  b  c  d  e  f |" +
                        NEWLINE + "+--------+-------------------------------------------------+----------------+");

        final int startIndex = offset;
        final int fullRows = length >>> 4;
        final int remainder = length & 0xF;

        // Dump the rows which have 16 bytes.
        for (int row = 0; row < fullRows; row++) {
            int rowStartIndex = (row << 4) + startIndex;

            // Per-row prefix.
            appendHexDumpRowPrefix(dump, row, rowStartIndex);

            // Hex dump
            int rowEndIndex = rowStartIndex + 16;
            for (int j = rowStartIndex; j < rowEndIndex; j++) {
                dump.append(BYTE2HEX[getUnsignedByte(buf, j)]);
            }
            dump.append(" |");

            // ASCII dump
            for (int j = rowStartIndex; j < rowEndIndex; j++) {
                dump.append(BYTE2CHAR[getUnsignedByte(buf, j)]);
            }
            dump.append('|');
        }

        // Dump the last row which has less than 16 bytes.
        if (remainder != 0) {
            int rowStartIndex = (fullRows << 4) + startIndex;
            appendHexDumpRowPrefix(dump, fullRows, rowStartIndex);

            // Hex dump
            int rowEndIndex = rowStartIndex + remainder;
            for (int j = rowStartIndex; j < rowEndIndex; j++) {
                dump.append(BYTE2HEX[getUnsignedByte(buf, j)]);
            }
            dump.append(HEXPADDING[remainder]);
            dump.append(" |");

            // Ascii dump
            for (int j = rowStartIndex; j < rowEndIndex; j++) {
                dump.append(BYTE2CHAR[getUnsignedByte(buf, j)]);
            }
            dump.append(BYTEPADDING[remainder]);
            dump.append('|');
        }

        dump.append(NEWLINE +
                "+--------+-------------------------------------------------+----------------+");
    }

    private static void appendHexDumpRowPrefix(StringBuilder dump, int row, int rowStartIndex) {
        if (row < HEXDUMP_ROWPREFIXES.length) {
            dump.append(HEXDUMP_ROWPREFIXES[row]);
        } else {
            dump.append(NEWLINE);
            dump.append(Long.toHexString(rowStartIndex & 0xFFFFFFFFL | 0x100000000L));
            dump.setCharAt(dump.length() - 9, '|');
            dump.append('|');
        }
    }

    public static short getUnsignedByte(ByteBuffer buffer, int index) {
        return (short) (buffer.get(index) & 0xFF);
    }
}
