1. 前言
拥有一台自己的云服务器可以做很多事情。阿里云服务器毫无疑问是国内最好的。
阿里云服务器可以用于各种互联网应用的搭建和运行,提供稳定、高性能的服务。
阿里云服务器的用途,包括但不限于以下几个方面:
-
网站托管:可以将网站的文件、数据库等部署在阿里云服务器上,提供稳定的网络环境和高性能的服务器资源,确保网站的正常运行。
-
应用部署:可以将各种应用程序、服务部署在阿里云服务器上,如电商系统、ERP系统、CRM系统等,提供稳定可靠的运行环境。
-
数据存储:可以将数据存储在阿里云服务器上,通过云存储服务进行备份和管理,确保数据的安全性和可靠性。
-
数据库服务:可以使用阿里云提供的数据库服务,如RDS(关系型数据库服务)、MongoDB、Redis等,提供高性能、可扩展的数据库服务。
-
虚拟化:可以使用阿里云提供的虚拟机服务,将应用程序运行在虚拟机上,实现资源的隔离和灵活的部署。
-
云存储:可以使用阿里云提供的云存储服务,如OSS(对象存储服务),将文件存储在云端,提供高可用、高可靠的存储服务。
-
安全防护:可以使用阿里云提供的安全防护服务,如DDoS防护、Web应用防火墙(WAF)等,保护服务器和应用程序免受网络攻击。
2. 申请阿里云服务器
2.1 登录注册
打开阿里云官网,在右上方点击"登录/注册",使用支付宝扫码登录

首页选择云服务器EC2, 打开后看到有“产品试用服务”,在个人使用版点击立即使用。每个新人用支付宝可以享受3个月的免费试用。

在创建实例页面上,根据需求选择实例配置,包括实例规格、操作系统、网络类型、存储等。
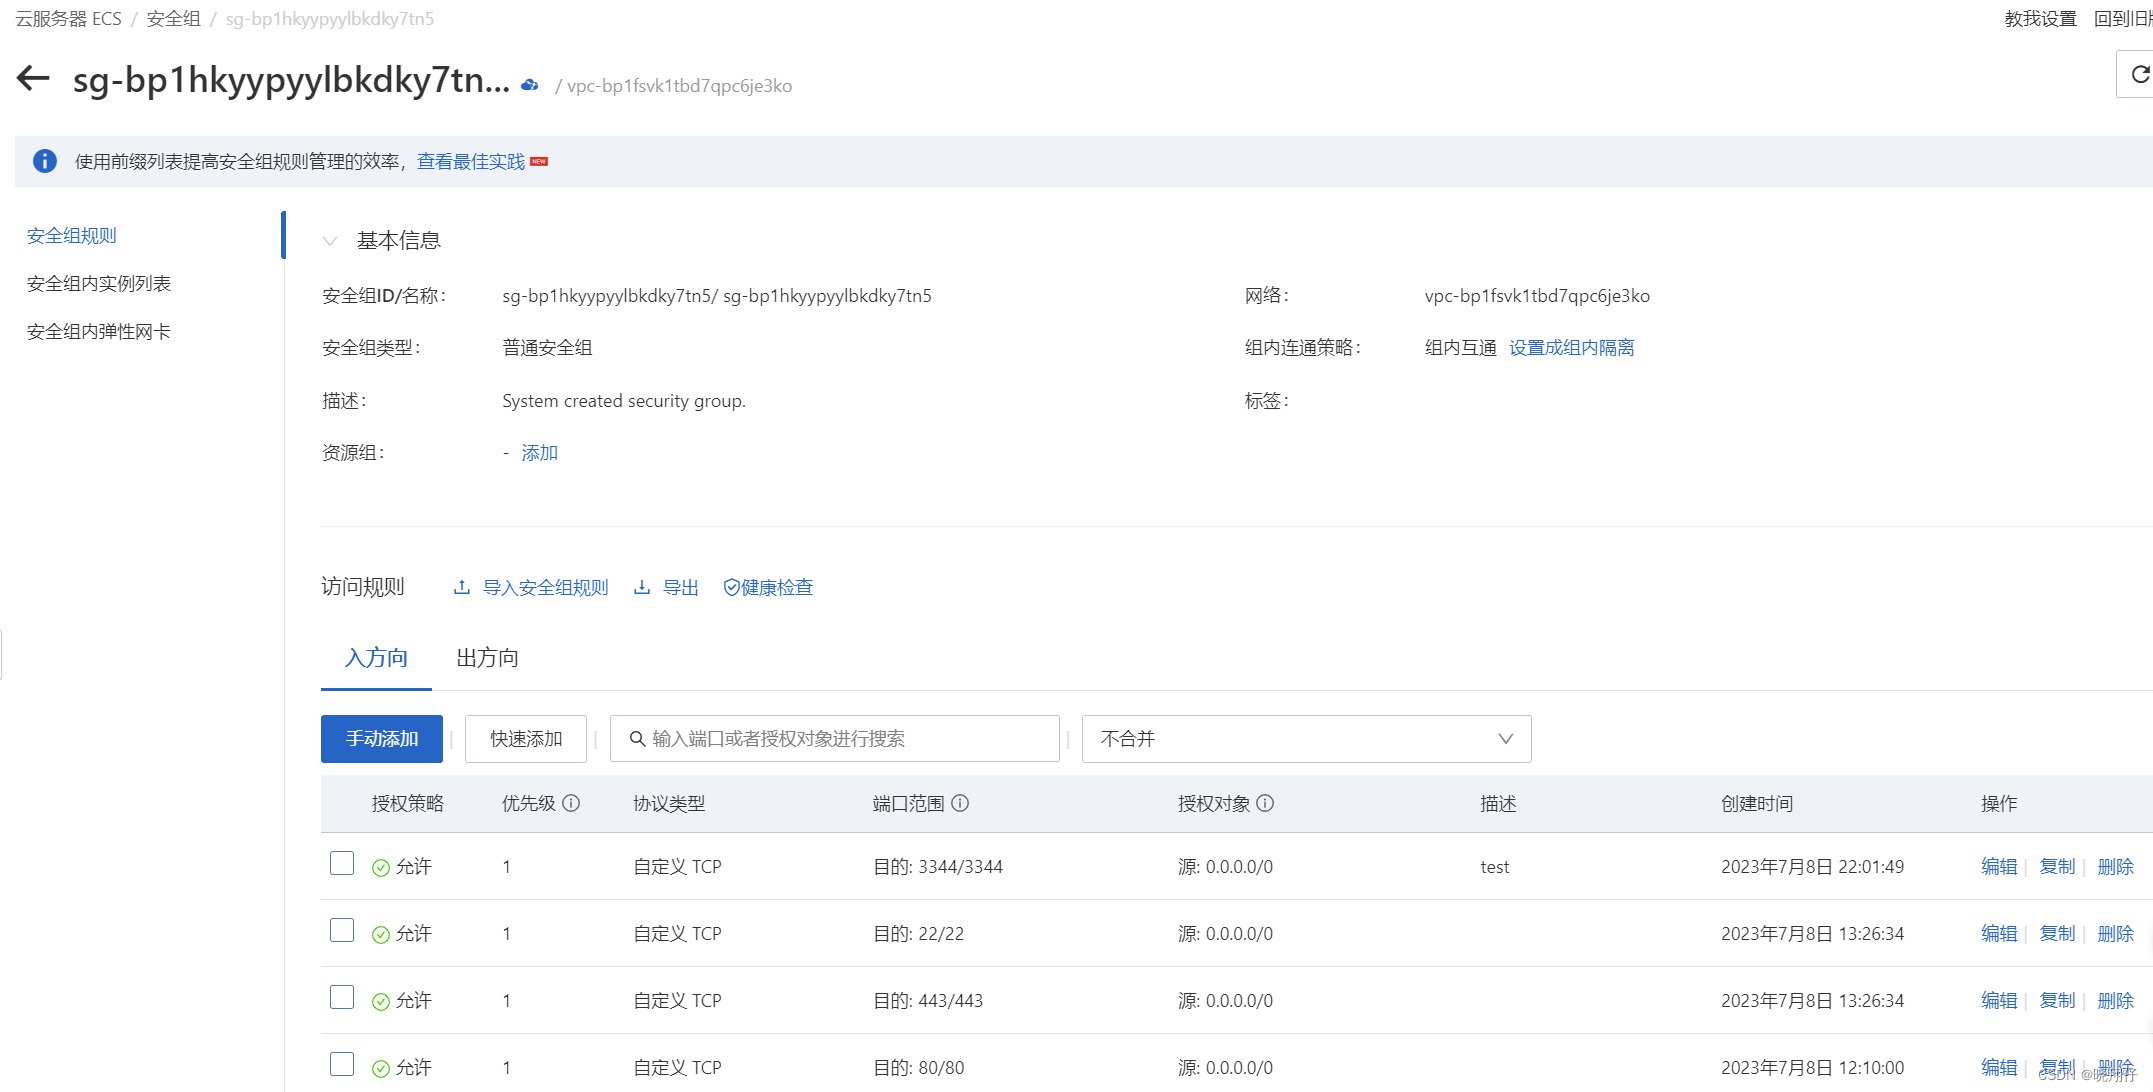
设置安全组。一般设置“入方向”。如果你想SSH登录,那么需要开放22端口。如果你想建立HTTP服务器,那么80 或者443端口需要开放。
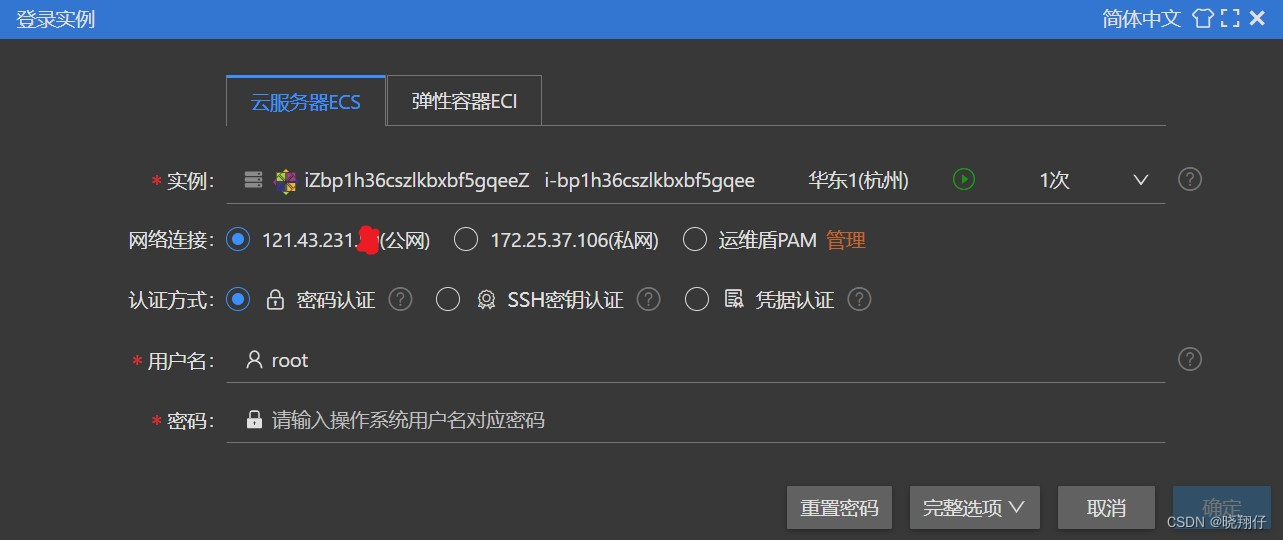
点击远程连接。阿里云提供了三种远程连接的方式。

设置“通过Workbench远程登录的密码”,但是此时无法直接登录。
首次登录必须选择VNC远程控制。VNC远程控制适用于实例处于启动中,或者实例处于运行中但操作系统尚未运行起来的场景下登陆实例。
按照提示设置VNC远程控制的密码,并登录成功。登录后检查网络配置,看到了eth0网卡里有本台实例的私有IP地址。
[root@iZbp1h36cszlkbxbf5gqeeZ ~]# ifconfig
bond0: flags=5123<UP,BROADCAST,MASTER,MULTICAST>  mtu 1500
        ether f2:ac:4a:db:46:4e  txqueuelen 1000  (Ethernet)
        RX packets 0  bytes 0 (0.0 B)
        RX errors 0  dropped 0  overruns 0  frame 0
        TX packets 0  bytes 0 (0.0 B)
        TX errors 0  dropped 0 overruns 0  carrier 0  collisions 0

docker0: flags=4099<UP,BROADCAST,MULTICAST>  mtu 1500
        inet 172.17.0.1  netmask 255.255.0.0  broadcast 172.17.255.255
        ether 02:42:cc:74:16:f8  txqueuelen 0  (Ethernet)
        RX packets 0  bytes 0 (0.0 B)
        RX errors 0  dropped 0  overruns 0  frame 0
        TX packets 0  bytes 0 (0.0 B)
        TX errors 0  dropped 0 overruns 0  carrier 0  collisions 0

eth0: flags=4163<UP,BROADCAST,RUNNING,MULTICAST>  mtu 1500
        inet 172.25.37.106  netmask 255.255.240.0  broadcast 172.25.47.255
        inet6 fe80::216:3eff:fe1e:ab8c  prefixlen 64  scopeid 0x20<link>
        ether 00:16:3e:1e:ab:8c  txqueuelen 1000  (Ethernet)
        RX packets 3870  bytes 3300682 (3.1 MiB)
        RX errors 0  dropped 0  overruns 0  frame 0
        TX packets 2692  bytes 411305 (401.6 KiB)
        TX errors 0  dropped 0 overruns 0  carrier 0  collisions 0

lo: flags=73<UP,LOOPBACK,RUNNING>  mtu 65536
        inet 127.0.0.1  netmask 255.0.0.0
        inet6 ::1  prefixlen 128  scopeid 0x10<host>
        loop  txqueuelen 1000  (Local Loopback)
        RX packets 0  bytes 0 (0.0 B)
        RX errors 0  dropped 0  overruns 0  frame 0
        TX packets 0  bytes 0 (0.0 B)
        TX errors 0  dropped 0 overruns 0  carrier 0  collisions 0
修改/etc/ssh/sshd_config文件的配置
PermitRootLogin yes
PassworkAuthentication yes
重启SSH服务,使其生效
systemctl restart sshd
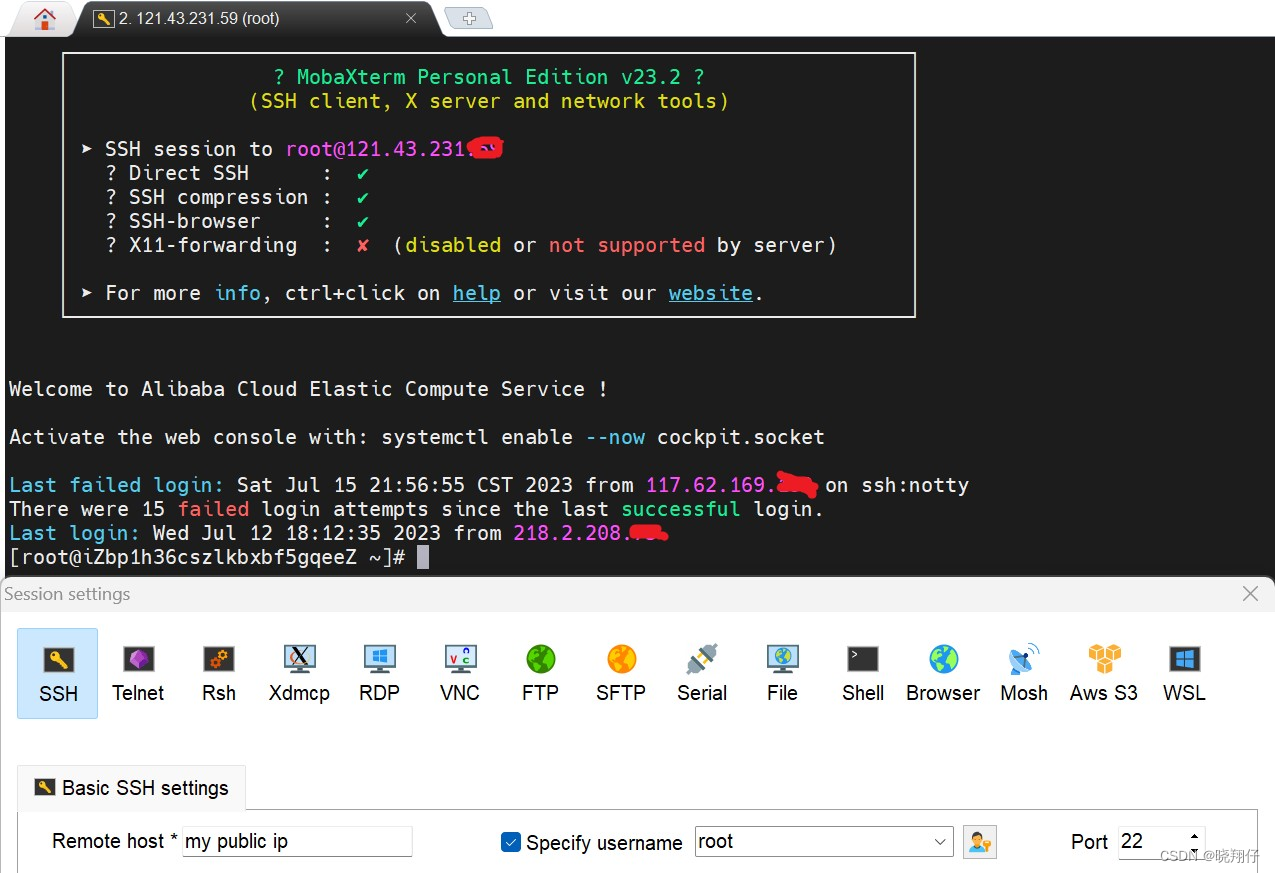
现在可以在本地计算机上通过SSH使用“公网IP + Workbench远程登录设置的密码”登录了。
3.用Flask搭建HTTP服务器
在centos上新建一个目录,使用python-Flask框架编写一个http服务器。实现最简单的上传下载功能。
3.1 目录结构
新建httpserver目录用于搭建本次的HTTP服务器。
在httpserver目录下创建templates目录,用于放置html文件。
新建app.py文件,用于编写HTTP服务器执行逻辑。
在httpserver目录下创建upload目录,用于放置上传下载的文件
[root@iZbp1h36cszlkbxbf5g**** httpserver]# ls -ltr
total 4
drwxr-xr-x 2 root root   24 Jul 17 22:14 templates
-rw-r--r-- 1 root root 1455 Jul 17 22:16 app.py
drwxr-xr-x 2 root root   24 Jul 17 22:17 upload
[root@iZbp1h36cszlkbxbf5g**** httpserver]# ls upload
upload.txt
[root@iZbp1h36cszlkbxbf5g**** httpserver]# ls templates
index.html
3.2 代码编写
编写 app.py(chatGPT给出来的代码稍微改了下)
from flask import Flask, render_template, request, send_from_directory
import os

app = Flask(__name__)
UPLOAD_FOLDER = 'upload'
app.config['UPLOAD_FOLDER'] = UPLOAD_FOLDER


@app.route('/', methods=['GET'])
def index():
    files = get_file_list()
    return render_template('index.html', files=files)


@app.route('/upload', methods=['POST'])
def upload_file():
    file = request.files['file']
    filename = file.filename
    save_path = os.path.join(app.config['UPLOAD_FOLDER'], filename)
    file.save(save_path)
    return 'File uploaded successfully.'


@app.route('/upload_data', defaults={'path': ''}, methods=['GET', 'POST'])
# @app.route('/<path:path>')
def upload_data(path):
    if request.method == 'POST':
       print('The upload data is: %s' % request.get_data())
    return 'Received!'


@app.route('/download/<path:filename>', methods=['GET'])
def download_file(filename):
    folder_path = app.config['UPLOAD_FOLDER']
    return send_from_directory(folder_path, filename, as_attachment=True)


def get_file_list():
    folder_path = app.config['UPLOAD_FOLDER']
    files = []
    for filename in os.listdir(folder_path):
        if os.path.isfile(os.path.join(folder_path, filename)):
            files.append(filename)
    return files


if __name__ == '__main__':
    if not os.path.exists(app.config['UPLOAD_FOLDER']):
        os.makedirs(app.config['UPLOAD_FOLDER'])
    app.run(host='0.0.0.0',port='80')
编写index.html
<!DOCTYPE html>
<html>
<head>
    <title>File Server</title>
    <style>
        table {
            border-collapse: collapse;
            width: 100%;
        }

        th, td {
            text-align: left;
            padding: 8px;
        }

        tr:nth-child(even) {
            background-color: #f2f2f2;
        }
    </style>
</head>
<body>
    <h1>File Server</h1>
    <h2>Upload File</h2>
    <form action="/upload" method="POST" enctype="multipart/form-data">
        <input type="file" name="file" required><br><br>
        <input type="submit" value="Upload">
    </form>
    <h2>Download Files</h2>
    <table>
        <tr>
            <th>Filename</th>
            <th>Actions</th>
        </tr>
        {% for file in files %}
        <tr>
            <td>{{ file }}</td>
            <td><a href="/download/{{ file }}">Download</a></td>
        </tr>
        {% endfor %}
    </table>
</body>
</html>
3.3 测试记录
运行命令
python3 app.py
或者
nohup python3 app.py > output.txt &
初次执行有报错,需要安装Flask库
pip install Flask==2.0.33.3.1 测试本地向http服务器发送json格式的数据
在本地计算机用curl尝试上传json格式的data
C:\Users\lenovo>curl -X POST -H "Content-Type: application/json" -d '{"key1":"value1","key2":"value2"}' http://121.43.231.**:80/upload_data
Received!
阿里云上的http服务器收到消息,返回
"Received!"。
[root@iZbp1h36cszlkbxbf5g**** httpserver]# python3 app.py
 * Serving Flask app 'app' (lazy loading)
 * Environment: production
   WARNING: This is a development server. Do not use it in a production deployment.
   Use a production WSGI server instead.
 * Debug mode: off
 * Running on all addresses.
   WARNING: This is a development server. Do not use it in a production deployment.
 * Running on http://172.25.37.106:80/ (Press CTRL+C to quit)


The upload data is: b"'{key1:value1,key2:value2}'"
117.62.169.192 - - [17/Jul/2023 22:28:57] "POST /upload_data HTTP/1.1" 200 -
3.3.2 测试本地向http服务器上传文件
在地址栏输入网址
http://121.43.231.**/可以看到
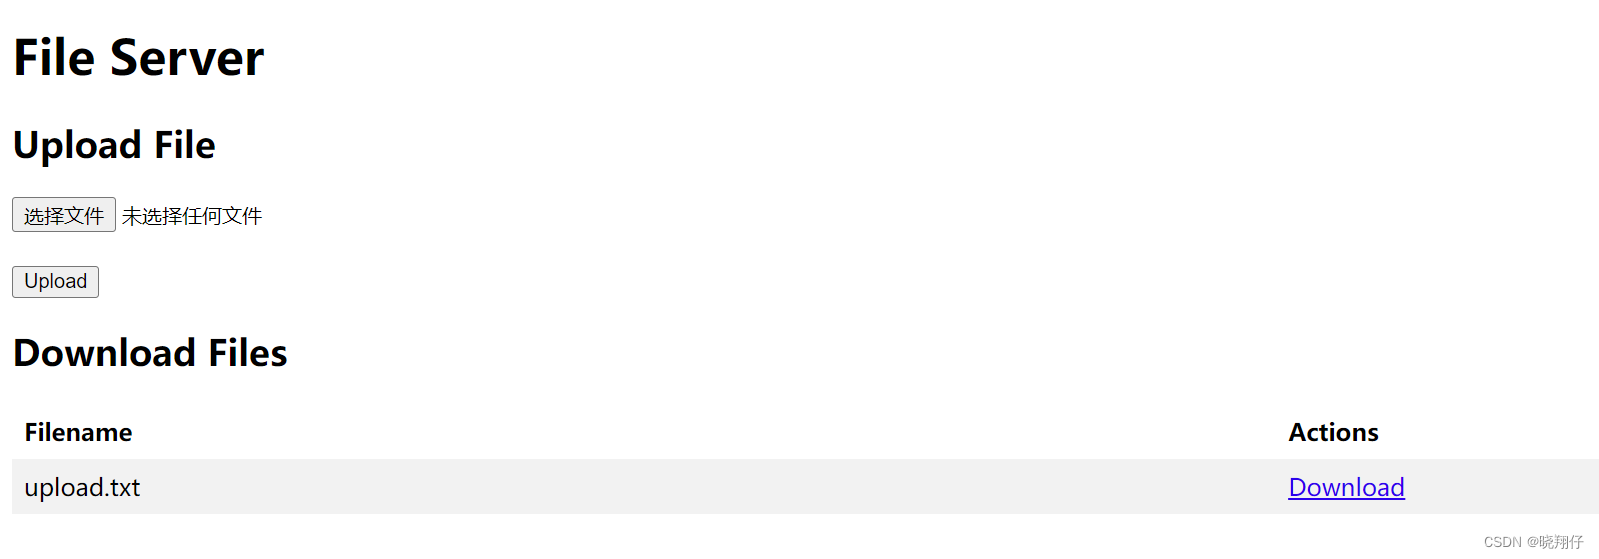
点击“选择文件”后,选择文件再点击Upload,文件便上传至http服务器的upload目录下。
3.3.3测试本地向http服务器下载文件
点击Actions下面的"Download",则可以下载文件。
4.最后
这是我第一次使用阿里云服务器的记录,供参考。


