文章目录
- `fastDFS 6.0.9`单机安装案例
- (1)前置环境安装明细
- (2)依赖库安装
- (3)`libfatscommon`安装
- (4)`libserverframe` 安装
- (5)`FastDFS` 安装
- 默认命令工具查看
- (6)配置文件修改
- `/etc/fdfs/tracker.conf`修改启动tracker
- `/etc/fdfs/storage.conf`修改启动storage
- 查看storage和tracker是否在通讯
- 上传图片测试
- (7)nginx 安装
- (8)`fastdfs-nginx-module` 安装
- (9)`nginx` 集成 `fastdfs-nginx-module`
- (10)最终结果演示
- 参考资料
fastDFS 6.0.9单机安装案例
好奇之前项目里用到的文件存储系统,决定自己搭建一个玩玩,于是乎开始倒腾,发现fastdfs安装部署这块内容网上还是比较多的但是版本啥的都已经比较老旧了,于是乎搜了下官方公众号最近的一次推荐部署版本 V6.09,就准备开干了。网上搜了下已经有大哥部署过该版本了centos7上单机安装fastdfs6.0.9,我就结合官网的install和大哥的手册跟着来了一遍,全程没卡壳很顺利。
(1)前置环境安装明细
| 依赖库 | 备注 |
|---|---|
libfatscommon | 基础库-fastdfs分离出来的公共函数 (V1.0.61 版本) |
libserverframe | 基础库-网络框架库 (V1.1.20 版本) |
FastDFS | fastdfs (6.0.9 版本) |
fastdfs-nginx-module | fastdfs与nginx整合模块 (V1.23版本) |
nginx | nginx (1.22.1版本) |
(2)依赖库安装
[root@localhost ~]# yum install git gcc gcc-c++ make automake autoconf libtool pcre pcre-devel zlib zlib-devel openssl-devel -y

Loaded plugins: fastestmirror, langpacks
Determining fastest mirrors
 * base: mirrors.ustc.edu.cn
 * extras: mirrors.huaweicloud.com
 * updates: mirrors.ustc.edu.cn
base
................
................
Complete!
(3)libfatscommon安装
我这里是用的git的方式下载然后进行编译安装,你们也可以去它的git官网找到对应的 tag下载对应的压缩包上传后进行编译安装
git clone https://gitee.com/fastdfs100/libfastcommon.gitcd libfastcommongit checkout V1.0.61./make.sh clean && ./make.sh && ./make.sh install
[root@localhost installpackage]# git clone https://gitee.com/fastdfs100/libfastcommon.git
Cloning into 'libfastcommon'...
remote: Enumerating objects: 4887, done.
remote: Counting objects: 100% (708/708), done.
remote: Compressing objects: 100% (707/707), done.
remote: Total 4887 (delta 494), reused 0 (delta 0), pack-reused 4179
Receiving objects: 100% (4887/4887), 1.72 MiB | 1.62 MiB/s, done.
Resolving deltas: 100% (3702/3702), done.
[root@localhost installpackage]# cd libfastcommon/
[root@localhost libfastcommon]# git checkout V1.0.61
Note: checking out 'V1.0.61'.

You are in 'detached HEAD' state. You can look around, make experimental
changes and commit them, and you can discard any commits you make in this
state without impacting any branches by performing another checkout.

If you want to create a new branch to retain commits you create, you may
do so (now or later) by using -b with the checkout command again. Example:

  git checkout -b new_branch_name

HEAD is now at c416c6e... upgrade version to 1.0.61
[root@localhost libfastcommon]# ./make.sh clean && ./make.sh && ./make.sh install
rm -f hash.o chain.o shared_func.o ini_file_reader.o logger.o sockopt.o base64.o sched_thread.o http_func.o md5.o pthread_func.o local_ip_func.o avl_tree.o ioevent.o ioevent_loop.o fast_task_queue.o fast_timer.o locked_timer.o process_ctrl.o fast_mblock.o
...............................................................
thread_pool.lo array_allocator.lo sorted_array.lo  libfastcommon.so libfastcommon.a
gcc -Wall -D_FILE_OFFSET_BITS=64 -D_GNU_SOURCE -g -O3 -c -o shared_func.o shared_func.c
gcc -Wall -D_FILE_OFFSET_BITS=64 -D_GNU_SOURCE -g -O3 -c -o ini_file_reader.o ini_file_reader.c
....................................................................
 multi_socket_client.o skiplist_set.o uniq_skiplist.o json_parser.o buffered_file_writer.o server_id_func.o fc_queue.o sorted_queue.o fc_memory.o shared_buffer.o thread_pool.o array_allocator.o sorted_array.o
mkdir -p /usr/lib64
mkdir -p /usr/lib
mkdir -p /usr/include/fastcommon
install -m 755 libfastcommon.so /usr/lib64
install -m 644 common_define.h hash.h chain.h logger.h base64.h shared_func.h pthread_func.h ini_file_reader.h _os_define.h
locked_list.h json_parser.h buffered_file_writer.h server_id_func.h fc_queue.h sorted_queue.h fc_memory.h shared_buffer.h thread_pool.h fc_atomic.h array_allocator.h sorted_array.h /usr/include/fastcommon
(4)libserverframe 安装
我这里是用的git的方式下载然后进行编译安装,你们也可以去它的git官网找到对应的 tag下载对应的压缩包上传后进行编译安装
git clone https://gitee.com/fastdfs100/libserverframe.gitcd libserverframe/git checkout V1.1.20./make.sh clean && ./make.sh && ./make.sh install
[root@localhost installpackage]# git clone https://gitee.com/fastdfs100/libserverframe.git
Cloning into 'libserverframe'...
remote: Enumerating objects: 2218, done.
remote: Counting objects: 100% (817/817), done.
remote: Compressing objects: 100% (803/803), done.
remote: Total 2218 (delta 568), reused 0 (delta 0), pack-reused 1401
Receiving objects: 100% (2218/2218), 452.70 KiB | 0 bytes/s, done.
Resolving deltas: 100% (1613/1613), done.
[root@localhost installpackage]#
[root@localhost installpackage]#
[root@localhost installpackage]# cd libserverframe/
[root@localhost libserverframe]# git checkout V1.1.20
Note: checking out 'V1.1.20'.

You are in 'detached HEAD' state. You can look around, make experimental
changes and commit them, and you can discard any commits you make in this
state without impacting any branches by performing another checkout.

If you want to create a new branch to retain commits you create, you may
do so (now or later) by using -b with the checkout command again. Example:

  git checkout -b new_branch_name

HEAD is now at 16be02e... upgrade version to 1.1.20
[root@localhost libserverframe]#
[root@localhost libserverframe]#
[root@localhost libserverframe]#  ./make.sh clean && ./make.sh && ./make.sh install
rm -f sf_nio.lo sf_iov.lo sf_service.lo sf_global.lo sf_func.lo sf_util.lo sf_configs.lo sf_proto.lo sf_sharding_htable.lo sf_cluster_cfg.lo sf_connection_manager.lo sf_serializer.lo sf_binlog_index.lo sf_file_writer.lo sf_binlog_writer.lo idempotency/client/receipt_handler.lo idempotency/client/client_channel.lo libserverframe.so
....................................................................
gcc -Wall -D_FILE_OFFSET_BITS=64 -D_GNU_SOURCE -g -O3 -fPIC -c -o sf_nio.lo sf_nio.c  -Iinclude -I/usr/local/include
gcc -Wall -D_FILE_OFFSET_BITS=64 -D_GNU_SOURCE -g -O3 -fPIC -c -o sf_iov.lo sf_iov.c  -Iinclude -I/usr/local/include
gcc -Wall -D_FILE_OFFSET_BITS=64 -D_GNU_SOURCE -g -O3 -fPIC -c -o sf_service.lo sf_service.c  -Iinclude -I/usr/local/include
....................................................................
idempotency/server/request_htable.lo idempotency/server/channel_htable.lo idempotency/server/server_handler.lo idempotency/server/request_metadata.lo idempotency/client/receipt_handler.lo idempotency/client/client_channel.lo -lpthread -lfastcommon
mkdir -p /usr/lib64
mkdir -p /usr/lib
mkdir -p /usr/include/sf/idempotency/common
mkdir -p /usr/include/sf/idempotency/server
mkdir -p /usr/include/sf/idempotency/client
install -m 755 libserverframe.so /usr/lib64
cp -f sf_types.h sf_global.h sf_define.h sf_nio.h sf_service.h sf_func.h sf_util.h sf_configs.h sf_proto.h sf_cluster_cfg.h sf_sharding_htable.h sf_connection_manager.h sf_serializer.h sf_binlog_index.h sf_file_writer.h sf_binlog_writer.h sf_ordered_writer.h sf_buffered_writer.h sf_iov.h sf_shared_mbuffer.h /usr/include/sf
cp -f idempotency/common/idempotency_types.h /usr/include/sf/idempotency/common
cp -f idempotency/server/server_types.h idempotency/server/server_channel.h idempotency/server/request_htable.h idempotency/server/channel_htable.h idempotency/server/server_handler.h idempotency/server/request_metadata.h /usr/include/sf/idempotency/server
cp -f idempotency/client/client_types.h idempotency/client/receipt_handler.h idempotency/client/client_channel.h idempotency/client/rpc_wrapper.h /usr/include/sf/idempotency/client
(5)FastDFS 安装
我这里是用的git的方式下载然后进行编译安装,你们也可以去它的git官网找到对应的 tag下载对应的压缩包上传后进行编译安装
git clone https://gitee.com/fastdfs100/fastdfs.gitcd fastdfs; git checkout V6.09./make.sh clean && ./make.sh && ./make.sh install安装
fastDFS时一定要注意它的cp -f fdfs_storaged /usr/bin,cp -f fdfs_trackerd /usr/bin是否成功,如果失败的话就需要重新安装,否则在启动的时候就会有问题
[root@localhost installpackage]# git clone https://gitee.com/fastdfs100/fastdfs.git
Cloning into 'fastdfs'...
remote: Enumerating objects: 2777, done.
remote: Counting objects: 100% (476/476), done.
remote: Compressing objects: 100% (471/471), done.
remote: Total 2777 (delta 291), reused 3 (delta 2), pack-reused 2301
Receiving objects: 100% (2777/2777), 10.51 MiB | 2.28 MiB/s, done.
Resolving deltas: 100% (2053/2053), done.
[root@localhost installpackage]#
[root@localhost installpackage]# cd fastdfs; git checkout V6.09
Note: checking out 'V6.09'.

You are in 'detached HEAD' state. You can look around, make experimental
changes and commit them, and you can discard any commits you make in this
state without impacting any branches by performing another checkout.

If you want to create a new branch to retain commits you create, you may
do so (now or later) by using -b with the checkout command again. Example:

  git checkout -b new_branch_name

HEAD is now at e6fcd3e... use atomic counter instead of mutex lock
[root@localhost fastdfs]#
[root@localhost fastdfs]# ./make.sh clean && ./make.sh && ./make.sh install
rm -f ../common/fdfs_global.o tracker_proto.o tracker_mem.o tracker_service.o tracker_status.o tracker_global.o tracker_func.o fdfs_server_id_func.o fdfs_shared_func.o tracker_relationship.o tracker_dump.o fdfs_trackerd
.............................................................................
ar rcs libfdfsclient.a  ../common/fdfs_global.o ../common/fdfs_http_shared.o ../common/mime_file_parser.o ../tracker/tracker_proto.o ../tracker/fdfs_shared_func.o ../tracker/fdfs_server_id_func.o ../storage/trunk_mgr/trunk_shared.o tracker_client.o client_func.o client_global.o storage_client.o
gcc -Wall -D_FILE_OFFSET_BITS=64 -D_GNU_SOURCE -g -O1 -DDEBUG_FLAG -o libfdfsclient.so  -shared ../common/fdfs_global.lo ../common/fdfs_http_shared.lo ../common/mime_file_parser.lo ../tracker/tracker_proto.lo ../tracker/fdfs_shared_func.lo ../tracker/fdfs_server_id_func.lo ../storage/trunk_mgr/trunk_shared.lo tracker_client.lo client_func.lo client_global.lo storage_client.lo -L/usr/lib64 -lpthread -lfastcommon -lserverframe
mkdir -p /usr/bin
mkdir -p /etc/fdfs
cp -f fdfs_trackerd /usr/bin
if [ ! -f /etc/fdfs/tracker.conf ]; then cp -f ../conf/tracker.conf /etc/fdfs/tracker.conf; fi
if [ ! -f /etc/fdfs/storage_ids.conf ]; then cp -f ../conf/storage_ids.conf /etc/fdfs/storage_ids.conf; fi
mkdir -p /usr/bin
mkdir -p /etc/fdfs
cp -f fdfs_storaged  /usr/bin
if [ ! -f /etc/fdfs/storage.conf ]; then cp -f ../conf/storage.conf /etc/fdfs/storage.conf; fi
mkdir -p /usr/bin
mkdir -p /etc/fdfs
mkdir -p /usr/lib64
mkdir -p /usr/lib
cp -f fdfs_monitor fdfs_test fdfs_test1 fdfs_crc32 fdfs_upload_file fdfs_download_file fdfs_delete_file fdfs_file_info fdfs_appender_test fdfs_appender_test1 fdfs_append_file fdfs_upload_appender fdfs_regenerate_filename /usr/bin
if [ 0 -eq 1 ]; then cp -f libfdfsclient.a /usr/lib64; cp -f libfdfsclient.a /usr/lib/;fi
if [ 1 -eq 1 ]; then cp -f libfdfsclient.so /usr/lib64; cp -f libfdfsclient.so /usr/lib/;fi
mkdir -p /usr/include/fastdfs
cp -f ../common/fdfs_define.h ../common/fdfs_global.h ../common/mime_file_parser.h ../common/fdfs_http_shared.h ../tracker/tracker_types.h ../tracker/tracker_proto.h ../tracker/fdfs_shared_func.h ../tracker/fdfs_server_id_func.h ../storage/trunk_mgr/trunk_shared.h tracker_client.h storage_client.h storage_client1.h client_func.h client_global.h fdfs_client.h /usr/include/fastdfs
if [ ! -f /etc/fdfs/client.conf ]; then cp -f ../conf/client.conf /etc/fdfs/client.conf; fi
默认命令工具查看
要注意
fdfs_trackerd, 和fdfs_trackerd在不在
[root@localhost fastdfs]# cd /usr/bin/ && ll | grep fdfs
-rwxr-xr-x.   1 root root     380400 Jul 18 22:03 fdfs_appender_test
-rwxr-xr-x.   1 root root     380176 Jul 18 22:03 fdfs_appender_test1
-rwxr-xr-x.   1 root root     367144 Jul 18 22:03 fdfs_append_file
-rwxr-xr-x.   1 root root     365776 Jul 18 22:03 fdfs_crc32
-rwxr-xr-x.   1 root root     367176 Jul 18 22:03 fdfs_delete_file
-rwxr-xr-x.   1 root root     367904 Jul 18 22:03 fdfs_download_file
-rwxr-xr-x.   1 root root     367856 Jul 18 22:03 fdfs_file_info
-rwxr-xr-x.   1 root root     387464 Jul 18 22:03 fdfs_monitor
-rwxr-xr-x.   1 root root     367416 Jul 18 22:03 fdfs_regenerate_filename
-rwxr-xr-x.   1 root root    1297968 Jul 18 22:03 fdfs_storaged
-rwxr-xr-x.   1 root root     390304 Jul 18 22:03 fdfs_test
-rwxr-xr-x.   1 root root     389520 Jul 18 22:03 fdfs_test1
-rwxr-xr-x.   1 root root     509944 Jul 18 22:03 fdfs_trackerd
-rwxr-xr-x.   1 root root     368120 Jul 18 22:03 fdfs_upload_appender
-rwxr-xr-x.   1 root root     369128 Jul 18 22:03 fdfs_upload_file
(6)配置文件修改
创建数据文件
/etc/fdfs/tracker.conf修改启动tracker
vim /etc/fdfs/tracker.conf
- 防火墙开放端口:
firewall-cmd --zone=public --add-port=22122/tcp --permanentfirewall-cmd --reload
# 配置文件是否不生效 false为生效
disabled = false
# tracker 服务的端口
port = 22122
# tracker 存储数据和日志文件的根目录,根目录需要提前创建好
base_path = /data/fastdfs/tracker
启动tracker server:
/usr/bin/fdfs_trackerd /etc/fdfs/tracker.conf restart检测tracker server 是否启动:
ps -ef | grep fd检测22122端口是否被监听:
netstat -tnpl | grep 22122关闭tracker server(根据自己的需要执行):
/usr/bin/fdfs_trackerd stop
[root@localhost tracker]# /usr/bin/fdfs_trackerd /etc/fdfs/tracker.conf restart
[root@localhost tracker]# ps -ef | grep fd
root       4703      1  0 22:10 ?        00:00:00 /usr/bin/fdfs_trackerd /etc/fdfs/tracker.conf restart
root       4714   2739  0 22:11 pts/1    00:00:00 grep --color=auto fd
[root@localhost tracker]# netstat -tnpl | grep 22122
tcp        0      0 0.0.0.0:22122           0.0.0.0:*               LISTEN      4703/fdfs_trackerd
/etc/fdfs/storage.conf修改启动storage
注意防火墙的开放端口 23000,8888
关闭tracker server(根据自己的需要执行):
/usr/bin/fdfs_storaged stop
vim /etc/fdfs/storage.conf
# 配置文件是否不生效,false 为生效
disabled=false
# 指定此 storage server 所在 组
group_name=group1
# storage server 服务的端口
port=23000
# Storage 数据和日志目录地址,目录必须提前创建好
base_path=/data/fastdfs/storage
# 文件存储路径的个数。
store_path_count=1
# 配置 store_path_count 个路径,索引号从 0 开始。
# 如果不配置 store_path0,那它就和 base_path 的路径一样。
store_path0=/data/fastdfs/storage
# FastDFS 存储文件时,采用了两级目录。这里配置存放文件的目录个数。
# tracker_server 的列表 ,会主动连接 tracker_server
# 当存在多个 tracker server 时,每个 tracker server 写一行
tracker_server=192.168.121.137:22122
# 此存储服务器上web服务器的端口
http.server_port=8888
[root@localhost tracker]# /usr/bin/fdfs_storaged /etc/fdfs/storage.conf restart
[root@localhost tracker]# ps -ef | grep fd
root       6895      1  0 23:29 ?        00:00:00 /usr/bin/fdfs_trackerd /etc/fdfs/tracker.conf restart
root       6934      1 13 23:30 ?        00:00:03 /usr/bin/fdfs_storaged /etc/fdfs/storage.conf restart
root       6959   2739  0 23:30 pts/1    00:00:00 grep --color=auto fd
[root@localhost tracker]#
[root@localhost tracker]# netstat -tnpl | grep 2300
tcp        0      0 0.0.0.0:23000           0.0.0.0:*               LISTEN      6934/fdfs_storaged
[root@localhost tracker]#
查看storage和tracker是否在通讯
/usr/bin/fdfs_monitor /etc/fdfs/storage.conf- 注意
tracker server is:XXXX.XXXX.XXXX.XXXX:22122, 和 Storage: 的信息即可
[root@localhost storage]# /usr/bin/fdfs_monitor /etc/fdfs/storage.conf
[2023-07-18 23:36:06] DEBUG - base_path=/opt/software/fastdfs/data/fastdfs/storage, connect_timeout=5, network_timeout=60, tracker_server_count=1, anti_steal_token=0, anti_steal_secret_key length=0, use_connection_pool=1, g_connection_pool_max_idle_time=3600s, use_storage_id=0, storage server id count: 0

server_count=1, server_index=0

tracker server is 192.168.125.100:22122

group count: 1

Group 1:
group name = group1
disk total space = 29,504 MB
disk free space = 18,374 MB
trunk free space = 0 MB
storage server count = 1
active server count = 1
storage server port = 23000
storage HTTP port = 8888
store path count = 1
subdir count per path = 256
current write server index = 0
current trunk file id = 0

	Storage 1:
		id = 192.168.125.100
		ip_addr = 192.168.125.100  ACTIVE
		http domain =
		version = 6.09
		join time = 2023-07-18 23:30:11
		up time = 2023-07-18 23:30:11
		total storage = 29,504 MB
		free storage = 18,374 MB
		upload priority = 10
		store_path_count = 1
		subdir_count_per_path = 256
		storage_port = 23000
		storage_http_port = 8888
		current_write_path = 0
.......................................
		success_file_read_count = 0
		total_file_write_count = 0
		success_file_write_count = 0
		last_heart_beat_time = 2023-07-18 23:35:47
		last_source_update = 1970-01-01 08:00:00
		last_sync_update = 1970-01-01 08:00:00
		last_synced_timestamp = 1970-01-01 08:00:00
[root@localhost storage]#
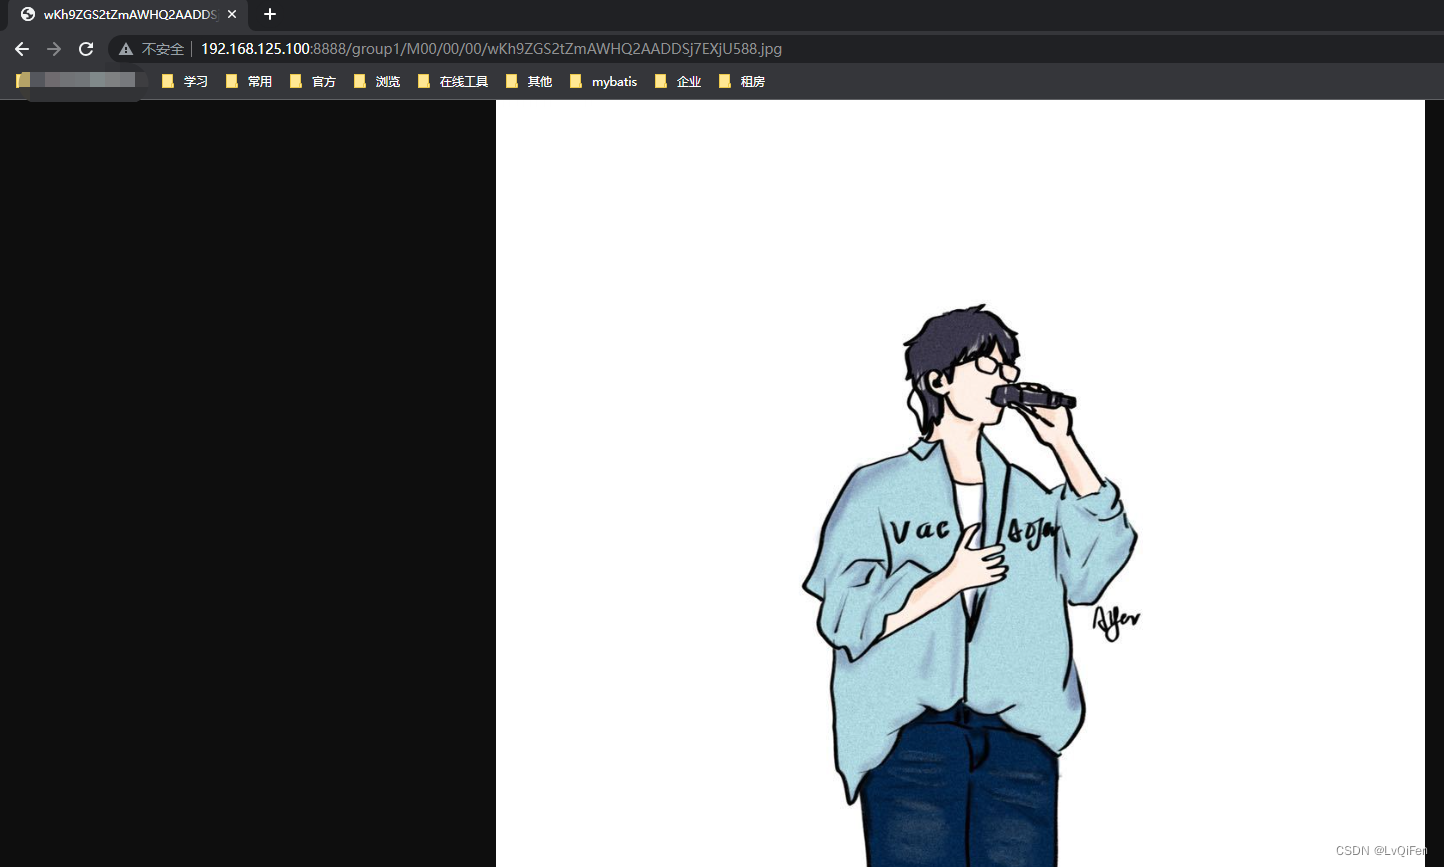
上传图片测试
可以使用 rz命令选择要上传的文件,也可以使用其它工具进行上传,然后修改下 client.conf的 配置文件
vim /etc/fdfs/client.conf/usr/bin/fdfs_upload_file /etc/fdfs/client.conf /opt/software/fastdfs/temp/hlb_head_pic.jpg使用client的上传命令后,会返回一串上传文件的 文件id, 例如:
group1/M00/00/00/wKh9ZGS2tZmAWHQ2AADDSj7EXjU588.jpg
group1: storage的组名M00:磁盘/00/00/:路径wKh9ZGS2tZmAWHQ2AADDSj7EXjU588.jpg: 文件名
# 存储client的日志文件
base_path = /data/fastdfs/client
# tracker服务器的地址,多个写多行
tracker_server = 192.168.100.125:22122
[root@localhost temp]# pwd
/opt/software/fastdfs/temp
[root@localhost temp]# ll
total 52
-rw-r--r--. 1 root root 49994 Jul 18 17:56 hlb_head_pic.jpg
[root@localhost temp]# /usr/bin/fdfs_upload_file /etc/fdfs/client.conf /opt/software/fastdfs/temp/hlb_head_pic.jpg
group1/M00/00/00/wKh9ZGS2tZmAWHQ2AADDSj7EXjU588.jpg
上面那个文件id 所指向的位置,实际上就是group 组为 group1的storage server ,它配置的base_path里的路径下的data,再往下
我配置的 group 组为 group1的storage server ,
base_path = /opt/software/fastdfs/data/fastdfs/storage, 最后上传文件后放在了/opt/software/fastdfs/data/fastdfs/storage/data/00/00下
[root@localhost 00]# pwd
/opt/software/fastdfs/data/fastdfs/storage/data/00/00
[root@localhost 00]#
[root@localhost 00]#
[root@localhost 00]# ls
wKh9ZGS2tZmAWHQ2AADDSj7EXjU588.jpg
(7)nginx 安装
- 下载:
wget http://nginx.org/download/nginx-1.22.1.tar.gz- 解压:
tar -zxvf nginx-1.22.1.tar.gz -C /opt/software- 编译:
- ./configure
- make
- make install
- 测试 安装是否存在问题
/usr/local/nginx/sbin/nginx -v- 启动:
/usr/local/nginx/sbin/nginx- 停止:
/usr/local/nginx/sbin/nginx -s stop- 刷新配置:
/usr/local/nginx/sbin/nginx -s reload
[root@localhost installpackage]# pwd
/opt/installpackage
[root@localhost installpackage]# wget http://nginx.org/download/nginx-1.22.1.tar.gz
--2023-03-31 06:20:27--  http://nginx.org/download/nginx-1.22.1.tar.gz
Resolving nginx.org (nginx.org)... 52.58.199.22, 3.125.197.172, 2a05:d014:edb:5702::6, ...
Connecting to nginx.org (nginx.org)|52.58.199.22|:80... connected.
HTTP request sent, awaiting response... 200 OK
Length: 1073948 (1.0M) [application/octet-stream]
Saving to: ‘nginx-1.22.1.tar.gz’

100%[=================================================================================================================================================================

2023-03-31 06:22:57 (6.99 KB/s) - ‘nginx-1.22.1.tar.gz’ saved [1073948/1073948]

[root@localhost installpackage]# tar -zxvf nginx-1.22.1.tar.gz -C /opt/software
[root@localhost installpackage]# /usr/local/nginx/sbin/nginx -v
nginx version: nginx/1.22.1
[root@localhost installpackage]# /usr/local/nginx/sbin/nginx -t
ngx_http_fastdfs_set pid=15289
nginx: the configuration file /usr/local/nginx/conf/nginx.conf syntax is ok
nginx: configuration file /usr/local/nginx/conf/nginx.conf test is successful
[root@localhost installpackage]# cd /opt/software/nginx-1.22.1
[root@localhost nginx-1.22.1]# pwd
/opt/software/nginx-1.22.1
[root@localhost nginx-1.22.1]# ./configure
....
[root@localhost nginx-1.22.1]# make
....
[root@localhost nginx-1.22.1]# make install
....
(8)fastdfs-nginx-module 安装
我这里是用的git的方式下载然后进行编译安装,你们也可以去它的git官网找到对应的 tag下载对应的压缩包上传后进行编译安装
- 注意不同于
libfastcomon和libserverframe,fastdfs-nginx-module不需要进行编译- 下载后需要用
nginx加载该模块
[root@localhost installpackage]# git clone https://gitee.com/fastdfs100/fastdfs-nginx-module.git
Cloning into 'fastdfs-nginx-module'...
remote: Enumerating objects: 129, done.
remote: Counting objects: 100% (14/14), done.
remote: Compressing objects: 100% (14/14), done.
remote: Total 129 (delta 2), reused 0 (delta 0), pack-reused 115
Receiving objects: 100% (129/129), 47.39 KiB | 0 bytes/s, done.
Resolving deltas: 100% (65/65), done.
[root@localhost installpackage]#
[root@localhost installpackage]#
[root@localhost installpackage]# cd fastdfs-nginx-module; git checkout V1.23
Note: checking out 'V1.23'.

You are in 'detached HEAD' state. You can look around, make experimental
changes and commit them, and you can discard any commits you make in this
state without impacting any branches by performing another checkout.

If you want to create a new branch to retain commits you create, you may
do so (now or later) by using -b with the checkout command again. Example:

  git checkout -b new_branch_name

HEAD is now at 17e919f... upgrade by FastDFS v6.09
(9)nginx 集成 fastdfs-nginx-module
- 先进入nginx的源码包,然后执行
./configure --add-module=/opt/installpackage/fastdfs-nginx-module/src添加fastd-nginx module。注意--add-module=XXX后面的路径就是你下载的fastdfs-nginx-module,并且要到src目录下- 编译:
make; make install- 查看nginx集成的模块:
/usr/local/nginx/sbin/nginx -V- 复制
fastdfs-nginx-module里的mod_fastdfs.conf文件 到/etc/fdfs/下- 复制
fastdfs的conf 下的mime.types和http.conf到/etc/fdfs下, 注意这里是fastdfs的conf是前面的FastDFS安装的那个- 编辑
/etc/fdfs/mod_fastdfs.conf- 配置
nginx conf的 server 段
[root@localhost nginx-1.22.1]# ./configure --add-module=/opt/installpackage/fastdfs-nginx-module/src
[root@localhost nginx-1.22.1]# make; make install
[root@localhost nginx-1.22.1]# /usr/local/nginx/sbin/nginx -V
nginx version: nginx/1.22.1
built by gcc 4.8.5 20150623 (Red Hat 4.8.5-44) (GCC)
configure arguments: --add-module=/opt/installpackage/fastdfs-nginx-module/src
[root@localhost nginx-1.22.1]# cp /opt/installpackage/fastdfs-nginx-module/src/mod_fastdfs.conf /etc/fdfs/
[root@localhost nginx-1.22.1]# cp /opt/installpackage/fastdfs/conf/mime.types /etc/fdfs/
[root@localhost nginx-1.22.1]# cp /opt/installpackage/fastdfs/conf/http.conf /etc/fdfs/
编辑
/etc/fdfs/mod_fastdfs.conf
vim /etc/fdfs/mod_fastdfs.conf
# tracker server 的地址,多个写多行
tracker_server=192.168.125.100:22122
# storage server的端口
storage_server_port=23000
# storage server的组名
group_name=group1
# url上是否有组名 默认是false,本案例这里需要打开true
url_have_group_name = true
# 和 storage.conf配置文件中配置的一样
store_path_count=1
# 和 storage.conf配置文件中配置的一样
store_path0=/data/fastdfs/storage
配置
nginx conf的 server 段,此处的8888和/etc/fdfs/storage.conf中的http.server_port=8888值要一致。
vim /usr/local/nginx/conf/nginx.conf
server {
        listen       8888;
        server_name  192.168.125.100;
        location ~/group([0-9])/ {
                ngx_fastdfs_module;
        }
 }
重启 nginx
- 测试:
/usr/local/nginx/sbin/nginx -t- 启动:
/usr/local/nginx/sbin/nginx- 刷新配置(根据需要操作):
/usr/local/nginx/sbin/nginx -s reload- 关闭(根据需要操作):
/usr/local/nginx/sbin/nginx -s stop
[root@localhost nginx]# /usr/local/nginx/sbin/nginx -t
ngx_http_fastdfs_set pid=19661
nginx: the configuration file /usr/local/nginx/conf/nginx.conf syntax is ok
nginx: configuration file /usr/local/nginx/conf/nginx.conf test is successful
[root@localhost nginx]# /usr/local/nginx/sbin/nginx
(10)最终结果演示
访问前面上传图片测试的路径,ip:端口/fastdfs生成的图片路径,即可访问到了
参考资料
- centos7上单机安装fastdfs6.0.9
- fastDFS gitee 官网
- fastdfs 6.0.9 install手册
- fastdfs-nginx-modeule V1.23 install 手册