
时不我待(第十八课)项目环境搭建_星辰镜的博客-CSDN博客
在上面的环境的基础上加上下面的一下配置
Normalize.css: Make browsers render all elements more consistently. (necolas.github.io)

介绍 | Pinia 中文文档 (web3doc.top)

Day.js · 中文文档 - 2kB 大小的 JavaScript 时间日期库

Button 按钮 - Vant Weapp (youzan.github.io)

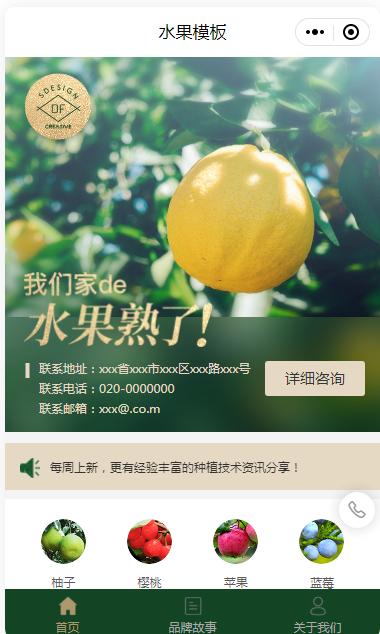
今天的项目要实现的效果图


App.vue


路由的跳转
import { createRouter, createWebHistory } from 'vue-router'

const router = createRouter({
  history: createWebHistory(import.meta.env.BASE_URL),
  routes: [
      {
        path:'/',
        redirect:'/home'
      },
      {
        path:'/home',
        component:()=>import("@/pages/home/home.vue")
      },
      {
        path:'/favor',
        component:()=>import("@/pages/favor/favor.vue")
      },
      {
        path:'/info',
        component:()=>import("@/pages/info/info.vue")
      },
      {
        path:'/order',
        component:()=>import("@/pages/order/order.vue")

      },

      }
  ]
})

export default router
<template>
  <div class="favor">
    <h3>我是第二个页面</h3>
  </div>
</template>

<script setup>

</script>

<style scoped>

</style>

<template>
  <div class="info">
   <h3>我是第三个页面</h3>
  </div>
</template>

<script setup>

</script>

<style scoped>

</style>


<template>
  <div class="order">
    <h3>我是第四个页面</h3>
  </div>
</template>

<script setup>

</script>

<style scoped>

</style>
<template>
  <div class="nav-tab">
    <!-- 文字标签 -->
    <div class="title">星辰旅途</div>
  </div>
</template>

<script setup>

</script>

<style scoped>
.nav-tab{
  display: flex;
  justify-content: center;
  align-items: center;
  padding: 14px 0;
  font-size: 16px;
  color: var(--color-all);
  font-weight: 800;
}
</style>
:root{
  --color-all:#ff9954;
  --line-color: #faf8f9;
  --theme-linear-gradient: linear-gradient(90deg, #fa8c1d, #fcaf3f);
}

body{
  font-size: 14px;
  /* font-family: serif; */
}

/* 隐藏tabbar */
.top-page{
  position: relative;
  z-index: 9;
  height: 100vh;
  background-color: #fff;
  overflow-y: auto;
}
body,html,h1,h2,h3,ul,li {
padding: 0;
margin: 0;
}
ul,li{
list-style: none;
}
a{
text-decoration: none;
color: #333;
}
img{
vertical-align: top;
}@import "./common.css";
@import "./reset.css"; <!-- 3 使用的四子组件引入的样式是城市的信息 -->
<van-swipe class="my-swipe" :autoplay="4000" indicator-color="red">
<van-swipe-item>
<img class="image" src="@/assets/img/home/img/1 (1).jpg" alt=""
/></van-swipe-item>
<van-swipe-item>
<img class="image" src="@/assets/img/home/img/1 (2).jpg" alt=""
/></van-swipe-item>
<van-swipe-item>
<img class="image" src="@/assets/img/home/img/1 (3).jpg" alt=""
/></van-swipe-item>
<van-swipe-item>
<img class="image" src="@/assets/img/home/img/1 (4).jpg" alt=""
/></van-swipe-item>
<van-swipe-item>
<img class="image" src="@/assets/img/home/img/1 (1).jpg" alt=""
/></van-swipe-item>
<van-swipe-item>
<img class="image" src="@/assets/img/home/img/1 (5).jpg" alt=""
/></van-swipe-item>
<van-swipe-item>
<img class="image" src="@/assets/img/home/img/1 (6).jpg" alt=""
/></van-swipe-item>
<van-swipe-item>
<img class="image" src="@/assets/img/home/img/1 (7).jpg" alt=""
/></van-swipe-item>
<van-swipe-item>
<img class="image" src="@/assets/img/home/img/1 (8).jpg" alt=""
/></van-swipe-item>
</van-swipe>Swiper Vue.js Components (swiperjs.com)

产品开发的大致流程
一般公司流程如下:
1、产品经理设计产品原型图 2、UI设计师设计符合需求的原型UI图 3、前端100%还原高保真UI设计图 4、后端设计接口 5、前后端接口联调 6、前后端功能自测 7、测试、运维进行产品的测试和上线
一般大型公司流程如下:
1、需求侧提出需求 2、SE进行需求分析并输出需求文档 3、开需求分析会(甲方、SE、开发、测试) 4、相关开发人员投入开发,开发完毕后进行自测且输出自测报告 5、合并代码到dev分支后进行申请转测 6、运维部署项目,测试人员开始测试并记录相关问题(开发跟进问题) 7、需求实现后合并代码到生产分支发布上线
