文章目录
- 概述
- 总线设备驱动
- 总线设备驱动模型
- 程序步骤:
- 常用函数
- 注册/ 反注册
- 获得资源
- LED 模板驱动程序的改造:总线设备驱动模型
- board_A_led.c
- chip_demo_gpio.c
- led_opr.h
- led_resource.h
- leddrv.c
- leddrv.h
- ledtest.c
- Makefile
- 编译测试
概述
为什么要引入总线设备架构?为了更好扩展和减少内核的臃肿
阅读博文:LED驱动(原始架构优化:分层/分离)——STM32MP157,我们可以利用分离的思想去写出比较通用的硬件操作代码,但是如果去写按键的驱动,需要定义按键资源的结构体,写lcd的驱动,也需要定义新的lcd资源的结构体,这样会导致内核定义了多个重复功能的结构体,能否用统一的结构体去定义GPIO、按键、lcd的资源呢?——利用总线设备架构,即只有一个结构体:platform_device 来定义所以设备的资源。
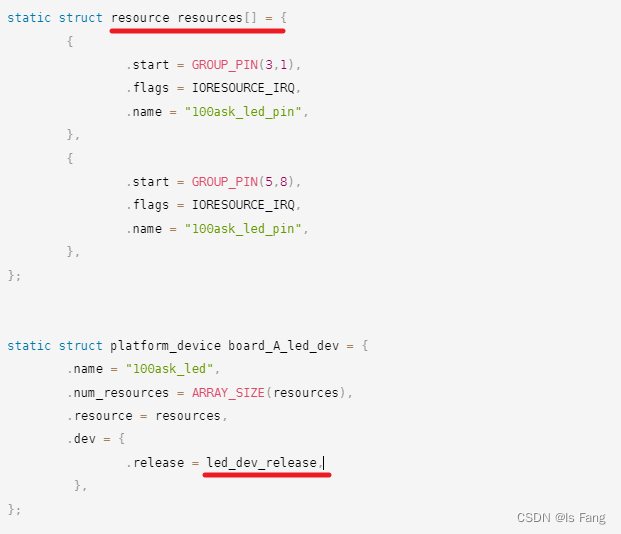
例如resources数组中就定义了led设备的所以资源,我们想要修改某个led设备节点所对应的引脚,就可以修改资源列表(数组)中的宏定义GROUP_PIN();
总线设备驱动
总线设备驱动模型
总线设备驱动模型

platform_driver结构体会匹配到对应的platform_device结构体,通过名字进行匹配
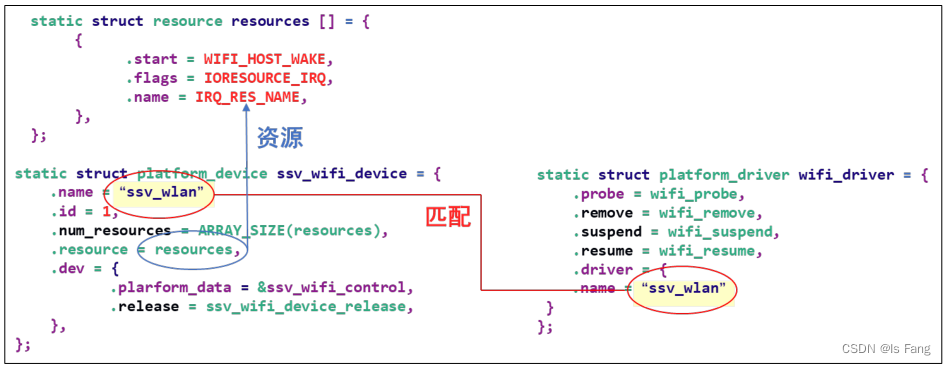
通过总线设备去管理platform_device和platform_driver两个结构体,即引入platform_device/platform_driver,将“资源”与“驱动”分离
在Linux 中实现“分离”:Bus/Dev/Drv 模型
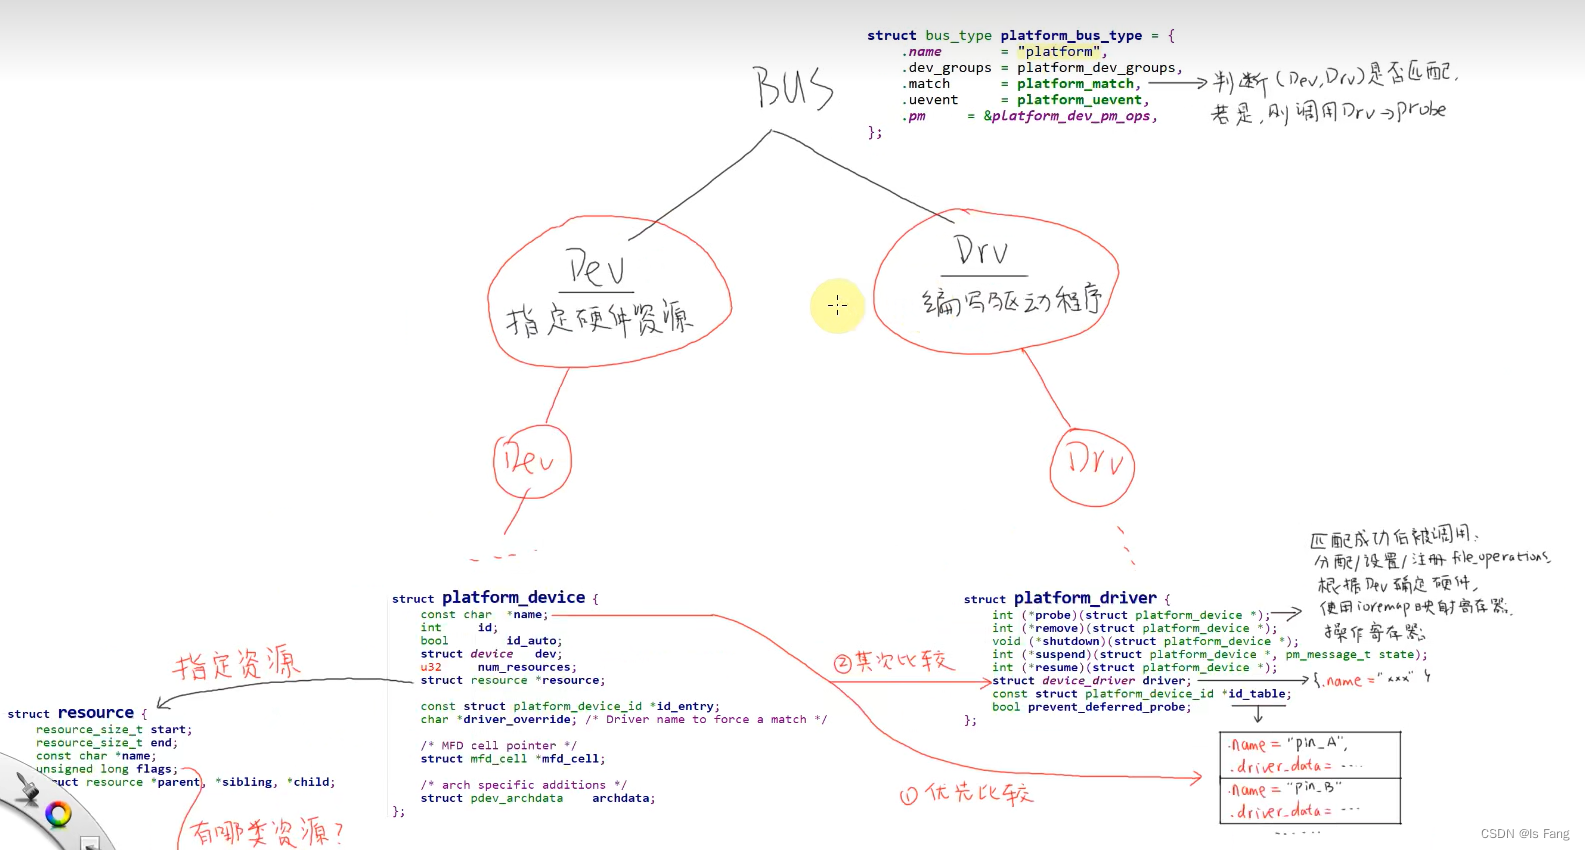
虚拟总线有match函数去匹配,匹配成功则调用DRv->probe函数,操作硬件时需要从probe函数的参数(platform_device)里面获取硬件资源的寄存器
匹配规则
- 匹配有多个步骤,
- 先拿driver_override去匹配driver结构体里面的name,
- 再拿name匹配id_table数组里面的name【该数组展示能够匹配的设备】,
- 最后拿name匹配driver结构体里面的name
匹配时函数的调用关系
platform_device_register
platform_device_add
	device_add
		bus_add_device // 放入链表
		bus_probe_device // probe 枚举设备,即找到匹配的(dev, drv)
			device_initial_probe
				__device_attach
					bus_for_each_drv(...,__device_attach_driver,...)
						__device_attach_driver
							driver_match_device(drv, dev) // 是否匹配
							driver_probe_device // 调用 drv 的 probe


platform_driver_register
	__platform_driver_register
		driver_register
			bus_add_driver // 放入链表
				driver_attach(drv)
					bus_for_each_dev(drv->bus, NULL, drv, __driver_attach);
						__driver_attach
							driver_match_device(drv, dev) // 是否匹配
							driver_probe_device // 调用 drv 的 probe
程序步骤:
- 分配/ 设置/ 注册
platform_device结构体
在里面定义所用资源,指定设备名字。 - 分配/ 设置/ 注册
platform_driver结构体
在其中的 probe 函数里,分配/设置/ 注册 file_operations 结构体,probe 函数里面主要完成两件事(记录资源和调用device_create)
并从platform_device 中确实所用硬件资源,
指定 platform_driver 的名字。
常用函数
函数可查看内核源码:drivers/base/platform.c,根据函数名即可知道其含义
注册/ 反注册
platform_device_register/ platform_device_unregister
platform_driver_register/ platform_driver_unregister
platform_add_devices // 注册多个 device
总线设备架构需要调用三个注册函数(platform_device_register和platform_driver_register和register_chrdev),分别注册三个结构体(platform_device和platform_driver和file_operations)
获得资源
因为硬件操作与设备资源的代码分离,所以硬件操作需要获取设备资源时,可以调用以下几个函数
- 返回该 dev 中某类型(type)资源中的第几个(num):
struct resource *platform_get_resource(struct platform_device *dev,
										unsigned int type,
										unsigned int num)
- 返回该 dev 所用的第几个(num)中断:
int platform_get_irq(struct platform_device *dev, unsigned int num)
- 通过名字(name)返回该 dev 的某类型(type)资源:
struct resource *platform_get_resource_byname(struct platform_device *dev,
												unsigned int type,
												const char *name)
- 通过名字(name)返回该 dev 的中断号:
int platform_get_irq_byname(struct platform_device *dev , const char *name)
LED 模板驱动程序的改造:总线设备驱动模型
实现流程
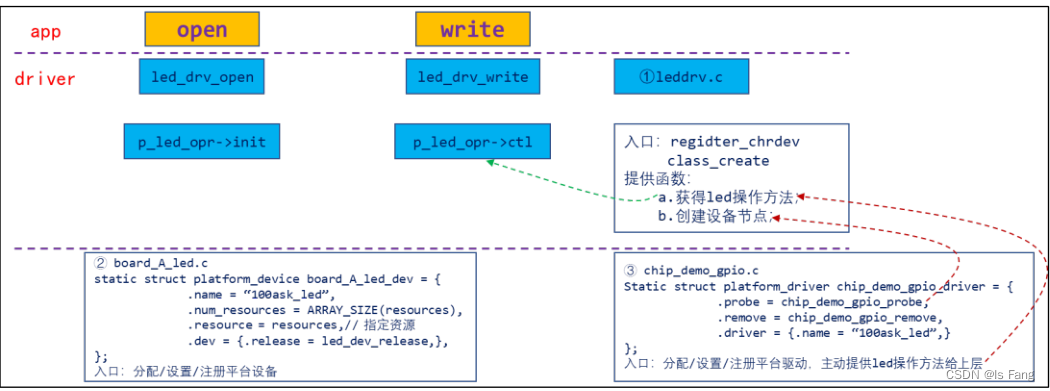
board_A_led.c
#include <linux/module.h>

#include <linux/fs.h>
#include <linux/errno.h>
#include <linux/miscdevice.h>
#include <linux/kernel.h>
#include <linux/major.h>
#include <linux/mutex.h>
#include <linux/proc_fs.h>
#include <linux/seq_file.h>
#include <linux/stat.h>
#include <linux/init.h>
#include <linux/device.h>
#include <linux/tty.h>
#include <linux/kmod.h>
#include <linux/gfp.h>
#include <linux/platform_device.h>

#include "led_resource.h"


static void led_dev_release(struct device *dev)
{
//必须定义该函数,否则 调用platform_device_unregister 时会出现警告
}

static struct resource resources[] = {
        {
                .start = GROUP_PIN(3,1),
                .flags = IORESOURCE_IRQ,
                .name = "100ask_led_pin",
        },
        {
                .start = GROUP_PIN(5,8),
                .flags = IORESOURCE_IRQ,
                .name = "100ask_led_pin",
        },
};


static struct platform_device board_A_led_dev = {
        .name = "100ask_led",
        .num_resources = ARRAY_SIZE(resources),
        .resource = resources,
        .dev = {
                .release = led_dev_release,
         },
};

static int __init led_dev_init(void)
{
    int err;

    err = platform_device_register(&board_A_led_dev);

    return 0;
}

static void __exit led_dev_exit(void)
{
    platform_device_unregister(&board_A_led_dev);
}

module_init(led_dev_init);
module_exit(led_dev_exit);

MODULE_LICENSE("GPL");
chip_demo_gpio.c
#include <linux/module.h>

#include <linux/fs.h>
#include <linux/errno.h>
#include <linux/miscdevice.h>
#include <linux/kernel.h>
#include <linux/major.h>
#include <linux/mutex.h>
#include <linux/proc_fs.h>
#include <linux/seq_file.h>
#include <linux/stat.h>
#include <linux/init.h>
#include <linux/device.h>
#include <linux/tty.h>
#include <linux/kmod.h>
#include <linux/gfp.h>
#include <linux/platform_device.h>

#include "led_opr.h"
#include "leddrv.h"
#include "led_resource.h"

//定义一个数组,存放引脚信息
static int g_ledpins[100];
static int g_ledcnt = 0;

static int board_demo_led_init (int which) /* 初始化LED, which-哪个LED */
{
    //printk("%s %s line %d, led %d\n", __FILE__, __FUNCTION__, __LINE__, which);

    printk("init gpio: group %d, pin %d\n", GROUP(g_ledpins[which]), PIN(g_ledpins[which]));
    switch(GROUP(g_ledpins[which]))
    {
        case 0:
        {
            printk("init pin of group 0 ...\n");
            break;
        }
        case 1:
        {
            printk("init pin of group 1 ...\n");
            break;
        }
        case 2:
        {
            printk("init pin of group 2 ...\n");
            break;
        }
        case 3:
        {
            printk("init pin of group 3 ...\n");
            break;
        }
    }

    return 0;
}

static int board_demo_led_ctl (int which, char status) /* 控制LED, which-哪个LED, status:1-亮,0-灭 */
{
    //printk("%s %s line %d, led %d, %s\n", __FILE__, __FUNCTION__, __LINE__, which, status ? "on" : "off");
    printk("set led %s: group %d, pin %d\n", status ? "on" : "off", GROUP(g_ledpins[which]), PIN(g_ledpins[which]));

    switch(GROUP(g_ledpins[which]))
    {
        case 0:
        {
            printk("set pin of group 0 ...\n");
            break;
        }
        case 1:
        {
            printk("set pin of group 1 ...\n");
            break;
        }
        case 2:
        {
            printk("set pin of group 2 ...\n");
            break;
        }
        case 3:
        {
            printk("set pin of group 3 ...\n");
            break;
        }
    }

    return 0;
}

static struct led_operations board_demo_led_opr = {
    .init = board_demo_led_init,
    .ctl  = board_demo_led_ctl,
};

struct led_operations *get_board_led_opr(void)
{
    return &board_demo_led_opr;
}
//获取资源信息和调用创建设备节点的函数device_create()
static int chip_demo_gpio_probe(struct platform_device *pdev)
{
    struct resource *res;
    int i = 0;

    while (1)
    {
        res = platform_get_resource(pdev, IORESOURCE_IRQ, i++);//返回该 dev 中某类型(type)资源中的第几个(num)
        if (!res)
            break;

        g_ledpins[g_ledcnt] = res->start;//记录引脚信息
        //注册设备,调用其他文件里面的函数,所以该源文件生成的模块要在调用函数所在模块之后,否则会报错
        led_class_create_device(g_ledcnt);
        g_ledcnt++;
    }
    return 0;

}

static int chip_demo_gpio_remove(struct platform_device *pdev)
{
    struct resource *res;
    int i = 0;

    while (1)
    {
        res = platform_get_resource(pdev, IORESOURCE_IRQ, i);
        if (!res)
            break;

        led_class_destroy_device(i);
        i++;
        g_ledcnt--;
    }
    return 0;
}


static struct platform_driver chip_demo_gpio_driver = {
    .probe      = chip_demo_gpio_probe,
    .remove     = chip_demo_gpio_remove,
    .driver     = {
        .name   = "100ask_led",
    },
};

static int __init chip_demo_gpio_drv_init(void)
{
    int err;

    err = platform_driver_register(&chip_demo_gpio_driver);
    register_led_operations(&board_demo_led_opr);//向上层提供了led的操作函数

    return 0;
}

static void __exit lchip_demo_gpio_drv_exit(void)
{
    platform_driver_unregister(&chip_demo_gpio_driver);
}

module_init(chip_demo_gpio_drv_init);
module_exit(lchip_demo_gpio_drv_exit);

MODULE_LICENSE("GPL");
led_opr.h
#ifndef _LED_OPR_H
#define _LED_OPR_H

struct led_operations {
	int (*init) (int which); /* 初始化LED, which-哪个LED */
	int (*ctl) (int which, char status); /* 控制LED, which-哪个LED, status:1-亮,0-灭 */
};

struct led_operations *get_board_led_opr(void);

#endif
led_resource.h
#ifndef _LED_RESOURCE_H
#define _LED_RESOURCE_H

/* GPIO3_0 */
/* bit[31:16] = group */
/* bit[15:0]  = which pin */
#define GROUP(x) (x>>16)
#define PIN(x)   (x&0xFFFF)
#define GROUP_PIN(g,p) ((g<<16) | (p))

#endif
leddrv.c
#include <linux/module.h>

#include <linux/fs.h>
#include <linux/errno.h>
#include <linux/miscdevice.h>
#include <linux/kernel.h>
#include <linux/major.h>
#include <linux/mutex.h>
#include <linux/proc_fs.h>
#include <linux/seq_file.h>
#include <linux/stat.h>
#include <linux/init.h>
#include <linux/device.h>
#include <linux/tty.h>
#include <linux/kmod.h>
#include <linux/gfp.h>

#include "led_opr.h"


/* 1. 确定主设备号                                                                 */
static int major = 0;
static struct class *led_class;
struct led_operations *p_led_opr;


#define MIN(a, b) (a < b ? a : b)

//将设备创建函数封装好并暴露出去
void led_class_create_device(int minor)
{
	device_create(led_class, NULL, MKDEV(major, minor), NULL, "100ask_led%d", minor); /* /dev/100ask_led0,1,... */
}
void led_class_destroy_device(int minor)
{
	device_destroy(led_class, MKDEV(major, minor));
}
void register_led_operations(struct led_operations *opr)
{
	p_led_opr = opr;
}

EXPORT_SYMBOL(led_class_create_device);//暴露该函数,其他模块可以调用
EXPORT_SYMBOL(led_class_destroy_device);
EXPORT_SYMBOL(register_led_operations);//存在交叉依赖,


/* 3. 实现对应的open/read/write等函数,填入file_operations结构体                   */
static ssize_t led_drv_read (struct file *file, char __user *buf, size_t size, loff_t *offset)
{
	printk("%s %s line %d\n", __FILE__, __FUNCTION__, __LINE__);
	return 0;
}

/* write(fd, &val, 1); */
static ssize_t led_drv_write (struct file *file, const char __user *buf, size_t size, loff_t *offset)
{
	int err;
	char status;
	struct inode *inode = file_inode(file);
	int minor = iminor(inode);

	printk("%s %s line %d\n", __FILE__, __FUNCTION__, __LINE__);
	err = copy_from_user(&status, buf, 1);

	/* 根据次设备号和status控制LED */
	p_led_opr->ctl(minor, status);

	return 1;
}

static int led_drv_open (struct inode *node, struct file *file)
{
	int minor = iminor(node);

	printk("%s %s line %d\n", __FILE__, __FUNCTION__, __LINE__);
	/* 根据次设备号初始化LED */
	p_led_opr->init(minor);

	return 0;
}

static int led_drv_close (struct inode *node, struct file *file)
{
	printk("%s %s line %d\n", __FILE__, __FUNCTION__, __LINE__);
	return 0;
}

/* 2. 定义自己的file_operations结构体                                              */
static struct file_operations led_drv = {
	.owner	 = THIS_MODULE,
	.open    = led_drv_open,
	.read    = led_drv_read,
	.write   = led_drv_write,
	.release = led_drv_close,
};

/* 4. 把file_operations结构体告诉内核:注册驱动程序                                */
/* 5. 谁来注册驱动程序啊?得有一个入口函数:安装驱动程序时,就会去调用这个入口函数 */
static int __init led_init(void)
{
	int err;

	printk("%s %s line %d\n", __FILE__, __FUNCTION__, __LINE__);
	major = register_chrdev(0, "100ask_led", &led_drv);  /* /dev/led */


	led_class = class_create(THIS_MODULE, "100ask_led_class");
	err = PTR_ERR(led_class);
	if (IS_ERR(led_class)) {
		printk("%s %s line %d\n", __FILE__, __FUNCTION__, __LINE__);
		unregister_chrdev(major, "led");
		return -1;
	}

	return 0;
}

/* 6. 有入口函数就应该有出口函数:卸载驱动程序时,就会去调用这个出口函数           */
static void __exit led_exit(void)
{
	printk("%s %s line %d\n", __FILE__, __FUNCTION__, __LINE__);

	class_destroy(led_class);
	unregister_chrdev(major, "100ask_led");
}


/* 7. 其他完善:提供设备信息,自动创建设备节点                                     */

module_init(led_init);
module_exit(led_exit);

MODULE_LICENSE("GPL");
leddrv.h
#ifndef _LEDDRV_H
#define _LEDDRV_H

#include "led_opr.h"

void led_class_create_device(int minor);
void led_class_destroy_device(int minor);
void register_led_operations(struct led_operations *opr);

#endif /* _LEDDRV_H */
ledtest.c
#include <sys/types.h>
#include <sys/stat.h>
#include <fcntl.h>
#include <unistd.h>
#include <stdio.h>
#include <string.h>

/*
 * ./ledtest /dev/100ask_led0 on
 * ./ledtest /dev/100ask_led0 off
 */
int main(int argc, char **argv)
{
	int fd;
	char status;

	/* 1. 判断参数 */
	if (argc != 3)
	{
		printf("Usage: %s <dev> <on | off>\n", argv[0]);
		return -1;
	}

	/* 2. 打开文件 */
	fd = open(argv[1], O_RDWR);
	if (fd == -1)
	{
		printf("can not open file %s\n", argv[1]);
		return -1;
	}

	/* 3. 写文件 */
	if (0 == strcmp(argv[2], "on"))
	{
		status = 1;
		write(fd, &status, 1);
	}
	else
	{
		status = 0;
		write(fd, &status, 1);
	}

	close(fd);

	return 0;
}
Makefile
# 1. 使用不同的开发板内核时, 一定要修改KERN_DIR
# 2. KERN_DIR中的内核要事先配置、编译, 为了能编译内核, 要先设置下列环境变量:
# 2.1 ARCH,          比如: export ARCH=arm64
# 2.2 CROSS_COMPILE, 比如: export CROSS_COMPILE=aarch64-linux-gnu-
# 2.3 PATH,          比如: export PATH=$PATH:/home/book/100ask_roc-rk3399-pc/ToolChain-6.3.1/gcc-linaro-6.3.1-2017.05-x86_64_aarch64-linux-gnu/bin
# 注意: 不同的开发板不同的编译器上述3个环境变量不一定相同,
#       请参考各开发板的高级用户使用手册

KERN_DIR = /home/book/100ask_stm32mp157_pro-sdk/Linux-5.4

all:
	make -C $(KERN_DIR) M=`pwd` modules
	$(CROSS_COMPILE)gcc -o ledtest ledtest.c

clean:
	make -C $(KERN_DIR) M=`pwd` modules clean
	rm -rf modules.order
	rm -f ledtest

# 参考内核源码drivers/char/ipmi/Makefile
# 要想把a.c, b.c编译成ab.ko, 可以这样指定:
# ab-y := a.o b.o
# obj-m += ab.o

obj-m += leddrv.o chip_demo_gpio.o board_A_led.o
编译测试
在Makefile文件目录下执行make指令,此时,目录下有编译好的内核模块board_A_led.ko、chip_demo_gpio.ko、leddrv.ko和可执行程序ledtest ,移植到开发板上
注意:
- a.c 编译为 a.ko,里面定义了 func_a;如果它想让 b.ko 使用该函数,那么 a.c 里需要导出此函数(如果 a.c, b.c 都编进内核,则无需导出):EXPORT_SYMBOL(led_device_create);并且,使用时要先加载 a.ko。如果先加载 b.ko,会有类似如下“Unknown symbol”的提示:

依次输入指令
//按顺序加载模块
insmod board_A_led.ko
insmod leddrv.ko
insmod chip_demo_gpio.ko
echo "7 4 1 7" > /proc/sys/kernel/printk //打开内核输出信息
ls /dev/100ask_led*	//显示注册了的节点
./ledtest /dev/100ask_led0 on  //打开
./ledtest /dev/100ask_led0 off  //熄灭
如果要增加led的资源,则修改board_A_led.c文件,增加resources数组的成员,然后重新编译该文件为模块,再移植到开发板,先卸载原来的模块后加载新的模块,再运行新的设备节点
rmmod board_A_led.ko
insmod board_A_led.ko
