目录
- 场景
- screw 官网介绍
- 接口编写
场景
在企业开发中,有些公司会要求开发人员编写数据库表结构文档,这项工作没啥技术含量而且很繁琐,每当有表发生更改时就需要维护这个文档,或者是需要交付数据库设计文档和导出数据库设计文档这类的需求,我们都可以通过 github 上的一个数据库文档生成工具 screw,快速的生成数据库设计文档,以下内容是简单介绍了下 screw 以及如何编写导出数据库设计文档的接口。
我不生产知识,我只是个知识的搬运工 ~~
screw 官网介绍
screw gitee :开源地址
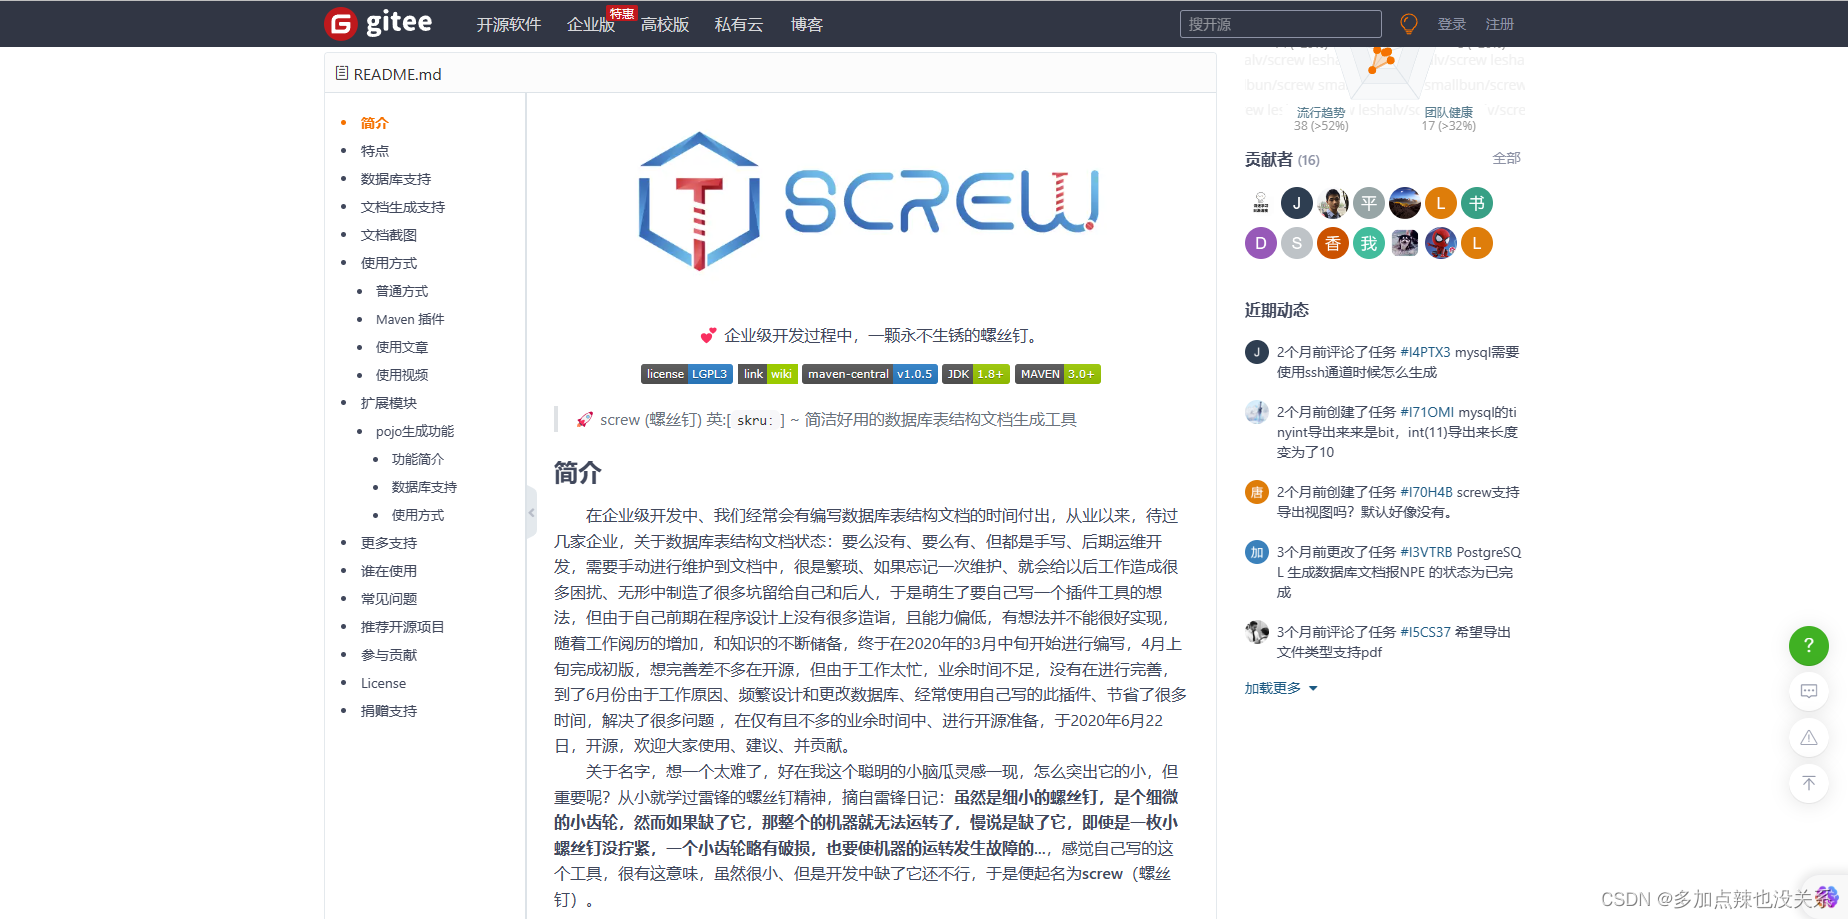
官方文档已经详细介绍了 screw 的特点、功能以及使用,这里我也只是搬运了一下而已 ~~
screw 的特点:
- 简洁、轻量、设计良好
- 多数据库支持
- 多种格式文档
- 灵活扩展
- 支持自定义模板
目前支持的数据库有:
- MySQL
- MariaDB
- TIDB
- Oracle
- SqlServer
- PostgreSQL
- Cache DB(2016)
文档生成支持:
- html
- word
- markdown
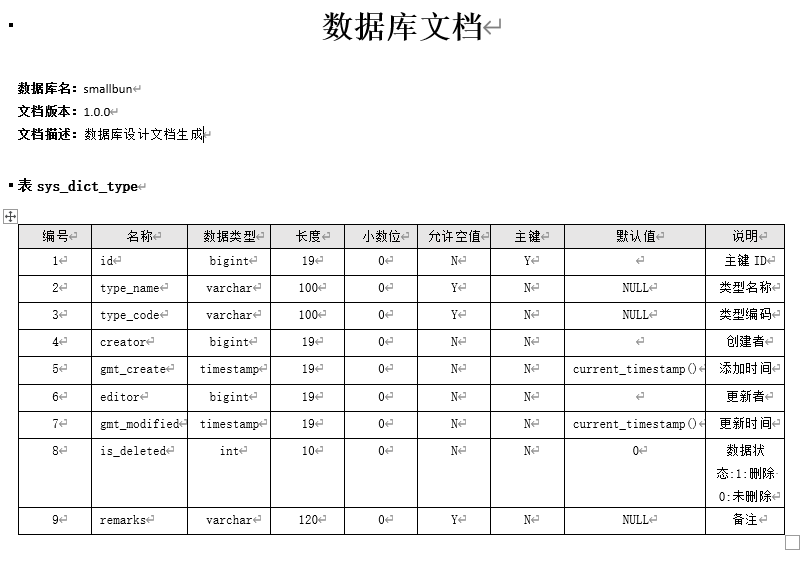
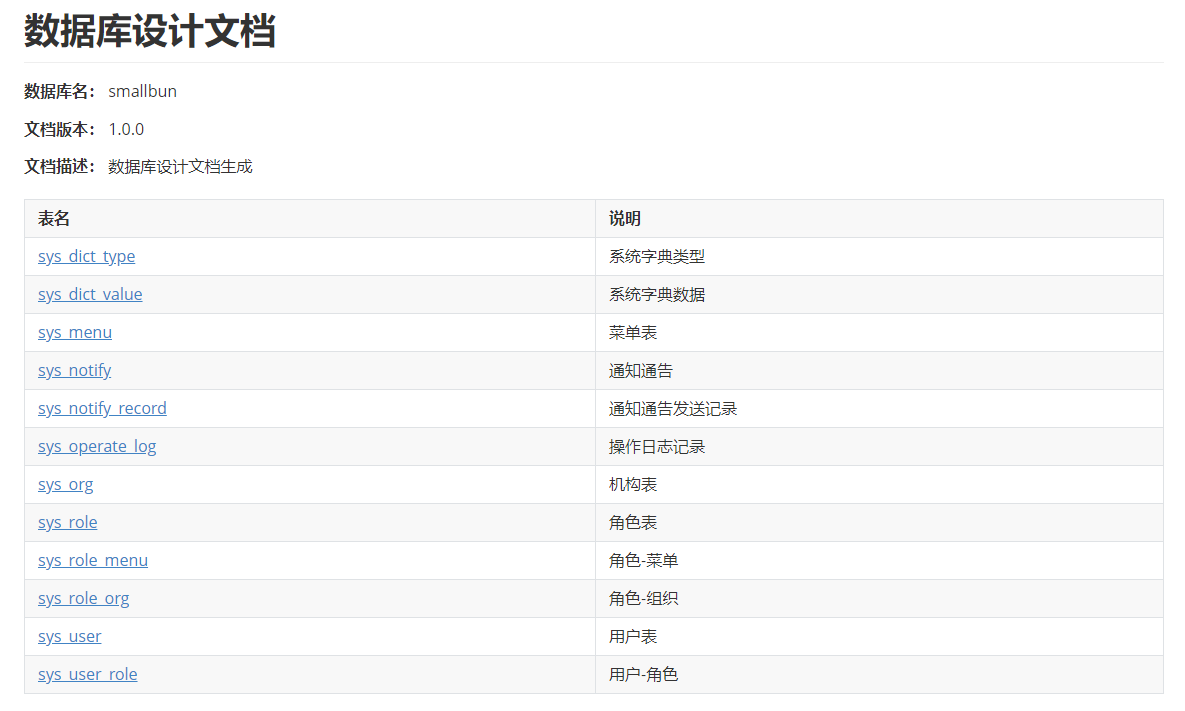
文档截图:
html

word
markdown
简单实现:
引入依赖
<dependency>
    <groupId>cn.smallbun.screw</groupId>
    <artifactId>screw-core</artifactId>
    <version>${lastVersion}</version>
 </dependency>
编写代码:
/**
 * 文档生成
 */
void documentGeneration() {
   //数据源
   HikariConfig hikariConfig = new HikariConfig();
   hikariConfig.setDriverClassName("com.mysql.cj.jdbc.Driver");
   hikariConfig.setJdbcUrl("jdbc:mysql://127.0.0.1:3306/database");
   hikariConfig.setUsername("root");
   hikariConfig.setPassword("password");
   //设置可以获取tables remarks信息
   hikariConfig.addDataSourceProperty("useInformationSchema", "true");
   hikariConfig.setMinimumIdle(2);
   hikariConfig.setMaximumPoolSize(5);
   DataSource dataSource = new HikariDataSource(hikariConfig);
   //生成配置
   EngineConfig engineConfig = EngineConfig.builder()
         //生成文件路径
         .fileOutputDir(fileOutputDir)
         //打开目录
         .openOutputDir(true)
         //文件类型
         .fileType(EngineFileType.HTML)
         //生成模板实现
         .produceType(EngineTemplateType.freemarker)
         //自定义文件名称
         .fileName("自定义文件名称").build();

   //忽略表
   ArrayList<String> ignoreTableName = new ArrayList<>();
   ignoreTableName.add("test_user");
   ignoreTableName.add("test_group");
   //忽略表前缀
   ArrayList<String> ignorePrefix = new ArrayList<>();
   ignorePrefix.add("test_");
   //忽略表后缀
   ArrayList<String> ignoreSuffix = new ArrayList<>();
   ignoreSuffix.add("_test");
   ProcessConfig processConfig = ProcessConfig.builder()
         //指定生成逻辑、当存在指定表、指定表前缀、指定表后缀时,将生成指定表,其余表不生成、并跳过忽略表配置
		 //根据名称指定表生成
		 .designatedTableName(new ArrayList<>())
		 //根据表前缀生成
		 .designatedTablePrefix(new ArrayList<>())
		 //根据表后缀生成
		 .designatedTableSuffix(new ArrayList<>())
         //忽略表名
         .ignoreTableName(ignoreTableName)
         //忽略表前缀
         .ignoreTablePrefix(ignorePrefix)
         //忽略表后缀
         .ignoreTableSuffix(ignoreSuffix).build();
   //配置
   Configuration config = Configuration.builder()
         //版本
         .version("1.0.0")
         //描述
         .description("数据库设计文档生成")
         //数据源
         .dataSource(dataSource)
         //生成配置
         .engineConfig(engineConfig)
         //生成配置
         .produceConfig(processConfig)
         .build();
   //执行生成
   new DocumentationExecute(config).execute();
}
接口编写
运行以上代码就能在指定的路径下生成数据库设计文档,但是有些需求是要导出数据库设计文档,所以这里我提供下导出这类文档的接口写法。
引入依赖:
        <!-- 实现数据库文档 -->
        <dependency>
            <groupId>cn.smallbun.screw</groupId>
            <artifactId>screw-core</artifactId>
            <version>1.0.5</version>
            <exclusions>
                <!-- 移除 Freemarker 依赖,采用 Velocity 作为模板引擎 -->
                <exclusion>
                    <groupId>org.freemarker</groupId>
                    <artifactId>freemarker</artifactId>
                </exclusion>
                <!-- 最新版screw-core1.0.5依赖fastjson1.2.73存在漏洞,移除。 -->
                <exclusion>
                    <groupId>com.alibaba</groupId>
                    <artifactId>fastjson</artifactId>
                </exclusion>
            </exclusions>
        </dependency>
代码:
DatabaseController.java
import cn.hutool.core.io.FileUtil;
import cn.hutool.core.io.IoUtil;
import cn.hutool.core.util.IdUtil;
import cn.smallbun.screw.core.Configuration;
import cn.smallbun.screw.core.engine.EngineConfig;
import cn.smallbun.screw.core.engine.EngineFileType;
import cn.smallbun.screw.core.engine.EngineTemplateType;
import cn.smallbun.screw.core.execute.DocumentationExecute;
import cn.smallbun.screw.core.process.ProcessConfig;
import com.zaxxer.hikari.HikariConfig;
import com.zaxxer.hikari.HikariDataSource;
import io.swagger.annotations.Api;
import io.swagger.annotations.ApiOperation;
import io.swagger.annotations.ApiParam;
import lombok.RequiredArgsConstructor;
import lombok.extern.slf4j.Slf4j;
import org.apache.commons.lang.StringUtils;
import org.springframework.beans.factory.annotation.Autowired;
import org.springframework.boot.autoconfigure.jdbc.DataSourceProperties;
import org.springframework.http.MediaType;
import org.springframework.web.bind.annotation.*;

import javax.annotation.Resource;
import javax.servlet.http.HttpServletResponse;
import java.io.File;
import java.io.IOException;
import java.net.URLEncoder;
import java.util.Arrays;

@Slf4j
@RestController
@RequestMapping("/db")
@Api(tags = "【数据库-管理】")
@RequiredArgsConstructor(onConstructor = @__(@Autowired))
@CrossOrigin(origins = "*", methods = {RequestMethod.POST, RequestMethod.GET})
public class DatabaseController {

    @Resource
    private DataSourceProperties dataSourceProperties;
    @Resource
    private HikariDataSource hikariDataSource;

    // @Value("${ignore-pre-fix}")
    private String ignorePreFix = "quartz_,gen_"; // 这里可以读取配置文件

    private static final String FILE_OUTPUT_DIR = System.getProperty("java.io.tmpdir") + File.separator + "db-doc";
    private static final String DOC_FILE_NAME = "数据库文档";
    private static final String DOC_VERSION = "1.0.0";
    private static final String DOC_DESCRIPTION = "文档描述";

    @GetMapping({"/export-db-document"})
    @ApiOperation(value = "导出-数据库文档", produces = "application/octet-stream")
    public void exportDbDocument(@RequestParam(defaultValue = "true") @ApiParam(value = "是否删除本地文件") Boolean deleteFile,
                                 @RequestParam(value = "id", required = false) @ApiParam(value = "导出文件类型:HTML、WORD、MD", required = false) EngineFileType fileType,
                                 HttpServletResponse response) throws IOException {
        exportDbDocument(fileType, deleteFile, response);
    }

    public void exportDbDocument(EngineFileType fileOutputType, Boolean deleteFile, HttpServletResponse response) throws IOException {
        if (fileOutputType == null) {
            fileOutputType = EngineFileType.HTML;
        }
        String docFileName = DOC_FILE_NAME + "_" + IdUtil.fastSimpleUUID();
        String filePath = doExportFile(fileOutputType, docFileName);
        String downloadFileName = DOC_FILE_NAME + fileOutputType.getFileSuffix(); //下载后的文件名
        try {
            // 读取,返回
            writeAttachment(response, downloadFileName, FileUtil.readBytes(filePath));
        } finally {
            handleDeleteFile(deleteFile, filePath);
        }
    }

    /**
     * 输出文件,返回文件路径
     *
     * @param fileOutputType 文件类型
     * @param fileName       文件名, 无需 ".docx" 等文件后缀
     * @return 生成的文件所在路径
     */
    private String doExportFile(EngineFileType fileOutputType, String fileName) {
        try (HikariDataSource dataSource = buildDataSource()) {
            // 创建 screw 的配置
            Configuration config = Configuration.builder()
                    .version(DOC_VERSION)  // 版本
                    .description(DOC_DESCRIPTION) // 描述
                    .dataSource(dataSource) // 数据源
                    .engineConfig(buildEngineConfig(fileOutputType, fileName)) // 引擎配置
                    .produceConfig(buildProcessConfig()) // 处理配置
                    .build();

            // 执行 screw,生成数据库文档
            new DocumentationExecute(config).execute();

            return FILE_OUTPUT_DIR + File.separator + fileName + fileOutputType.getFileSuffix();
        }
    }

    /**
     * 创建数据源
     */
    private HikariDataSource buildDataSource() {

        /*
         * 这里要根据 yml 文件获取数据库连接的一些信息
         *
         * 多数据源的话需要注入 DynamicDataSourceProperties,从而获取连接数据库的信息,比如:
         *
         *      @Resource
         *      private DynamicDataSourceProperties dynamicDataSourceProperties;
         *
         *      String primary = dynamicDataSourceProperties.getPrimary();
         *      DataSourceProperty dataSourceProperty = dynamicDataSourceProperties.getDatasource().get(primary);
         *      从 dataSourceProperty 获取 url、username、password
         *
         * 如果没有使用多数据源则注入 DataSourceProperties,从中获取 url、username、password
         * 如果你的 username 和 password 是放在 hikari 配置下的话,则需要注入 HikariDataSource,从中获取 username、password
         */

        // 创建 HikariConfig 配置类
        HikariConfig hikariConfig = new HikariConfig();
        hikariConfig.setJdbcUrl(dataSourceProperties.getUrl());
        hikariConfig.setUsername(hikariDataSource.getUsername());
        hikariConfig.setPassword(hikariDataSource.getPassword());
        hikariConfig.addDataSourceProperty("useInformationSchema", "true"); // 设置可以获取 tables remarks 信息
        // 创建数据源
        return new HikariDataSource(hikariConfig);
    }

    /**
     * 创建 screw 的引擎配置
     */
    private static EngineConfig buildEngineConfig(EngineFileType fileOutputType, String docFileName) {
        return EngineConfig.builder()
                .fileOutputDir(FILE_OUTPUT_DIR) // 生成文件路径
                .openOutputDir(false) // 打开目录
                .fileType(fileOutputType) // 文件类型
                .produceType(EngineTemplateType.velocity) // 文件类型
                .fileName(docFileName) // 自定义文件名称
                .build();
    }

    /**
     * 创建 screw 的处理配置,一般可忽略
     * 指定生成逻辑、当存在指定表、指定表前缀、指定表后缀时,将生成指定表,其余表不生成、并跳过忽略表配置
     */
    private ProcessConfig buildProcessConfig() {
        String str = StringUtils.isBlank(ignorePreFix) ? "" : ignorePreFix;
        return ProcessConfig.builder()
                .ignoreTablePrefix(Arrays.asList(str.split(","))) // 忽略表前缀
                .build();
    }


    /**
     * 返回附件
     *
     * @param response 响应
     * @param filename 文件名
     * @param content  附件内容
     */
    private  void writeAttachment(HttpServletResponse response, String filename, byte[] content) throws IOException {
        // 设置 header 和 contentType
        response.setHeader("Content-Disposition", "attachment;filename=" + URLEncoder.encode(filename, "UTF-8"));
        response.setContentType(MediaType.APPLICATION_OCTET_STREAM_VALUE);
        // 输出附件
        IoUtil.write(response.getOutputStream(), false, content);
    }

    private void handleDeleteFile(Boolean deleteFile, String filePath) {
        if (!deleteFile) {
            return;
        }
        FileUtil.del(filePath);
    }
}
这里要注意的就是 buildDataSource() 这个方法中需要配置 hikariConfig 有关数据库的相关信息,如果你想从配置文件中拿连接数据库的信息,这里的写法跟你配置文件数据库配置的写法有关:
比如你配置文件是这样的:
  datasource:
    driver-class-name: com.mysql.cj.jdbc.Driver
    url: jdbc:mysql://127.0.0.1:3306/mike_inner?characterEncoding=UTF-8&useSSL=false&serverTimezone=GMT%2B8
    username: root
    password: root
那么 buildDataSource() 方法这样写:
	@Resource
    private DataSourceProperties dataSourceProperties;

    /**
     * 创建数据源
     */
    private HikariDataSource buildDataSource() {
        // 创建 HikariConfig 配置类
        HikariConfig hikariConfig = new HikariConfig();
        hikariConfig.setJdbcUrl(dataSourceProperties.getUrl());
        hikariConfig.setUsername(dataSourceProperties.getUsername());
        hikariConfig.setPassword(dataSourceProperties.getPassword());
        hikariConfig.addDataSourceProperty("useInformationSchema", "true"); // 设置可以获取 tables remarks 信息
        // 创建数据源
        return new HikariDataSource(hikariConfig);
    }
如果你配置文件是这样的:
  # 数据库配置
  datasource:
    url: jdbc:mysql://127.0.0.1:3306/mike_inner?characterEncoding=UTF-8&useSSL=false&serverTimezone=GMT%2B8
    hikari:
      username: 'root'
      password: 'root'
      driver-class-name: 'com.mysql.cj.jdbc.Driver'
那么 buildDataSource() 方法这样写:
	@Resource
    private DataSourceProperties dataSourceProperties;
	@Resource
    private HikariDataSource hikariDataSource;

    /**
     * 创建数据源
     */
    private HikariDataSource buildDataSource() {
        // 创建 HikariConfig 配置类
        HikariConfig hikariConfig = new HikariConfig();
        hikariConfig.setJdbcUrl(dataSourceProperties.getUrl());
        hikariConfig.setUsername(hikariDataSource.getUsername());
        hikariConfig.setPassword(hikariDataSource.getPassword());
        hikariConfig.addDataSourceProperty("useInformationSchema", "true"); // 设置可以获取 tables remarks 信息
        // 创建数据源
        return new HikariDataSource(hikariConfig);
    }
如果你配置文件是这样的:
  datasource:
    dynamic: # ??????
      primary: master
      datasource:
        master:
          name: ry-vue
          url: jdbc:mysql://127.0.0.1:3306/mike_inner?useUnicode=true&characterEncoding=utf8&zeroDateTimeBehavior=convertToNull&useSSL=true&serverTimezone=GMT%2B8
          driver-class-name: com.mysql.jdbc.Driver
          username: root
          password: root
那么 buildDataSource() 方法这样写:
	@Resource
    private DynamicDataSourceProperties dynamicDataSourceProperties;

    /**
     * 创建数据源
     */
    private HikariDataSource buildDataSource() {
        // 获得 DataSource 数据源,目前只支持首个
        String primary = dynamicDataSourceProperties.getPrimary();
        DataSourceProperty dataSourceProperty = dynamicDataSourceProperties.getDatasource().get(primary);
        // 创建 HikariConfig 配置类
        HikariConfig hikariConfig = new HikariConfig();
        hikariConfig.setJdbcUrl(dataSourceProperty.getUrl());
        hikariConfig.setUsername(dataSourceProperty.getUsername());
        hikariConfig.setPassword(dataSourceProperty.getPassword());
        hikariConfig.addDataSourceProperty("useInformationSchema", "true"); // 设置可以获取 tables remarks 信息
        // 创建数据源
        return new HikariDataSource(hikariConfig);
    }
测试:

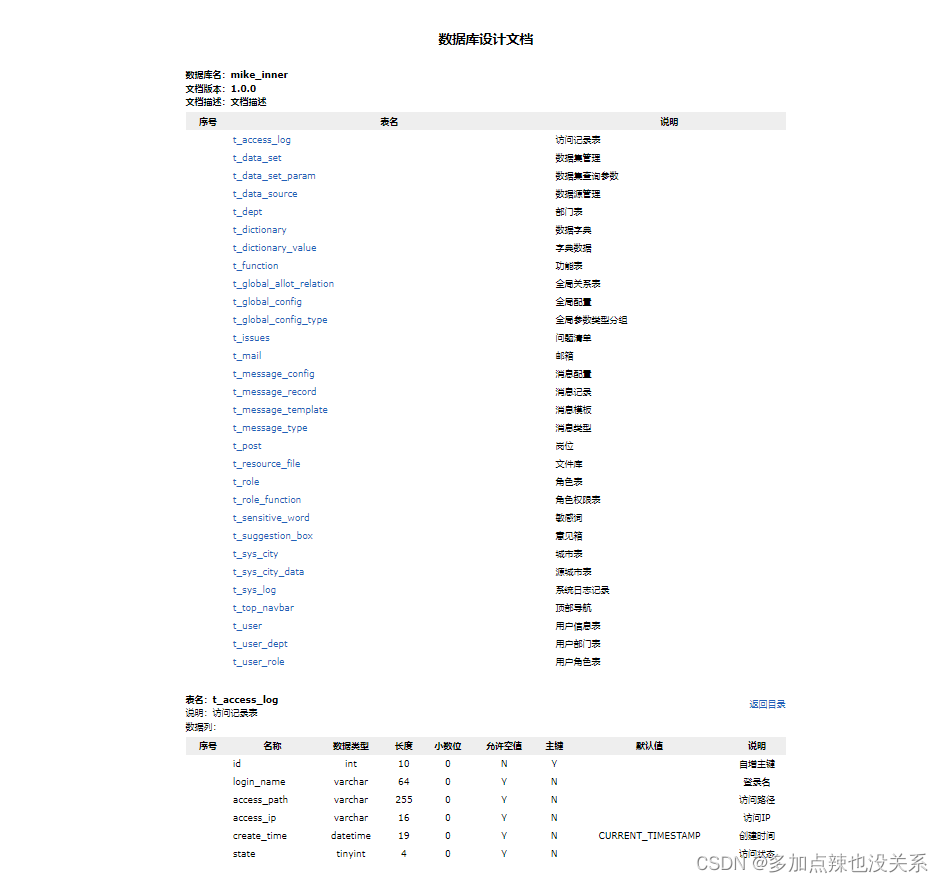



![[虚幻引擎插件说明] DTOperateFile 使用蓝图操作文件](https://img-blog.csdnimg.cn/img_convert/dc01c35d8e802d3588b5b0738d88e6a4.png)
