文章目录
- 一、前言
- 二、异常报告器介绍
- 2.1、作用
- 2.2、接口定义
- 2.3、FailureAnalyzer错误分析器
- 2.4、FailureAnalysisReporter错误报告器
- 三 、SpringBootExceptionReporter源码分析
- 四、shutdownHook介绍
- 4.1、背景
- 4.2、什么是Shutdown Hook
- 4.3、什么时候会调用Shutdown Hook
- 4.4、如何使用Shutdown Hook
- 4.5、测试例子
- 五、自定义异常报告器
- 5.1、方式一:实现SpringBootExceptionReporter接口
- 5.2、方式二:实现FailureAnalyzer接口
- 六、总结
一、前言
本文基于spring-boot-2.2.14.BUILD-SNAPSHOT源码分析SpringBootExceptionReporter异常报告器
本文主要内容是SpringBoot项目启动过程的异常分析器,也就是SpringBootExceptionReporter,回想我们启动项目的时候,是否会因为缺少数据库配置、端口占用、bean命名重复等各种原因,导致项目启动失败呢,比如端口占用的情况下启动项目,控制台会打印如下日志
Error starting ApplicationContext. To display the conditions report re-run your application with 'debug' enabled.
2023-07-14 15:12:35.836 ERROR 21456 --- [           main] o.s.b.d.LoggingFailureAnalysisReporter   :

***************************
APPLICATION FAILED TO START
***************************

Description:

Web server failed to start. Port 80 was already in use.

Action:

Identify and stop the process that's listening on port 80 or configure this application to listen on another port.
这段日志会指出启动失败的原因,以及建议的解决方案,比如添加某些配置,或者将某配置设置为true等等
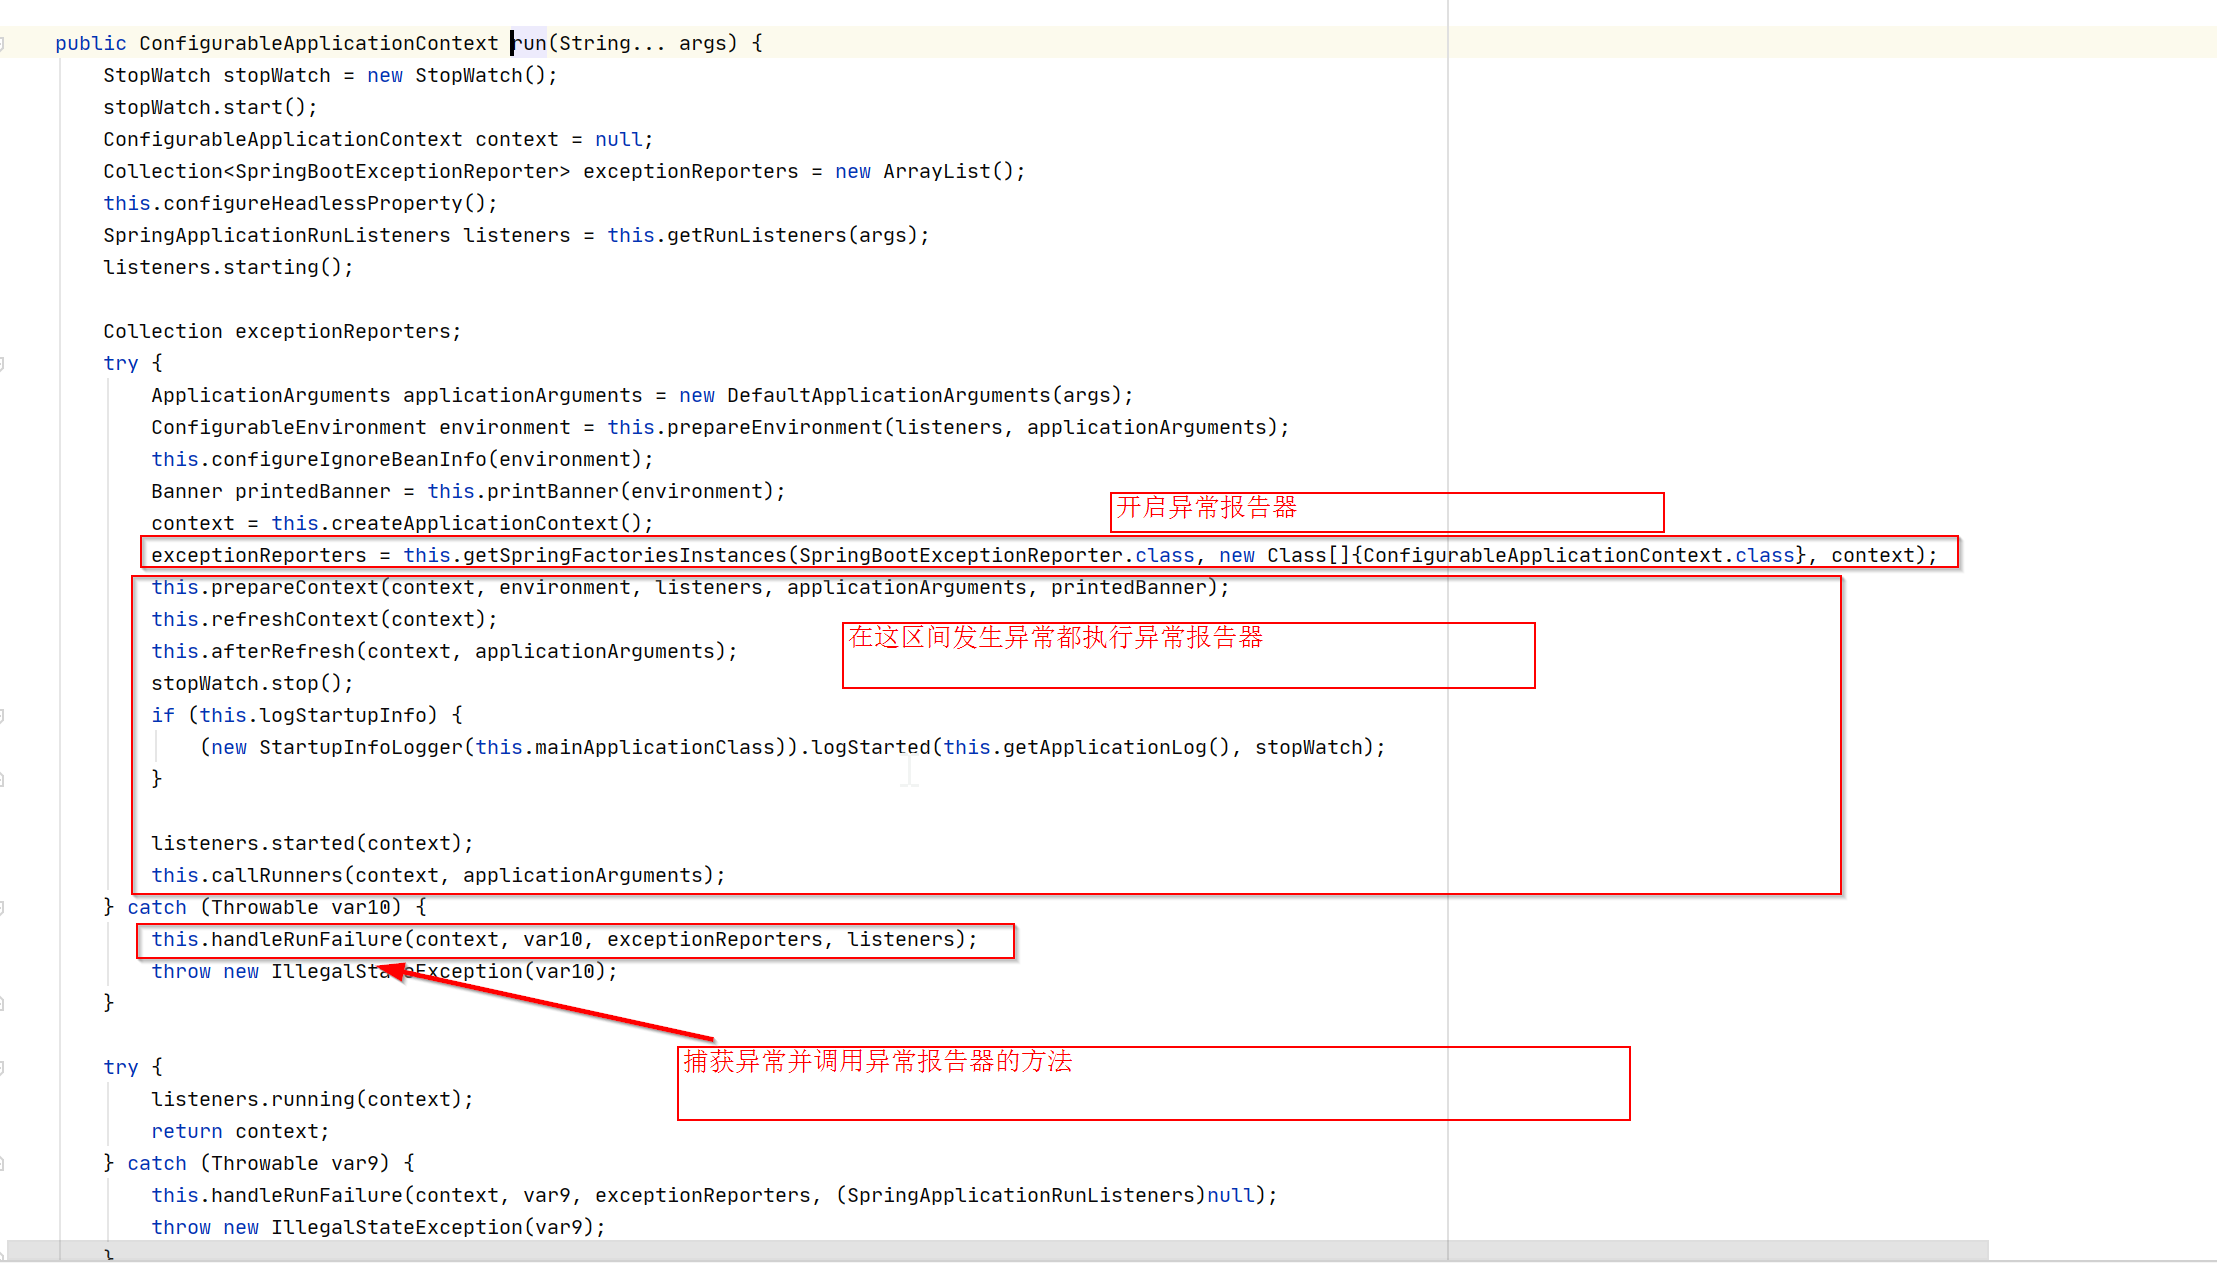
SpringBootExceptionReporter的作用就是对启动过程的异常进行分析、报告,涉及到的代码在SpringApplication类的run方法中:
二、异常报告器介绍
2.1、作用
收集错误信息,用于向用户报告错误原因。
Spring Boot 提出了错误分析器(FailureAnalyzer)与错误报告器(FailureAnalysisReporter)的概念,前者用于将报错信息转换为更加详细的错误分析报告,后者负责将这个报告呈现出来。
2.2、接口定义
@FunctionalInterface
public interface SpringBootExceptionReporter {
	// 向用户报告失败信息
	boolean reportException(Throwable failure);

}
接口实现
@Override
public boolean reportException(Throwable failure) {
    //调用FailureAnalyzer获得错误分析报告FailureAnalysis
	FailureAnalysis analysis = analyze(failure, this.analyzers);
	//调用FailureAnalysisReporter将报告呈现出来
	return report(analysis, this.classLoader);
}
2.3、FailureAnalyzer错误分析器
调用FailureAnalyzer获得错误分析报告FailureAnalysis
Spring Boot 中对于 FailureAnalyzer 接口的定义如下,只有一个 analyze 方法,入参是 Throwable,也就是所有异常的基类,返回一个 FailureAnalysis,也就是错误分析报告。
@FunctionalInterface
public interface FailureAnalyzer {
	FailureAnalysis analyze(Throwable failure);
}
FailureAnalyzer 需要表明自己是哪些异常的分析器,AbstractFailureAnalyzer 实现了 FailureAnalyzer 方法,并在类上申明一个泛型,这个泛型类就是该分析器感兴趣的异常类。具体的代码也很简单,核心是调用异常的 getCause() 进行循环/遍历,以检查异常及其消息的根源,判断是否和泛型是一个类型,Spring Boot 中大部分的分析器都会继承 AbstractFailureAnalyzer。
public abstract class AbstractFailureAnalyzer<T extends Throwable> implements FailureAnalyzer {
  ...
}
回过头来看错误分析报告,该类中包含了这个错误的详细描述(description),错误的解决方式(action)以及异常本身(cause)。我们可以认为,这个报告是 Srping Boot 对于异常类的二次封装,在不破坏原本异常信息的前提下,额外增加了更加详细的异常信息。
public class FailureAnalysis {
    //错误的详细描述
	private final String description;
    //错误的解决方式/优化建议
	private final String action;
	//异常本身
	private final Throwable cause;

	public FailureAnalysis(String description, String action, Throwable cause) {
		this.description = description;
		this.action = action;
		this.cause = cause;
	}

  ...

}
2.4、FailureAnalysisReporter错误报告器
负责展示这些错误分析报告
FailureAnalysisReporter 也是一个单方法的接口,入参就是错误分析报告。
@FunctionalInterface
public interface FailureAnalysisReporter {
	void report(FailureAnalysis analysis);
}
Spring Boot 默认提供了一个 FailureAnalysisReporter,那就是 LoggingFailureAnalysisReporter。这个类会根据当前日志级别的不同,调用日志的 debug 或 error方法进行打印。
public final class LoggingFailureAnalysisReporter implements FailureAnalysisReporter {

	private static final Log logger = LogFactory.getLog(LoggingFailureAnalysisReporter.class);

	@Override
	public void report(FailureAnalysis failureAnalysis) {
		if (logger.isDebugEnabled()) {
			logger.debug("Application failed to start due to an exception", failureAnalysis.getCause());
		}
		if (logger.isErrorEnabled()) {
			logger.error(buildMessage(failureAnalysis));
		}
	}

  ...

}
总结下 Spring Boot 异常处理方案:Spring Boot 在捕获一个异常后,会调用该异常对应的 FailureAnalyzer 对其进行分析,将异常转换为 FailureAnalysis。然后调用 FailureAnalysisReporter 对异常分析报告打印出来。
三 、SpringBootExceptionReporter源码分析
异常报告器是用来捕捉全局异常使用的,当springboot应用程序在发生异常时,异常报告器会将其捕捉并做相应处理
public ConfigurableApplicationContext run(String... args) {
	......
	Collection<SpringBootExceptionReporter> exceptionReporters = new ArrayList<>();

	try {
		......
        // 获取所有 SpringBootExceptionReporter 实现类
		exceptionReporters = getSpringFactoriesInstances(SpringBootExceptionReporter.class,
				new Class[] { ConfigurableApplicationContext.class }, context);
		......
	}
	catch (Throwable ex) {
		handleRunFailure(context, ex, exceptionReporters, listeners);
		throw new IllegalStateException(ex);
	}

	try {
		......
	}
	catch (Throwable ex) {
		handleRunFailure(context, ex, exceptionReporters, null);
		throw new IllegalStateException(ex);
	}
	return context;
}
需要注意的是,这个异常报告器只会捕获启动过程抛出的异常,如果是在启动完成后,在用户请求时报错,异常报告器不会捕获请求中出现的异常
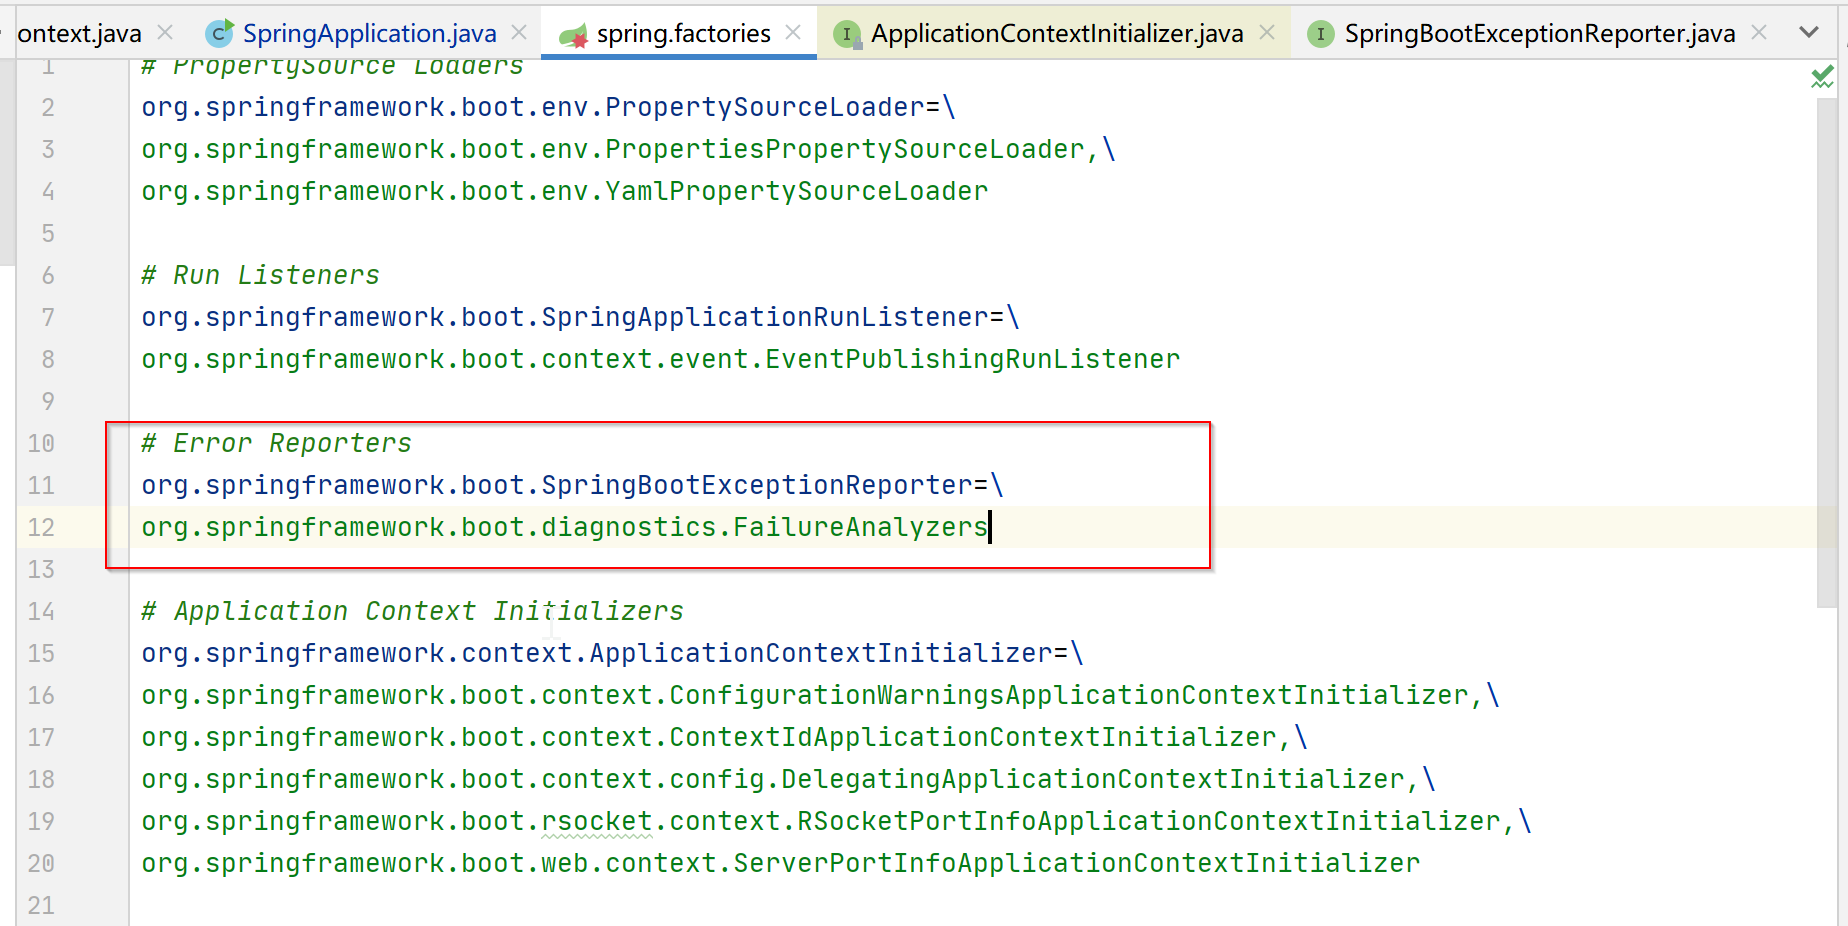
getSpringFactoriesInstances到classpath下的META-INF/spring.factories文件中找SpringBootExceptionReporter的实现类,然后将新建的容器作为参数调用其构造方法
最终只找到一个FailureAnalyzers,在spring-boot包下
查看FailureAnalyzers类的构造方法
final class FailureAnalyzers implements SpringBootExceptionReporter {
    private static final Log logger = LogFactory.getLog(FailureAnalyzers.class);
    private final ClassLoader classLoader;
    private final List<FailureAnalyzer> analyzers;

    FailureAnalyzers(ConfigurableApplicationContext context) {
        this(context, (ClassLoader)null);
    }

    FailureAnalyzers(ConfigurableApplicationContext context, ClassLoader classLoader) {
        Assert.notNull(context, "Context must not be null");
        this.classLoader = classLoader != null ? classLoader : context.getClassLoader();
        this.analyzers = this.loadFailureAnalyzers(this.classLoader);
        prepareFailureAnalyzers(this.analyzers, context);
    }
使用容器的类加载器,去加载具体的异常分析器,进入loadFailureAnalyzers方法
private List<FailureAnalyzer> loadFailureAnalyzers(ClassLoader classLoader) {
	List<String> analyzerNames = SpringFactoriesLoader.loadFactoryNames(FailureAnalyzer.class, classLoader);
	List<FailureAnalyzer> analyzers = new ArrayList<>();
	for (String analyzerName : analyzerNames) {
		try {
			Constructor<?> constructor = ClassUtils.forName(analyzerName, classLoader).getDeclaredConstructor();
			ReflectionUtils.makeAccessible(constructor);
			analyzers.add((FailureAnalyzer) constructor.newInstance());
		}
		catch (Throwable ex) {
			logger.trace(LogMessage.format("Failed to load %s", analyzerName), ex);
		}
	}
	AnnotationAwareOrderComparator.sort(analyzers);
	return analyzers;
}
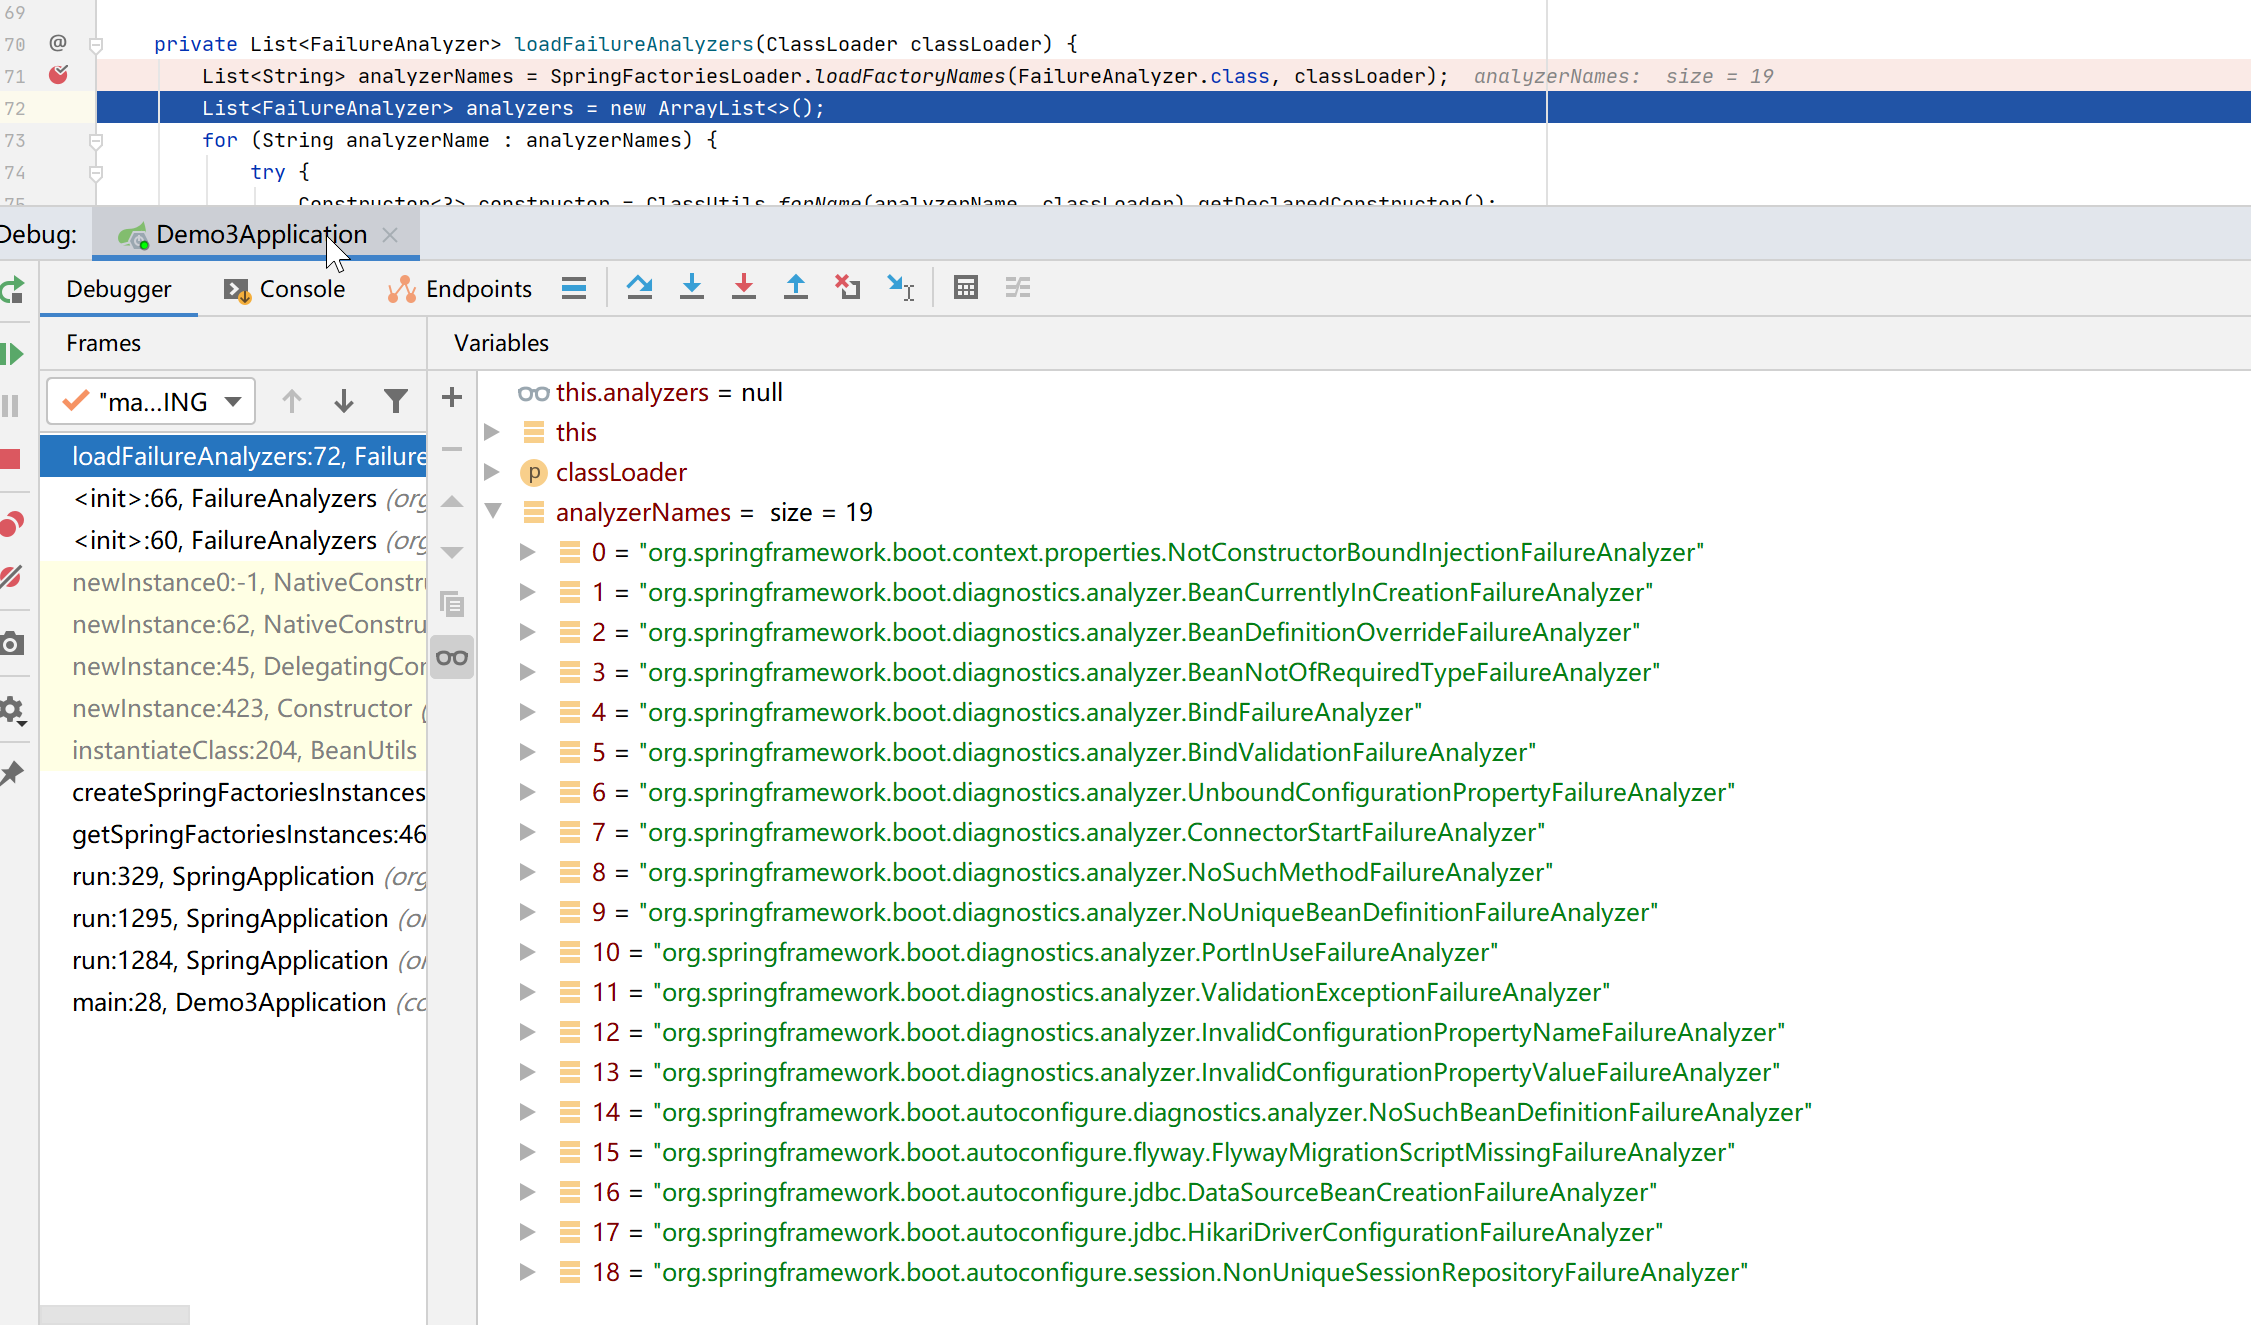
同样是到spring.factories中加载FailureAnalyzer类型的实现类,并实例化
这次共找到了19个实现类,其中14个位于spring-boot包下,5个位于spring-boot-autoconfigure包下,看名字大多数还是比较熟悉的,比如循环依赖异常、beanDefinition重复异常、端口占用异常等等
回到FailureAnalyzers构造方法,加载到FailureAnalyzer列表后,调用prepareFailureAnalyzers方法
private void prepareFailureAnalyzers(List<FailureAnalyzer> analyzers, ConfigurableApplicationContext context) {
	for (FailureAnalyzer analyzer : analyzers) {
		prepareAnalyzer(context, analyzer);
	}
}
循环FailureAnalyzer列表,调用prepareAnalyzer方法
private void prepareAnalyzer(ConfigurableApplicationContext context, FailureAnalyzer analyzer) {
	if (analyzer instanceof BeanFactoryAware) {
		((BeanFactoryAware) analyzer).setBeanFactory(context.getBeanFactory());
	}
	if (analyzer instanceof EnvironmentAware) {
		((EnvironmentAware) analyzer).setEnvironment(context.getEnvironment());
	}
}
这个方法查看如果FailureAnalyzer实现了BeanFactoryAware接口和EnvironmentAware接口,将对应的BeanFactory和Environment赋给它
之所以有这个步骤,是因为有些异常分析器处理异常信息的过程中,有可能要依赖容器或者项目的环境,而Aware接口正常的执行时机是在容器刷新的时候,如果在Aware的过程中,或者在这之前就发生了异常,这一部分FailureAnalyzer就没办法正常工作了,所以需要提前将依赖设置进来
需要注意的是,这里设置进来的environment,是直接从容器中取的,它是在容器的构造函数中新建的,并不是我们之前经过了一系列加工的environment,虽然后面会用我们的environment将容器中的替换掉,但是这些FailureAnalyzer持有的environment并没有一起更新,所以这个步骤我个人认为是有点问题的。(上一篇文章中我们有讲过为什么会有两套环境)
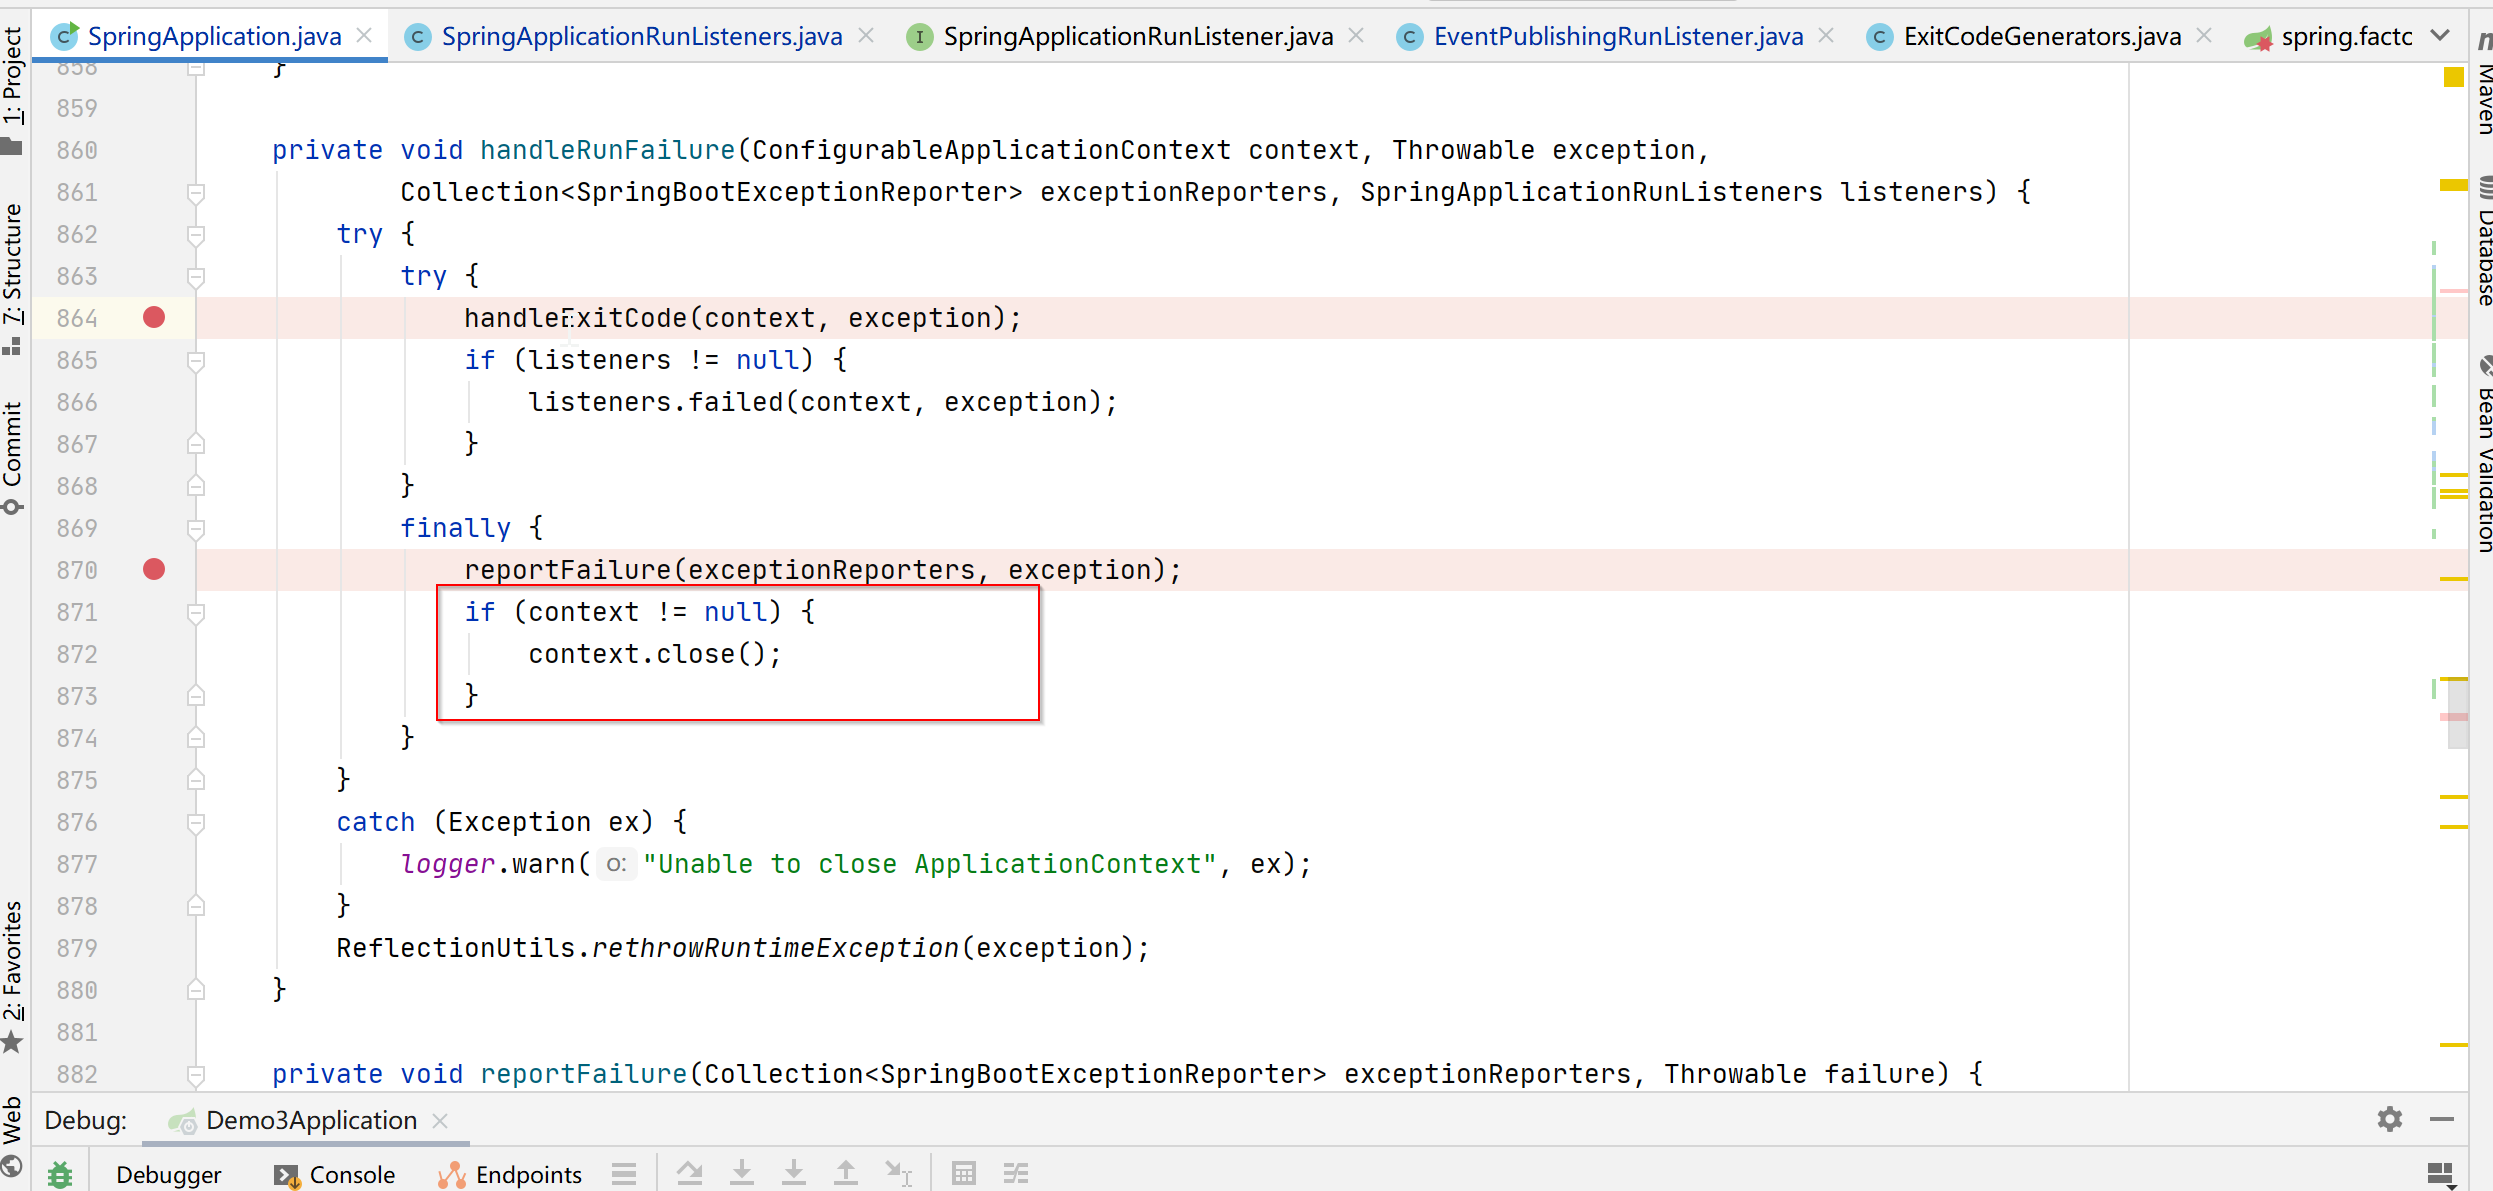
prepareAnalyzer完成后,加载SpringBootExceptionReporter的流程就结束了,接下来看catch中是怎么使用这么分析器的,进入handleRunFailure方法
private void handleRunFailure(ConfigurableApplicationContext context, Throwable exception, Collection<SpringBootExceptionReporter> exceptionReporters, SpringApplicationRunListeners listeners) {
  try {
        try {
            handleExitCode(context, exception);
            if (listeners != null) {
                //发送启动失败事件
                listeners.failed(context, exception);
            }
        } finally {
            // 报告失败信息
            reportFailure(exceptionReporters, exception);
            if (context != null) {
                //关闭上下文
                context.close();
            }

        }
    } catch (Exception ex) {
        logger.warn("Unable to close ApplicationContext", ex);
    }

    ReflectionUtils.rethrowRuntimeException(exception);
}
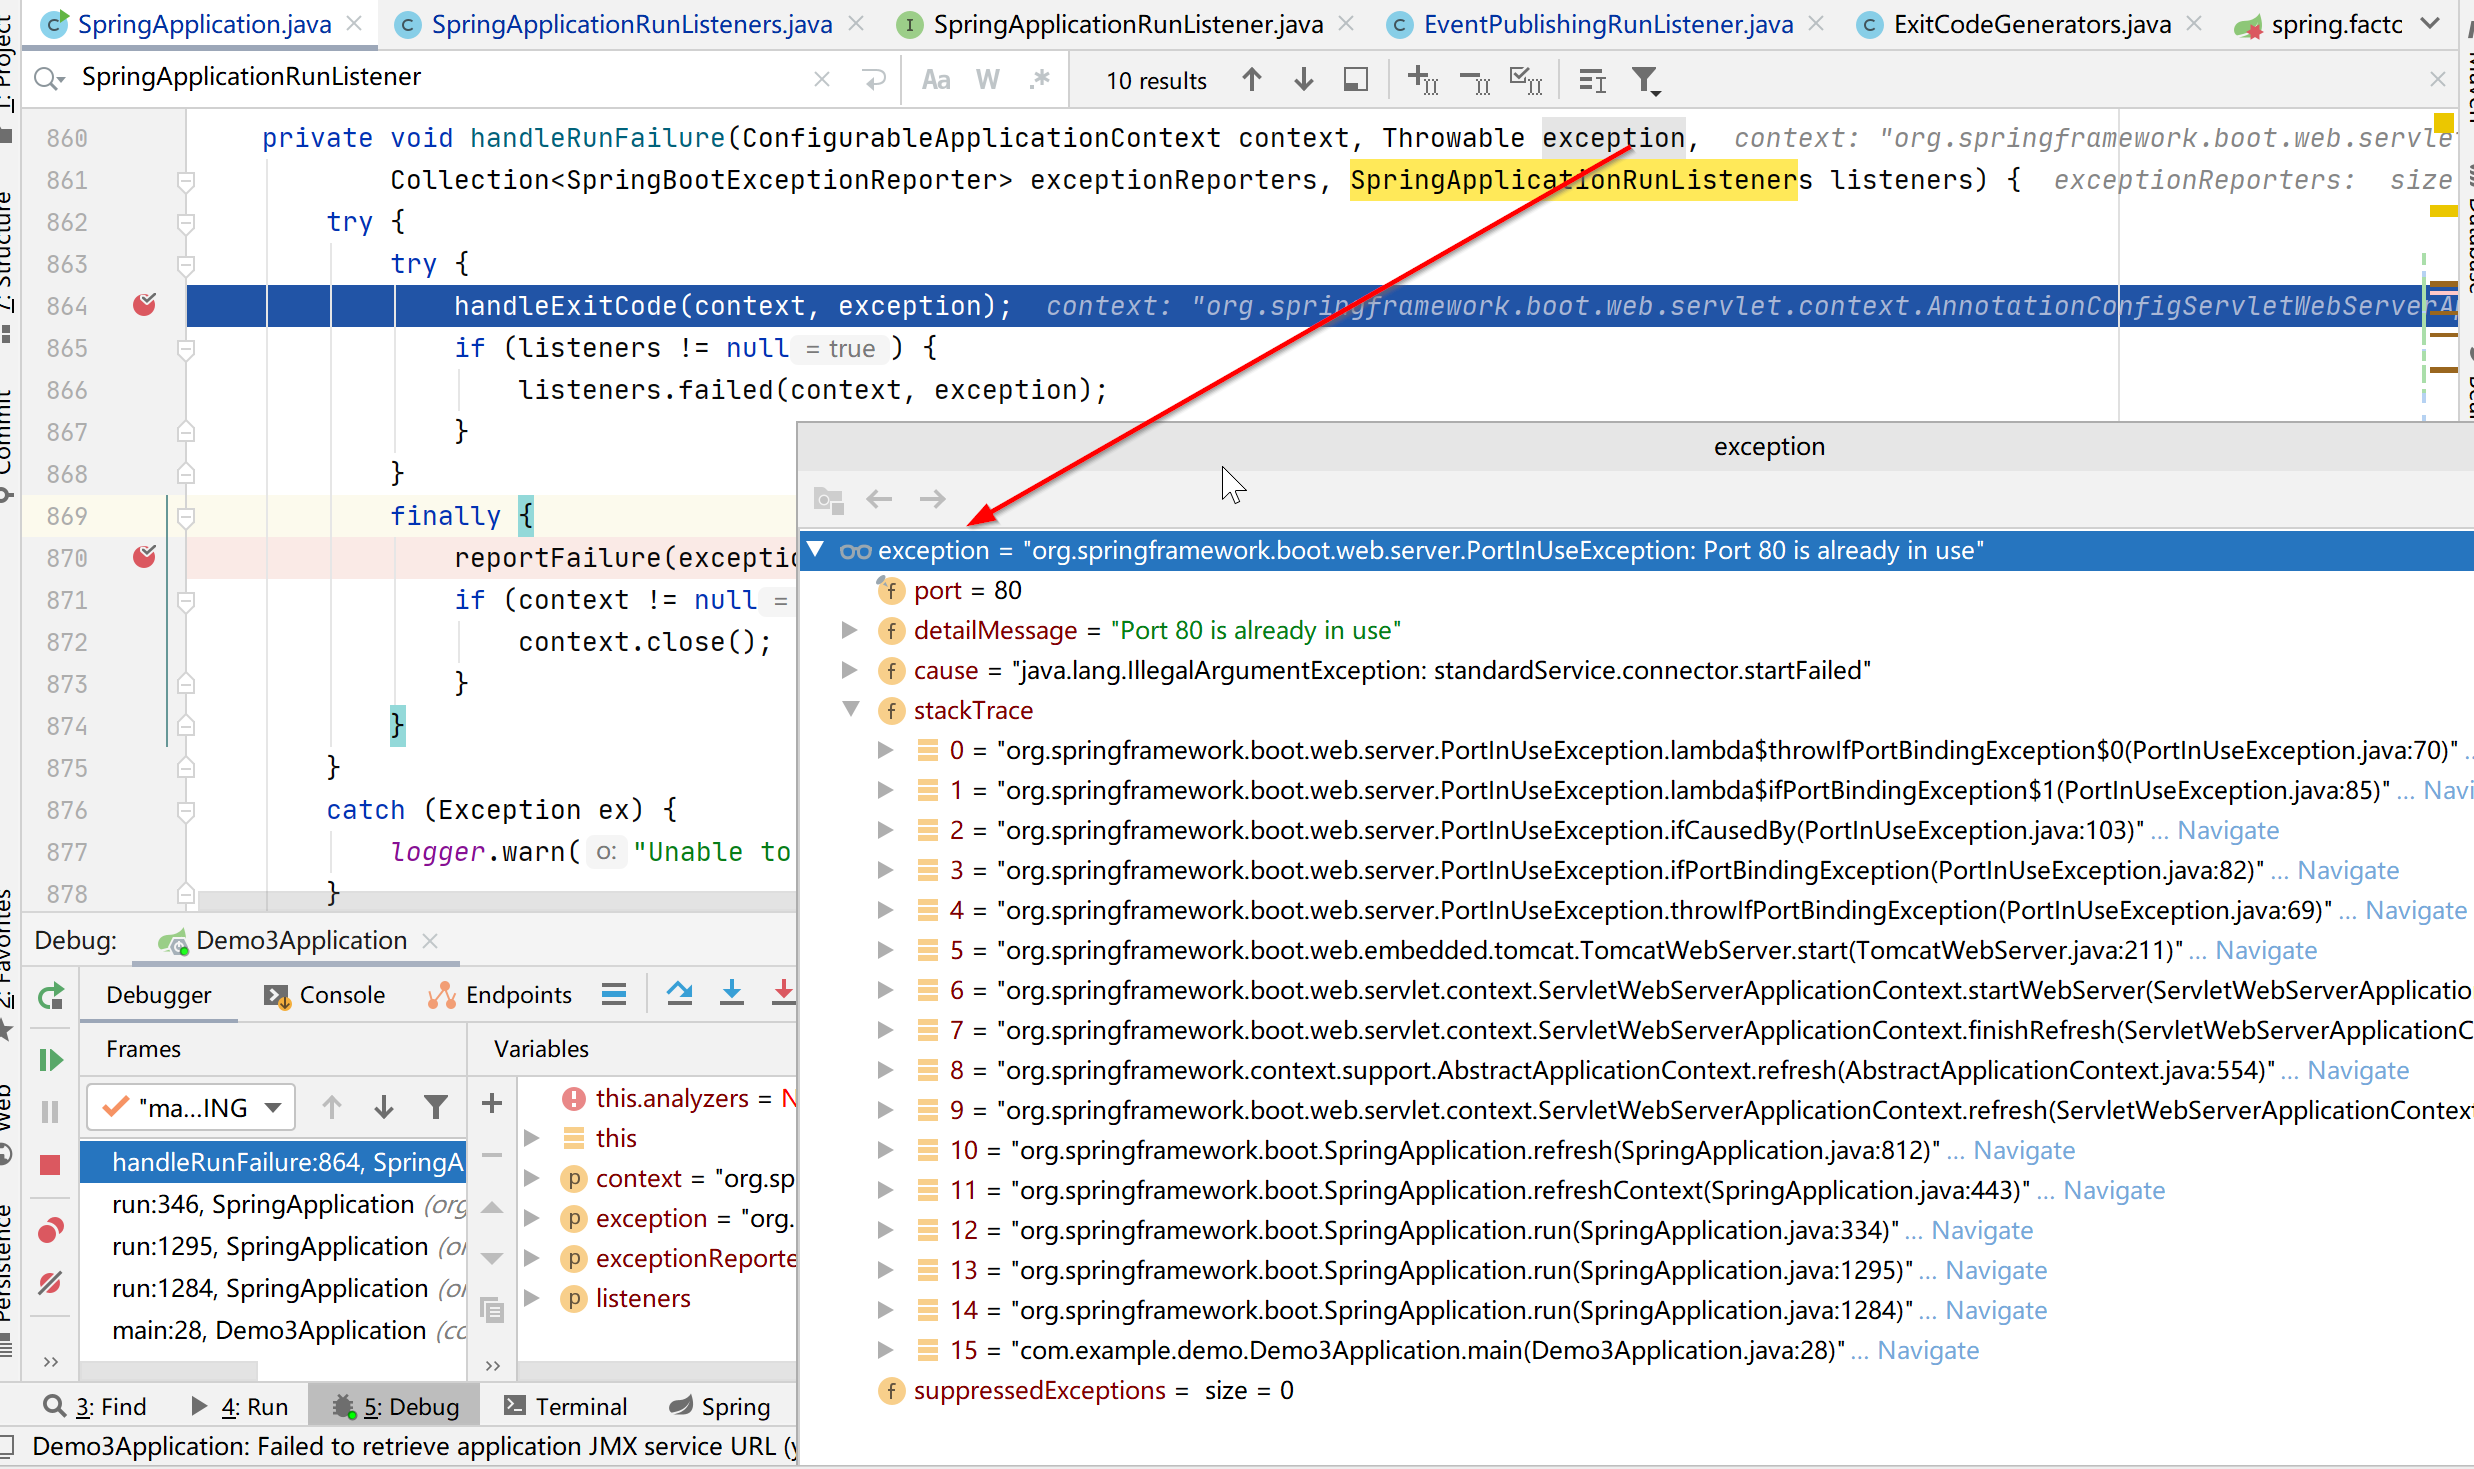
先看第一行handleExitCode,它根据exitCode来决定是否发送退出事件,同时也提供了一些接口让我们可以自定义exitCode,0 为正常出,非 0 是异常退出。
private void handleExitCode(ConfigurableApplicationContext context, Throwable exception) {
    // 从异常中获取退出代码
	int exitCode = getExitCodeFromException(context, exception);
	if (exitCode != 0) {
		if (context != null) {
			context.publishEvent(new ExitCodeEvent(context, exitCode));
		}
		SpringBootExceptionHandler handler = getSpringBootExceptionHandler();
		if (handler != null) {
			handler.registerExitCode(exitCode);
		}
	}
}
getExitCodeFromException方法根据容器的状态以及异常类型来获取exitCode
private int getExitCodeFromException(ConfigurableApplicationContext context, Throwable exception) {
	int exitCode = getExitCodeFromMappedException(context, exception);
	if (exitCode == 0) {
		exitCode = getExitCodeFromExitCodeGeneratorException(exception);
	}
	return exitCode;
}
getExitCodeFromMappedException方法,如果容器还没有启动,直接返回0,否则从容器中获取ExitCodeExceptionMapper类型的Bean,赋给ExitCodeGenerators,并调用其getExitCode方法获取退出码
private int getExitCodeFromMappedException(ConfigurableApplicationContext context, Throwable exception) {
	if (context == null || !context.isActive()) {
		return 0;
	}
	ExitCodeGenerators generators = new ExitCodeGenerators();
	Collection<ExitCodeExceptionMapper> beans = context.getBeansOfType(ExitCodeExceptionMapper.class).values();
	generators.addAll(exception, beans);
	return generators.getExitCode();
}
ExitCodeExceptionMapper是一个函数式接口,提供了从异常中获取退出码的方法,我们可以通过实现这个接口,来自定义退出码
@FunctionalInterface
public interface ExitCodeExceptionMapper {

	int getExitCode(Throwable exception);

}
通过getExitCode方法遍历这个列表,根据if里面的条件,其实不确定最终的响应码到底是正数还是负数,正负码之间并没有相对的优先级,而程序最终关心的是退出码是否为0
int getExitCode() {
	int exitCode = 0;
	for (ExitCodeGenerator generator : this.generators) {
		try {
			int value = generator.getExitCode();
			if (value > 0 && value > exitCode || value < 0 && value < exitCode) {
				exitCode = value;
			}
		}
		catch (Exception ex) {
			exitCode = (exitCode != 0) ? exitCode : 1;
			ex.printStackTrace();
		}
	}
	return exitCode;
}
回到getExitCodeFromException方法,通过上面这一步拿到的退出码如果是0,会再根据异常做一次判断,因为有可能第一步容器并没有激活,直接就返回0了,调用getExitCodeFromExitCodeGeneratorException方法,如果异常类实现了ExitCodeGenerator 接口,就调用其getExitCode方法获取退出码
private int getExitCodeFromExitCodeGeneratorException(Throwable exception) {
		if (exception == null) {
			return 0;
		}
		if (exception instanceof ExitCodeGenerator) {
			return ((ExitCodeGenerator) exception).getExitCode();
		}
		return getExitCodeFromExitCodeGeneratorException(exception.getCause());
	}
最终返回的退出码如果不是0,就通过容器发布一个ExitCodeEvent事件,并将退出码注册到SpringBootExceptionHandler上,用于后续的日志记录
退出码处理完毕,回到handleRunFailure方法,接下来看listeners 如果不为空,就通过它来发布启动失败事件
private void handleRunFailure(ConfigurableApplicationContext context, Throwable exception,
			Collection<SpringBootExceptionReporter> exceptionReporters, SpringApplicationRunListeners listeners) {
	try {
		try {
			handleExitCode(context, exception);
			if (listeners != null) {
				listeners.failed(context, exception);
			}
		}
		finally {
			reportFailure(exceptionReporters, exception);
			if (context != null) {
				context.close();
			}
		}
	}
	catch (Exception ex) {
		logger.warn("Unable to close ApplicationContext", ex);
	}
	ReflectionUtils.rethrowRuntimeException(exception);
}
此时listeners 肯定不为空的,在前面的文章,我们已经通过它发布了应用启动事件ApplicationStartingEvent,以及环境准备就绪事件ApplicationEnvironmentPreparedEvent,而这里就是要发布应用启动失败相关的事件,进入failed方法
void failed(ConfigurableApplicationContext context, Throwable exception) {
	for (SpringApplicationRunListener listener : this.listeners) {
		callFailedListener(listener, context, exception);
	}
}
跟之前一样,这个listeners列表只有一个元素EventPublishingRunListener,将它传给callFailedListener方法
private void callFailedListener(SpringApplicationRunListener listener, ConfigurableApplicationContext context,
			Throwable exception) {
	try {
		listener.failed(context, exception);
	}
	catch (Throwable ex) {
		if (exception == null) {
			ReflectionUtils.rethrowRuntimeException(ex);
		}
		if (this.log.isDebugEnabled()) {
			this.log.error("Error handling failed", ex);
		}
		else {
			String message = ex.getMessage();
			message = (message != null) ? message : "no error message";
			this.log.warn("Error handling failed (" + message + ")");
		}
	}
}
最后是调用了EventPublishingRunListener的fail方法
@Override
public void failed(ConfigurableApplicationContext context, Throwable exception) {
	ApplicationFailedEvent event = new ApplicationFailedEvent(this.application, this.args, context, exception);
	if (context != null && context.isActive()) {
		// Listeners have been registered to the application context so we should
		// use it at this point if we can
		context.publishEvent(event);
	}
	else {
		// An inactive context may not have a multicaster so we use our multicaster to
		// call all of the context's listeners instead
		if (context instanceof AbstractApplicationContext) {
			for (ApplicationListener<?> listener : ((AbstractApplicationContext) context)
					.getApplicationListeners()) {
				this.initialMulticaster.addApplicationListener(listener);
			}
		}
		this.initialMulticaster.setErrorHandler(new LoggingErrorHandler());
		this.initialMulticaster.multicastEvent(event);
	}
}
这里先初始化了一个事件ApplicationFailedEvent ,然后判断容器是否已经启动了,如果是,就由容器来负责事件的发布,否则将容器中已经存在的事件监听器注册到当前的事件多播器中,跟之前几个事件的发布流程一样,继续由它来发布事件
处理退出码、发布启动失败事件等流程结束后,分析异常原因,并关闭容器
   //...... 省略其他代码
   finally {
        this.reportFailure(exceptionReporters, exception);
        if (context != null) {
            context.close();
        }
    }
   //...... 省略其他代码
看下reportFailure的实现,入参就是开始时找到的SpringBootExceptionReporter,只有一个实现FailureAnalyzers
private void reportFailure(Collection<SpringBootExceptionReporter> exceptionReporters, Throwable failure) {
	try {
		for (SpringBootExceptionReporter reporter : exceptionReporters) {
			if (reporter.reportException(failure)) {
				registerLoggedException(failure);
				return;
			}
		}
	}
	catch (Throwable ex) {
		// Continue with normal handling of the original failure
	}
	if (logger.isErrorEnabled()) {
		logger.error("Application run failed", failure);
		registerLoggedException(failure);
	}
}
进入FailureAnalyzers类的reportException方法
public boolean reportException(Throwable failure) {
	FailureAnalysis analysis = analyze(failure, this.analyzers);
	return report(analysis, this.classLoader);
}
先调用analyze,用之前找到的19个异常解析器去分析异常原因,直到某个解析器返回的解析结果不为空,就结束遍历
private FailureAnalysis analyze(Throwable failure, List<FailureAnalyzer> analyzers) {
	for (FailureAnalyzer analyzer : analyzers) {
		try {
			FailureAnalysis analysis = analyzer.analyze(failure);
			if (analysis != null) {
				return analysis;
			}
		}
		catch (Throwable ex) {
			logger.debug(LogMessage.format("FailureAnalyzer %s failed", analyzer), ex);
		}
	}
	return null;
}
文章开头的异常日志中,启动失败的原因以及建议的解决方案,就是封装在这个解析结果中
public class FailureAnalysis {

	private final String description;

	private final String action;

	private final Throwable cause;
}
解析的过程由每个解析器去实现,根据异常的类型来决定是否返回结果,然后将解析结果传给FailureAnalyzers类的report方法
private boolean report(FailureAnalysis analysis, ClassLoader classLoader) {
	List<FailureAnalysisReporter> reporters = SpringFactoriesLoader.loadFactories(FailureAnalysisReporter.class,
			classLoader);
	if (analysis == null || reporters.isEmpty()) {
		return false;
	}
	for (FailureAnalysisReporter reporter : reporters) {
		reporter.report(analysis);
	}
	return true;
}
该方法先到spring.factories中找FailureAnalysisReporter的实现类,它决定了异常分析结果的报告形式,默认只找到一个LoggingFailureAnalysisReporter,定义在spring-boot包下
# FailureAnalysisReporters
org.springframework.boot.diagnostics.FailureAnalysisReporter=\
org.springframework.boot.diagnostics.LoggingFailureAnalysisReporter
也就是最终调用了LoggingFailureAnalysisReporter的report方法
public void report(FailureAnalysis failureAnalysis) {
	if (logger.isDebugEnabled()) {
		logger.debug("Application failed to start due to an exception", failureAnalysis.getCause());
	}
	if (logger.isErrorEnabled()) {
		logger.error(buildMessage(failureAnalysis));
	}
}
根据传进来的结果,调用buildMessage构建输出信息,这个内容就很熟悉了,就是前面日志里展示的异常报告格式
private String buildMessage(FailureAnalysis failureAnalysis) {
	StringBuilder builder = new StringBuilder();
	builder.append(String.format("%n%n"));
	builder.append(String.format("***************************%n"));
	builder.append(String.format("APPLICATION FAILED TO START%n"));
	builder.append(String.format("***************************%n%n"));
	builder.append(String.format("Description:%n%n"));
	builder.append(String.format("%s%n", failureAnalysis.getDescription()));
	if (StringUtils.hasText(failureAnalysis.getAction())) {
		builder.append(String.format("%nAction:%n%n"));
		builder.append(String.format("%s%n", failureAnalysis.getAction()));
	}
	return builder.toString();
}
打印信息如下:
Error starting ApplicationContext. To display the conditions report re-run your application with 'debug' enabled.
2023-07-14 15:12:35.836 ERROR 21456 --- [           main] o.s.b.d.LoggingFailureAnalysisReporter   :

***************************
APPLICATION FAILED TO START
***************************

Description:

Web server failed to start. Port 80 was already in use.

Action:

Identify and stop the process that's listening on port 80 or configure this application to listen on another port.
最后调用context.close方法
close方法先调用doClose方法,然后移除钩子方法。
public void close() {
	synchronized (this.startupShutdownMonitor) {
		doClose();
		// If we registered a JVM shutdown hook, we don't need it anymore now:
		// We've already explicitly closed the context.
		if (this.shutdownHook != null) {
			try {
			    // 移除钩子方法
				Runtime.getRuntime().removeShutdownHook(this.shutdownHook);
			}
			catch (IllegalStateException ex) {
				// ignore - VM is already shutting down
			}
		}
	}
}
doClose方法。发布shoutdown广播,关闭一些bean和工厂bean,方便垃圾回收。
protected void doClose() {
	// Check whether an actual close attempt is necessary...
	if (this.active.get() && this.closed.compareAndSet(false, true)) {
		if (logger.isDebugEnabled()) {
			logger.debug("Closing " + this);
		}

		LiveBeansView.unregisterApplicationContext(this);

		try {
			// 发布容器关闭事件
			publishEvent(new ContextClosedEvent(this));
		}
		catch (Throwable ex) {
			logger.warn("Exception thrown from ApplicationListener handling ContextClosedEvent", ex);
		}

		// Stop all Lifecycle beans, to avoid delays during individual destruction.
		if (this.lifecycleProcessor != null) {
			try {
				this.lifecycleProcessor.onClose();
			}
			catch (Throwable ex) {
				logger.warn("Exception thrown from LifecycleProcessor on context close", ex);
			}
		}

		// Destroy all cached singletons in the context's BeanFactory.
		// 销毁所有的单例bean
		destroyBeans();

		// Close the state of this context itself.
		// 关闭容器
		closeBeanFactory();

		// Let subclasses do some final clean-up if they wish...
		// 调用子类的重写方法,关闭web服务器
		onClose();

		// Reset local application listeners to pre-refresh state.
		if (this.earlyApplicationListeners != null) {
			this.applicationListeners.clear();
			this.applicationListeners.addAll(this.earlyApplicationListeners);
		}

		// Switch to inactive.
		this.active.set(false);
	}
}
钩子方法。
在JVM退出时,调用这个方法
public static void main(String[] args) {
    System.out.println("hello");
    Thread close_jvm = new Thread(()-> System.out.println("close jvm"));
    Runtime.getRuntime().addShutdownHook(close_jvm);
    System.out.println("world");
}
hello
world
close jvm
四、shutdownHook介绍
- 作用:JVM退出时执行的业务逻辑
- 添加:Runtime.getRuntime().addShutdownHook()
- 移除:Runtime.getRuntime().removeShutdownHook(this.shutdownHook)
4.1、背景
在开发中,遇到这种情况,多个线程同时工作,突然一个线程遇到了fetal的错误,需要立即终止程序,等人工排查解决了问题之后重新启动。但是这样会有一个问题,程序终止时,其他线程可能正在进行重要操作,比如发一个message到另一个模块,并更新数据库状态。突然终止,可能会让这个操作只完成一半,从而导致数据不一致。
解决方案是:参考数据库Transaction原子性的概念,将这一系列重要操作看作一个整体,要么全部完成,要么全部不完成。为方便表述,我们把这一系列重要操作记为操作X。
当程序即将退出时,查看当前是否有操作X在执行中,如果有,等待其完成然后退出。且期间不再接受新的操作X。如果操作X执行之间过长,终止并回滚所有状态。
如果没有,则可以立即退出。
在程序退出的时候,做一些Check,保证已经开始的操作X的原子性,这里就用到了Runtime.ShutdownHook。
4.2、什么是Shutdown Hook
Shutdown hook是一个initialized but unstarted thread。当JVM开始执行shutdown sequence时,会并发运行所有registered Shutdown Hook。这时,在Shutdown Hook这个线程里定义的操作便会开始执行。
需要注意的是,在Shutdown Hook里执行的操作应当是不太耗时的。因为在用户注销或者操作系统关机导致的JVM shutdown的例子中,系统只会预留有限的时间给未完成的工作,超时之后还是会强制关闭。
4.3、什么时候会调用Shutdown Hook
程序正常停止
- Reach the end of program
- System.exit
程序异常退出
- NPE
- OutOfMemory
受到外界影响停止
- Ctrl+C
- kill -9
- 用户注销或者关机
4.4、如何使用Shutdown Hook
调用java.lang.Runtime这个类的addShutdownHook(Thread hook)方法即可注册一个Shutdown Hook,然后在Thread中定义需要在system exit时进行的操作。如下:
Runtime.getRuntime().addShutdownHook(new Thread(() ->
    System.out.println("Do something in Shutdown Hook")
));
4.5、测试例子
- 首先,注册了一个Shutdown Hook。
- 然后,系统Sleep 3秒,模拟进行某些操作。
- 然后,调用一个空的List,抛出异常,准备结束程序。
- 在程序将要结束的时候,执行Shutdown Hook中的内容。
public static void main(String[] args)
{
    // register shutdown hook
    Runtime.getRuntime().addShutdownHook(new Thread(() -> System.out.println("Do something in Shutdown Hook")));

    // sleep for some time
    try {
        for (int i=0; i<3; i++) {
            System.out.println("Count: " + i + "...");
            TimeUnit.MILLISECONDS.sleep(1000);
        }
        List nullList = new ArrayList<>();
        System.out.println("Trying to print null list's first element: " + nullList.get(0).toString());
    } catch (InterruptedException e) {
        e.printStackTrace();
    }

    System.out.println("Ready to exit.");
    System.exit(0);
}
结果如下:
Count: 0...
Count: 1...
Count: 2...
Exception in thread "main" java.lang.IndexOutOfBoundsException: Index: 0, Size: 0
    at java.util.ArrayList.rangeCheck(ArrayList.java:653)
    at java.util.ArrayList.get(ArrayList.java:429)
    at HookTest.main(HookTest.java:18)
Do something in Shutdown Hook

Process finished with exit code 1
需要注意的点
- 当System.exit之后,当Shutdown Hook开始执行时,其他的线程还是会继续执行。
- 应当保证Shutdown Hook的线程安全。
- 在使用多个Shutdown Hook时一定要特别小心,保证其调用的服务不会被其他Hook影响。否则会出现当前Hook所依赖的服务被另外一个Hook终止了的情况。
五、自定义异常报告器
5.1、方式一:实现SpringBootExceptionReporter接口
(1):模拟异常,创建UserService
public class UserService {

}
引入UserService
@RestController
public class UserController {


    @Autowired
    UserService userService;

}
由于UserService没有加入IOC容器中,所以这里正常启动后报错如下:
***************************
APPLICATION FAILED TO START
***************************

Description:

Field userService in com.example.demo.controller.UserController required a bean of type 'com.example.demo.service.UserService' that could not be found.

The injection point has the following annotations:
	- @org.springframework.beans.factory.annotation.Autowired(required=true)


Action:

Consider defining a bean of type 'com.example.demo.service.UserService' in your configuration.
我们想要打印自己定义的格式应该如何做呢?
(2):自定义异常
package com.example.demo.exception;
import org.springframework.beans.factory.UnsatisfiedDependencyException;
import org.springframework.boot.SpringBootExceptionReporter;
import org.springframework.context.ConfigurableApplicationContext;
//自定义异常报告器
public class MyExceptionReporter implements SpringBootExceptionReporter{
private ConfigurableApplicationContext context;
//实例化构造方法 如果不实例化会报错 报 Cannot instantiate interface
//java.lang.NoSuchMethodException: com.example.demo.exception.MyExceptionReporter.
// <init>(org.springframework.context.ConfigurableApplicationContext)
public MyExceptionReporter(ConfigurableApplicationContext context) {
this.context = context;
}
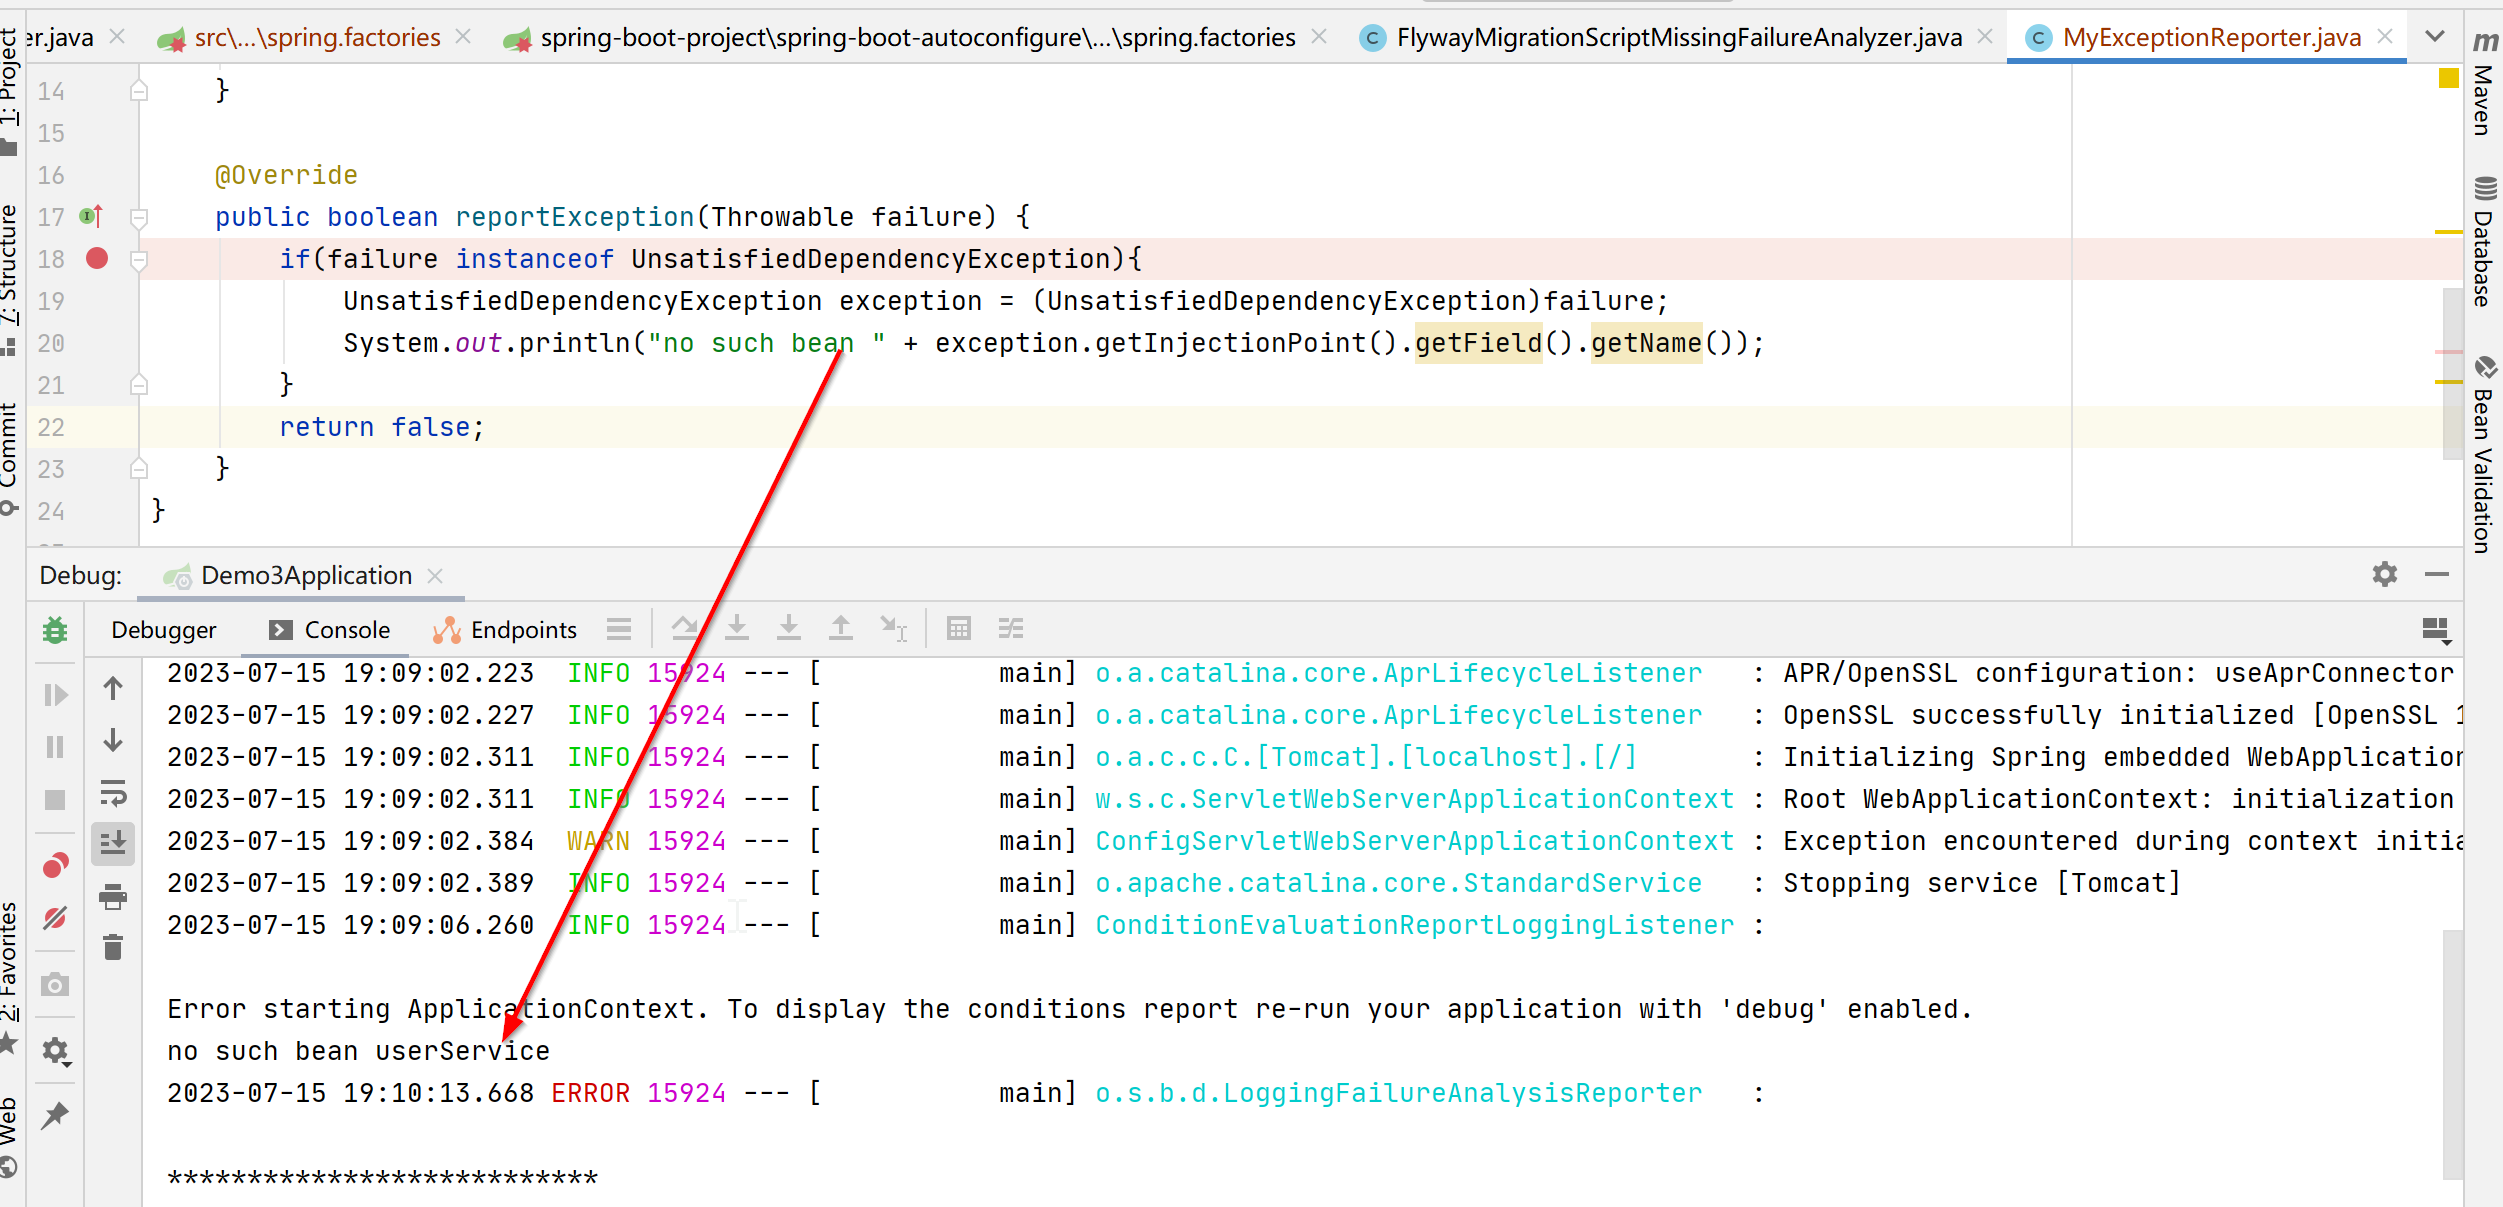
@Override
public boolean reportException(Throwable failure) {
if(failure instanceof UnsatisfiedDependencyException){
UnsatisfiedDependencyException exception = (UnsatisfiedDependencyException)failure;
System.out.println("no such bean " + exception.getInjectionPoint().getField().getName());
}
//返回false打印详细信息 返回true只打印异常信息
return false;
}
}
在 spring.factories 文件中注册异常报告器
# 注册异常报告器
org.springframework.boot.SpringBootExceptionReporter=\
com.example.demo.exception.MyExceptionReporter
(3):运行程序,错误输出如下
5.2、方式二:实现FailureAnalyzer接口
(1):自定义一个异常
public class MyException extends RuntimeException{
}
(2):实现FailureAnalyzer接口
package com.example.demo.exception;

public class MyFailureAnalyzer extends AbstractFailureAnalyzer<MyException> {
    @Override
    protected FailureAnalysis analyze(Throwable rootFailure, MyException cause) {
        String des = "发生自定义异常";
        String action = "由于自定义了一个异常";
        return new FailureAnalysis(des, action, rootFailure);
    }
}
在 spring.factories 文件中注册异常分析器
org.springframework.boot.diagnostics.FailureAnalyzer=\
com.example.demo.exception.MyFailureAnalyzer
(3)测试
需要在Spring Boot 启动的时候抛出异常,为了测试,我们在上下文准备的时候抛出自定义异常,添加到demo中的MyApplicationRunListener中。
public void contextPrepared(ConfigurableApplicationContext context) {
    System.out.println("在创建和准备ApplicationContext之后,但在加载源之前调用");
    throw new MyException();
}
启动后打印异常日志如下:
***************************
APPLICATION FAILED TO START
***************************

Description:

发生自定义异常

Action:

由于自定义了一个异常
六、总结
- Spring Boot 为了将启动过程中的错误以更加友好,灵活的方式呈现出来,设计了一套异常处理方案。
- Spring Boot 提出了错误分析器(FailureAnalyzer)与错误报告器(FailureAnalysisReporter)的概念,前者用于将报错信息转换为更加详细的错误分析报告,后者负责将这个报告呈现出来。
- 错误分析器(FailureAnalyzer)的职责是识别当前错误的类型,对于感兴趣的错误进行二次包装,包装的结果就是错误分析报告(FailureAnalysis)。
- 错误分析报告(FailureAnalysis)中除了原始的错误信息外,新增了描述(description)以及行为(action)用于提示用户后续的处理方式。
- Spring Boot 框架异常处理体系中大量使用 SPI 的方式进行特定类的加载,方便框架后续对异常处理方案,特定异常检查,异常展示方式的扩展。
参考文章:
https://blog.csdn.net/m0_37298252/article/details/122879031
https://blog.51cto.com/u_14014612/6007663