前言:
kubernetes集群的安装部署是学习kubernetes所需要面对的第一个难关,确实是非常不好部署的,尤其是二进制方式,虽然有minikube,kubeadm大大的简化了kubernetes的部署难度,那么,针对我们的学习环境或者测试环境,我们应该如何能够快速的,简单的,非常优雅的部署一个学习或者测试用的kubernetes集群呢?
目前来说,版本答案就是kubekey项目了,也就是kk
该项目针对kubernetes集群的部署难度,极大的降低了kubernetes集群的部署门槛,可以非常迅速的部署单master集群,多master高可用集群,通常部署安装可能至多需要10来分钟(在线安装的话),如果是离线方式安装那么部署时间可缩短到 1 2 分钟。
本文将就kubekey部署kubernetes单master集群做一个简单的描述。
一,
kubekey项目的下载地址
Releases · kubesphere/kubekey · GitHub

大概翻译一下About,该项目的简介说的是,kubekey可以仅安装kubernetes集群,也可以安装kubernetes集群和kubesphere,并且支持多云架构,支持多工作节点,高可用kubernetes集群。
那么,需要注意的是,kubekey由于是kubesphere公司的一个子项目,因此,和kubesphere是没有解耦的,也就是说,要么用kubekey安装kubernetes集群,要么用kubekey安装kubernetes集群和kubesphere,两个同时安装,不能只使用kubekey安装kubesphere
OK,本文将仅仅使用kubekey安装部署一个单master的kubernetes集群(在线部署,注意,不是离线的方式,还没研究出来呢)
作为一个安装工具,当然是使用最新版的比较好了,因为支持的kubernetes版本够多,bug修复的够多,功能也够多嘛
我由于是演示性质,因此随意选择了一个版本下载,本文使用的版本是kubekey-v3.1.0-alpha.0-linux-amd64.tar.gz
可以看到最新版3.0.8还是比较香的,基本都是最新的技术啦,如果想体验高版本的kubernetes的快乐,自然是此版本比较合适的

二,
kubekey使用的先决条件
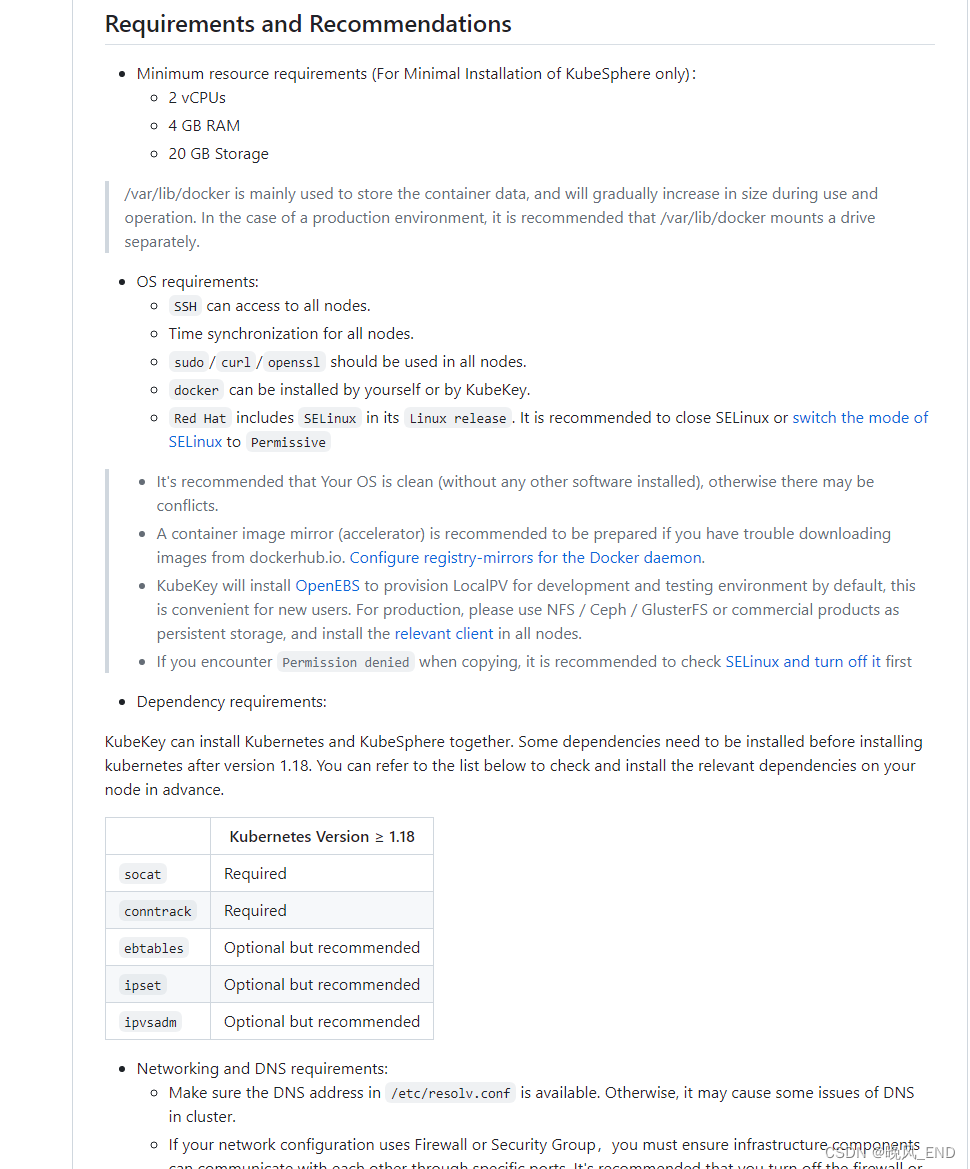
大概翻译一下
第一,服务器系统需要2核CPU,4G内存,至少20G的磁盘使用空间
第二,ssh服务是正常的,通过ssh服务可以访问到所有节点
第三,curl,openssl命令可以sudo,假如是使用普通用户部署的情况下
第四,docker环境
第五,selinux关闭了或者已做了相关配置,建议是直接关闭selinux
第六,最好是干净的刚安装完毕系统的服务器
第七,需要安装socat,conntrack,这两个是关键依赖,必须安装的,ebtables,ipset,ipvsadm中等依赖,可不安装,但最好安装
总结一哈,在centos7下那就是需要docker环境(可以不安装,等kubekey来安装),时间服务器,sshd,服务器密码,关闭selinux和防火墙,可用的外部yum源,最好是有epel源和基础源。
安装依赖,安装命令为:
yum install conntrack socat ipset ipvsadm ebtables -y本例使用的是两台服务器的信息是:
IP:192.168.123.11 192.168.123.12 操作系统版本是centos7
[root@node1 ~]# cat /etc/redhat-release
CentOS Linux release 7.7.1908 (Core)
那么,我们在kubeadm或者二进制部署的时候,还经常有升级内核这些步骤,为什么kubekey这里没有提到呢? 其实,内核的升级只是让kubernetes集群更加稳定而已,考虑到此次部署工作的目的是测试环境或者学习环境,因此,内核可以不需要升级。
三,
kubekey生成部署配置文件
基本上kubekey和kubeadm是比较相似的,是可以使用配置文件的,也就是配置文件内写如何部署安装kubernetes,然后告诉kubekey吧
在kubekey的官网,我们使用它的高阶部署方式,也就是配置文件方式
####注,kubekey的二进制安装包建议放置在master节点,解压后直接使用即可

生成配置文件
./kk create config [--with-kubernetes version] [--with-kubesphere version] [(-f | --filename) path]根据示例命令,编写下面这个命令,生成配置文件1.22.yaml
./kk create config with-kubernetes 1.22.16 -f 1.22.yaml
文件内容如下:
[root@node1 ~]# vim 1.22.yaml
[root@node1 ~]# cat  1.22.yaml

apiVersion: kubekey.kubesphere.io/v1alpha2
kind: Cluster
metadata:
  name: sample
spec:
  hosts:
  - {name: node1, address: 172.16.0.2, internalAddress: 172.16.0.2, user: ubuntu, password: "Qcloud@123"}
  - {name: node2, address: 172.16.0.3, internalAddress: 172.16.0.3, user: ubuntu, password: "Qcloud@123"}
  roleGroups:
    etcd:
    - node1
    control-plane:
    - node1
    worker:
    - node1
    - node2
  controlPlaneEndpoint:
    ## Internal loadbalancer for apiservers
    # internalLoadbalancer: haproxy

    domain: lb.kubesphere.local
    address: ""
    port: 6443
  kubernetes:
    version: v1.23.10
    clusterName: cluster.local
    autoRenewCerts: true
    containerManager: docker
  etcd:
    type: kubekey
  network:
    plugin: calico
    kubePodsCIDR: 10.233.64.0/18
    kubeServiceCIDR: 10.233.0.0/18
    ## multus support. https://github.com/k8snetworkplumbingwg/multus-cni
    multusCNI:
      enabled: false
  registry:
    privateRegistry: ""
    namespaceOverride: ""
    registryMirrors: []
    insecureRegistries: []
  addons: []
很显然,该文件还是有很多不符合我们的预期的,需要修改,修改后的文件内容如下:
###主要是IP地址,密码和CIDR的修改
apiVersion: kubekey.kubesphere.io/v1alpha2
kind: Cluster
metadata:
  name: sample
spec:
  hosts:
  - {name: node1, address: 192.168.123.11, internalAddress: 192.168.123.11, user: root, password: "密码"}
  - {name: node2, address: 192.168.123.12, internalAddress: 192.168.123.12, user: root, password: "密码"}
  roleGroups:
    etcd:
    - node1
    control-plane:
    - node1
    worker:
    - node1
    - node2
  controlPlaneEndpoint:
    ## Internal loadbalancer for apiservers
    # internalLoadbalancer: haproxy

    domain: lb.kubesphere.local
    address: ""
    port: 6443
  kubernetes:
    version: 1.22.16
    clusterName: cluster.local
    autoRenewCerts: true
    containerManager: docker
  etcd:
    type: kubekey
  network:
    plugin: calico
    kubePodsCIDR: 10.244.0.0/24
    kubeServiceCIDR: 10.96.0.0/24
    ## multus support. https://github.com/k8snetworkplumbingwg/multus-cni
    multusCNI:
      enabled: false
  registry:
    privateRegistry: ""
    namespaceOverride: ""
    registryMirrors: []
    insecureRegistries: []
  addons: []
四,
kubekey应用修改后的配置文件开始正式部署
./kk create cluster -f 1.22.yaml在开始部署前,由于防火墙的原因,我们需要增加一个环境变量,使用国内的镜像等等,也就是国产化
export KKZONE=cn命令的输出大概如下:
####注,表格内全是y就可以了,直接输入yes,开始安装
[root@centos1 ~]# ./kk create cluster -f 123.yaml


 _   __      _          _   __
| | / /     | |        | | / /
| |/ / _   _| |__   ___| |/ /  ___ _   _
|    \| | | | '_ \ / _ \    \ / _ \ | | |
| |\  \ |_| | |_) |  __/ |\  \  __/ |_| |
\_| \_/\__,_|_.__/ \___\_| \_/\___|\__, |
                                    __/ |
                                   |___/

11:52:54 CST [GreetingsModule] Greetings
11:52:54 CST message: [node2]
Greetings, KubeKey!
11:52:55 CST message: [node1]
Greetings, KubeKey!
11:52:55 CST success: [node2]
11:52:55 CST success: [node1]
11:52:55 CST [NodePreCheckModule] A pre-check on nodes
11:53:01 CST success: [node2]
11:53:01 CST success: [node1]
11:53:01 CST [ConfirmModule] Display confirmation form
+-------+------+------+---------+----------+-------+-------+---------+-----------+--------+--------+------------+------------+-------------+------------------+--------------+
| name  | sudo | curl | openssl | ebtables | socat | ipset | ipvsadm | conntrack | chrony | docker | containerd | nfs client | ceph client | glusterfs client | time         |
+-------+------+------+---------+----------+-------+-------+---------+-----------+--------+--------+------------+------------+-------------+------------------+--------------+
| node1 | y    | y    | y       | y        | y     | y     |         | y         |        |        |            |            |             |                  | CST 11:53:01 |
| node2 | y    | y    | y       | y        | y     | y     |         | y         |        |        |            |            |             |                  | CST 11:52:55 |
+-------+------+------+---------+----------+-------+-------+---------+-----------+--------+--------+------------+------------+-------------+------------------+--------------+

This is a simple check of your environment.
Before installation, ensure that your machines meet all requirements specified at
https://github.com/kubesphere/kubekey#requirements-and-recommendations

Continue this installation? [yes/no]:
yes后,开始下载组件并执行安装了,可以看到下载了kubeadm,并且用了很多脚本:
11:54:24 CST success: [LocalHost]
11:54:24 CST [NodeBinariesModule] Download installation binaries
11:54:24 CST message: [localhost]
downloading amd64 kubeadm v1.22.16 ...
  % Total    % Received % Xferd  Average Speed   Time    Time     Time  Current
                                 Dload  Upload   Total   Spent    Left  Speed
100 43.7M  100 43.7M    0     0   998k      0  0:00:44  0:00:44 --:--:-- 1031k
11:55:09 CST message: [localhost]
downloading amd64 kubelet v1.22.16 ...
  % Total    % Received % Xferd  Average Speed   Time    Time     Time  Current
                                 Dload  Upload   Total   Spent    Left  Speed
100  115M  100  115M    0     0  1017k      0  0:01:56  0:01:56 --:--:-- 1078k
11:57:06 CST message: [localhost]
downloading amd64 kubectl v1.22.16 ...
  % Total    % Received % Xferd  Average Speed   Time    Time     Time  Current
                                 Dload  Upload   Total   Spent    Left  Speed
100 44.7M  100 44.7M    0     0  1017k      0  0:00:45  0:00:45 --:--:-- 1151k
11:57:51 CST message: [localhost]
downloading amd64 helm v3.9.0 ...
  % Total    % Received % Xferd  Average Speed   Time    Time     Time  Current
                                 Dload  Upload   Total   Spent    Left  Speed
100 44.0M  100 44.0M    0     0  1012k      0  0:00:44  0:00:44 --:--:-- 1082k
11:58:36 CST message: [localhost]
downloading amd64 kubecni v1.2.0 ...
  % Total    % Received % Xferd  Average Speed   Time    Time     Time  Current
                                 Dload  Upload   Total   Spent    Left  Speed
100 38.6M  100 38.6M    0     0  1008k      0  0:00:39  0:00:39 --:--:-- 1143k
11:59:16 CST message: [localhost]
downloading amd64 crictl v1.24.0 ...
  % Total    % Received % Xferd  Average Speed   Time    Time     Time  Current
                                 Dload  Upload   Total   Spent    Left  Speed
100 13.8M  100 13.8M    0     0  1044k      0  0:00:13  0:00:13 --:--:-- 1154k
11:59:29 CST message: [localhost]
downloading amd64 etcd v3.4.13 ...
  % Total    % Received % Xferd  Average Speed   Time    Time     Time  Current
                                 Dload  Upload   Total   Spent    Left  Speed
100 16.5M  100 16.5M    0     0  1012k      0  0:00:16  0:00:16 --:--:-- 1066k
11:59:46 CST message: [localhost]
downloading amd64 docker 20.10.8 ...
最终的输出如下:
poddisruptionbudget.policy/calico-kube-controllers created
12:05:00 CST success: [node1]
12:05:00 CST [ConfigureKubernetesModule] Configure kubernetes
12:05:00 CST success: [node1]
12:05:00 CST [ChownModule] Chown user $HOME/.kube dir
12:05:00 CST success: [node2]
12:05:00 CST success: [node1]
12:05:00 CST [AutoRenewCertsModule] Generate k8s certs renew script
12:05:01 CST success: [node1]
12:05:01 CST [AutoRenewCertsModule] Generate k8s certs renew service
12:05:02 CST success: [node1]
12:05:02 CST [AutoRenewCertsModule] Generate k8s certs renew timer
12:05:02 CST success: [node1]
12:05:02 CST [AutoRenewCertsModule] Enable k8s certs renew service
12:05:03 CST success: [node1]
12:05:03 CST [SaveKubeConfigModule] Save kube config as a configmap
12:05:03 CST success: [LocalHost]
12:05:03 CST [AddonsModule] Install addons
12:05:03 CST success: [LocalHost]
12:05:03 CST Pipeline[CreateClusterPipeline] execute successfully
Installation is complete.

Please check the result using the command:

	kubectl get pod -A
非常简单的,等待10来分钟一个可用的kubernetes-1.22.16版本的集群就部署好了
五,
小结:
kubekey到底在kubernetes集群安装中做了些什么工作呢?这样的集群有什么缺陷吗?
1,
kubekey大体做的有下载二进制kubernetes的部分组件,例如,kubelet,kubeadm,helm,还有一些脚本,配置文件等等
具体的目录在kubekey这个文件夹下:
[root@node1 kubekey]# ll
total 12
drwxr-xr-x. 3 root root   20 Jul 16 11:58 cni
-rw-r--r--. 1 root root 5667 Jul 16 12:04 config-sample
drwxr-xr-x. 3 root root   21 Jul 16 11:59 crictl
drwxr-xr-x. 3 root root   21 Jul 16 11:59 docker
drwxr-xr-x. 3 root root   21 Jul 16 11:59 etcd
drwxr-xr-x. 3 root root   20 Jul 16 11:57 helm
drwxr-xr-x. 3 root root   22 Jul 16 11:54 kube
drwxr-xr-x. 2 root root   53 Jul 16 11:52 logs
drwxr-xr-x. 2 root root 4096 Jul 16 12:37 node1
drwxr-xr-x. 2 root root  137 Jul 16 12:04 node2
drwxr-xr-x. 3 root root   18 Jul 16 12:03 pki
更多安装细节在logs目录下的日志文件内,感兴趣的同学可以去研究研究,其实,初始化系统那个脚本是值得一看的
[root@node1 node1]# ls
10-kubeadm.conf      backup-etcd.timer  daemon.json     etcd-backup.sh  etcd.service  k8s-certs-renew.service  k8s-certs-renew.timer  kubelet.service      nodelocaldnsConfigmap.yaml
backup-etcd.service  coredns-svc.yaml   docker.service  etcd.env        initOS.sh     k8s-certs-renew.sh       kubeadm-config.yaml    network-plugin.yaml  nodelocaldns.yaml
[root@node1 node1]# pwd
/root/kubekey/node1
可以看到,初始化脚本关闭了防火墙,selinux并做了内核优化这些工作
[root@node1 node1]# cat initOS.sh
#!/usr/bin/env bash

# Copyright 2020 The KubeSphere Authors.
#
# Licensed under the Apache License, Version 2.0 (the "License");
# you may not use this file except in compliance with the License.
# You may obtain a copy of the License at
#
#     http://www.apache.org/licenses/LICENSE-2.0
#
# Unless required by applicable law or agreed to in writing, software
# distributed under the License is distributed on an "AS IS" BASIS,
# WITHOUT WARRANTIES OR CONDITIONS OF ANY KIND, either express or implied.
# See the License for the specific language governing permissions and
# limitations under the License.

swapoff -a
sed -i /^[^#]*swap*/s/^/\#/g /etc/fstab

# See https://github.com/kubernetes/website/issues/14457
if [ -f /etc/selinux/config ]; then
  sed -ri 's/SELINUX=enforcing/SELINUX=disabled/' /etc/selinux/config
fi
# for ubuntu: sudo apt install selinux-utils
# for centos: yum install selinux-policy
if command -v setenforce &> /dev/null
then
  setenforce 0
  getenforce
fi

echo 'net.ipv4.ip_forward = 1' >> /etc/sysctl.conf
echo 'net.bridge.bridge-nf-call-arptables = 1' >> /etc/sysctl.conf
echo 'net.bridge.bridge-nf-call-ip6tables = 1' >> /etc/sysctl.conf
echo 'net.bridge.bridge-nf-call-iptables = 1' >> /etc/sysctl.conf
echo 'net.ipv4.ip_local_reserved_ports = 30000-32767' >> /etc/sysctl.conf
echo 'vm.max_map_count = 262144' >> /etc/sysctl.conf
echo 'vm.swappiness = 1' >> /etc/sysctl.conf
echo 'fs.inotify.max_user_instances = 524288' >> /etc/sysctl.conf
echo 'kernel.pid_max = 65535' >> /etc/sysctl.conf


#See https://imroc.io/posts/kubernetes/troubleshooting-with-kubernetes-network/
sed -r -i "s@#{0,}?net.ipv4.tcp_tw_recycle ?= ?(0|1)@net.ipv4.tcp_tw_recycle = 0@g" /etc/sysctl.conf

sed -r -i  "s@#{0,}?net.ipv4.ip_forward ?= ?(0|1)@net.ipv4.ip_forward = 1@g" /etc/sysctl.conf
sed -r -i  "s@#{0,}?net.bridge.bridge-nf-call-arptables ?= ?(0|1)@net.bridge.bridge-nf-call-arptables = 1@g" /etc/sysctl.conf
sed -r -i  "s@#{0,}?net.bridge.bridge-nf-call-ip6tables ?= ?(0|1)@net.bridge.bridge-nf-call-ip6tables = 1@g" /etc/sysctl.conf
sed -r -i  "s@#{0,}?net.bridge.bridge-nf-call-iptables ?= ?(0|1)@net.bridge.bridge-nf-call-iptables = 1@g" /etc/sysctl.conf
sed -r -i  "s@#{0,}?net.ipv4.ip_local_reserved_ports ?= ?([0-9]{1,}-{0,1},{0,1}){1,}@net.ipv4.ip_local_reserved_ports = 30000-32767@g" /etc/sysctl.conf
sed -r -i  "s@#{0,}?vm.max_map_count ?= ?([0-9]{1,})@vm.max_map_count = 262144@g" /etc/sysctl.conf
sed -r -i  "s@#{0,}?vm.swappiness ?= ?([0-9]{1,})@vm.swappiness = 1@g" /etc/sysctl.conf
sed -r -i  "s@#{0,}?fs.inotify.max_user_instances ?= ?([0-9]{1,})@fs.inotify.max_user_instances = 524288@g" /etc/sysctl.conf
sed -r -i  "s@#{0,}?kernel.pid_max ?= ?([0-9]{1,})@kernel.pid_max = 65535@g" /etc/sysctl.conf

tmpfile="$$.tmp"
awk ' !x[$0]++{print > "'$tmpfile'"}' /etc/sysctl.conf
mv $tmpfile /etc/sysctl.conf

systemctl stop firewalld 1>/dev/null 2>/dev/null
systemctl disable firewalld 1>/dev/null 2>/dev/null
systemctl stop ufw 1>/dev/null 2>/dev/null
systemctl disable ufw 1>/dev/null 2>/dev/null

modinfo br_netfilter > /dev/null 2>&1
if [ $? -eq 0 ]; then
   modprobe br_netfilter
   mkdir -p /etc/modules-load.d
   echo 'br_netfilter' > /etc/modules-load.d/kubekey-br_netfilter.conf
fi

modinfo overlay > /dev/null 2>&1
if [ $? -eq 0 ]; then
   modprobe overlay
   echo 'overlay' >> /etc/modules-load.d/kubekey-br_netfilter.conf
fi

modprobe ip_vs
modprobe ip_vs_rr
modprobe ip_vs_wrr
modprobe ip_vs_sh

cat > /etc/modules-load.d/kube_proxy-ipvs.conf << EOF
ip_vs
ip_vs_rr
ip_vs_wrr
ip_vs_sh
EOF

modprobe nf_conntrack_ipv4 1>/dev/null 2>/dev/null
if [ $? -eq 0 ]; then
   echo 'nf_conntrack_ipv4' > /etc/modules-load.d/kube_proxy-ipvs.conf
else
   modprobe nf_conntrack
   echo 'nf_conntrack' > /etc/modules-load.d/kube_proxy-ipvs.conf
fi
sysctl -p

sed -i ':a;$!{N;ba};s@# kubekey hosts BEGIN.*# kubekey hosts END@@' /etc/hosts
sed -i '/^$/N;/\n$/N;//D' /etc/hosts

cat >>/etc/hosts<<EOF
# kubekey hosts BEGIN
192.168.123.11  node1.cluster.local node1
192.168.123.12  node2.cluster.local node2
192.168.123.11  lb.kubesphere.local
# kubekey hosts END
EOF

echo 3 > /proc/sys/vm/drop_caches

# Make sure the iptables utility doesn't use the nftables backend.
update-alternatives --set iptables /usr/sbin/iptables-legacy >/dev/null 2>&1 || true
update-alternatives --set ip6tables /usr/sbin/ip6tables-legacy >/dev/null 2>&1 || true
update-alternatives --set arptables /usr/sbin/arptables-legacy >/dev/null 2>&1 || true
update-alternatives --set ebtables /usr/sbin/ebtables-legacy >/dev/null 2>&1 || true

ulimit -u 65535
ulimit -n 65535
2,
kubekey默认安装的kubernetes有哪些地方是不合理的呢?
我认为etcd这个组件的处理事比较差的,因为只是一个单示例etcd,这样的集群是无法用在生产上的。虽然是外部etcd,但不是集群,无法保证集群的稳定
[root@node1 node1]# kubectl get po -A
NAMESPACE     NAME                                       READY   STATUS    RESTARTS   AGE
kube-system   calico-kube-controllers-69cfcfdf6c-2dl2z   1/1     Running   0          41m
kube-system   calico-node-8l2vk                          1/1     Running   0          41m
kube-system   calico-node-plbbn                          1/1     Running   0          41m
kube-system   coredns-5495dd7c88-7746t                   1/1     Running   0          42m
kube-system   coredns-5495dd7c88-gzxl2                   1/1     Running   0          42m
kube-system   kube-apiserver-node1                       1/1     Running   0          42m
kube-system   kube-controller-manager-node1              1/1     Running   0          42m
kube-system   kube-proxy-ld97n                           1/1     Running   0          42m
kube-system   kube-proxy-q7zzm                           1/1     Running   0          41m
kube-system   kube-scheduler-node1                       1/1     Running   0          42m
kube-system   nodelocaldns-9l8lf                         1/1     Running   0          42m
kube-system   nodelocaldns-hw4tn                         1/1     Running   0          41m
[root@node1 node1]# systemctl status etcd
● etcd.service - etcd
   Loaded: loaded (/etc/systemd/system/etcd.service; enabled; vendor preset: disabled)
   Active: active (running) since Sun 2023-07-16 12:03:33 CST; 43min ago
 Main PID: 4872 (etcd)
    Tasks: 15
   Memory: 50.6M
   CGroup: /system.slice/etcd.service
           └─4872 /usr/local/bin/etcd

Jul 16 12:24:24 node1 etcd[4872]: store.index: compact 1888
Jul 16 12:24:24 node1 etcd[4872]: finished scheduled compaction at 1888 (took 400.469µs)
Jul 16 12:29:24 node1 etcd[4872]: store.index: compact 2279
Jul 16 12:29:24 node1 etcd[4872]: finished scheduled compaction at 2279 (took 351.415µs)
Jul 16 12:34:24 node1 etcd[4872]: store.index: compact 2672
Jul 16 12:34:24 node1 etcd[4872]: finished scheduled compaction at 2672 (took 403.899µs)
Jul 16 12:39:24 node1 etcd[4872]: store.index: compact 3063
Jul 16 12:39:24 node1 etcd[4872]: finished scheduled compaction at 3063 (took 355.549µs)
Jul 16 12:44:24 node1 etcd[4872]: store.index: compact 3455
Jul 16 12:44:24 node1 etcd[4872]: finished scheduled compaction at 3455 (took 346.379µs)
其它的地方kubekey表现基本是完美的(kubekey是支持高可用kubernetes集群安装的,但本例没有使用)
下一篇文章讲述如何使用kubekey部署一个高可用的kubernetes集群,并修正上述的etcd问题。
![[Linux笔记]常见命令(持续施工)](https://img-blog.csdnimg.cn/880deb62f4704ccba141f5827eef335e.png)


