一、说明
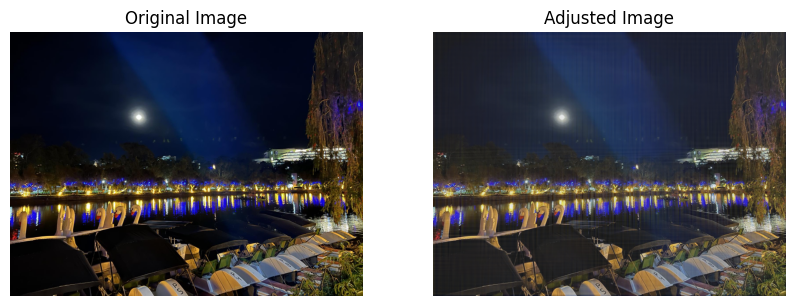
我在节日期间拍了一张照片,在夜间庆祝活动中。遗憾的是,图像中央有一束破坏性的光束。通过应用一系列增强技术,我们对消除这种光线持乐观态度,以实现更平衡和吸引人的构图。

二、傅里叶变换的魔力
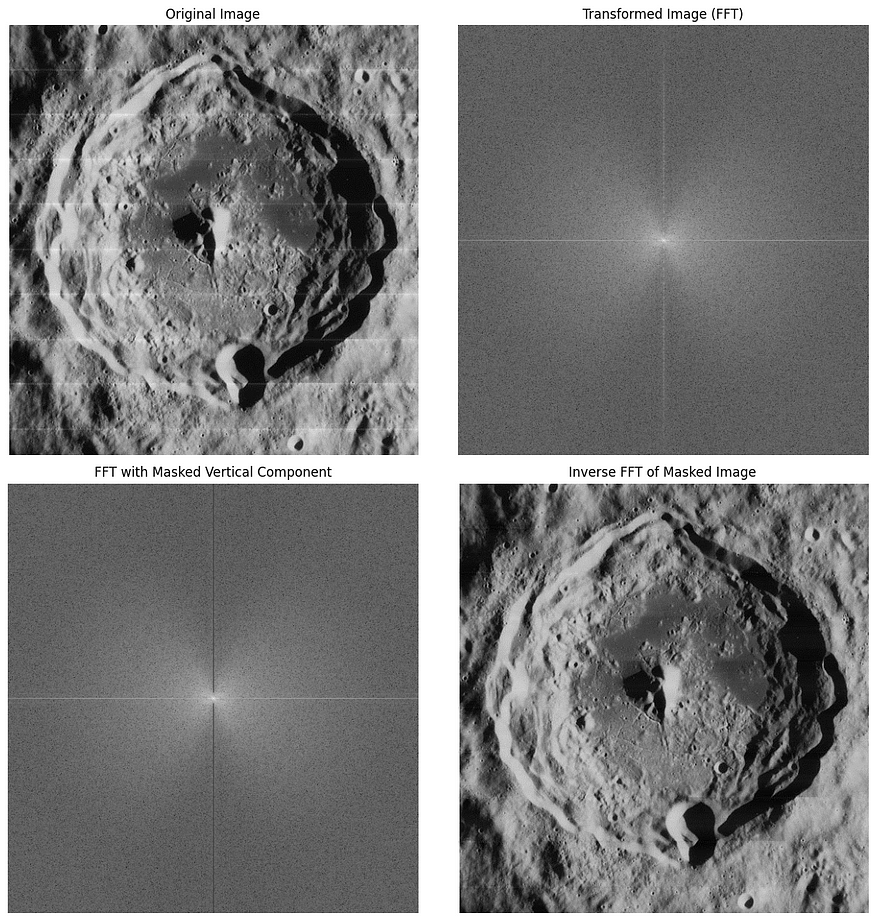
如果图像可以说一种语言,那就是数学,傅里叶变换就是语法。该数学工具将图像从空间域转换为频域。它将图像分解为正弦和余弦分量,表示图像中像素亮度变化的频率。
为什么这很重要?好吧,许多图像增强技术,例如滤波和压缩,在频域中执行得更好。这些技术可以消除噪声,增强边缘,甚至压缩图像以实现更高效的存储和传输。完成所需的增强后,可以应用逆傅里叶变换将图像转换回空间域,使其再次可见。
不幸的是,傅里叶变换技术对我的特定图像无效,尽管它确实证明对月球轨道这一不同的图像有益。
import numpy as np
import matplotlib.pyplot as plt
from skimage.io import imread, imshow
from skimage.color import rgb2gray

# Load and transform image
orbiter = rgb2gray(imread('lunar_orbiter.jpg'))
orbiter_fft = np.fft.fftshift(np.fft.fft2(orbiter))

orbiter_fft2 = orbiter_fft.copy()

# mask vertical component (scan lines)
orbiter_fft2[:280,orbiter_fft.shape[1]//2] = 1
orbiter_fft2[-280:,orbiter_fft.shape[1]//2] = 1

# Create 2 x 2 grid for plots
fig, axs = plt.subplots(2, 2, figsize=(12, 12))

# Original Image
axs[0, 0].imshow(orbiter, cmap='gray')
axs[0, 0].set_title('Original Image')
axs[0, 0].axis('off')

# Transformed Image (FFT)
axs[0, 1].imshow(np.log(abs(orbiter_fft)), cmap='gray')
axs[0, 1].set_title('Transformed Image (FFT)')
axs[0, 1].axis('off')

# FFT with Masked Vertical Component
axs[1, 0].imshow(np.log(abs(orbiter_fft2)), cmap='gray')
axs[1, 0].set_title('FFT with Masked Vertical Component')
axs[1, 0].axis('off')

# Inverse FFT of Masked Image
axs[1, 1].imshow(abs(np.fft.ifft2(orbiter_fft2)), cmap='gray')
axs[1, 1].set_title('Inverse FFT of Masked Image')
axs[1, 1].axis('off')

plt.tight_layout()
plt.show()
三、白色平衡:增强本色
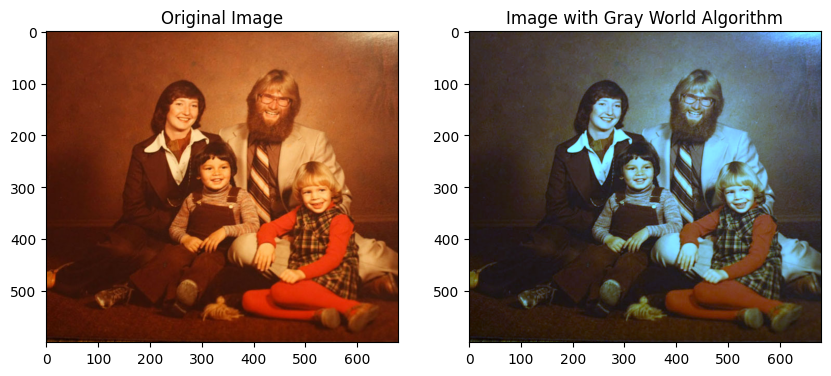
白平衡是一种有影响力的技术,能够显着改变图像的美感。这个过程的本质在于调整照片中的颜色,以便现实中的白色物品在图片中也被描绘成白色。这是一个至关重要的步骤,因为光源的颜色可能会有很大差异,从而影响照片中颜色的感知方式。
通过确保图像中的颜色准确一致,白平衡可为照片带来更大的真实性,无论拍摄照片时的照明条件如何。大多数现代相机都配备了自动白平衡设置,但对此过程的更深入理解使摄影师能够手动进行调整以获得出色的效果。这可以显着提高照片的美学质量,使其与肉眼看到的场景更紧密地对齐。
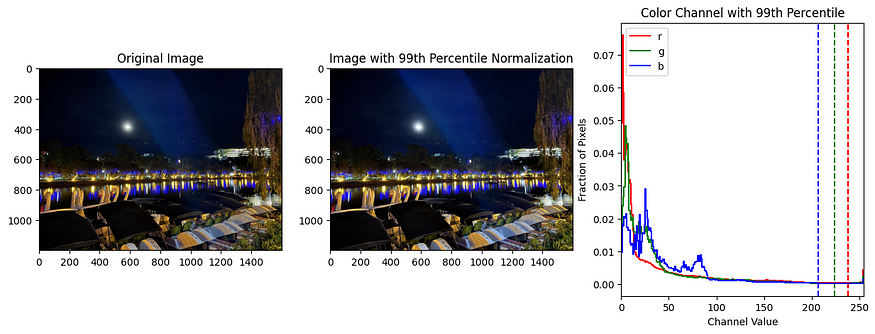
但是,并非所有图像都能从白平衡的使用中受益。在某些情况下,就像我拥有的特定图像一样,这些技术可能不会带来显着的增强。为了说明白平衡的力量,我将分享另一个例子,它大大提高了图像质量,展示了它的潜在有效性。

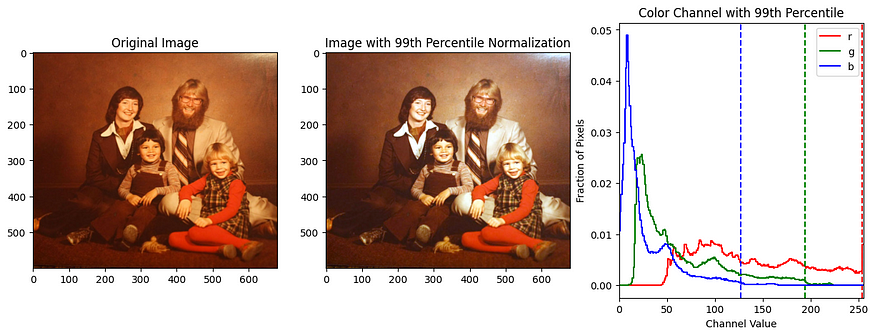

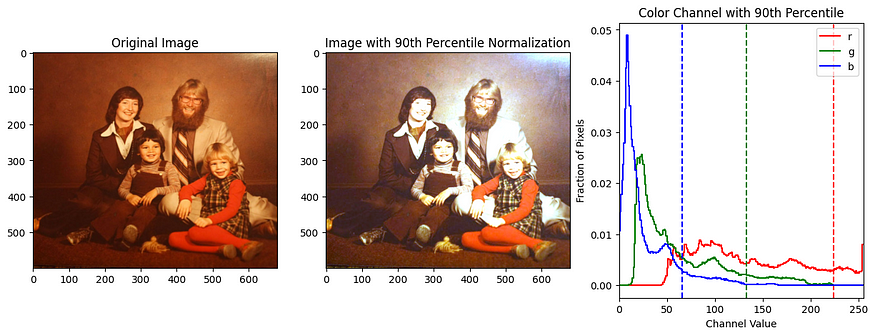
import matplotlib.pyplot as plt
import numpy as np
from skimage import util

def plot_channel_histogram(ax, image, percentile):
    for channel, color in enumerate('rgb'):
        channel_values = image[:, :, channel]
        ax.step(np.arange(256),
                np.bincount(channel_values.flatten(),
                 minlength=256) / channel_values.size,
                c=color, label=color)
        ax.axvline(np.percentile(channel_values, percentile),
                ls='--', c=color)

    ax.set_xlim(0, 255)
    ax.set_title(f'Color Channel with {percentile}th Percentile')
    ax.set_xlabel('Channel Value')
    ax.set_ylabel('Fraction of Pixels')
    ax.legend()

def apply_white_patch(image, percentile):
    # Convert and normalize the image
    wp = util.img_as_ubyte((image * 1.0 / np.percentile(image,
              percentile, axis=(0, 1))).clip(0, 1))

    # Create subplots
    fig, axs = plt.subplots(1, 3, figsize=(15, 5))

    axs[0].imshow(image)
    axs[0].set_title('Original Image')

    axs[1].imshow(wp)
    axs[1].set_title(f'Image with {percentile}th Percentile Normalization')

    plot_channel_histogram(axs[2], image, percentile)

    plt.show()

def main():
    percentiles = [99, 90]
    for percentile in percentiles:
        apply_white_patch(image, percentile)
四、直方图操作:平衡对比度和亮度的艺术
直方图用作图像中色调分布的图形说明。它们提供了对图片中每个亮度水平的像素数的见解,从而帮助摄影师理解照片的曝光和对比度。
通过利用直方图处理技术,摄影师可以大大增强最初显示对比度差的图像。这些方法使他们能够微调亮度和对比度,从而提高照片的整体质量。
但是,请务必记住,直方图操作的有效性可能因图像而异。在我的特定情况下,即使我采用了直方图操作,该技术也没有为我的图像产生所需的增强效果。尽管如此,为了展示直方图操作的潜力,我将举一个例子,说明这种方法在提高图像质量方面非常成功。
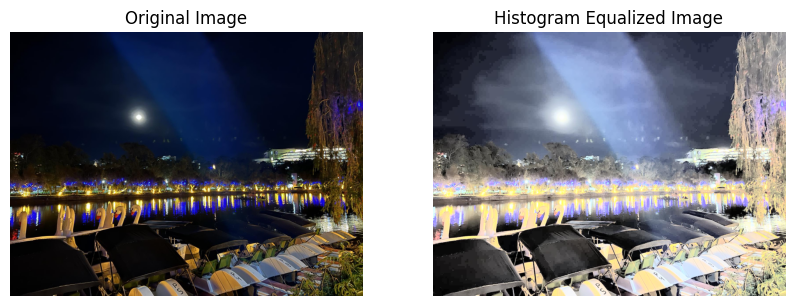
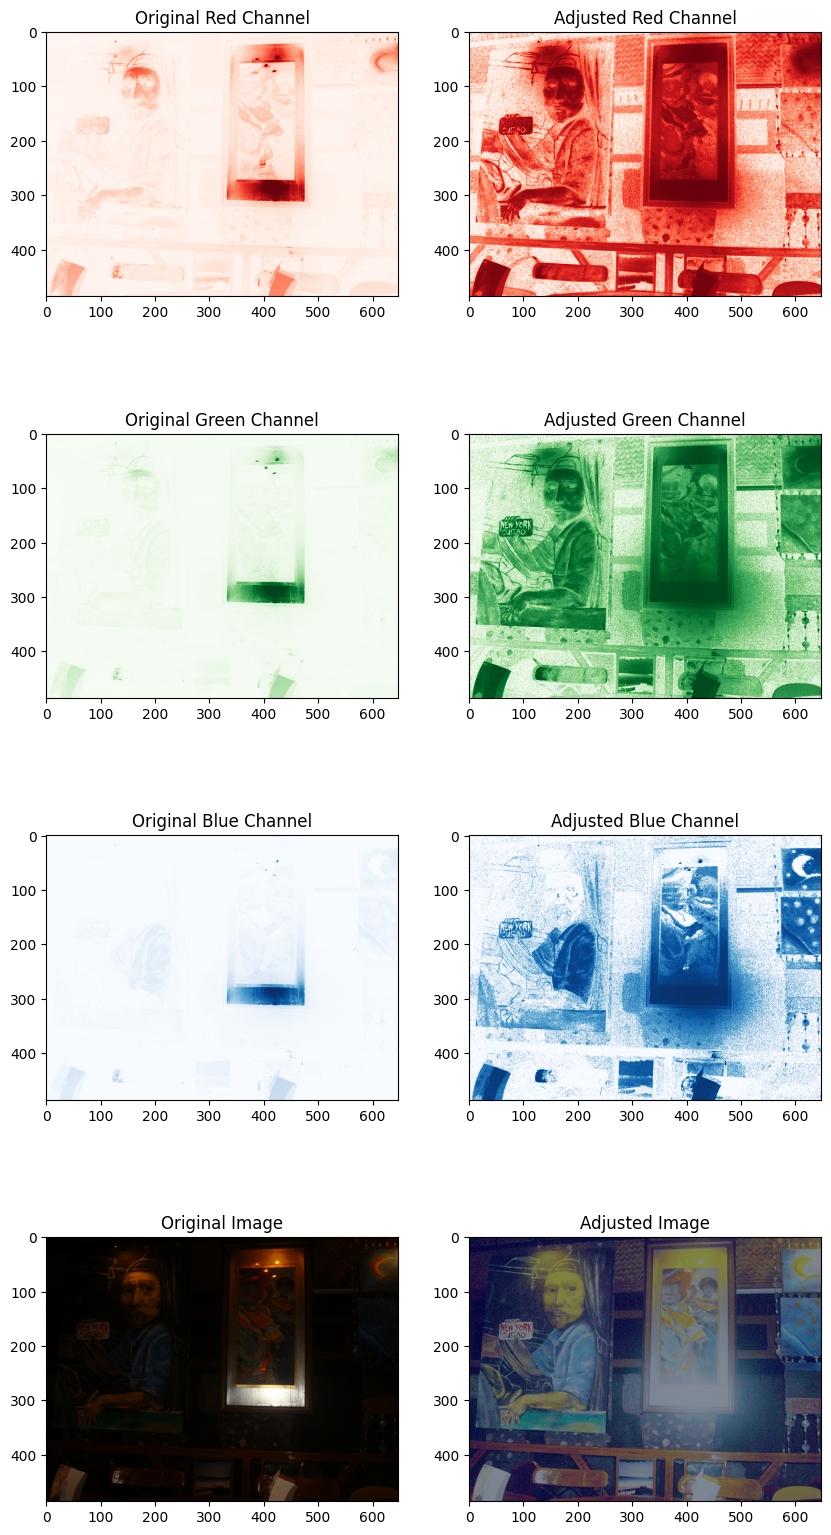
from skimage import color, exposure
import numpy as np
import matplotlib.pyplot as plt


# Original image
image = dark_image.copy()

# Convert the image to grayscale
gray_image = color.rgb2gray(image)

# Compute the histogram and cumulative distribution function
# (CDF) of the gray image
hist, bin_centers = exposure.histogram(gray_image)
cdf = np.cumsum(hist) / np.sum(hist)

# Split the color image into separate RGB channels
red_channel = image[:, :, 0]
green_channel = image[:, :, 1]
blue_channel = image[:, :, 2]

# Compute color multipliers from CDF for each channel
multipliers = 0.5 + 0.5 * np.concatenate([cdf]*3)
red_mult = multipliers[0]
green_mult = multipliers[1]
blue_mult = multipliers[2]

# Apply global histogram equalization to each channel
red_eq = exposure.equalize_hist(red_channel)
green_eq = exposure.equalize_hist(green_channel)
blue_eq = exposure.equalize_hist(blue_channel)

# Adjust channels by corresponding multipliers
red_final = red_eq * red_mult
green_final = green_eq * green_mult
blue_final = blue_eq * blue_mult

# Recombine the channels into a color image
adjusted_image = np.stack((red_final, green_final, blue_final), axis=-1)

# Create a 4x2 subplot for original and adjusted channels and images
fig, axs = plt.subplots(4, 2, figsize=(10, 20))

channels = [
    ('Red', red_channel, red_eq),
    ('Green', green_channel, green_eq),
    ('Blue', blue_channel, blue_eq)
]

for i, (color_name, original, adjusted) in enumerate(channels):
    axs[i, 0].set_title(f'Original {color_name} Channel')
    axs[i, 0].imshow(original, cmap=f'{color_name}s')
    axs[i, 1].set_title(f'Adjusted {color_name} Channel')
    axs[i, 1].imshow(adjusted, cmap=f'{color_name}s')

# Plot the original and final combined images
axs[3, 0].set_title('Original Image')
axs[3, 0].imshow(image)
axs[3, 1].set_title('Adjusted Image')
axs[3, 1].imshow(adjusted_image)

# Show the subplots
plt.show()
五、结论
图像增强技术,包括傅里叶变换、白平衡和直方图操作,是可以将摄影提升到新高度的强大工具。这些技术中的每一种都有其独特的优势和应用,使图像增强成为一个迷人但复杂的过程。例如,我在圣诞节假期拍摄的一张照片具有破坏性的光线,这些技术都无法单独消除。这凸显了图像增强的复杂性和对定制方法的需求。
对这些技术的实验揭示了它们各自的潜力。虽然傅里叶变换和白平衡没有为我的圣诞图像提供预期的结果,但它们在增强其他照片方面发挥了重要作用。同样,直方图操作并没有显着改善我的图像,但对另一张图像非常有效。这种经验强调了了解这些方法的独特功能并知道何时应用每种方法的重要性。
