1.简介
对接口限流的目的是通过对并发访问/请求进行限速,或者对一个时间窗口内的请求进行限速来保护系统,一旦达到限制速率则可以拒绝服务、排队或等待、降级等处理。
1.1.为什么需要限流?
- 大量正常用户高频访问导致服务器宕机
- 恶意用户高频访问导致服务器宕机
- 网页爬虫 ,对于这些情况我们需要对用户的访问进行限流访问
1.2.限流和熔断有什么区别?
-
限流发生在流量进来之前,超过的流量进行限制。
-
熔断是一种应对故障的机制,发生在流量进来之后,如果系统发生故障或者异常,熔断会自动切断请求,防止故障进一步扩展,导致服务雪崩。
1.3.限流和削峰有什么区别?
-
削峰是对流量的平滑处理,通过缓慢地增加请求的处理速率来避免系统瞬时过载。
-
削峰大概就是水库,把流量储存起来,慢慢流,限流大概就是闸口,拒绝超出的流量。
1.4.限流的通用流程
那么具体限流怎么实现呢?可以概括为以下几个步骤:
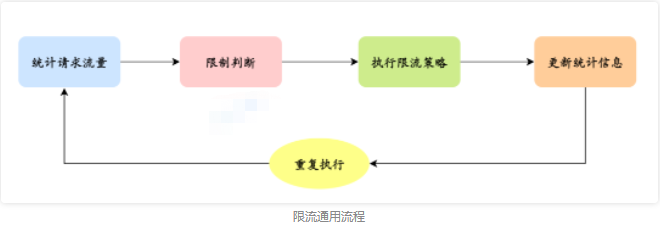
我们注意到,在限流的通用流程里,需要统计请求量、更新统计量,那么这个请求量的统计和更新就必须维护在一个存储里。
假如只是一个单机版的环境,那就很好办了,直接储存到本地。
- 统计请求流量:记录请求的数量或速率,可以通过计数器、滑动窗口等方式进行统计。
- 判断是否超过限制:根据设定的限制条件,判断当前请求流量是否超过限制。
- 执行限流策略:如果请求流量超过限制,执行限流策略,如拒绝请求、延迟处理、返回错误信息等。
- 更新统计信息:根据请求的处理结果,更新统计信息,如增加计数器的值、更新滑动窗口的数据等。
- 重复执行以上步骤:不断地统计请求流量、判断是否超过限制、执行限流策略、更新统计信息
需要注意的是,具体的限流算法实现可能会根据不同的场景和需求进行调整和优化,比如使用令牌桶算法、漏桶算法等。
1.5.单机限流和分布式限流
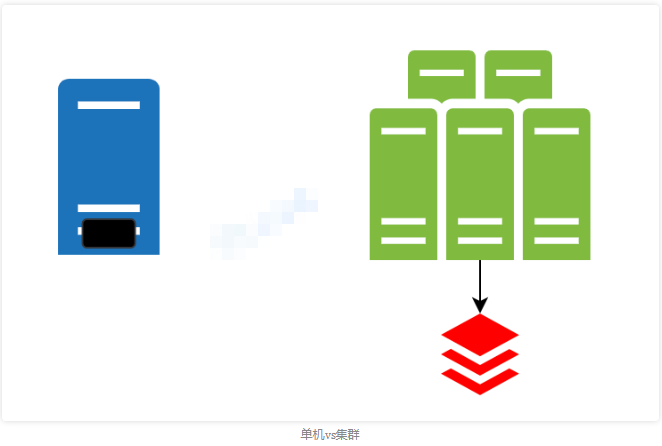
但是一般来讲,我们的服务都是集群部署的,如何来实现多台机器之间整体的限流呢?
这时候就可以把我们的统计信息放到Tair或Redis等分布式的K-V存储中。
2.四种限流算法
目前主流的限流算法:漏桶算法、令牌桶算法、计数器算法(固定窗口)、滑动窗口算法。Nginx都实现了漏桶算法,Springcloud Gateway和Guava Ratelimiter实现了令牌桶,阿里的 Sentinel实现了滑动窗口。
2.1.固定窗口算法(计数器算法)
这是限流算法中最暴力的一种想法。既然我们希望某个API在一分钟内只能固定被访问N次(可能是出于安全考虑,也可能是出于服务器资源的考虑),那么我们就可以直接统计这一分钟开始对API的访问次数,如果访问次数超过了限定值,则抛弃后续的访问。直到下一分钟开始,再开放对API的访问。
所有的暴力算法的共同点都是容易实现,而固定窗口限流的缺点也同样很明显。假设现在有一个恶意用户在上一分钟的最后一秒和下一分钟的第一秒疯狂的冲击API。按照固定窗口的限流规则,这些请求都能够访问成功,但是在这一秒内,服务将承受超过规定值的访问冲击(这个规定值很可能是服务器能够承受的最大负载),从而导致服务无法稳定提供。而且因为用户在这一秒内耗光了上一分钟和下一分钟的访问定额,从而导致别的用户无法享受正常的服务,对于服务提供方来说是完全不能接收的。
2.2.滑动窗口
固定窗口就像是滑动窗口的一个特例。滑动窗口将固定窗口再等分为多个小的窗口,每一次对一个小的窗口进行流量控制。这种方法可以很好的解决之前的临界问题。
这里找的网上一个图,假设我们将1s划分为4个窗口,则每个窗口对应250ms。假设恶意用户还是在上一秒的最后一刻和下一秒的第一刻冲击服务,按照滑动窗口的原理,此时统计上一秒的最后750毫秒和下一秒的前250毫秒,这种方式能够判断出用户的访问依旧超过了1s的访问数量,因此依然会阻拦用户的访问。
2.3.漏桶算法
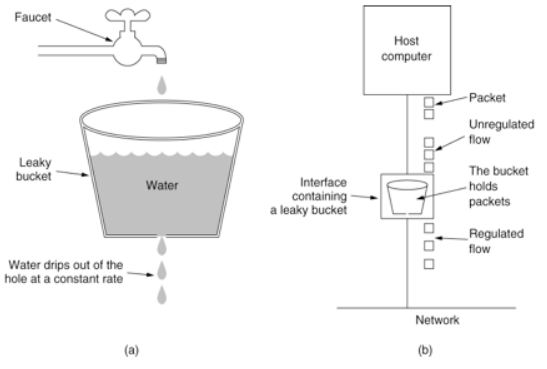
漏桶(Leaky Bucket)算法思路很简单,水(请求)先进入到漏桶里,漏桶以一定的速度出水(接口有响应速率),当水流入速度过大会直接溢出(访问频率超过接口响应速率),然后就拒绝请求,可以看出漏桶算法能强行限制数据的传输速率.示意图如下:
2.4.令牌桶算法
令牌桶算法的原理是系统会以一个恒定的速度往桶里放入令牌,而如果请求需要被处理,则需要先从桶里获取一个令牌,当桶里没有令牌可取时,则拒绝服务,令牌桶算法通过发放令牌,根据令牌的rate频率做请求频率限制,容量限制等
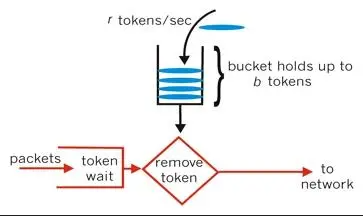
2.5. 漏桶算法和令牌桶算法区别:
令牌桶可以用来保护自己,主要用来对调用者频率进行限流,为的是让自己不被打垮。所以如果自己本身有处理能力的时候,如果流量突发(实际消费能力强于配置的流量限制),那么实际处理速率可以超过配置的限制。而漏桶算法,这是用来保护他人,也就是保护他所调用的系统。主要场景是,当调用的第三方系统本身没有保护机制,或者有流量限制的时候,我们的调用速度不能超过他的限制,由于我们不能更改第三方系统,所以只有在主调方控制。这个时候,即使流量突发,也必须舍弃。因为消费能力是第三方决定的。
总结起来:如果要让自己的系统不被打垮,用令牌桶。如果保证被别人的系统不被打垮,用漏桶算法
3.基于guava的RateLimiter实现
RateLimiter控制的是访问速率,RateLimiter是令牌桶算法的一种实现方式
3.1.常用方法
| 方法 | 描述 |
|---|---|
| create(int permits) | 创建每秒发放permits个令牌的桶 |
| acquire() | 不带参数表示获取一个令牌.如果没有令牌则一直等待,返回等待的时间(单位为秒),没有被限流则直接返回0.0 |
| acquire(int permits ) | 获取permits 个令牌,.如果没有获取完令牌则一直等待,返回等待的时间(单位为秒),没有被限流则直接返回0.0 |
| tryAcquire() | 尝试获取一个令牌,立即返回(非阻塞) |
| tryAcquire(int permits) | 尝试获取permits 个令牌,立即返回(非阻塞) |
| tryAcquire(long timeout, TimeUnit unit) | 尝试获取1个令牌,带超时时间 |
| tryAcquire(int permits, long timeout, TimeUnit unit) | 尝试获取permits个令牌,带超时时间 |
获取令牌方法源码如下
   @CanIgnoreReturnValue
    public double acquire() {
        return this.acquire(1);
    }

    @CanIgnoreReturnValue
    public double acquire(int permits) {
        long microsToWait = this.reserve(permits);
        this.stopwatch.sleepMicrosUninterruptibly(microsToWait);//会进行线程休眠
        return 1.0D * (double)microsToWait / (double)TimeUnit.SECONDS.toMicros(1L);
    }

    public boolean tryAcquire() {
        return this.tryAcquire(1, 0L, TimeUnit.MICROSECONDS);
    }

    public boolean tryAcquire(int permits, long timeout, TimeUnit unit) {
        long timeoutMicros = Math.max(unit.toMicros(timeout), 0L);
        checkPermits(permits);
        long microsToWait;
        synchronized(this.mutex()) {
            long nowMicros = this.stopwatch.readMicros();
            //无参的tryAcquire方法默认的超时时间设置是0,如果在这里没有立即获取到令牌,会直接返回获取令牌失败
            if (!this.canAcquire(nowMicros, timeoutMicros)) {
                return false;
            }

            microsToWait = this.reserveAndGetWaitLength(permits, nowMicros);
        }

        this.stopwatch.sleepMicrosUninterruptibly(microsToWait);
        return true;
    }
3.2.main函数版本
    public static void main(String[] args) {
        SimpleDateFormat sdf=new SimpleDateFormat("HH:mm:ss");
        long begin = System.currentTimeMillis();
        // 每秒允许发放1个令牌
        double permits=1.0;
        RateLimiter limiter = RateLimiter.create(permits);
        for (int i = 1; i <= 10; i++) {
            // 获取i个令牌, 当i超过permits会被阻塞
            double waitTime = limiter.acquire(i);
            System.out.println("curTime=" + sdf.format(new Date()) + " call index:" + i + " waitTime:" + waitTime);
        }
        long end =  System.currentTimeMillis();
        System.out.println("begin time:" + sdf.format(new Date(begin))+",end time:"+sdf.format(new Date(end))+",Total task time:"+(end-begin));
    }
测试结果如下
当i等于1的时候,直接获取到了令牌,当i大于1的时候会随着i的增长,获取令牌的等待时间也在增长

3.3.API接口限流实战
通关aop实现对接口的限流
3.3.1.引入依赖
        <!-- guava 限流 -->
        <dependency>
            <groupId>com.google.guava</groupId>
            <artifactId>guava</artifactId>
            <version>25.1-jre</version>
        </dependency>
        <!-- SpringBoot AOP -->
        <dependency>
            <groupId>org.springframework.boot</groupId>
            <artifactId>spring-boot-starter-aop</artifactId>
        </dependency>
3.3.2.自定义注解
该注解主要用于AOP功能的切入,不需要属性
@Target({ElementType.PARAMETER, ElementType.METHOD})
@Retention(RetentionPolicy.RUNTIME)
@Documented
public @interface RateLimit {

    String limitKey() default ""; //限流的方法名

    double value()  default 0d;  //发放的许可证数量
}
3.3.3.自定义切面类
通过limiter.acquire()来获取令牌,当然也可以通过tryAcquire(int permits, long timeout, TimeUnit unit)来设置等待超时时间的方式获取令牌,如果超timeout为0或则调用无参的tryAcquire(),则代表非阻塞,获取不到立即返回,支持阻塞或可超时的令牌消费。
@Component
@Scope
@Aspect
public class RateLimitAspect {

    /**
     * 存储限流量和方法必须是static且线程安全
     */
    public static Map<String, RateLimiter> rateLimitMap = new ConcurrentHashMap<>();

    /**
     * 业务层切点
     */
    @Pointcut("@annotation(com.ljm.boot.apilimit.limit.RateLimit)")
    public void ServiceAspect() {
    }

    @Around("ServiceAspect()")
    public Object around(ProceedingJoinPoint joinPoint) {
        Object obj = null;
        try {
            //获取目标对象
            Class<?> clz = joinPoint.getTarget().getClass();
            //tryAcquire()是非阻塞, rateLimiter.acquire()是阻塞的
            Signature signature = joinPoint.getSignature();
            String name = signature.getName();
            String limitKey = getLimitKey(clz, name);
            RateLimiter rateLimiter = rateLimitMap.get(limitKey);
            if (rateLimiter.tryAcquire()) {
                obj = joinPoint.proceed();
            } else {
                //拒绝了请求(服务降级)
                obj = "The system is busy, please visit after a while";
            }
        } catch (Throwable e) {
            e.printStackTrace();
        }
        return obj;
    }

    private String getLimitKey(Class<?> clz, String methodName) {
        for (Method method : clz.getDeclaredMethods()) {
            //找出目标方法
            if (method.getName().equals(methodName)) {
                //判断是否是限流方法
                if (method.isAnnotationPresent(RateLimit.class)) {
                    String key= method.getAnnotation(RateLimit.class).limitKey();
                    if(key.equals("")){
                        key=method.getName();
                    }
                    return key;
                }
            }
        }
        return null;
    }
}
3.3.4.初始化限流的许可证数量
@Component
public class InitRateLimit implements ApplicationContextAware {

    @Override
    public void setApplicationContext(ApplicationContext applicationContext) throws BeansException {
        Map<String, Object> beanMap = applicationContext.getBeansWithAnnotation(RestController.class);
        beanMap.forEach((k, v) -> {
            Class<?> controllerClass = v.getClass();
            System.out.println(controllerClass.toString());
            System.out.println(controllerClass.getSuperclass().toString());
            //获取所有声明的方法
            Method[] allMethods = controllerClass.getSuperclass().getDeclaredMethods();
            for (Method method : allMethods) {
                //判断方法是否使用了限流注解
                if (method.isAnnotationPresent(RateLimit.class)) {
                    //获取配置的限流量,实际值可以动态获取,配置key,根据key从配置文件获取
                    double value = method.getAnnotation(RateLimit.class).value();
                    String key = method.getAnnotation(RateLimit.class).limitKey();
                    if(key.equals("")){
                        key=method.getName();
                    }
                    System.out.println("RatelimitKey:" +key+",许可证数是:"+value);
                    //key作为key.value为具体限流量,传递到切面的map中
                    RateLimitAspect.rateLimitMap.put(key, RateLimiter.create(value));
                }
            }
        });
    }
}
3.3.5.web接口
@RestController
public class LimitTestController {

    @RateLimit(value =3)
    @RequestMapping("/ratelimit")
    public String ratelimit() throws Exception{
     	//假设业务处理了1秒
        TimeUnit.SECONDS.sleep(1);
        return "success";
    }
}
3.3.6.压测
    public static void main(String[] args) throws Exception {
        ///设置线程池最大执行20个线程并发执行任务
        int threadSize = 20;
        //AtomicInteger通过CAS操作能保证统计数量的原子性
        AtomicInteger successCount = new AtomicInteger(0);
        CountDownLatch downLatch = new CountDownLatch(20);
        ExecutorService fixedThreadPool = Executors.newFixedThreadPool(threadSize);
        for (int i = 0; i < threadSize; i++) {
            fixedThreadPool.submit(() -> {
                RestTemplate restTemplate = new RestTemplate();
                String str = restTemplate.getForObject("http://localhost:8010/ratelimit", String.class);
                if ("success".equals(str)) {
                    successCount.incrementAndGet();
                }
                System.out.println(str);
                downLatch.countDown();
            });
        }
        //等待所有线程都执行完任务
        downLatch.await();
        fixedThreadPool.shutdown();
        System.out.println("总共有" + successCount.get() + "个线程获得到了令牌!");
    }
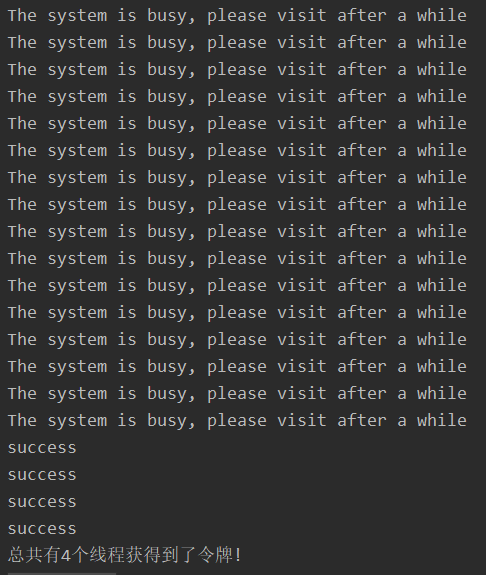
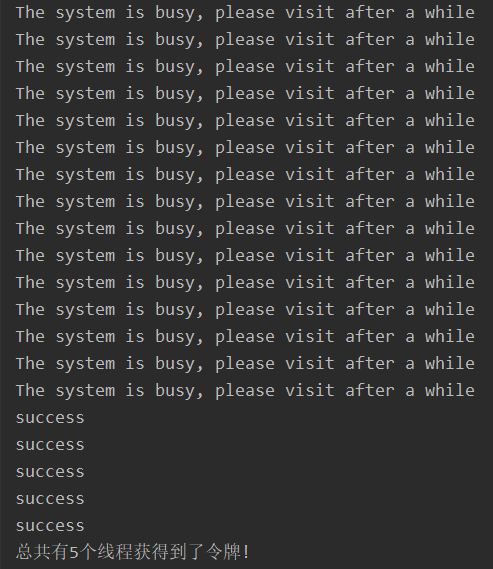
可以看到大部分请求直接被拒绝了,只有4个线程获取到了令牌
4.基于Semaphore控制并发数
Semaphore(信号量),是用来控制同时访问特定资源的线程数量,它通过计数来协调各个线程,以保证合理的使用公共资源。我的理解是:信号量控制着一个线程池中并发线程的数量。就好像我们去一家饭店吃饭,这家饭店最多可以同时供应50人,如果饭店中已经坐满50人,这时新来的客人就必须等待,直到有客人离开他们才可以进入,并且总的数量不可以超过50人。这里饭店就好比线程池,饭店里的服务人员和厨师就好比共享的资源,每个客人都相当于一个线程, semaphore就记录着里面的人数,要根据semaphore的数量来决定是否让新的客人进入。为了得到一个资源,每个线程都要先获取permit,以确保当前可以访问。
4.1.常用方法
| 方法 | 描述 |
|---|---|
| acquire() | 从许可集中请求获取一个许可,此时当前线程开始阻塞,直到获得一个可用许可,或者当前线程被中断。 |
| acquire(int permits) | 从许可集中请求获取指定个数(permits)的许可,此时当前线程开始阻塞,直到获得指定数据(permits)可用许可,或者当前线程被中断。 |
| release(int permits) | 释放指定个数(permits)许可,将其返回给许可集。 |
| tryAcquire() | 尝试获取一个可用许可,如果此时有一个可用的许可,则立即返回true,同时许可集中许可个数减一;如果此时许可集中无可用许可,则立即返回false。 |
| tryAcquire(int permits) | 尝试获取指定个数(permits)可用许可,如果此时有指定个数(permits)可用的许可,则立即返回true,同时许可集中许可个数减指定个数(permits);如果此时许可集中许可个数不足指定个数(permits),则立即返回false。 |
| tryAcquire(long timeout, TimeUnit unit) | 在给定的等待时间内,尝试获取一个可用许可,如果此时有一个可用的许可,则立即返回true,同时许可集中许可个数减一;如果此时许可集中无可用许可,当前线程阻塞,直至其它某些线程调用此Semaphore的release()方法并且当前线程是下一个被分配许可的线程,或者其它某些线程中断当前线程或者已超出指定的等待时间 |
| tryAcquire(int permits, long timeout, TimeUnit unit) | 在给定的等待时间内,尝试获取指定个数(permits)可用许可,如果此时有指定个数(permits)可用的许可,则立即返回true,同时许可集中许可个数减指定个数(permits);如果此时许可集中许可个数不足指定个数(permits),当前线程阻塞,直至其它某些线程调用此Semaphore的release()方法并且当前线程是下一个被分配许可的线程并且许可个数满足指定个数,或者其它某些线程中断当前线程,或者已超出指定的等待时间。 |
4.2.main函数版本
下面代码设置了20个线程并发执行任务,但是通过Semaphore 设置只允许5个并发的执行
public class SemaphoreTest {

    private final static Semaphore permit = new Semaphore(5);

    public static void main(String[] args) {
        //设置线程池最大执行20个线程并发执行任务
        int threadSize = 20;
        ExecutorService fixedThreadPool = Executors.newFixedThreadPool(threadSize);
        for (int i = 0; i < threadSize; i++) {
            fixedThreadPool.submit(() -> {
                try {
                    //获取令牌
                    permit.acquire();
                    Thread.sleep(1L);
                    //业务逻辑处理
                    System.out.println("处理任务的线程是" + Thread.currentThread().getId() + ",当前时间是" + System.currentTimeMillis());
                } catch (InterruptedException e) {
                    e.printStackTrace();
                } finally {
                    //释放令牌
                    permit.release();
                }
            });
        }
    }
}
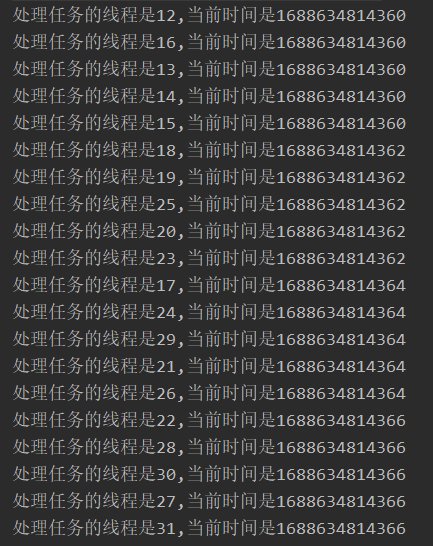
执行结果
通过下图可以看到,每毫秒只有5个线程在执行任务
4.3.API接口限流实战
4.3.1.引入依赖
   <!-- SpringBoot AOP -->
        <dependency>
            <groupId>org.springframework.boot</groupId>
            <artifactId>spring-boot-starter-aop</artifactId>
        </dependency>
4.3.2.自定义注解
@Target({ElementType.PARAMETER, ElementType.METHOD})
@Retention(RetentionPolicy.RUNTIME)
@Documented
public @interface SemaphoreLimit {

    String limitKey() default ""; //限流的方法名

    int value()  default 0;  //发放的许可证数量

}
4.3.3.自定义切面类
@Component
@Scope
@Aspect
public class SemaphoreLimitAspect {

    /**
     * 存储限流量和方法必须是static且线程安全
     */
    public static Map<String, Semaphore> semaphoreMap = new ConcurrentHashMap<>();

    /**
     * 业务层切点
     */
    @Pointcut("@annotation(com.wts.interfaceLimit.semaphoreLimit.SemaphoreLimit)")
    public void ServiceAspect() {

    }

    @Around("ServiceAspect()")
    public Object around(ProceedingJoinPoint joinPoint) {
        //获取目标对象
        Class<?> clz = joinPoint.getTarget().getClass();
        //获取增强方法信息
        Signature signature = joinPoint.getSignature();
        String name = signature.getName();
        String limitKey = getLimitKey(clz, name);
        Semaphore semaphore = semaphoreMap.get(limitKey);
        //立即获取许可证,非阻塞
        boolean flag = semaphore.tryAcquire();
        Object obj = null;
        try {
            //拿到许可证则执行任务
            if (flag) {
                obj = joinPoint.proceed();
            } else {
                //拒绝了请求(服务降级)
                obj = "limitKey:"+limitKey+", The system is busy, please visit after a while";
            }
        } catch (Throwable e) {
            e.printStackTrace();
        } finally {
            if (flag) {
                semaphore.release(); //拿到许可证后释放通行证
            }
        }
        return obj;
    }

    /**
     * 获取拦截方法配置的限流key,没有返回null
     */
    private String getLimitKey(Class<?> clz, String methodName) {
        for (Method method : clz.getDeclaredMethods()) {
            //找出目标方法
            if (method.getName().equals(methodName)) {
                //判断是否是限流方法
                if (method.isAnnotationPresent(SemaphoreLimit.class)) {
                    String key= method.getAnnotation(SemaphoreLimit.class).limitKey();
                    if(key.equals("")){
                        key=method.getName();
                    }
                    return key;
                }
            }
        }
        return null;
    }
}
4.3.4.初始化限流的许可证数量
@Component
public class InitSemaphoreLimit implements ApplicationContextAware {

    @Override
    public void setApplicationContext(ApplicationContext applicationContext) throws BeansException {
        Map<String, Object> beanMap = applicationContext.getBeansWithAnnotation(RestController.class);
        beanMap.forEach((k, v) -> {
            Class<?> controllerClass = v.getClass();
            System.out.println(controllerClass.toString());
            System.out.println(controllerClass.getSuperclass().toString());
            //获取所有声明的方法
            Method[] allMethods = controllerClass.getSuperclass().getDeclaredMethods();
            for (Method method : allMethods) {
                System.out.println(method.getName());
                //判断方法是否使用了限流注解
                if (method.isAnnotationPresent(SemaphoreLimit.class)) {
                    //获取配置的限流量,实际值可以动态获取,配置key,根据key从配置文件获取
                    int value = method.getAnnotation(SemaphoreLimit.class).value();
                    String key = method.getAnnotation(SemaphoreLimit.class).limitKey();
                    if(key.equals("")) {
                        key = method.getName();
                    }
                    System.out.println("SemaphoreLimitKey:" + key + ",许可证数是" + value);
                    //key作为key.value为具体限流量,传递到切面的map中
                    SemaphoreLimitAspect.semaphoreMap.put(key, new Semaphore(value));
                }
            }
        });
    }
}
4.3.5.web接口
@RestController
public class SemaphoreLimitTestController {
    /**
     * 设置limitKey=SemaphoreKey,并且许可证只有3个
     */
    @SemaphoreLimit(limitKey = "semaphoreLimit", value = 3)
    @RequestMapping("/semaphoreLimit")
    public String semaphoreLimit() throws Exception{
        //假设业务处理了1秒
        TimeUnit.SECONDS.sleep(1);
        return "success";
    }
}
4.3.6.压测
和标题3.3.6一样,把接口名称改成semaphoreLimit即可。
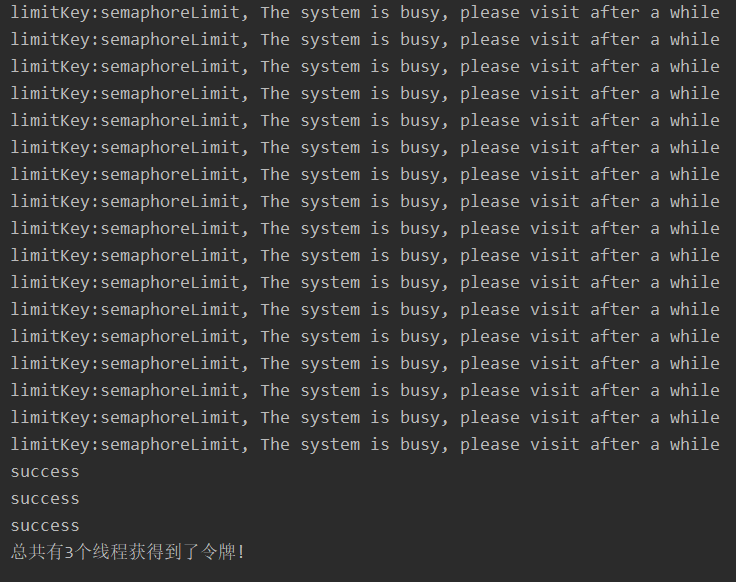
测试结果如下图
因为我们在调用web接口时候线程休眠了1秒,所以20个线程并发处理任务的时候,只有3个获取到个许可证,和我们预期的结果一致.
5.基于redission的RateLimiter实现分布式限流
Redission是Redis官方推荐的客户端,其中RateLimiter实现和guava的RateLimiter类似都是是要令牌桶算法实现限流guava基于内存只能实现单节点的限流,Redission基于redis缓存数据库可以实现分布式限流
下面示例设置的是限流的接口名称为rate_limiter,限流模式为所有实例共享,时间窗口2秒内流出10个令牌。
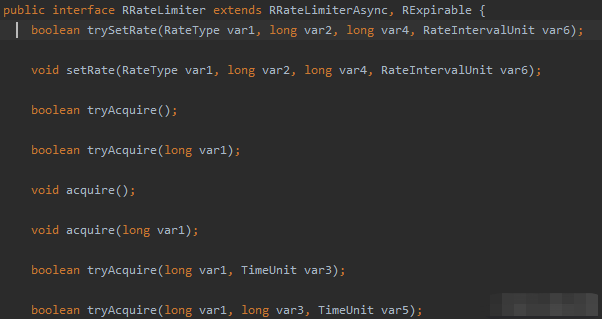
- 根据
key创建限流对象:client.getRateLimiter(key); - 设置限流参数:
rRateLimiter.trySetRate(RateType.PER_CLIENT, 10,2, - RateIntervalUnit.SECONDS);第一个参数表示限流模式,第二个参数表示令牌数,第三个是时间,第四个是时间单位。 - 限流模式包括:
RateType.PER_CLIENT(单实例共享),RateType.OVERALL=所有实例共享。 Redission的RRateLimiter和guava的RateLimiter接口函数大部分类似,就不过多再描述了。
5.1.main函数版本
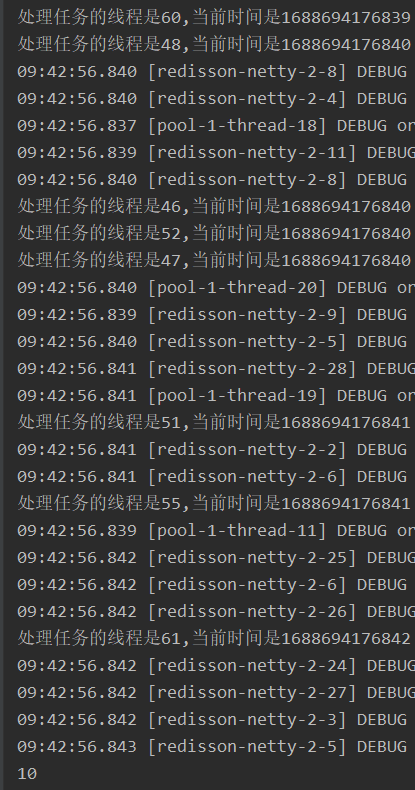
Main函数测试
    public static void main(String[] args) throws Exception {
        Config config = new Config();
        config.useSingleServer().setAddress("redis://127.0.0.1:6379");
        RedissonClient client = Redisson.create(config);
        RRateLimiter rateLimiter = client.getRateLimiter("rate_limiter");
        Integer threadSize=20;
        //访问模式    访问数 访问速率  访问时间
        //访问模式 RateType.PER_CLIENT=单实例共享     RateType.OVERALL=所有实例共享
        rateLimiter.trySetRate(RateType.OVERALL, 10, 2, RateIntervalUnit.SECONDS);
        ExecutorService executorService = Executors.newFixedThreadPool(threadSize);
        CountDownLatch downLatch = new CountDownLatch(threadSize);
        AtomicInteger successCount = new AtomicInteger(0);
        for (int i = 0; i < threadSize; i++) {
            executorService.submit(() -> {
                try {
                    if(rateLimiter.tryAcquire()){
                        successCount.incrementAndGet();
                        System.out.println("处理任务的线程是" + Thread.currentThread().getId() + ",当前时间是" + System.currentTimeMillis());
                    }
                    downLatch.countDown();
                } catch (Exception e) {
                    e.printStackTrace();
                }
            });
        }
        downLatch.await();
        System.out.println(successCount.get());
    }
5.2.API接口限流实战
5.2.1.引入依赖
       <dependency>
            <groupId>org.redisson</groupId>
            <artifactId>redisson-spring-boot-starter</artifactId>
            <version>3.17.6</version>
        </dependency>
        <!-- SpringBoot AOP -->
        <dependency>
            <groupId>org.springframework.boot</groupId>
            <artifactId>spring-boot-starter-aop</artifactId>
        </dependency>
5.2.2.自定义注解
@Target({ElementType.PARAMETER, ElementType.METHOD})
@Retention(RetentionPolicy.RUNTIME)
@Documented
public @interface RedisRateLimit {

    String limitKey() default ""; //限流的方法名

    int time() default  1; //默认设置为1秒

    int value()  default 3;  //发放的许可证数量
}
5.2.3.自定义切面类
@Component
@Scope
@Aspect
public class RedisRateLimitAspect {

    /**
     * 存储限流量和方法必须是static且线程安全
     */
    public static Map<String, RRateLimiter> rateLimitMap = new ConcurrentHashMap<>();

    /**
     * 业务层切点
     */
    @Pointcut("@annotation(com.wts.interfaceLimit.redisRateLimit.RedisRateLimit)")
    public void ServiceAspect() {
    }

    @Around("ServiceAspect()")
    public Object around(ProceedingJoinPoint joinPoint) {
        Object obj = null;
        try {
            //获取目标对象
            Class<?> clz = joinPoint.getTarget().getClass();
            //tryAcquire()是非阻塞, rateLimiter.acquire()是阻塞的
            Signature signature = joinPoint.getSignature();
            String name = signature.getName();
            String limitKey = getLimitKey(clz, name);
            RRateLimiter rateLimiter = rateLimitMap.get(limitKey);
            if (rateLimiter.tryAcquire()) {
                obj = joinPoint.proceed();
            } else {
                //拒绝了请求(服务降级)
                obj = "The system is busy, please visit after a while";
            }
        } catch (Throwable e) {
            e.printStackTrace();
        }
        return obj;
    }

    private String getLimitKey(Class<?> clz, String methodName) {
        for (Method method : clz.getDeclaredMethods()) {
            //找出目标方法
            if (method.getName().equals(methodName)) {
                //判断是否是限流方法
                if (method.isAnnotationPresent(RedisRateLimit.class)) {
                    String key= method.getAnnotation(RedisRateLimit.class).limitKey();
                    if(key.equals("")){
                        key=method.getName();
                    }
                    return key;
                }
            }
        }
        return null;
    }
}
5.2.4.初始化限流的许可证数量
@Component
public class InitRedisRateLimit implements ApplicationContextAware {

    @Autowired
    private RedissonClient redissonClient;

    @Override
    public void setApplicationContext(ApplicationContext applicationContext) throws BeansException {
        Map<String, Object> beanMap = applicationContext.getBeansWithAnnotation(RestController.class);
        beanMap.forEach((k, v) -> {
            Class<?> controllerClass = v.getClass();
            System.out.println(controllerClass.toString());
            System.out.println(controllerClass.getSuperclass().toString());
            // 获取所有声明的方法
            Method[] allMethods = controllerClass.getSuperclass().getDeclaredMethods();
            RedisRateLimit redisRateLimit;
            RRateLimiter rRateLimiter;
            for (Method method : allMethods) {
                // 判断方法是否使用了限流注解
                if (method.isAnnotationPresent(RedisRateLimit.class)) {
                    // 获取配置的限流量,实际值可以动态获取,配置key,根据key从配置文件获取
                    redisRateLimit = method.getAnnotation(RedisRateLimit.class);
                    String key = redisRateLimit.limitKey();
                    if (key.equals("")) {
                        key = method.getName();
                    }
                    System.out.println("RedisRatelimitKey:" + key + ",许可证数是:" + redisRateLimit.value());
                    // key作为key,value为具体限流量,传递到切面的map中
                    rRateLimiter = redissonClient.getRateLimiter(key);
                    // 访问模式    访问数 访问速率  访问时间
                    // 访问模式分为: 1、RateType.PER_CLIENT=单实例共享     2、RateType.OVERALL=所有实例共享
                    rRateLimiter.trySetRate(RateType.OVERALL, redisRateLimit.value(), redisRateLimit.time(), RateIntervalUnit.SECONDS);
                    RedisRateLimitAspect.rateLimitMap.put(key, rRateLimiter);
                }
            }
        });
    }
}
5.2.5.Web接口
@RestController
public class RedisRateLimitTestController {

    /**
     * 设置limitKey=redisRatelimit,并且每2秒许可证只有5个
     */
    @RedisRateLimit(limitKey = "redisRatelimit", value = 5,time = 2)
    @RequestMapping("/redisRatelimit")
    public String redisRatelimit() throws Exception{
        //假设业务处理了1秒
        TimeUnit.SECONDS.sleep(1);
        return "success";
    }

}
压测和标题3.3.6代码一样,把接口名称改成redisRatelimit即可。
6、SpringBoot集成alibaba-sentinel实现接口限流入门
6.1.Sentinel 介绍
随着微服务的流行,服务和服务之间的稳定性变得越来越重要。 Sentinel 以流量为切入点,从流量控制、熔断降级、系统负载保护等多个维度保护服务的稳定性。该方法使用的是滑动窗口算法。
6.2.Sentinel 具有以下特征:
-
丰富的应用场景: Sentinel 承接了阿里巴巴近 10 年的双十一大促流量的核心场景,例如秒杀(即突发流量控制在系统容量可以承受的范围)、消息削峰填谷、实时熔断下游不可用应用等。
-
完备的实时监控: Sentinel 同时提供实时的监控功能。您可以在控制台中看到接入应用的单台机器秒级数据,甚至 500 台以下规模的集群的汇总运行情况。
-
广泛的开源生态: Sentinel 提供开箱即用的与其它开源框架/库的整合模块,例如与 Spring Cloud、Dubbo、gRPC 的整合。您只需要引入相应的依赖并进行简单的配置即可快速地接入 Sentinel。
-
完善的 SPI 扩展点: Sentinel 提供简单易用、完善的 SPI 扩展点。您可以通过实现扩展点,快速的定制逻辑。例如定制规则管理、适配数据源等。
6.3.安装Sentinel
6.3.1.下载Sentinel服务端jar
访问:https://github.com/alibaba/Sentinel/releases 下载 sentinel-dashboard-1.6.0.jar
6.3.2.启动Sentinel服务端后台管理
执行命令:java -Dserver.port=8082 -jar sentinel-dashboard-1.6.0.jar 默认8080端口
6.3.3.访问 localhost:8082
默认登录用户:sentinel
        pwd:sentinel
6.3.4.创建项目springboot-sentinel添加sentinel的pom依赖
<?xml version="1.0" encoding="UTF-8"?>
<project xmlns="http://maven.apache.org/POM/4.0.0" xmlns:xsi="http://www.w3.org/2001/XMLSchema-instance"
         xsi:schemaLocation="http://maven.apache.org/POM/4.0.0 http://maven.apache.org/xsd/maven-4.0.0.xsd">
    <modelVersion>4.0.0</modelVersion>
    <parent>
        <groupId>org.springframework.boot</groupId>
        <artifactId>spring-boot-starter-parent</artifactId>
        <version>2.1.4.RELEASE</version>
        <relativePath/> <!-- lookup parent from repository -->
    </parent>
    <groupId>com.willow</groupId>
    <artifactId>springboot-sentinel</artifactId>
    <version>0.0.1-SNAPSHOT</version>
    <name>springboot-sentinel</name>
    <description>springboot-sentinel</description>

    <properties>
        <java.version>1.8</java.version>
    </properties>

    <dependencies>
        <dependency>
            <groupId>org.springframework.boot</groupId>
            <artifactId>spring-boot-starter</artifactId>
        </dependency>


        <dependency>
            <groupId>org.springframework.cloud</groupId>
            <artifactId>spring-cloud-starter-alibaba-sentinel</artifactId>
            <version>0.2.0.RELEASE</version>
        </dependency>

        <dependency>
            <groupId>org.springframework.boot</groupId>
            <artifactId>spring-boot-starter-web</artifactId>
        </dependency>
    </dependencies>

    <build>
        <plugins>
            <plugin>
                <groupId>org.springframework.boot</groupId>
                <artifactId>spring-boot-maven-plugin</artifactId>
            </plugin>
        </plugins>
    </build>

</project>
6.3.5.springboot-sentinel项目中properties添加配置
  server.port=8081
  spring.application.name=sentine
  # sentinel-dashboard-1.6.0 的访问路径 ,启动方式java -jar sentinel-dashboard-1.6.0.jar
  spring.cloud.sentinel.transport.dashboard=localhost:8082
  #取消Sentinel控制台懒加载
  spring.cloud.sentinel.eager=true
6.3.6、springboot-sentinel项目添加controller测试限流
    @RestController
    public class SentinelController {
        @RequestMapping("/sentinel")
        public String sentinel(){
            return "sentinel ....";
        }
    }
6.3.7.启动创建的springboot-sentinel项目
访问项目路径 http://localhost:8081/sentinel
访问sentinel管理后台 http://localhost:8082/ 如图 ,可以看到已经记录/sentinel路径访问一次了
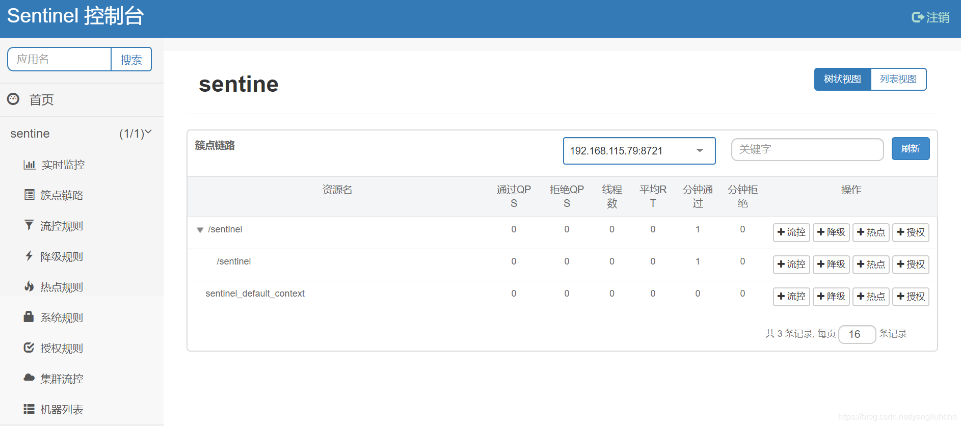
点击流控设置QPS为2
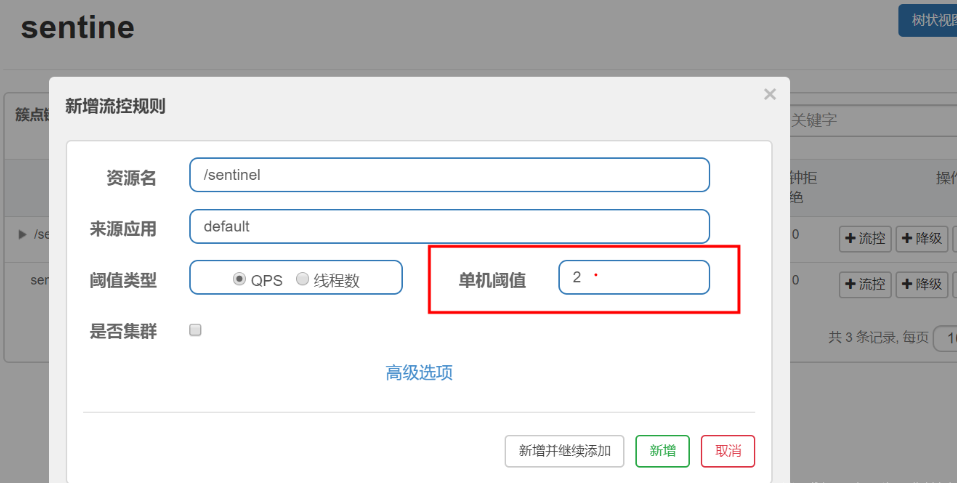
多次连续点击访问:http://localhost:8081/sentinel
每秒的前2次返回数据正常,后面可以看到浏览器返回:
Blocked by Sentinel (flow limiting)
【扩展】
1.计数器算法(固定窗口)
计数器算法是使用计数器在周期内累加访问次数,当达到设定的阈值时就会触发限流策略。下一个周期开始时,清零重新开始计数。此算法在单机和分布式环境下实现都非常简单,可以使用Redis的incr原子自增和线程安全即可以实现。

这个算法常用于QPS限流和统计访问总量,对于秒级以上周期来说会存在非常严重的问题,那就是临界问题,如下图:

假设我们设置的限流策略时1分钟限制计数100,在第一个周期最后5秒和第二个周期的开始5秒,分别计数都是88,即在10秒时间内计数达到了176次,已经远远超过之前设置的阈值,由此可见,计数器算法(固定窗口)限流方式对于周期比较长的限流存在很大弊端。
1.1. Java 实现计数器(固定窗口):
/**
 * 固定窗口
 */
@Slf4j
public class FixWindow {

    private final ScheduledExecutorService scheduledExecutorService = Executors.newScheduledThreadPool(5);

    private final int limit = 100;

    private AtomicInteger currentCircleRequestCount = new AtomicInteger(0);

    private AtomicInteger timeCircle = new AtomicInteger(0);

    private void doFixWindow() {
        scheduledExecutorService.scheduleWithFixedDelay(() -> {
            log.info(" 当前时间窗口,第 {} 秒 ", timeCircle.get());
            if(timeCircle.get() >= 60) {
                timeCircle.set(0);
                currentCircleRequestCount.set(0);
                log.info(" =====进入新的时间窗口===== ");
            }
            if(currentCircleRequestCount.get() > limit) {
                log.info("触发限流策略,当前窗口累计请求数 : {}", currentCircleRequestCount);
            } else {
                final int requestCount = (int) ((Math.random() * 5) + 1);
                log.info("当前发出的 ==requestCount== : {}", requestCount);
                currentCircleRequestCount.addAndGet(requestCount);
            }
           timeCircle.incrementAndGet();
        }, 0, 1, TimeUnit.SECONDS);
    }

    public static void main(String[] args) {
        new FixWindow().doFixWindow();
    }

}
2.滑动窗口算法
滑动窗口算法是将时间周期拆分成N个小的时间周期,分别记录小周期里面的访问次数,并且根据时间的滑动删除过期的小周期。如下图,假设时间周期为1分钟,将1分钟再分为2个小周期,统计每个小周期的访问数量,则可以看到,第一个时间周期内,访问数量为92,第二个时间周期内,访问数量为104,超过100的访问则被限流掉了。

由此可见,当滑动窗口的格子划分的越多,那么滑动窗口的滚动就越平滑,限流的统计就会越精确。此算法可以很好的解决固定窗口算法的临界问题。
2.1. Java实现滑动窗口:
/**
 * 滑动窗口
 *
 * 60s限流100次请求
 */
@Slf4j
public class RollingWindow {

    private final ScheduledExecutorService scheduledExecutorService = Executors.newScheduledThreadPool(5);

    // 窗口跨度时间60s
    private int timeWindow = 60;

    // 限流100个请求
    private final int limit = 100;

    // 当前窗口请求数
    private AtomicInteger currentWindowRequestCount = new AtomicInteger(0);

    // 时间片段滚动次数
    private AtomicInteger timeCircle = new AtomicInteger(0);

    // 触发了限流策略后等待的时间
    private AtomicInteger waitTime = new AtomicInteger(0);

    // 在下一个窗口时,需要减去的请求数
    private int expiredRequest = 0;

    // 时间片段为5秒,每5秒统计下过去60秒的请求次数
    private final int slidingTime = 5;

    private ArrayBlockingQueue<Integer> slidingTimeValues = new ArrayBlockingQueue<>(11);

    public void rollingWindow() {
        scheduledExecutorService.scheduleWithFixedDelay(() -> {

            if (waitTime.get() > 0) {
                waitTime.compareAndExchange(waitTime.get(), waitTime.get() - slidingTime);
                log.info("=====当前滑动窗口===== 限流等待下一个时间窗口倒计时: {}s", waitTime.get());
                if (currentWindowRequestCount.get() > 0) {
                    currentWindowRequestCount.set(0);
                }
            } else {
                final int requestCount = (int) ((Math.random() * 10) + 7);
                if (timeCircle.get() < 12) {
                    timeCircle.incrementAndGet();
                }

            log.info("当前时间片段5秒内的请求数: {} ", requestCount);
            currentWindowRequestCount.addAndGet(requestCount);
            log.info("=====当前滑动窗口===== {}s 内请求数: {} ", timeCircle.get()*slidingTime , currentWindowRequestCount.get());

            if(!slidingTimeValues.offer(requestCount)){
                expiredRequest =  slidingTimeValues.poll();
                slidingTimeValues.offer(requestCount);
            }

            if(currentWindowRequestCount.get() > limit) {
                // 触发限流
                log.info("=====当前滑动窗口===== 请求数超过100, 触发限流,等待下一个时间窗口 ");
                waitTime.set(timeWindow);
                timeCircle.set(0);
                slidingTimeValues.clear();
            } else {
                // 没有触发限流,滑动下一个窗口需要,移除相应的:在下一个窗口时,需要减去的请求数
                log.info("=====当前滑动窗口===== 请求数 <100, 未触发限流,当前窗口请求总数: {},即将过期的请求数:{}"
                        ,currentWindowRequestCount.get(), expiredRequest);
                currentWindowRequestCount.compareAndExchange(currentWindowRequestCount.get(), currentWindowRequestCount.get() - expiredRequest);
            }
        }
        }, 5, 5, TimeUnit.SECONDS);
    }

    public static void main(String[] args) {
        new RollingWindow().rollingWindow();
    }


}






![[SSM]MyBatis的注解式开发与PageHelper](https://img-blog.csdnimg.cn/00b6ec8d019349c5a048861ae6b66b27.png)

