尚医通开发记录(Vue3+TypeScript+Pinia+Axios)
一、接口地址
服务器地址:http://syt.atguigu.cn
医院接口:http://139.198.34.216:8201/swagger-ui.html
公共数据接口:http://139.198.34.216:8202/swagger-ui.html
会员接口:http://139.198.34.216:8203/swagger-ui.html
短信验证码接口:http://139.198.34.216:8204/swagger-ui.html
订单接口:http://139.198.34.216:8206/swagger-ui.html
文件上传接口:http://139.198.34.216:8205/swagger-ui.html
后台用户接口:http://139.198.34.216:8212/swagger-ui.html
二、创建项目
创建项目 syt_hospital
npm init vue@latest

项目架构


三、配置项目
1.配置icon
favicon.ico
2.配置项目代码规范
- 集成 editorconfig配置 https://editorconfig.org/
editorconfig有助于为不同IDE编辑器上处理同一个项目的多个开发人员维护一致的编码风格。
.editorconfig
# http://editorconfig.org
root = true

[*] # 表示所有的文件
charset = utf-8 # 设置文件字符集为utf-8
indent_style = space # 缩进风格 (tab或者space)
indent_size = 2 # 缩进大小
end_of_line = lf # 控制换行风格
trim_trailing_whitespace = true # 去除行尾的任意空白字符
insert_final_newline = true # 始终在文件末尾插入一个新行

[*.md] # 表示仅设置 markdown 文件适用以下规则
max_line_length = off
trim_trailing_whitespace = false
- Vscode 需要安装插件
EditorConfig for VS Code
- 使用prettier工具 https://www.prettier.cn/
Prettier 是一款强大的代码格式化工具,支持 javascript、typescript、css、scss、less、jsx、angular、vue、graphql、json、markdown等语言,基本上前端能用到的文件格式它都可以搞定,是当下最流行的代码格式化工具。
- 2.1 安装prettier
npm install prettier -D
- 2.2. 配置 .prettierrc 文件;
- useTabs: 使用tab缩进还是空格缩进,选择 false
- tabWidth: tab是空格的情况下,是几个空格,选择2个
- printWidth: 当行字符的长度,推荐80,也有人喜欢100或120
- singleQuote: 使用单引号还是双引号,选择true ,使用单引号
- TranilingComma: 在多行输入的尾逗号是否添加,设置为true,比如对象类型的最后一个属性后面是否加一个 , ;
- semi: 语句末尾是否要加分号,默认值true,选择false表示不加;
- useTabs: 使用tab缩进还是空格缩进,选择 false
{
  "useTabs":false,
 	"tabwidth":2,
  "printWidth":80,
  "singleQuote":true,
  "trailingComma":"none",
  "semi":false
}
-
2.3. 配置 .prettierrcignore 忽略文件;
/dist/* .local .output.js /node_modules/** **/*.svg **/*.sh /public/* -
2.4 vscode 需要安装插件
Prettier - Code formatter -
2.5 测试prettier是否生效
-
测试一:在代码中保存代码
-
测试二:配置一次性修改的命令
在
package.json中配置一个 scripts:
"prettier":"prettier --write ."
-
3.使用ESLint检测
-
Vue创建项目的时候,选择ESLint,会默认帮我们配置需要的ESLint环境
-
vscode需要安装ESLint插件
ESLint -
解决eslint和prettier冲突的问题:
- 安装插件 (vue在创建项目时,如果选择prettier,那么这两个插件会自动安装)
npm install eslint-plugin-prettier eslint-config-prettier -D
-
添加 prettier插件
  extends: [
    'plugin:prettier/recommended'
  ],
4.git Husky和eslint
5.git commit 规范
四、项目准备
CSS样式的重置
-
对默认css样式进行重置:
-
normalize.css
-
reset.css
-
-
安装
npm install normalize.css
在main.ts中 引用
import 'normalize.css' -
在assets / css 中新建
- reset.less 重置的样式
- common.less 公共的样式
- index.less 其他less的出口,将这个less在main.ts中引入
//css main.ts import 'normalize.css' import '@/assets/css/index.css' -
安装 less
npm install less -D(个人习惯用less)
路由配置
import { createRouter, createWebHistory } from 'vue-router'
// 初始配置
const router = createRouter({
  history: createWebHistory(),
  // 配置映射关系:path => component
  routes: [
    {
      path: '/',
      redirect: '/home'
    },
    {
      path: '/home',
      component: () => import('../views/home/index.vue')
    },
    {
      path: '/hospital',
      component: () => import('../views/hospital/index.vue')
    },
    {
      path: '/:pathMatch(.*)',
      component: () => import('../views/not-found/index.vue')
    }
  ]
})

export default router
状态管理Pinia
-
在store/index.ts中,创建pinia
import { createPinia } from 'pinia' const pinia = createPinia() export default pinia -
将pinia引入到main.ts中
import pinia from './store'
...
app.use(pinia)
二次封装axios
- 安装
npm install axios
// service/request/index.ts
import axios from 'axios'
import type { AxiosInstance } from 'axios'
import type { PKRequestConfig } from './type'

// 拦截器: 蒙版 loading ... / token / 修改配置

class PKRequest {
  instance: AxiosInstance
  // request实例 => axios实例
  constructor(config: PKRequestConfig) {
    this.instance = axios.create(config)
    // 全局拦截器:给每个instance实例都添加拦截器
    this.instance.interceptors.request.use(
      (config) => {
        // loading token
        console.log('全局请求成功的拦截器')
        return config
      },
      (err) => {
        console.log('全局请求失败的拦截器')
        return err
      }
    )
    this.instance.interceptors.response.use(
      (res) => {
        // loading token
        console.log('全局响应成功的拦截器')
        return res
      },
      (err) => {
        console.log('全局响应失败的拦截器')
        return err
      }
    )

    // 判断是否携带拦截器

    this.instance.interceptors.request.use(
      config.interceptors?.requestOnFulfilledFn as any,
      config.interceptors?.requestOnRejectedFn
    )
    this.instance.interceptors.response.use(
      config.interceptors?.responseOnFulfilledFn,
      config.interceptors?.responseOnRejectedFn
    )
  }

  // 封装网络请求的方法
  request<T = any>(config: PKRequestConfig<T>) {
    // 单次请求的成功拦截处理
    if (config.interceptors?.requestOnFulfilledFn) {
      config = config.interceptors.requestOnFulfilledFn(config)
    }
    // 返回的promise
    return new Promise<T>((resolve, reject) => {
      this.instance
        .request<any, T>(config)
        .then((res) => {
          // 单次响应的成功拦截处理
          if (config.interceptors?.responseOnFulfilledFn) {
            res = config.interceptors.responseOnFulfilledFn(res)
          }
          resolve(res)
        })
        .catch((err) => {
          reject(err)
        })
    })
  }
  get<T = any>(config: PKRequestConfig<T>) {
    return this.instance.request({ method: 'GET', ...config })
  }
  post<T = any>(config: PKRequestConfig<T>) {
    return this.instance.request({ method: 'POST', ...config })
  }
  put<T = any>(config: PKRequestConfig<T>) {
    return this.instance.request({ method: 'PUT', ...config })
  }
  delete<T = any>(config: PKRequestConfig<T>) {
    return this.instance.request({ method: 'DELETE', ...config })
  }
  patch<T = any>(config: PKRequestConfig<T>) {
    return this.instance.request({ method: 'PATCH', ...config })
  }
}
export default PKRequest
// type.ts
import type { AxiosRequestConfig, AxiosResponse } from 'axios'

// 针对AxiosRequestConfig进行扩展
export interface IPKInterceptors<T = AxiosResponse> {
  requestOnFulfilledFn?: (config: AxiosRequestConfig) => AxiosRequestConfig
  requestOnRejectedFn?: (err: any) => any
  responseOnFulfilledFn?: (res: T) => T
  responseOnRejectedFn?: (err: any) => any
}

export interface PKRequestConfig<T = AxiosResponse> extends AxiosRequestConfig {
  interceptors?: IPKInterceptors<T>
}
-
创建网络请求的实例
import PKRequest from './request/index'
import { BASE_URL, TIME_OUT } from './config/index'

// 可以创建一个实例,也可以创建多个实例
const pkRequest = new PKRequest({
  baseURL: BASE_URL,
  timeout: TIME_OUT,
  interceptors: {
    requestOnFulfilledFn: (config) => {
      console.log('实例:请求成功的拦截')
      return config
    },
    requestOnRejectedFn: (err) => {
      console.log('实例:请求失败的拦截')
      return err
    },
    responseOnFulfilledFn: (res) => {
      console.log('实例:响应成功的拦截')
      return res
    },
    responseOnRejectedFn: (err) => {
      console.log('实例:响应失败的拦截')
      return err
    }
  }
})

export default pkRequest
// config.ts export const BASE_URL = 'http://syt.atguigu.cn' export const TIME_OUT = 5000 -
使用 例如:
import pkRequest from '@/service/index'

// 发送网络请求
// 数据类型
export interface IHomeRoot {
  code: number
  message: string
  data: any
  ok: boolean
}


pkRequest
  .request<IHomeRoot>({
    url: '/api/hosp/hospital/1/5'
  })
  .then((res) => {
    console.log('home', res.data)
  })
区分 development和production环境
在实际开发中,有些变量或者标识符在开发环境和生产环境的值是不一样的。比如:baseURL=“服务器地址”。
-
区分开发环境和生产环境
-
方法一:以baseURL 为例:不用的环境注释掉
// export const BASE_URL = 'http://syt.atguigu.cn' //生产环境
export const BASE_URL = 'http://syt.atguigu.cn' //开发环境
缺点:太多依赖人为手动,不安全性太高
-
方法二:vite环境变量
Vite 在一个特殊的
import.meta.env对象上暴露环境变量。这里有一些在所有情况下都可以使用的内建变量:import.meta.env.MODE: {string} 应用运行的模式。import.meta.env.BASE_URL: {string} 部署应用时的基本 URL。他由base配置项决定。import.meta.env.PROD: {boolean} 应用是否运行在生产环境。import.meta.env.DEV: {boolean} 应用是否运行在开发环境 (永远与import.meta.env.PROD相反)。import.meta.env.SSR: {boolean} 应用是否运行在 server 上。
let BASE_URL = '' if (import.meta.env.PROD) { BASE_URL = 'http://syt.atguigu.cn' } else { BASE_URL = 'http://syt.atguigu.cn' } export const TIME_OUT = 5000 export { BASE_URL } -
方法三:Vite使用 dotenv 从你的 环境目录 中的下列文件加载额外的环境变量:
https://cn.vitejs.dev/guide/env-and-mode.html#env-files
.env # 所有情况下都会加载 .env.local # 所有情况下都会加载,但会被 git 忽略 .env.[mode] # 只在指定模式下加载 .env.[mode].local # 只在指定模式下加载,但会被 git 忽略-
在项目中 创建文件:
.env.env.development.env.production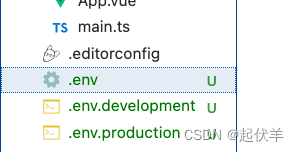
-
-
集成ElementPlus
https://element-plus.org/zh-CN/guide/quickstart.html
-
安装
npm install element-plus --save -
按需引入
安装
npm install -D unplugin-vue-components unplugin-auto-import// vite.config.ts import { defineConfig } from 'vite' import AutoImport from 'unplugin-auto-import/vite' import Components from 'unplugin-vue-components/vite' import { ElementPlusResolver } from 'unplugin-vue-components/resolvers' export default defineConfig({ // ... plugins: [ // ... AutoImport({ resolvers: [ElementPlusResolver()], }), Components({ resolvers: [ElementPlusResolver()], }), ], })
问题:
-
Component name “index” should always be multi-word.eslintvue/multi-word-component-names
- .eslintrc.cjs 中 配置
module.exports = { root: true, extends: . . . rules: { 'vue/multi-word-component-names': 'off' } } -
将生成到 CommonJS 输出的文件中不允许 ‘import.meta’ 元属性。ts(1470)
The type of
import.meta.If you need to declare that a given property exists on
import.meta, this type may be augmented via interface merging.tsconfig.node.json"compilerOptions": { "module": "ESNext", }


![[工业互联-17]:常见EtherCAT主站与实现方法](https://img-blog.csdnimg.cn/img_convert/290bef9205e738ed7950c39603fc5b61.webp?x-oss-process=image/format,png)