前言:Linux 内核同样作为 Linux 驱动开发的 “三巨头” 之一,Linux 内核的启动流程要比 uboot 复杂的多,涉及到的内容也更多。但秉持着 “知其然知其所以然” 的学习态度,作者将给读者朋友大致的过一遍 Linux 内核的启动流程。(考虑到硬件平台与Linux内核版本不一致,实际情况可能有些许出入)
实验硬件:imx6ull;Linux内核版本:4.1.15
想深挖 Linux 内核的启动流程就需要从 Linux 的链接脚本入手(程序的入口:程序执行的第一条指令被称为程序的入口,这个入口通常就是在链接脚本指定的),打开 arch/arm/kernel/vmlinux.lds 这个文件(下载 Linux 源码后进行编译得到lds链接脚本):
/* ld script to make ARM Linux kernel
 * taken from the i386 version by Russell King
 * Written by Martin Mares <mj@atrey.karlin.mff.cuni.cz>
 */

#include <asm-generic/vmlinux.lds.h>
#include <asm/cache.h>
#include <asm/thread_info.h>
#include <asm/memory.h>
#include <asm/page.h>
#ifdef CONFIG_ARM_KERNMEM_PERMS
#include <asm/pgtable.h>
#endif

#define PROC_INFO							\
	. = ALIGN(4);							\
	VMLINUX_SYMBOL(__proc_info_begin) = .;				\
	*(.proc.info.init)						\
	VMLINUX_SYMBOL(__proc_info_end) = .;

#define IDMAP_TEXT							\
	ALIGN_FUNCTION();						\
	VMLINUX_SYMBOL(__idmap_text_start) = .;				\
	*(.idmap.text)							\
	VMLINUX_SYMBOL(__idmap_text_end) = .;				\
	. = ALIGN(PAGE_SIZE);						\
	VMLINUX_SYMBOL(__hyp_idmap_text_start) = .;			\
	*(.hyp.idmap.text)						\
	VMLINUX_SYMBOL(__hyp_idmap_text_end) = .;

#ifdef CONFIG_HOTPLUG_CPU
#define ARM_CPU_DISCARD(x)
#define ARM_CPU_KEEP(x)		x
#else
#define ARM_CPU_DISCARD(x)	x
#define ARM_CPU_KEEP(x)
#endif

#if (defined(CONFIG_SMP_ON_UP) && !defined(CONFIG_DEBUG_SPINLOCK)) || \
	defined(CONFIG_GENERIC_BUG)
#define ARM_EXIT_KEEP(x)	x
#define ARM_EXIT_DISCARD(x)
#else
#define ARM_EXIT_KEEP(x)
#define ARM_EXIT_DISCARD(x)	x
#endif

OUTPUT_ARCH(arm)
ENTRY(stext)

#ifndef __ARMEB__
jiffies = jiffies_64;
#else
jiffies = jiffies_64 + 4;
#endif

SECTIONS
{
	/*
	 * XXX: The linker does not define how output sections are
	 * assigned to input sections when there are multiple statements
	 * matching the same input section name.  There is no documented
	 * order of matching.
	 *
	 * unwind exit sections must be discarded before the rest of the
	 * unwind sections get included.
	 */
	/DISCARD/ : {
		*(.ARM.exidx.exit.text)
		*(.ARM.extab.exit.text)
		ARM_CPU_DISCARD(*(.ARM.exidx.cpuexit.text))
		ARM_CPU_DISCARD(*(.ARM.extab.cpuexit.text))
		ARM_EXIT_DISCARD(EXIT_TEXT)
		ARM_EXIT_DISCARD(EXIT_DATA)
		EXIT_CALL
#ifndef CONFIG_MMU
		*(.text.fixup)
		*(__ex_table)
#endif
#ifndef CONFIG_SMP_ON_UP
		*(.alt.smp.init)
#endif
		*(.discard)
		*(.discard.*)
	}

#ifdef CONFIG_XIP_KERNEL
	. = XIP_VIRT_ADDR(CONFIG_XIP_PHYS_ADDR);
#else
	. = PAGE_OFFSET + TEXT_OFFSET;
#endif
	.head.text : {
		_text = .;
		HEAD_TEXT
	}

#ifdef CONFIG_ARM_KERNMEM_PERMS
	. = ALIGN(1<<SECTION_SHIFT);
#endif

//省略.......
在 vmlinux.lds 链接文件的第 49 行可以找到 ENTRY(stext) ,ENTRY 指明了了 Linux 内核入口,入口为 stext,stext 定义在文件 arch/arm/kernel/head.S 中 , 因 此 要 分 析 Linux 内核的启动流程,就得先从文件 arch/arm/kernel/head.S 的 stext 处开始分析。
一、Linux内核总体启动流程
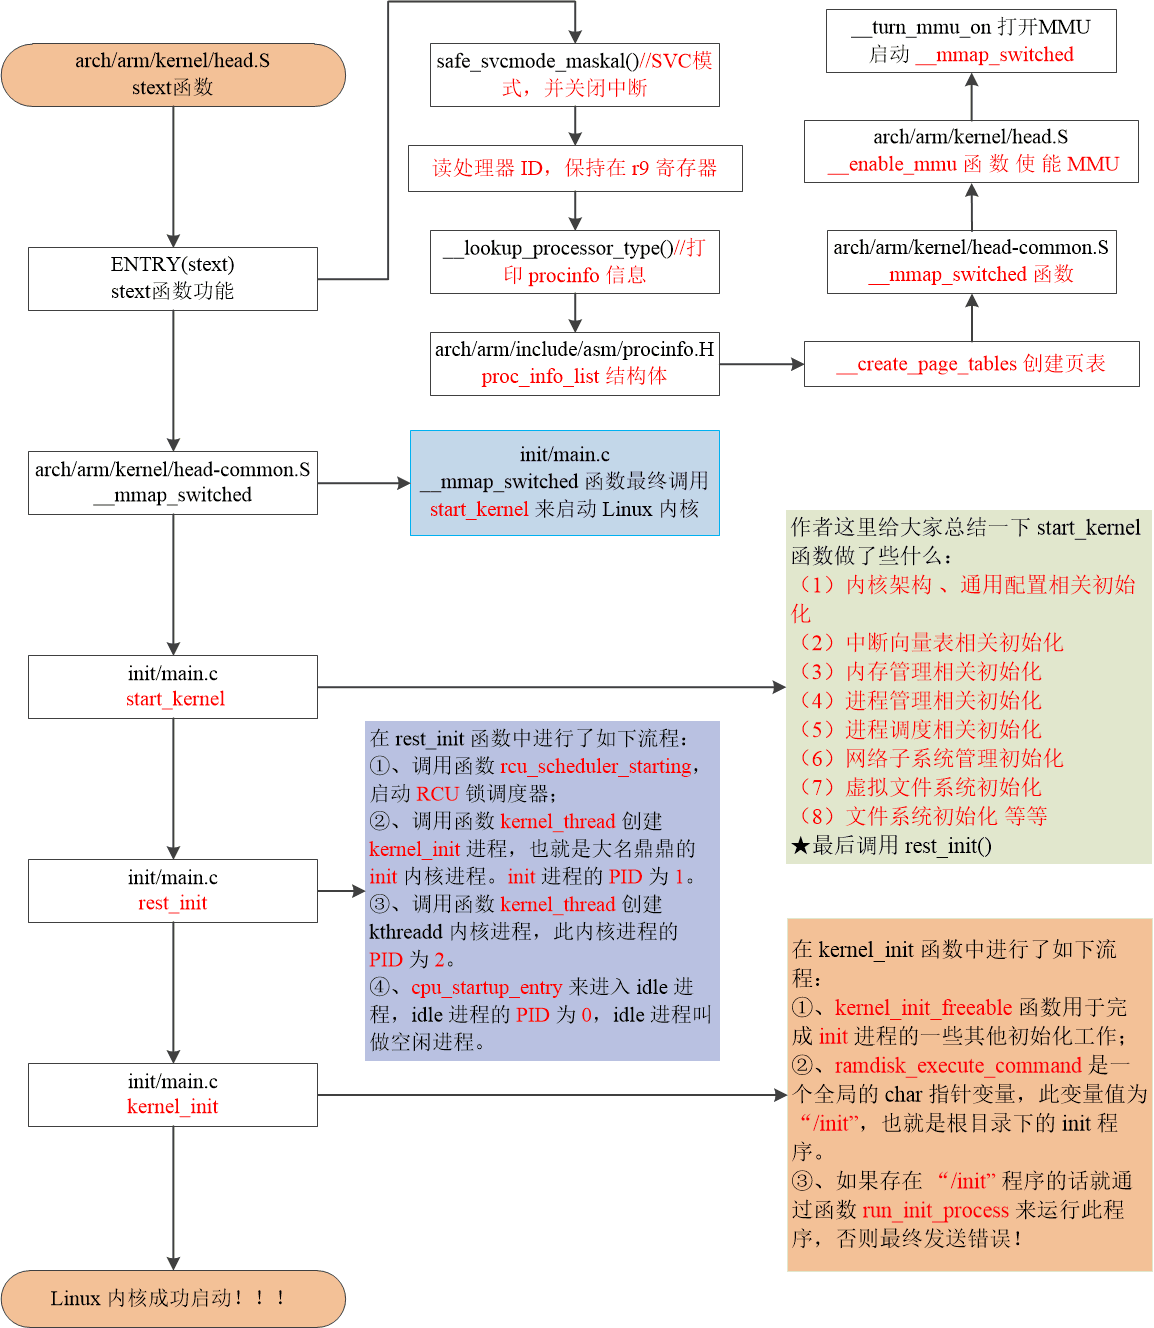
★作者将 Linux 内核的总体启动流程分为 5 个部分:
二、Linux内核启动流程
2.1 Linux 内核入口 stext
stext 是 Linux 内核的入口地址,在文件 arch/arm/kernel/head.S 中有如下所示提示内容:
/*
 * Kernel startup entry point.
 * ---------------------------
 *
 * This is normally called from the decompressor code.  The requirements
 * are: MMU = off, D-cache = off, I-cache = dont care, r0 = 0,
 * r1 = machine nr, r2 = atags or dtb pointer.
 *
 * This code is mostly position independent, so if you link the kernel at
 * 0xc0008000, you call this at __pa(0xc0008000).
 *
 * See linux/arch/arm/tools/mach-types for the complete list of machine
 * numbers for r1.
 *
 * We're trying to keep crap to a minimum; DO NOT add any machine specific
 * crap here - that's what the boot loader (or in extreme, well justified
 * circumstances, zImage) is for.
 */
根据上方示例代码中的注释,Linux 内核启动之前要求如下:
①、关闭 MMU。
②、关闭 D-cache。
③、I-Cache 无所谓。
④、r0 = 0。
⑤、r1= machine nr(也就是机器 ID)。
⑥、r2 = atags 或者设备树(dtb)首地址。
Linux 内核的入口点 stext 其实相当于内核的入口函数,stext 函数内容如下:
ENTRY(stext)
 ARM_BE8(setend	be )			@ ensure we are in BE8 mode

 THUMB(	adr	r9, BSYM(1f)	)	@ Kernel is always entered in ARM.
 THUMB(	bx	r9		)	@ If this is a Thumb-2 kernel,
 THUMB(	.thumb			)	@ switch to Thumb now.
 THUMB(1:			)

#ifdef CONFIG_ARM_VIRT_EXT
	bl	__hyp_stub_install
#endif
	@ ensure svc mode and all interrupts masked
	safe_svcmode_maskall r9

	mrc	p15, 0, r9, c0, c0		@ get processor id
	bl	__lookup_processor_type		@ r5=procinfo r9=cpuid
	movs	r10, r5				@ invalid processor (r5=0)?
 THUMB( it	eq )		@ force fixup-able long branch encoding
	beq	__error_p			@ yes, error 'p'

#ifdef CONFIG_ARM_LPAE
	mrc	p15, 0, r3, c0, c1, 4		@ read ID_MMFR0
	and	r3, r3, #0xf			@ extract VMSA support
	cmp	r3, #5				@ long-descriptor translation table format?
 THUMB( it	lo )				@ force fixup-able long branch encoding
	blo	__error_lpae			@ only classic page table format
#endif

#ifndef CONFIG_XIP_KERNEL
	adr	r3, 2f
	ldmia	r3, {r4, r8}
	sub	r4, r3, r4			@ (PHYS_OFFSET - PAGE_OFFSET)
	add	r8, r8, r4			@ PHYS_OFFSET
#else
	ldr	r8, =PLAT_PHYS_OFFSET		@ always constant in this case
#endif

	/*
	 * r1 = machine no, r2 = atags or dtb,
	 * r8 = phys_offset, r9 = cpuid, r10 = procinfo
	 */
	bl	__vet_atags
#ifdef CONFIG_SMP_ON_UP
	bl	__fixup_smp
#endif
#ifdef CONFIG_ARM_PATCH_PHYS_VIRT
	bl	__fixup_pv_table
#endif
	bl	__create_page_tables

	/*
	 * The following calls CPU specific code in a position independent
	 * manner.  See arch/arm/mm/proc-*.S for details.  r10 = base of
	 * xxx_proc_info structure selected by __lookup_processor_type
	 * above.  On return, the CPU will be ready for the MMU to be
	 * turned on, and r0 will hold the CPU control register value.
	 */
	ldr	r13, =__mmap_switched		@ address to jump to after
						@ mmu has been enabled
	adr	lr, BSYM(1f)			@ return (PIC) address
	mov	r8, r4				@ set TTBR1 to swapper_pg_dir
	ldr	r12, [r10, #PROCINFO_INITFUNC]
	add	r12, r12, r10
	ret	r12
1:	b	__enable_mmu
ENDPROC(stext)
在 stext 函数中进行了如下流程:
①、调用函数 safe_svcmode_maskall 确保 CPU 处于 SVC 模式,并且关闭了所有的中断。safe_svcmode_maskall 定义在文件 arch/arm/include/asm/assembler.h 中。
②、读处理器 ID,ID 值保存在 r9 寄存器中。
③、调用函数 __lookup_processor_type 检查当前系统是否支持此 CPU,如果支持就获取 procinfo 信息。 procinfo 是 proc_info_list 类 型 的 结 构 体 , proc_info_list 在文件 arch/arm/include/asm/procinfo.h 中定义
④、调用函数 __create_page_tables 创建页表
⑤、将函数 __mmap_switched 的地址保存到 r13 寄存器中。__mmap_switched 定义在文件 arch/arm/kernel/head-common.S,__mmap_switched 最终会调用 start_kernel 函数
⑥、调 用 __enable_mmu 函 数 使 能 MMU , __enable_mmu 定 义 在 文 件 arch/arm/kernel/head.S 中。__enable_mmu 最终会通过调用 __turn_mmu_on 来打开 MMU,__turn_mmu_on 最后会执行 r13 里面保存的 __mmap_switched 函数。
2.2 __mmap_switched 函数
__mmap_switched 函数定义在文件 arch/arm/kernel/head-common.S 中,函数代码如下:
/*
 * The following fragment of code is executed with the MMU on in MMU mode,
 * and uses absolute addresses; this is not position independent.
 *
 *  r0  = cp#15 control register
 *  r1  = machine ID
 *  r2  = atags/dtb pointer
 *  r9  = processor ID
 */
	__INIT
__mmap_switched:
	adr	r3, __mmap_switched_data

	ldmia	r3!, {r4, r5, r6, r7}
	cmp	r4, r5				@ Copy data segment if needed
1:	cmpne	r5, r6
	ldrne	fp, [r4], #4
	strne	fp, [r5], #4
	bne	1b

	mov	fp, #0				@ Clear BSS (and zero fp)
1:	cmp	r6, r7
	strcc	fp, [r6],#4
	bcc	1b

 ARM(	ldmia	r3, {r4, r5, r6, r7, sp})
 THUMB(	ldmia	r3, {r4, r5, r6, r7}	)
 THUMB(	ldr	sp, [r3, #16]		)
	str	r9, [r4]			@ Save processor ID
	str	r1, [r5]			@ Save machine type
	str	r2, [r6]			@ Save atags pointer
	cmp	r7, #0
	strne	r0, [r7]			@ Save control register values
	b	start_kernel
ENDPROC(__mmap_switched)
__mmap_switched 函数最终调用 start_kernel 来启动 Linux 内核,start_kernel 函数定义在文件 init/main.c 中。
2.3 start_kernel 函数
start_kernel 通过调用众多的子函数来完成 Linux 启动之前的一些初始化工作,由于 start_kernel 函数里面调用的子函数太多,而这些子函数又很复杂,因此我们简单的来看一下一些重要的子函数。精简并添加注释后的 start_kernel 函数内容如下:
asmlinkage __visible void __init start_kernel(void)
{
 char *command_line;
 char *after_dashes;
 lockdep_init(); /* lockdep 是死锁检测模块,此函数会初始化
 * 两个 hash 表。此函数要求尽可能早的执行!
 */
 set_task_stack_end_magic(&init_task);/* 设置任务栈结束魔术数,
*用于栈溢出检测
*/
 smp_setup_processor_id(); /* 跟 SMP 有关(多核处理器),设置处理器 ID。
 * 有很多资料说 ARM 架构下此函数为空函数,那是因
 * 为他们用的老版本 Linux,而那时候 ARM 还没有多
 * 核处理器。
*/
 debug_objects_early_init(); /* 做一些和 debug 有关的初始化 */
 boot_init_stack_canary(); /* 栈溢出检测初始化 */
 cgroup_init_early(); /* cgroup 初始化,cgroup 用于控制 Linux 系统资源*/
 local_irq_disable(); /* 关闭当前 CPU 中断 */
 early_boot_irqs_disabled = true;
 /*
 * 中断关闭期间做一些重要的操作,然后打开中断
 */
 boot_cpu_init(); /* 跟 CPU 有关的初始化 */
 page_address_init(); /* 页地址相关的初始化 */
 pr_notice("%s", linux_banner);/* 打印 Linux 版本号、编译时间等信息 */
 setup_arch(&command_line); /* 架构相关的初始化,此函数会解析传递进来的
 * ATAGS 或者设备树(DTB)文件。会根据设备树里面
 * 的 model 和 compatible 这两个属性值来查找
 * Linux 是否支持这个单板。此函数也会获取设备树
 * 中 chosen 节点下的 bootargs 属性值来得到命令
 * 行参数,也就是 uboot 中的 bootargs 环境变量的
* 值,获取到的命令行参数会保存到
*command_line 中。
 */
 mm_init_cpumask(&init_mm); /* 看名字,应该是和内存有关的初始化 */
 setup_command_line(command_line); /* 好像是存储命令行参数 */
 setup_nr_cpu_ids(); /* 如果只是 SMP(多核 CPU)的话,此函数用于获取
 * CPU 核心数量,CPU 数量保存在变量
 * nr_cpu_ids 中。
*/
 setup_per_cpu_areas(); /* 在 SMP 系统中有用,设置每个 CPU 的 per-cpu 数据 */
 smp_prepare_boot_cpu();
 build_all_zonelists(NULL, NULL); /* 建立系统内存页区(zone)链表 */
 page_alloc_init(); /* 处理用于热插拔 CPU 的页 */
/* 打印命令行信息 */
pr_notice("Kernel command line: %s\n", boot_command_line);
 parse_early_param(); /* 解析命令行中的 console 参数 */
 after_dashes = parse_args("Booting kernel",
 static_command_line, __start___param,
 __stop___param - __start___param,
 -1, -1, &unknown_bootoption);
 if (!IS_ERR_OR_NULL(after_dashes))
 parse_args("Setting init args", after_dashes, NULL, 0, -1, -1,
 set_init_arg);
 jump_label_init();
 setup_log_buf(0); /* 设置 log 使用的缓冲区*/
 pidhash_init(); /* 构建 PID 哈希表,Linux 中每个进程都有一个 ID,
 * 这个 ID 叫做 PID。通过构建哈希表可以快速搜索进程
 * 信息结构体。
 */
vfs_caches_init_early(); /* 预先初始化 vfs(虚拟文件系统)的目录项和
* 索引节点缓存
*/
 sort_main_extable(); /* 定义内核异常列表 */
 trap_init(); /* 完成对系统保留中断向量的初始化 */
 mm_init(); /* 内存管理初始化 */
 sched_init(); /* 初始化调度器,主要是初始化一些结构体 */
 preempt_disable(); /* 关闭优先级抢占 */
 if (WARN(!irqs_disabled(), /* 检查中断是否关闭,如果没有的话就关闭中断 */
 "Interrupts were enabled *very* early, fixing it\n"))
 local_irq_disable();
 idr_init_cache(); /* IDR 初始化,IDR 是 Linux 内核的整数管理机
 * 制,也就是将一个整数 ID 与一个指针关联起来。
 */
 rcu_init(); /* 初始化 RCU,RCU 全称为 Read Copy Update(读-拷贝修改) */
 trace_init(); /* 跟踪调试相关初始化 */
 context_tracking_init();
 radix_tree_init(); /* 基数树相关数据结构初始化 */
 early_irq_init(); /* 初始中断相关初始化,主要是注册 irq_desc 结构体变
 * 量,因为 Linux 内核使用 irq_desc 来描述一个中断。
 */
 init_IRQ(); /* 中断初始化 */
 tick_init(); /* tick 初始化 */
 rcu_init_nohz();
 init_timers(); /* 初始化定时器 */
 hrtimers_init(); /* 初始化高精度定时器 */
 softirq_init(); /* 软中断初始化 */
 timekeeping_init();
 time_init(); /* 初始化系统时间 */
 sched_clock_postinit();
 perf_event_init();
 profile_init();
 call_function_init();
 WARN(!irqs_disabled(), "Interrupts were enabled early\n");
 early_boot_irqs_disabled = false;
 local_irq_enable(); /* 使能中断 */
 kmem_cache_init_late(); /* slab 初始化,slab 是 Linux 内存分配器 */
 console_init(); /* 初始化控制台,之前 printk 打印的信息都存放
 * 缓冲区中,并没有打印出来。只有调用此函数
 * 初始化控制台以后才能在控制台上打印信息。
 */
 if (panic_later)
 panic("Too many boot %s vars at `%s'", panic_later,
 panic_param);
 lockdep_info();/* 如果定义了宏 CONFIG_LOCKDEP,那么此函数打印一些信息。*/
 locking_selftest() /* 锁自测 */
 ......
 page_ext_init();
 debug_objects_mem_init();
 kmemleak_init(); /* kmemleak 初始化,kmemleak 用于检查内存泄漏 */
 setup_per_cpu_pageset();
 numa_policy_init();
 if (late_time_init)
 late_time_init();
 sched_clock_init();
 calibrate_delay(); /* 测定 BogoMIPS 值,可以通过 BogoMIPS 来判断 CPU 的性能
 * BogoMIPS 设置越大,说明 CPU 性能越好。
 */
 pidmap_init(); /* PID 位图初始化 */
 anon_vma_init(); /* 生成 anon_vma slab 缓存 */
 acpi_early_init();
 ......
 thread_info_cache_init();
 cred_init(); /* 为对象的每个用于赋予资格(凭证) */
 fork_init(); /* 初始化一些结构体以使用 fork 函数 */
 proc_caches_init(); /* 给各种资源管理结构分配缓存 */
 buffer_init(); /* 初始化缓冲缓存 */
 key_init(); /* 初始化密钥 */
 security_init(); /* 安全相关初始化 */
 dbg_late_init();
 vfs_caches_init(totalram_pages); /* 为 VFS 创建缓存 */
 signals_init(); /* 初始化信号 */
 page_writeback_init(); /* 页回写初始化 */
 proc_root_init(); /* 注册并挂载 proc 文件系统 */
 nsfs_init();
 cpuset_init(); /* 初始化 cpuset,cpuset 是将 CPU 和内存资源以逻辑性
 * 和层次性集成的一种机制,是 cgroup 使用的子系统之一
 */
 cgroup_init(); /* 初始化 cgroup */
 taskstats_init_early(); /* 进程状态初始化 */
 delayacct_init();
 check_bugs(); /* 检查写缓冲一致性 */
 acpi_subsystem_init();
 sfi_init_late();
 if (efi_enabled(EFI_RUNTIME_SERVICES)) {
 efi_late_init();
 efi_free_boot_services();
 }
 ftrace_init();
 rest_init(); /* rest_init 函数 */
}
start_kernel 里面调用了大量的函数,每一个函数都是一个庞大的知识点,如果想要学习 Linux 内核,那么这些函数就需要去详细的研究。本篇博客为 Linux 内核启动流程的概述,这里就不深究各个函数的内部功能实现了,感兴趣的朋友可以自己去看看!
作者这里简单的给大家总结一下 start_kernel 函数做了些什么:
(1)内核架构 、通用配置相关初始化
(2)中断向量表相关初始化
(3)内存管理相关初始化
(4)进程管理相关初始化
(5)进程调度相关初始化
(6)网络子系统管理初始化
(7)虚拟文件系统初始化
(8)文件系统初始化 等等
★最后调用 rest_init()
2.4 rest_init 函数
rest_init 函数定义在文件 init/main.c 中,函数内容如下:
static noinline void __init_refok rest_init(void)
{
	int pid;

	rcu_scheduler_starting();
	smpboot_thread_init();
	/*
	 * We need to spawn init first so that it obtains pid 1, however
	 * the init task will end up wanting to create kthreads, which, if
	 * we schedule it before we create kthreadd, will OOPS.
	 */
	kernel_thread(kernel_init, NULL, CLONE_FS);
	numa_default_policy();
	pid = kernel_thread(kthreadd, NULL, CLONE_FS | CLONE_FILES);
	rcu_read_lock();
	kthreadd_task = find_task_by_pid_ns(pid, &init_pid_ns);
	rcu_read_unlock();
	complete(&kthreadd_done);

	/*
	 * The boot idle thread must execute schedule()
	 * at least once to get things moving:
	 */
	init_idle_bootup_task(current);
	schedule_preempt_disabled();
	/* Call into cpu_idle with preempt disabled */
	cpu_startup_entry(CPUHP_ONLINE);
}
在 rest_init 函数中进行了如下流程:
①、调用函数 rcu_scheduler_starting,启动 RCU 锁调度器
②、调用函数 kernel_thread 创建 kernel_init 进程,也就是大名鼎鼎的 init 内核进程。init 进程的 PID 为 1。init 进程一开始是内核进程(也就是运行在内核态),后面 init 进程会在根文件系统中查找名为“init”这个程序,这个 “init” 程序处于用户态,通过运行这个 “init” 程序,init 进程就会实现从内核态到用户态的转变。
③、调用函数 kernel_thread 创建 kthreadd 内核进程,此内核进程的 PID 为 2。kthreadd进程负责所有内核进程的调度和管理。
④、最后调用函数 cpu_startup_entry 来进入 idle 进程,cpu_startup_entry 会调用 cpu_idle_loop,cpu_idle_loop 是个 while 循环,也就是 idle 进程代码。idle 进程的 PID 为 0,idle 进程叫做空闲进程。
在 Linux 终端中输入“ps -A” 就可以打印出当前系统中的所有进程,其中就能看到 init 进程和 kthreadd 进程,如下图所示:
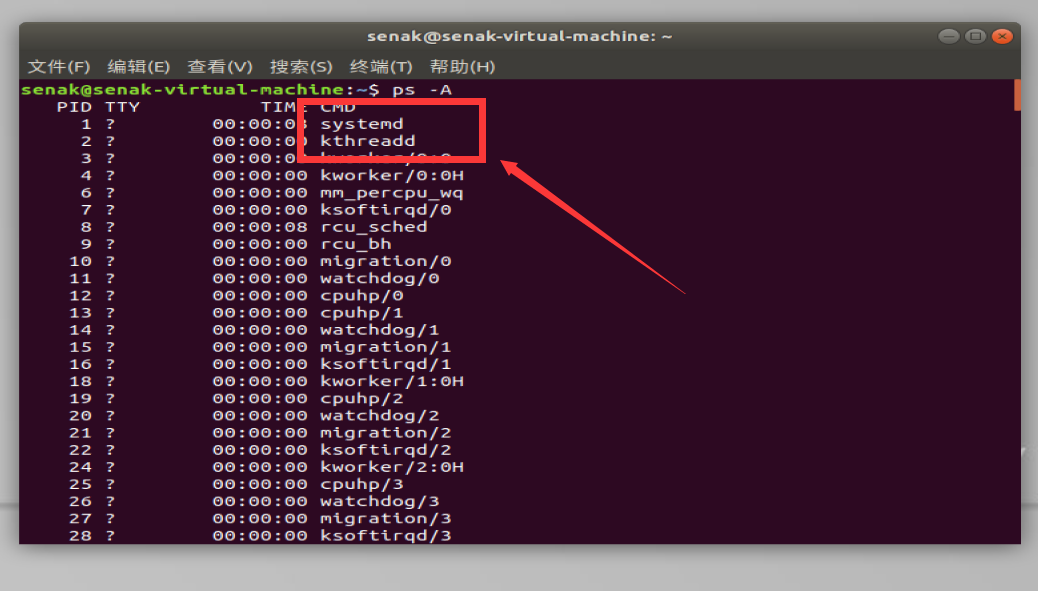
我们接下来重点看一下 init 进程,kernel_init 就是 init 进程的进程函数。
2.5 init 进程
kernel_init 函数就是 init 进程具体做的工作,定义在文件 init/main.c 中,函数内容如下:
static int __ref kernel_init(void *unused)
{
	int ret;

	kernel_init_freeable();
	/* need to finish all async __init code before freeing the memory */
	async_synchronize_full();
	free_initmem();
	mark_rodata_ro();
	system_state = SYSTEM_RUNNING;
	numa_default_policy();

	flush_delayed_fput();

	if (ramdisk_execute_command) {
		ret = run_init_process(ramdisk_execute_command);
		if (!ret)
			return 0;
		pr_err("Failed to execute %s (error %d)\n",
		       ramdisk_execute_command, ret);
	}

	/*
	 * We try each of these until one succeeds.
	 *
	 * The Bourne shell can be used instead of init if we are
	 * trying to recover a really broken machine.
	 */
	if (execute_command) {
		ret = run_init_process(execute_command);
		if (!ret)
			return 0;
		panic("Requested init %s failed (error %d).",
		      execute_command, ret);
	}
	if (!try_to_run_init_process("/sbin/init") ||
	    !try_to_run_init_process("/etc/init") ||
	    !try_to_run_init_process("/bin/init") ||
	    !try_to_run_init_process("/bin/sh"))
		return 0;

	panic("No working init found.  Try passing init= option to kernel. "
	      "See Linux Documentation/init.txt for guidance.");
}
在 kernel_init 函数中进行了如下流程:
①、kernel_init_freeable 函数用于完成 init 进程的一些其他初始化工作;
②、ramdisk_execute_command 是一个全局的 char 指针变量,此变量值为“/init”,也就是根目录下的 init 程序。ramdisk_execute_command 也可以通过 uboot 传递,在 bootargs 中使用 “rdinit=xxx” 即可,xxx 为具体的 init 程序名字。
③、如果存在 “/init” 程序的话就通过函数 run_init_process 来运行此程序。
④、如果 ramdisk_execute_command 为空的话就看 execute_command 是否为空,反正不管如何一定要在根文件系统中找到一个可运行的 init 程序。execute_command 的值是通过 uboot 传递,在 bootargs 中使用“init=xxxx”就可以了,比如“init=/linuxrc”表示根文件系统中的 linuxrc 就是要执行的用户空间 init 程序。
⑤、如果 ramdisk_execute_command 和 execute_command 都为空,那么就依次查找“/sbin/init”、“/etc/init”、“/bin/init”和“/bin/sh”,这四个相当于备用 init 程序,如果这四个也不存在,那么 Linux 启动失败!
如果以上步骤都没有找到用户空间的 init 程序,那么就提示错误发生!
三、Linux内核启动流程总结

Linux 内核的启动流程总结:
Linux内核的语言:C和汇编语言为主,辅以其他语言
Linux 内核的简化版启动流程:
1、使CPU进入SVC特权模式,并且关闭中断;
2、创建页表,使能内存管理单元MMU,开启MMU,开启 __mmap_switched 函数;
3、通过 start_kernel 函数进行一系列配置、中断、内存等(Linux内核7大组成)初始化;
4、启动 RCU 锁调度器,kernel_thread 创建 init 进程, kernel_thread 创建 kthreadd 内核进程, cpu_startup_entry 来进入 idle 进程;
5、kernel_init_freeable 函数用于完成 init 进程的一些其他初始化工作,通过run_init_process 来运行 init 程序;


![[MMDetection]COCO数据集可视化验证](https://img-blog.csdnimg.cn/img_convert/ed161824548e0b2b45d0271becde6a45.png)