目录
一,Sentinel--服务容错
1.1 高并发带来的问题
1. 使用压测工具,对请求进行压力测试
2.修改配置文件中tomcat的并发数
1.2 服务雪崩效应
1.3 常见容错方案
1.4 Sentinel入门
什么是Sentinel
微服务集成Sentinel
安装Sentinel控制台
实现一个接口的限流
sentinel简单模式之流控QPS案例
sentinel流控简单模式之并发线程案例
Sentinel的概念和功能
基本概念
重要功能
Sentinel规则
流控规则
简单配置
配置流控模式
配置流控效果
降级规则
自定义异常返回
热点规则
授权规则
系统规则
@SentinelResource的使用
Sentinel规则持久化
Feign整合Sentinel
网关限流
一,Sentinel--服务容错
1.1 高并发带来的问题
在微服务架构中,我们将业务拆分成一个个的服务,服务与服务之间可以相互调用,但是由于网络 原因或者自身的原因,服务并不能保证服务的100%可用,如果单个服务出现问题,调用这个服务就会 出现网络延迟,此时若有大量的网络涌入,会形成任务堆积,最终导致服务瘫痪。 接下来,我们来模拟一个高并发的场景
启动我们的三个微服务:用户 商品 订单 保证可用
微服务搭建请阅读前期文章
访问成功
1. 使用压测工具,对请求进行压力测试
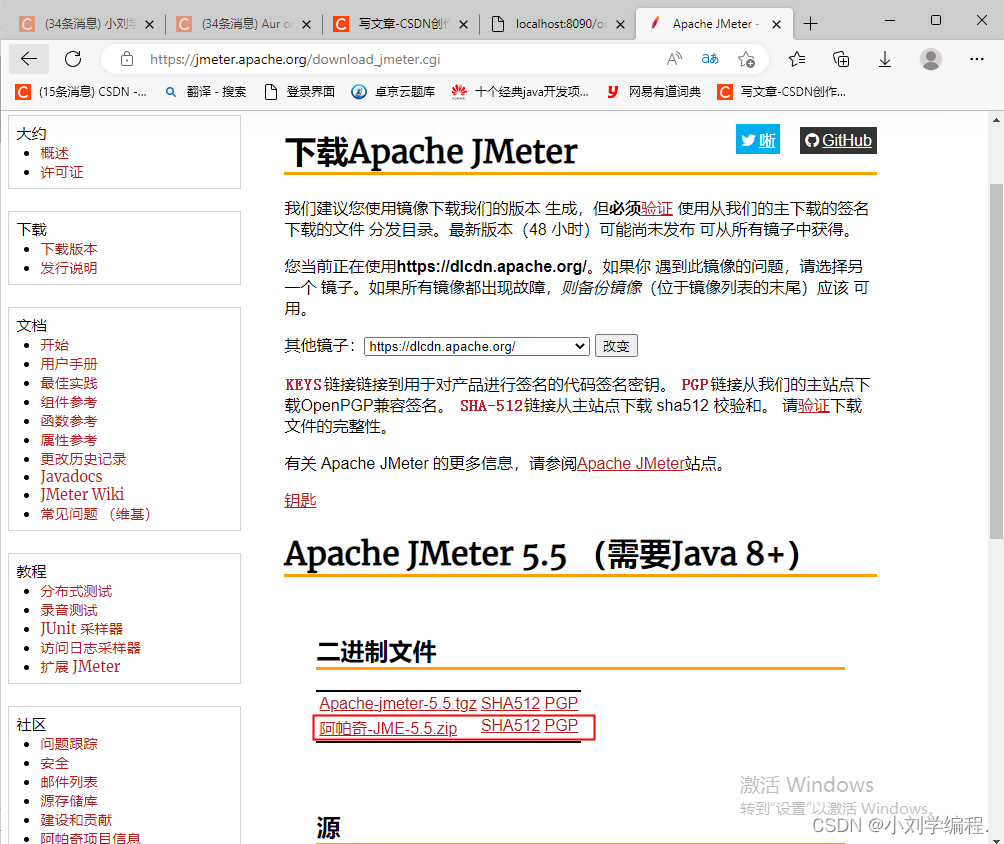
下载地址Apache JMeter - Apache JMeter™
第一步:修改配置,并启动软件
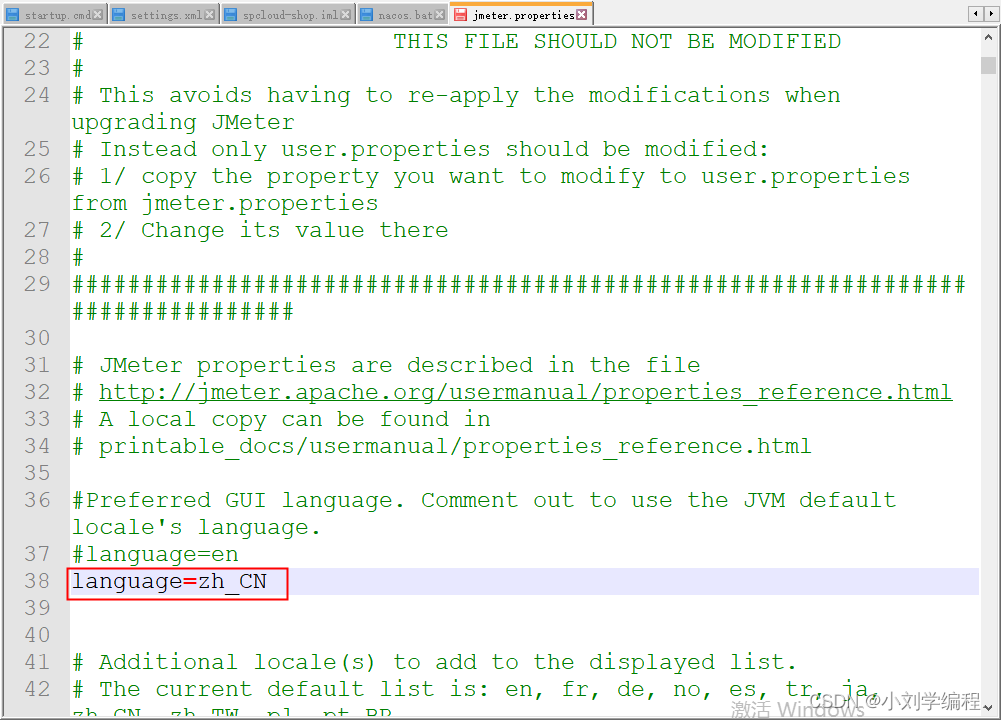
进入bin目录,修改jmeter.properties文件中的语言支持为language=zh_CN,然后点击jmeter.bat,启动软件。

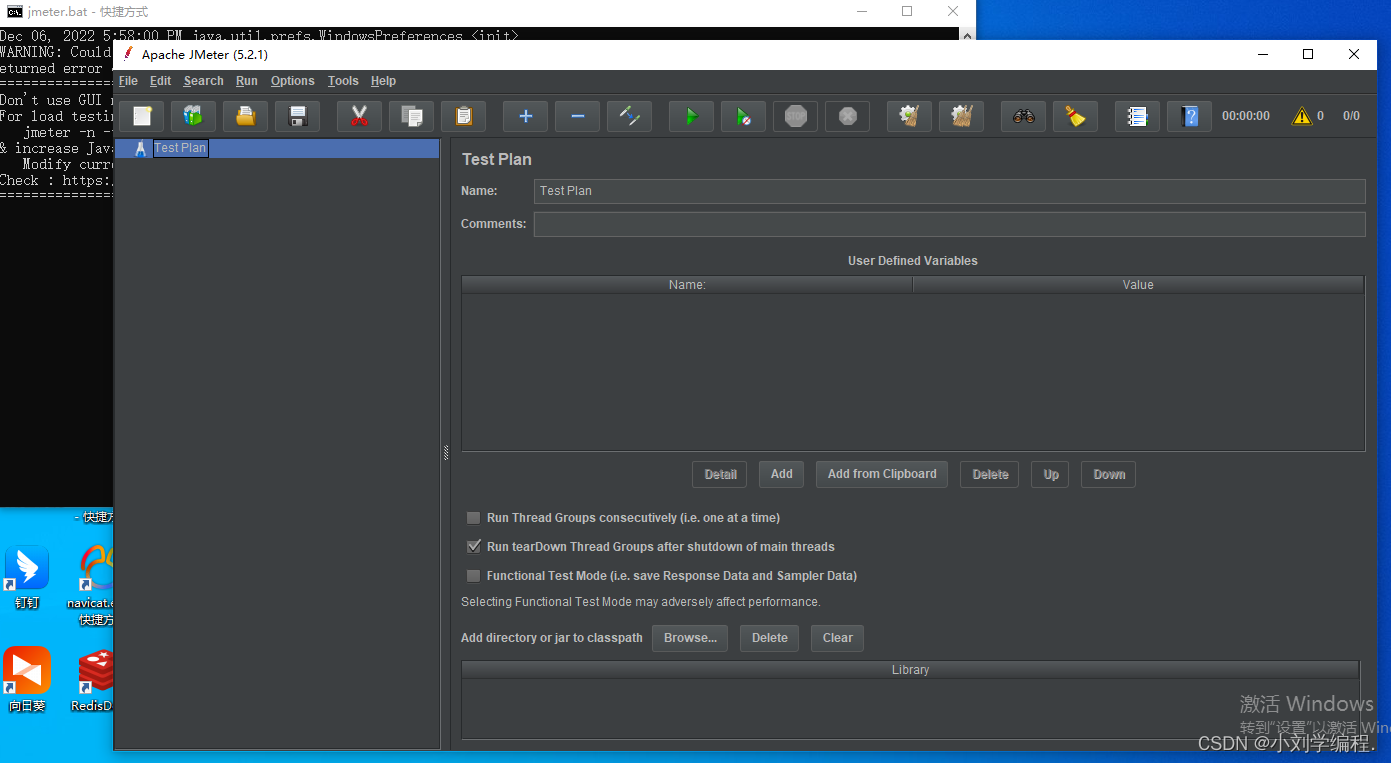
将启动软件的bat文件发送到了桌面快捷方式并启动软件
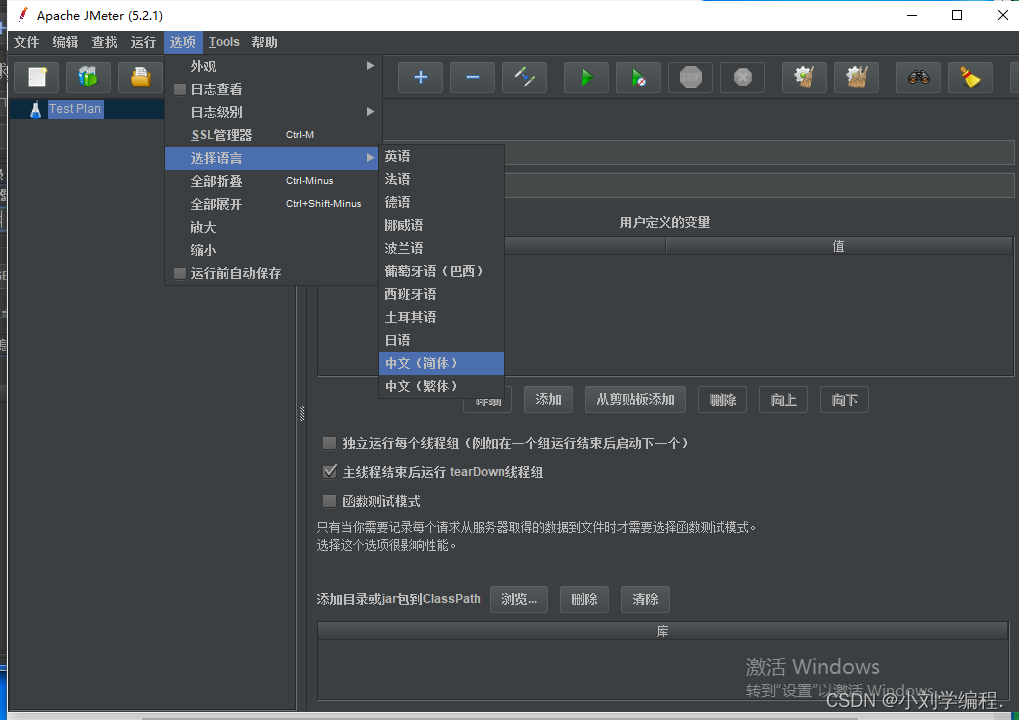
选择语言 中文
1.添加一个线程组
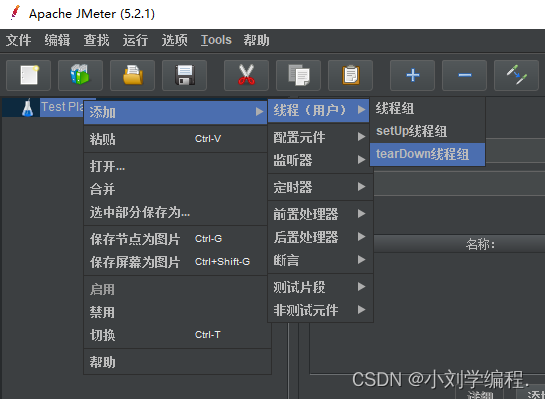
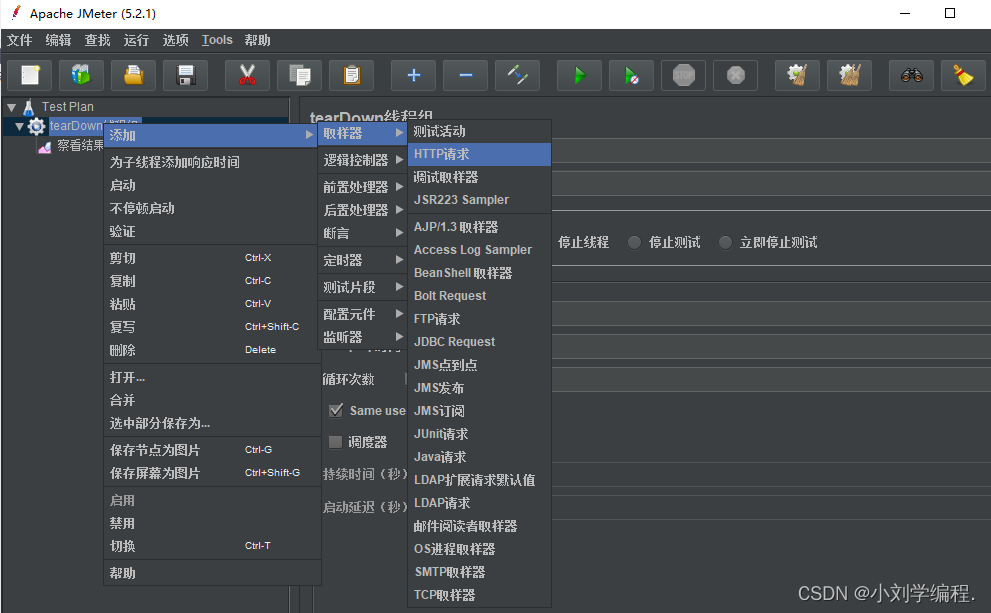
2.在线程组里添加http请求
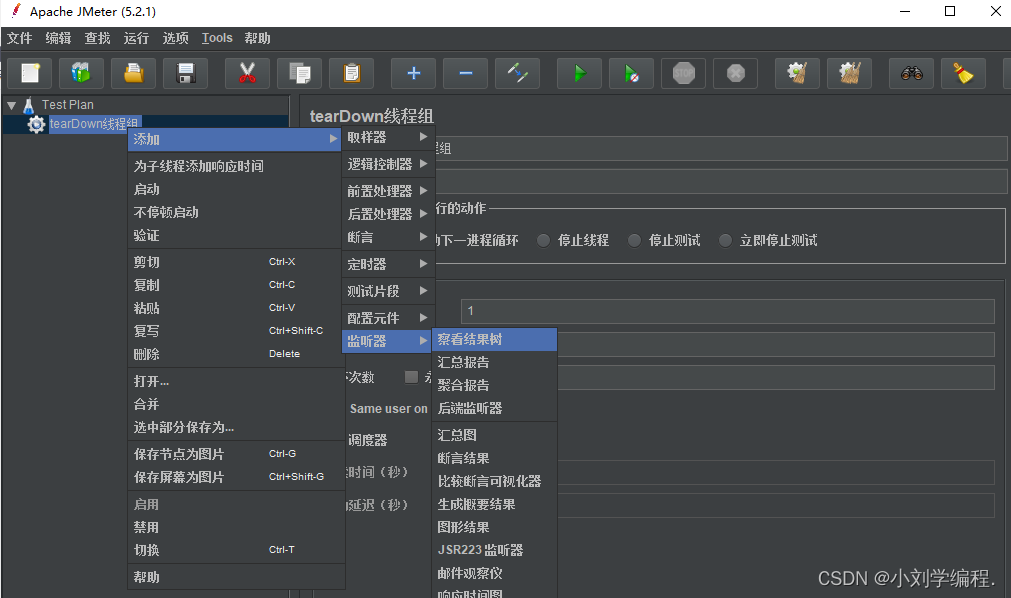
3.查看结果树
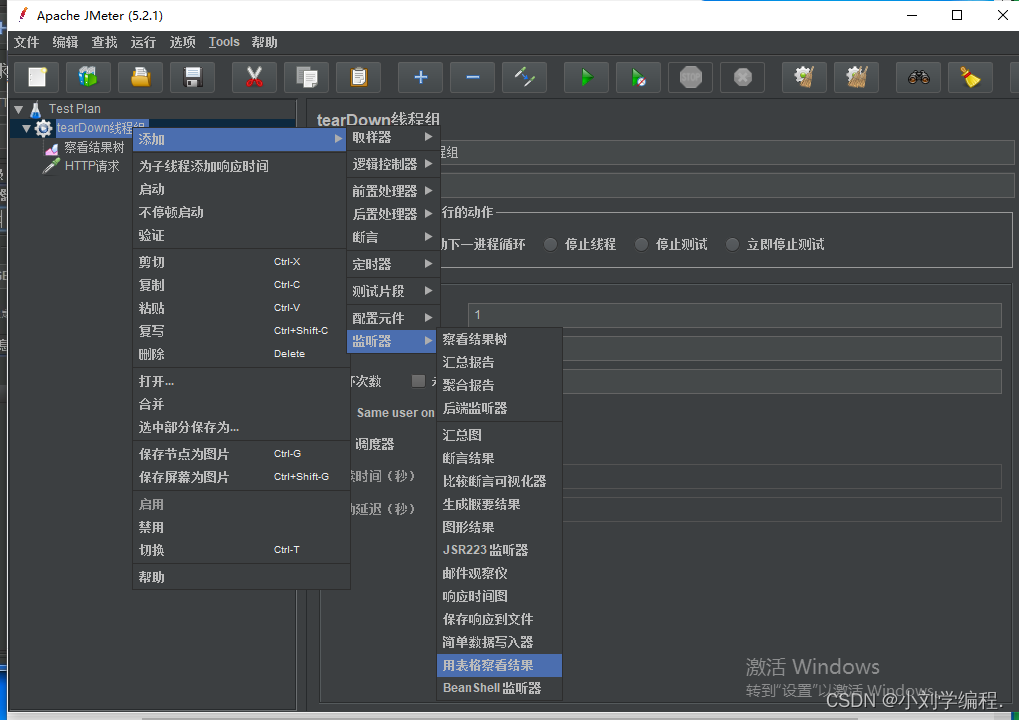
4.用表格查看结果
5.编辑线程组与http请求
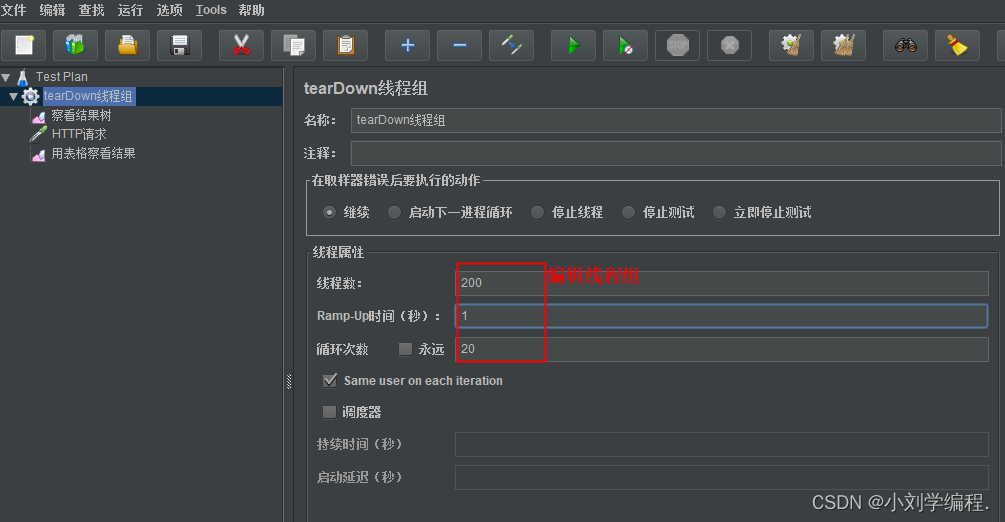

点击发送请求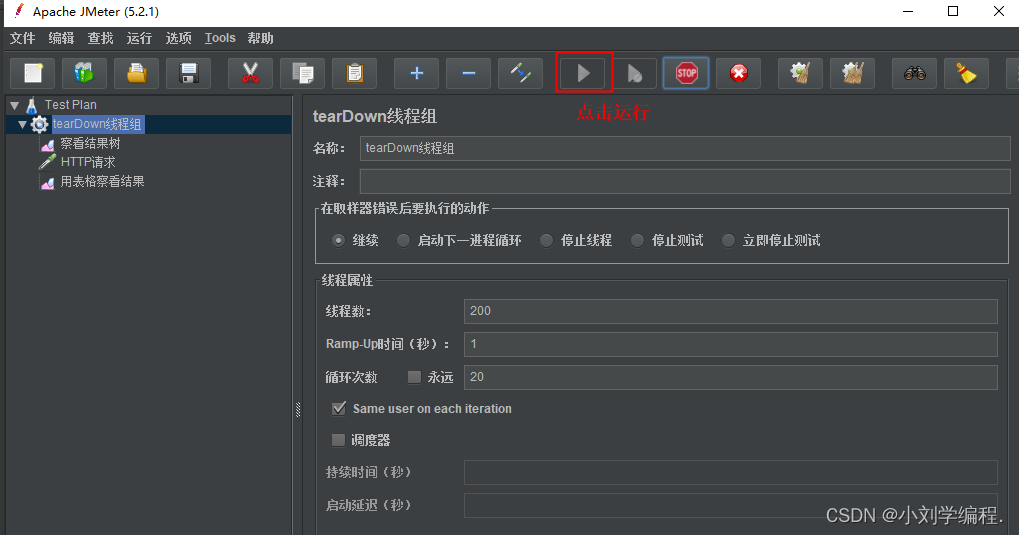
发送成功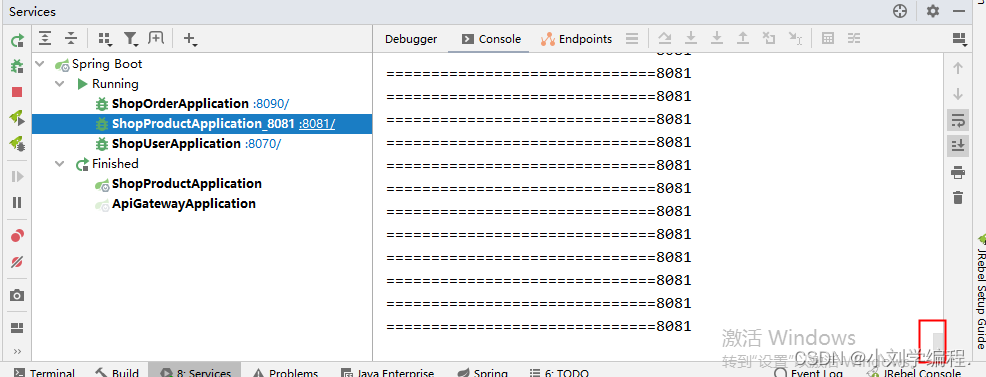
目前少量请求发送失败 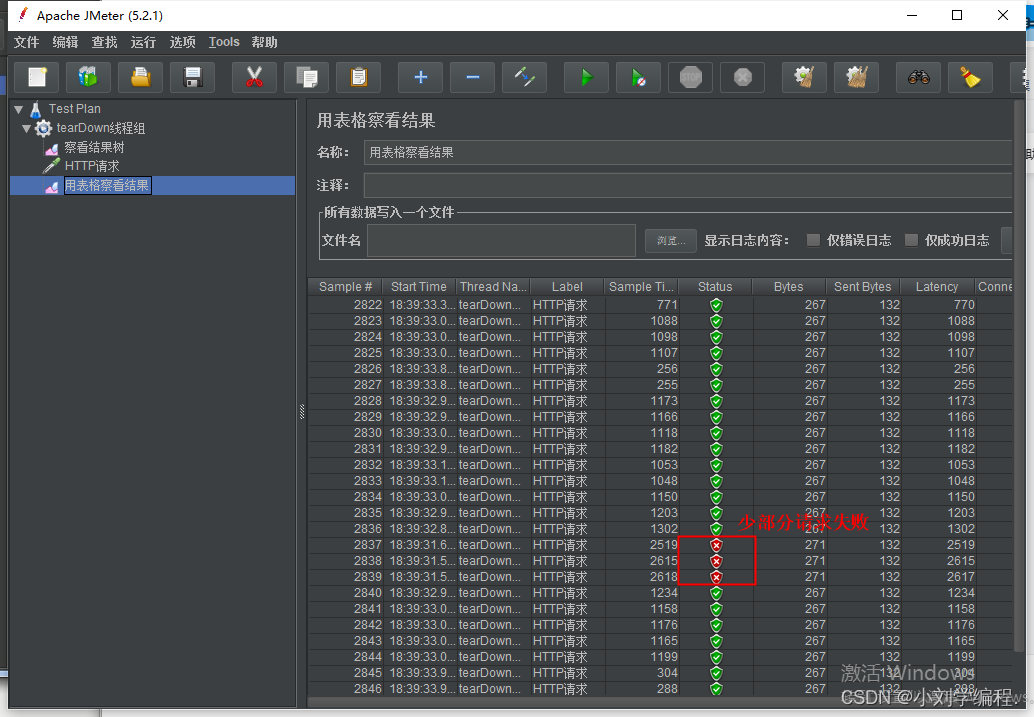
2.修改配置文件中tomcat的并发数
1秒钟20个请求,最大连接数10,最大等待数10,最大线程数2,相当于一个线程1s能处理5个请求(2秒个处理10个请求)
在order的配置文件中修改 重新启动订单微服务 再次测试
server:
port: 8091
tomcat:
max-threads: 2 #最大线程数
max-connections: 10 #最大连接数
accept-count: 10 #最大线程等待数
请求失败的数量激增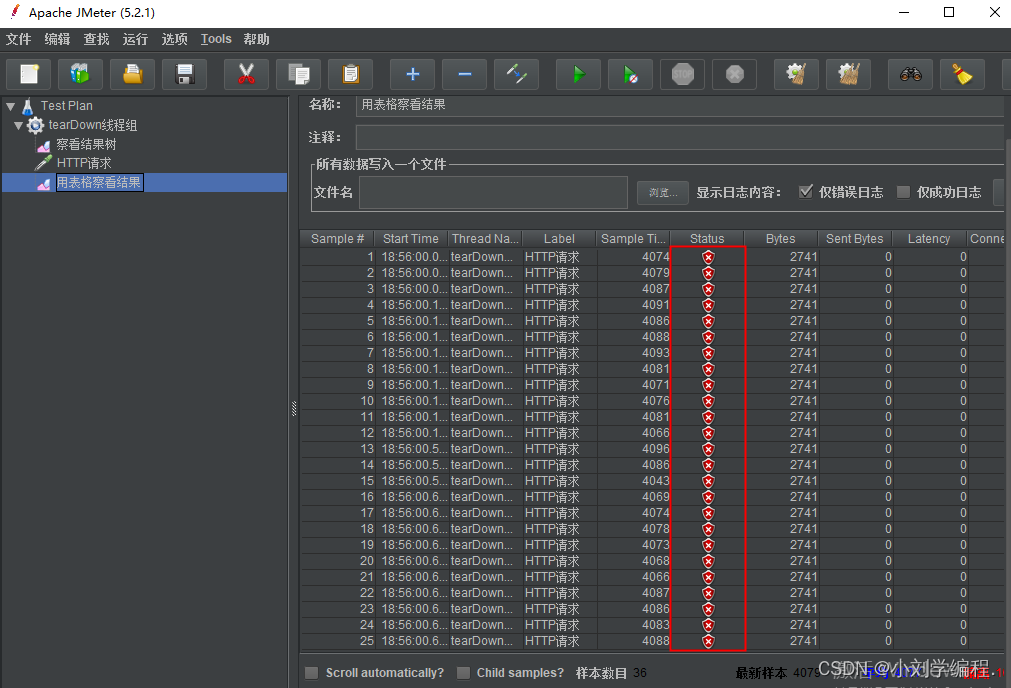
结论: 此时会发现, 由于order方法囤积了大量请求, 导致message方法的访问出现了问题,这就是服务雪崩的雏形。
1.2 服务雪崩效应
在分布式系统中,由于网络原因或自身的原因,服务一般无法保证 100% 可用。如果一个服务出现了 问题,调用这个服务就会出现线程阻塞的情况,此时若有大量的请求涌入,就会出现多条线程阻塞等 待,进而导致服务瘫痪。 由于服务与服务之间的依赖性,故障会传播,会对整个微服务系统造成灾难性的严重后果,这就是 服务故障的 “雪崩效应” 。
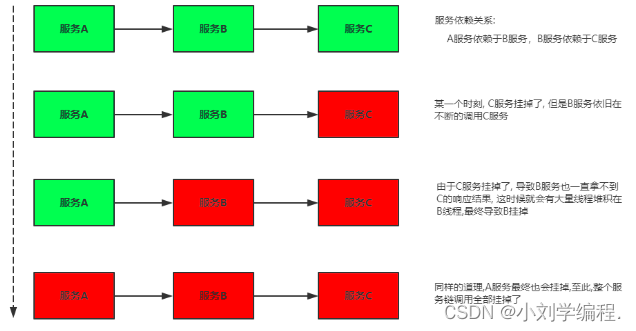
雪崩发生的原因多种多样,有不合理的容量设计,或者是高并发下某一个方法响应变慢,亦或是某 台机器的资源耗尽。我们无法完全杜绝雪崩源头的发生,只有做好足够的容错,保证在一个服务发生问 题,不会影响到其它服务的正常运行。也就是"雪落而不雪崩"。
1.3 常见容错方案
要防止雪崩的扩散,我们就要做好服务的容错,容错说白了就是保护自己不被猪队友拖垮的一些措 施, 下面介绍常见的服务容错思路和组件。 常见的容错思路 常见的容错思路有隔离、超时、限流、熔断、降级这几种,下面分别介绍一下。
服务熔断一般有三种状态: * 熔断关闭状态(Closed) 服务没有故障时,熔断器所处的状态,对调用方的调用不做任何限制 * 熔断开启状态(Open) 后续对该服务接口的调用不再经过网络,直接执行本地的fallback方法 * 半熔断状态(Half-Open) 尝试恢复服务调用,允许有限的流量调用该服务,并监控调用成功率。如果成功率达到预 期,则说明服务已恢复,进入熔断关闭状态;如果成功率仍旧很低,则重新进入熔断关闭状态。
-
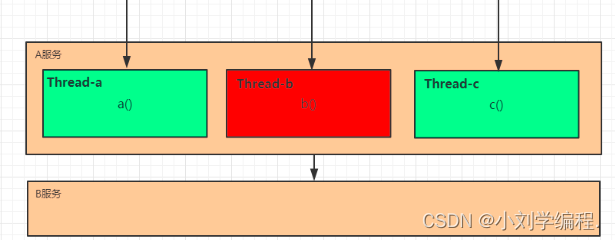
隔离 它是指将系统按照一定的原则划分为若干个服务模块,各个模块之间相对独立,无强依赖。当有故 障发生时,能将问题和影响隔离在某个模块内部,而不扩散风险,不波及其它模块,不影响整体的 系统服务。常见的隔离方式有:线程池隔离和信号量隔离.
-
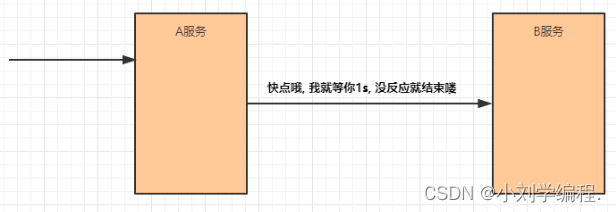
超时 在上游服务调用下游服务的时候,设置一个最大响应时间,如果超过这个时间,下游未作出反应, 就断开请求,释放掉线程。
-
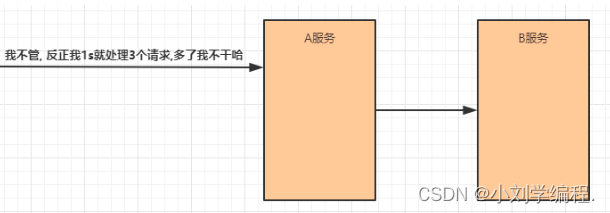
限流 限流就是限制系统的输入和输出流量已达到保护系统的目的。为了保证系统的稳固运行,一旦达到 的需要限制的阈值,就需要限制流量并采取少量措施以完成限制流量的目的。
-
熔断 在互联网系统中,当下游服务因访问压力过大而响应变慢或失败,上游服务为了保护系统整 体的可用性,可以暂时切断对下游服务的调用。这种牺牲局部,保全整体的措施就叫做熔断。

-
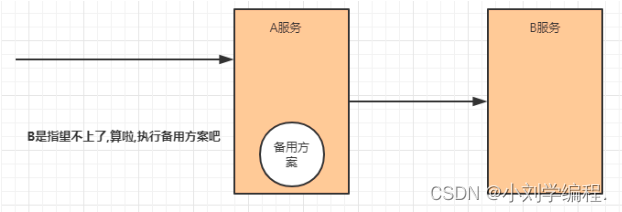
降级 降级其实就是为服务提供一个托底方案,一旦服务无法正常调用,就使用托底方案。
常见的容错组件
-
Hystrix Hystrix是由Netflix开源的一个延迟和容错库,用于隔离访问远程系统、服务或者第三方库,防止 级联失败,从而提升系统的可用性与容错性。
-
Resilience4J Resilicence4J一款非常轻量、简单,并且文档非常清晰、丰富的熔断工具,这也是Hystrix官方推 荐的替代产品。不仅如此,Resilicence4j还原生支持Spring Boot 1.x/2.x,而且监控也支持和 prometheus等多款主流产品进行整合。
-
Sentinel Sentinel 是阿里巴巴开源的一款断路器实现,本身在阿里内部已经被大规模采用,非常稳定。
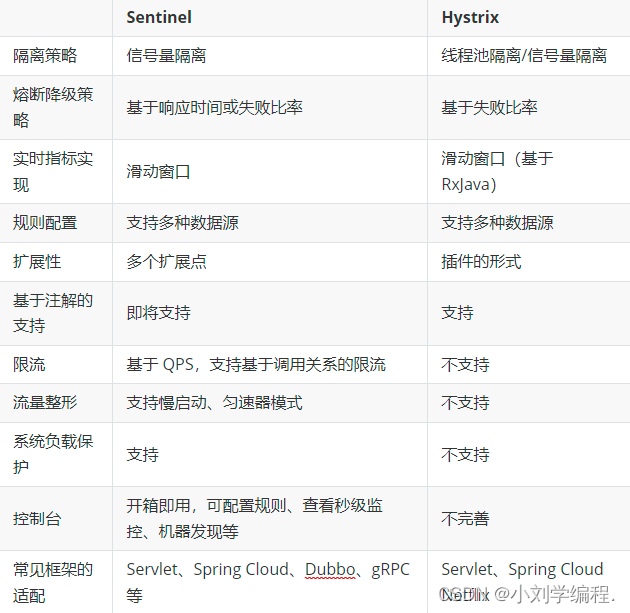
下面是三个组件在各方面的对比:
1.4 Sentinel入门
什么是Sentinel
Sentinel (分布式系统的流量防卫兵) 是阿里开源的一套用于服务容错的综合性解决方案。它以流量 为切入点, 从流量控制、熔断降级、系统负载保护等多个维度来保护服务的稳定性。
Sentinel 具有以下特征:
丰富的应用场景:Sentinel 承接了阿里巴巴近 10 年的双十一大促流量的核心场景, 例如秒杀(即 突发流量控制在系统容量可以承受的范围)、消息削峰填谷、集群流量控制、实时熔断下游不可用 应用等。
完备的实时监控:Sentinel 提供了实时的监控功能。通过控制台可以看到接入应用的单台机器秒 级数据, 甚至 500 台以下规模的集群的汇总运行情况。
广泛的开源生态:Sentinel 提供开箱即用的与其它开源框架/库的整合模块, 例如与 Spring Cloud、Dubbo、gRPC 的整合。只需要引入相应的依赖并进行简单的配置即可快速地接入 Sentinel。
完善的 SPI 扩展点:Sentinel 提供简单易用、完善的 SPI 扩展接口。您可以通过实现扩展接口来快 速地定制逻辑。例如定制规则管理、适配动态数据源等。
Sentinel 分为两个部分:
-
核心库(Java 客户端)不依赖任何框架/库,能够运行于所有 Java 运行时环境,同时对 Dubbo / Spring Cloud 等框架也有较好的支持。
-
控制台(Dashboard)基于 Spring Boot 开发,打包后可以直接运行,不需要额外的 Tomcat 等 应用容器。
微服务集成Sentinel
为微服务集成Sentinel非常简单, 只需要加入Sentinel的依赖即可
1 在订单模块(shop-order)的pom.xml中加入下面依赖
<!--sentinel-->
<dependency>
<groupId>com.alibaba.cloud</groupId>
<artifactId>spring-cloud-starter-alibaba-sentinel</artifactId>
</dependency>
网关gateway集成sentinel,需还另添加以下依赖(此次不需要
<dependency>
<groupId>com.alibaba.cloud</groupId>
<artifactId>spring-cloud-alibaba-sentinel-gateway</artifactId>
</dependency>
安装Sentinel控制台
Sentinel 提供一个轻量级的控制台, 它提供机器发现、单机资源实时监控以及规则管理等功能。
1 下载jar包,解压到文件夹
Releases · alibaba/Sentinel · GitHubA powerful flow control component enabling reliability, resilience and monitoring for microservices. (面向云原生微服务的高可用流控防护组件) - Releases · alibaba/Sentinel![]() https://github.com/alibaba/Sentinel/releases 2 启动控制台
https://github.com/alibaba/Sentinel/releases 2 启动控制台
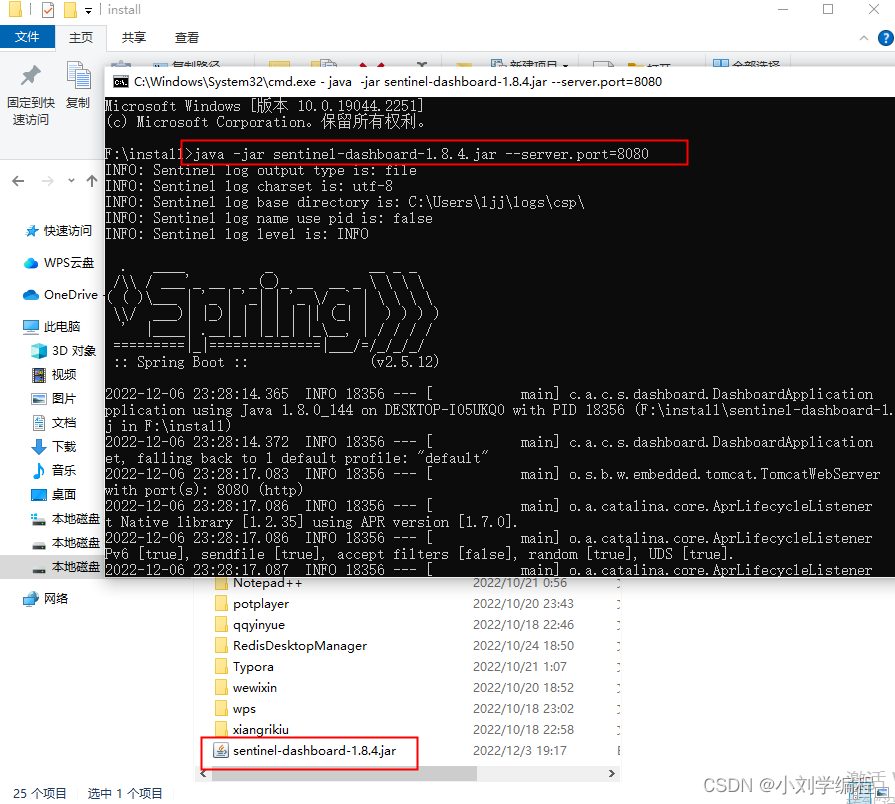
# 直接使用jar命令启动项目(控制台本身是一个SpringBoot项目)
java -Dserver.port=8080 -Dcsp.sentinel.dashboard.server=localhost:8080 -Dproject.name=sentinel-dashboard -jar sentinel-dashboard-1.7.0.jar#参考1
java -jar sentinel-dashboard-1.8.1.jar --server.port=8080(因版本修改指令)
#参考2
java -Dserver.port=8080 -Dcsp.sentinel.dashboard.server=localhost:8080 -Dproject.name=sentinel-dashboard -jar sentinel-dashboard-1.8.1.jar
3 修改shop-order ,在里面加入有关控制台的配置
spring:
cloud:
nacos:
discovery:
server-addr: localhost:8848
sentinel:
transport:
port: 9999 #跟控制台交流的端口,随意指定一个未使用的端口即可
dashboard: localhost:8080 # 指定控制台服务的地址
4 通过浏览器访问localhost:8080 进入控制台 ( 默认用户名密码是 sentinel/sentinel )
当访问了微服务请求再进入该控制台才会自动监控到图中所圈的服务地址 原本为空的
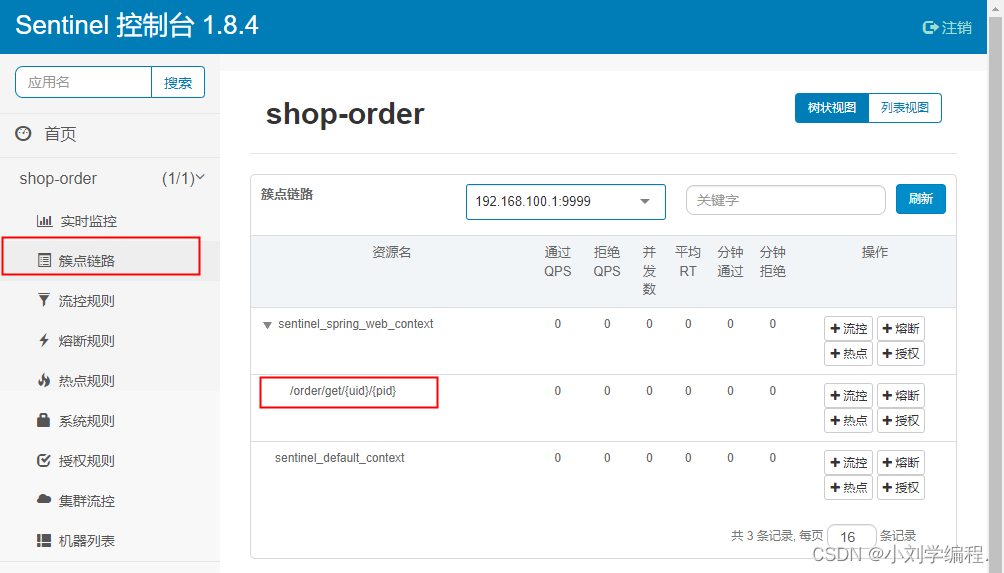
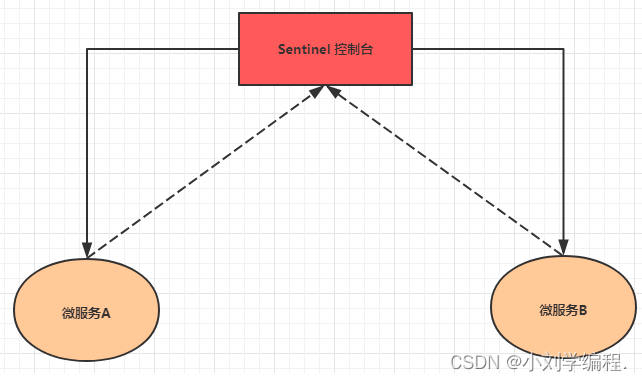
补充:了解控制台的使用原理 Sentinel的控制台其实就是一个SpringBoot编写的程序。我们需要将我们的微服务程序注册到控制台上, 即在微服务中指定控制台的地址, 并且还要开启一个跟控制台传递数据的端口, 控制台也可以通过此端口 调用微服务中的监控程序获取微服务的各种信息。
实现一个接口的限流
sentinel简单模式之流控QPS案例

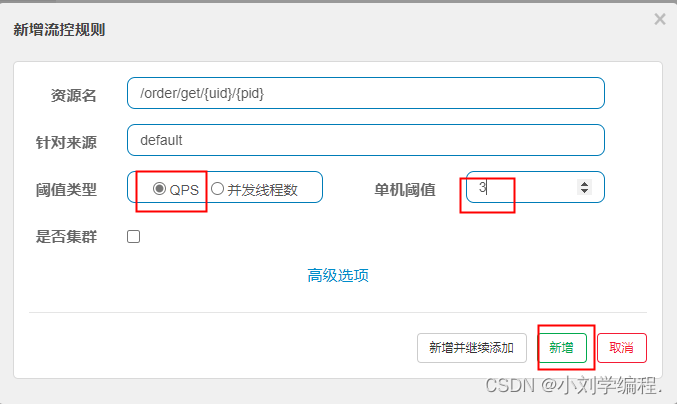
当浏览器访问该路径达到一秒三次以上时就会达到阈值从而停止服务

修改流控规则如下
sentinel流控简单模式之并发线程案例
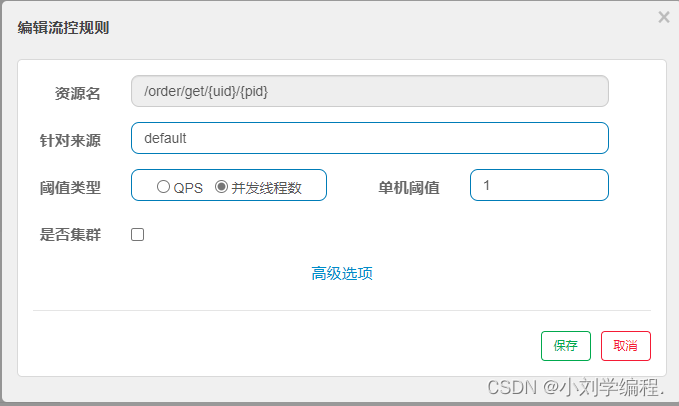
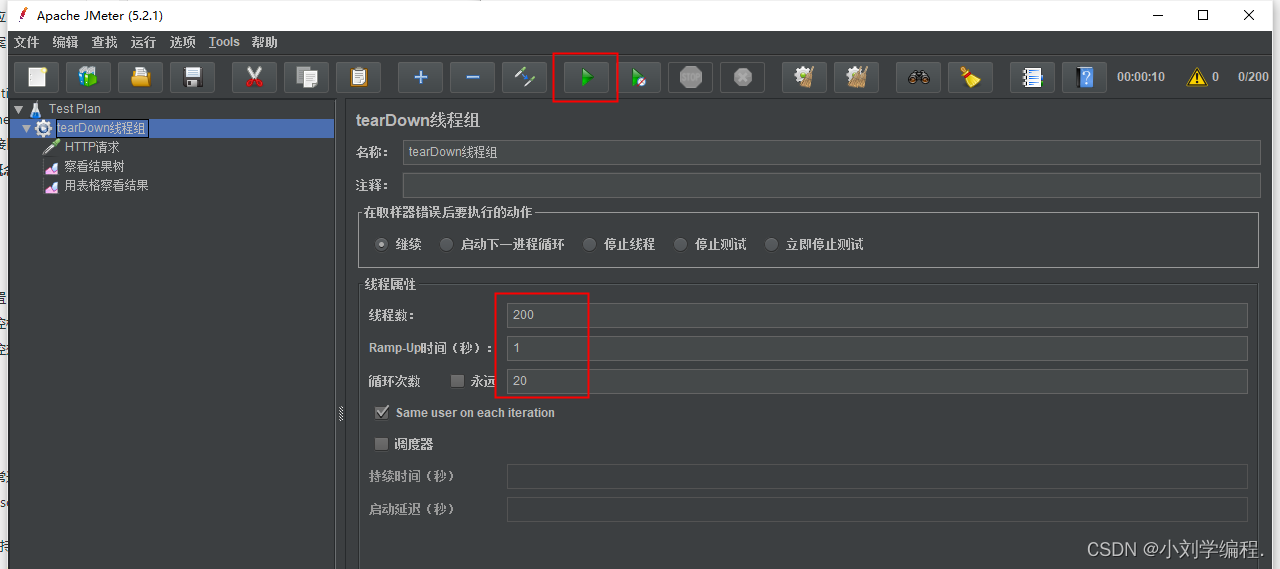
测试此规则时需要考验到哥们的手速 打开测压工具jmeter 对此服务发送请求 在请求结束之前我们需要进入浏览器 手动的去访问该服务 此时两个线程同时访问 就达到了阈值 从而服务停止

Sentinel的概念和功能
基本概念
资源 资源就是Sentinel要保护的东西 资源是 Sentinel 的关键概念。它可以是 Java 应用程序中的任何内容,可以是一个服务,也可以是 一个方法,甚至可以是一段代码。
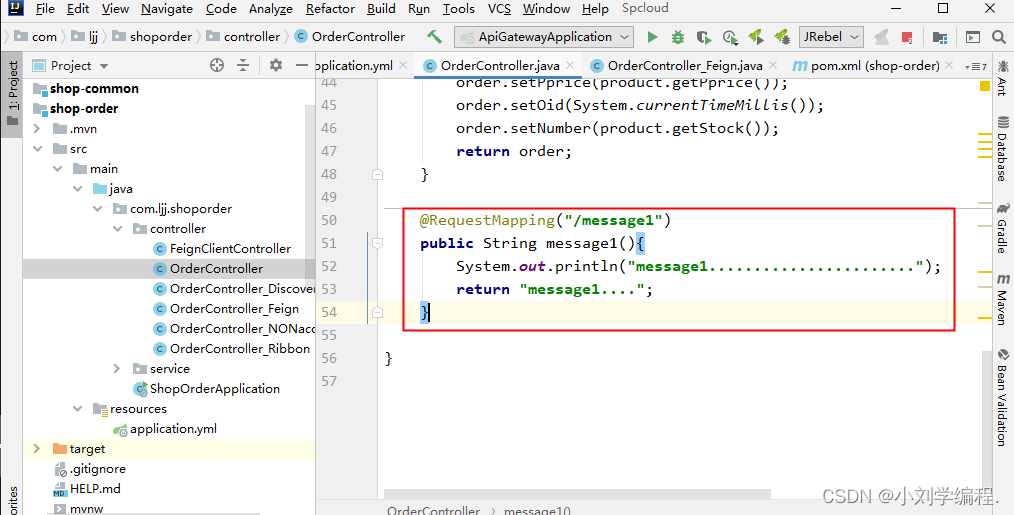
我们入门案例中的message1方法就可以认为是一个资源
规则 规则就是用来定义如何进行保护资源的 作用在资源之上, 定义以什么样的方式保护资源,主要包括流量控制规则、熔断降级规则以及系统 保护规则。
我们入门案例中就是为message1资源设置了一种流控规则, 限制了进入message1的流量
重要功能
Sentinel的主要功能就是容错,主要体现为下面这三个:
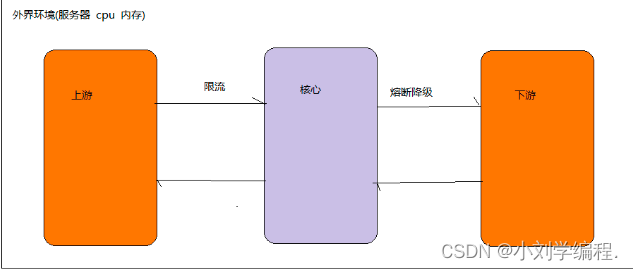
流量控制
流量控制在网络传输中是一个常用的概念,它用于调整网络包的数据。任意时间到来的请求往往是 随机不可控的,而系统的处理能力是有限的。我们需要根据系统的处理能力对流量进行控制。 Sentinel 作为一个调配器,可以根据需要把随机的请求调整成合适的形状。
熔断降级
当检测到调用链路中某个资源出现不稳定的表现,例如请求响应时间长或异常比例升高的时候,则 对这个资源的调用进行限制,让请求快速失败,避免影响到其它的资源而导致级联故障。 Sentinel 对这个问题采取了两种手段:
通过并发线程数进行限制 Sentinel 通过限制资源并发线程的数量,来减少不稳定资源对其它资源的影响。当某个资源 出现不稳定的情况下,例如响应时间变长,对资源的直接影响就是会造成线程数的逐步堆 积。当线程数在特定资源上堆积到一定的数量之后,对该资源的新请求就会被拒绝。堆积的 线程完成任务后才开始继续接收请求。
通过响应时间对资源进行降级 除了对并发线程数进行控制以外,Sentinel 还可以通过响应时间来快速降级不稳定的资源。 当依赖的资源出现响应时间过长后,所有对该资源的访问都会被直接拒绝,直到过了指定的 时间窗口之后才重新恢复。
Sentinel 和 Hystrix 的区别
两者的原则是一致的, 都是当一个资源出现问题时, 让其快速失败, 不要波及到其它服务 但是在限制的手段上, 确采取了完全不一样的方法:
Hystrix 采用的是线程池隔离的方式, 优点是做到了资源之间的隔离, 缺点是增加了线程 切换的成本。
Sentinel 采用的是通过并发线程的数量和响应时间来对资源做限制。
系统负载保护
Sentinel 同时提供系统维度的自适应保护能力。当系统负载较高的时候,如果还持续让 请求进入可能会导致系统崩溃,无法响应。在集群环境下,会把本应这台机器承载的流量转发到其 它的机器上去。如果这个时候其它的机器也处在一个边缘状态的时候,Sentinel 提供了对应的保 护机制,让系统的入口流量和系统的负载达到一个平衡,保证系统在能力范围之内处理最多的请 求。 总之一句话: 我们需要做的事情,就是在Sentinel的资源上配置各种各样的规则,来实现各种容错的功 能。
Sentinel规则
流控规则
流量控制,其原理是监控应用流量的QPS(每秒查询率) 或并发线程数等指标,当达到指定的阈值时 对流量进行控制,以避免被瞬时的流量高峰冲垮,从而保障应用的高可用性。
第1步: 点击簇点链路,我们就可以看到访问过的接口地址,然后点击对应的流控按钮,进入流控规则配 置页面。新增流控规则界面如下:
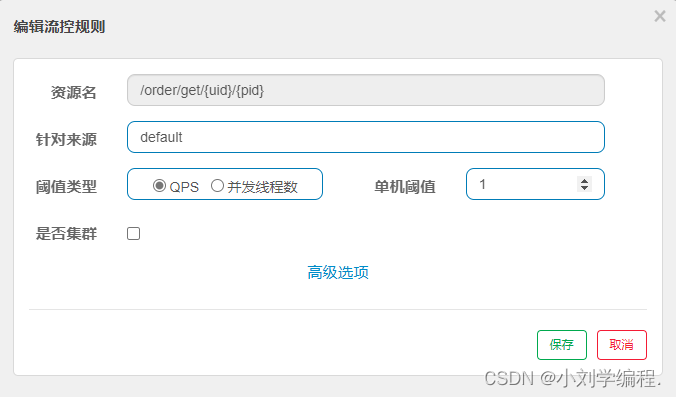
资源名:唯一名称,默认是请求路径,可自定义 针对来源:指定对哪个微服务进行限流,默认指default,意思是不区分来源,全部限制 阈值类型/单机阈值:
-
QPS(每秒请求数量): 当调用该接口的QPS达到阈值的时候,进行限流
-
线程数:当调用该接口的线程数达到阈值的时候,进行限流
是否集群:暂不需要集群 接下来我们以QPS为例来研究限流规则的配置。
简单配置
我们先做一个简单配置,设置阈值类型为QPS,单机阈值为3。即每秒请求量大于3的时候开始限流。 接下来,在流控规则页面就可以看到这个配置。
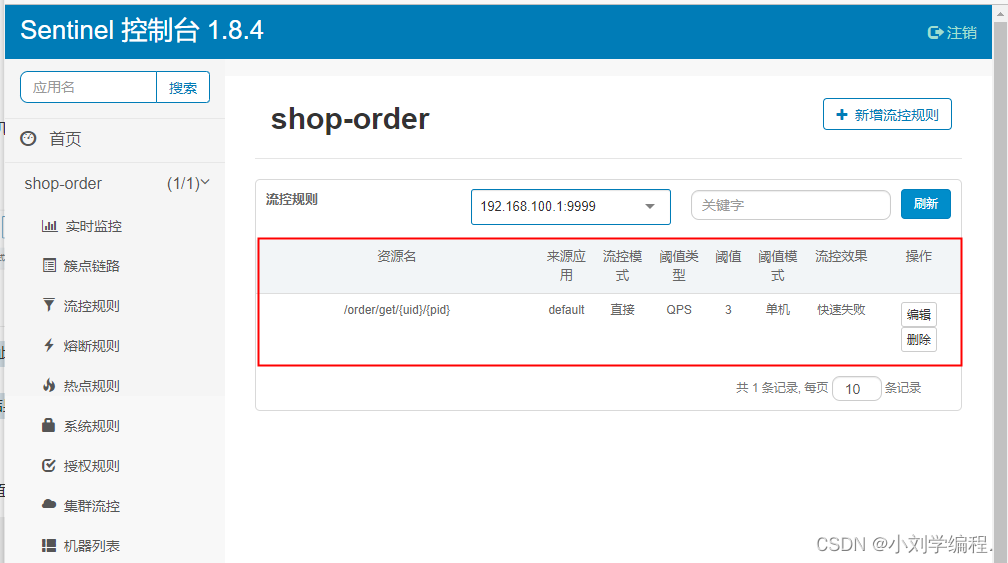
然后快速访问接口,观察效果。此时发现,当QPS > 3的时候,服务就不能正常响 应,而是返回Blocked by Sentinel (flow limiting)结果。
配置流控模式
点击上面设置流控规则的编辑按钮,然后在编辑页面点击高级选项,会看到有流控模式一栏。
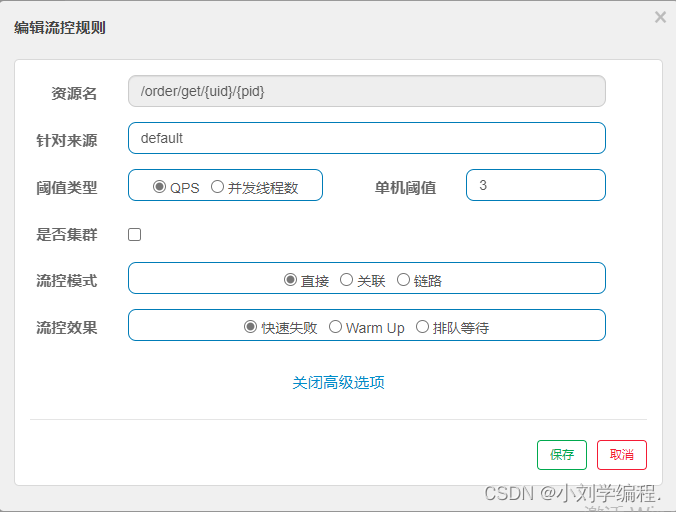
sentinel共有三种流控模式,分别是:
-
直接(默认):接口达到限流条件时,开启限流
-
关联:当关联的资源达到限流条件时,开启限流 [适合做应用让步]
-
链路:当从某个接口过来的资源达到限流条件时,开启限流
下面呢分别演示三种模式:
直接流控模式 直接流控模式是最简单的模式,当指定的接口达到限流条件时开启限流。上面案例使用的就是直接流控 模式。
关联流控模式 关联流控模式指的是,当指定接口关联的接口达到限流条件时,开启对指定接口开启限流。
第1步:配置限流规则, 将流控模式设置为关联,关联资源设置为的 /order/message1
先删除sentinel中直接流控模式的流控规则
在订单Controller中添加一个方法 重启服务
可以访问
多一行
在sentinel中开启关联流控
当关联资源中的路径访问时达到了阈值时 资源名中的路径就会受到限流
第3步:通过jmeter工具向/order/message1连续发送请求,注意QPS一定要大于1
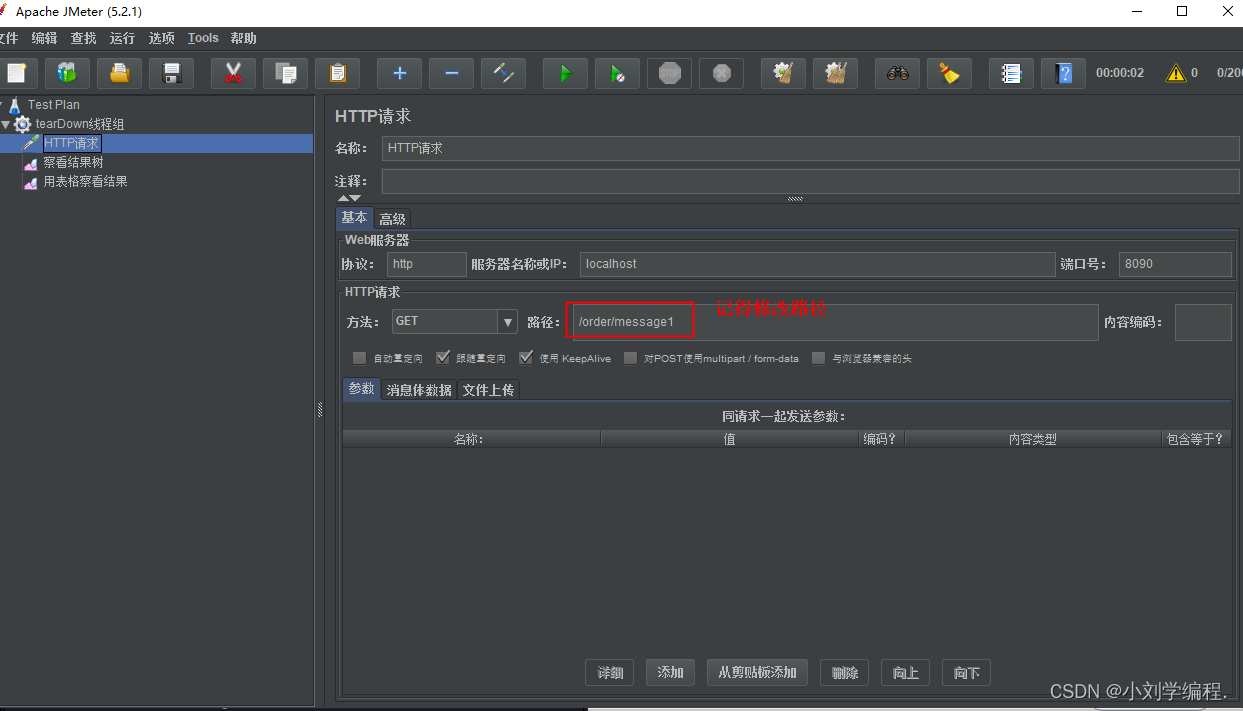
第4步:访问/order/message1,会发现已经被限流

链路流控模式
链路流控模式指的是,当从某个接口过来的资源达到限流条件时,开启限流。它的功能有点类似于针对 来源配置项,区别在于:针对来源是针对上级微服务,而链路流控是针对上级接口,也就是说它的粒度 更细。
第1步: 编写一个service,在里面添加一个方法message
@Service
public class OrderServiceImpl2 {
@SentinelResource(value = "message", blockHandler = "failBlockHandler")
public Map message() {
Map map = new HashMap();
map.put("code","200");
map.put("msg","正常响应成功");
return map;
}public Map failBlockHandler(BlockException be) {
Map map = new HashMap();
map.put("code","-1");
map.put("msg","接口被限流了...");
return map;
}
}
第2步: 在OrderController中声明两个方法,分别调用service中的方法message
@Autowired
private OrderServiceImpl2 orderService;
// 主要讲解 sentinel 中的 链路流控模式
@RequestMapping("/message3")
public Map message3() {
return orderService.message();
}
@RequestMapping("/message4")
public Map message4() {
return orderService.message();
}


第3步: 禁止收敛URL的入口 context 从1.6.3 版本开始,Sentinel Web filter默认收敛所有URL的入口context,因此链路限流不生效。
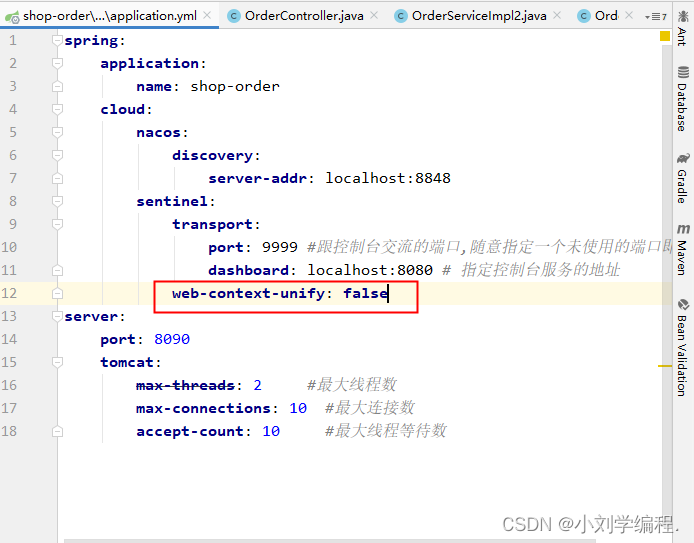
1.7.0 版本开始(对应SCA的2.1.1.RELEASE),官方在CommonFilter 引入了 WEB_CONTEXT_UNIFY 参数,用于控制是否收敛context。将其配置为 false 即可根据不同的 URL 进行链路限流。 SCA 2.1.1.RELEASE之后的版本,可以通过配置spring.cloud.sentinel.web-context-unify=false即 可关闭收敛
像message4下面没有message 而3下面有 我们如何将4的也放出来 否则不能进行链路的设置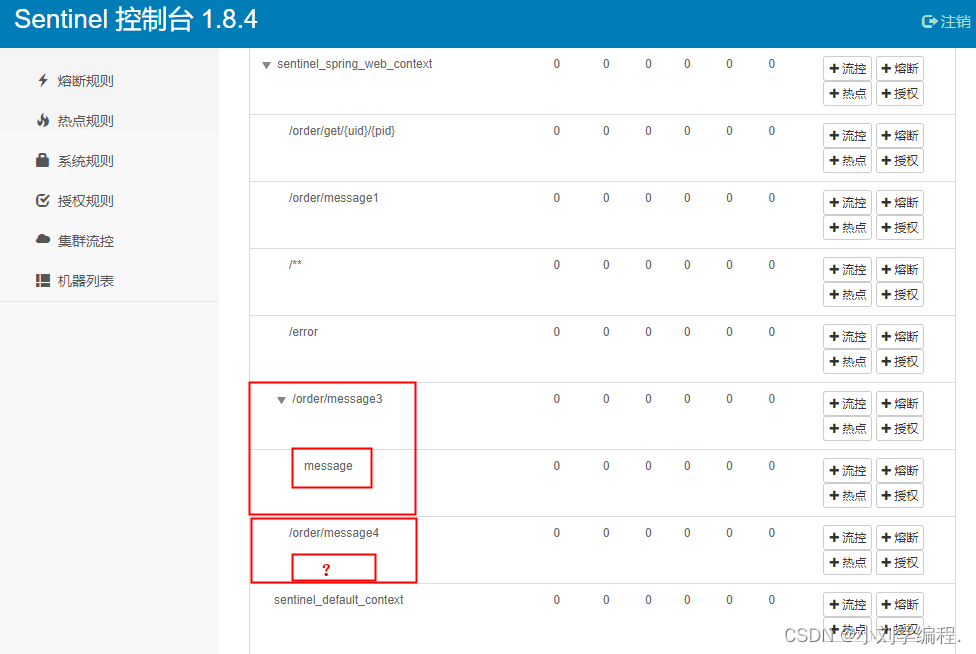
修改applcation.yml文件 重启服务
web-context-unify:false :false
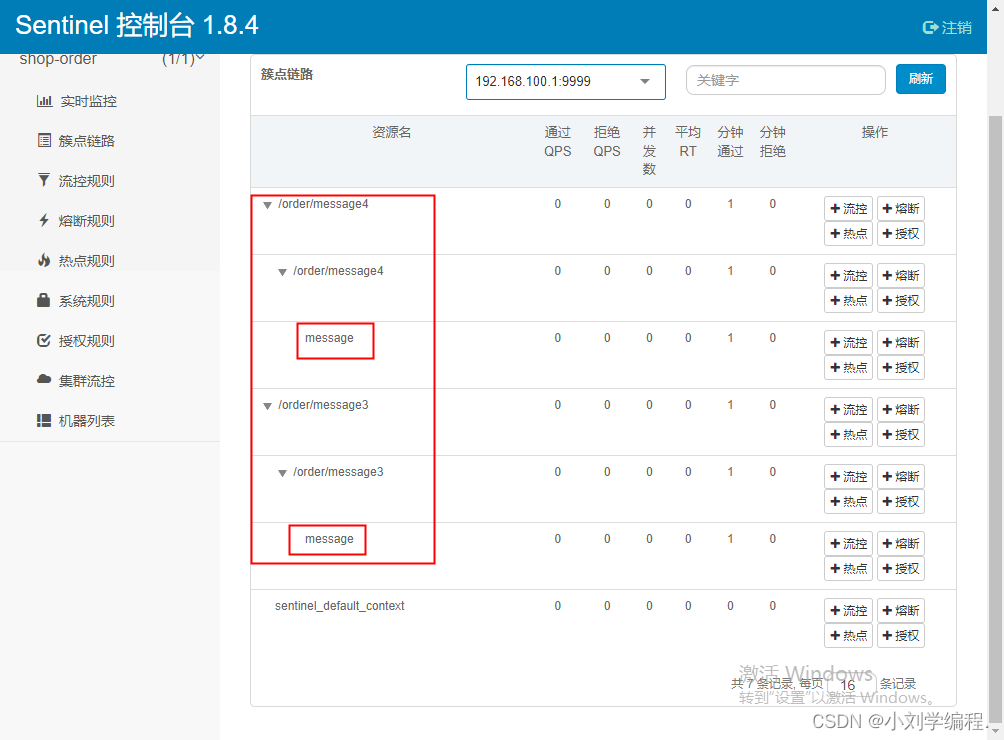
此时可以进行选择链路进行限流 虽然3与4调用的是同样的方法 但是链路模式可以单独指定一个链路进行限流
第4步: 控制台配置限流规则
我们对message3进行限流
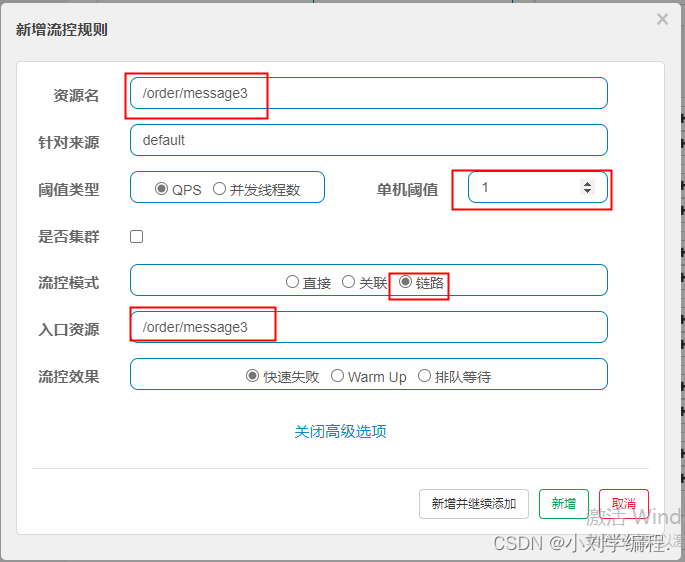
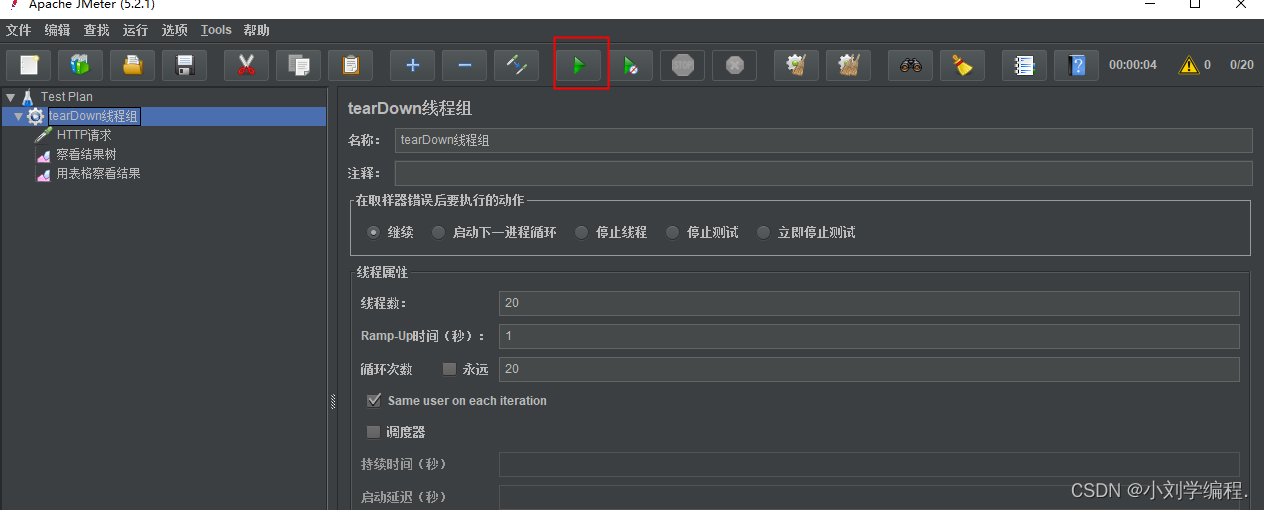
当快速访问message3时会限流

当快速访问message4时没有影响

配置流控效果
快速失败(默认): 直接失败,抛出异常,不做任何额外的处理,是最简单的效果
Warm Up:它从开始阈值到最大QPS阈值会有一个缓冲阶段,一开始的阈值是最大QPS阈值的 1/3,然后慢慢增长,直到最大阈值,适用于将突然增大的流量转换为缓步增长的场景。
排队等待:让请求以均匀的速度通过,单机阈值为每秒通过数量,其余的排队等待; 它还会让设 置一个超时时间,当请求超过超时间时间还未处理,则会被丢弃。
降级规则
降级规则就是设置当满足什么条件的时候,对服务进行降级 本质就是托底方案。Sentinel提供了三个衡量条件:
平均响应时间 :当资源的平均响应时间超过阈值(以 ms 为单位)之后,资源进入准降级状态。
再添加一个方法
//    sentinal中的熔断降级 平均响应时间
//    预测的结果:平均时间大于0.22秒 那么会出现降级处理结果
//    如果平均时间小于0.22秒 就正常响应结果
    @RequestMapping("/message2")
    public String message2() {
        try {
//            代表当前方法需要执行0.22秒
            TimeUnit.MILLISECONDS.sleep(220);
        } catch (InterruptedException e) {
            e.printStackTrace();
        }
        return "message2";
    }


效果:在统计时长1秒内当请求数大于5以后,如果请求的响应时间大于200毫秒的超过20%,则熔断5秒。
因为我们在请求的方法中定死了请求时间为0.22s 所以肯定就超时了

注意:RT指的响应时间,Sentinel 默认统计的 RT 上限是 4900ms,超出此阈值的都会算作 4900ms,若需要 变更此上限可以通过启动配置项-Dcsp.sentinel.statistic.max.rt=xxx 来配置
异常比例:当资源的每秒异常总数占通过量的比值超过阈值之后,资源进入降级状态,即在接下的
时间窗口(以 s 为单位)之内,对这个方法的调用都会自动地返回。异常比率的阈值范围是 [0.0, 1.0]。
第1步: 首先模拟一个异常
//    sentinal中的熔断降级:异常比例
int i = 0;
@RequestMapping("/message5")
public String message5() {
    i++;
    //异常比例为0.333 每执行三次的时候抛出一个异常
    if (i % 3 == 0){
        throw new RuntimeException();
    }
    return "message5";
}

第2步: 设置异常比例为0.3
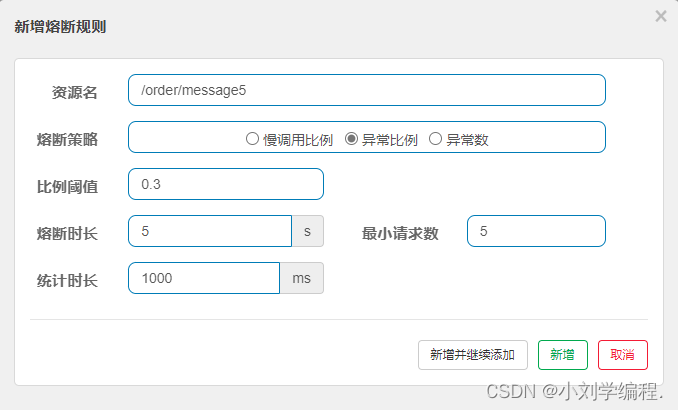
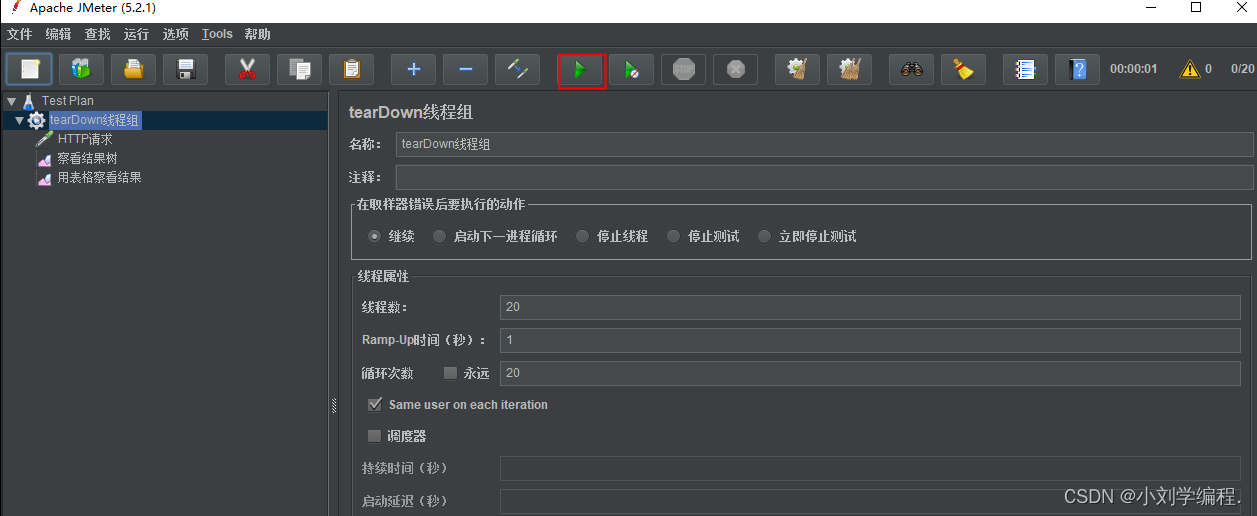
在代码中定义了每三次抛出异常 异常比例为0.333..超过了异常比例阈值0.3

异常数 :当资源近 1 分钟的异常数目超过阈值之后会进行服务降级。注意由于统计时间窗口是分 钟级别的,若时间窗口小于 60s,则结束熔断状态后仍可能再进入熔断状态。
最后我们将其做优化,我们并不能显示出一个类似这种的页面给用户,所以我们需要用到下面的操作

自定义异常返回

BlockException 异常接口,包含Sentinel的五个异常
FlowException 限流异常
DegradeException 降级异常
ParamFlowException 参数限流异常
AuthorityException 授权异常
SystemBlockException 系统负载异常
新建一个config包 建一个自定义异常返回的类
package com.ljj.shoporder.controller.config;

import com.alibaba.csp.sentinel.adapter.spring.webmvc.callback.BlockExceptionHandler;
import com.alibaba.csp.sentinel.slots.block.BlockException;
import com.alibaba.csp.sentinel.slots.block.degrade.DegradeException;
import com.alibaba.csp.sentinel.slots.block.flow.FlowException;
import com.alibaba.fastjson.JSON;
import lombok.AllArgsConstructor;
import lombok.Data;
import lombok.NoArgsConstructor;
import org.springframework.stereotype.Component;

import javax.servlet.http.HttpServletRequest;
import javax.servlet.http.HttpServletResponse;
import java.io.IOException;

//异常处理页面
@Component
public class ExceptionHandlerPage implements BlockExceptionHandler {
    @Override
    public void handle(HttpServletRequest request, HttpServletResponse response, BlockException e) throws Exception {
        response.setContentType("application/json;charset=utf-8");
        ResponseData data = null;
        if (e instanceof FlowException) {
            data = new ResponseData(-1, "接口被限流了...");
        } else if (e instanceof DegradeException) {
            data = new ResponseData(-2, "接口被降级了...");
        }
        response.getWriter().write(JSON.toJSONString(data));
    }
}

@Data
@AllArgsConstructor//全参构造
@NoArgsConstructor//无参构造
class ResponseData {
    private int code;
    private String message;
}
再次熔断时

热点规则
热点参数流控规则是一种更细粒度的流控规则, 它允许将规则具体到参数上。
热点规则简单使用
第1步: 编写代码
第2步: 配置热点规则
@RequestMapping("/order/message3")
@SentinelResource("message3")//注意这里必须使用这个注解标识,热点规则不生效
public String message3(String name, Integer age) {
return name + age;
}
第3步: 分别用两个参数访问,会发现只对第一个参数限流了 热点规则增强使用 参数例外项允许对一个参数的具体值进行流控 编辑刚才定义的规则,增加参数例外项
授权规则
很多时候,我们需要根据调用来源来判断该次请求是否允许放行,这时候可以使用 Sentinel 的来源
访问控制的功能。来源访问控制根据资源的请求来源(origin)限制资源是否通过: 若配置白名单,则只有请求来源位于白名单内时才可通过; 若配置黑名单,则请求来源位于黑名单时不通过,其余的请求通过。 上面的资源名和授权类型不难理解,但是流控应用怎么填写呢? 其实这个位置要填写的是来源标识,Sentinel提供了RequestOriginParser 接口来处理来源。 只要Sentinel保护的接口资源被访问,Sentinel就会调用RequestOriginParser 的实现类去解析 访问来源。
第1步: 自定义来源处理规则
第2步: 授权规则配置 这个配置的意思是只有serviceName=pc不能访问(黑名单)
第3步: 访问 http://localhost:8091/order/message1?serviceName=pc观察结果
系统规则
系统保护规则是从应用级别的入口流量进行控制,从单台机器的总体 Load、RT、入口 QPS 、CPU 使用率和线程数五个维度监控应用数据,让系统尽可能跑在最大吞吐量的同时保证系统整体的稳定性。 系统保护规则是应用整体维度的,而不是资源维度的,并且仅对入口流量 (进入应用的流量) 生效。
-
Load(仅对 Linux/Unix-like 机器生效):当系统 load1 超过阈值,且系统当前的并发线程数超过 系统容量时才会触发系统保护。系统容量由系统的 maxQps * minRt 计算得出。设定参考值一般 是 CPU cores * 2.5。
-
RT:当单台机器上所有入口流量的平均 RT 达到阈值即触发系统保护,单位是毫秒。
-
线程数:当单台机器上所有入口流量的并发线程数达到阈值即触发系统保护。
-
入口 QPS:当单台机器上所有入口流量的 QPS 达到阈值即触发系统保护。
-
CPU使用率:当单台机器上所有入口流量的 CPU使用率达到阈值即触发系统保护。
@SentinelResource的使用
对于某个方法的调用限流,对于某个外部资源的调用限流等都希望做到控制。
那么如何使用@SentinelResource注解灵活的定义控制资源以及如何配置控制策略。
@Service
public class OrderMessageImpl {
@SentinelResource("message")
public String message(){
return "message";
}
}
Sentinel规则持久化
通过前面的讲解,我们已经知道,可以通过Dashboard来为每个Sentinel客户端设置各种各样的规 则,但是这里有一个问题,就是这些规则默认是存放在内存中,极不稳定,所以需要将其持久化。 本地文件数据源会定时轮询文件的变更,读取规则。这样我们既可以在应用本地直接修改文件来更 新规则,也可以通过 Sentinel 控制台推送规则。以本地文件数据源为例,
推送过程如下图所示:

首先 Sentinel 控制台通过 API 将规则推送至客户端并更新到内存中,接着注册的写数据源会将新的 规则保存到本地的文件中。
1 编写处理类
package com.ljj.config;

import com.alibaba.csp.sentinel.command.handler.ModifyParamFlowRulesCommandHandler;
import com.alibaba.csp.sentinel.datasource.*;
import com.alibaba.csp.sentinel.init.InitFunc;
import com.alibaba.csp.sentinel.slots.block.authority.AuthorityRule;
import com.alibaba.csp.sentinel.slots.block.authority.AuthorityRuleManager;
import com.alibaba.csp.sentinel.slots.block.degrade.DegradeRule;
import com.alibaba.csp.sentinel.slots.block.degrade.DegradeRuleManager;
import com.alibaba.csp.sentinel.slots.block.flow.FlowRule;
import com.alibaba.csp.sentinel.slots.block.flow.FlowRuleManager;
import com.alibaba.csp.sentinel.slots.block.flow.param.ParamFlowRule;
import com.alibaba.csp.sentinel.slots.block.flow.param.ParamFlowRuleManager;
import com.alibaba.csp.sentinel.slots.system.SystemRule;
import com.alibaba.csp.sentinel.slots.system.SystemRuleManager;
import com.alibaba.csp.sentinel.transport.util.WritableDataSourceRegistry;
import com.alibaba.fastjson.JSON;
import com.alibaba.fastjson.TypeReference;
import org.springframework.beans.factory.annotation.Value;

import java.io.File;
import java.io.IOException;
import java.util.List;


public class FilePersistence implements InitFunc {

    @Override
    public void init() throws Exception {
        String ruleDir = System.getProperty("user.home") + "/sentinel-rules/shopex";
        String flowRulePath = ruleDir + "/flow-rule.json";
        String degradeRulePath = ruleDir + "/degrade-rule.json";
        String systemRulePath = ruleDir + "/system-rule.json";
        String authorityRulePath = ruleDir + "/authority-rule.json";
        String paramFlowRulePath = ruleDir + "/param-flow-rule.json";

        this.mkdirIfNotExits(ruleDir);
        this.createFileIfNotExits(flowRulePath);
        this.createFileIfNotExits(degradeRulePath);
        this.createFileIfNotExits(systemRulePath);
        this.createFileIfNotExits(authorityRulePath);
        this.createFileIfNotExits(paramFlowRulePath);

        // 流控规则
        ReadableDataSource<String, List<FlowRule>> flowRuleRDS = new FileRefreshableDataSource<>(
                flowRulePath,
                flowRuleListParser
        );
        FlowRuleManager.register2Property(flowRuleRDS.getProperty());
        WritableDataSource<List<FlowRule>> flowRuleWDS = new FileWritableDataSource<>(
                flowRulePath,
                this::encodeJson
        );
        WritableDataSourceRegistry.registerFlowDataSource(flowRuleWDS);

        // 降级规则
        ReadableDataSource<String, List<DegradeRule>> degradeRuleRDS = new FileRefreshableDataSource<>(
                degradeRulePath,
                degradeRuleListParser
        );
        DegradeRuleManager.register2Property(degradeRuleRDS.getProperty());
        WritableDataSource<List<DegradeRule>> degradeRuleWDS = new FileWritableDataSource<>(
                degradeRulePath,
                this::encodeJson
        );
        WritableDataSourceRegistry.registerDegradeDataSource(degradeRuleWDS);

        // 系统规则
        ReadableDataSource<String, List<SystemRule>> systemRuleRDS = new FileRefreshableDataSource<>(
                systemRulePath,
                systemRuleListParser
        );
        SystemRuleManager.register2Property(systemRuleRDS.getProperty());
        WritableDataSource<List<SystemRule>> systemRuleWDS = new FileWritableDataSource<>(
                systemRulePath,
                this::encodeJson
        );
        WritableDataSourceRegistry.registerSystemDataSource(systemRuleWDS);

        // 授权规则
        ReadableDataSource<String, List<AuthorityRule>> authorityRuleRDS = new FileRefreshableDataSource<>(
                authorityRulePath,
                authorityRuleListParser
        );
        AuthorityRuleManager.register2Property(authorityRuleRDS.getProperty());
        WritableDataSource<List<AuthorityRule>> authorityRuleWDS = new FileWritableDataSource<>(
                authorityRulePath,
                this::encodeJson
        );
        WritableDataSourceRegistry.registerAuthorityDataSource(authorityRuleWDS);

        // 热点参数规则
        ReadableDataSource<String, List<ParamFlowRule>> paramFlowRuleRDS = new FileRefreshableDataSource<>(
                paramFlowRulePath,
                paramFlowRuleListParser
        );
        ParamFlowRuleManager.register2Property(paramFlowRuleRDS.getProperty());
        WritableDataSource<List<ParamFlowRule>> paramFlowRuleWDS = new FileWritableDataSource<>(
                paramFlowRulePath,
                this::encodeJson
        );
        ModifyParamFlowRulesCommandHandler.setWritableDataSource(paramFlowRuleWDS);
    }

    private Converter<String, List<FlowRule>> flowRuleListParser = source -> JSON.parseObject(
            source,
            new TypeReference<List<FlowRule>>() {
            }
    );
    private Converter<String, List<DegradeRule>> degradeRuleListParser = source -> JSON.parseObject(
            source,
            new TypeReference<List<DegradeRule>>() {
            }
    );
    private Converter<String, List<SystemRule>> systemRuleListParser = source -> JSON.parseObject(
            source,
            new TypeReference<List<SystemRule>>() {
            }
    );

    private Converter<String, List<AuthorityRule>> authorityRuleListParser = source -> JSON.parseObject(
            source,
            new TypeReference<List<AuthorityRule>>() {
            }
    );

    private Converter<String, List<ParamFlowRule>> paramFlowRuleListParser = source -> JSON.parseObject(
            source,
            new TypeReference<List<ParamFlowRule>>() {
            }
    );

    private void mkdirIfNotExits(String filePath) throws IOException {
        File file = new File(filePath);
        if (!file.exists()) {
            file.mkdirs();
        }
    }

    private void createFileIfNotExits(String filePath) throws IOException {
        File file = new File(filePath);
        if (!file.exists()) {
            file.createNewFile();
        }
    }

    private <T> String encodeJson(T t) {
        return JSON.toJSONString(t);
    }
}
2 添加配置
在resources下创建配置目录META-INF/services ,然后添加文件
com.alibaba.csp.sentinel.init.InitFunc
在文件中添加配置类的全路径
com.ljj.config.FilePersistence
Feign整合Sentinel
第1步: 引入sentinel的依赖
<!--sentinel-->
<dependency>
<groupId>com.alibaba.cloud</groupId>
<artifactId>spring-cloud-starter-alibaba-sentinel</artifactId>
</dependency>
第2步: 在配置文件中开启Feign对Sentinel的支持
# 开启feign对sentinel的支持
feign:
sentinel:
enabled: true
第3步: 创建容错类
package com.ljj.service;

import com.ljj.domain.Product;
import lombok.extern.slf4j.Slf4j;
import org.springframework.stereotype.Component;

//容错类要求必须实现被容错的接口,并为每个方法实现容错方案
@Component
@Slf4j
public class ProductServiceFallBack implements ProductService {
    @Override
    public Product findByPid(Integer pid) {
        Product product = new Product();
        product.setPid(-1);
        return product;
    }
}
第4步: 为被容器的接口指定容错类
//@FeignClient("service-product")//声明调用的提供者的name
//value用于指定调用nacos下哪个微服务
//fallback用于指定容错类
@FeignClient(value = "service-product", fallback = ProductServiceFallBack.class)
public interface ProductService {
//指定调用提供者的哪个方法
//@FeignClient+@GetMapping 就是一个完整的请求路径
//http://serviceproduct/product/{pid}
@GetMapping(value = "/product/{pid}")
Product findByPid(@PathVariable("pid") Integer pid);
}
第5步: 修改controller
package com.ljj.controller;

import com.alibaba.fastjson.JSON;
import com.zking.domain.Order;
import com.zking.domain.Product;
import com.zking.service.OrderService;
import com.zking.service.ProductService;
import lombok.extern.slf4j.Slf4j;
import org.springframework.beans.factory.annotation.Autowired;
import org.springframework.cloud.client.ServiceInstance;
import org.springframework.cloud.client.discovery.DiscoveryClient;
import org.springframework.web.bind.annotation.GetMapping;
import org.springframework.web.bind.annotation.PathVariable;
import org.springframework.web.bind.annotation.RequestMapping;
import org.springframework.web.bind.annotation.RestController;
import org.springframework.web.client.RestTemplate;

import java.util.List;
import java.util.Random;

@RestController
@Slf4j
public class OrderController {
    @Autowired
    private OrderService orderService;
    @Autowired
    private ProductService productService;

    //下单--fegin
    @RequestMapping("/order/prod/{pid}")
    public Order order(@PathVariable("pid") Integer pid) {
        log.info("接收到{}号商品的下单请求,接下来调用商品微服务查询此商品信息", pid);
        //调用商品微服务,查询商品信息
        Product product = productService.findByPid(pid);
        if (product.getPid() == -1) {
            Order order = new Order();
            order.setPname("下单失败");
            log.info("*******下单失败!稍后重试!");
            return order;
        }
        log.info("查询到{}号商品的信息,内容是:{}", pid, JSON.toJSONString(product));
        //下单(创建订单)
        Order order = new Order();
        order.setUid(1);
        order.setUsername("测试用户");
        order.setPid(pid);
        order.setPname(product.getPname());
        order.setPprice(product.getPprice());
        order.setNumber(1);
        orderService.createOrder(order);
        log.info("创建订单成功,订单信息为{}", JSON.toJSONString(order));
        try {
            Thread.sleep(100);
        } catch (InterruptedException e) {
            e.printStackTrace();
        }
        return order;
    }
}
第6步: 停止所有shop-product 服务,重启shop-order 服务,访问请求,观察容错效果 扩展: 如果想在容错类中拿到具体的错误,可以使用下面的方式
@RequestMapping("/order/prod/{pid}")
public Order order(@PathVariable("pid") Integer pid) {
log.info("接收到{}号商品的下单请求,接下来调用商品微服务查询此商品信息", pid);
//调用商品微服务,查询商品信息
Product product = productService.findByPid(pid);
if (product.getPid() == -1) {
Order order = new Order();
order.setPname("下单失败");
return order;
}
log.info("查询到{}号商品的信息,内容是:{}", pid, JSON.toJSONString(product));
//下单(创建订单)
Order order = new Order();
order.setUid(1);
order.setUsername("测试用户");
order.setPid(pid);
order.setPname(product.getPname());
order.setPprice(product.getPprice());
order.setNumber(1);
orderService.createOrder(order);
log.info("创建订单成功,订单信息为{}", JSON.toJSONString(order));
try {
Thread.sleep(100);
} catch (InterruptedException e) {
e.printStackTrace();
}
return order;
}
}
注意: fallback和fallbackFactory只能使用其中一种方式
网关限流
网关是所有请求的公共入口,所以可以在网关进行限流,而且限流的方式也很多,我们本次采用前 面学过的Sentinel组件来实现网关的限流。Sentinel支持对SpringCloud Gateway、Zuul等主流网关进 行限流。
从1.6.0版本开始,Sentinel提供了SpringCloud Gateway的适配模块,可以提供两种资源维度的限流:
-
route维度:即在Spring配置文件中配置的路由条目,资源名为对应的routeId
-
自定义API维度:用户可以利用Sentinel提供的API来自定义一些API分组
1.导入依赖
<dependency>
<groupId>com.alibaba.csp</groupId>
<artifactId>sentinel-spring-cloud-gateway-adapter</artifactId>
</dependency>
2 编写配置类 基于Sentinel 的Gateway限流是通过其提供的Filter来完成的,使用时只需注入对应的 SentinelGatewayFilter实例以及 SentinelGatewayBlockExceptionHandler 实例即可。
package com.ljj.config;

import com.alibaba.csp.sentinel.adapter.gateway.common.SentinelGatewayConstants;
import com.alibaba.csp.sentinel.adapter.gateway.common.api.ApiDefinition;
import com.alibaba.csp.sentinel.adapter.gateway.common.api.ApiPathPredicateItem;
import com.alibaba.csp.sentinel.adapter.gateway.common.api.ApiPredicateItem;
import com.alibaba.csp.sentinel.adapter.gateway.common.api.GatewayApiDefinitionManager;
import com.alibaba.csp.sentinel.adapter.gateway.common.rule.GatewayFlowRule;
import com.alibaba.csp.sentinel.adapter.gateway.common.rule.GatewayRuleManager;
import com.alibaba.csp.sentinel.adapter.gateway.sc.SentinelGatewayFilter;
import com.alibaba.csp.sentinel.adapter.gateway.sc.callback.BlockRequestHandler;
import com.alibaba.csp.sentinel.adapter.gateway.sc.callback.GatewayCallbackManager;
import com.alibaba.csp.sentinel.adapter.gateway.sc.exception.SentinelGatewayBlockExceptionHandler;
import org.springframework.beans.factory.ObjectProvider;
import org.springframework.cloud.gateway.filter.GlobalFilter;
import org.springframework.context.annotation.Bean;
import org.springframework.context.annotation.Configuration;
import org.springframework.core.Ordered;
import org.springframework.core.annotation.Order;
import org.springframework.http.HttpStatus;
import org.springframework.http.MediaType;
import org.springframework.http.codec.ServerCodecConfigurer;
import org.springframework.web.reactive.function.BodyInserters;
import org.springframework.web.reactive.function.server.ServerResponse;
import org.springframework.web.reactive.result.view.ViewResolver;
import org.springframework.web.server.ServerWebExchange;
import reactor.core.publisher.Mono;

import javax.annotation.PostConstruct;
import java.util.*;

@Configuration
public class GatewayConfiguration {
    private final List<ViewResolver> viewResolvers;

    private final ServerCodecConfigurer serverCodecConfigurer;

    public GatewayConfiguration(ObjectProvider<List<ViewResolver>> viewResolversProvider,
                                ServerCodecConfigurer serverCodecConfigurer) {
        this.viewResolvers = viewResolversProvider.getIfAvailable(Collections::emptyList);
        this.serverCodecConfigurer = serverCodecConfigurer;
    }

    // 初始化一个限流的过滤器
    @Bean
    @Order(Ordered.HIGHEST_PRECEDENCE)
    public GlobalFilter sentinelGatewayFilter() {
        return new SentinelGatewayFilter();
    }

    // 配置初始化的限流参数
    @PostConstruct
    public void initGatewayRules() {
        Set<GatewayFlowRule> rules = new HashSet<>();
        rules.add(
                new GatewayFlowRule("product_route") //资源名称,对应路由id
                        .setCount(1) // 限流阈值
                        .setIntervalSec(1) // 统计时间窗口,单位是秒,默认是 1 秒
        );
        GatewayRuleManager.loadRules(rules);
    }

    // 配置限流的异常处理器
    @Bean
    @Order(Ordered.HIGHEST_PRECEDENCE)
    public SentinelGatewayBlockExceptionHandler sentinelGatewayBlockExceptionHandler() {
        return new SentinelGatewayBlockExceptionHandler(viewResolvers, serverCodecConfigurer);
    }

    // 自定义限流异常页面
    @PostConstruct
    public void initBlockHandlers() {
        BlockRequestHandler blockRequestHandler = new BlockRequestHandler() {
            public Mono<ServerResponse> handleRequest(ServerWebExchange serverWebExchange, Throwable throwable) {
                Map map = new HashMap<>();
                map.put("code", 0);
                map.put("message", "接口被限流了");
                return ServerResponse.status(HttpStatus.OK).
                        contentType(MediaType.APPLICATION_JSON_UTF8).
                        body(BodyInserters.fromObject(map));
            }
        };
        GatewayCallbackManager.setBlockHandler(blockRequestHandler);
    }

}
3 测试 在一秒钟内多次访问http://localhost:7000/shop-product/product/1就可以看到限流启作用了。
4 自定义API分组 自定义API分组是一种更细粒度的限流规则定义
    // 配置初始化的限流参数
    @PostConstruct
    public void initGatewayRules() {
//        Set<GatewayFlowRule> rules = new HashSet<>();
//        rules.add(
//                new GatewayFlowRule("product_route") //资源名称,对应路由id
//                        .setCount(1) // 限流阈值
//                        .setIntervalSec(1) // 统计时间窗口,单位是秒,默认是 1 秒
//        );
//        GatewayRuleManager.loadRules(rules);


        Set<GatewayFlowRule> rules = new HashSet<>();
        rules.add(new GatewayFlowRule("product_api1").setCount(1).setIntervalSec(1));
        rules.add(new GatewayFlowRule("product_api2").setCount(1).setIntervalSec(1));
        GatewayRuleManager.loadRules(rules);
    }

   //自定义API分组
    @PostConstruct
    private void initCustomizedApis() {
        Set<ApiDefinition> definitions = new HashSet<>();
        ApiDefinition api1 = new ApiDefinition("product_api1")
                .setPredicateItems(new HashSet<ApiPredicateItem>() {{
                    // 以/product-serv/product/api1 开头的请求
                    add(new ApiPathPredicateItem().setPattern("/product-serv/product/api1/**").
                            setMatchStrategy(SentinelGatewayConstants.URL_MATCH_STRATEGY_PREFIX));
                }});
        ApiDefinition api2 = new ApiDefinition("product_api2")
                .setPredicateItems(new HashSet<ApiPredicateItem>() {{
                    // 以/product-serv/product/api2/demo1 完成的url路径匹配
                    add(new ApiPathPredicateItem().setPattern("/product-serv/product/api2/demo1"));
                }});
        definitions.add(api1);
        definitions.add(api2);
        GatewayApiDefinitionManager.loadApiDefinitions(definitions);
    }


![[附源码]计算机毕业设计常见Web漏洞对应PC应用系统Springboot程序](https://img-blog.csdnimg.cn/dd5be5cf2f784ed7ae4a5023f7aa6eb5.png)


![[附源码]计算机毕业设计贷款申请审核管理系统论文Springboot程序](https://img-blog.csdnimg.cn/f0a73885fe66475ba826e0f6c8ac4f3a.png)
