一、
如果文件夹路径是 path/to/folder with spaces/,使用以下方式输入
path/to/folder\ with\ spaces/
或者使用引号包裹路径:
"path/to/folder with spaces/"
这样可以确保命令行正确解析文件夹路径,并将空格作为路径的一部分进行处理。
二、
DataLoader(object):
class DataLoader(object):
    def __next__(self):
        if self.num_workers == 0:
            indices = next(self.sample_iter)  # Sampler
            batch = self.collate_fn([self.dataset[i] for i in indices]) # Dataset
            if self.pin_memory:
                batch = _utils.pin_memory.pin_memory_batch(batch)
            return batch

train_loader = torch.utils.data.DataLoader(train_data, batch_size=args.batch_size, shuffle=True,
                                               num_workers=args.workers, pin_memory=True)
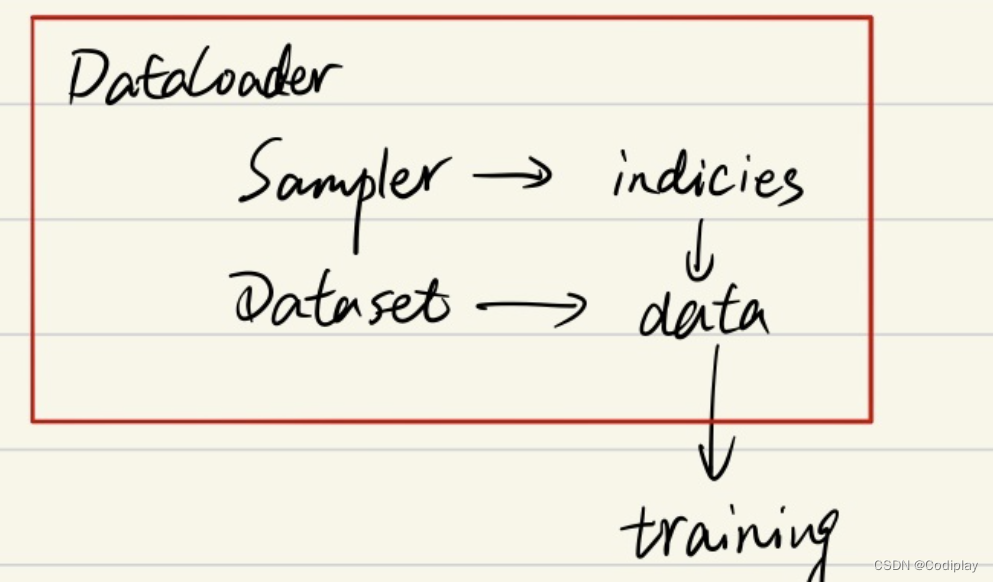
假设我们的数据是一组图像,每一张图像对应一个index,那么如果我们要读取数据就只需要对应的index即可,即上面代码中的indices,而选取index的方式有多种,有按顺序的,也有乱序的,所以这个工作需要Sampler完成.
下面一行。我们已经拿到了indices,那么下一步我们只需要根据index对数据进行读取即可了。
再下面的if语句的作用简单理解就是,如果pin_memory=True,那么Pytorch会采取一系列操作把数据拷贝到GPU,总之就是为了加速。
pytorch源码描述:
sampler (Sampler or Iterable, optional): defines the strategy to draw
samples from the dataset. Can be anyIterablewith__len__
implemented. If specified, :attr:shufflemust not be specified.
对应代码:可见:所有的exception都可以从源码中找到if sampler is not None and shuffle: raise ValueError('sampler option is mutually exclusive with ' 'shuffle')
sampler和batch_sampler,都默认为None。前者的作用是生成一系列的index,而batch_sampler则是将sampler生成的indices打包分组,得到一个又一个batch的index。

若shuffle=True,则sampler=RandomSampler(dataset)
若shuffle=False,则sampler=SequentialSampler(dataset)Sequential Sampler产生的索引是顺序索引
所以当
data = list([17, 22, 3, 41, 8])
seq_sampler = sampler.SequentialSampler(data_source=data)
# ran_sampler = sampler.RandomSampler(data_source=data)
for index in seq_sampler: # sampler就是产生index的
    print("index: {}, data: {}".format(str(index), str(data[index])))
# SequentialSampler
index: 0, data: 17
index: 1, data: 22
index: 2, data: 3
index: 3, data: 41
index: 4, data: 8
# RandomSampler
index: 0, data: 17
index: 2, data: 3
index: 3, data: 41
index: 4, data: 8
index: 1, data: 22
SubsetRandomSampler:
SubsetRandomSampler(Sampler):
    Samples elements randomly from a given list of indices, without replacement.
    Arguments:
        indices (sequence): a sequence of indices
    def __init__(self, indices):
        self.indices = indices

    def __iter__(self):
        return (self.indices[i] for i in torch.randperm(len(self.indices)))


    def __len__(self):
        return len(self.indices)
这个采样器常见的使用场景是将训练集划分成训练集和验证集,示例如下:(记住)
n_train = len(train_dataset)
split = n_train // 3
indices = random.shuffle(list(range(n_train)))
train_sampler = torch.utils.data.sampler.SubsetRandomSampler(indices[split:])
valid_sampler = torch.utils.data.sampler.SubsetRandomSampler(indices[:split])
train_loader = DataLoader(..., sampler=train_sampler, ...)
valid_loader = DataLoader(..., sampler=valid_sampler, ...)
subsetRandomSampler应该用于训练集、测试集和验证集的划分,下面将data划分为train和val两个部分,iter()返回的的不是索引,而是索引对应的数据:
iter()返回的并不是随机数序列,而是通过随机数序列作为indices的索引,进而返回打乱的数据本身
sub_sampler_train = sampler.SubsetRandomSampler(indices=data[0:2])
sub_sampler_val = sampler.SubsetRandomSampler(indices=data[2:])
# Train的输出:
index: 17
index: 22
######
# Val的输出
index: 8
index: 41
index: 3
其实是没有SubSequentialSampler的:
ImportError: cannot import name 'SubsetSequentialSampler' from 'torch.utils.data.sampler'
最终代码:
用上面乱七八糟的:
import torchvision
import torchvision.transforms as transforms
from torch.utils.data import DataLoader, random_split

# 数据预处理
transform = transforms.Compose([
    transforms.ToTensor(),  # 转为Tensor类型
    transforms.Normalize((0.5, 0.5, 0.5), (0.5, 0.5, 0.5))  # 数据归一化
])

# 加载完整的训练集
dataset = torchvision.datasets.CIFAR10(root='./data', train=True, download=True, transform=transform)

#写一个子类SubsetSequentialSampler
train_index_sampler = SubsetRandomSampler
  class SubsetSequentialSampler(SubsetRandomSampler):
      def __iter__(self):
          return (self.indices[i] for i in torch.arange(len(self.indices)).int())
val_index_sampler = SubsetSequentialSampler

train_n = len(dataset)
indices = list(range(train_n))
val_size =  int(train_n * 0.2)
train_size = train_n - val_size
np.random.seed(10)
np.random.shuffle(indices)
train_idx, val_idx = indices[val_size:], indices[:val_size]
train_sampler = SubsetRandoomSampler(train_idx)
val_sampler = val_index_sampler(val_idx)

train_dataloader = torch.utils.data.DataLoader(trainset, batch_size=batch_size,num_workers=num_workers,sampler=train_sampler)
val_dataloader = torch.utils.data.DataLoader(validset, batch_size=batch_size,num_workers=num_workers,sampler=val_sampler)
test_dataloader = torch.utils.data.DataLoader(testset, batch_size=batch_size,num_workers=num_workers)
干脆不用!!太麻烦了!!还是random_split爽:
import torchvision
import torchvision.transforms as transforms
from torch.utils.data import DataLoader, random_split

# 数据预处理
transform = transforms.Compose([
    transforms.ToTensor(),  # 转为Tensor类型
    transforms.Normalize((0.5, 0.5, 0.5), (0.5, 0.5, 0.5))  # 数据归一化
])

# 加载完整的训练集
dataset = torchvision.datasets.CIFAR10(root='./data', train=True, download=True, transform=transform)

# 将训练集分割为训练集和验证集
train_size = int(0.8 * len(dataset))
valid_size = len(dataset) - train_size
trainset, validset = random_split(dataset, [train_size, valid_size])

# 创建数据加载器
trainloader = DataLoader(trainset, batch_size=64, shuffle=True, num_workers=2)
validloader = DataLoader(validset, batch_size=64, shuffle=False, num_workers=2)

# 加载测试集
testset = torchvision.datasets.CIFAR10(root='./data', train=False, download=True, transform=transform)
testloader = DataLoader(testset, batch_size=64, shuffle=False, num_workers=2)





![Failed to start connector [Connector[HTTP/1.1-8080]]](https://img-blog.csdnimg.cn/7673761ee2c244c9bb129d8a75b399f2.png)
