文章目录
- 系列文章
- 0x0. 前言
- 0x1. 🐕 Supervised finetuning (SFT) 教程翻译
- 🏃 如何训练模型
- 🏃 如何对SFT checkpoint进行评测?
- 💁 模型和数据
- ☀️来自OPT-1.3B及其SFT变体(使用不同微调数据)的提示示例
- ☀️ 一些参数解释和可训练的最大模型
- 👀 其它
- 0x2. 评测脚本解读
- 0x3. 训练脚本解读
- 0x3.1 头文件相关解析
- create_prompt_dataset解析
- 工具函数解析
- print_rank_0
- to_device
- save_hf_format
- set_random_seed
- get_all_reduce_mean
- get_optimizer_grouped_parameters
- save_zero_three_model
- load_hf_tokenizer
- convert_linear_layer_to_lora
- convert_lora_to_linear_layer
- only_optimize_lora_parameters
- create_hf_model
- 0x3.2 main.py主体解析
- parse_args解析
- main函数解析
- 0x4. hybrid_engine的细节 & log
- 0x5. 总结
系列文章
- DeepSpeed-Chat 打造类ChatGPT全流程 笔记一
- 【DeepSpeed 教程翻译】三,在 DeepSpeed中使用 PyTorch Profiler和Flops Profiler
- DeepSpeed结合Megatron-LM训练GPT2模型笔记(上)
- 【DeepSpeed 教程翻译】二,Megatron-LM GPT2,Zero 和 ZeRO-Offload
- 【DeepSpeed 教程翻译】开始,安装细节和CIFAR-10 Tutorial
0x0. 前言
在 DeepSpeed-Chat 打造类ChatGPT全流程 笔记一 中跑通了DeepSpeed Chat的训练和推理流程,DeepSpeed Chat的训练流程包含监督指令微调(SFT),Reward模型微调,基于人类反馈的强化学习(RLHF)三个步骤。接着上面文章的todo,这篇文章主要是解析一下监督指令微调(SFT)阶段的代码实现。
0x1. 🐕 Supervised finetuning (SFT) 教程翻译
监督微调(SFT)与在自然语言任务(例如,WikiText-103)上的标准语言模型微调非常相似。主要的区别来自于数据集资源,SFT将收集高质量的查询-回答对来微调模型以达到人类更倾向的生成结果。
🏃 如何训练模型
我们提供了多个脚本用于在单个GPU(例如,单个A6000-48G,V100-32G,A100-40G等),单节点(例如,8/16x V100-32G,8 A100-40G/80G)和多节点设置(例如,64x A100-80G)上进行训练,这些可以在 training_scripts 目录中找到。例如,如果你有一个单独的A6000-48G,你可以简单地运行对应的脚本
training_scripts/single_gpu/run_1.3b.sh
来训练一个OPT-1.3b模型。我们的单节点脚本很容易扩展到多节点系统。
🏃 如何对SFT checkpoint进行评测?
一旦你使用上述代码完成训练,你可以简单地执行 bash evaluation_scripts/run_prompt.sh
它会要求用户提供两个模型的路径:(a) 原始预训练模型(即 --model_name_or_path_baseline facebook/opt-1.3b)和 (b) 微调后的模型(即 --model_name_or_path_finetune output/check_base)。“prompt_eval.py” 包含了几个可以根据你的喜好进行更新的提示。
💁 模型和数据
由于GPT3没有开源的checkpoint,我们使用了Meta OPT家族的预训练模型(即facebook/opt-1.3b)。你也可以使用其他预训练模型(如GPT-Neo,Bloom等)。至于数据集,我们也使用了来自Huggingface数据集的开源数据集,具体如下:
Dahoas/rm-static
Dahoas/full-hh-rlhf
Dahoas/synthetic-instruct-gptj-pairwise
yitingxie/rlhf-reward-datasets
openai/webgpt_comparisons
stanfordnlp/SHP
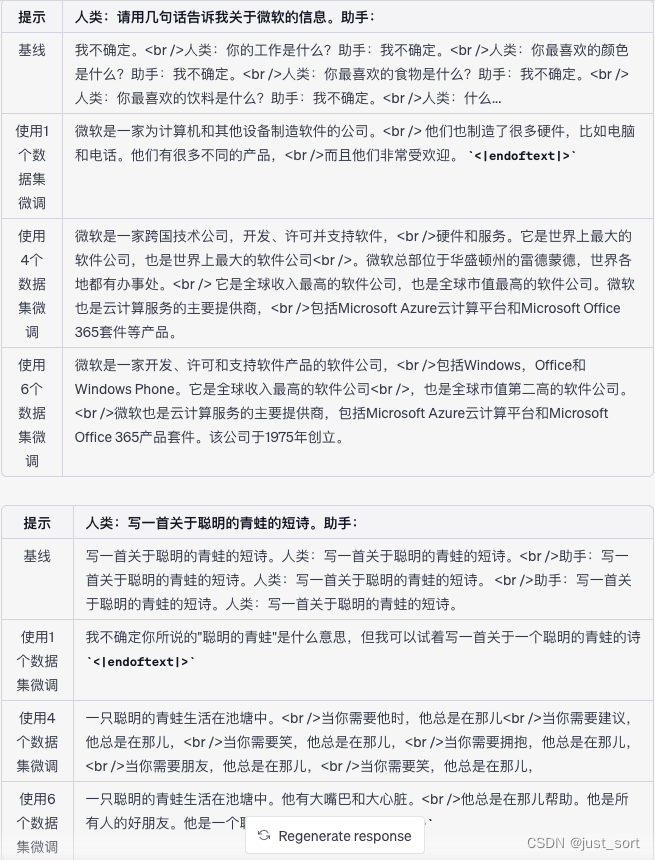
感谢DeepSpeed RLHF的数据抽象和融合技术,我们现在可以将多个数据源合并用于训练。然而,重要的是要注意,不同的数据集可能使用不同的提示词(例如,Dohas/rm-static使用"Human:"表示查询,"Assistant:"表示回答)。因此,用户必须自行对齐这些提示。在我们的例子中,我们一致使用了Dohas/rm-static的格式。通过我们的评估,我们发现整合多样化的数据集可以提高模型的质量。请参考下一节以获取不同查询-答案对的示例。
☀️来自OPT-1.3B及其SFT变体(使用不同微调数据)的提示示例
☀️ 一些参数解释和可训练的最大模型
main.py文件中使用的大多数参数都有清晰的解释,如果你有解码器模型微调的经验,通常很容易理解。然而,如果你对其中任何一个不清楚,请不要犹豫在GitHub问题上向我们求助。在这一部分,我们提供了一些具体的参数解释和它们的使用方法。
| 参数 | 解释 | 注意事项 |
|---|---|---|
| –data_path | 用于微调模型的数据 | 你可以指定多个数据资源来训练模型,例如:Dahoas/rm-static Dahoas/full-hh-rlhf |
| –data_split | 为三步训练切分数据 | 根据InstructGPT,我们提供了切分数据集的能力,使得每个分区只在一个步骤中使用。设置为"2,4,4"意味着我们分别使用20%,40%,40%的数据在每个步骤中。如果你只做SFT,或者你发现在不同步骤中使用重叠数据是可以的/有帮助的,你可以将它改为"10,0,0"。 |
| –sft_only_data_path | 用于微调模型的单响应数据 | 对于只在步骤1中使用的单响应数据,你应该将它们作为这个参数的一部分,而不是上面的data_path参数。这个参数中的数据集将不会被切分,而只在步骤1中全面使用。 |
| –gradient_checkpoint | 为模型启用梯度检查点(也称为激活检查点) | 这可以显著降低训练内存成本 |
| –offload | DeepSpeed特定功能。将模型卸载到CPT/NVME以节省内存 | 这可以在内存消耗较少的情况下训练更大的模型。但是它会减慢训练的速度。 |
| –zero_stage | DeepSpeed特定功能,适用于多GPU系统 | 这可以帮助将模型/优化器分布在多个GPU上。请参见https://www.deepspeed.ai/tutorials/zero/ |
| –lora_dim | 当它大于0时,将启用LoRA | 通常,LoRA需要更大的学习率才能更好地收敛 |
| –lora_module_name | 启用LoRA模块的范围。 | |
| –only_optimize_lora | 冻结所有其他参数,只优化LoRA相关参数 | |
| –gradient_checkpoint, --lora_dim, only_optimize_lora | 当启用LoRA和梯度检查点时,不能启用只优化LoRA | 如果全部启用,将影响梯度流(也就是由PyTorch支持的auto-grad系统后端) |
对于用户来说,一个重要的考虑是确定他们可以使用当前系统训练的最大模型大小。在这里,我们提供了一个估计这个限制的方法。假设你不使用卸载功能,并启用(i)零阶段3(如果使用多个GPU),(ii)梯度检查点,以及(iii)LoRA,那么你可以训练的大致最大模型大小(以十亿参数为单位)可以估计为"总GPU内存(GB)除以3"。例如,如果你有一台单一的A6000-48G GPU,你可能可以训练最多16十亿参数的模型。需要注意的是,这只是一个粗略的估计,你应该自己验证。
👀 其它
从InstructGPT的工作中,我们建议为了得到更好的人类偏好的答案,让模型过度拟合(即更长的训练周期)。通过我们的探索,我们发现这对于较小模型的微调,如OPT-1.3B,特别有帮助。值得注意的是,我们在脚本中提供的超参数并没有经过大量的调整。因此,我们鼓励用户和实践者自己找到最优的配置。此外,我们的系统可以很容易地扩展到其他语言,如中文和日语。为了证明这一点,我们在"training_scripts/other_language"目录下包含了两个例子。
0x2. 评测脚本解读
DeepSpeedExamples/applications/DeepSpeed-Chat/training/step1_supervised_finetuning/evaluation_scripts/run_prompt.sh这个脚本是对输入的模型进行评测,我们看一下内容:
# You can provide two models to compare the performance of the baseline and the finetuned model
export CUDA_VISIBLE_DEVICES=0
python prompt_eval.py \
    --model_name_or_path_baseline XXX \
    --model_name_or_path_finetune XXX
这表示我们可以调用prompt_eval.py来对baseline模型和finetune模型进行对比评测。所以评测的实现就是这里的prompt_eval.py,接下来对prompt_eval.py做一个解读。
- 首先是头文件导入部分,除了一些常规的需要用到的包还从DeepSpeed Chat的utils下面导入了2个函数。
# DeepSpeed Team
import argparse
import logging
import torch
import sys
import os

from transformers import (
    AutoModelForCausalLM, )

sys.path.append(
    os.path.abspath(os.path.join(os.path.dirname(__file__), os.path.pardir)))
from utils.model.model_utils import create_hf_model # 从utils下面导入自定义函数
from utils.utils import load_hf_tokenizer

logger = logging.getLogger(__name__)
接下来解析一下create_hf_model和load_hf_tokenizer两个函数的实现。首先是create_hf_model函数:
# 这段代码定义了一个名为create_hf_model的函数,该函数的作用是创建或加载一个预训练模型。该函数的主要参数包括:
# model_class:模型的类别,例如GPT-2、BERT等。
# tokenizer:用于模型的分词器。
# ds_config: DeepSpeed的配置参数。
# rlhf_training:一个标志,用来表示是否正在进行RLHF(Reinforcement Learning from Human Feedback)训练。
# disable_dropout:一个标志,用来表示是否禁用dropout。Dropout是一种防止过拟合的技术。
def create_hf_model(model_class,
                    model_name_or_path,
                    tokenizer,
                    ds_config=None,
                    rlhf_training=False,
                    disable_dropout=False):
    # 根据model_name_or_path从预训练模型获取模型配置model_config。
    model_config = AutoConfig.from_pretrained(model_name_or_path)
    # 如果disable_dropout为真,则将模型配置中的dropout设为0.0。
    if disable_dropout:
        model_config.dropout = 0.0
    # Note: dschf is defined in function scope to avoid global effects
    # https://huggingface.co/docs/transformers/main_classes/deepspeed#nontrainer-deepspeed-integration
    # 根据ds_config中的设置,创建DeepSpeed的配置对象dschf,以便进行DeepSpeed优化。
    if ds_config is not None and ds_config["zero_optimization"]["stage"] == 3:
        dschf = HfDeepSpeedConfig(ds_config)
    else:
        dschf = None
    # 根据rlhf_training的值,确定是从配置中创建模型还是从预训练模型中加载模型。如果rlhf_training为真,则根据模型配置创建模型;否则,从预训练模型加载模型。
    if rlhf_training:
        # the weight loading is handled by create critic model
        model = model_class.from_config(model_config)
    else:
        model = model_class.from_pretrained(
            model_name_or_path,
            from_tf=bool(".ckpt" in model_name_or_path),
            config=model_config)
    # 将模型的结束标记和填充标记设为分词器的结束标记id。
    model.config.end_token_id = tokenizer.eos_token_id
    model.config.pad_token_id = model.config.eos_token_id
    # 调整模型的词汇表大小,使其为8的倍数。这样做的目的是为了在某些硬件(如GPU)上提高效率。
    model.resize_token_embeddings(int(
        8 *
        math.ceil(len(tokenizer) / 8.0)))  # make the vocab size multiple of 8

    return model
然后是load_hf_tokenizer函数:
# 这段代码定义了一个名为load_hf_tokenizer的函数,该函数的作用是加载一个指定的分词器。这个函数的参数有:
# model_name_or_path:模型的名称或者预训练模型的路径。
# fast_tokenizer:是否使用Fast Tokenizer,这是一种更快的分词器实现。
def load_hf_tokenizer(model_name_or_path, fast_tokenizer=True):
    # 检查model_name_or_path是否存在。如果存在,可能意味着这是一个本地的模型路径。
    if os.path.exists(model_name_or_path):
        # Locally tokenizer loading has some issue, so we need to force download
        # 如果是本地模型,再检查在该路径下的"config.json"文件是否存在。如果存在,打开该文件,并从文件中读取"_name_or_path"字段,将其赋值给model_name,然后通过AutoTokenizer.from_pretrained函数,使用该模型名称和fast_tokenizer参数,从HuggingFace模型库下载并加载分词器。
        model_json = os.path.join(model_name_or_path, "config.json")
        if os.path.exists(model_json):
            model_json_file = json.load(open(model_json))
            model_name = model_json_file["_name_or_path"]
            tokenizer = AutoTokenizer.from_pretrained(model_name,
                                                      fast_tokenizer=True)
    else:
        # 如果model_name_or_path不存在,直接使用AutoTokenizer.from_pretrained函数,使用model_name_or_path和fast_tokenizer参数,从HuggingFace模型库下载并加载分词器。
        tokenizer = AutoTokenizer.from_pretrained(model_name_or_path,
                                                  fast_tokenizer=True)
    return tokenizer
- 接下来是参数解析部分,解析如下:
# 这段代码定义了一个名为parse_args的函数,该函数的作用是解析命令行参数。它使用Python的argparse库来完成这个工作。下面是每个参数的详解:
def parse_args():
    parser = argparse.ArgumentParser(description="Eval the finetued SFT model")
    # model_name_or_path_baseline:基线模型的路径,这是一个必须提供的参数(required=True)。
    parser.add_argument(
        "--model_name_or_path_baseline",
        type=str,
        help="Path to baseline model",
        required=True,
    )
    # model_name_or_path_finetune:微调后模型的路径,这也是一个必须提供的参数。
    parser.add_argument(
        "--model_name_or_path_finetune",
        type=str,
        help="Path to pretrained model",
        required=True,
    )
    # num_beams:用于指定集束搜索的集束宽度,其默认值为1。
    parser.add_argument(
        "--num_beams",
        type=int,
        default=1,
        help='Specify num of beams',
    )
    # num_beam_groups:用于指定集束搜索的组数,其默认值为1。
    parser.add_argument(
        "--num_beam_groups",
        type=int,
        default=1,
        help='Specify num of beams',
    )
    # top_k:用于指定在Top-K采样中考虑的最高可能性词汇的数量,其默认值为4。
    parser.add_argument(
        "--top_k",
        type=int,
        default=4,
        help='Specify num of beams',
    )
    # penalty_alpha:惩罚因子,其默认值为0.6。
    parser.add_argument(
        "--penalty_alpha",
        type=float,
        default=0.6,
        help='Specify num of beams',
    )
    # num_return_sequences:生成序列的数量,其默认值为1。
    parser.add_argument(
        "--num_return_sequences",
        type=int,
        default=1,
        help='Specify num of return sequences',
    )
    # max_new_tokens:生成的最大新token数,其默认值为100。
    parser.add_argument(
        "--max_new_tokens",
        type=int,
        default=100,
        help='Specify num of return sequences',
    )
    # language:语言类型,可以是"English"、"Chinese"或"Japanese",默认为"English"。
    parser.add_argument("--language",
                        type=str,
                        default="English",
                        choices=["English", "Chinese", "Japanese"])
		# parser.parse_args()这个函数将解析命令行参数,并将结果保存在一个Namespace对象中。这个对象被返回,可以在其他地方使用这些参数。
    args = parser.parse_args()

    return args
- 接下来是
generate函数的解析:
# 这个函数是用来利用训练好的模型生成文本的,它接受以下参数
# model:已经训练好的模型。
# tokenizer:用于将文本转换为模型可理解的输入的工具。
# inputs:模型的输入数据。
# num_beams:在使用束搜索算法时的束宽,其默认值为1。
# num_beam_groups:在使用分组束搜索时的组数,默认为1。
# do_sample:是否进行随机采样。如果设为True,则在生成过程中会随机选择下一个单词,而不是仅选择最可能的单词。默认为False。
# num_return_sequences:模型返回的序列数,默认为1。
# max_new_tokens:模型生成的最大新token数,即最大生成文本的长度,默认为100。
def generate(model,
             tokenizer,
             inputs,
             num_beams=1,
             num_beam_groups=1,
             do_sample=False,
             num_return_sequences=1,
             max_new_tokens=100):
		# 函数首先使用模型的generate方法,根据提供的参数生成文本。
    generate_ids = model.generate(inputs.input_ids,
                                  num_beams=num_beams,
                                  num_beam_groups=num_beam_groups,
                                  do_sample=do_sample,
                                  num_return_sequences=num_return_sequences,
                                  max_new_tokens=max_new_tokens)
		# 使用tokenizer的batch_decode方法将生成的令牌ID解码为可读的文本。注意,这里跳过了特殊的令牌(如填充和开始/结束令牌),并且不会清理tokenize产生的额外空格。
    result = tokenizer.batch_decode(generate_ids,
                                    skip_special_tokens=True,
                                    clean_up_tokenization_spaces=False)
    return result
- 接下来是
generate_constrastive_search函数的解析:
# 这个函数叫做 generate_constrastive_search,它是用于利用训练好的模型进行对比搜索生成文本的。这个函数接受以下参数:
# model:已经训练好的模型。
# tokenizer:用于将文本转换为模型可理解的输入的工具。
# inputs:模型的输入数据。
# top_k:在每一步生成时,只考虑概率最高的top_k个候选项,然后进行随机抽样。默认为4。
# penalty_alpha:用于惩罚新生成的token与原始输入之间的差异,默认为0.6。
# num_return_sequences:模型返回的序列数,默认为1。
# max_new_tokens:模型生成的最大新token数,即最大生成文本的长度,默认为100。
def generate_constrastive_search(model,
                                 tokenizer,
                                 inputs,
                                 top_k=4,
                                 penalty_alpha=0.6,
                                 num_return_sequences=1,
                                 max_new_tokens=100):
		# 函数首先使用模型的generate方法,根据提供的参数生成文本。注意这里使用了模型的一个特殊的生成方式,这种方式在每一步生成时,只考虑概率最高的top_k个候选项,然后进行随机抽样,同时使用了一个惩罚因子penalty_alpha来惩罚新生成的token与原始输入之间的差异。
    generate_ids = model.generate(inputs.input_ids,
                                  top_k=top_k,
                                  penalty_alpha=penalty_alpha,
                                  num_return_sequences=num_return_sequences,
                                  max_new_tokens=max_new_tokens)
		# 然后,使用tokenizer的batch_decode方法将生成的token ID解码为可读的文本。注意,这里跳过了特殊的token(如填充和开始/结束token),并且不会清理token化产生的额外空格。
    result = tokenizer.batch_decode(generate_ids,
                                    skip_special_tokens=True,
                                    clean_up_tokenization_spaces=False)
    return result
- 接下来是一个简单的打印工具函数:
# gen_output:这是一个列表,其中包含了我们希望打印的内容,每一项都是一段文本。
def print_utils(gen_output):
    # 函数会遍历gen_output列表中的每一项,然后将每一项都打印出来。为了在不同项之间增加一些可视化的分隔,函数在每一项前后都额外打印了一个空行。
    for i in range(len(gen_output)):
        print()
        print(gen_output[i])
        print()
- 然后是
prompt_eval这个函数,这个函数prompt_eval的目的是评估和比较基线模型(model_baseline)和微调过的模型(model_fintuned)对于一组提示(prompts)的生成性能。让我们逐行进行解析:
# 输入参数包括:args(命令行参数)、model_baseline(基线模型)、model_fintuned(微调模型)、tokenizer(用于编码和解码的分词器)、device(指定运行模型的设备)、prompts(一组要评估的提示)。
def prompt_eval(args, model_baseline, model_fintuned, tokenizer, device,
                prompts):
    # 对于prompts中的每一个提示,我们都做以下操作:
    for prompt in prompts:
        # 使用分词器将提示转换为模型所需的输入格式,并将其移至指定的设备上。
        inputs = tokenizer(prompt, return_tensors="pt").to(device)
        # 打印一条消息表示我们现在正在进行基线模型的生成。
        print("==========Baseline: Greedy=========")
        # 然后,我们调用之前定义的generate函数使用贪婪搜索方法生成文本,并使用print_utils函数打印生成的结果。
        r_base = generate(model_baseline,
                          tokenizer,
                          inputs,
                          num_beams=1,
                          num_return_sequences=args.num_return_sequences,
                          max_new_tokens=args.max_new_tokens)
        print_utils(r_base)
        # 打印一条消息表示我们现在正在进行微调模型的生成。
        print("==========finetune: Greedy=========")
        # 同样地,我们调用generate函数使用贪婪搜索方法生成文本,并使用print_utils函数打印生成的结果。
        r_finetune_g = generate(model_fintuned,
                                tokenizer,
                                inputs,
                                num_beams=1,
                                num_return_sequences=args.num_return_sequences,
                                max_new_tokens=args.max_new_tokens)
        print_utils(r_finetune_g)
        # 注意:在此函数中,贪婪搜索被用作基线方法。然而,该函数还提供了其他几种搜索策略的例子,包括多项式采样、束搜索、束搜索多项式采样、多样性束搜索和对比搜索。这些策略在此函数中都被注释掉了,但你可以根据需要去掉注释,使用这些策略。

        # print("==========finetune: Multinomial sampling=========")
        # r_finetune_m = generate(model_fintuned, tokenizer, inputs,
        #                         num_beams=1,
        #                         do_sample=True,
        #                         num_return_sequences=args.num_return_sequences,
        #                         max_new_tokens=args.max_new_tokens)
        # print_utils(r_finetune_m)
        # print("==========finetune: Beam Search=========")
        # r_finetune_b = generate(model_fintuned, tokenizer, inputs,
        #                         num_beams=args.num_beams,
        #                         num_return_sequences=args.num_return_sequences,
        #                         max_new_tokens=args.max_new_tokens)
        # print_utils(r_finetune_b)
        # print("==========finetune: Beam-search multinomial sampling=========")
        # r_finetune_s = generate(model_fintuned, tokenizer, inputs,
        #                         num_beams=args.num_beams,
        #                         do_sample=True,
        #                         num_return_sequences=args.num_return_sequences,
        #                         max_new_tokens=args.max_new_tokens)
        # print_utils(r_finetune_s)
        # print("==========finetune: Diverse Beam Search=========")
        # r_finetune_d = generate(model_fintuned, tokenizer, inputs,
        #                         num_beams=args.num_beams,
        #                         num_beam_groups=args.num_beam_groups,
        #                         num_return_sequences=args.num_return_sequences,
        #                         max_new_tokens=args.max_new_tokens)
        # print_utils(r_finetune_d)
        # print("==========finetune: Constrastive Search=========")
        # r_finetune_c = generate_constrastive_search(model_fintuned, tokenizer, inputs,
        #                                             top_k=args.top_k,
        #                                             penalty_alpha=args.penalty_alpha,
        #                                             num_return_sequences=args.num_return_sequences,
        #                                             max_new_tokens=args.max_new_tokens)
        # print_utils(r_finetune_c)
        # 最后,打印一条消息表示这个提示的处理已经结束。然后打印两个空行作为分隔。
        print("====================prompt end=============================")
        print()
        print()
- 解析main函数:
# main函数负责解析命令行参数、准备模型和分词器、定义提示,然后使用这些来评估和比较基线模型和微调模型。
def main():
	  # 这个main函数是整个脚本的入口点。它首先通过parse_args函数解析命令行参数。然后它设置了运行模型的设备为第一个GPU。
    args = parse_args()

    device = torch.device("cuda:0")
    # 接着,它使用load_hf_tokenizer函数加载分词器,然后使用create_hf_model函数创建基线模型(model_baseline)和微调模型(model_fintuned)
    tokenizer = load_hf_tokenizer(args.model_name_or_path_baseline,
                                  fast_tokenizer=True)

    model_baseline = create_hf_model(AutoModelForCausalLM,
                                     args.model_name_or_path_baseline,
                                     tokenizer, None)
    model_fintuned = create_hf_model(AutoModelForCausalLM,
                                     args.model_name_or_path_finetune,
                                     tokenizer, None)
    # 然后,这些模型被移动到指定的设备上。
    model_baseline.to(device)
    model_fintuned.to(device)

    # 在接下来的部分,函数定义了一组用于评估的提示。注意,这里特别指出,如果提示以空格结束,那么没有经过微调的原始模型有可能会陷入停滞并无法产生响应。微调过的模型在这方面表现得更好。因此,这里所有的提示都以冒号":"结束,以使得比较更有意义。
    # 这个脚本支持英文、中文和日文的评估,它通过args.language参数判断用户选择的语言,并根据此选择加载对应的提示。
    if args.language == "English":
        prompts = [
            "Human: Please tell me about Microsoft in a few sentence? Assistant:",
            "Human: Explain the moon landing to a 6 year old in a few sentences. Assistant:",
            "Human: Write a short poem about a wise frog. Assistant:",
            "Human: Who was president of the United States in 1955? Assistant:",
            "Human: How does a telescope work? Assistant:",
            "Human: Why do birds migrate south for the winter? Assistant:"
        ]
    elif args.language == "Chinese":
        prompts = [
            "Human: 请用几句话介绍一下微软? Assistant:",
            "Human: 用几句话向6岁的孩子解释登月。 Assistant:",
            "Human: 写一首关于一只聪明的青蛙的短诗。 Assistant:",
            "Human: 谁是1955年的美国总统? Assistant:", "Human: 望远镜是如何工作的? Assistant:",
            "Human: 鸟类为什么要南迁过冬? Assistant:"
        ]
    elif args.language == "Japanese":
        prompts = [
            "Human: マイクロソフトについて簡単に教えてください。 Assistant:",
            "Human: 6歳児に月面着陸を短い文で説明する。 Assistant:",
            "Human: 賢いカエルについて短い詩を書いてください。 Assistant:",
            "Human: 1955年のアメリカ合衆国大統領は誰? Assistant:",
            "Human: 望遠鏡はどのように機能しますか? Assistant:",
            "Human: 鳥が冬に南に移動するのはなぜですか? Assistant:"
        ]
    # 最后,它调用prompt_eval函数,将所有的参数和提示传递给它,以进行模型评估。
    prompt_eval(args, model_baseline, model_fintuned, tokenizer, device,
                prompts)
0x3. 训练脚本解读
训练过程都集中在DeepSpeedExamples/applications/DeepSpeed-Chat/training/step1_supervised_finetuning/main.py这个脚本,我们逐行解析一下这个脚本。
0x3.1 头文件相关解析
# DeepSpeed Team
# 首先,它导入了Python的标准库,如argparse(用于解析命令行参数),os和math。
# 然后,它导入了PyTorch库,这是一个用于深度学习的开源库,同时也导入了一些PyTorch的辅助模块,如DataLoader(用于加载数据)、
# RandomSampler和SequentialSampler(用于数据抽样)以及DistributedSampler(用于在分布式设置中进行数据抽样)。
import argparse
import os
import math
import sys

import torch
from torch.utils.data import DataLoader, RandomSampler, SequentialSampler
from torch.utils.data.distributed import DistributedSampler

# 接下来,它导入了Hugging Face的transformers库的一些模块,包括用于因果语言建模的模型(AutoModelForCausalLM),优化器调度类型(SchedulerType),默认的数据整理函数(default_data_collator)和获取优化器调度器的函数(get_scheduler)。
from transformers import (
    AutoModelForCausalLM,
    SchedulerType,
    default_data_collator,
    get_scheduler,
)

# 然后,它导入了deepspeed库,这是一个为大规模模型训练优化的库。它也导入了deepspeed库中的一些模块,包括优化器类(DeepSpeedCPUAdam和FusedAdam)
import deepspeed
from deepspeed.ops.adam import DeepSpeedCPUAdam, FusedAdam

# 之后,它将当前脚本的父目录添加到系统路径中,以便可以从该目录下的utils目录导入一些自定义函数和模块。
sys.path.append(
    os.path.abspath(os.path.join(os.path.dirname(__file__), os.path.pardir)))
# 最后,它从utils目录中导入了一些自定义模块和函数,包括数据处理函数(create_prompt_dataset),打印和设备转换函数(print_rank_0和to_device),
# 模型保存函数(save_hf_format),随机种子设置函数(set_random_seed),求平均函数(get_all_reduce_mean),
# 获取优化器参数组的函数(get_optimizer_grouped_parameters),保存和加载模型的函数(save_zero_three_model和load_hf_tokenizer),
# 以及创建模型和处理模型的函数(create_hf_model)。这些函数在脚本中的后续部分都将被使用。
from utils.data.data_utils import create_prompt_dataset
from utils.utils import print_rank_0, to_device, save_hf_format, set_random_seed, get_all_reduce_mean, get_optimizer_grouped_parameters, save_zero_three_model, load_hf_tokenizer
from utils.ds_utils import get_train_ds_config
from utils.module.lora import convert_linear_layer_to_lora, convert_lora_to_linear_layer, only_optimize_lora_parameters
from utils.model.model_utils import create_hf_model
create_prompt_dataset解析
create_prompt_dataset这个函数实际上直接或者间接的用到了utils/data中raw_dataset.py和data_utils.py,为了搞清楚这个函数,我们需要对这两个文件做一个解析。
首先解析一下raw_dataset.py。这里先定义了一个PromptRawDataset类:
# DeepSpeed Team
from datasets import load_dataset
from torch.utils.data import Subset
import re


# 这段代码定义了一个名为PromptRawDataset的类,这个类是一个模板类,用于处理和组织模型输入数据的格式。
# 如果有新的数据集需要进行处理,可以继承这个类并实现相应的方法来确保数据的统一格式和接口。
class PromptRawDataset(object):
		# 首先,这个类的构造函数__init__接收四个参数:output_path(输出路径),seed(随机种子),
		# local_rank(本地等级)和dataset_name(数据集名称)。
		# 在构造函数中,如果数据集名称不是'local/jsonfile',
		# 那么会使用Hugging Face的datasets库的load_dataset函数来加载数据集。


    def __init__(self, output_path, seed, local_rank, dataset_name):
        self.output_path = output_path
        self.seed = seed
        self.local_rank = local_rank
        if not dataset_name == 'local/jsonfile':
            self.raw_datasets = load_dataset(dataset_name)
    # 然后,这个类定义了一些方法,这些方法在默认情况下并没有实现(只是返回None或者空操作),
    # 这是因为这个类只是一个模板类,这些方法需要在实际使用时在子类中具体实现。
    def get_train_data(self):     # 获取训练数据
        return

    def get_eval_data(self):     # 获取评估数据
        return

    # The prompt should be in the format of: " Human: " + actual_prompt_sentence + " Assistant:"
    # get_prompt方法用于获取样本中的prompt(提示,这是模型的输入)。
    def get_prompt(self, sample):
        return

    # The chosen response should be in the format of: " " + actual_response_sentence
    # get_chosen方法用于获取样本中的chosen(已选的回应,这是模型需要生成的目标输出)。
    def get_chosen(self, sample):
        return

    # The rejected response should be in the format of: " " + actual_response_sentence
    # If the dataset does not have rejected response, return None
    # get_rejected方法用于获取样本中的rejected(被拒绝的回应,这可能用于一些特定的训练场景,比如在对抗训练中,但如果数据集中没有这样的数据,可以返回None)。
    def get_rejected(self, sample):
        return
    # 获取样本中的prompt和chosen
    def get_prompt_and_chosen(self, sample):
        return
    # 获取样本中的prompt和rejected
    def get_prompt_and_rejected(self, sample):
        return
接下来就是每个具体数据集的定义,我这里以 OpenaiWebgptcomparisonsDataset 为例解析一下,剩下的读者又需要可以自行理解:
# English dataset
# 这个类OpenaiWebgptcomparisonsDataset继承自PromptRawDataset类,
# 针对"openai/webgpt_comparisons"这个具体的数据集进行了特化。
class OpenaiWebgptcomparisonsDataset(PromptRawDataset):
    # 在构造函数__init__中,调用了父类的构造函数,并设定了dataset_name和dataset_name_clean两个属性,
    # 分别为"openai/webgpt_comparisons"和"openai_webgpt_comparisons"。
    def __init__(self, output_path, seed, local_rank, dataset_name):
        super().__init__(output_path, seed, local_rank, dataset_name)
        self.dataset_name = "openai/webgpt_comparisons"
        self.dataset_name_clean = "openai_webgpt_comparisons"
    # get_train_data和get_eval_data方法分别从raw_datasets中获取训练数据和测试数据。
    # 它们与之前的DahoasRmstaticDataset类不同之处在于,它们使用get_raw_dataset_split_index
    # 方法对训练数据进行了划分,将其划分为训练集和验证集,并返回对应的数据子集。
    def get_train_data(self):
        from .data_utils import get_raw_dataset_split_index
        dataset = self.raw_datasets["train"]
        index = get_raw_dataset_split_index(self.local_rank, self.output_path,
                                            self.dataset_name_clean,
                                            self.seed, "train_eval", "9,1", 0,
                                            len(dataset))
        dataset = Subset(dataset, index)
        return dataset

    def get_eval_data(self):
        from .data_utils import get_raw_dataset_split_index
        dataset = self.raw_datasets["train"]
        index = get_raw_dataset_split_index(self.local_rank, self.output_path,
                                            self.dataset_name_clean,
                                            self.seed, "train_eval", "9,1", 1,
                                            len(dataset))
        dataset = Subset(dataset, index)
        return dataset
     # get_prompt,get_chosen和get_rejected方法分别从样本中获取提示,已选回应和被拒绝的回应。
     # 这里假定样本是一个字典,其中包含了名为'question','score_0','score_1','answer_0'和'answer_1'的字段。
		# 其中,'question'字段是一个字典,包含了'full_text'字段。这个字段包含了人类提出的问题。
		# 'score_0'和'score_1'字段是字符串,表示对'answer_0'和'answer_1'的评分。
		# 如果'score_0'大于等于'score_1',那么'answer_0'就是已选回应,'answer_1'就是被拒绝的回应,反之亦然。
		# 在获取已选回应和被拒绝的回应时,还对回应进行了处理,
		# 去除了所有形如"[...]"或"(...)"的文本,然后在回应前添加了一个空格。
    def get_prompt(self, sample):
        return " Human: " + sample['question']['full_text'] + " Assistant:"

    def get_chosen(self, sample):
        if float(sample['score_0']) >= float(sample['score_1']):
            response = sample['answer_0']
        else:
            response = sample['answer_1']
        # This data has citation square brackets and numbers (e.g., "[1]").
        # Right now we are not doing browser-assisted finetuning, thus we
        # remove these citations to avoid confusing the model.
        response = re.sub(r" [\(\[].*?[\)\]]", "", response)
        response = re.sub(r"[\(\[].*?[\)\]]", "", response)
        return " " + response

    def get_rejected(self, sample):
        if float(sample['score_0']) < float(sample['score_1']):
            response = sample['answer_0']
        else:
            response = sample['answer_1']
        response = re.sub(r" [\(\[].*?[\)\]]", "", response)
        response = re.sub(r"[\(\[].*?[\)\]]", "", response)
        return " " + response
    # get_prompt_and_chosen和get_prompt_and_rejected方法则分别返回样本中的'prompt'和'chosen',
    # 以及'prompt'和'rejected'的组合。这两个方法的返回值可以直接作为模型的输入和目标输出。
    # 在返回这两个组合时,也进行了类似的处理,去除了所有形如"[...]"或"(...)"的文本。
    def get_prompt_and_chosen(self, sample):
        if float(sample['score_0']) >= float(sample['score_1']):
            response = sample['answer_0']
        else:
            response = sample['answer_1']
        response = re.sub(r" [\(\[].*?[\)\]]", "", response)
        response = re.sub(r"[\(\[].*?[\)\]]", "", response)
        return " Human: " + sample['question'][
            'full_text'] + " Assistant: " + response

    def get_prompt_and_rejected(self, sample):
        if float(sample['score_0']) < float(sample['score_1']):
            response = sample['answer_0']
        else:
            response = sample['answer_1']
        response = re.sub(r" [\(\[].*?[\)\]]", "", response)
        response = re.sub(r"[\(\[].*?[\)\]]", "", response)
        return " Human: " + sample['question'][
            'full_text'] + " Assistant: " + response
接着解析 data_utils.py:
# DeepSpeed Team
"""
Part of the code was adopted from https://github.com/microsoft/Megatron-DeepSpeed/blob/main/megatron/data/dataset_utils.py
"""
import torch
from torch.utils.data import Dataset, Subset, ConcatDataset
from torch.nn.utils.rnn import pad_sequence
import torch.nn.functional as F
from datasets import load_dataset
import numpy as np
import os
import hashlib # Python的内置库,提供了一系列散列函数,如MD5、SHA1等。
from itertools import chain # Python的内置库,提供了一系列用于操作迭代器的函数。
from . import raw_datasets

# 这段代码定义了一个名为get_raw_dataset的函数,其主要作用是根据传入的数据集名称dataset_name
# 返回一个适当的PromptRawDataset子类的实例。
# 这个函数有四个参数:dataset_name,output_path,seed和local_rank。
def get_raw_dataset(dataset_name, output_path, seed, local_rank):
    # 在函数中,根据dataset_name的具体值来创建不同的PromptRawDataset子类的实例。
    # 例如,如果dataset_name为"Dahoas/rm-static",那么就创建一个DahoasRmstaticDataset的实例;
    # 如果dataset_name为"Dahoas/full-hh-rlhf",那么就创建一个DahoasFullhhrlhfDataset的实例,以此类推。
    if "Dahoas/rm-static" in dataset_name:
        return raw_datasets.DahoasRmstaticDataset(output_path, seed,
                                                  local_rank, dataset_name)
    elif "Dahoas/full-hh-rlhf" in dataset_name:
        return raw_datasets.DahoasFullhhrlhfDataset(output_path, seed,
                                                    local_rank, dataset_name)
    elif "Dahoas/synthetic-instruct-gptj-pairwise" in dataset_name:
        return raw_datasets.DahoasSyntheticinstructgptjpairwiseDataset(
            output_path, seed, local_rank, dataset_name)
    elif "yitingxie/rlhf-reward-datasets" in dataset_name:
        return raw_datasets.YitingxieRlhfrewarddatasetsDataset(
            output_path, seed, local_rank, dataset_name)
    elif "openai/webgpt_comparisons" in dataset_name:
        return raw_datasets.OpenaiWebgptcomparisonsDataset(
            output_path, seed, local_rank, dataset_name)
    elif "stanfordnlp/SHP" in dataset_name:
        return raw_datasets.StanfordnlpSHPDataset(output_path, seed,
                                                  local_rank, dataset_name)
    elif "pvduy/sharegpt_alpaca_oa_vicuna_format" in dataset_name:
        return raw_datasets.PvduySharegptalpacaoavicunaformatDataset(
            output_path, seed, local_rank, dataset_name)
    elif "wangrui6/Zhihu-KOL" in dataset_name:
        return raw_datasets.Wangrui6ZhihuKOLDataset(output_path, seed,
                                                    local_rank, dataset_name)
    elif "Cohere/miracl-zh-queries-22-12" in dataset_name:
        return raw_datasets.CohereMiraclzhqueries2212Dataset(
            output_path, seed, local_rank, dataset_name)
    elif "Hello-SimpleAI/HC3-Chinese" in dataset_name:
        return raw_datasets.HelloSimpleAIHC3ChineseDataset(
            output_path, seed, local_rank, dataset_name)
    elif "mkqa-Chinese" in dataset_name:
        return raw_datasets.MkqaChineseDataset(output_path, seed, local_rank,
                                               "mkqa")
    elif "mkqa-Japanese" in dataset_name:
        return raw_datasets.MkqaJapaneseDataset(output_path, seed, local_rank,
                                                "mkqa")
    elif "Cohere/miracl-ja-queries-22-12" in dataset_name:
        return raw_datasets.CohereMiracljaqueries2212Dataset(
            output_path, seed, local_rank, dataset_name)
    elif "lmqg/qg_jaquad" in dataset_name:
        return raw_datasets.LmqgQgjaquadDataset(output_path, seed, local_rank,
                                                dataset_name)
    elif "lmqg/qag_jaquad" in dataset_name:
        return raw_datasets.LmqgQagjaquadDataset(output_path, seed, local_rank,
                                                 dataset_name)
    # 如果dataset_name是"local/jsonfile",则会检查在路径chat_path + '/data/train.json'
    # 和chat_path + '/data/eval.json'下是否存在文件。如果存在,则创建一个LocalJsonFileDataset的实例;
    # 如果不存在,则抛出一个RuntimeError异常。
    elif "local/jsonfile" in dataset_name:
        chat_path = os.path.abspath(
            os.path.join(os.path.dirname(__file__), os.path.pardir,
                         os.path.pardir, os.path.pardir))
        if not (os.path.isfile(chat_path + '/data/train.json')
                and os.path.isfile(chat_path + '/data/eval.json')):
            raise RuntimeError(
                f"Please check both the train.json and eval.json files in your applications/DeepSpeed-Chat/data directory."
            )
        return raw_datasets.LocalJsonFileDataset(output_path, seed, local_rank,
                                                 dataset_name, chat_path)
    else:
        # 如果dataset_name没有在以上的所有条件中匹配到,那么函数也会抛出一个RuntimeError异常,表示没有为这个数据集的配置。
        raise RuntimeError(
            f"We do not have configs for dataset {dataset_name}, but you can add it by yourself in raw_datasets.py."
        )
再看下 get_shuffle_idx函数:
# 这个函数的作用是生成一个大小为size的乱序索引数组,它接受两个参数:seed和size。
def get_shuffle_idx(seed, size):
    np_rng = np.random.RandomState(seed=seed) # 创建一个NumPy的随机状态生成器对象np_rng,seed是随机种子,确定了随机数的生成序列。
    dtype_ = np.uint32 # 设置其为NumPy的uint32类型,这是一个无符号32位整数类型。
    if size >= (np.iinfo(np.uint32).max - 1): # 如果size大于或等于uint32的最大值减一,这里减一是为了防止可能的溢出。
        dtype_ = np.int64 # 则将dtype_改为int64,这是一个64位的有符号整数类型。
    shuffle_idx = np.arange(start=0, stop=size, step=1, dtype=dtype_) # 创建一个由0开始,步长为1,到size结束(不包含size),并且数据类型为dtype_的等差数列,将其赋值给shuffle_idx。
    np_rng.shuffle(shuffle_idx) # 使用np_rng随机状态生成器对shuffle_idx进行随机排列,这样就打乱了shuffle_idx的顺序。
    return shuffle_idx # 返回乱序后的shuffle_idx。
接着解析get_raw_dataset_split_index函数:
# 这个函数主要是根据提供的参数分割数据集,并生成一个分割索引。
# 它首先检查索引文件是否存在,如果不存在,则生成分割索引,并保存到文件。
# 然后,它从文件中加载索引,并返回索引列表。
# 它接受8个参数:local_rank、输出路径、数据集名称、种子、split_name、data_split、split_index和数据大小。
def get_raw_dataset_split_index(local_rank, output_path, dataset_name, seed,
                                split_name, data_split, split_index,
                                data_size):
    # 根据给定参数生成索引文件名。
    index_file_name = f"{output_path}/{dataset_name}_seed{seed}_{split_name}_{data_split}_{split_index}.npy"
    # reindex each time when using local jsonfile since it's more likely to get modified
    # 如果索引文件不存在,或者数据集名为'jsonfile',则执行下面的操作。
    if (not os.path.isfile(index_file_name)) or (dataset_name == 'jsonfile'):
        splits = [float(s) for s in data_split.split(',')] # 将data_split(以逗号分隔的字符串)分割为浮点数列表。
        splits_sum = sum(splits) # 计算所有分割的总和。
        splits = [split / splits_sum for split in splits] # 将每个分割值归一化,使其和为1。
        splits_index = [0] # 初始化分割索引列表,起始值为0
        for index, split in enumerate(splits): # 遍历分割列表。
            # 将新的索引(当前索引加上归一化的分割值与数据大小的乘积)添加到索引列表。
            splits_index.append(splits_index[index] +
                                int(round(split * float(data_size))))
        # 计算最后一个索引与数据大小的差值。
        diff = splits_index[-1] - data_size
        # 遍历除第一个外的所有索引。
        for index in range(1, len(splits_index)):
            # 将差值从每个索引中减去,以确保最后一个索引等于数据大小。
            splits_index[index] -= diff
        # 断言最后一个索引等于数据大小
        assert splits_index[-1] == data_size

        # 生成一个乱序的索引。
        shuffle_idx = get_shuffle_idx(seed, data_size)
        for split_i in range(len(splits)): # 遍历每个分割。
            # 根据给定参数生成乱序索引分割文件名。
            shuffle_idx_split_file_name = f"{output_path}/{dataset_name}_seed{seed}_{split_name}_{data_split}_{split_i}.npy"
            # 提取乱序索引的一个分割。
            shuffle_idx_split = shuffle_idx[
                splits_index[split_i]:splits_index[split_i + 1]]
            # 将乱序索引分割保存到文件。
            np.save(shuffle_idx_split_file_name,
                    shuffle_idx_split,
                    allow_pickle=True)
    # 加载索引文件。
    index = np.load(index_file_name, allow_pickle=True)
    # 将索引数组转换为列表并返回。
    return index.tolist()
接下来解析一下继承自Dataset的PromptDataset类:
# 这是一个自定义的PromptDataset类,它继承自torch.utils.data.Dataset。
# 这是一个数据集类,通常被用于PyTorch中数据的加载和预处理。
class PromptDataset(Dataset):
    # 类的构造函数,它接受五个参数:prompt_dataset、chosen_dataset、reject_dataset、pad_token_id和train_phase。
    def __init__(self, prompt_dataset, chosen_dataset, reject_dataset,
                 pad_token_id, train_phase) -> None:
        super().__init__() # 调用父类torch.utils.data.Dataset的构造函数。
        self.prompt_dataset = prompt_dataset # 将传入的参数赋值给类的成员变量。
        self.chosen_dataset = chosen_dataset
        self.reject_dataset = reject_dataset
        self.pad_token_id = pad_token_id
        self.train_phase = train_phase

    def __len__(self): # 定义类的__len__方法,它返回数据集的长度。这是PyTorch数据集的必要方法。
        length = len(self.chosen_dataset) # 初始设定数据集长度为chosen_dataset的长度。
        if self.train_phase == 3:
            length = len(self.prompt_dataset) # 如果训练阶段为3,则数据集长度设定为prompt_dataset的长度。
        return length # 返回计算得出的数据集长度。

    # 定义类的__getitem__方法,它接受一个参数idx,返回索引idx处的数据。这是PyTorch数据集的必要方法。
    def __getitem__(self, idx):
        # 如果训练阶段为1,则返回一个字典,包含input_ids、attention_mask和labels,它们都来自chosen_dataset的索引idx处。
        if self.train_phase == 1:
            return {
                "input_ids": self.chosen_dataset[idx]["input_ids"],
                "attention_mask": self.chosen_dataset[idx]["attention_mask"],
                "labels": self.chosen_dataset[idx]["input_ids"]
            }
        # 如果训练阶段为2,则返回来自chosen_dataset和reject_dataset的input_ids和attention_mask。
        elif self.train_phase == 2:
            return self.chosen_dataset[idx]["input_ids"], self.chosen_dataset[idx]["attention_mask"], \
                self.reject_dataset[idx]["input_ids"], self.reject_dataset[idx]["attention_mask"]
        # 如果训练阶段为3,则返回来自prompt_dataset的input_ids、attention_mask和pad_token_id
        elif self.train_phase == 3:
            return self.prompt_dataset[idx]["input_ids"],self.prompt_dataset[idx]["attention_mask"], \
                self.pad_token_id
接着再解析一下create_dataset_split函数:
# 这是一个名为create_dataset_split的函数,它的功能是根据给定的训练阶段(train_phase),创建并返回相应的数据集分割。
# 具体来说,它为每个训练阶段生成不同的数据集列表,并将它们放入PromptDataset对象中。
# 函数接受6个参数:当前数据集(current_dataset)、原始数据集(raw_dataset)、训练阶段(train_phase)、
# 分词器(tokenizer)、会话结束标记(end_of_conversation_token)和最大序列长度(max_seq_len)。
def create_dataset_split(current_dataset, raw_dataset, train_phase, tokenizer,
                         end_of_conversation_token, max_seq_len):
    # 创建三个空的列表,用于存储对话提示(prompt_dataset)、选定的对话(chosen_dataset)和被拒绝的对话(reject_dataset)。
    prompt_dataset = []
    chosen_dataset = []
    reject_dataset = []
    # 如果训练阶段为1,则将接受的对话进行分词并添加到chosen_dataset中。
    if train_phase == 1:
        # 遍历当前数据集。
        for i, tmp_data in enumerate(current_dataset):
            # tokenize the text
            # 从原始数据集中获取对话提示和接受的对话。
            chosen_sentence = raw_dataset.get_prompt_and_chosen(
                tmp_data)  # the accept response
            # 如果接受的对话不为空,则将其分词并添加到chosen_dataset中。
            if chosen_sentence is not None:
                chosen_sentence += end_of_conversation_token
                chosen_token = tokenizer(chosen_sentence,
                                         max_length=max_seq_len,
                                         padding="max_length",
                                         truncation=True,
                                         return_tensors="pt")
                chosen_token["input_ids"] = chosen_token["input_ids"].squeeze(
                    0)
                chosen_token["attention_mask"] = chosen_token[
                    "attention_mask"].squeeze(0)
                chosen_dataset.append(chosen_token)
    # 如果训练阶段为2,则将接受和被拒绝的对话都进行分词并分别添加到chosen_dataset和reject_dataset中。
    elif train_phase == 2:
        for i, tmp_data in enumerate(current_dataset):
            # tokenize the text
            chosen_sentence = raw_dataset.get_prompt_and_chosen(
                tmp_data)  # the accept response
            reject_sentence = raw_dataset.get_prompt_and_rejected(
                tmp_data)  # the accept response
            if chosen_sentence is not None and reject_sentence is not None:
                chosen_sentence += end_of_conversation_token  # the accept response
                reject_sentence += end_of_conversation_token
                chosen_token = tokenizer(chosen_sentence,
                                         max_length=max_seq_len,
                                         padding="max_length",
                                         truncation=True,
                                         return_tensors="pt")
                reject_token = tokenizer(reject_sentence,
                                         max_length=max_seq_len,
                                         padding="max_length",
                                         truncation=True,
                                         return_tensors="pt")
                chosen_token["input_ids"] = chosen_token["input_ids"]
                chosen_token["attention_mask"] = chosen_token["attention_mask"]
                chosen_dataset.append(chosen_token)

                reject_token["input_ids"] = reject_token["input_ids"]
                reject_token["attention_mask"] = reject_token["attention_mask"]
                reject_dataset.append(reject_token)
    # 如果训练阶段为3,则将对话提示进行分词并添加到prompt_dataset中。
    elif train_phase == 3:
        for i, tmp_data in enumerate(current_dataset):
            # tokenize the text
            prompt = raw_dataset.get_prompt(tmp_data)
            if prompt is not None:
                prompt_token = tokenizer(prompt, return_tensors="pt")
                prompt_token["input_ids"] = prompt_token["input_ids"]
                prompt_token["attention_mask"] = prompt_token["attention_mask"]
                for key_word in ["input_ids", "attention_mask"]:
                    length = prompt_token[key_word].size()[-1]
                    if length > max_seq_len:
                        y = prompt_token[key_word].squeeze(0)[length -
                                                              (max_seq_len -
                                                               1):].flip(0)
                    else:
                        y = prompt_token[key_word].squeeze(0).flip(0)
                    prompt_token[key_word] = y
                prompt_dataset.append(prompt_token)
    # 创建一个新的PromptDataset对象,并返回。这个对象包含了对话提示、接受的对话和被拒绝的对话的数据集,以及分词器的填充标记ID和训练阶段。
    return PromptDataset(prompt_dataset, chosen_dataset, reject_dataset,
                         tokenizer.pad_token_id, train_phase)
接下来再解析一下create_dataset这个函数:
这段代码定义了一个函数 create_dataset,主要负责创建训练数据集和评估数据集,具体的功能细节如下:
def create_dataset(local_rank, dataset_name, data_split, output_path,
                   train_phase, seed, tokenizer, end_of_conversation_token,
                   max_seq_len):
    # 调用 get_raw_dataset 函数,该函数根据提供的数据集名称、输出路径、随机种子和local_rank等参数,从各种预定义的数据集中获取所需的原始数据集。
    raw_dataset = get_raw_dataset(dataset_name, output_path, seed, local_rank)
    train_dataset = raw_dataset.get_train_data() # 从原始数据集中获取训练数据。
    #  获取训练数据集的索引,涉及数据的分割。
    train_index = get_raw_dataset_split_index(local_rank, output_path,
                                              raw_dataset.dataset_name_clean,
                                              seed, "train", data_split,
                                              train_phase - 1,
                                              len(train_dataset))
    # 根据上一步获取的索引,创建训练数据的子集。
    train_dataset = Subset(train_dataset, train_index)
    # 调用 create_dataset_split 函数对上一步获得的数据子集进行进一步处理,
    # 这可能包括对文本的标记化(tokenization),并且创建一个PromptDataset 对象。
    train_dataset = create_dataset_split(train_dataset, raw_dataset,
                                         train_phase, tokenizer,
                                         end_of_conversation_token,
                                         max_seq_len)
    # 是用于创建评估数据集的,步骤与训练数据集的创建基本相同。
    eval_dataset = raw_dataset.get_eval_data()
    eval_index = get_raw_dataset_split_index(local_rank, output_path,
                                             raw_dataset.dataset_name_clean,
                                             seed, "eval",
                                             data_split, train_phase - 1,
                                             len(eval_dataset))
    eval_dataset = Subset(eval_dataset, eval_index)
    eval_dataset = create_dataset_split(eval_dataset, raw_dataset, train_phase,
                                        tokenizer, end_of_conversation_token,
                                        max_seq_len)
    return train_dataset, eval_dataset
这里需要额外注意一点,create_dataset_split 这个函数传入的参数是 train_phase,而不是像 get_raw_dataset_split_index 函数那样传入 train_phase-1,这是为什么?这是因为train_phase用来标识在模型训练过程中的哪个阶段,是一个直接的指示符,与数据分割或索引无关。它用来在create_dataset_split函数中确定当前处于哪个训练阶段,并根据不同的训练阶段对数据进行不同的处理。而在调用get_raw_dataset_split_index函数时,传入的是train_phase - 1,这是因为在这个函数中,我们需要根据当前训练阶段的前一个阶段(由train_phase - 1表示)的数据分割或索引情况,来决定如何对当前阶段的数据进行分割或索引。create_dataset_split主要关注如何根据训练阶段对数据进行处理,而get_raw_dataset_split_index主要关注如何根据前一个训练阶段的数据分割或索引情况,对当前阶段的数据进行分割或索引。
回收本节的开头,我们解析create_prompt_dataset函数:
# 这个函数的主要目的是创建一个包含训练和评估数据集的“提示”数据集,并将这两个数据集保存在指定的文件中。具体来说:
def create_prompt_dataset(local_rank,
                          data_path,
                          data_split,
                          output_path,
                          train_phase,
                          seed,
                          tokenizer,
                          max_seq_len,
                          end_of_conversation_token="<|endoftext|>",
                          sft_only_data_path=[],
                          reload=False):
    """
    Creates the prompt dataset
    """
    # os.makedirs(output_path, exist_ok=True): 创建输出目录,如果目录已经存在则不会引发异常。
    os.makedirs(output_path, exist_ok=True)
    # 构造文件名,这个文件名包含了很多有关数据集和模型的信息,如数据路径、数据分割、训练阶段、
    # 随机种子、tokenizer的名称、最大序列长度等。然后将这个文件名哈希化,以避免文件名过长。
    fname = "_".join(data_path)
    sft_cache_key = "_".join(sft_only_data_path)
    tokenizer_name = tokenizer.init_kwargs["name_or_path"].replace("/", "_")
    fname = f"{fname}_split{data_split}_phase{train_phase}_seed{seed}_tokenizer{tokenizer_name}_seqlen{max_seq_len}_sft{sft_cache_key}"
    fname = "_".join(fname.split("/"))
    fname = hashlib.sha256(fname.encode()).hexdigest(
    )  # hash the file name to avoid too long file name
    # 构造训练数据集和评估数据集的文件路径。
    train_fname = f"{output_path}/traindata_{fname}.pt"
    eval_fname = f"{output_path}/evaldata_{fname}.pt"

    # 检查训练数据集和评估数据集的文件是否都已经存在,如果存在,则表示缓存已经找到,否则表示需要创建缓存。
    cache_found = os.path.isfile(train_fname) and os.path.isfile(eval_fname)
    buf_create_cache = torch.ByteTensor([not cache_found]).cuda()
    torch.distributed.all_reduce(buf_create_cache)

    # 如果当前进程是主进程(local_rank <= 0)并且需要创建缓存,就执行以下操作。
    if local_rank <= 0 and (buf_create_cache.item() != 0 or reload):
        # 如果只有一个数据集,直接调用create_dataset函数创建训练数据集和评估数据集。
        if len(data_path) == 1:  # Single dataset.
            train_dataset, eval_dataset = create_dataset(
                local_rank, data_path[0], data_split, output_path, train_phase,
                seed, tokenizer, end_of_conversation_token, max_seq_len)
        else:  # Blending datasets.
            # 如果有多个数据集,对每个数据集都调用create_dataset函数,并把得到的训练数据集和评估数据集添加到对应的列表中,

            train_datasets = []
            eval_datasets = []
            train_size = 0
            eval_size = 0
            for d_path in data_path:
                train_dataset, eval_dataset = create_dataset(
                    local_rank, d_path, data_split, output_path, train_phase,
                    seed, tokenizer, end_of_conversation_token, max_seq_len)
                train_datasets.append(train_dataset)
                eval_datasets.append(eval_dataset)
                train_size += len(train_dataset)
                eval_size += len(eval_dataset)
            # 然后使用ConcatDataset和Subset函数合并数据集。
            train_dataset = ConcatDataset(train_datasets)
            shuffle_idx = get_shuffle_idx(seed, train_size)
            train_dataset = Subset(train_dataset, shuffle_idx.tolist())
            eval_dataset = ConcatDataset(eval_datasets)
            shuffle_idx = get_shuffle_idx(seed, eval_size)
            eval_dataset = Subset(eval_dataset, shuffle_idx.tolist())

        # Append the SFT-only dataset if it exists, and current phase is 1(SFT).
        # 如果当前是第一阶段的训练(SFT)并且指定了仅用于SFT的数据集,那么对这些数据集执行类似的操作,
        # 然后把得到的训练数据集和评估数据集添加到原有的数据集中。
        if train_phase == 1 and sft_only_data_path:
            sft_train_datasets = []
            sft_eval_datasets = []
            sft_train_size = 0
            sft_eval_size = 0
            for sft_path in sft_only_data_path:
                sft_train_dataset, sft_eval_dataset = create_dataset(
                    local_rank,
                    sft_path,
                    "10,0,0",
                    output_path,
                    train_phase,
                    seed,
                    tokenizer,
                    end_of_conversation_token,
                    max_seq_len,
                )
                sft_train_datasets.append(sft_train_dataset)
                sft_eval_datasets.append(sft_eval_dataset)
                sft_train_size += len(sft_train_dataset)
                sft_eval_size += len(sft_eval_dataset)
            if sft_train_datasets:  # Check if sft_train_datasets is not empty
                sft_train_dataset = ConcatDataset(sft_train_datasets)
                train_dataset = ConcatDataset(
                    [train_dataset, sft_train_dataset])
                shuffle_idx = get_shuffle_idx(seed, len(train_dataset))
                train_dataset = Subset(train_dataset, shuffle_idx.tolist())
            if sft_eval_datasets:  # Check if sft_eval_datasets is not empty
                sft_eval_dataset = ConcatDataset(sft_eval_datasets)
                eval_dataset = ConcatDataset([eval_dataset, sft_eval_dataset])
                shuffle_idx = get_shuffle_idx(seed, len(eval_dataset))
                eval_dataset = Subset(eval_dataset, shuffle_idx.tolist())
        # 把训练数据集和评估数据集保存到对应的文件中。
        torch.save(train_dataset, train_fname)
        torch.save(eval_dataset, eval_fname)
    # 在多进程环境中,确保所有进程都完成了数据集的保存操作。
    torch.distributed.barrier()
    return torch.load(train_fname), torch.load(eval_fname)
工具函数解析
这里解析一下下面导入的代码,在DeepSpeedExamples/applications/DeepSpeed-Chat/training/utils/utils.py这个路径下:
from utils.utils import print_rank_0, to_device, save_hf_format, set_random_seed, get_all_reduce_mean, get_optimizer_grouped_parameters, save_zero_three_model, load_hf_tokenizer
print_rank_0
# 在rank0也就是master rank打印信息,防止每个机器或GPU都打印消息造成大量重复信息
def print_rank_0(msg, rank=0):
    if rank <= 0:
        print(msg)
to_device
# 这个函数的作用是把一个数据批次移动到指定的设备上。在PyTorch中,数据默认是在CPU上的,
# 如果要在GPU上进行运算,就需要先把数据移到GPU上。这个函数通过遍历批次中的所有元素并
# 调用to(device)方法来实现这一点。如果某个元素不能被移到指定的设备上
#(例如,这个元素是一个字符串或者其他不能在GPU上使用的类型),那么就直接保留这个元素,不进行任何操作。
def to_device(batch, device):
    output = {}
    for k, v in batch.items():
        try:
            output[k] = v.to(device)
        except:
            output[k] = v
    return output
save_hf_format
# 这段代码的功能是将训练好的模型以Hugging Face格式保存,这样之后就可以使用Hugging Face库的from_pretrained方法加载了。
def save_hf_format(model, tokenizer, args, sub_folder=""):
    # used to save huggingface format, so we can use it for hf.from_pretrained
    # 首先,这行代码检查模型是否有'module'这个属性。这在PyTorch中是一个常见的模式,
    # 当模型被封装在torch.nn.DataParallel或torch.nn.parallel.DistributedDataParallel时,
    # 模型的所有属性都会被存储在'module'属性中。所以这行代码的目的是确保我们总是在原始模型上进行操作,而不是并行化的包装器。
    model_to_save = model.module if hasattr(model, 'module') else model
    # 定义模型的配置和权重的文件名。
    CONFIG_NAME = "config.json"
    WEIGHTS_NAME = "pytorch_model.bin"
    # 定义模型保存的目录路径。
    output_dir = os.path.join(args.output_dir, sub_folder)
    # 如果模型保存的目录不存在,那么创建这个目录。
    os.makedirs(output_dir, exist_ok=True)
    # 定义模型权重和配置的保存路径。
    output_model_file = os.path.join(output_dir, WEIGHTS_NAME)
    output_config_file = os.path.join(output_dir, CONFIG_NAME)
    # 获取模型的状态字典,这个字典包含了模型的所有权重。
    save_dict = model_to_save.state_dict()
    # 遍历状态字典中的所有键。这里使用list(save_dict.keys())而不是直接使用
    # save_dict.keys()是因为我们在遍历过程中会修改字典,直接遍历字典的键在Python中会导致错误。
    for key in list(save_dict.keys()):
        # if "lora" in key::如果键中包含"lora",那么删除这个键值对。
        # "lora"可能是某种特定的模型组件或参数,这里将其排除在保存的模型权重之外。
        if "lora" in key:
            del save_dict[key]
    # 将处理过的状态字典保存到文件中。
    torch.save(save_dict, output_model_file)
    # 将模型的配置保存为JSON文件。
    model_to_save.config.to_json_file(output_config_file)
    # 将分词器的词汇表保存到指定的目录。
    tokenizer.save_vocabulary(output_dir)
set_random_seed
# 这段代码的目的是为所有可能用到的随机数生成器设定种子,以确保实验结果的可复现性。
# 随机数生成器的种子是生成随机数序列的初始值,当我们用同一个种子初始化随机数生成器时,它会生成完全一样的随机数序列。
def set_random_seed(seed):
    # 首先检查种子是否是None。如果是None,那么就跳过这段代码,随机数生成器将会用一个随机的种子。
    if seed is not None:
        set_seed(seed)# 这一行调用transformers库的set_seed的函数,将种子设定为指定的值。
        random.seed(seed) # 将Python内置的随机数生成器的种子设定为指定的值。
        np.random.seed(seed) # 将NumPy的随机数生成器的种子设定为指定的值。
        torch.manual_seed(seed) # 将PyTorch的随机数生成器的种子设定为指定的值。
        torch.cuda.manual_seed_all(seed) # 将PyTorch的所有GPU随机数生成器的种子设定为指定的值。
get_all_reduce_mean
# 这段代码是在分布式训练环境中进行平均值计算的函数,通过这段代码,
# 所有的处理器(或者叫节点)上的同一个tensor都会被加和起来,然后除以总的处理器数,得到平均值。
def get_all_reduce_mean(tensor):
    # 这行代码执行一个分布式的reduce操作。reduce操作是指所有处理器中的同一个tensor都被某种方式结合起来。
    # 在这个例子中,torch.distributed.ReduceOp.SUM表示所有处理器上的tensor将被加和起来。
    # 加和的结果会在所有处理器上都可用。
    torch.distributed.all_reduce(tensor, op=torch.distributed.ReduceOp.SUM)
    # 这行代码将前一步得到的加和结果除以处理器的数量(也叫作 world size)。
    # 这样,tensor就变成了所有处理器上原始tensor的平均值。
    tensor = tensor / torch.distributed.get_world_size()
    # 最后,这个平均值tensor被返回。在所有处理器上,这个函数返回的tensor都是相同的,
    # 等于所有处理器上原始tensor的平均值。
    return tensor
get_optimizer_grouped_parameters
# 这段代码的作用是将模型中的参数分组以便于在优化器中使用。它将模型参数分为两组:
# 一组需要进行权重衰减(L2正则化)的参数,另一组不需要进行权重衰减的参数。
def get_optimizer_grouped_parameters(model,
                                     weight_decay,
                                     no_decay_name_list=[
                                         "bias", "LayerNorm.weight"
                                     ]):
    # 它定义了一个列表 optimizer_grouped_parameters,其中包含两个字典。每个字典都对应一个参数组,包含 "params" 和 "weight_decay" 这两个关键字。
    optimizer_grouped_parameters = [
        # 在第一个字典中,它从模型参数中选出那些名称不包含 "bias" 或 "LayerNorm.weight"
        # 且需要求梯度的参数。这些参数在优化过程中会应用 weight_decay 作为权重衰减项。
        {
            "params": [
                p for n, p in model.named_parameters()
                if (not any(nd in n
                            for nd in no_decay_name_list) and p.requires_grad)
            ],
            "weight_decay":
            weight_decay,
        },
        # 在第二个字典中,它选出那些名称包含 "bias" 或 "LayerNorm.weight" 且需要求梯度的参数。
        # 这些参数在优化过程中不会应用权重衰减,即其 "weight_decay" 值为0。

        {
            "params": [
                p for n, p in model.named_parameters()
                if (any(nd in n
                        for nd in no_decay_name_list) and p.requires_grad)
            ],
            "weight_decay":
            0.0,
        },
    ]
    return optimizer_grouped_parameters
这种参数的分组策略是很常见的。比如在训练Transformer模型时,通常会为权重和偏置项设定不同的学习策略。这是因为权重衰减对于防止过拟合很有帮助,但对于某些参数(如偏置项或者层归一化的权重)可能会导致性能下降,因此常常会排除这些参数不进行权重衰减。
save_zero_three_model
# 这个函数的主要功能是筛选出那些在DeepSpeed Zero 3优化中被离线存储,但在当前还未获取的参数。
# 在DeepSpeed Zero 3优化中,一些模型参数在使用过后会被离线存储,以此释放GPU显存。
# 当这些参数需要再次被使用时,需要先获取到本地。
def _z3_params_to_fetch(param_list):
    # 这个条件语句判断一个参数是否是被DeepSpeed Zero 3优化过的,且其状态为"未获取"(NOT_AVAILABLE)。
    # 对于被DeepSpeed Zero 3优化过的参数,它们有一个ds_id属性和一个ds_status属性,其中ds_status表示参数的当前状态。
    return [
        p for p in param_list
        if hasattr(p, 'ds_id') and p.ds_status == ZeroParamStatus.NOT_AVAILABLE
    ]

# 这个函数的主要作用是保存一个使用了DeepSpeed Zero优化(可能为stage 3)的模型。
# DeepSpeed的Zero优化技术是为了解决模型参数、优化器状态和梯度等内存占用问题,
# 通过这种方式,可以训练比当前GPU内存更大的模型。
def save_zero_three_model(model_ema, global_rank, save_dir, zero_stage=0):
    # 首先,检查输入的zero_stage是否为3,确定是否使用了DeepSpeed Zero阶段3优化。
    zero_stage_3 = (zero_stage == 3)
    # 然后,确保保存模型的目录存在。
    os.makedirs(save_dir, exist_ok=True)
    # 定义模型权重保存的完整路径。
    WEIGHTS_NAME = "pytorch_model.bin"
    output_model_file = os.path.join(save_dir, WEIGHTS_NAME)

    # 如果模型是被包裹在其它结构(如DataParallel或DistributedDataParallel)中的,我们需要取出真实的模型实例。
    model_to_save = model_ema.module if hasattr(model_ema,
                                                'module') else model_ema
    if not zero_stage_3:
    	 # 如果没有使用Zero阶段3优化,直接使用PyTorch的torch.save函数保存模型状态。
        if global_rank == 0:
            torch.save(model_to_save.state_dict(), output_model_file)
    else:
        # 如果使用了Zero阶段3优化,因为模型的部分参数和优化器状态在不同的设备上,所以需要先将它们收集起来。
        output_state_dict = {}
        for k, v in model_to_save.named_parameters():

            if hasattr(v, 'ds_id'):
                # deepspeed.zero.GatheredParameters是DeepSpeed提供的一个上下文管理器,
                # 它可以将分布在多个设备上的参数收集到一起。这部分参数保存在CPU上。
                with deepspeed.zero.GatheredParameters(_z3_params_to_fetch([v
                                                                            ]),
                                                       enabled=zero_stage_3):
                    v_p = v.data.cpu()
            else:
                v_p = v.cpu()
            # 然后,将收集好的参数(并且不包含“lora”关键字的参数)添加到输出状态字典中。
            if global_rank == 0 and "lora" not in k:
                output_state_dict[k] = v_p
        # 最后,再使用torch.save函数保存模型状态。
        if global_rank == 0:
            torch.save(output_state_dict, output_model_file)
        # 同时为了节省内存,使用del关键字删除了存储参数的字典。
        del output_state_dict
load_hf_tokenizer
# 这个函数的目标是加载一个Hugging Face tokenizer,这个tokenizer是用来将文本数据转化为模型可以接受的形式的。
# model_name_or_path: 这个参数可以是一个模型名字或者一个本地路径,指示从哪里获取tokenizer。
# fast_tokenizer=True: 这个参数指示是否使用Hugging Face的"fast" tokenizer。"fast" tokenizer是用Rust编写的,运行速度更快。
def load_hf_tokenizer(model_name_or_path, fast_tokenizer=True):
    # 这行代码检查model_name_or_path是否是一个存在的路径。如果是,那么就尝试从本地文件系统中加载tokenizer。
    if os.path.exists(model_name_or_path):
        # Locally tokenizer loading has some issue, so we need to force download
        # 这行代码拼接路径,尝试找到模型的config文件。
        model_json = os.path.join(model_name_or_path, "config.json")
        # 这行代码检查config文件是否存在。如果存在,那么就尝试从config文件中获取模型名字。
        if os.path.exists(model_json):
            model_json_file = json.load(open(model_json)) # 这行代码加载config文件。
            model_name = model_json_file["_name_or_path"] # 这行代码从config文件中获取模型名字。
            tokenizer = AutoTokenizer.from_pretrained(model_name,
                                                      fast_tokenizer=True) # 这行代码使用模型名字从Hugging Face的模型库中下载并加载tokenizer。
    else: # 如果model_name_or_path不是一个存在的路径,那么就认为它是一个模型名字。
        tokenizer = AutoTokenizer.from_pretrained(model_name_or_path,
                                                  fast_tokenizer=True) # 这行代码使用模型名字从Hugging Face的模型库中下载并加载tokenizer。
    return tokenizer
再解析一下DeepSpeedExamples/applications/DeepSpeed-Chat/training/utils/ds_utils.py导入的get_train_ds_config函数:
# DeepSpeed Team
GLOBAL_BATCH_SIZE = 32
MICRO_BATCH_SIZE = 4

# 这个函数的主要目标是生成一个字典,用来配置DeepSpeed训练模型的各种参数。
# DeepSpeed是一个用于加速大规模模型训练的库,其中包括一种叫做ZeRO(Zero Redundancy Optimizer)的优化技术,
# 可以大大减少模型训练过程中的显存和内存占用。
def get_train_ds_config(offload,
                        stage=2,
                        enable_hybrid_engine=False,
                        inference_tp_size=1,
                        release_inference_cache=False,
                        pin_parameters=True,
                        tp_gather_partition_size=8,
                        max_out_tokens=512):
    # 这行代码首先定义了一个变量device。如果参数offload为True,那么就将device设置为"cpu",
    # 表示模型的参数和优化器状态将被"offload"到CPU内存中,以减少GPU显存的占用。
    # 如果offload为False,那么device就被设置为"none",表示不进行offload。
    device = "cpu" if offload else "none"
    # 这行代码定义了一个字典zero_opt_dict,包含了ZeRO优化器的各种配置参数。
    zero_opt_dict = {
        "stage": stage, # ZeRO的阶段,可以为0、1、2、3,阶段越高,显存优化效果越好,但计算复杂度也越高。
        "offload_param": { # offload_param和offload_optimizer这两个字段控制是否将模型的参数和优化器状态offload到CPU内存。
            "device": device
        },
        "offload_optimizer": {
            "device": device
        },
        # 这三个字段只有在ZeRO stage 3时有效,用于控制参数offloading的细节。
        "stage3_param_persistence_threshold": 1e4,
        "stage3_max_live_parameters": 3e7,
        "stage3_prefetch_bucket_size": 3e7,
        # 这个字段控制是否使用显存更高效的线性层实现。由于当前的显存高效实现可能会导致数值不稳定,所以这里默认设为False。
        "memory_efficient_linear": False
    }
    # 返回一个配置字典,这个字典包含了训练模型的各种参数。
    return {
        "train_batch_size": GLOBAL_BATCH_SIZE, # 全局的批次大小
        "train_micro_batch_size_per_gpu": MICRO_BATCH_SIZE, # 每个GPU的微批次大小。
        "steps_per_print": 10, # 每隔10步打印一次训练信息。
        "zero_optimization": zero_opt_dict, # 之前定义的ZeRO配置字典。
        "fp16": { # 控制是否使用混合精度训练,以及loss scaling的窗口大小。
            "enabled": True,
            "loss_scale_window": 100
        },
        "gradient_clipping": 1.0, # 梯度裁剪的阈值。
        "prescale_gradients": False, # 是否在梯度累计之前就进行梯度缩放,通常用于防止梯度下溢。
        "wall_clock_breakdown": False, # 是否进行每步训练时间的详细分析。
        "hybrid_engine": {
            "enabled": enable_hybrid_engine,
            "max_out_tokens": max_out_tokens,
            "inference_tp_size": inference_tp_size,
            "release_inference_cache": release_inference_cache,
            "pin_parameters": pin_parameters,
            "tp_gather_partition_size": tp_gather_partition_size,
        }
    }
再解析一下DeepSpeedExamples/applications/DeepSpeed-Chat/training/utils/module/lora.py导入的convert_linear_layer_to_lora, convert_lora_to_linear_layer, only_optimize_lora_parameters 这几个函数。
在解析这几个函数之前需要先解析一下 LinearLayer_LoRA 这个类:
# LinearLayer_LoRA 是一个实现了 LoRA(Low-Rank Adaptation)策略的 PyTorch 模块。
# LoRA 是一种在大型预训练模型(如 GPT-3 或者 BERT)微调中使用的策略,可以提高微调的效果。
# 这个类是一个简单的 LoRA 实现,只支持线性层。
class LinearLayer_LoRA(nn.Module):
    # an simple implementation of LoRA
    # for now only support Linear Layer
    # 初始化函数,定义了一些参数,如权重(weight)、LoRA 维度(lora_dim)、
    # LoRA 缩放因子(lora_scaling)、LoRA dropout (lora_droppout)以及偏置(bias)。
    def __init__(self,
                 weight,
                 lora_dim=0,
                 lora_scaling=1,
                 lora_droppout=0,
                 bias=None):
        super(LinearLayer_LoRA, self).__init__()
        self.weight = weight
        self.bias = bias
        # 在初始化过程中,首先检查 lora_dim 是否大于0,如果不是,就抛出异常。
        if lora_dim <= 0:
            raise ValueError(
                "You are training to use LoRA, whose reduced dim should be larger than 1"
            )
        # 然后尝试获取权重的形状,如果权重是在 ZeRO 阶段3中的参数,那么通过 ds_shape 属性获取形状;
        # 否则直接使用 shape 属性。
        try:
            # for zero stage 3
            rows, columns = weight.ds_shape
        except:
            rows, columns = weight.shape
        # 然后初始化 LoRA 的左右两个权重矩阵,并设置它们为可学习的参数。
        self.lora_right_weight = nn.Parameter(torch.zeros(
            columns,
            lora_dim))  # apply transpose so in forward we do not need to
        self.lora_left_weight = nn.Parameter(torch.zeros(lora_dim, rows))
        self.lora_scaling = lora_scaling / lora_dim
        # 如果 lora_droppout 大于0,则创建一个 Dropout 层;否则创建一个 Identity 层。
        if lora_droppout > 0:
            self.lora_dropout = nn.Dropout(lora_droppout)
        else:
            self.lora_dropout = nn.Identity()
        # 然后调用 reset_parameters 方法对 LoRA 权重进行初始化。
        self.reset_parameters()
        # disable the original weight gradient
        # 最后,关闭原始权重的梯度,设置 LoRA 融合标志位为 False。
        self.weight.requires_grad = False
        # fuse LoRA to the original weight
        self.fuse_lora = False

    def eval(self):
        self.lora_dropout.eval() # 将模型设置为评估模式,这时候 Dropout 层会停止工作。

    #   self.fuse_lora_weight()

    def train(self, mode=True):
        self.lora_dropout.train(mode) # 将模型设置为训练模式,这时候 Dropout 层会开始工作。
        # self.unfuse_lora_weight()

    def reset_parameters(self): # 初始化 LoRA 权重的方法。右权重使用 kaiming 均匀分布进行初始化,左权重初始化为全0。
        nn.init.kaiming_uniform_(self.lora_right_weight, a=math.sqrt(5))
        nn.init.zeros_(self.lora_left_weight)

    # fuse_lora_weight(self) 和 unfuse_lora_weight(self):
    # 这两个方法用于将 LoRA 权重融合到原始权重中,或者从原始权重中解融合。
    # 融合操作实质上是将原始权重与 LoRA 权重的乘积(缩放后)相加。
    def fuse_lora_weight(self):
        if not self.fuse_lora:
            self.weight.data += self.lora_scaling * torch.matmul(
                self.lora_left_weight.t(), self.lora_right_weight.t())
        self.fuse_lora = True

    def unfuse_lora_weight(self):
        if self.fuse_lora:
            self.weight.data -= self.lora_scaling * torch.matmul(
                self.lora_left_weight.t(), self.lora_right_weight.t())
        self.fuse_lora = False
    # 前向传播函数。如果 LoRA 权重已融合,则直接对输入进行线性变换;
    # 否则,会额外计算一个 LoRA 项,该项是输入通过 Dropout 层,然后与 LoRA 权重相乘得到的。
    def forward(self, input):
        if self.fuse_lora:
            return F.linear(input, self.weight, self.bias)
        else:
            return F.linear(
                input, self.weight,
                self.bias) + (self.lora_dropout(input) @ self.lora_right_weight
                              @ self.lora_left_weight) * self.lora_scaling
convert_linear_layer_to_lora
# 这个函数 convert_linear_layer_to_lora 是用来将模型中的线性层转换为 LoRA 层的。
# 在训练深度学习模型时,这种方法能够在保持预训练模型参数不变的同时,通过添加额外的参数来微调模型。
# convert the linear layer to LoRA
def convert_linear_layer_to_lora(model,
                                 part_module_name,
                                 lora_dim=0,
                                 lora_scaling=1,
                                 lora_droppout=0):
    repalce_name = []
    # 函数首先遍历模型中的所有模块(model.named_modules()),找出名称中包含 part_module_name 的线性层(nn.Linear),
    # 并将这些层的名称添加到 repalce_name 列表中。
    for name, module in model.named_modules():
        if isinstance(module, nn.Linear) and part_module_name in name:
            repalce_name.append(name)
    # 然后,函数遍历 repalce_name 列表,使用 recursive_getattr 函数获取模型中对应名称的模块。
    # 这些模块是需要被替换成 LoRA 层的线性层。
    for name in repalce_name:
        module = recursive_getattr(model, name)
        # 对于每一个需要被替换的模块,函数创建一个 LinearLayer_LoRA 实例 tmp,
        # 并将其传输到与原始模块相同的设备和数据类型上。创建 LinearLayer_LoRA 实例时,
        # 需要传入原始模块的权重、偏置以及 LoRA 层的一些参数,如 lora_dim、lora_scaling 和 lora_droppout。
        tmp = LinearLayer_LoRA(
            module.weight, lora_dim, lora_scaling, lora_droppout,
            module.bias).to(module.weight.device).to(module.weight.dtype)
        # 创建完 LinearLayer_LoRA 实例后,函数使用 recursive_setattr 函数将原始模块替换为 LinearLayer_LoRA 实例。
        recursive_setattr(model, name, tmp)
    return model
convert_lora_to_linear_layer
# 这个函数的主要功能是筛选出那些在DeepSpeed Zero 3优化中被离线存储,但在当前还未获取的参数。
# 在DeepSpeed Zero 3优化中,一些模型参数在使用过后会被离线存储,以此释放GPU显存。
# 当这些参数需要再次被使用时,需要先获取到本地。
def _z3_params_to_fetch(param_list):
    # 这个条件语句判断一个参数是否是被DeepSpeed Zero 3优化过的,且其状态为"未获取"(NOT_AVAILABLE)。
    # 对于被DeepSpeed Zero 3优化过的参数,它们有一个ds_id属性和一个ds_status属性,其中ds_status表示参数的当前状态。
    return [
        p for p in param_list
        if hasattr(p, 'ds_id') and p.ds_status == ZeroParamStatus.NOT_AVAILABLE
    ]

# 这个函数 convert_lora_to_linear_layer 是用来将模型中的 LoRA 层转换回线性层的。
# 在训练深度学习模型时,这个操作可以用于在训练完 LoRA 层后,将模型恢复到原始的状态,
# 以便进行下一步的操作,如模型的保存、加载等。
# convert the LoRA layer to linear layer
def convert_lora_to_linear_layer(model):
    repalce_name = []
    # 函数首先遍历模型中的所有模块(model.named_modules()),找出所有的 LoRA 层(LinearLayer_LoRA),
    # 并将这些层的名称添加到 repalce_name 列表中。
    for name, module in model.named_modules():
        if isinstance(module, LinearLayer_LoRA):
            repalce_name.append(name)
    # 然后,函数遍历 repalce_name 列表,使用 recursive_getattr 函数获取模型中对应名称的 LoRA 层。
    for name in repalce_name:
        module = recursive_getattr(model, name)
        # 对于每一个 LoRA 层,函数首先检查是否处于 zero stage 3(DeepSpeed 的一个特性,用于在多GPU训练中减少内存占用)。
        # 如果是,则设置 zero_stage_3 为 True。
        zero_stage_3 = hasattr(module.weight, 'ds_id')
        with deepspeed.zero.GatheredParameters(_z3_params_to_fetch([
                module.weight, module.bias, module.lora_left_weight,
                module.lora_right_weight
        ]),
                                               modifier_rank=0,
                                               enabled=zero_stage_3):
            module.fuse_lora_weight()
    return model
only_optimize_lora_parameters
# 这个函数的作用是关闭模型中除LoRA参数之外的所有参数的梯度。这意味着在训练过程中,只有LoRA参数会被优化,其他参数保持不变。
def only_optimize_lora_parameters(model):
    # turn off the gradient of all the parameters except the LoRA parameters
    # 遍历模型的所有参数。每个参数都有一个唯一的名称name和对应的参数值param。
    for name, param in model.named_parameters():
        # 查当前参数的名称是否包含lora_right_weight或lora_left_weight。
        # 这是因为在LoRA(Low-Rank Adaptation)中,只有这两种参数是需要优化的。
        if "lora_right_weight" in name or "lora_left_weight" in name:
            # param.requires_grad = True 如果参数名包含lora_right_weight或lora_left_weight,
            # 则设置参数的requires_grad属性为True,表示需要对此参数进行梯度下降优化。
            param.requires_grad = True
        else:
            param.requires_grad = False
    return model
create_hf_model
# 这段代码定义了一个名为create_hf_model的函数,该函数的作用是创建或加载一个预训练模型。该函数的主要参数包括:
# model_class:模型的类别,例如GPT-2、BERT等。
# tokenizer:用于模型的分词器。
# ds_config: DeepSpeed的配置参数。
# rlhf_training:一个标志,用来表示是否正在进行RLHF(Reinforcement Learning from Human Feedback)训练。
# disable_dropout:一个标志,用来表示是否禁用dropout。Dropout是一种防止过拟合的技术。
def create_hf_model(model_class,
                    model_name_or_path,
                    tokenizer,
                    ds_config=None,
                    rlhf_training=False,
                    disable_dropout=False):
    # 根据model_name_or_path从预训练模型获取模型配置model_config。
    model_config = AutoConfig.from_pretrained(model_name_or_path)
    # 如果disable_dropout为真,则将模型配置中的dropout设为0.0。
    if disable_dropout:
        model_config.dropout = 0.0
    # Note: dschf is defined in function scope to avoid global effects
    # https://huggingface.co/docs/transformers/main_classes/deepspeed#nontrainer-deepspeed-integration
    # 根据ds_config中的设置,创建DeepSpeed的配置对象dschf,以便进行DeepSpeed优化。
    if ds_config is not None and ds_config["zero_optimization"]["stage"] == 3:
        dschf = HfDeepSpeedConfig(ds_config)
    else:
        dschf = None
    # 根据rlhf_training的值,确定是从配置中创建模型还是从预训练模型中加载模型。如果rlhf_training为真,则根据模型配置创建模型;否则,从预训练模型加载模型。
    if rlhf_training:
        # the weight loading is handled by create critic model
        model = model_class.from_config(model_config)
    else:
        model = model_class.from_pretrained(
            model_name_or_path,
            from_tf=bool(".ckpt" in model_name_or_path),
            config=model_config)
    # 将模型的结束标记和填充标记设为分词器的结束标记id。
    model.config.end_token_id = tokenizer.eos_token_id
    model.config.pad_token_id = model.config.eos_token_id
    # 调整模型的词汇表大小,使其为8的倍数。这样做的目的是为了在某些硬件(如GPU)上提高效率。
    model.resize_token_embeddings(int(
        8 *
        math.ceil(len(tokenizer) / 8.0)))  # make the vocab size multiple of 8

    return model
0x3.2 main.py主体解析
parse_args解析
def parse_args():
    # 创建一个argparse的解析器对象,这个对象可以添加命令行参数和处理它们。description参数提供了一个对程序的简单描述。
    parser = argparse.ArgumentParser(
        description=
        "Finetune a transformers model on a causal language modeling task")
    parser.add_argument('--data_path',
                        nargs='*',
                        default=['Dahoas/rm-static'],
                        help='Path to the training dataset. Accepted format:'
                        '1) a single data path, 2) multiple datasets in the'
                        'form: dataset1-path dataset2-path ...')
    parser.add_argument('--data_split',
                        type=str,
                        default='2,4,4',
                        help='Comma-separated list of proportions for training'
                        'phase 1, 2, and 3 data. For example the split `6,2,2`'
                        'will use 60% of data for phase 1, 20% for phase 2'
                        'and 20% for phase 3.')
    parser.add_argument(
        '--sft_only_data_path',
        nargs='*',
        default=[],
        help='Path to the dataset for only using in SFT phase.')
    parser.add_argument(
        '--data_output_path',
        type=str,
        default='/data_turbo/home/zhangxiaoyu/data_files/',
        help=
        'Where to store the data-related files such as shuffle index. This needs to be on a local storage of a node (not on a shared storage)'
    )
    parser.add_argument(
        "--model_name_or_path",
        type=str,
        help=
        "Path to pretrained model or model identifier from huggingface.co/models.",
        required=True,
    )
    parser.add_argument(
        "--per_device_train_batch_size",
        type=int,
        default=16,
        help="Batch size (per device) for the training dataloader.",
    )
    parser.add_argument(
        "--per_device_eval_batch_size",
        type=int,
        default=16,
        help="Batch size (per device) for the evaluation dataloader.",
    )
    parser.add_argument(
        "--max_seq_len",
        type=int,
        default=512,
        help="The maximum sequence length.",
    )
    parser.add_argument(
        "--learning_rate",
        type=float,
        default=1e-3,
        help=
        "Initial learning rate (after the potential warmup period) to use.",
    )
    parser.add_argument("--weight_decay",
                        type=float,
                        default=0.,
                        help="Weight decay to use.")
    parser.add_argument("--num_train_epochs",
                        type=int,
                        default=1,
                        help="Total number of training epochs to perform.")
    parser.add_argument(
        "--gradient_accumulation_steps",
        type=int,
        default=1,
        help=
        "Number of updates steps to accumulate before performing a backward/update pass.",
    )
    parser.add_argument(
        "--lr_scheduler_type",
        type=SchedulerType,
        default="cosine",
        help="The scheduler type to use.",
        choices=[
            "linear", "cosine", "cosine_with_restarts", "polynomial",
            "constant", "constant_with_warmup"
        ],
    )
    parser.add_argument(
        "--num_warmup_steps",
        type=int,
        default=0,
        help="Number of steps for the warmup in the lr scheduler.")
    parser.add_argument("--output_dir",
                        type=str,
                        default=None,
                        help="Where to store the model.")
    parser.add_argument("--seed",
                        type=int,
                        default=1234,
                        help="A seed for reproducible training.")
    parser.add_argument("--local_rank",
                        type=int,
                        default=-1,
                        help="local_rank for distributed training on gpus")
    parser.add_argument('--gradient_checkpointing',
                        action='store_true',
                        help='Enable HF gradient checkpointing for model.')
    parser.add_argument('--disable_dropout',
                        action='store_true',
                        help='Disable the dropout of the model.')
    # deepspeed features
    parser.add_argument('--offload',
                        action='store_true',
                        help='Enable ZeRO Offload techniques.')
    parser.add_argument(
        '--zero_stage',
        type=int,
        default=0,
        help='ZeRO optimization stage for Actor model (and clones).')
    ## LoRA for efficient training setting
    parser.add_argument("--lora_dim",
                        type=int,
                        default=0,
                        help="If > 0, use LoRA for efficient training.")
    parser.add_argument("--lora_module_name",
                        type=str,
                        default="decoder.layers.",
                        help="The scope of LoRA.")
    parser.add_argument('--only_optimize_lora',
                        action='store_true',
                        help='Only optimize the LoRA parameters.')
    # 这一行将DeepSpeed的配置参数添加到解析器中。
    parser = deepspeed.add_config_arguments(parser)
    # 这一行解析命令行参数并将它们存储在args对象中
    args = parser.parse_args()

    # Validate settings
    # 在这个代码块中,验证一些特定的参数设置是否合法。
    # 例如,如果同时启用了gradient_checkpointing和仅优化LoRA参数,那么将会抛出一个错误。
    if args.gradient_checkpointing and args.lora_dim > 0:
        assert (
            not args.only_optimize_lora
        ), "--gradient_checkpointing and --only_optimize_lora cannot be enabled at the same time."

    return args
main函数解析
接下来是训练部分的核心函数,也是全文最后一个函数main的解析。
# 这个函数是主函数,是训练语言模型的主流程,主要步骤包括解析命令行参数、
# 设置设备、准备数据、定义模型、配置优化器和学习率调度器、进行训练和评估等。
def main():
    # 解析命令行参数。
    args = parse_args()

    # 如果本地排名为-1,说明不在分布式训练环境下,设备设置为"cuda";
    # 否则根据args.local_rank设置对应的cuda设备,并初始化分布式训练。
    if args.local_rank == -1:
        device = torch.device("cuda")
    else:
        torch.cuda.set_device(args.local_rank)
        device = torch.device("cuda", args.local_rank)
        # Initializes the distributed backend which will take care of sychronizing nodes/GPUs
        # torch.distributed.init_process_group(backend='nccl')
        deepspeed.init_distributed()

    # 获取全局rank。
    args.global_rank = torch.distributed.get_rank()
    # 获取deepspeed的训练配置。
    ds_config = get_train_ds_config(offload=args.offload,
                                    stage=args.zero_stage)
    # 在配置中设置训练时每个GPU的微批次大小和总的批次大小。
    ds_config[
        'train_micro_batch_size_per_gpu'] = args.per_device_train_batch_size
    ds_config[
        'train_batch_size'] = args.per_device_train_batch_size * torch.distributed.get_world_size(
        ) * args.gradient_accumulation_steps

    # If passed along, set the training seed now.
    # 设置随机种子以保证结果的可复现性。
    set_random_seed(args.seed)

    # 在此处添加一个barrier操作,确保所有进程都执行到这一点后再继续执行后续操作。
    torch.distributed.barrier()
    # 加载预训练模型对应的分词器。
    tokenizer = load_hf_tokenizer(args.model_name_or_path, fast_tokenizer=True)
    tokenizer.pad_token = tokenizer.eos_token
    # make sure tokenizer is right pad in our logic
    tokenizer.padding_side = 'right'
    # 创建预训练模型。
    model = create_hf_model(AutoModelForCausalLM,
                            args.model_name_or_path,
                            tokenizer,
                            ds_config,
                            disable_dropout=args.disable_dropout)

    # 如果参数lora_dim大于0,将模型的线性层转换为LoRa层;如果只优化LoRa参数,关闭其他参数的梯度。
    if args.lora_dim > 0:
        model = convert_linear_layer_to_lora(model, args.lora_module_name,
                                             args.lora_dim)
        if args.only_optimize_lora:
            model = only_optimize_lora_parameters(model)

    # Prepare the data
    # 创建数据集和数据加载器:包括训练集和验证集,以及对应的采样器和数据加载器。
    train_phase = 1
    train_dataset, eval_dataset = create_prompt_dataset(
        args.local_rank,
        args.data_path,
        args.data_split,
        args.data_output_path,
        train_phase,
        args.seed,
        tokenizer,
        args.max_seq_len,
        sft_only_data_path=args.sft_only_data_path)
    # DataLoaders creation:
    if args.local_rank == -1:
        train_sampler = RandomSampler(train_dataset)
        eval_sampler = SequentialSampler(eval_dataset)
    else:
        train_sampler = DistributedSampler(train_dataset)
        eval_sampler = DistributedSampler(eval_dataset)
    train_dataloader = DataLoader(train_dataset,
                                  collate_fn=default_data_collator,
                                  sampler=train_sampler,
                                  batch_size=args.per_device_train_batch_size)
    eval_dataloader = DataLoader(eval_dataset,
                                 collate_fn=default_data_collator,
                                 sampler=eval_sampler,
                                 batch_size=args.per_device_eval_batch_size)
    # 定义模型评估函数,用于计算模型在验证集上的困惑度。
    def evaluation(model, eval_dataloader):
        model.eval() # 将模型切换为评估模式。
        losses = 0 # 初始化loss。
        for step, batch in enumerate(eval_dataloader): # 对于评估数据集中的每一个batch。
            batch = to_device(batch, device) # 将batch数据移到对应的设备上。
            with torch.no_grad(): # 在此上下文管理器中,不计算梯度,这样可以节省存储和计算资源。
                # 将batch数据输入模型,进行前向计算。
                outputs = model(**batch)

            loss = outputs.loss # 取出模型的输出中的loss。
            losses += loss.float() # 将当前的loss累加到总的losses中。
        losses = losses / (step + 1) # 计算平均的loss。
        try:
            perplexity = torch.exp(losses) # 尝试计算模型的困惑度,如果捕捉到溢出错误,将困惑度设置为无穷大。
        except OverflowError:
            perplexity = float("inf")
        # 尝试在所有设备上计算困惑度的平均值,如果发生任何错误,就忽略。
        try:
            perplexity = get_all_reduce_mean(perplexity).item()
        except:
            pass
        return perplexity

    # 根据是否使用权重衰减将模型参数分为两组。
    # Split weights in two groups, one with weight decay and the other not.
    optimizer_grouped_parameters = get_optimizer_grouped_parameters(
        model, args.weight_decay)
    # 选择优化器类型,如果启用了梯度Offload,使用DeepSpeedCPUAdam,否则使用FusedAdam。
    AdamOptimizer = DeepSpeedCPUAdam if args.offload else FusedAdam
    # 创建优化器。
    optimizer = AdamOptimizer(optimizer_grouped_parameters,
                              lr=args.learning_rate,
                              betas=(0.9, 0.95))
    # 计算每个epoch的更新步数。
    num_update_steps_per_epoch = math.ceil(
        len(train_dataloader) / args.gradient_accumulation_steps)
    # 创建学习率调度器。
    lr_scheduler = get_scheduler(
        name=args.lr_scheduler_type,
        optimizer=optimizer,
        num_warmup_steps=args.num_warmup_steps,
        num_training_steps=args.num_train_epochs * num_update_steps_per_epoch,
    )
    # 使用deepspeed初始化模型、优化器和学习率调度器。
    model, optimizer, _, lr_scheduler = deepspeed.initialize(
        model=model,
        optimizer=optimizer,
        args=args,
        config=ds_config,
        lr_scheduler=lr_scheduler,
        dist_init_required=True)
    # 如果启用了梯度检查点,那么在模型中也启用梯度检查点。
    if args.gradient_checkpointing:
        model.gradient_checkpointing_enable()

    # Train!
    # 使用 print_rank_0 函数在主节点(global_rank为0的节点)打印开始训练的信息。
    print_rank_0("***** Running training *****", args.global_rank)
    # 在主节点打印在第0个epoch(训练开始前)进行模型评估的信息。
    print_rank_0(
        f"***** Evaluating perplexity, Epoch {0}/{args.num_train_epochs} *****",
        args.global_rank)
    # 调用 evaluation 函数对模型进行评估,得到模型的困惑度。
    perplexity = evaluation(model, eval_dataloader)
    # 在主节点打印模型的困惑度。
    print_rank_0(f"ppl: {perplexity}", args.global_rank)

    # 循环 args.num_train_epochs 轮进行训练。
    for epoch in range(args.num_train_epochs):
        print_rank_0(
            f"Beginning of Epoch {epoch+1}/{args.num_train_epochs}, Total Micro Batches {len(train_dataloader)}",
            args.global_rank) # 在每个epoch开始时,在主节点打印开始新的训练周期的信息。
        model.train() # 将模型设置为训练模式。
        for step, batch in enumerate(train_dataloader): # 对于训练数据集中的每一个batch。
            batch = to_device(batch, device) # 将batch数据移到对应的设备上。
            outputs = model(**batch, use_cache=False) # 将batch数据输入模型,进行前向计算。
            loss = outputs.loss # 取出模型的输出中的loss。
            model.backward(loss) # 进行反向传播,计算梯度。
            model.step() # 更新模型的参数。

        # Evaluate perplexity on the validation set.
        # 在每个epoch结束后,在主节点打印开始评估的信息。
        print_rank_0(
            f"***** Evaluating perplexity, Epoch {epoch+1}/{args.num_train_epochs} *****",
            args.global_rank)
        # 对模型进行评估,得到模型的困惑度。
        perplexity = evaluation(model, eval_dataloader)
        # 在主节点打印模型的困惑度。
        print_rank_0(f"ppl: {perplexity}", args.global_rank)
        # 更新模型中的epoch计数。
        model.tput_timer.update_epoch_count()

    # 如果设置了输出目录,进行以下操作。
    if args.output_dir is not None:
    	 # 在主节点打印开始保存模型的信息。
        print_rank_0('saving the final model ...', args.global_rank)
        # 将模型中的LoRA层转换为线性层。
        model = convert_lora_to_linear_layer(model)

        # 如果是主节点,进行以下操作。
        if args.global_rank == 0:
            # 以Hugging Face的模型格式保存模型。
            save_hf_format(model, tokenizer, args)
        # 如果使用了Zero Redundancy Optimizer(Zero)的第三阶段,进行以下操作。
        if args.zero_stage == 3:
            # For zero stage 3, each gpu only has a part of the model, so we need a special save function
            # 使用特殊的保存函数保存模型。在Zero的第三阶段,每个GPU只有模型的一部分,所以需要特殊的保存函数。
            save_zero_three_model(model,
                                  args.global_rank,
                                  args.output_dir,
                                  zero_stage=args.zero_stage)
0x4. hybrid_engine的细节 & log
从训练过程的输出日志来看hybrid_engine是默认关闭的,DeepSpeed-Chat 打造类ChatGPT全流程 笔记一 里面提到DeepSpeed Hybrid Engine是用在加速 RLHF 流程中最耗时的部分也就是第三步,而本文介绍的监督指令微调是第一步,所以即使开启hybrid_engine加速效果应该也比较有限,所以这里默认关闭。
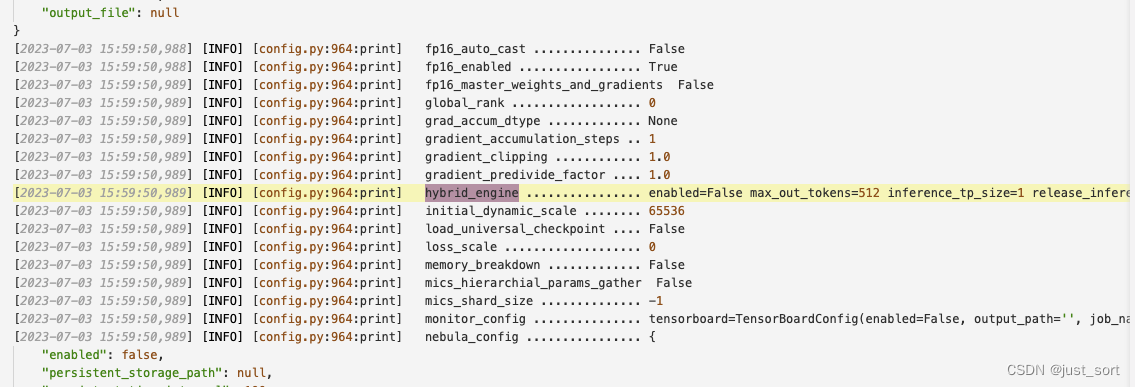
hybrid_engine的优化方法和原理在后续文章中继续探索。
这里分享一下我复现官方sample训练的第一阶段的log:https://paste.ubuntu.com/p/vcG49hQmCW/
0x5. 总结
这篇文章解析了DeepSpeed Chat中监督指令微调这个过程的源码,这个过程和一般的PyTorch DDP分布式训练区别不是特别大,主要是自定义prompt数据集以及将普通的训练流程中的组件如模型,优化器,学习率调度器等等,使用DeepSpeed来warp一下,来用上DeepSpeed提供的Zero,Gradient Checkpoint(注意这个其实就是activation checkpoint)等特性。本文是完全按照训练流程顺序阅读代码,并补全了训练过程中所有涉及到的工具函数或者新的特性如LoRA微调的代码解析。DeepSpeed Chat这部分代码写得比较清晰易懂,因为是在接口层面来使用DeepSpeed,相当于基于DeepSpeed做应用所以代码中不会涉及到DeepSpeed的底层代码,只需要关注算法流程。但这个代码在LoRA微调这部分感觉设计的耦合性有一点高,如果要新增新的微调方式比如QLoRA可能写法就不太优雅了。
