1.Docker 的CS模式
1.1.Docker 的C/S模式介绍
在 Docker Client 中来运行 Docker 的各种命令,这些命令会传送给在 Docker 的宿主机上运行的 Docker 守护进程。而 Docker 守护进程是负责实现 Docker 各种功能的。
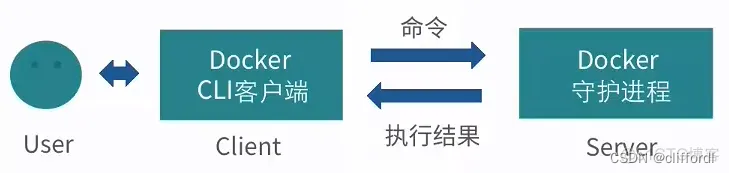
如图所示,Docker 守护进程运行在宿主机上,也就是“C/S架构”的Server(服务)端,守护进程启动后,一直在后台运行,负责实现 Docker 的各种功能。Docker 的使用者要通过 Docker 的客户端,与守护进程进行交互,也就是 Docker 的命令行接口,与 Docker 守护进程进行通信。这个命令行接口,也就是在 Shell 中执行 Docker 命令时运行的二进制程序,它是 Docker 最主要的用户接口,用来从用户处接收 Docker 的命令,并且传递给守护进程;而守护进程将命令执行的结果返回给客户端,返显示在命令行接口中。
1.2.Docker 客户端与守护进程的通信方式
Docker 客户端与守护进程,实际上是通过 Socket 进行连接的。
Docker 提供了三种 Socket 连接的模式:
- Unix 的端口模式
unix:///var/run/docker.sock - TCP 协议的 host:port 模式
tcp://host:port - fd 的 Socket 模式
fd://socketfd
其中,Unix 的端口模式是 Docker 默认的客户端与守护进程的连接方式。我们也可以通过配置进行修改,来修改 Socket 连接方式。

用户可以通过命令行接口,或者自定义的应用,来与客户端进行连接。这个客户端可以是 Docker 提供的二进制程序( Shell 中运行的 Docker 命令),也可以是用户自定义的程序,而这个程序是通过调用Remote API来调用Docker的服务。而 Docker 客户端与 Docker 服务端是通过 Socket 进行连接,这种连接本身也就意味着,Docker 客户端与服务端既可以在同一台机器,也可以在不同机器上运行。也就是 Docker 客户端可以通过远程访问的方式,来访问 Docker 服务端。
2.Docker 守护进程的配置
2.1.Docker 守护进程的启停
启动、停止和重启 Docker 守护进程,需要使用到Linux的service命令,相关的操作如下:
sudo service docker start
sudo service docker stop
sudo service docker restart
# 等同于
sudo systemctl start docker
sudo systemctl stop docker
sudo systemctl restart docker
当修改了 Docker 启动配置时,就需要使用 service 命令来重新启动 Docker 服务,以使得修改的配置能够得到应用。
2.2.Docker 的启动选项
Docker 针对不同的应用场景,为守护进程提供了非常丰富的启动配置选项。而这种配置选项,是通过如下格式来运行的:
docker -d [OPTIONS]
其中 -d 是代表以“守护”的方式来运行Docker的程序,后面的“[OPTIONS]”就是守护进程的配置选项,Docker提供了非常丰富的配置选项,如下:
Docker守护进程相关:
与 Docker 守护进程相关的运行选项,它包含了 Docker 的目录、日志级别、进程id、写入文件的地址、debug 模式的开启以及 docker 运行时使用的驱动模式等等:
	-D, --debug=false:debug模式的开启
	-e, --exec-driver="native":docker运行时使用的驱动模式
	-g, --graph="/var/lib/docker":设置Docker运行时根目录
	--icc=true:设置启用内联容器的通信。
	-l,--log-level="info":docker的日志级别指定
	--label=[]:docker标签
	-p, --pidfile="/var/run/docker.pid":设置后台进程PID文件路径。
Docker服务器连接相关:
	-G, --group="docker":在后台运行模式下,赋予指定的Group到相应的unix socket上。注意,当此参数 --group 赋予空字符串时,将去除组信息
	-H, --host=[]:设置后台模式下指定socket绑定,可以绑定一个或多个 tcp://host:port, unix:///path/to/socket, fd://* 或 fd://socketfd。如:$ docker -H tcp://0.0.0.0:2375 ps 或者$ export DOCKER_HOST="tcp://0.0.0.0:2375"$ docker ps
	--tls=false:设置是否使用TLS
	--tlscacert="/home/sven/.docker/ca.pem":设置要在远程证书中使用的CA证书文件的路径
	--tlscert="/home/sven/.docker/cert.pem":设置证书文件路径
	--tlskey="/home/sven/.docker/key.pem":设置密匙文件路径
	--tlsverify=false:使用TLS远程证书,守护进程与客户端全部使用证书验证
Remote API相关:
--api-enable-cors=false:设置是否允许远程API调用。
存储相关:
	-s, --storage-driver="":设置容器运行时使用指定的存储驱动,如,指定使用devicemapper,可以这样:docker -d -s devicemapper
	--selinux-enabled=false:设置启用selinux支持
	--storage-opt=[]:设置存储驱动的参数
Registry(仓库连接)相关:
	--insecure-registry=[]:使用私有证书搭建docker注册服务器时,设置docker注册服务器域名
	--registry-mirror=[]:设置docker registry 的镜像地址
网络设置相关:
	-b, --bridge="":使用事先创建的网桥接口。若设置为none,则不在容器内使用网络
	--bip="":使用CIDR标记法设置docker 的IP带宽。该选项不能与-b选项同时使用
	--fixed-cidr="":固定分配IPv4地址的带宽。该IP地址必须在-b选项设置的网桥网络或--bip设置的IP网段内
	--fixed-cidr-v6="":设置 IPv6子网
	--dns=[]:设置容器使用DNS服务器。例如: docker -d --dns 8.8.8.8
	--dns-search=[]:设置容器使用指定的DNS搜索域名。如: docker -d --dns-search example.com
	--ip=0.0.0.0:设置容器绑定IP时使用的默认IP地址
	--ip-forward=true:设置启动容器的 net.ipv4.ip_forward
	--ip-masq=true:为网桥上的IP地址开启IP伪装(masquerading)
	--iptables=true:设置启动Docker容器自定义的iptable规则
	--ipv6=false:设置是否使用ipv6子网
	--mtu=0:设置容器网络的MTU值,如果没有这个参数,选用默认 route MTU,如果没有默认route,就设置成常量值 1500。
Docker官方网站:https://docs.docker.com/reference/commandline/cli
2.3.Docker 服务配置
Docker的启动配置文件:
- 老版:
在1.12版本后之前,由于不同操作系统不同的init初始化系统,Docker的初始化配置文件根据不同的系统放置在不同的位置,在Ubuntu 中的位置是:/etc/default/docker,在CentOS中的位置是:/etc/sysconfig/docker。
“tcp”协议配置老版端口默认是2375 - 新版:
1.12版本后,用户可以自行创建 /etc/docker/daemon.json,该文件是 docker 进程的配置管理文件,里面几乎包含了所有 docker 命令行启动可以配置的参数,不管是哪个平台,不管是以何种方式启动,默认都会来这里读取配置。
“tcp”协议配置新版端口默认是5678
为本地 Docker 服务添加一个“ labels 选项”:
[test@localhost ~]# sudo vim /etc/docker/daemon.json
# {} 不能有多个
{
	"labels" : ["nodeName=docker_server_1"]
}
“ labels 选项”可以定义一个key-value的值,而这个值可以在“docker info”命令中查看到。
# 重启docker
[test@localhost ~]$ sudo service docker restart
# 查看labels信息,nodeName=docker_server_1已添加
[test@localhost ~]$ sudo docker info
Client:
 Context:    default
 Debug Mode: false
 Plugins:
  app: Docker App (Docker Inc., v0.9.1-beta3)
  buildx: Build with BuildKit (Docker Inc., v0.4.2-docker)

Server:
 Containers: 5
  Running: 0
  Paused: 0
  Stopped: 5
 Images: 26
 Server Version: 20.10.0
 Storage Driver: overlay2
  Backing Filesystem: xfs
  Supports d_type: true
  Native Overlay Diff: true
 Logging Driver: json-file
 Cgroup Driver: cgroupfs
 Cgroup Version: 1
 Plugins:
  Volume: local
  Network: bridge host ipvlan macvlan null overlay
  Log: awslogs fluentd gcplogs gelf journald json-file local logentries splunk syslog
 Swarm: inactive
 Runtimes: io.containerd.runc.v2 io.containerd.runtime.v1.linux runc
 Default Runtime: runc
 Init Binary: docker-init
 containerd version: 2806fc1057397dbaeefbea0e4e17bddfbd388f38
 runc version: v1.1.5-0-gf19387a
 init version: de40ad0
 Security Options:
  seccomp
   Profile: default
 Kernel Version: 3.10.0-1160.83.1.el7.x86_64
 Operating System: CentOS Linux 7 (Core)
 OSType: linux
 Architecture: x86_64
 CPUs: 112
 Total Memory: 125.4GiB
 Name: localhost.localdomain
 ID: BQJU:EZOH:U5ZS:YI3X:EDS3:WA2Z:XB4C:3KPF:ZAXF:2ZFM:ZZLR:4LJE
 Docker Root Dir: /var/lib/docker
 Debug Mode: false
 Registry: https://index.docker.io/v1/
 # Labels信息已添加
 Labels:
  nodeName=docker_server_1
 Experimental: false
 Insecure Registries:
  127.0.0.0/8
 Live Restore Enabled: false
 [test@localhost ~]$
3.Docker 的远程访问
3.1.Docker 远程访问概述
远程访问的时候,需要保证两台服务器的API版本一致,通过“docker version”版本信息查看指令。
默认情况下,Docker的守护进程使用的是“unix”模式来实现与客户端的通信。这里需要用“tcp”模式来进行网络交互。有两种方式配置:
首先,在 docker daemon 配置文件 /lib/systemd/system/docker.service 中的“ExecStart”选项后,添加“tcp”协议的配置。
ExecStart=/usr/bin/dockerd -H fd:// --containerd=/run/containerd/containerd.sock -H tcp://0.0.0.0:5678
其次,是在/etc/docker/daemon.json文件中配置,需要修改 /lib/systemd/system/docker.service,去掉所有-H 参数:
[test@localhost ~]# sudo vim /etc/docker/daemon.json
{
	"hosts": ["tcp://0.0.0.0:5678", "unix:///var/run/docker.sock"]
}
Ps:目前笔者使用的 Docker 20.10.0-ce版本。
3.2.修改docker.service方式
查看 docker socket 模式:
# ps查看看不到“-H tcp://0.0.0.0:5678”信息
[test@localhost ~]$ ps -ef | grep docker
root       7616      1  0 17:43 ?        00:00:01 /usr/bin/dockerd -H fd:// --containerd=/run/containerd/containerd.sock
# 使用curl链接,会被拒绝
[test@localhost ~]$ curl http://127.0.0.1:5678/info
curl: (7) Failed connect to 127.0.0.1:5678; 拒绝连接
[test@localhost ~]$
修改 /lib/systemd/system/docker.service 配置,添加ExecStart项:
[test@localhost ~]# sudo vim /lib/systemd/system/docker.service
[Unit]
Description=Docker Application Container Engine
Documentation=https://docs.docker.com
After=network-online.target firewalld.service containerd.service multi-user.target
Wants=network-online.target
Requires=docker.socket containerd.service

[Service]
Type=notify
# the default is not to use systemd for cgroups because the delegate issues still
# exists and systemd currently does not support the cgroup feature set required
# for containers run by docker
# 默认版本
# ExecStart=/usr/bin/dockerd -H fd:// --containerd=/run/containerd/containerd.sock
# 添加 -H tcp://0.0.0.0:5678
ExecStart=/usr/bin/dockerd -H fd:// --containerd=/run/containerd/containerd.sock -H tcp://0.0.0.0:5678
ExecReload=/bin/kill -s HUP $MAINPID
TimeoutSec=0
RestartSec=2
Restart=always

# Note that StartLimit* options were moved from "Service" to "Unit" in systemd 229.
# Both the old, and new location are accepted by systemd 229 and up, so using the old location
# to make them work for either version of systemd.
StartLimitBurst=3

# Note that StartLimitInterval was renamed to StartLimitIntervalSec in systemd 230.
# Both the old, and new name are accepted by systemd 230 and up, so using the old name to make
# this option work for either version of systemd.
StartLimitInterval=60s

# Having non-zero Limit*s causes performance problems due to accounting overhead
# in the kernel. We recommend using cgroups to do container-local accounting.
LimitNOFILE=infinity
LimitNPROC=infinity
LimitCORE=infinity

# Comment TasksMax if your systemd version does not support it.
# Only systemd 226 and above support this option.
TasksMax=infinity

# set delegate yes so that systemd does not reset the cgroups of docker containers
Delegate=yes

# kill only the docker process, not all processes in the cgroup
KillMode=process
OOMScoreAdjust=-500

[Install]
添加完tcp之后,重启:
sudo systemctl daemon-reload
sudo service docker restart
再次查看 docker socket 模式,“tcp”已添加,并本机测试“tcp”:
[test@localhost ~]$ ps -ef | grep docker
root      45102      1  3 17:54 ?        00:00:00 /usr/bin/dockerd -H fd:// --containerd=/run/containerd/containerd.sock -H tcp://0.0.0.0:5678
[test@localhost ~]$ curl http://127.0.0.1:5678/info
{"ID":"BQJU:EZOH:U5ZS:YI3X:EDS3:WA2Z:XB4C:3KPF:ZAXF:2ZFM:ZZLR:4LJE","Containers":5,"ContainersRunning":0,"ContainersPaused":0,"ContainersStopped":5,"Images":26,"Driver":"overlay2","DriverStatus":[["Backing Filesystem","xfs"],["Supports d_type","true"],["Native Overlay Diff","true"]],"Plugins":{"Volume":["local"],"Network":["bridge","host","ipvlan","macvlan","null","overlay"],"Authorization":null,"Log":["awslogs","fluentd","gcplogs","gelf","journald","json-file","local","logentries","splunk","syslog"]},"MemoryLimit":true,"SwapLimit":true,"KernelMemory":true,"KernelMemoryTCP":true,"CpuCfsPeriod":true,"CpuCfsQuota":true,"CPUShares":true,"CPUSet":true,"PidsLimit":true,"IPv4Forwarding":true,"BridgeNfIptables":true,"BridgeNfIp6tables":true,"Debug":false,"NFd":23,"OomKillDisable":true,"NGoroutines":34,"SystemTime":"2023-06-30T17:58:32.0594699+08:00","LoggingDriver":"json-file","CgroupDriver":"cgroupfs","CgroupVersion":"1","NEventsListener":0,"KernelVersion":"3.10.0-1160.83.1.el7.x86_64","OperatingSystem":"CentOS Linux 7 (Core)","OSVersion":"7","OSType":"linux","Architecture":"x86_64","IndexServerAddress":"https://index.docker.io/v1/","RegistryConfig":{"AllowNondistributableArtifactsCIDRs":[],"AllowNondistributableArtifactsHostnames":[],"InsecureRegistryCIDRs":["127.0.0.0/8"],"IndexConfigs":{"docker.io":{"Name":"docker.io","Mirrors":[],"Secure":true,"Official":true}},"Mirrors":[]},"NCPU":112,"MemTotal":134651682816,"GenericResources":null,"DockerRootDir":"/var/lib/docker","HttpProxy":"","HttpsProxy":"","NoProxy":"","Name":"localhost.localdomain","Labels":["nodeName=docker_server_1"],"ExperimentalBuild":false,"ServerVersion":"20.10.0","Runtimes":{"io.containerd.runc.v2":{"path":"runc"},"io.containerd.runtime.v1.linux":{"path":"runc"},"runc":{"path":"runc"}},"DefaultRuntime":"runc","Swarm":{"NodeID":"","NodeAddr":"","LocalNodeState":"inactive","ControlAvailable":false,"Error":"","RemoteManagers":null},"LiveRestoreEnabled":false,"Isolation":"","InitBinary":"docker-init","ContainerdCommit":{"ID":"2806fc1057397dbaeefbea0e4e17bddfbd388f38","Expected":"2806fc1057397dbaeefbea0e4e17bddfbd388f38"},"RuncCommit":{"ID":"v1.1.5-0-gf19387a","Expected":"v1.1.5-0-gf19387a"},"InitCommit":{"ID":"de40ad0","Expected":"de40ad0"},"SecurityOptions":["name=seccomp,profile=default"],"Warnings":["WARNING: API is accessible on http://0.0.0.0:5678 without encryption.\n         Access to the remote API is equivalent to root access on the host. Refer\n         to the 'Docker daemon attack surface' section in the documentation for\n         more information: https://docs.docker.com/engine/security/security/#docker-daemon-attack-surface"]}
[test@localhost ~]$
异地(10.49.44.16)测试"tcp"(docker daemon 主机IP为:10.49.44.14):
[test@localhost ~]$ curl http://10.49.44.14:5678/info
{"ID":"BQJU:EZOH:U5ZS:YI3X:EDS3:WA2Z:XB4C:3KPF:ZAXF:2ZFM:ZZLR:4LJE","Containers":5,"ContainersRunning":0,"ContainersPaused":0,"ContainersStopped":5,"Images":26,"Driver":"overlay2","DriverStatus":[["Backing Filesystem","xfs"],["Supports d_type","true"],["Native Overlay Diff","true"]],"Plugins":{"Volume":["local"],"Network":["bridge","host","ipvlan","macvlan","null","overlay"],"Authorization":null,"Log":["awslogs","fluentd","gcplogs","gelf","journald","json-file","local","logentries","splunk","syslog"]},"MemoryLimit":true,"SwapLimit":true,"KernelMemory":true,"KernelMemoryTCP":true,"CpuCfsPeriod":true,"CpuCfsQuota":true,"CPUShares":true,"CPUSet":true,"PidsLimit":true,"IPv4Forwarding":true,"BridgeNfIptables":true,"BridgeNfIp6tables":true,"Debug":false,"NFd":23,"OomKillDisable":true,"NGoroutines":34,"SystemTime":"2023-07-03T09:31:56.804561345+08:00","LoggingDriver":"json-file","CgroupDriver":"cgroupfs","CgroupVersion":"1","NEventsListener":0,"KernelVersion":"3.10.0-1160.83.1.el7.x86_64","OperatingSystem":"CentOS Linux 7 (Core)","OSVersion":"7","OSType":"linux","Architecture":"x86_64","IndexServerAddress":"https://index.docker.io/v1/","RegistryConfig":{"AllowNondistributableArtifactsCIDRs":[],"AllowNondistributableArtifactsHostnames":[],"InsecureRegistryCIDRs":["127.0.0.0/8"],"IndexConfigs":{"docker.io":{"Name":"docker.io","Mirrors":[],"Secure":true,"Official":true}},"Mirrors":[]},"NCPU":112,"MemTotal":134651682816,"GenericResources":null,"DockerRootDir":"/var/lib/docker","HttpProxy":"","HttpsProxy":"","NoProxy":"","Name":"localhost.localdomain","Labels":["nodeName=docker_server_1"],"ExperimentalBuild":false,"ServerVersion":"20.10.0","Runtimes":{"io.containerd.runc.v2":{"path":"runc"},"io.containerd.runtime.v1.linux":{"path":"runc"},"runc":{"path":"runc"}},"DefaultRuntime":"runc","Swarm":{"NodeID":"","NodeAddr":"","LocalNodeState":"inactive","ControlAvailable":false,"Error":"","RemoteManagers":null},"LiveRestoreEnabled":false,"Isolation":"","InitBinary":"docker-init","ContainerdCommit":{"ID":"2806fc1057397dbaeefbea0e4e17bddfbd388f38","Expected":"2806fc1057397dbaeefbea0e4e17bddfbd388f38"},"RuncCommit":{"ID":"v1.1.5-0-gf19387a","Expected":"v1.1.5-0-gf19387a"},"InitCommit":{"ID":"de40ad0","Expected":"de40ad0"},"SecurityOptions":["name=seccomp,profile=default"],"Warnings":["WARNING: API is accessible on http://0.0.0.0:5678 without encryption.\n         Access to the remote API is equivalent to root access on the host. Refer\n         to the 'Docker daemon attack surface' section in the documentation for\n         more information: https://docs.docker.com/engine/security/security/#docker-daemon-attack-surface"]}
[test@localhost ~]$
发现都是可以连通的。
此时我们可以尝试在 Docker 的查询指令中间添加“-H tcp://10.49.44.14:5678”来运行远程Docker指令:
[test@localhost ~]$ sudo docker -H tcp://10.49.44.14:5678 info
Client:
 Context:    default
 Debug Mode: false

Server:
 Containers: 5
  Running: 0
  Paused: 0
  Stopped: 5
 Images: 26
 Server Version: 20.10.0
 Storage Driver: overlay2
  Backing Filesystem: xfs
  Supports d_type: true
  Native Overlay Diff: true
 Logging Driver: json-file
 Cgroup Driver: cgroupfs
 Cgroup Version: 1
 Plugins:
  Volume: local
  Network: bridge host ipvlan macvlan null overlay
  Log: awslogs fluentd gcplogs gelf journald json-file local logentries splunk syslog
 Swarm: inactive
 Runtimes: io.containerd.runc.v2 io.containerd.runtime.v1.linux runc
 Default Runtime: runc
 Init Binary: docker-init
 containerd version: 2806fc1057397dbaeefbea0e4e17bddfbd388f38
 runc version: v1.1.5-0-gf19387a
 init version: de40ad0
 Security Options:
  seccomp
   Profile: default
 Kernel Version: 3.10.0-1160.83.1.el7.x86_64
 Operating System: CentOS Linux 7 (Core)
 OSType: linux
 Architecture: x86_64
 CPUs: 112
 Total Memory: 125.4GiB
 Name: localhost.localdomain
 ID: BQJU:EZOH:U5ZS:YI3X:EDS3:WA2Z:XB4C:3KPF:ZAXF:2ZFM:ZZLR:4LJE
 Docker Root Dir: /var/lib/docker
 Debug Mode: false
 Registry: https://index.docker.io/v1/
 Labels:
  nodeName=docker_server_1
 Experimental: false
 Insecure Registries:
  127.0.0.0/8
 Live Restore Enabled: false

WARNING: API is accessible on http://0.0.0.0:5678 without encryption.
         Access to the remote API is equivalent to root access on the host. Refer
         to the 'Docker daemon attack surface' section in the documentation for
         more information: https://docs.docker.com/engine/security/security/#docker-daemon-attack-surface
test@10.49.44.16:~$
这是因为此时在执行 Docker 命令时,会连接到 -H 指定的远程 Docker 服务器上。
3.3.修改daemon.json方式
修改 /lib/systemd/system/docker.service 配置ExecStart项,去掉所有-H 项,不然会与daemon.json产生冲突:
[test@localhost ~]$ sudo vim /lib/systemd/system/docker.service
......
[Service]
Type=notify
# the default is not to use systemd for cgroups because the delegate issues still
# exists and systemd currently does not support the cgroup feature set required
# for containers run by docker
# ExecStart=/usr/bin/dockerd -H fd:// --containerd=/run/containerd/containerd.sock
# 添加 -H tcp 参数
# ExecStart=/usr/bin/dockerd -H fd:// --containerd=/run/containerd/containerd.sock -H tcp://0.0.0.0:5678
# 不添加 -H 参数
ExecStart=/usr/bin/dockerd
......
重启:
sudo systemctl daemon-reload
sudo service docker restart
查看 docker socket 模式:
# ps查看看不到“-H tcp://0.0.0.0:5678”信息
[test@localhost ~]$ ps -ef | grep docker
root       7616      1  0 17:43 ?        00:00:01 /usr/bin/dockerd -H fd:// --containerd=/run/containerd/containerd.sock
# 使用curl链接,会被拒绝
[test@localhost ~]$ curl http://127.0.0.1:5678/info
curl: (7) Failed connect to 127.0.0.1:5678; 拒绝连接
[test@localhost ~]$
修改/etc/docker/daemon.json配置文件,添加hosts参数,然后重启服务:
[test@localhost ~]$ vim /etc/docker/daemon.json
{
        "labels" : ["nodeName=docker_server_1"],
        "hosts": ["tcp://0.0.0.0:5678", "unix:///var/run/docker.sock"],
        "dns" : [
                "114.114.114.114",
                "8.8.8.8"
        ]
},
ps -ef | grep docker看不到-H 信息,但是curl可以,异地也可以。
[test@localhost ~]$ ps -ef | grep docker
root      45289      1  4 10:24 ?        00:00:00 /usr/bin/dockerd
[test@localhost ~]$ curl http://127.0.0.1:5678/info
{"ID":"BQJU:EZOH:U5ZS:YI3X:EDS3:WA2Z:XB4C:3KPF:ZAXF:2ZFM:ZZLR:4LJE","Containers":6,"ContainersRunning":0,"ContainersPaused":0,"ContainersStopped":6,"Images":26,"Driver":"overlay2","DriverStatus":[["Backing Filesystem","xfs"],["Supports d_type","true"],["Native Overlay Diff","true"]],"Plugins":{"Volume":["local"],"Network":["bridge","host","ipvlan","macvlan","null","overlay"],"Authorization":null,"Log":["awslogs","fluentd","gcplogs","gelf","journald","json-file","local","logentries","splunk","syslog"]},"MemoryLimit":true,"SwapLimit":true,"KernelMemory":true,"KernelMemoryTCP":true,"CpuCfsPeriod":true,"CpuCfsQuota":true,"CPUShares":true,"CPUSet":true,"PidsLimit":true,"IPv4Forwarding":true,"BridgeNfIptables":true,"BridgeNfIp6tables":true,"Debug":false,"NFd":24,"OomKillDisable":true,"NGoroutines":35,"SystemTime":"2023-07-03T10:25:10.152686291+08:00","LoggingDriver":"json-file","CgroupDriver":"cgroupfs","CgroupVersion":"1","NEventsListener":0,"KernelVersion":"3.10.0-1160.83.1.el7.x86_64","OperatingSystem":"CentOS Linux 7 (Core)","OSVersion":"7","OSType":"linux","Architecture":"x86_64","IndexServerAddress":"https://index.docker.io/v1/","RegistryConfig":{"AllowNondistributableArtifactsCIDRs":[],"AllowNondistributableArtifactsHostnames":[],"InsecureRegistryCIDRs":["127.0.0.0/8"],"IndexConfigs":{"docker.io":{"Name":"docker.io","Mirrors":[],"Secure":true,"Official":true}},"Mirrors":[]},"NCPU":112,"MemTotal":134651682816,"GenericResources":null,"DockerRootDir":"/var/lib/docker","HttpProxy":"","HttpsProxy":"","NoProxy":"","Name":"localhost.localdomain","Labels":["nodeName=docker_server_1"],"ExperimentalBuild":false,"ServerVersion":"20.10.0","Runtimes":{"io.containerd.runc.v2":{"path":"runc"},"io.containerd.runtime.v1.linux":{"path":"runc"},"runc":{"path":"runc"}},"DefaultRuntime":"runc","Swarm":{"NodeID":"","NodeAddr":"","LocalNodeState":"inactive","ControlAvailable":false,"Error":"","RemoteManagers":null},"LiveRestoreEnabled":false,"Isolation":"","InitBinary":"docker-init","ContainerdCommit":{"ID":"2806fc1057397dbaeefbea0e4e17bddfbd388f38","Expected":"2806fc1057397dbaeefbea0e4e17bddfbd388f38"},"RuncCommit":{"ID":"v1.1.5-0-gf19387a","Expected":"v1.1.5-0-gf19387a"},"InitCommit":{"ID":"de40ad0","Expected":"de40ad0"},"SecurityOptions":["name=seccomp,profile=default"],"Warnings":["WARNING: API is accessible on http://0.0.0.0:5678 without encryption.\n         Access to the remote API is equivalent to root access on the host. Refer\n         to the 'Docker daemon attack surface' section in the documentation for\n         more information: https://docs.docker.com/engine/security/security/#docker-daemon-attack-surface"]}
[test@localhost ~]$
/lib/systemd/system/docker.service -H 与/etc/docker/daemon.json hosts[“”]不能同时配置,不然重启失败:
[test@localhost ~]$ sudo systemctl daemon-reload
[test@localhost ~]$ sudo service docker restart
Redirecting to /bin/systemctl restart docker.service
Job for docker.service failed because the control process exited with error code. See "systemctl status docker.service" and "journalctl -xe" for details.
[test@localhost ~]$
3.4.docker -H方式
[test@localhost ~]$ sudo dockerd --debug   --tls=true   --tlscert=/var/docker/server.pem   --tlskey=/var/docker/serverkey.pem   --host tcp://127.0.0.1:5678
INFO[2023-07-03T10:50:36.985386294+08:00] Starting up
failed to create API server: Could not load X509 key pair (cert: "/var/docker/server.pem", key: "/var/docker/serverkey.pem"): open /var/docker/server.pem: no such file or directory
[test@localhost ~]$
提示证书不存在。已经有3.2.和3.3两种方式了,这种方式以后在研究吧。
参考:https://blog.csdn.net/a1010256340/article/details/80106735
3.5.Docker 环境变量配置
如果我们需要频繁访问远程 Docker 指令,一直添加“-H”指令明显很繁琐,所以 Docker 客户端提供了一个环境变量来简化该操作。
首先我们使用 export 指令来设置环境变量:export DOCKER_HOST=“tcp://127.0.0.1:5678”。
设置完毕之后,我们运行 sudo docker info 命令,返回的信息也是远程服务器的。
如果我们使用完了远程的服务器,需要连接本机时,只需使用exoprt指令将“DOCKER_HOST”环境变量置空,即可恢复本机的Docker服务连接。此时我们再运行 info 命令,显示的就是我们本机的Docker信息了。
4.Docker 常用接口
curl http://10.49.44.14:5678/info // 相当于在本地 docker info访问
curl http://10.49.44.14:5678/containers/json // 返回活动的容器
curl http://10.49.44.14:5678/containers/json?all=1 // 返回所有容器
curl http://10.49.44.14:5678/images/json
在linux下,可以通过curl工具访问url,因为返回的是json串,非格式化的。可以结合python命令,转为格式化的json,让看起来比较清。如:
curl http://10.49.44.14:5678/images/json | python -mjson.tool
参考:
https://
blog.51cto.com/u_16012040/6130770
https://blog.51cto.com/u_16012040/6142527
https://blog.51cto.com/u_16012040/6142525
https://www.cnblogs.com/xiugeng/p/16323859.html
https://www.cnblogs.com/51kata/p/5267687.html


![BUUCTF [GXYCTF2019] CheckIn 1](https://img-blog.csdnimg.cn/b8b178517f694f23a483076c3721ad4d.png#pic_center)