C# WPF 路径动画

news2024/11/22 22:21:51

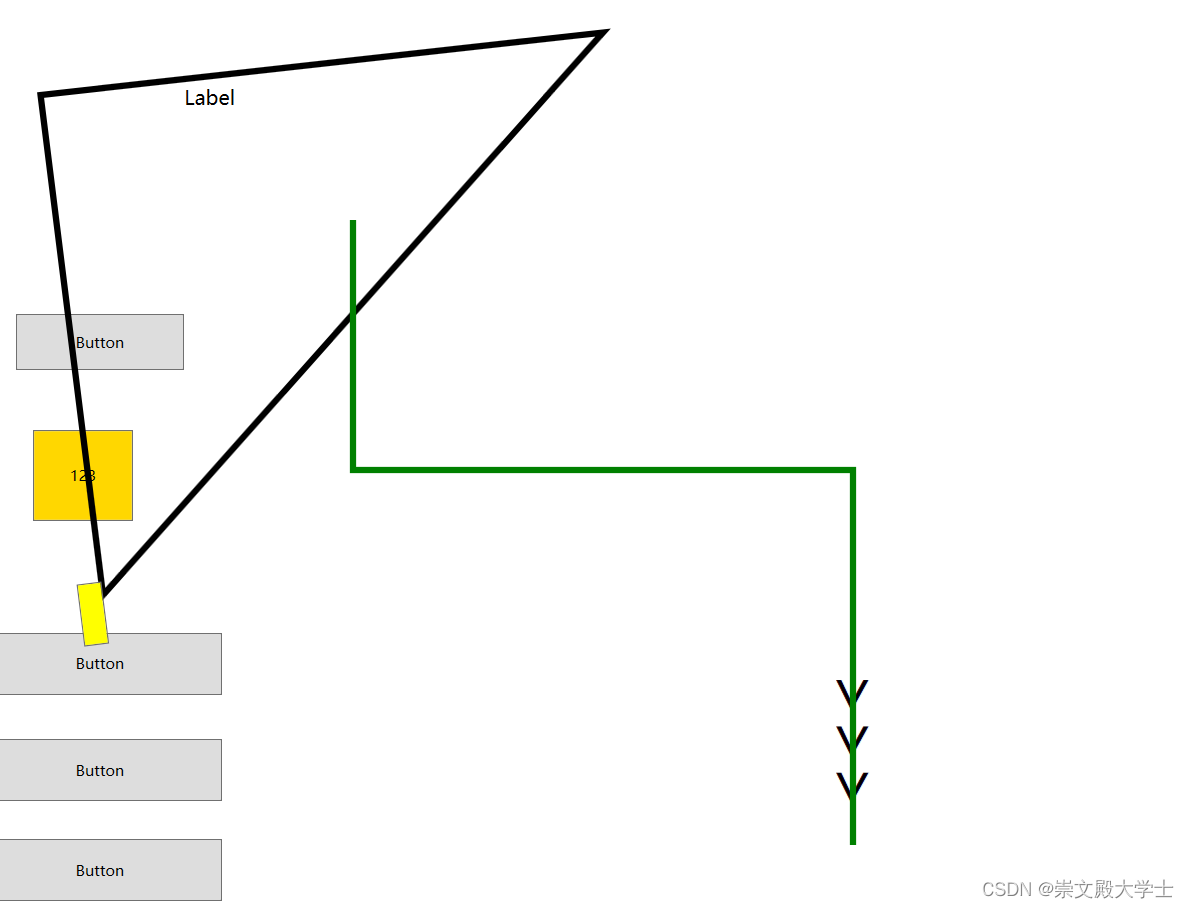
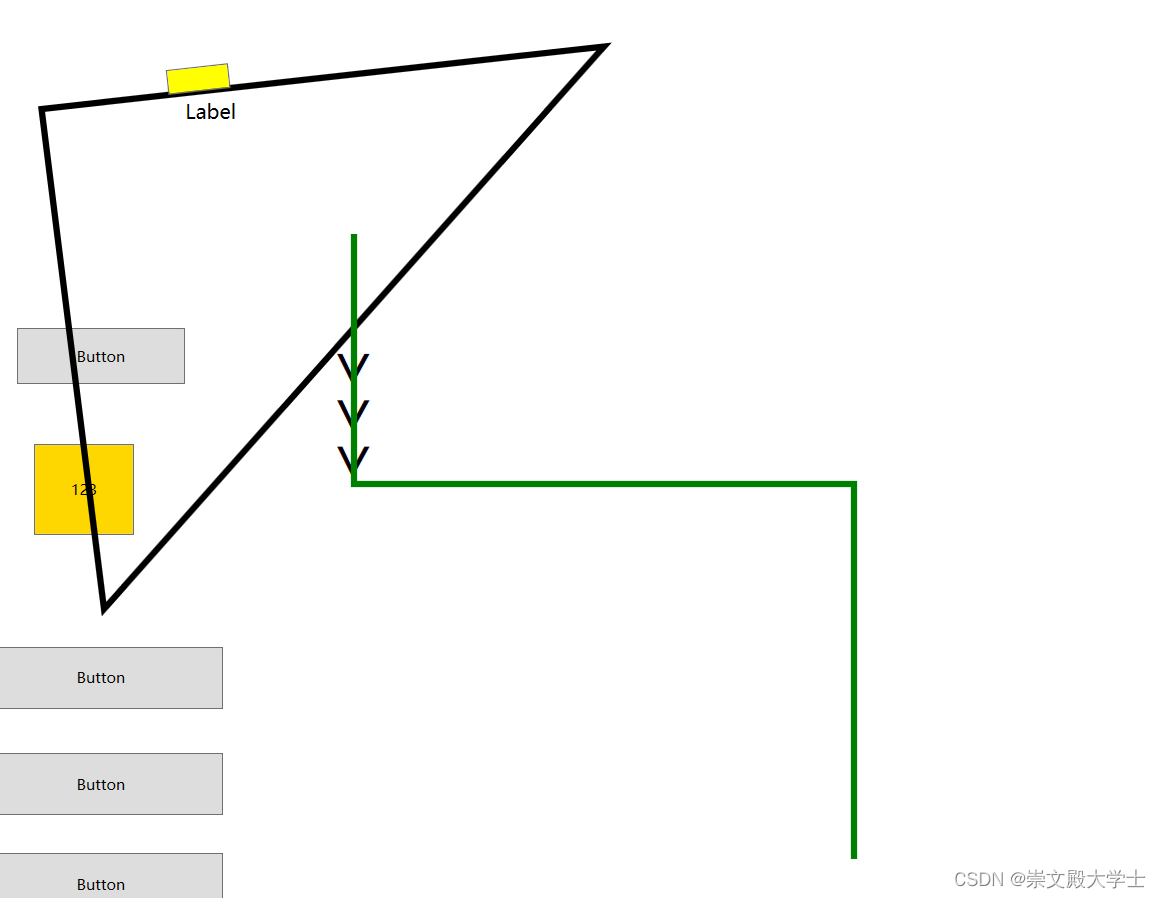
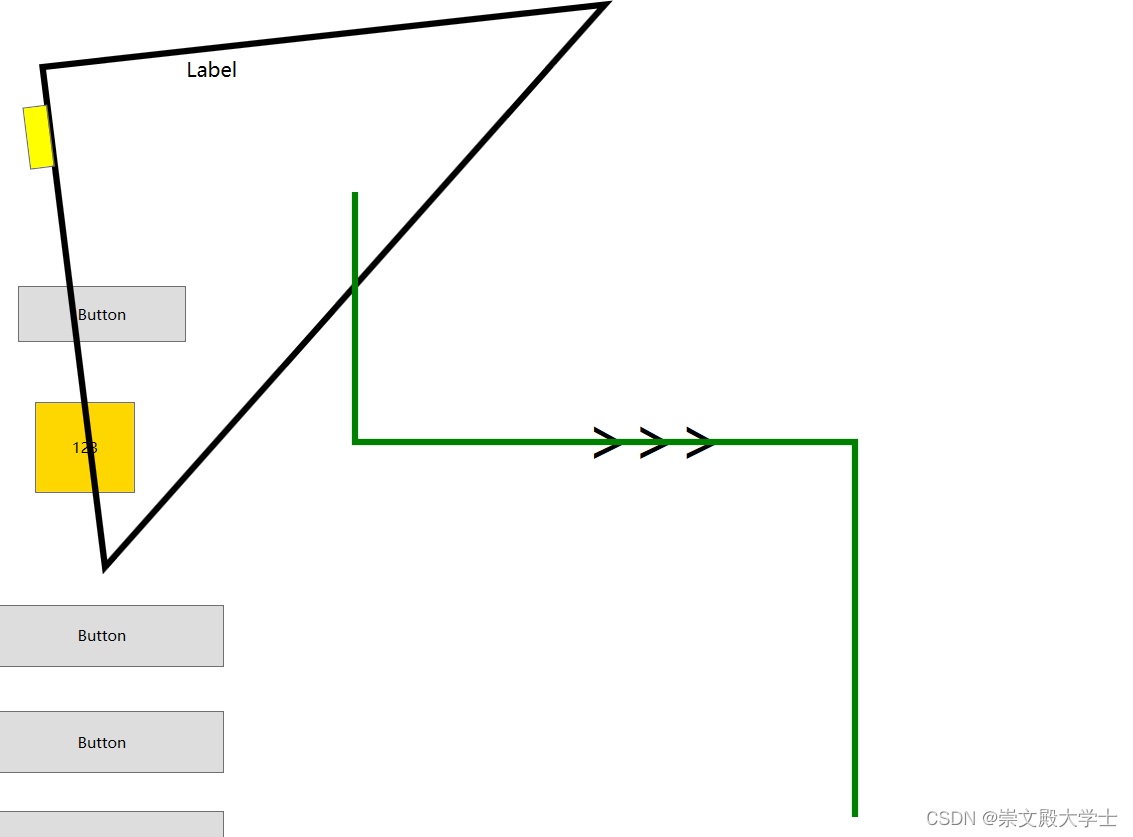
路径动画:一个东西沿着你画的的线跑。
微软对这个有很详细的说明,有需要请参照微软Learn网站
在这里插入图片描述
在这里插入图片描述

在这里插入图片描述
cs的代码

PathGeometry pathGeometry = new PathGeometry();

            PathFigure pathFigure = new PathFigure();
            //pathFigure.IsClosed = true;
            pathFigure.StartPoint = new Point(300, 200);

            LineSegment lineSegment = new LineSegment();
            lineSegment.Point = new Point(300, 400);
            pathFigure.Segments.Add(lineSegment);
            lineSegment = new LineSegment();
            lineSegment.Point = new Point(700, 400);
            pathFigure.Segments.Add(lineSegment);
            lineSegment = new LineSegment();
            lineSegment.Point = new Point(700, 700);
            pathFigure.Segments.Add(lineSegment);;
            pathFigure.Segments.Add(lineSegment);

            PathFigureCollection pathFigures = new PathFigureCollection();
            pathFigures.Add(pathFigure);

            pathGeometry.Figures.Add(pathFigure);

            pathGeometry.Freeze();

            System.Windows.Shapes.Path path = new System.Windows.Shapes.Path();
            path.Data = pathGeometry;
            path.Stroke = Brushes.Green;
            path.StrokeThickness = 5;

            canvas2.Children.Add(path);

            MatrixAnimationUsingPath matrixAnimationUsingPath = new MatrixAnimationUsingPath();
            matrixAnimationUsingPath.PathGeometry = pathGeometry;
            matrixAnimationUsingPath.Duration = TimeSpan.FromSeconds(5);
            matrixAnimationUsingPath.RepeatBehavior = RepeatBehavior.Forever;
            matrixAnimationUsingPath.DoesRotateWithTangent = true;

            Storyboard.SetTargetName(matrixAnimationUsingPath, "ButtonMatrixTransform2");
            Storyboard.SetTargetProperty(matrixAnimationUsingPath, new PropertyPath(MatrixTransform.MatrixProperty));

            Storyboard pathAnimationStoryboard = new Storyboard();
            pathAnimationStoryboard.Children.Add(matrixAnimationUsingPath);
            pathAnimationStoryboard.Begin(this);

这里是xaml的内容

<Window x:Class="WPF_Test.MainWindow"
        xmlns="http://schemas.microsoft.com/winfx/2006/xaml/presentation"
        xmlns:x="http://schemas.microsoft.com/winfx/2006/xaml"
        xmlns:d="http://schemas.microsoft.com/expression/blend/2008"
        xmlns:mc="http://schemas.openxmlformats.org/markup-compatibility/2006"
        xmlns:local="clr-namespace:WPF_Test"
        xmlns:control="clr-namespace:WPF_Test.Combox"
        mc:Ignorable="d"
        Title="MainWindow" Height="800" Width="1200" Loaded="Window_Loaded">
    <Grid>
        <Canvas x:Name="canvasMain">
            <Button Content="123" Foreground="Black" x:Name="machineHand" Background="Gold" HorizontalAlignment="Left" 
                                            VerticalAlignment="Top" Width="80" Height="73" Canvas.Left="14" Canvas.Top="301" Margin="30,67,0,0">
                <Button.RenderTransform>
                    <TranslateTransform x:Name="machineAnimation"/>
                </Button.RenderTransform>
            </Button>
            <Button  Content="Button" Click="Button_Click" HorizontalAlignment="Left" Height="45" Margin="30,275,0,0" VerticalAlignment="Top" Width="135"/>
            <Label Content="Label" x:Name="label01" FontSize="16px" HorizontalAlignment="Left" Margin="160,87,0,0" VerticalAlignment="Top" Width="225" RenderTransformOrigin="0.754,-0.658"/>
            <Button Content="Button" Click="Button_Click_1" Canvas.Top="530" Width="195" HorizontalAlignment="Center" Height="50" VerticalAlignment="Top"/>
            <Button Content="Button" Click="Button_Click_2" Canvas.Top="615" Width="195" Height="50" HorizontalAlignment="Left" VerticalAlignment="Top"/>
            <Button Content="Button" Click="Button_Click_3" Canvas.Top="695" Width="195" Height="50" HorizontalAlignment="Center" VerticalAlignment="Top"/>
            <Canvas x:Name="canvas2">
                <Canvas.Resources>
                    <PathGeometry x:Key="path">
                        <PathGeometry.Figures>
                            <PathFigureCollection>
                                <PathFigure IsClosed="True" StartPoint="50,100">
                                    <PathFigure.Segments>
                                        <PathSegmentCollection>
                                            <LineSegment Point="100,500" />
                                            <LineSegment Point="500,50" />
                                        </PathSegmentCollection>
                                    </PathFigure.Segments>
                                </PathFigure>
                            </PathFigureCollection>
                        </PathGeometry.Figures>
                    </PathGeometry>
                    <Storyboard x:Key="pathStoryboard" >
                        <MatrixAnimationUsingPath PathGeometry="{StaticResource path}"
                                          Storyboard.TargetName="ButtonMatrixTransform"
                                          Storyboard.TargetProperty="Matrix"
                                          DoesRotateWithTangent="True"
                                          Duration="0:0:10" RepeatBehavior="Forever" >
                        </MatrixAnimationUsingPath>
                    </Storyboard>
                </Canvas.Resources>

                <Canvas.Triggers>
                    <EventTrigger RoutedEvent="Control.Loaded">
                        <BeginStoryboard Storyboard="{StaticResource pathStoryboard}" />
                    </EventTrigger>
                </Canvas.Triggers>

                <Path Data="{StaticResource path}" Stroke="Black" StrokeThickness="5" />

                <Button Width="50" Height="20" Background="Yellow">
                    <Button.RenderTransform>
                        <MatrixTransform x:Name="ButtonMatrixTransform" />
                    </Button.RenderTransform>
                </Button>

                <Button x:Name="aButton" Content=">>>" FontSize="50" BorderThickness="0" Width="110" Height="50" Background="Transparent" HorizontalAlignment="Left" VerticalAlignment="Center" Canvas.Left="35" Canvas.Top="-35">
                    <Button.RenderTransform>
                        <MatrixTransform x:Name="ButtonMatrixTransform2" />
                    </Button.RenderTransform>
                </Button>
            </Canvas>

        </Canvas>

    </Grid>
</Window>

本文来自互联网用户投稿,该文观点仅代表作者本人,不代表本站立场。本站仅提供信息存储空间服务,不拥有所有权,不承担相关法律责任。如若转载,请注明出处:http://www.coloradmin.cn/o/702391.html

如若内容造成侵权/违法违规/事实不符,请联系多彩编程网进行投诉反馈,一经查实,立即删除!

相关文章

试着攻击自己写的网站

背景介绍 概念简介 CSRF XSS攻击是一种常见的安全攻击&#xff0c;它通过伪造用户输入&#xff0c;利用CSRF漏洞获取用户的敏感信息或者执行恶意操作。CSRF XSS攻击不仅会给用户带来损失&#xff0c;还会对互联网安全造成威胁。因此&#xff0c;防范CSRF XSS攻击已经成为了当…

C++ - 20230629

一. 思维导图 二. 练习 #include <iostream> using namespace std;class Person { private:int age;int *p; public://无参构造Person():p(new int(89)){age 18;}//有参构造Person(int age,int num){this->age age;this->pnew int(num);}//拷贝构造函数Person(P…

jmeter:BeanShell预处理程序获取/设置/引用变量

BeanShell预处理程序 1、局部变量 获取局部变量&#xff1a;vars.get("变量名") 设置局部变量&#xff1a;vars.put("变量名",变量值) 调用 ${变量名} 2、全局变量 获取局部变量&#xff1a;props.get("变量名") 设置局部变量&#xff1a…

使用 JCommander 解析命令行参数

前言 如果你想构建一个支持命令行参数的程序&#xff0c;那么 jcommander 非常适合你&#xff0c;jcommander 是一个只有几十 kb 的 Java 命令行参数解析工具&#xff0c;可以通过注解的方式快速实现命令行参数解析。 这篇教程会通过介绍 jcommadner &#xff0c;快速的创建一…

【WinRAR技巧】如何合并RAR分卷压缩文件?

很多小伙伴在压缩RAR文件的时候&#xff0c;会选择分卷压缩&#xff0c;便于网上上传、下载或邮件发送。 那如果后续不需要分卷压缩了&#xff0c;如何将RAR分卷压缩文件重新合并成一个文件呢&#xff1f;下面小编来分享一下具体的操作方法。 一般来说&#xff0c;我们都会选…

【C++初阶】C++STL详解(三)—— vector的介绍及使用

​ ​&#x1f4dd;个人主页&#xff1a;Sherry的成长之路 &#x1f3e0;学习社区&#xff1a;Sherry的成长之路&#xff08;个人社区&#xff09; &#x1f4d6;专栏链接&#xff1a;C初阶 &#x1f3af;长路漫漫浩浩&#xff0c;万事皆有期待 上一篇博客&#xff1a;【C初阶】…

(三)灌溉系统WIFI通信部分

ESP8266 ESP8266S烧录器&#xff1a;CH430C arduino离线配置esp8266参考&#xff1a;参考文章 灯光闪烁就是烧录成功 ESP8266调试入门&#xff1a;参考文章 ESP8266调试&#xff1a;参考文章 人麻了已经&#xff0c;尝试半天了&#xff0c;AT指令没回应&#xff0c;尝试刷固…

Feed流实现

关注推送 关注推送也称为Feed流(直译为投喂)&#xff0c;为用户持续的提供“沉浸式”的体验&#xff0c;通过无限下拉刷新获取新的信息(如&#xff0c;短视频、博客等)。 获取信息的两种模式 传统模式&#xff1a;需要用户自己去根据所需去查询内容。 Feed模式&#xff1a;…

八、Docker安装MySQL主从

学习参考&#xff1a;尚硅谷Docker实战教程、Docker官网、其他优秀博客(参考过的在文章最后列出) 目录 前言一、pull一个mysql镜像二、主服务器master配置2.1 新建主服务器容器实例2.2 配置master的my.cnf2.3 重启master容器实例并验证2.4 master容器实例内创建数据同步用户 三…

JVM知识扫盲篇

JVM扫盲 一&#xff1a;故事背景二&#xff1a;知识点主要构成2.1 JVM为什么能跨平台2.2 JVM整体结构2.1 类加载子系统2.1.1 概述2.1.2 具体类加载器2.1.3 双亲委派机制2.1.4 Tomcat为什么要自定义类加载器 2.2 运行时数据区2.2.1 整体概念2.2.2 程序计数器的作用2.2.3 虚拟机栈…

MySQL - 数据库级别的外键

1. 外键 FOREIGN KEY (了解) 测试数据 &#xff1a; 学生表 CREATE TABLE IF NOT EXISTS student (id INT(4) NOT NULL AUTO_INCREMENT COMMENT 学号,name VARCHAR(30) NOT NULL DEFAULT 匿名 COMMENT 姓名,pwd VARCHAR(20) NOT NULL DEFAULT 123456 COMMENT 密码,sex VARC…

在 Mac 上安装 K8S

本篇文章将介绍如何在 Mac 上使用 minikube 搭建单机版的 Kubernetes。 安装步骤 安装 Docker 安装 docker 主要是用于提供容器引擎。直接下载安装即可。 下载地址 安装 Kubectl 推荐使用 home brew 安装 brew install kubectl可以使用下面的命令查看是否已经安装完毕 …

MAYA粒子圈

无法修改 完成一圈的时间

【C51】基于51单片机的自动输液监控系统设计与实现

摘 要 随着科技进步&#xff0c;我国的医疗设施不断完善&#xff0c;逐渐达到现代化水平。在当今的医疗环境下&#xff0c;病患更关心自己是否能够及时进行有效的治疗&#xff0c;医护人员对患者进行输液过程的全程监控。医生治疗的效果明显提高&#xff0c;不仅节约大量的时间…

Linux: 进程管理

一&#xff0c;快速上手&#xff0c;结束一个失控的进程 在主目录中&#xff0c;用文本编辑器创建一个文本文件badpro&#xff0c;如下&#xff1a; #! /bin/bash while echo "Im making files!!" domkdir adircd adirtouch afilesleep 2s done将该文件设定为可执行…

Leetcode 刷题 动态规划 子序列问题

300. 最长递增子序列 首先明确什么是子序列 子序列是由数组派生而来的序列&#xff0c;删除&#xff08;或不删除&#xff09;数组中的元素而不改变其余元素的顺序 不一定要连续 可以删除部分元素 但是要保证相对顺序 1. dp[i]的定义 dp[i]表示i之前包括i的以nums[i]结尾的最长…

Hutool 30

Hutool是一个Java工具包&#xff0c;提供了丰富的工具类库和简化开发的工具方法。它的目标是提供一套丰富、实用、高效和易用的Java工具类&#xff0c;以提升开发者的开发效率和开发质量。以下是Hutool的一些主要特点和功能模块&#xff1a; 常用工具类&#xff1a;Hutool提供了…

【Linux | Shell命令】bash shell 进程、磁盘、排序命令

目录 一、概述二、进程相关命令2.1 ps 命令 三四五 一、概述 上篇文章 bash shell 基础命令 中&#xff0c;介绍了一些与目录、文件相关的 shell 命令&#xff0c;本文继续介绍其他与进程、磁盘、排序、归档相关的命令&#xff0c;读者可以在自己的Linux系统下&#xff0c;实操…

【AI赋能未来】一文带你了解生成对抗网络(GAN)

自我介绍⛵ &#x1f4e3;我是秋说&#xff0c;研究人工智能、大数据等前沿技术&#xff0c;传递Java、Python等语言知识。 &#x1f649;主页链接&#xff1a;秋说的博客 &#x1f4c6; 学习专栏推荐&#xff1a;MySQL进阶之路、C刷题集、网络安全攻防姿势总结 欢迎点赞 &…