一、拆分
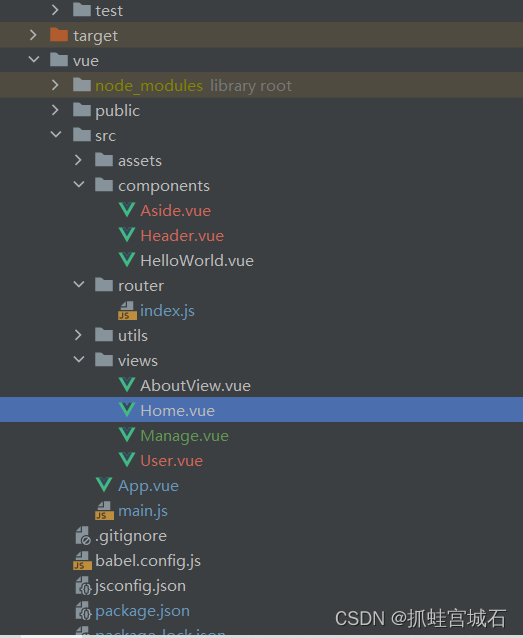
新建包:
Aside和Header都是组件
User为视图
Aside.vue:
<template>
  <el-menu :default-openeds="['1', '3']" style="min-height: 100%; overflow-x: hidden"
           background-color="rgb(48, 65, 86)"
           text-color="#fff"
           active-text-color="#ffd04b"
           :collapse-transition="false"
           :collapse="isCollapse"

  >
    <div style="height: 60px; line-height: 60px; text-align: center">
      <img src="../assets/logo.png" alt="" style="width: 20px; position: relative; top: 5px; right: 5px">
      <b style="color: white" v-show="logoTextShow">后台管理系统</b>
    </div>
    <el-menu-item index="/">
      <template slot="title">
        <i class="el-icon-s-home"></i>
        <span slot="title">主页</span>
      </template>
    </el-menu-item>

    <el-submenu index="2">
      <template slot="title">
        <i class="el-icon-menu"></i>
        <span slot="title">系统管理</span>
      </template>
        <el-menu-item index="/user">
          <template slot="title">
            <i class="el-icon-user"></i>
            <span slot="title">用户管理</span>
          </template>
        </el-menu-item>
    </el-submenu>
  </el-menu>
</template>

<script>
export default {
  name: "Aside",


//根据数据类型定义变量
  props:{
    isCollapse:Boolean,
    logoTextShow:Boolean
  },

}
</script>

<style scoped>

</style>
Head.vue
<template>
  <div style="font-size: 12px;line-height: 60px; display: flex">
    <div style="flex: 1;">
      <span :class="collapseBtnClass" style="cursor: pointer; font-size: 18px" @click="collapse"></span>

      <el-breadcrumb separator="/" style="display: inline-block;margin-left: 10px" >
        <el-breadcrumb-item :to="item.paths" :key v-for="item in paths">{{ item.name }}</el-breadcrumb-item>
      </el-breadcrumb>

    </div>
    <el-dropdown style="width: 70px; cursor: pointer">
      <span>王小虎</span><i class="el-icon-arrow-down" style="margin-left: 5px"></i>
      <el-dropdown-menu slot="dropdown">
        <el-dropdown-item style="font-size: 14px; padding: 5px 0">个人信息</el-dropdown-item>
        <el-dropdown-item style="font-size: 14px; padding: 5px 0">退出</el-dropdown-item>
      </el-dropdown-menu>
    </el-dropdown>
  </div>
</template>

<script>
export default {
  name: "Header",
  props:{
    collapseBtnClass: String,
    collapse:Function
  },
  data(){
    return{
      paths:[]
    }
  },
}
</script>

<style scoped>

</style>
User.vue
拆出页面布局及方法
<template>
<div>

  <div style="margin: 10px 0">
    <el-input style="width: 200px" placeholder="请输入名称" suffix-icon="el-icon-search"
              v-model="username"></el-input>
    <el-input style="width: 200px" placeholder="请输入邮箱" suffix-icon="el-icon-message"
              v-model="email" class="ml-5"></el-input>
    <el-input style="width: 200px" placeholder="请输入地址" suffix-icon="el-icon-position"
              v-model="address" class="ml-5"></el-input>
    <el-button class="ml-5" type="primary" @click="load">搜索</el-button>
    <el-button class="ml-5" type="warning" @click="reset">重置</el-button>
  </div>

  <div style="margin: 10px 0">
    <el-button type="primary" @click="handleAdd">新增 <i class="el-icon-circle-plus-outline"></i></el-button>
    <el-popconfirm
        class="ml-5"
        confirm-button-text='确定'
        cancel-button-text='我再想想'
        icon="el-icon-info"
        icon-color="red"
        title="这是一段内容确定删除吗?"
        @confirm="delBatch"
    >
      <el-button type="danger" slot="reference">批量删除 <i class="el-icon-remove-outline"></i></el-button>
    </el-popconfirm>
    <el-button type="primary" class="ml-5">导入 <i class="el-icon-bottom"></i></el-button>
    <el-button type="primary">导出 <i class="el-icon-top"></i></el-button>
  </div>

  <el-table :data="tableData" border stripe :header-cell-class-name="headerBg"
            @selection-change="handleSelectionChange">
    <el-table-column
        type="selection"
        width="55">
    </el-table-column>
    <el-table-column prop="id" label="ID" width="80"></el-table-column>
    <el-table-column prop="username" label="用户名" width="140"></el-table-column>
    <el-table-column prop="nickname" label="昵称" width="120"></el-table-column>
    <el-table-column prop="email" label="邮箱"></el-table-column>
    <el-table-column prop="phone" label="电话"></el-table-column>
    <el-table-column prop="address" label="地址"></el-table-column>
    <el-table-column label="操作" width="200" align="center">
      <template slot-scope="scope">
        <el-button type="success" @click="handleEdit(scope.row)">编辑 <i class="el-icon-edit"></i></el-button>
        <el-popconfirm
            confirm-button-text='确定'
            cancel-button-text='我再想想'
            icon="el-icon-info"
            icon-color="red"
            title="这是一段内容确定删除吗?"
            @confirm="del(scope.row.id)"
        >

          <el-button type="danger" slot="reference" class="ml-5">删除 <i class="el-icon-remove-outline"></i>
          </el-button>
        </el-popconfirm>
      </template>
    </el-table-column>
  </el-table>
  <div style="padding: 10px 0">
    <el-pagination
        @size-change="handleSizeChange"
        @current-change="handleCurrentChange"
        :current-page="pageNum"
        :page-sizes="[2, 5, 10, 20]"
        :page-size="pageSize"
        layout="total, sizes, prev, pager, next, jumper"
        :total="total">
    </el-pagination>
  </div>

  <!--新增表单-->
  <el-dialog title="用户信息" :visible.sync="dialogFormVisible" width="30%">
    <el-form label-width="80px" size="small">
      <el-form-item label="用户名">
        <el-input v-model="form.username" autocomplete="off"></el-input>
      </el-form-item>
      <el-form-item label="昵称">
        <el-input v-model="form.nickname" autocomplete="off"></el-input>
      </el-form-item>
      <el-form-item label="邮箱">
        <el-input v-model="form.email" autocomplete="off"></el-input>
      </el-form-item>
      <el-form-item label="电话">
        <el-input v-model="form.phone" autocomplete="off"></el-input>
      </el-form-item>
      <el-form-item label="地址">
        <el-input v-model="form.address" autocomplete="off"></el-input>
      </el-form-item>
    </el-form>
    <div slot="footer" class="dialog-footer">
      <el-button @click="dialogFormVisible = false">取 消</el-button>
      <el-button type="primary" @click="save">确 定</el-button>
    </div>
  </el-dialog>
</div>
</template>

<script>
export default {
  name: "User",
  data(){
    return {
      dialogFormVisible: false,
      multipleSelection: [],
      tableData: [],
      total: 0,
      pageNum: 1,
      pageSize: 2,
      form: {},
      username: "",
      email: "",
      address: "",
      headerBg: 'headerBg'
    }
  },
  created() {
    this.load()
  },
  methods:{
    load() {
      this.request.get("/user/selectPage", {
        params: {
          pageNum: this.pageNum,
          pageSize: this.pageSize,
          username: this.username,
          address: this.address,
          email: this.email
        }
      }).then(res => {
        console.log(res)
        this.tableData = res.records
        this.total = res.total
      })

    },
    reset() {
      this.username = ""
      this.email = ""
      this.address = ""
    },

    //新增方法
    handleAdd() {
      this.dialogFormVisible = true
      this.form = {}
    },
    save() {
      this.request.post("/user/saveUser", this.form).then(res => {
        if (res) {
          this.$message.success("保存成功")
          this.dialogFormVisible = false
          this.load()
        } else {
          this.$message.error("保存失败")
          this.dialogFormVisible = false
        }
      })
    },

    /*编辑方法*/
    handleEdit(row) {
      this.form = JSON.parse(JSON.stringify(row))
      this.dialogFormVisible = true
    },

    //删除方法
    del(id) {
      this.request.delete("/user/" + id).then(res => {
        if (res) {
          this.$message.success("删除成功")
          this.load()
        } else {
          this.$message.error("删除失败")
        }
      })
    },
    //批量删除
    delBatch() {
      //把对象的数组变成纯id数组
      let ids = this.multipleSelection.map(v => v.id)
      this.request.post("/user/del/batch", ids).then(res => {
        if (res) {
          this.$message.success("删除成功")
          this.load()
        } else {
          this.$message.error("删除失败")
        }
      })
    },

    handleSelectionChange(val) {
      console.log(val)
      this.multipleSelection = val
    },

    handleSizeChange(pageSize) {
      console.log(pageSize)
      this.pageSize = pageSize
      this.load()
    },
    handleCurrentChange(pageNum) {
      console.log(pageNum)
      this.pageNum = pageNum
      this.load()
    }
  }
}
</script>

<style>
.headerBg {
  background: #eee !important;
}
</style>
Manage.vue
调用拆分的视图及组件
视图:使用router-view调用
组件:导入组件包:
//导入
import Aside from "@/components/Aside.vue";
import Header from "@/components/Header.vue";
创建组件包含内容
//调用组件
  components: {
    Aside,
    Header,
  },
调用组件:
<el-aside :width="sideWidth + 'px'" style="box-shadow: 2px 0 6px rgb(0 21 41 / 35%);">
      <Aside :isCollapse="isCollapse" :logoTextShow="logoTextShow"/>
    </el-aside>


<el-container>
      <el-header style=" border-bottom: 1px solid #ccc;">
        <Header :collapseBtnClass="collapseBtnClass" :collapse="collapse"/>
      </el-header>

      <el-main>
        <!--表示当前页面的子路由会在router-view展示-->
        <router-view/>
      </el-main>

    </el-container>
<template>
<el-container style="min-height: 100vh">
<el-aside :width="sideWidth + 'px'" style="box-shadow: 2px 0 6px rgb(0 21 41 / 35%);">
<Aside :isCollapse="isCollapse" :logoTextShow="logoTextShow"/>
</el-aside>
<el-container>
<el-header style=" border-bottom: 1px solid #ccc;">
<Header :collapseBtnClass="collapseBtnClass" :collapse="collapse"/>
</el-header>
<el-main>
<!--表示当前页面的子路由会在router-view展示-->
<router-view/>
</el-main>
</el-container>
</el-container>
</template>
<script>
//导入
import Aside from "@/components/Aside.vue";
import Header from "@/components/Header.vue";
export default {
name: 'Home',
data() {
return {
collapseBtnClass: 'el-icon-s-fold',
isCollapse: false,
sideWidth: 200,
logoTextShow: true,
}
},
//调用组件
components: {
Aside,
Header,
},
methods: {
collapse() { // 点击收缩按钮触发
this.isCollapse = !this.isCollapse
this.logoTextShow = !this.logoTextShow
if (this.isCollapse) { // 收缩
this.sideWidth = 64
this.collapseBtnClass = 'el-icon-s-unfold'
this.logoTextShow = false
} else { // 展开
this.sideWidth = 200
this.collapseBtnClass = 'el-icon-s-fold'
this.logoTextShow = true
}
},
}
}
</script>
<style>
</style>router/index.js
import Vue from 'vue'
import VueRouter from 'vue-router'

Vue.use(VueRouter)

const routes = [
  {
    path: '/',
    component: () => import('../views/Manage.vue'),
    redirect:"/home",
    children:[
      {path: 'user', name: '用户管理', component: () => import('../views/User.vue'),},
      {path: 'home', name: '首页', component: () => import('../views/Home.vue'),}

    ]
  },
  {
    path: '/about',
    name: 'About',
    component: () => import('../views/AboutView.vue')
  }
]

const router = new VueRouter({
  mode: 'history',
  base: process.env.BASE_URL,
  routes
})

export default router
Vue路由使用:
Aside:
<template>
  <el-menu :default-openeds="['1', '3']" style="min-height: 100%; overflow-x: hidden"
           background-color="rgb(48, 65, 86)"
           text-color="#fff"
           active-text-color="#ffd04b"
           :collapse-transition="false"
           :collapse="isCollapse"
//添加就能跳转
           router
  >
    <div style="height: 60px; line-height: 60px; text-align: center">
      <img src="../assets/logo.png" alt="" style="width: 20px; position: relative; top: 5px; right: 5px">
      <b style="color: white" v-show="logoTextShow">后台管理系统</b>
    </div>
    <el-menu-item index="/home">
      <template slot="title">
        <i class="el-icon-house"></i>
        <span slot="title">主页</span>
      </template>
    </el-menu-item>
    <el-submenu index="2">
      <template slot="title">
        <i class="el-icon-menu"></i>
        <span slot="title">系统管理</span>
      </template>
      <el-menu-item index="/user">
        <i class="el-icon-s-custom"></i>
        <span slot="title">用户管理</span>
      </el-menu-item>
    </el-submenu>
  </el-menu>
</template>

<script>
export default {
  name: "Aside",
  props: {
    isCollapse: Boolean,
    logoTextShow: Boolean
  }
}
</script>

<style scoped>

</style>
router/index.js
import Vue from 'vue'
import VueRouter from 'vue-router'

Vue.use(VueRouter)

const routes = [
  {
    path: '/',
    component: () => import('../views/Manage.vue'),
    redirect:"/home",
    children:[
      {path: 'user', name: '用户管理', component: () => import('../views/User.vue'),},
      {path: 'home', name: '首页', component: () => import('../views/Home.vue'),}

    ]
  },
  {
    path: '/about',
    name: 'About',
    component: () => import('../views/AboutView.vue')
  }
]

const router = new VueRouter({
  mode: 'history',
  base: process.env.BASE_URL,
  routes
})

/*// 路由守卫
router.beforeEach((to, from, next) => {
  localStorage.setItem("currentPathName", to.name)  // 设置当前的路由名称,为了在Header组件中去使用
  store.commit("setPath")  // 触发store的数据更新
  next()  // 放行路由
})*/

export default router
Head.vue
<template>
  <div style="line-height: 60px; display: flex">
    <div style="flex: 1;">
      <span :class="collapseBtnClass" style="cursor: pointer; font-size: 18px" @click="collapse"></span>

      <el-breadcrumb separator="/" style="display: inline-block; margin-left: 10px">
        <el-breadcrumb-item v-if="this.$route.name !== '主页'">{{ this.$route.name }}</el-breadcrumb-item>
      </el-breadcrumb>
    </div>
    <el-dropdown style="width: 70px; cursor: pointer">
      <span>王小虎</span><i class="el-icon-arrow-down" style="margin-left: 5px"></i>
      <el-dropdown-menu slot="dropdown" style="width: 100px; text-align: center">
        <el-dropdown-item style="font-size: 14px; padding: 5px 0">个人信息</el-dropdown-item>
        <el-dropdown-item style="font-size: 14px; padding: 5px 0">退出</el-dropdown-item>
      </el-dropdown-menu>
    </el-dropdown>
  </div>
</template>

<script>
export default {
  name: "Header",
  props: {
    collapseBtnClass: String,
    collapse: Function,
  },
  /*computed: {
    currentPathName () {
      return this.$store.state.currentPathName;  //需要监听的数据
    }
  }*/
}
</script>

<style scoped>

</style>
Vuex下载
npm i vuex -Sstore.js
import Vue from 'vue'
import Vuex from 'vuex'

Vue.use(Vuex)

const store = new Vuex.Store({
    state: {
        currentPathName: ''
    },
    mutations: {
        setPath (state) {
            state.currentPathName = localStorage.getItem("currentPathName")
        }
    }
})

export default store
main.js
import store from './store'


new Vue({
    router,
    store,
    render: h => h(App)
}).$mount('#app')
