1 Wav2Lip-HD项目介绍
数字人打造中语音驱动人脸和超分辨率重建两种必备的模型,它们被用于实现数字人的语音和图像方面的功能。通过Wav2Lip-HD项目可以快速使用这两种模型,完成高清数字人形象的打造。
项目代码地址:github地址
1.1 语音驱动面部模型wav2lip
语音驱动人脸技术主要是通过语音信号处理和机器学习等技术,实现数字人的语音识别和语音合成,从而实现数字人的语音交互功能。同时,结合人脸识别等技术,还可以实现数字人的表情和口型等与语音交互相关的功能。
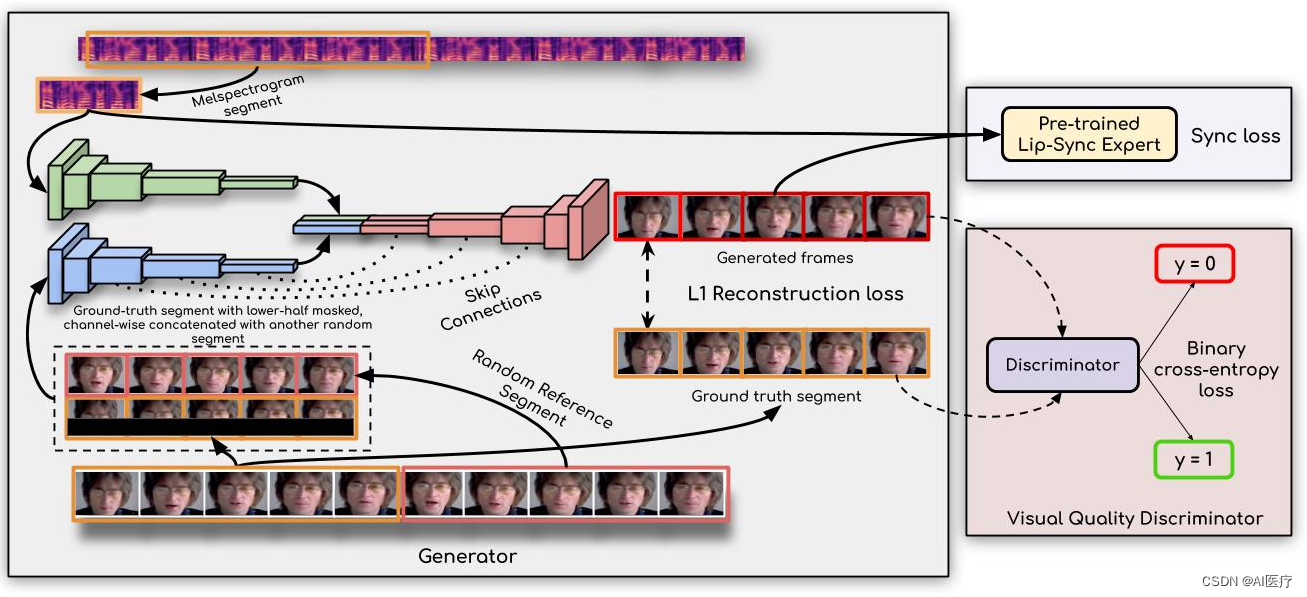
Wav2Lip模型是一个两阶段模型。
- 第一阶段是:训练一个能够判别声音与嘴型是否同步的判别器;
- 第二阶段是:采用编码-解码模型结构(一个生成器 ,两个判别器);
1.2 图像超分辨率模型Real-ESRGAN
超分辨率重建技术则主要用于数字人的图像处理,通过将低分辨率的图像进行处理,从而生成高分辨率的图像,从而实现数字人的图像交互功能。超分辨率重建技术可以应用于数字人的头发、皮肤、服装等细节部分的处理,使数字人更加真实和逼真。

Real-ESRGAN是腾讯ARC实验室发表超分辨率算法,目标是开发出实用的图像/视频修复算法。ESRGAN 的基础上使用纯合成的数据来进行训练,以使其能被应用于实际的图片修复的场景。
- 提出一种高阶退化过程(high-order degradation process)来模拟实际退化,并利用 sinc 滤波器给训练图片添加 Ringing artifacts(振铃伪影,周围震荡波的感觉)和 Overshoot artifacts(过冲伪影,如白边)构造训练集
- 用 U-net 而不是 VGG 作为 GAN 的 Discriminator,提高鉴别器能力并稳定训练动态
- Real-ESRGAN 性能更优,效果更好
2 运行环境构建
2.1 annoconda安装
annoconda安装和使用详见:annoconda环境构建
2.2 运行环境准备
conda create -n wav2lip-hd python=3.9
conda activate wav2lip-hd

conda install ffmpeg

git clone https://github.com/saifhassan/Wav2Lip-HD.git
cd Wav2Lip-HD
rm -fr Real-ESRGAN
git clone https://github.com/xinntao/Real-ESRGAN.git
修改requirements.txt,修改下面两行:
vi requirements.txtlibrosa==0.9.1
numba==0.56.4安装依赖
pip install -r requirements.txt
pip install basicsr==1.4.2
2.3 模型文件下载
下载第一个预训练模型包:预训练模型1
下载完成后,将以下几个文件移动到 checkpoints文件夹下:
esrgan_yunying.pth,face_segmentation.pth,net_g_67500.pth,pretrained.state,s3fd.pth,wav2lip_gan.pth
移动后的通过命令查看显示如下:
 ll checkpoints/
总用量 1425200
-rw-r--r-- 1 root root  67040989 6月  19 17:14 esrgan_yunying.pth
-rw-r--r-- 1 root root  53289463 6月  19 17:14 face_segmentation.pth
-rw-r--r-- 1 root root  66919172 6月  19 17:14 net_g_67500.pth
-rw-r--r-- 1 root root 310688649 6月  19 17:15 pretrained.state
-rw-r--r-- 1 root root  89843225 6月  19 17:15 s3fd.pth
-rw-r--r-- 1 root root 435801865 6月  19 17:16 wav2lip_gan.pth
下载第二个预训练模型包:预训练模型2
下载完成后,将RealESRGAN_x4plus.pth文件移动到 Real-ESRGAN/weights/文件夹下,移动后命令行查看如下:
 ll Real-ESRGAN/weights/
总用量 65476
-rw-r--r-- 1 root root       54 6月  19 20:22 README.md
-rw-r--r-- 1 root root 67040989 6月  19 17:15 RealESRGAN_x4plus.pth
将detection_Resnet50_Final.pth,GFPGANv1.3.pth,parsing_parsenet.pth移动到
Real-ESRGAN/gfpgan/weights/文件夹下,移动完成后,命令行查看如下:
ll Real-ESRGAN/gfpgan/weights/
总用量 530728
-rw-r--r-- 1 root root 109497761 6月  19 17:14 detection_Resnet50_Final.pth
-rw-r--r-- 1 root root 348632874 6月  20 17:09 GFPGANv1.3.pth
-rw-r--r-- 1 root root  85331193 6月  19 17:14 parsing_parsenet.pth
2.4 修改模型地址(避免从公网下载):
vi Real-ESRGAN/inference_realesrgan.py if args.face_enhance: # Use GFPGAN for face enhancement
from gfpgan import GFPGANer
face_enhancer = GFPGANer(
model_path='https://github.com/TencentARC/GFPGAN/releases/download/v1.3.0/GFPGANv1.3.pth',
upscale=args.outscale,
arch='clean',
channel_multiplier=2,
bg_upsampler=upsampler)
修改为:
if args.face_enhance: # Use GFPGAN for face enhancement
from gfpgan import GFPGANer
face_enhancer = GFPGANer(
model_path='./gfpgan/weights/GFPGANv1.3.pth',
upscale=args.outscale,
arch='clean',
channel_multiplier=2,
bg_upsampler=upsampler)2.5 修改一行报错的代码:
vi Real-ESRGAN/realesrgan/__init__.py注释掉最后一行,注释后如下:
# flake8: noqa
from .archs import *
from .data import *
from .models import *
from .utils import *
#from .version import *
3 启动项目生成
3.1 上传文件
将demo.mp4放入input_videos 目录下

将demo.wav放入input_audios 目录下
3.2 更改run_final.sh文件
主要修改以下两行:
filename=kennedy
input_audio=input_audios/ai.wav
修改后的文件内容如下:
export filename=demo
export input_video=input_videos
export input_audio=input_audios/demo.wav
export frames_wav2lip=frames_wav2lip
export frames_hd=frames_hd
export output_videos_wav2lip=output_videos_wav2lip
export output_videos_hd=output_videos_hd
export back_dir=..

python3 inference.py --checkpoint_path "checkpoints/wav2lip_gan.pth" --segmentation_path "checkpoints/face_segmentation.pth" --sr_path "checkpoints/esrgan_yunying.pth" --face ${input_video}/${filename}.mp4 --audio ${input_audio} --save_frames --gt_path "data/gt" --pred_path "data/lq" --no_sr --no_segmentation --outfile ${output_videos_wav2lip}/${filename}.mp4
python video2frames.py --input_video ${output_videos_wav2lip}/${filename}.mp4 --frames_path ${frames_wav2lip}/${filename}
cd Real-ESRGAN
python inference_realesrgan.py -n RealESRGAN_x4plus -i ${back_dir}/${frames_wav2lip}/${filename} --output ${back_dir}/${frames_hd}/${filename} --outscale 3.5 --face_enhance
3.3 启动生成模型
bash run_final.sh3.4 生成结果
output_videos_wav2lip:wav2lip 模型生成的视频.frames_wav2lip:wav2lip 模型生成的视频帧frames_hd:Real-ESRGAN模型生成超分辨率视频帧.output_videos_hd:生成的最终结果视频
3.5 结果展示

