今天介绍一下p4的tutorials-master\utils如何将tutorials-master\exercises下各个小实验的实现,有助于以后自己构建mininet并配置p4交换机,通过本博客可以简单了解:
- Makefile是如何实现相关的实验的
- 基于p4的mininet如何搭建
1.Makefile干了什么?
1.1 实验文件夹下的makefile
我们这里以防火墙为例,当在实验文件夹下的命令行使用run的时候,真正make的文件其实是工具文件夹下的MakefileBMV2_SWITCH_EXE = simple_switch_grpc TOPO = pod-topo/topology.json DEFAULT_PROG = basic.p4 include ../../utils/Makefile
1.2 build创建文件夹
在run的时候,可以看到,先是build了一下,而在build中,创建了一个名称为build文件夹,以供未来编译p4程序使用run: build sudo python3 $(RUN_SCRIPT) -t $(TOPO) $(run_args) build: dirs $(compiled_json) dirs: mkdir -p $(BUILD_DIR) $(PCAP_DIR) $(LOG_DIR)
1.3 编译p4文件成信息文件与json
build结束以后,进入了p4编译阶段,将make工作目录下的所有p4程序编译一下,生成的信息文件以及json文件都存在了build文件夹下,其中P4C_ARGS += --p4runtime-files $(BUILD_DIR)/$(basename $@).p4.p4info.txt%.json: %.p4 $(P4C) --p4v 16 $(P4C_ARGS) -o $(BUILD_DIR)/$@ $<
1.4 run
从下面的make代码可以看到,其实run调用的是工具文件夹下的run_exercise.py的文件,python运行传递的参数绕来绕去,实际上很简单,这里以防火墙为例,用到的就是basic.p4文件编译的json用到的交换机是simple_switch_grpc,创建的拓扑是pod-topo/topology.json
run_exercise.py究竟是干嘛的,在后面说。
run: build
	sudo python3 $(RUN_SCRIPT) -t $(TOPO) $(run_args)

#run的一些参数
RUN_SCRIPT = ../../utils/run_exercise.py
TOPO = pod-topo/topology.json

ifndef NO_P4
run_args += -j $(DEFAULT_JSON)
endif

# Set BMV2_SWITCH_EXE to override the BMv2 target
ifdef BMV2_SWITCH_EXE
run_args += -b $(BMV2_SWITCH_EXE)
endif

DEFAULT_JSON = $(BUILD_DIR)/$(DEFAULT_PROG:.p4=.json)
DEFAULT_PROG = basic.p4
BMV2_SWITCH_EXE = simple_switch_grpc
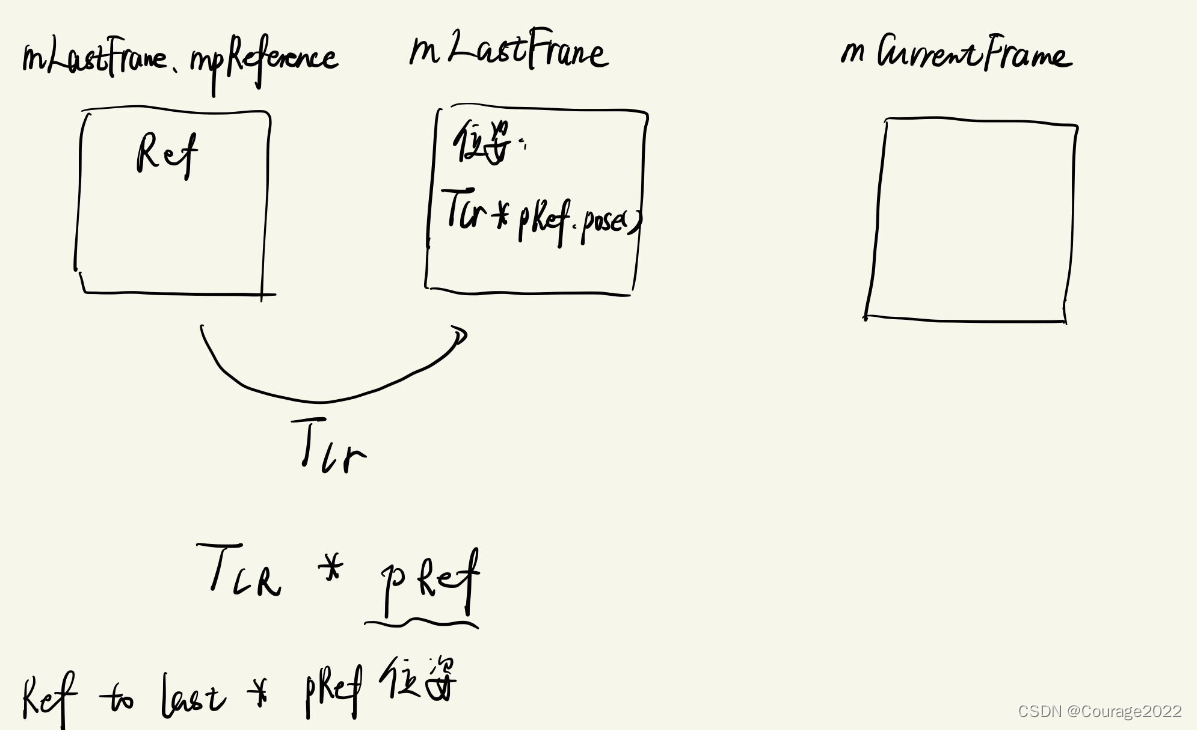
最后,附上一张图可以很直观的看到,makefile做了什么

2.run_exercise.py是怎么创建的基于p4的mininet网络的?
我想,如果是要自己玩一些花样了话,这些多少是要了解一些的。。。
这里继续以防火墙小实验为例,防火墙小实验中,有4台交换机,但是3台交换机的配置是basic.p4有一台是firewall.p4,这个差异化配置是怎么做到的呢?
2.1 run_exercise.py大致流程
从下面的代码看出,简单来说,获取一堆参数,然后创建网络,然后运行起来,就这么简单
if __name__ == '__main__':
    # from mininet.log import setLogLevel
    # setLogLevel("info")

    args = get_args()
    exercise = ExerciseRunner(args.topo, args.log_dir, args.pcap_dir,
                              args.switch_json, args.behavioral_exe, args.quiet)

    exercise.run_exercise()
看了一下参数的获取函数get_args(),结合在make run中涉及到的
sudo python3 ../../utils/run_exercise.py -t pod-topo/topology.json -j build/basic.json -b simple_switch_grpc的指令,就是把拓扑的json,和p4编译后的json还有行为模型传进来
def get_args():
    cwd = os.getcwd()
    default_logs = os.path.join(cwd, 'logs')
    default_pcaps = os.path.join(cwd, 'pcaps')
    parser = argparse.ArgumentParser()
    parser.add_argument('-q', '--quiet', help='Suppress log messages.',
                        action='store_true', required=False, default=False)
    parser.add_argument('-t', '--topo', help='Path to topology json',
                        type=str, required=False, default='./topology.json')
    parser.add_argument('-l', '--log-dir', type=str, required=False, default=default_logs)
    parser.add_argument('-p', '--pcap-dir', type=str, required=False, default=default_pcaps)
    parser.add_argument('-j', '--switch_json', type=str, required=False)
    parser.add_argument('-b', '--behavioral-exe', help='Path to behavioral executable',
                                type=str, required=False, default='simple_switch')
    return parser.parse_args()
2.2 ExerciseRunner
先看构造函数,其实就是把上面的拓扑json提取出来存进来
def __init__(self, topo_file, log_dir, pcap_dir,
                       switch_json, bmv2_exe='simple_switch', quiet=False):
        """ Initializes some attributes and reads the topology json. Does not
            actually run the exercise. Use run_exercise() for that.

            Arguments:
                topo_file : string    // A json file which describes the exercise's
                                         mininet topology.
                log_dir  : string     // Path to a directory for storing exercise logs
                pcap_dir : string     // Ditto, but for mininet switch pcap files
                switch_json : string  // Path to a compiled p4 json for bmv2
                bmv2_exe    : string  // Path to the p4 behavioral binary
                quiet : bool          // Enable/disable script debug messages
        """

        self.quiet = quiet
        self.logger('Reading topology file.')
        with open(topo_file, 'r') as f:
            topo = json.load(f)
        self.hosts = topo['hosts']
        self.switches = topo['switches']
        self.links = self.parse_links(topo['links'])

        # Ensure all the needed directories exist and are directories
        for dir_name in [log_dir, pcap_dir]:
            if not os.path.isdir(dir_name):
                if os.path.exists(dir_name):
                    raise Exception("'%s' exists and is not a directory!" % dir_name)
                os.mkdir(dir_name)
        self.log_dir = log_dir
        self.pcap_dir = pcap_dir
        self.switch_json = switch_json
        self.bmv2_exe = bmv2_exe
拓扑的json格式,可以看到,每一个主机都会有一个commands确保以后可以通过arp发现一下对方,在交换机中,具有一个runtime_json,这个是运行时的控制面文件,里面存一些table信息,此外,默认情况下,交换机都会采用默认的p4配置,如果有"program"就会用里面的p4编译的json配置
{
    "hosts": {
        "h1": {"ip": "10.0.1.1/24", "mac": "08:00:00:00:01:11",
               "commands":["route add default gw 10.0.1.10 dev eth0",
                           "arp -i eth0 -s 10.0.1.10 08:00:00:00:01:00"]},
        "h2": {"ip": "10.0.2.2/24", "mac": "08:00:00:00:02:22",
               "commands":["route add default gw 10.0.2.20 dev eth0",
                           "arp -i eth0 -s 10.0.2.20 08:00:00:00:02:00"]},
        "h3": {"ip": "10.0.3.3/24", "mac": "08:00:00:00:03:33",
               "commands":["route add default gw 10.0.3.30 dev eth0",
                           "arp -i eth0 -s 10.0.3.30 08:00:00:00:03:00"]},
        "h4": {"ip": "10.0.4.4/24", "mac": "08:00:00:00:04:44",
               "commands":["route add default gw 10.0.4.40 dev eth0",
                           "arp -i eth0 -s 10.0.4.40 08:00:00:00:04:00"]}
    },
    "switches": {
        "s1": { "runtime_json" : "pod-topo/s1-runtime.json",
                "program" : "build/firewall.json" },
        "s2": { "runtime_json" : "pod-topo/s2-runtime.json" },
        "s3": { "runtime_json" : "pod-topo/s3-runtime.json" },
        "s4": { "runtime_json" : "pod-topo/s4-runtime.json" }
    },
    "links": [
        ["h1", "s1-p1"], ["h2", "s1-p2"], ["s1-p3", "s3-p1"], ["s1-p4", "s4-p2"],
        ["h3", "s2-p1"], ["h4", "s2-p2"], ["s2-p3", "s4-p1"], ["s2-p4", "s3-p2"]
    ]
}
2.3 create_nework()
- 先看一眼大概流程,可以看到,首先定义一下交换机的默认配置,重点就是这个p4编译的json,json_path=self.switch_json,其实具体来说在这里传进来的参数就是在刚才命令行里看到的-j build/basic.json
def create_network(self):
        """ Create the mininet network object, and store it as self.net.

            Side effects:
                - Mininet topology instance stored as self.topo
                - Mininet instance stored as self.net
        """
        self.logger("Building mininet topology.")

        defaultSwitchClass = configureP4Switch(
                                sw_path=self.bmv2_exe,
                                json_path=self.switch_json,
                                log_console=True,
                                pcap_dump=self.pcap_dir)

        self.topo = ExerciseTopo(self.hosts, self.switches, self.links, self.log_dir, self.bmv2_exe, self.pcap_dir)

        self.net = Mininet(topo = self.topo,
                      link = TCLink,
                      host = P4Host,
                      switch = defaultSwitchClass,
                      controller = None)
- 在上面的代码中,看到创建了一个拓扑用到了ExerciseTopo,里面就是根据链路、交换机、主机进行一个创建,这里主要看交换机,如果交换机的program字段存在,就比如防火墙的配置存在,就会把这个交换机配置成具有防火墙功能的交换机,
for sw, params in switches.items():
            if "program" in params:
                switchClass = configureP4Switch(
                        sw_path=bmv2_exe,
                        json_path=params["program"],
                        log_console=True,
                        pcap_dump=pcap_dir)
            else:
                # add default switch
                switchClass = None
            self.addSwitch(sw, log_file="%s/%s.log" %(log_dir, sw), cls=switchClass)
具体的配置函数看一下就好了,这里不深究,因为就算以后自己写一个p4文件,写一个topo.json也不会改写这个函数,除非你想要调整一下next_thrift_port = xxx:
def configureP4Switch(**switch_args):
    """ Helper class that is called by mininet to initialize
        the virtual P4 switches. The purpose is to ensure each
        switch's thrift server is using a unique port.
    """
    if "sw_path" in switch_args and 'grpc' in switch_args['sw_path']:
        # If grpc appears in the BMv2 switch target, we assume will start P4Runtime
        class ConfiguredP4RuntimeSwitch(P4RuntimeSwitch):
            def __init__(self, *opts, **kwargs):
                kwargs.update(switch_args)
                P4RuntimeSwitch.__init__(self, *opts, **kwargs)

            def describe(self):
                print("%s -> gRPC port: %d" % (self.name, self.grpc_port))

        return ConfiguredP4RuntimeSwitch
    else:
        class ConfiguredP4Switch(P4Switch):
            next_thrift_port = 9090
            def __init__(self, *opts, **kwargs):
                global next_thrift_port
                kwargs.update(switch_args)
                kwargs['thrift_port'] = ConfiguredP4Switch.next_thrift_port
                ConfiguredP4Switch.next_thrift_port += 1
                P4Switch.__init__(self, *opts, **kwargs)

            def describe(self):
                print("%s -> Thrift port: %d" % (self.name, self.thrift_port))

        return ConfiguredP4Switch
- 在执行完下面的代码以后,就已经有一个拓扑大概的样子了,连接,主机,交换机及其类型都配置好了(这里只配置好了防火墙的交换机),因为别的交换机program不存在,所以默认的配置还没有配置,从上面的代码段中看到是None,它们的默认配置在mininet中配置的
self.topo = ExerciseTopo(self.hosts, self.switches, self.links, self.log_dir, self.bmv2_exe, self.pcap_dir)去看一眼mininet的源码,就可以很清楚的发现,带着defaultSwitchClass去配置Mininet,就会把还没没有配置的交换机用defaultSwitchClass配置一下,初始化的时候,传defaultSwitchClass的参进去,而且默认build是True
def __init__( self, topo=None, switch=OVSKernelSwitch, host=Host,
                  controller=DefaultController, link=Link, intf=Intf,
                  build=True, xterms=False, cleanup=False, ipBase='10.0.0.0/8',
                  inNamespace=False,
                  autoSetMacs=False, autoStaticArp=False, autoPinCpus=False,
                  listenPort=None, waitConnected=False ):


        ...

        ...

        ...

        if topo and build:
            self.build()
所以在初始化最后一行有一个代码执行了build方法,只看拓扑相关的,build函数实际上调用了buildFromTopo( self.topo ),拓扑就是我们早在ExerciseTopo阶段就已经配置好的拓扑了,但是那个时候,我们只配置了防火墙到s1交换机中,仔细看一下buildFromTopo创建交换机的时候,它的addSwitch方法
def build( self ):
        "Build mininet."
        if self.topo:
            self.buildFromTopo( self.topo )

def buildFromTopo( self, topo=None ):
        """Build mininet from a topology object
           At the end of this function, everything should be connected
           and up."""

        # Possibly we should clean up here and/or validate
        # the topo
        if self.cleanup:
            pass

        info( '*** Creating network\n' )

        if not self.controllers and self.controller:
            # Add a default controller
            info( '*** Adding controller\n' )
            classes = self.controller
            if not isinstance( classes, list ):
                classes = [ classes ]
            for i, cls in enumerate( classes ):
                # Allow Controller objects because nobody understands partial()
                if isinstance( cls, Controller ):
                    self.addController( cls )
                else:
                    self.addController( 'c%d' % i, cls )

        info( '*** Adding hosts:\n' )
        for hostName in topo.hosts():
            self.addHost( hostName, **topo.nodeInfo( hostName ) )
            info( hostName + ' ' )

        info( '\n*** Adding switches:\n' )
        for switchName in topo.switches():
            # A bit ugly: add batch parameter if appropriate
            params = topo.nodeInfo( switchName)
            cls = params.get( 'cls', self.switch )
            if hasattr( cls, 'batchStartup' ):
                params.setdefault( 'batch', True )
            self.addSwitch( switchName, **params )
            info( switchName + ' ' )

        info( '\n*** Adding links:\n' )
        for srcName, dstName, params in topo.links(
                sort=True, withInfo=True ):
            self.addLink( **params )
            info( '(%s, %s) ' % ( srcName, dstName ) )

        info( '\n' )
方法里面写到,里面说到,如果交换机没有cls,也就是cls是None,那就把传参的配置配给它,这里传参的配置就是basic.p4进行配置以后生成的类
def addSwitch( self, name, cls=None, **params ):
        """Add switch.
           name: name of switch to add
           cls: custom switch class/constructor (optional)
           returns: added switch
           side effect: increments listenPort ivar ."""
        defaults = { 'listenPort': self.listenPort,
                     'inNamespace': self.inNamespace }
        defaults.update( params )
        if not cls:
            cls = self.switch
        sw = cls( name, **defaults )
        if not self.inNamespace and self.listenPort:
            self.listenPort += 1
        self.switches.append( sw )
        self.nameToNode[ name ] = sw
        return sw
小结
- 通过阅读makefile文件,了解到如何通过make来运行基于p4的mininet小实验
- 通过阅读run_exercise等源码,了解到以后要如何设置相关的json文件,用来创建mininet,而这个网络创建的代码其实如果不是特定需求了话,也不需要我们去改


![[附源码]JAVA毕业设计企业信息安全评价系统(系统+LW)](https://img-blog.csdnimg.cn/145d7aeec96448a38fcfeb161e7abca5.png)
![[附源码]Python计算机毕业设计Django小区疫情事件处理系统](https://img-blog.csdnimg.cn/c90085f701e84b98b8df0e292a3f182c.png)


![[附源码]计算机毕业设计绿色生鲜Springboot程序](https://img-blog.csdnimg.cn/b890396b330c4401a2c57069cd4961c8.png)


![[附源码]计算机毕业设计JAVA在线二手车交易信息管理系统](https://img-blog.csdnimg.cn/d5a838dec92a48a6ba9702b1fe7868b7.png)