文章目录
- 一、环境搭建
- 1.qemu-8.0.2
- 2.buildroot
- 配置
- 3.编译工具链gcc-linaro-7.2.1
- 下载交叉编译工具链
- 4.linux kernel 5.16
- config_kernel.sh
- 配置内核
- build_kernel.sh
- 5.启动虚拟机
- (1)创建磁盘镜像文件
- (2)拷贝内核镜像和根文件系统到指定目录
- (3)配置和管理虚拟机网络接口
- (4)虚拟机启动脚本start_qemu_arm64_vsock.sh
- 二、测试vsock
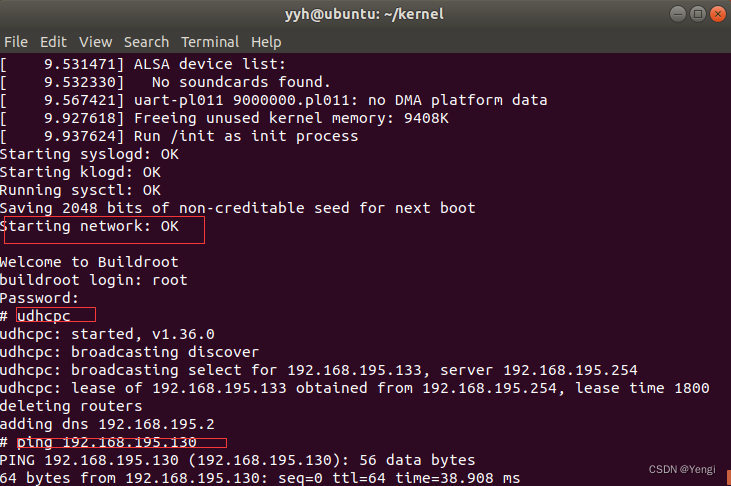
- 1.运行start_qemu_arm64_vsock.sh启动虚拟机
- 2.编译代码
- 3.通过tftp将cli文件传输至arm64虚拟机
- 三、遇到的问题
- 问题1:Running postconf script '/usr/bin/python3 /home/yyh/kernel/qemu-8.0.2/scripts/symlink-install-tree.py'
- 解决方法:
- 问题2:Traceback (most recent call last):File "/usr/lib/command-not-found", line 28, in <module>
- 解决方法:
- 问题3:Err:1 http://security.ubuntu.com/ubuntu bionic-security InRelease
- 解决方法
- 问题4:qemu-system-aarch64: -device vhost-vsock-device,guest-cid=3: vhost-vsock: failed to open vhost device: No such device
- 解决方法
- 原因
- 问题5:ubuntu设置共享文件夹时不显示解决方案
一、环境搭建
1.qemu-8.0.2
https://download.qemu.org/
参考资料: https://wiki.qemu.org/Hosts/Linux
cd
mkdir kernel && cd kernel
wget -c https://download.qemu.org/qemu-8.0.2.tar.xz
tar xvJf qemu-8.0.2.tar.xz
cd qemu-8.0.2
mkdir compile_result && cd compile_result #编译后的目录
../configure --prefix=$(pwd)  --enable-debug
make -j8 && sudo make install
2.buildroot
https://buildroot.org/download.html
 git clone git://git.busybox.net/buildroot
 make menuconfig

#配置好后编译
 make -j8
#编译好的结果会在output目录
配置
在弹出的配置界面中,
设置
Target option ---> Target Architecture为
AArch64 (little endian);
设置
Toolchain ---> Toolchain type为
External toolchain,这时我们可以看到
Toolchain ---> Toolchain的值为
linaro AArch64 xxxx.xx;
设置
System configuration ---> Enable root login with password开启,并设置
System configuration ---> Root password为
xxxx(任意的你喜欢的密码);
设置
System configuration ---> Run a getty (login prompt) after boot ---> TTY port的值为
#按i编辑
ttyAMA0(这一条非常重要,不然虚拟机可能启动不了);
表示使用树莓派上的串口设备ttyAMA0作为终端设备
设置
Target packages ---> Show packages that are also provided by busybox开启;设置
Target packages ---> Debugging, profiling and benchmark ---> strace开启(应用程序和系统调用的信息追踪);设置
Filesystem images ---> cpio the root filesystem开启(生成cpio格式的根文件系统镜像)
3.编译工具链gcc-linaro-7.2.1
下载交叉编译工具链
https://releases.linaro.org/components/toolchain/binaries/
wget -c https://releases.linaro.org/components/toolchain/binaries/7.2-2017.11/aarch64-linux-gnu/gcc-linaro-7.2.1-2017.11-x86_64_aarch64-linux-gnu.tar.xz
sudo mkdir /home/toolchain
sudo tar xvJf gcc-linaro-7.2.1-2017.11-x86_64_aarch64-linux-gnu.tar.xz  -C /home/toolchain
4.linux kernel 5.16
https://www.kernel.org/
https://git.kernel.org/pub/scm/linux/kernel/git/torvalds/linux.git/snapshot/linux-5.16.tar.gz
#下载内核源码:
wget -c https://cdn.kernel.org/pub/linux/kernel/v5.x/linux-5.16.tar.xz
tar xvJf linux-5.16.tar.xz
config_kernel.sh
BUILD_DIR=$(pwd)/linux-5.16

if [ ! -z $1 ]
then
                BUILD_DIR=$1
fi

export ARCH=arm64
export CROSS_COMPILE=/home/toolchain/gcc-linaro-7.2.1-2017.11-x86_64_aarch64-linux-gnu/bin/aarch64-linux-gnu-
cd $BUILD_DIR
make menuconfig
配置内核
#运行config_kernel.sh后进行设置
设置
Boot options ---> (console=ttyAMA0) Default kernel command string
设置其值为console=ttyAMA0

设置
General setup  ---> [*] Initial RAM filesystem and RAM disk (initramfs/initrd) support
                        (/home/yyh/kernel/buildroot/output/images/rootfs.cpio) Initramfs source file(s)
设置其值为
$BUILD_ROOT_PATH/output/images/rootfs.cpio(注意,这里要自己展开变量BUILD_ROOT_PATH);
设置支持virtio-vsock
 [*] Networking support  --->
                  Networking options  --->
                                      <*> Virtual Socket protocol                                                                                            x x
                                                <*>   Virtual Sockets monitoring interface (NEW)                                                                       x x
                                                <*>   Virtual Sockets loopback transport (NEW)                                                                         x x
                                                 <*>   virtio transport for Virtual Sockets
build_kernel.sh
#! /bin/bash

BUILD_DIR=$(pwd)/linux-5.16

if [ ! -z $1 ]
then
    BUILD_DIR=$1
fi

export ARCH=arm64
export CROSS_COMPILE=/home/toolchain/gcc-linaro-7.2.1-2017.11-x86_64_aarch64-linux-gnu/bin/aarch64-linux-gnu-
cd $BUILD_DIR
make -j8
5.启动虚拟机
(1)创建磁盘镜像文件
$(pwd)/qemu-8.0.2/compile_result/qemu-img create -f qcow2 test-qcow2.img 10G
(2)拷贝内核镜像和根文件系统到指定目录
mkdir img_space && cd img_space
mv ../test-qcow2.img .
cp /home/yyh/kernel/buildroot/output/images/rootfs.cpio .
cp /home/yyh/kernel/linux-5.16/arch/arm64/boot/Image .
(3)配置和管理虚拟机网络接口
参考:https://blog.csdn.net/chengbeng1745/article/details/81271024
https://www.jianshu.com/p/110b60c14a8b
/etc/qemu-ifup脚本在启动虚拟机的网络接口时运行,用于配置虚拟机的IP地址、子网掩码、网关等
sudo vim /etc/qemu-ifup
#添加如下内容

#!/bin/sh
switch=br0
interface=ens33
if [ -n "$1" ]; then
    switch_exit=`sudo ifconfig -a | grep $switch`
    interface_switch=`sudo brctl show | grep $interface`
    if [ "$switch_exit" = "" ] ; then
        sudo brctl addbr $switch
    fi
   if [ "$interface_switch" = "" ] ; then
       sudo ifconfig $interface 0.0.0.0 promisc up
       sudo brctl addif $switch $interface
    fi
    sudo ifconfig $1 0.0.0.0 promisc up
    sudo brctl addif $switch $1
    sudo dhclient $switch
else
   echo "Error: no interface specified"
   exit
fi
/etc/qemu-ifdown脚本在关闭虚拟机的网络接口时运行,用于清除虚拟机的网络配置
sudo vim /etc/qemu-ifdown
#添加如下内容
#! /bin/sh

switch=br0
if [ -n "$1" ]; then

#    sudo tunctl -d $1
    sudo brctl delif $switch $1
    sudo ifconfig $1 down
else
    echo "error: no interface specified"
    exit 1
fi
在Linux中创建一个桥接接口br0,并将物理接口eth0添加到该桥接接口上。这样虚拟机可以通过eth0与宿主机进行网络通信。配置好后重启系统sudo reboot
sudo chmod +x /etc/qemu-*
sudo apt-get install uml-utilities bridge-utils
sudo vim /etc/network/interfaces
#添加如下内容
auto eth0
iface eth0 inet manual

auto br0
iface br0 inet dhcp
    bridge_ports eth0
    bridge_stp off
    bridge_fd 0

#创建一个名为br0的桥接接口,并使用DHCP协议自动分配IP地址
#bridge_ports eth0表示将物理接口eth0添加到桥接接口br0上
#bridge_stp off表示关闭STP(Spanning Tree Protocol)
#bridge_fd 0表示禁用桥接接口的转发延迟
(4)虚拟机启动脚本start_qemu_arm64_vsock.sh
#!/bin/sh

QEMU_PATH=$(pwd)/qemu-8.0.2/compile_result/aarch64-softmmu/qemu-system-aarch64
KERNEL_IMG_PATH=$(pwd)/img_space/Image
DISK_IMG_PATH=$(pwd)/img_space/test-qcow2.img
ROOTFS_IMG_PATH=$(pwd)/img_space/rootfs.cpio

MEM_SIZE="4G"
CPU_CORES="4"
NETDEV_TYPE="tap"
NETDEV_ID="net0"
NETDEV_IFNAME="tap0"
NETDEV_SCRIPT="/etc/qemu-ifup"
NETDEV_DOWNSCRIPT="/etc/qemu-ifdown"

sudo \
    $QEMU_PATH \
    -machine virt,accel=tcg \
    -m $MEM_SIZE \
    -smp $CPU_CORES \
    -kernel $KERNEL_IMG_PATH \
    -initrd $ROOTFS_IMG_PATH \
    -append "console=ttyAMA0" \
    -drive file=$DISK_IMG_PATH,format=qcow2,if=virtio,id=hdw \
    -netdev $NETDEV_TYPE,id=$NETDEV_ID,ifname=$NETDEV_IFNAME,script=$NETDEV_SCRIPT,downscript=$NETDEV_DOWNSCRIPT \
    -device virtio-net-pci,netdev=$NETDEV_ID \
    -device vhost-vsock-device,guest-cid=3 \
    -cpu cortex-a57 \
    -serial stdio \
    -display none
qemu相关参数
-machine指定虚拟机的架构和加速器,这里使用了virt和tcg

-m指定虚拟机的内存大小

-smp指定虚拟机的CPU核心数

-kernel指定内核镜像文件的路径

-initrd指定根文件系统镜像文件的路径

-append指定内核的启动参数

-drive指定磁盘镜像文件、格式、接口和ID

-netdev指定网络设备类型、ID、名称、启动脚本和关闭脚本

-device指定设备类型和ID

-cpu指定CPU类型

-serial指定串行控制台

-display指定显示设备类型
二、测试vsock
参考:http://www.manongjc.com/detail/20-yjvqsrjykkxqwfq.html
1.运行start_qemu_arm64_vsock.sh启动虚拟机
2.编译代码
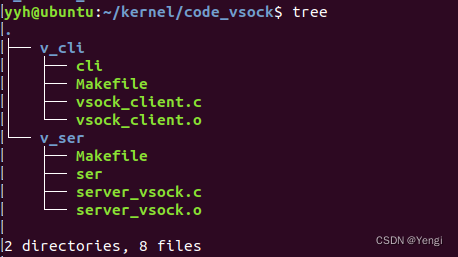
v_cli目录下的makefile
CC =/home/toolchain/gcc-linaro-7.2.1-2017.11-x86_64_aarch64-linux-gnu/bin/aarch64-linux-gnu-gcc
#CC = gcc
CFLAGS = #-Wall -Werror
INCLUDES =
LDFLAGS =
LIBS =
SRCS = vsock_client.c
OBJS = $(SRCS:.c=.o)
TARGET = cli

all: $(TARGET)
$(TARGET): $(OBJS)
    $(CC) $(LDFLAGS) -o $@ $^ $(LIBS)
%.o: %.c
    $(CC) $(CFLAGS) $(INCLUDES) -c -o $@ $<
clean:
    rm -f $(OBJS) $(TARGET)
v_server目录下的makefile
#CC =/home/toolchain/gcc-linaro-7.2.1-2017.11-x86_64_aarch64-linux-gnu/bin/aarch64-linux-gnu-gcc
CC = gcc
CFLAGS = #-Wall -Werror
INCLUDES =
LDFLAGS =
LIBS =
SRCS = vsock_server.c
OBJS = $(SRCS:.c=.o)
TARGET = ser

all: $(TARGET)
$(TARGET): $(OBJS)
    $(CC) $(LDFLAGS) -o $@ $^ $(LIBS)
%.o: %.c
    $(CC) $(CFLAGS) $(INCLUDES) -c -o $@ $<
clean:
    rm -f $(OBJS) $(TARGET)
3.通过tftp将cli文件传输至arm64虚拟机
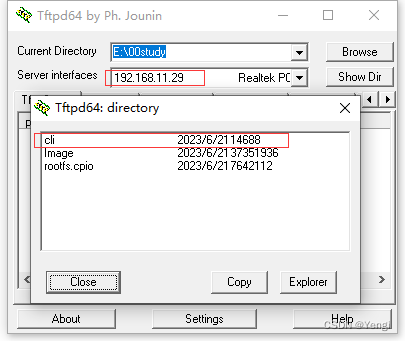
windows启动tftp服务器,将编译好的cli放在设置好的共享目录
#arm64虚拟机通过tftp获取cli文件
tftp -gr cli 192.168.11.29
chmod +x cli
3.运行测试
#ubnutu18.04运行ser
./ser
#arm64虚拟机运行cli
./cli

三、遇到的问题
问题1:Running postconf script ‘/usr/bin/python3 /home/yyh/kernel/qemu-8.0.2/scripts/symlink-install-tree.py’
NOTICE: You are using Python 3.6 which is EOL. Starting with v0.62.0, Meson will require Python 3.7 or newer
解决方法:
sudo apt-get install python3.7
which python3.7
sudo update-alternatives --install /usr/bin/python3 python3 /usr/bin/python3.7 1
python3 --version
问题2:Traceback (most recent call last):File “/usr/lib/command-not-found”, line 28, in
from CommandNotFound import CommandNotFound
File “/usr/lib/python3/dist-packages/CommandNotFound/CommandNotFound.py”, line 19, in
from CommandNotFound.db.db import SqliteDatabase
File “/usr/lib/python3/dist-packages/CommandNotFound/db/db.py”, line 5, in
import apt_pkg
ModuleNotFoundError: No module named ‘apt_pkg’
参考:https://blog.csdn.net/qq_35191755/article/details/108199567
解决方法:
sudo apt-get remove --purge python-apt
sudo apt-get install -f -y python-apt

sudo cp /usr/lib/python3/dist-packages/apt_pkg.cpython-36m-x86_64-linux-gnu.so apt_pkg.cpython-37m-x86_64-linux-gnu.so
sudo apt-get update
问题3:Err:1 http://security.ubuntu.com/ubuntu bionic-security InRelease
Could not resolve ‘security.ubuntu.com’
参考:https://blog.csdn.net/qq_29720657/article/details/109066682
解决方法
#vi /etc/resolv.conf
nameserver 8.8.8.8
nameserver 8.8.4.4
sudo service network-manager restart
问题4:qemu-system-aarch64: -device vhost-vsock-device,guest-cid=3: vhost-vsock: failed to open vhost device: No such device
参考:https://blog.csdn.net/kunyus/article/details/106986621
解决方法
运行下面命令,创建配置文件 /etc/modprobe.d/blacklist-vmware.conf。然后重启sudo reboot
sudo tee /etc/modprobe.d/blacklist-vmware.conf << EOF
blacklist vmw_vsock_virtio_transport_common
blacklist vmw_vsock_vmci_transport
EOF
原因
这是由于linux 检测到在 vmware 环境中运行时,会加载一些 vmware 的模块并使用 vsock 从而产生了冲突。
可以通过命令lsmod | grep vsock来查看哪些模块产生了冲突。
命令输出:
core@ubuntu20-dev:~$ lsmod | grep vsock
vmw_vsock_virtio_transport_common    32768  0
vmw_vsock_vmci_transport    32768  1
vsock                  36864  3 vmw_vsock_virtio_transport_common,vmw_vsock_vmci_transport
vmw_vmci               69632  2 vmw_balloon,vmw_vsock_vmci_transport
问题5:ubuntu设置共享文件夹时不显示解决方案
参考:
https://blog.csdn.net/qq_45953886/article/details/126020253


![[进阶]网络通信:UDP通信,一发一收、多发多收](https://img-blog.csdnimg.cn/62e62086ea1346e7ba0ccb32535749cd.png)


![[保姆级啰嗦教程] Tesseract OCR 5在Windows 10下编译安装及测试 (亲测成功)](https://img-blog.csdnimg.cn/194b86a7c9ee4341888fdb1899f50e0e.png#pic_center)
![[SpringBoot 分布式调度elasticjob 整合 ]](https://img-blog.csdnimg.cn/14e427049b574c098b97d878911393d8.png)

