🍨 本文为🔗365天深度学习训练营 中的学习记录博客 ** 参考文章:Pytorch实战 | 第P5周:运动鞋识别** 🍖 原作者:K同学啊|接辅导、项目定制
文章目录
深度学习----第J1周:ResNet50算法实战 前言 一、残差网络介绍 二、前期工作
三、ResNet-50网络模型 四、构建ResNet-50网络模型 1.tensorflow 代码 2.pytorch 代码(自己实现) 五、模型评估 六、全部代码(tensorflow框架)
经过本周的练习知道ResNet50基本的网络结构,了解残差网络基本结构,自己也用pytorch框架进行实现了ResNet50网络结构代码编写,同时也掌握tensorflow框架下ResNet50网络结构代码编写。 对残差网络这部分内容进行重新梳理,以及数据集有关操作,自己网络结构编写代码时,出现的代码错误自己很容易就能找到并改正。
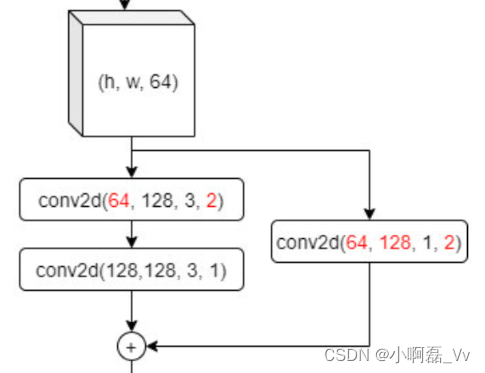
其实残差网络我们可以看一个最基本(小)的一个结构图。 其实最后残差连接进行 add 操作时,会发现特征的宽和高是一致, 而通道数可以不一致
import tensorflow as tf
import matplotlib. pyplot as plt
import os, PIL, pathlib, glob
import numpy as np
from tensorflow import keras
from tensorflow. keras import layers, models
from tensorflow. keras. layers import Input, Activation, BatchNormalization, Flatten
from tensorflow. keras. layers import Dense, Conv2D, MaxPooling2D, ZeroPadding2D, AveragePooling2D
from tensorflow. keras import Model
gpus = tf. config. list_physical_devices( "GPU" )
if gpus:
tf. config. experimental. set_memory_growth( gpus[ 0 ] , True )
tf. config. set_visible_devices( [ gpus[ 0 ] ] , "GPU" )
data_dir = './bird/bird_photos'
data_dir = pathlib. Path( data_dir)
image_count = len ( list ( data_dir. glob( '*/*' ) ) )
print ( "图片总数为: " , image_count)
batch_size = 8
img_height = 224
img_width = 224
train_ds = tf. keras. preprocessing. image_dataset_from_directory(
data_dir,
validation_split= 0.2 ,
subset= "training" ,
seed= 123 ,
image_size= ( img_height, img_width) ,
batch_size= batch_size
)
val_ds = tf. keras. preprocessing. image_dataset_from_directory(
data_dir,
validation_split= 0.2 ,
subset= "validation" ,
seed= 123 ,
image_size= ( img_height, img_width) ,
batch_size= batch_size
)
class_names = train_ds. class_names
print ( class_names)
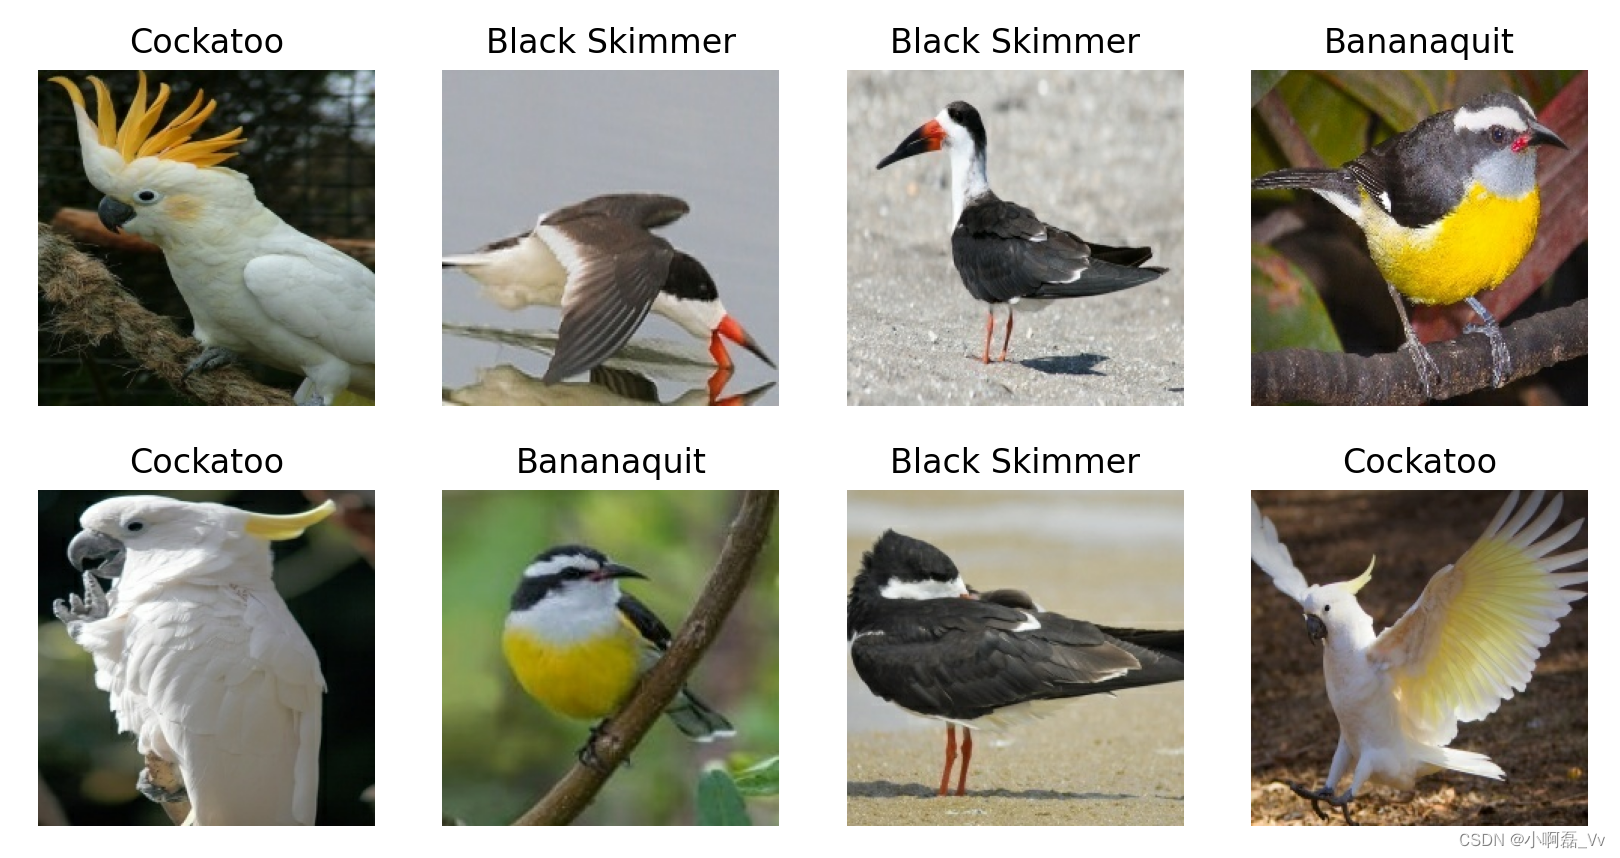
plt. figure( figsize= ( 10 , 5 ) )
for images, labels in train_ds. take( 1 ) :
for i in range ( 8 ) :
ax = plt. subplot( 2 , 4 , i+ 1 )
plt. imshow( images[ i] . numpy( ) . astype( "uint8" ) )
plt. title( class_names[ labels[ i] ] )
plt. axis( "off" )
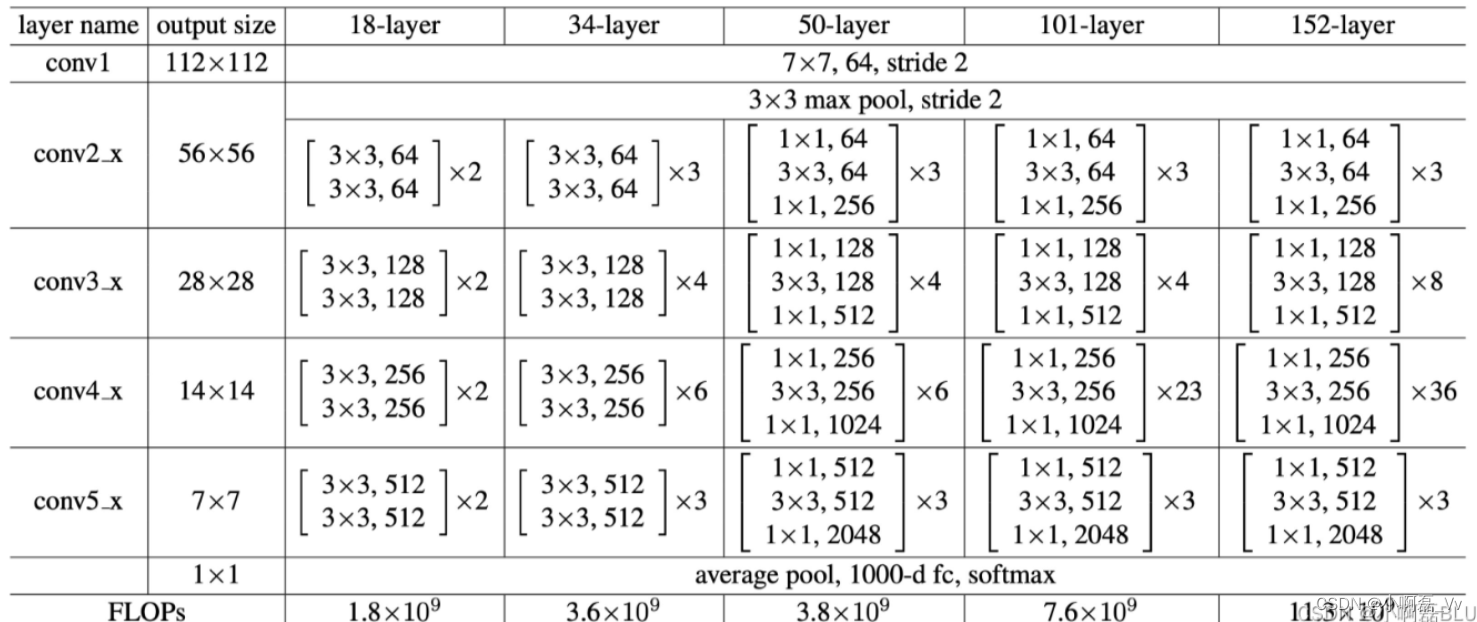
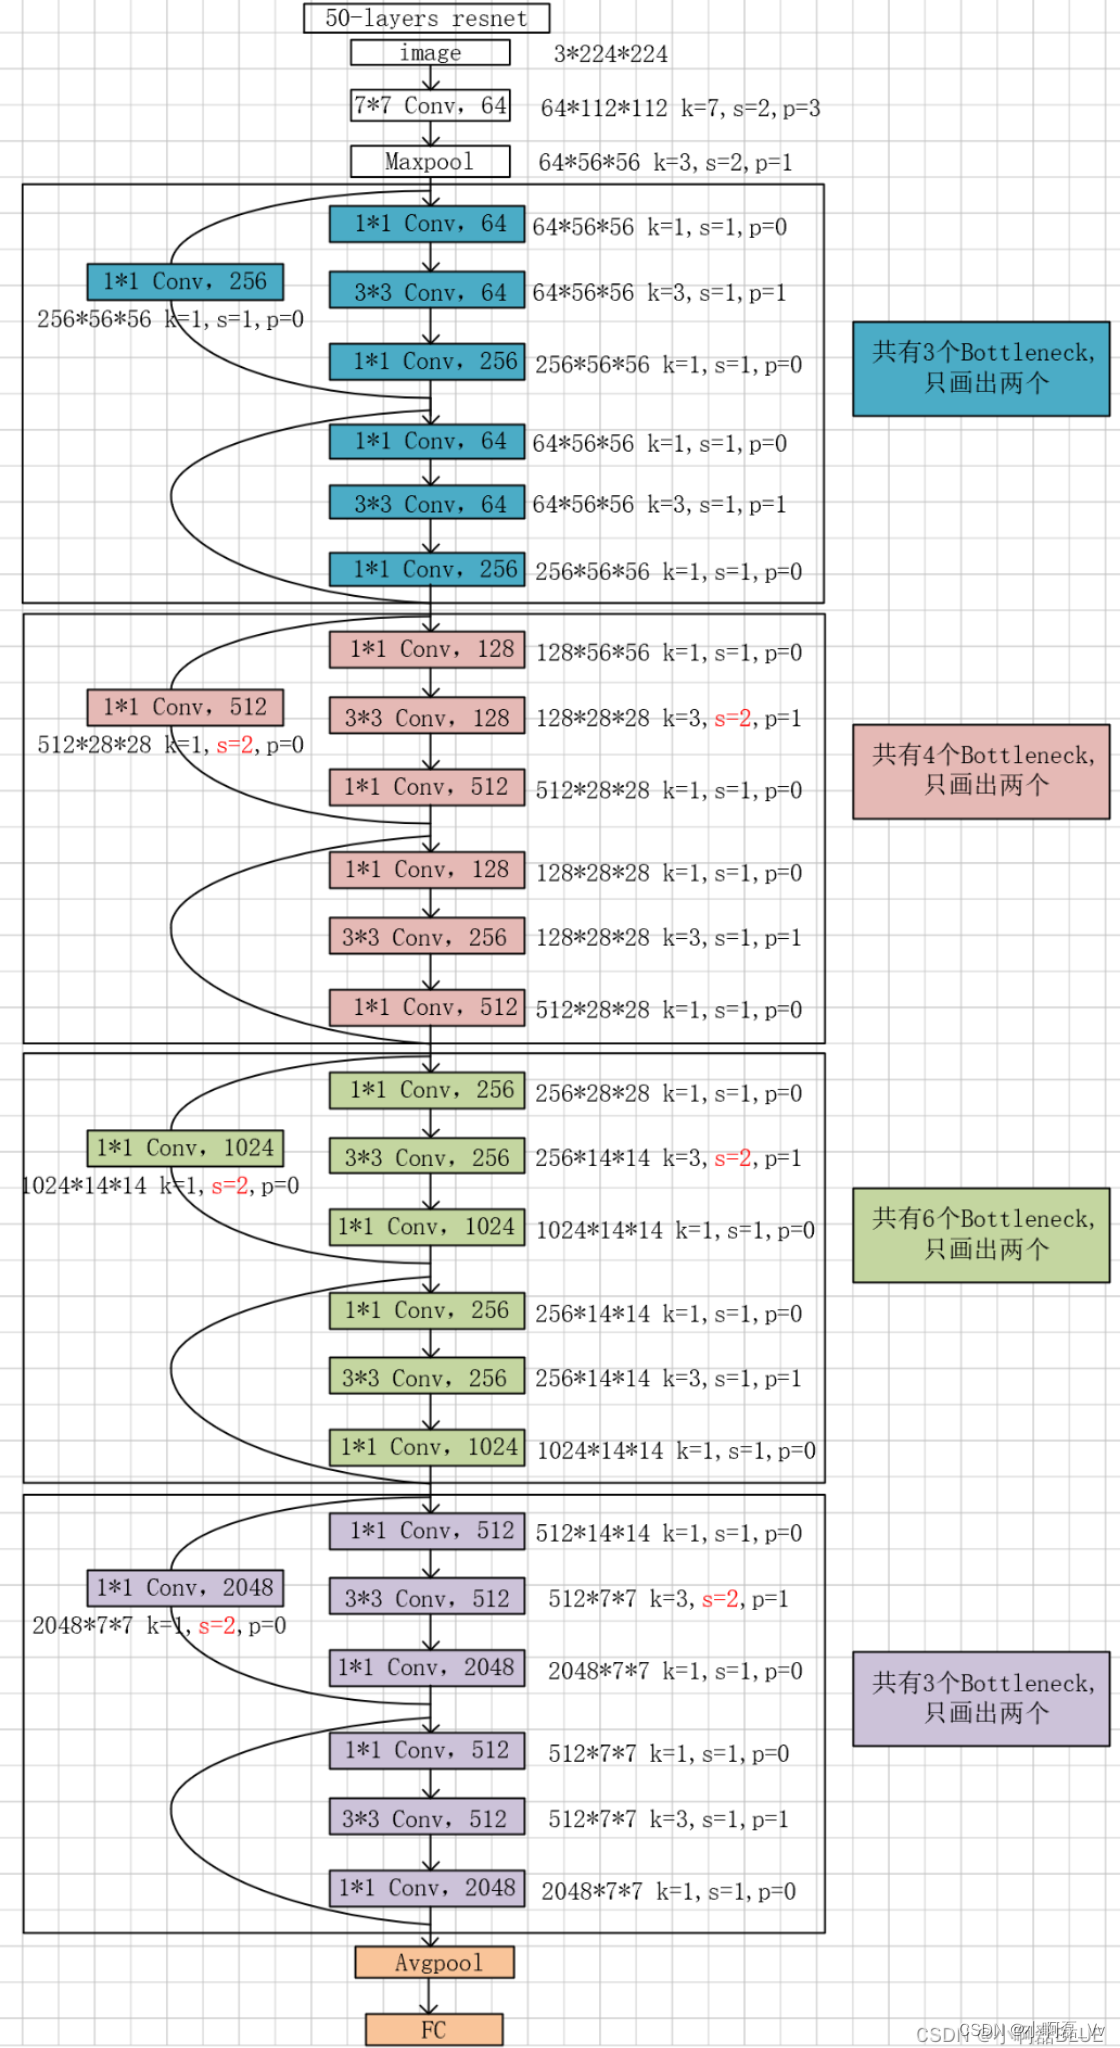
ResNet-50 有两个基本的模块, 分别为Conv Block 和 Identity Block 对模型网络结构进行绘制
def identity_block ( input_tensor, kernel_size, filters, stage, block) :
filters_1, filters_2, filters_3 = filters
name_base = str ( stage) + block + '_identity_block_'
x = Conv2D( filters_1, ( 1 , 1 ) , name= name_base+ 'conv1' ) ( input_tensor)
x = BatchNormalization( name= name_base + 'bn1' ) ( x)
x = Activation( 'relu' , name= name_base + 'relu1' ) ( x)
x = Conv2D( filters_2, kernel_size, padding= 'same' , name= name_base + 'conv2' ) ( x)
x = BatchNormalization( name= name_base + 'bn2' ) ( x)
x = Activation( 'relu' , name= name_base + 'relu2' ) ( x)
x = Conv2D( filters_3, ( 1 , 1 ) , name= name_base + 'conv3' ) ( x)
x = BatchNormalization( name= name_base + 'bn3' ) ( x)
x = layers. add( [ x, input_tensor] , name= name_base + 'add' )
x = Activation( 'relu' , name= name_base + 'relu4' ) ( x)
return x
def conv_block ( input_tensor, kernel_size, filters, stage, block, strides= ( 2 , 2 ) ) :
filters_1, filters_2, filters_3 = filters
res_name_base = str ( stage) + block + '_conv_block_res_'
name_base = str ( stage) + block + '_conv_block_'
x = Conv2D( filters_1, ( 1 , 1 ) , strides= strides, name= name_base + 'conv1' ) ( input_tensor)
x = BatchNormalization( name= name_base + 'bn1' ) ( x)
x = Activation( 'relu' , name= name_base + 'relu1' ) ( x)
x = Conv2D( filters_2, kernel_size, padding= 'same' , name= name_base + 'conv2' ) ( x)
x = BatchNormalization( name= name_base + 'bn2' ) ( x)
x = Activation( 'relu' , name= name_base + 'relu2' ) ( x)
x = Conv2D( filters_3, ( 1 , 1 ) , name= name_base + 'conv3' ) ( x)
x = BatchNormalization( name= name_base + 'bn3' ) ( x)
shortcut = Conv2D( filters_3, ( 1 , 1 ) , strides= strides, name= res_name_base + 'conv' ) ( input_tensor)
shortcut = BatchNormalization( name= res_name_base + 'bn' ) ( shortcut)
x = layers. add( [ x, shortcut] , name= name_base + 'add' )
x = Activation( 'relu' , name= name_base + 'relu4' ) ( x)
return x
def ResNet50 ( input_shape= [ 224 , 224 , 3 ] , classes= 1000 ) :
img_input = Input( shape= input_shape)
x = ZeroPadding2D( ( 3 , 3 ) ) ( img_input)
x = Conv2D( 64 , ( 7 , 7 ) , strides= ( 2 , 2 ) , name= 'conv1' ) ( x)
x = BatchNormalization( name= 'bn_conv1' ) ( x)
x = Activation( 'relu' ) ( x)
x = MaxPooling2D( ( 3 , 3 ) , strides= ( 2 , 2 ) ) ( x)
x = conv_block( x, 3 , [ 64 , 64 , 256 ] , stage= 2 , block= 'a' , strides= ( 1 , 1 ) )
x = identity_block( x, 3 , [ 64 , 64 , 256 ] , stage= 2 , block= 'b' )
x = identity_block( x, 3 , [ 64 , 64 , 256 ] , stage= 2 , block= 'c' )
x = conv_block( x, 3 , [ 128 , 128 , 512 ] , stage= 3 , block= 'a' )
x = identity_block( x, 3 , [ 128 , 128 , 512 ] , stage= 3 , block= 'b' )
x = identity_block( x, 3 , [ 128 , 128 , 512 ] , stage= 3 , block= 'c' )
x = identity_block( x, 3 , [ 128 , 128 , 512 ] , stage= 3 , block= 'd' )
x = conv_block( x, 3 , [ 256 , 256 , 1024 ] , stage= 4 , block= 'a' )
x = identity_block( x, 3 , [ 256 , 256 , 1024 ] , stage= 4 , block= 'b' )
x = identity_block( x, 3 , [ 256 , 256 , 1024 ] , stage= 4 , block= 'c' )
x = identity_block( x, 3 , [ 256 , 256 , 1024 ] , stage= 4 , block= 'd' )
x = identity_block( x, 3 , [ 256 , 256 , 1024 ] , stage= 4 , block= 'e' )
x = identity_block( x, 3 , [ 256 , 256 , 1024 ] , stage= 4 , block= 'f' )
x = conv_block( x, 3 , [ 512 , 512 , 2048 ] , stage= 5 , block= 'a' )
x = identity_block( x, 3 , [ 512 , 512 , 2048 ] , stage= 5 , block= 'b' )
x = identity_block( x, 3 , [ 512 , 512 , 2048 ] , stage= 5 , block= 'c' )
x = AveragePooling2D( ( 7 , 7 ) , name= 'avg_pool' ) ( x)
x = Flatten( ) ( x)
x = Dense( classes, activation= 'softmax' , name= 'fc1000' ) ( x)
model = Model( img_input, x, name= 'resnet50' )
model. load_weights( './bird/resnet50_weights_tf_dim_ordering_tf_kernels.h5' )
return model
model = ResNet50( )
print ( model. summary( ) )
class ResBlock_1 ( nn. Module) :
def __init__ ( self, down_sample, in_channels, min_channels, out_channels) :
super ( ResBlock_1, self) . __init__( )
self. down_sample = down_sample
self. conv_1 = nn. Sequential(
nn. Conv2d( in_channels, min_channels, 1 , 1 , 0 ) ,
nn. BatchNorm2d( min_channels) ,
nn. ReLU( ) ,
nn. Conv2d( min_channels, min_channels, 3 , 1 , 1 ) ,
nn. BatchNorm2d( min_channels) ,
nn. ReLU( ) ,
nn. Conv2d( min_channels, out_channels, 3 , 1 , 1 ) ,
nn. BatchNorm2d( out_channels) ,
nn. ReLU( )
)
self. shortcut_conv = nn. Conv2d( in_channels, out_channels, 1 , 1 , 0 )
self. shortcut_bn = nn. BatchNorm2d( out_channels)
self. relu = nn. ReLU( )
def forward ( self, x) :
if self. down_sample is True :
shortcut = self. shortcut_bn( self. shortcut_conv( x) )
x = self. conv_1( x)
x = x + shortcut
x = self. relu( x)
else :
shortcut = x
x = self. conv_1( x)
x = x + shortcut
x = self. relu( x)
return x
class ResBlock_2 ( nn. Module) :
def __init__ ( self, down_sample, in_channels, min_channels, out_channels) :
super ( ResBlock_2, self) . __init__( )
self. down_sample = down_sample
if self. down_sample is True :
s = 2
else :
s = 1
self. conv_2 = nn. Sequential(
nn. Conv2d( in_channels, min_channels, 1 , 1 , 0 ) ,
nn. BatchNorm2d( min_channels) ,
nn. ReLU( ) ,
nn. Conv2d( min_channels, min_channels, 3 , s, 1 ) ,
nn. BatchNorm2d( min_channels) ,
nn. ReLU( ) ,
nn. Conv2d( min_channels, out_channels, 1 , 1 , 0 ) ,
nn. BatchNorm2d( out_channels) ,
nn. ReLU( )
)
self. shortcut_conv = nn. Conv2d( in_channels, out_channels, 1 , 2 , 0 )
self. shortcut_bn = nn. BatchNorm2d( out_channels)
self. relu = nn. ReLU( )
def forward ( self, x) :
if self. down_sample is True :
shortcut = self. shortcut_bn( self. shortcut_conv( x) )
x = self. conv_2( x)
x = x + shortcut
x = self. relu( x)
else :
shortcut = x
x = self. conv_2( x)
x = x + shortcut
x = self. relu( x)
return x
class Resnet_50 ( nn. Module) :
"""
搭建一个简单的残差网络: RESNET 50
输入: 224*224*3
输出: 1000类
"""
def __init__ ( self) :
super ( Resnet_50, self) . __init__( )
self. layer_0 = nn. Sequential(
nn. Conv2d( in_channels= 3 , out_channels= 64 , kernel_size= 7 , stride= 2 , padding= 3 ) ,
nn. BatchNorm2d( 64 ) ,
nn. ReLU( inplace= True ) ,
nn. MaxPool2d( kernel_size= 3 , stride= 2 , padding= 1 )
)
self. layer_1 = nn. Sequential(
ResBlock_1( True , 64 , 64 , 256 ) ,
ResBlock_1( False , 256 , 64 , 256 ) ,
ResBlock_1( False , 256 , 64 , 256 ) ,
)
self. layer_2 = nn. Sequential(
ResBlock_2( True , 256 , 128 , 512 ) ,
ResBlock_2( False , 512 , 128 , 512 ) ,
ResBlock_2( False , 512 , 128 , 512 ) ,
ResBlock_2( False , 512 , 128 , 512 ) ,
)
self. layer_3 = nn. Sequential(
ResBlock_2( True , 512 , 256 , 1024 ) ,
ResBlock_2( False , 1024 , 256 , 1024 ) ,
ResBlock_2( False , 1024 , 256 , 1024 ) ,
ResBlock_2( False , 1024 , 256 , 1024 ) ,
ResBlock_2( False , 1024 , 256 , 1024 ) ,
ResBlock_2( False , 1024 , 256 , 1024 ) ,
)
self. layer_4 = nn. Sequential(
ResBlock_2( True , 1024 , 512 , 2048 ) ,
ResBlock_2( False , 2048 , 512 , 2048 ) ,
ResBlock_2( False , 2048 , 512 , 2048 ) ,
)
self. app = nn. AdaptiveAvgPool2d( 1 )
self. flatten = nn. Flatten( )
self. linear = nn. Linear( 2048 , 1000 )
def forward ( self, x) :
x = self. layer_0( x)
x = self. layer_1( x)
x = self. layer_2( x)
x = self. layer_3( x)
x = self. layer_4( x)
x = self. app( x)
x = self. flatten( x)
x = self. linear( x)
return x
import tensorflow as tf
import matplotlib. pyplot as plt
import os, PIL, pathlib, glob
import numpy as np
from tensorflow import keras
from tensorflow. keras import layers, models
from tensorflow. keras. layers import Input, Activation, BatchNormalization, Flatten
from tensorflow. keras. layers import Dense, Conv2D, MaxPooling2D, ZeroPadding2D, AveragePooling2D
from tensorflow. keras import Model
gpus = tf. config. list_physical_devices( "GPU" )
if gpus:
tf. config. experimental. set_memory_growth( gpus[ 0 ] , True )
tf. config. set_visible_devices( [ gpus[ 0 ] ] , "GPU" )
data_dir = './bird/bird_photos'
data_dir = pathlib. Path( data_dir)
image_count = len ( list ( data_dir. glob( '*/*' ) ) )
print ( "图片总数为: " , image_count)
batch_size = 8
img_height = 224
img_width = 224
train_ds = tf. keras. preprocessing. image_dataset_from_directory(
data_dir,
validation_split= 0.2 ,
subset= "training" ,
seed= 123 ,
image_size= ( img_height, img_width) ,
batch_size= batch_size
)
val_ds = tf. keras. preprocessing. image_dataset_from_directory(
data_dir,
validation_split= 0.2 ,
subset= "validation" ,
seed= 123 ,
image_size= ( img_height, img_width) ,
batch_size= batch_size
)
class_names = train_ds. class_names
print ( class_names)
plt. figure( figsize= ( 10 , 5 ) )
for images, labels in train_ds. take( 1 ) :
for i in range ( 8 ) :
ax = plt. subplot( 2 , 4 , i+ 1 )
plt. imshow( images[ i] . numpy( ) . astype( "uint8" ) )
plt. title( class_names[ labels[ i] ] )
plt. axis( "off" )
for image_batch, labels_batch in train_ds:
print ( image_batch. shape)
print ( labels_batch. shape)
break
AUTOTUNE = tf. data. AUTOTUNE
train_ds = train_ds. cache( ) . shuffle( 1000 ) . prefetch( buffer_size= AUTOTUNE)
val_ds = val_ds. cache( ) . prefetch( buffer_size= AUTOTUNE)
def identity_block ( input_tensor, kernel_size, filters, stage, block) :
filters_1, filters_2, filters_3 = filters
name_base = str ( stage) + block + '_identity_block_'
x = Conv2D( filters_1, ( 1 , 1 ) , name= name_base+ 'conv1' ) ( input_tensor)
x = BatchNormalization( name= name_base + 'bn1' ) ( x)
x = Activation( 'relu' , name= name_base + 'relu1' ) ( x)
x = Conv2D( filters_2, kernel_size, padding= 'same' , name= name_base + 'conv2' ) ( x)
x = BatchNormalization( name= name_base + 'bn2' ) ( x)
x = Activation( 'relu' , name= name_base + 'relu2' ) ( x)
x = Conv2D( filters_3, ( 1 , 1 ) , name= name_base + 'conv3' ) ( x)
x = BatchNormalization( name= name_base + 'bn3' ) ( x)
x = layers. add( [ x, input_tensor] , name= name_base + 'add' )
x = Activation( 'relu' , name= name_base + 'relu4' ) ( x)
return x
def conv_block ( input_tensor, kernel_size, filters, stage, block, strides= ( 2 , 2 ) ) :
filters_1, filters_2, filters_3 = filters
res_name_base = str ( stage) + block + '_conv_block_res_'
name_base = str ( stage) + block + '_conv_block_'
x = Conv2D( filters_1, ( 1 , 1 ) , strides= strides, name= name_base + 'conv1' ) ( input_tensor)
x = BatchNormalization( name= name_base + 'bn1' ) ( x)
x = Activation( 'relu' , name= name_base + 'relu1' ) ( x)
x = Conv2D( filters_2, kernel_size, padding= 'same' , name= name_base + 'conv2' ) ( x)
x = BatchNormalization( name= name_base + 'bn2' ) ( x)
x = Activation( 'relu' , name= name_base + 'relu2' ) ( x)
x = Conv2D( filters_3, ( 1 , 1 ) , name= name_base + 'conv3' ) ( x)
x = BatchNormalization( name= name_base + 'bn3' ) ( x)
shortcut = Conv2D( filters_3, ( 1 , 1 ) , strides= strides, name= res_name_base + 'conv' ) ( input_tensor)
shortcut = BatchNormalization( name= res_name_base + 'bn' ) ( shortcut)
x = layers. add( [ x, shortcut] , name= name_base + 'add' )
x = Activation( 'relu' , name= name_base + 'relu4' ) ( x)
return x
def ResNet50 ( input_shape= [ 224 , 224 , 3 ] , classes= 1000 ) :
img_input = Input( shape= input_shape)
x = ZeroPadding2D( ( 3 , 3 ) ) ( img_input)
x = Conv2D( 64 , ( 7 , 7 ) , strides= ( 2 , 2 ) , name= 'conv1' ) ( x)
x = BatchNormalization( name= 'bn_conv1' ) ( x)
x = Activation( 'relu' ) ( x)
x = MaxPooling2D( ( 3 , 3 ) , strides= ( 2 , 2 ) ) ( x)
x = conv_block( x, 3 , [ 64 , 64 , 256 ] , stage= 2 , block= 'a' , strides= ( 1 , 1 ) )
x = identity_block( x, 3 , [ 64 , 64 , 256 ] , stage= 2 , block= 'b' )
x = identity_block( x, 3 , [ 64 , 64 , 256 ] , stage= 2 , block= 'c' )
x = conv_block( x, 3 , [ 128 , 128 , 512 ] , stage= 3 , block= 'a' )
x = identity_block( x, 3 , [ 128 , 128 , 512 ] , stage= 3 , block= 'b' )
x = identity_block( x, 3 , [ 128 , 128 , 512 ] , stage= 3 , block= 'c' )
x = identity_block( x, 3 , [ 128 , 128 , 512 ] , stage= 3 , block= 'd' )
x = conv_block( x, 3 , [ 256 , 256 , 1024 ] , stage= 4 , block= 'a' )
x = identity_block( x, 3 , [ 256 , 256 , 1024 ] , stage= 4 , block= 'b' )
x = identity_block( x, 3 , [ 256 , 256 , 1024 ] , stage= 4 , block= 'c' )
x = identity_block( x, 3 , [ 256 , 256 , 1024 ] , stage= 4 , block= 'd' )
x = identity_block( x, 3 , [ 256 , 256 , 1024 ] , stage= 4 , block= 'e' )
x = identity_block( x, 3 , [ 256 , 256 , 1024 ] , stage= 4 , block= 'f' )
x = conv_block( x, 3 , [ 512 , 512 , 2048 ] , stage= 5 , block= 'a' )
x = identity_block( x, 3 , [ 512 , 512 , 2048 ] , stage= 5 , block= 'b' )
x = identity_block( x, 3 , [ 512 , 512 , 2048 ] , stage= 5 , block= 'c' )
x = AveragePooling2D( ( 7 , 7 ) , name= 'avg_pool' ) ( x)
x = Flatten( ) ( x)
x = Dense( classes, activation= 'softmax' , name= 'fc1000' ) ( x)
model = Model( img_input, x, name= 'resnet50' )
model. load_weights( './bird/resnet50_weights_tf_dim_ordering_tf_kernels.h5' )
return model
model = ResNet50( )
print ( model. summary( ) )
opt = tf. keras. optimizers. Adam( learning_rate= 1e-7 )
model. compile ( optimizer= 'adam' ,
loss= 'sparse_categorical_crossentropy' ,
metrics= [ 'accuracy' ]
)
epochs = 10
history = model. fit(
train_ds,
validation_data= val_ds,
epochs= epochs
)
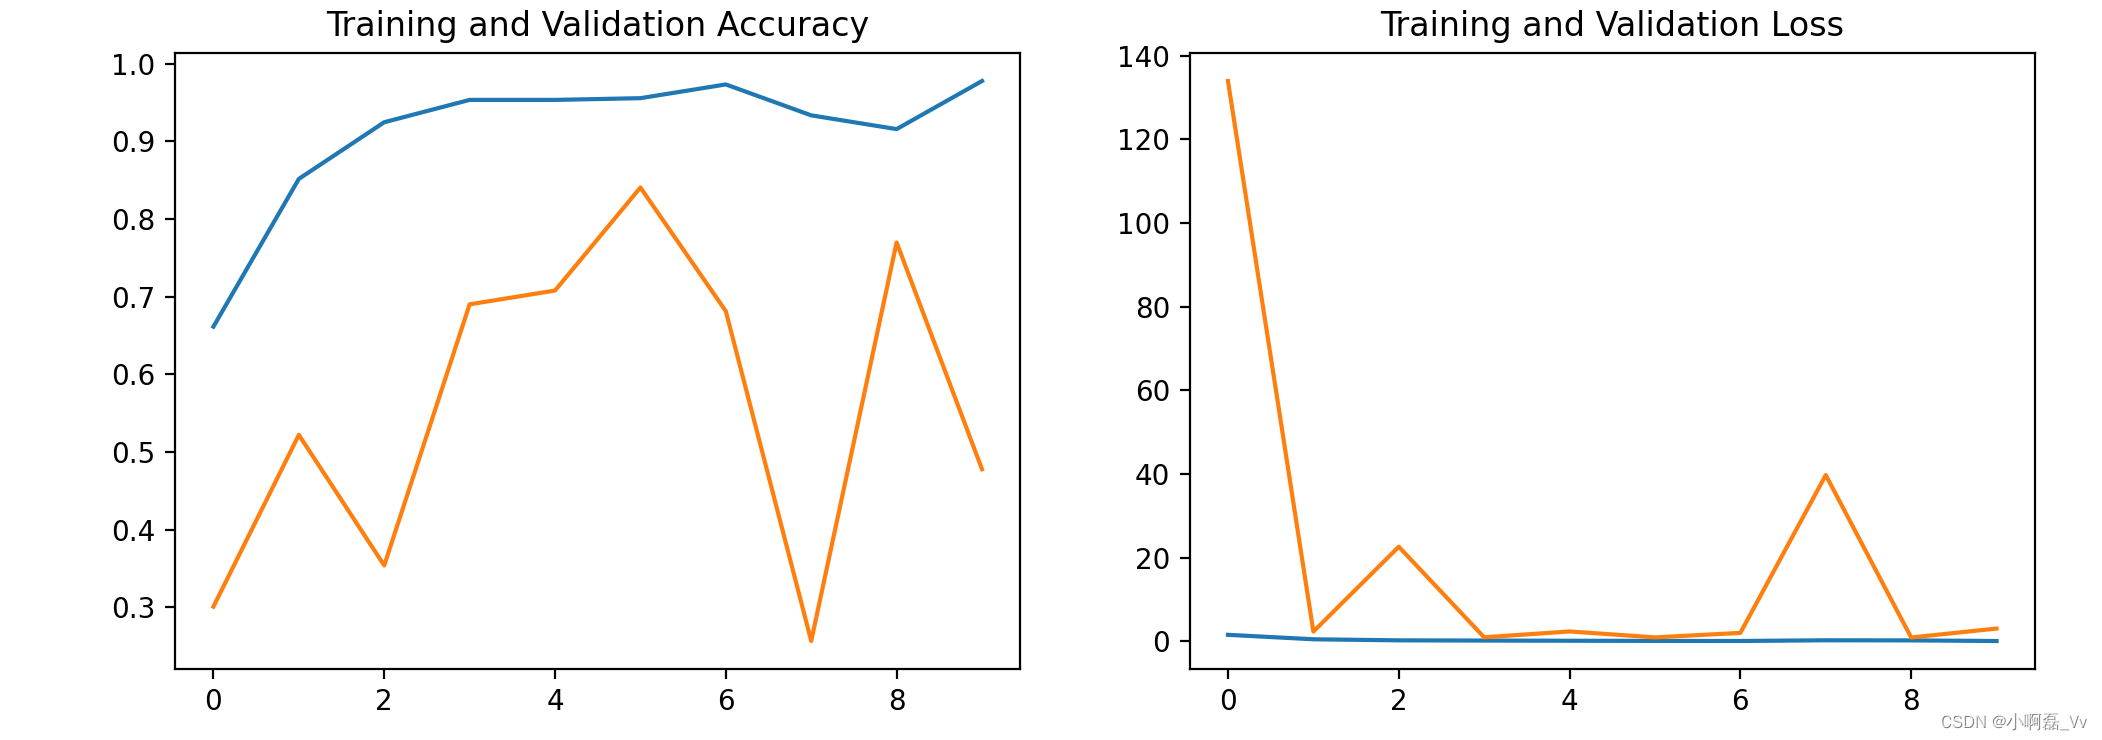
acc = history. history[ 'accuracy' ]
val_acc = history. history[ 'val_accuracy' ]
loss = history. history[ 'loss' ]
val_loss = history. history[ 'val_loss' ]
epochs_range = range ( epochs)
plt. figure( figsize= ( 12 , 4 ) )
plt. subplot( 1 , 2 , 1 )
plt. plot( epochs_range, acc, label= 'Training Accuracy' )
plt. plot( epochs_range, val_acc, label= 'Validation Accuracy' )
plt. title( 'Training and Validation Accuracy' )
plt. subplot( 1 , 2 , 2 )
plt. plot( epochs_range, loss, label= 'Training Loss' )
plt. plot( epochs_range, val_loss, label= 'Validation Loss' )
plt. title( 'Training and Validation Loss' )
plt. show( )


![[设计模式] OOP六大原则](https://img-blog.csdnimg.cn/6fd208eda28743d2870c71f1c0682c79.png)