1、Synchronized
1.1、synchronized特性
1、互斥
synchronized会起到互斥效果,某个线程执行到某个对象的synchronized中时,其他线程如果也执行到同一个对象synchronized就会阻塞等待。
*进入synchronized修饰的代码块,就相当于加锁。
*退出synchronized修饰的代码块,就相当于解锁。

一个线程先上了锁,其他线程只能等待这个线程释放。可以理解为“阻塞等待”
注意:
*上一个线程解锁之后,下一个线程并不是立即就可以获取到锁,而是要靠操作系统来“唤醒”,这也就是操作系统线程调度的一部分。
*假设有A,B,C三个线程线程A先获取到锁,然后B尝试获取锁,然后C再尝试获取锁,此时B和C都在阻塞队列中等待,但是A释放锁之后,虽然B比C先来,但B不一定就能拿到锁,而是和C重新竞争。并部遵循先来后到的原则。
2、刷新内存
synchronized工作过程
(1)获得互斥锁
(2)从主内存拷贝变量的最新副本到工作内存
(3)执行代码
(4)将更改后的共享变量的值刷新到主内存
(5)释放互斥锁
所以synchronized可以保证内存可见性
3、可重入
synchronized同步块对同一条线程来说是可重入的,不会出现自己把自己锁死的现象。
锁死现象:
一个线程没有释放锁,然后又开始尝试获取锁
// 第一次加锁, 加锁成功
lock();
// 第二次加锁, 锁已经被占用, 阻塞等待.
lock();

java中的synchronized是可重入锁,所以不存在上述问题。
代码示例:
public class Exe_03 {
    private static int num=50000;
    public static void main(String[] args) throws InterruptedException {
        Counter04 counter1=new Counter04();
        //创建线程完成自增
        Thread thread1=new Thread(()->{
            for (int i = 0; i < num; i++) {
                //自增操作
                counter1.increase();
            }
        });
        Thread thread2=new Thread(()->{
            for (int i = 0; i < num; i++) {
                //自增操作
                counter1.increase1();
            }
        });
        //启动线程
        thread1.start();
        thread2.start();
        //等待线程结束
        thread1.join();
        thread2.join();
        //获取自增后的count值
        System.out.println("count结果="+counter1.count);
    }
}
class Counter04{
    int count=0;
    public synchronized void increase(){
        count++;
    }
    public synchronized void increase1(){
        count++;
    }
}
运行结果:

在可重入锁的内部,包含了“线程持有者”和“计数器”两个信息。
*如果某个线程加锁的时候,发现锁已经被人占用,但是恰好占用的是自己,那么依然可以获取到锁,并让计数器自增。
*解锁的时候计数器递减为0的时候,才真正的释放锁。(才能被其他线程获取到锁)
1.2、关于synchronized
1、被synchronized修饰的代码,变成串行执行
2、使用多线程的前提是保证结果的正确
3、在多线程修改共享变量的时候才会出现线程安全问题
针对修改操作加锁,缩小锁的范围(锁的粒度)从而提高成序的并发处理能力
4、synchronized不仅可以修饰方法,还可以修饰代码块

5、用synchronized修饰的代码块所涉及的指令,并不是在CPU一下子就执行完成,而是有可能在执行了一半被CPU调度走了,但是锁并没有释放,别的线程想要获取锁依然需要等待。
6、只给一个线程加锁,也会出现线程安全问题
代码示例:
public class Exe_02 {
    private static int num=50000;

    public static void main(String[] args) throws InterruptedException {
        //实例化对象
        Counter03 counter03=new Counter03();
        //创建线程
        Thread t1=new Thread(() ->{
            for (int i = 0; i < num; i++) {
                //调用加锁方法
                counter03.add();
            }
        });
        Thread t2=new Thread(() ->{
            for (int i = 0; i < num; i++) {
                //调用不加锁方法
                counter03.increase();
            }
        });
        //启动线程
        t1.start();
        t2.start();
        //等待线程执行完成
        t1.join();
        t2.join();
        //打印结果
        System.out.println("累加结果"+counter03.count);
    }
}
class Counter03{
    int count=0;
    public void add(){
        synchronized (this){
            count++;
        }
    }
    public void increase(){
        count++;
    }
}
7、锁对象

获取锁总结:
1、只有一个线程A要获取锁,那么可以直接获取到锁,没有锁竞争。
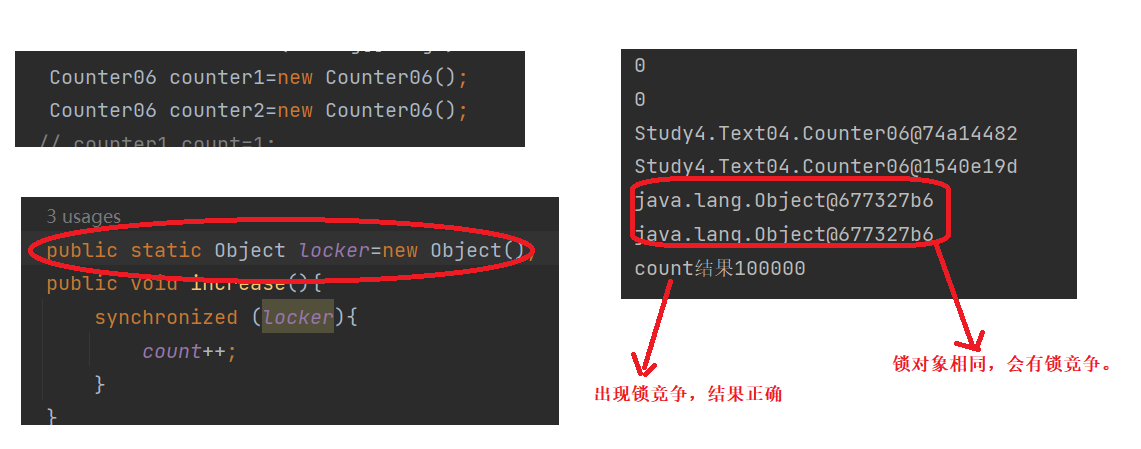
2、线程A与线程B共同抢一把锁,那么谁先拿到就先执行谁的逻辑,另外一个线程就阻塞等待,等待持有锁的线程释放锁之后再去抢锁,这时就存在锁竞争。
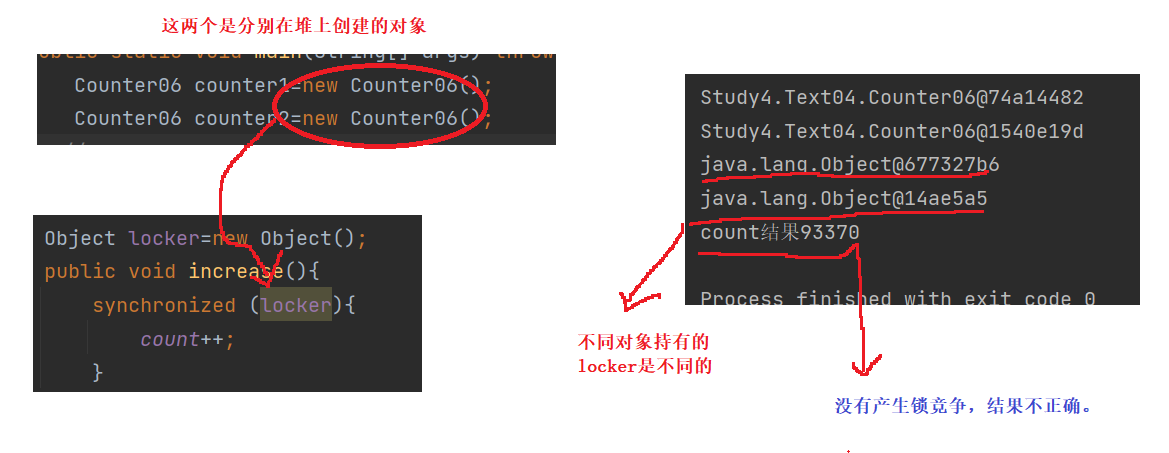
3、线程A和线程B竞争的不是同一把锁,那么它们没有竞争关系,那么它们分别难道自己的锁,不存在锁竞争关系。
2、锁对象
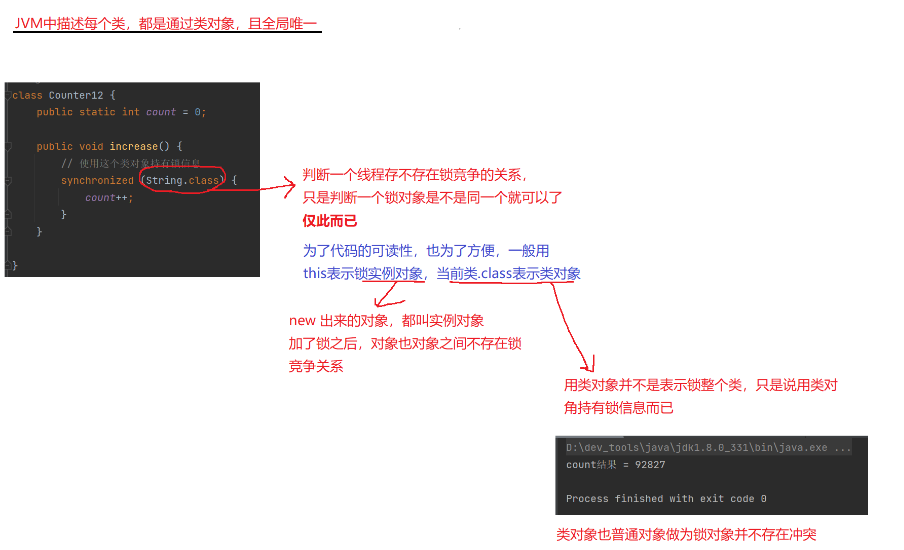
锁对象本身就是一个对象,无论什么对象都可以成为锁对象(实例对象、类对象)
锁对象记录的是当前获得到锁的线程信息
比如ThreadA拿到了锁,锁信息记录的就是ThreadA的地址。
代码示例:
public class Exe_03 {
    private static int num=50000;
    public static void main(String[] args) throws InterruptedException {
        Counter04 counter1=new Counter04();
        Counter04 counter2=new Counter04();
        //创建线程完成自增
        Thread thread1=new Thread(()->{
            for (int i = 0; i < num; i++) {
                //自增操作
                counter1.increase();
            }
        });
        Thread thread2=new Thread(()->{
            for (int i = 0; i < num; i++) {
                //自增操作
                counter2.increase1();
            }
        });
        //启动线程
        thread1.start();
        thread2.start();
        //等待线程结束
        thread1.join();
        thread2.join();
        //获取自增后的count值
        System.out.println("count结果="+counter2.count);
    }
}
class Counter04{
    int count=0;
    public synchronized void increase(){
        count++;
    }
    public synchronized void increase1(){
        count++;
    }
}

3、Java Object LayOut工具
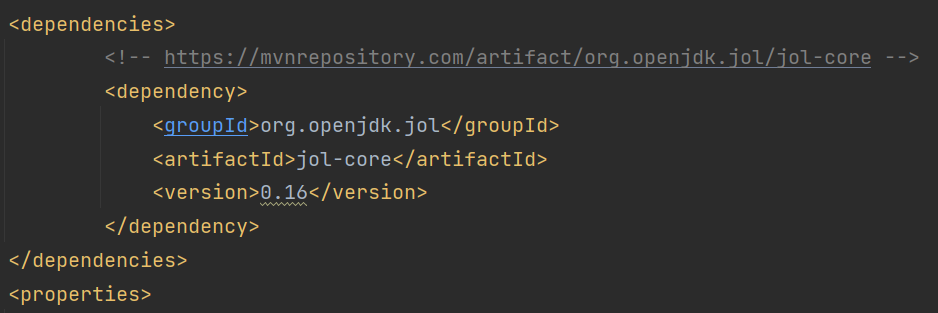
3.1、使用Java Object LayOut工具之前要先在pom.xml文件导入maven依赖包

代码示例:
import org.openjdk.jol.info.ClassLayout;

public class Demo_405 {
    private int count;
    private long count1 = 200;
    private String hello = "";

    private TestLayout test001 = new TestLayout();

    public static void main(String[] args) {
        Demo_405 obj = new Demo_405();
        // 打印实例布局
        System.out.println(ClassLayout.parseInstance(obj).toPrintable());
        // 调用hashCode后才保存hashCode的值
        obj.hashCode();
        // 观察现象
        System.out.println(ClassLayout.parseInstance(obj).toPrintable());
        System.out.println("=================================");
        // 加锁后观察加锁信息
        synchronized (obj) {
            System.out.println(ClassLayout.parseInstance(obj).toPrintable());
            synchronized (obj) {
                System.out.println(ClassLayout.parseInstance(obj).toPrintable());
            }
            System.out.println(ClassLayout.parseInstance(obj).toPrintable());
        }
        System.out.println("=================================");
        // 强制执行垃圾回收
        System.gc();
        // 观察GC计数
        System.out.println(ClassLayout.parseInstance(obj).toPrintable());
        // 打印类布局
        System.out.println(ClassLayout.parseClass(Demo_405.class).toPrintable());
    }
}

class TestLayout {

} 
在多线程环境下进行锁竞争的时候,一个线程抢锁的时候,JVM先看一下对象里有没有锁信息,如果没有,那么就让现在锁竞争的线程获取锁,如果有这个锁信息,那么就阻塞等待锁的释放。

4、锁对象示例
4.1、Locker对象不同代码示例:
public class Exe_06 {
    private static int num = 50000;

    public static void main(String[] args) throws InterruptedException {
        Counter06 counter1=new Counter06();
        Counter06 counter2=new Counter06();
       // counter1.count=1;
        System.out.println(counter1.count);
        System.out.println(counter2.count);
        System.out.println(counter1);
        System.out.println(counter2);
        System.out.println(counter1.locker);
        System.out.println(counter2.locker);
        Thread t1=new Thread(() ->{
            for (int i = 0; i < num; i++) {
                // 这里调用了counter1的自增方法
                counter1.increase();
            }
        });
        Thread t2=new Thread(() ->{
            for (int i = 0; i < num; i++) {
                // 这里调用了counter2的自增方法
                counter2.increase();
            }
        });
        t1.start();
        t2.start();
        t1.join();
        t2.join();
        System.out.println("count结果"+counter1.count);
    }
}
class Counter06{
    public static int count=0;
    //自定义一个锁对象
    Object locker=new Object();
    public void increase(){
        synchronized (locker){
            count++;
        }
    }
}
4.2、Locker对象相同代码示例:
public class Exe_06 {
    private static int num = 50000;

    public static void main(String[] args) throws InterruptedException {
        Counter06 counter1=new Counter06();
        Counter06 counter2=new Counter06();
       // counter1.count=1;
        System.out.println(counter1.count);
        System.out.println(counter2.count);
        System.out.println(counter1);
        System.out.println(counter2);
        System.out.println(counter1.locker);
        System.out.println(counter2.locker);
        Thread t1=new Thread(() ->{
            for (int i = 0; i < num; i++) {
                // 这里调用了counter1的自增方法
                counter1.increase();
            }
        });
        Thread t2=new Thread(() ->{
            for (int i = 0; i < num; i++) {
                // 这里调用了counter2的自增方法
                counter2.increase();
            }
        });
        t1.start();
        t2.start();
        t1.join();
        t2.join();
        System.out.println("count结果"+counter1.count);
    }
}
class Counter06{
    public static int count=0;
    //自定义一个锁对象
    public static Object locker=new Object();
    public void increase(){
        synchronized (locker){
            count++;
        }
    }
} 
4.3、锁静态Locker和this:

4.4、锁类对象:
4.5、总结:
synchronized的几种用法
1、修饰普通方法,相当于锁实例对象。
2、对代码块加锁,相当于锁当前调用方法的对象(也是实例对象)。
3、对静态方法加锁,相当于锁类对象(静态对象)。
5、valatile关键字
volatile能保证内存可见性,也可以解决有序性问题(禁止指令重排)。
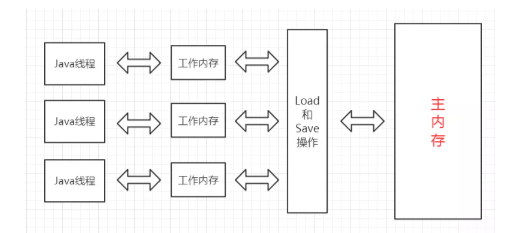
代码在写入volatile修饰的变量的时候,
*改变线程工作内存中volatile变量副本的值。
*将改变后的副本的值从工作内存刷新到主内存。
代码在读取volatile修饰的变量的时候,
*从主内存中读取volatile变量的最新值到工作内存中
*从工作内存中读取volatile变量的副本
观察内存可见性:
import java.util.Scanner;

public class Exe_10 {
    public static class Counter{
        public static volatile int count=0;
    }

    public static void main(String[] args) {
        Thread t1=new Thread(() ->{
            System.out.println(Thread.currentThread().getName()+"线程启动");
            while(Counter.count==0){
                //一直循环
            }
            System.out.println(Thread.currentThread().getName()+"线程退出");
        },"t1");
        //启动线程
        t1.start();
        //确保t1先启动
        try {
            Thread.sleep(1000);
        } catch (InterruptedException e) {
            e.printStackTrace();
        }
        Thread t2=new Thread(() ->{
            System.out.println(Thread.currentThread().getName()+"线程启动");
            Scanner sc=new Scanner(System.in);
            System.out.println("请输入一个非零的值:");
            Counter.count=sc.nextInt();
            System.out.println(Thread.currentThread().getName()+"线程退出");
        },"t2");
        //启动线程
        t2.start();
    }
}


