1、搭建环境
1.1、查看GPU版本
在安装tensorflow的GPU版本之前可以先看下自己的显卡情况
命令:nvidia-smi

或者桌面右下角,NVIDIA图标,进入到NVIDIA的控制面板:
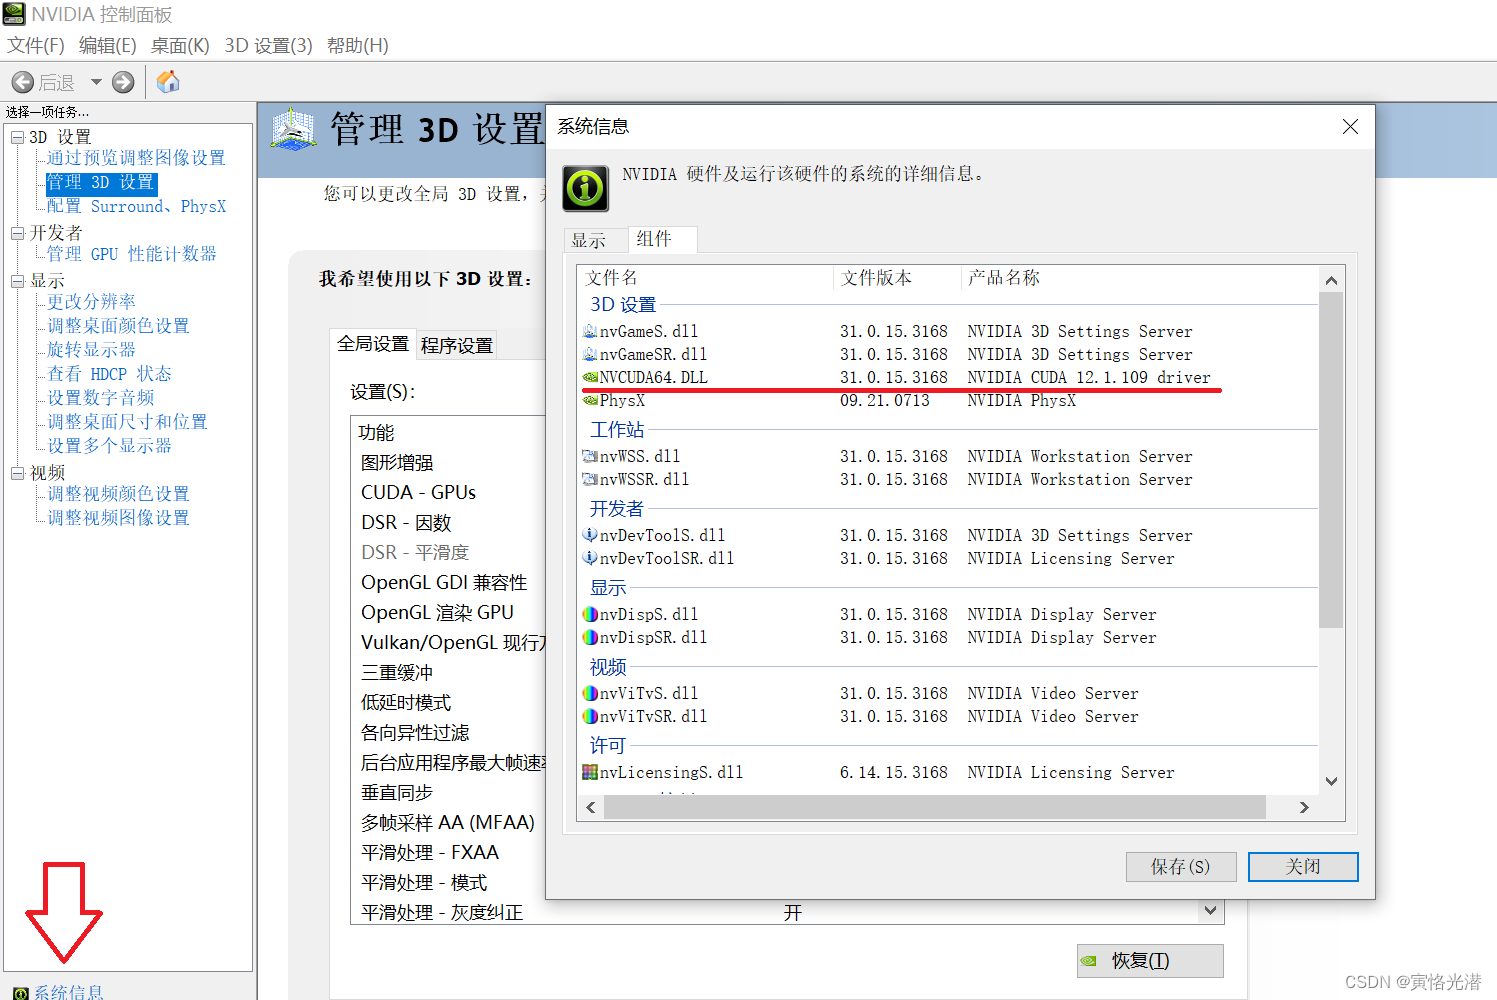 点击左下角的系统信息,组件中查看NVCUDA64.dll的版本
1.2、新建虚拟环境
创建一个虚拟环境,名称为myTFGPU,Python版本为3.7,这两个按自己环境指定,也可以进入站点:tensorflow-GPU版本 选择适合自己的版本
conda create -n myTFGPU python=3.7
进入这个虚拟环境:activate myTFGPU
1.3、安装带GPU版本的tensorflow
安装命令,带上豆瓣镜像要快很多
pip install tensorflow-gpu==2.9.0 -i http://pypi.douban.com/simple/ --trusted-host pypi.douban.com
安装好之后,我们来看下自己的设备情况:
import tensorflow as tf
tf.test.gpu_device_name()
#Created device /device:GPU:0 with 1318 MB memory:  -> device: 0, name: NVIDIA GeForce GTX 1050, pci bus id: 0000:01:00.0, compute capability: 6.1
'/device:GPU:0'
可以看到GPU的型号,大小,计算能力。这些能够正确显示,说明就安装成功了。再来看下本机的物理GPU和CPU的情况
# 查看gpu和cpu的数量
gpus = tf.config.experimental.list_physical_devices(device_type='GPU')
cpus = tf.config.experimental.list_physical_devices(device_type='CPU')
print(gpus, cpus)
#[PhysicalDevice(name='/physical_device:GPU:0', device_type='GPU')] [PhysicalDevice(name='/physical_device:CPU:0', device_type='CPU')]
1.4、CUDA和cuDNN版本对应
其中cudnn和cuda因为以前安装过,这里就省略了,安装命令:
conda install -c conda-forge cudatoolkit=11.2 cudnn=8.1.0
当然这两个对应的版本,可以使用命令:conda search -f cudnn 查看对应的版本,避免出现版本问题
(tensorflowGPU) C:\Users\Tony>conda search -f cudnn
Fetching package metadata .........
cudnn                        7.1.4                 cuda9.0_0  defaults
                             7.1.4                 cuda8.0_0  defaults
                             7.3.1                 cuda9.0_0  defaults
                             7.3.1                cuda10.0_0  defaults
                             7.6.0                cuda10.1_0  defaults
                             7.6.0                cuda10.0_0  defaults
                             7.6.0                 cuda9.0_0  defaults
                             7.6.4                cuda10.1_0  defaults
                             7.6.4                 cuda9.0_0  defaults
                             7.6.4                cuda10.0_0  defaults
                             7.6.5                 cuda9.0_0  defaults
                             7.6.5                cuda10.1_0  defaults
                             7.6.5                cuda10.0_0  defaults
                             7.6.5                cuda10.2_0  defaults
                             7.6.5                 cuda9.2_0  defaults
                             8.2.1                cuda11.3_0  defaults
1.5、CUDA和cuDNN下载
CUDA和cuDNN比较大,建议下载安装要好点:
CUDA Toolkit:https://developer.nvidia.com/cuda-toolkit-archive
cuDNN:https://developer.nvidia.com/rdp/cudnn-archive

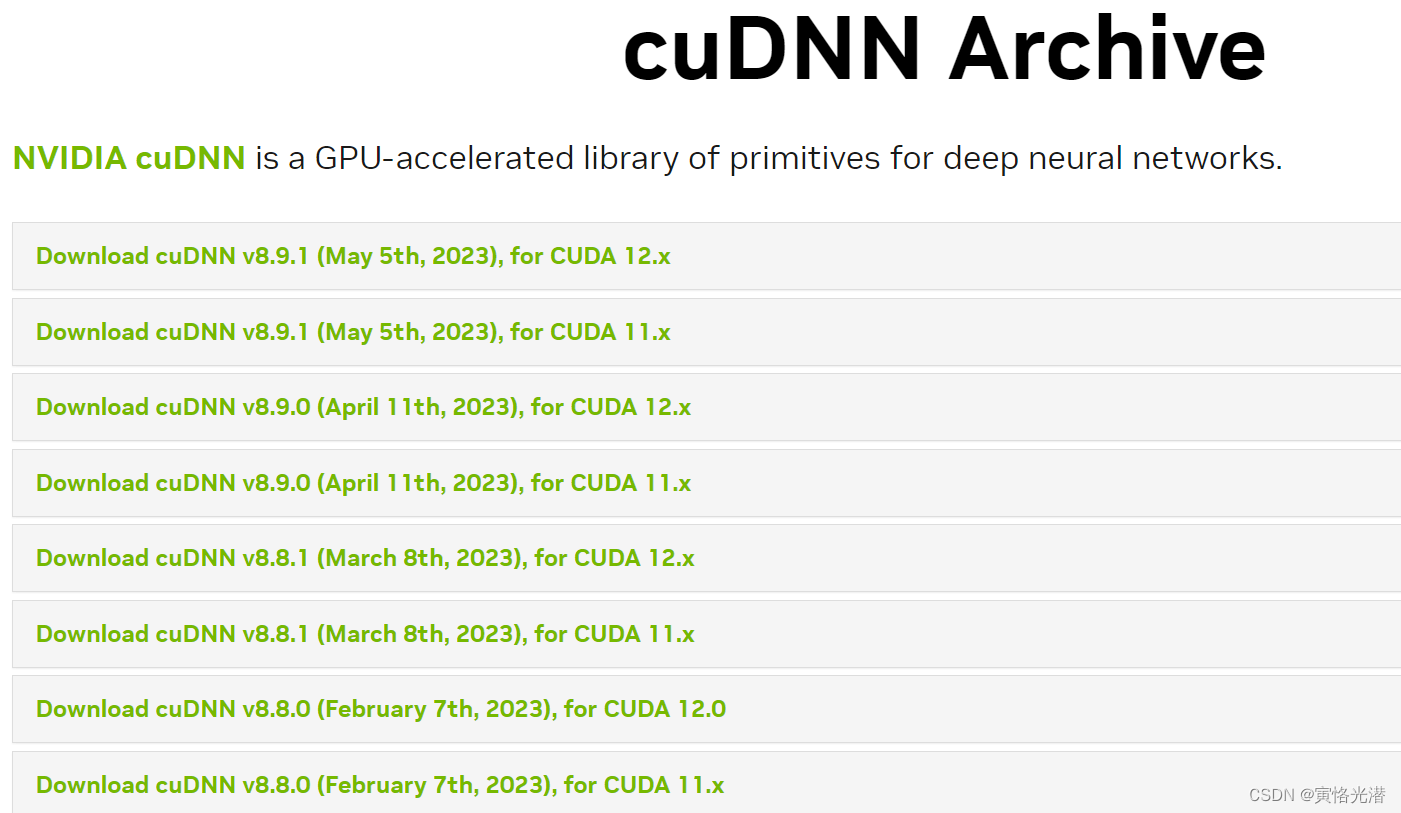
安装好了之后,将下面这几个文件复制到对应位置即可:
Copy <installpath>\cuda\bin\cudnn*.dll to C:\Program Files\NVIDIA GPU Computing Toolkit\CUDA\v11.2\bin.
Copy <installpath>\cuda\include\cudnn*.h to C:\Program Files\NVIDIA GPU Computing Toolkit\CUDA\v11.2\include.
Copy <installpath>\cuda\lib\x64\cudnn*.lib to C:\Program Files\NVIDIA GPU Computing Toolkit\CUDA\v11.2\lib\x64.
如果安装中遇到问题可以参看:https://blog.csdn.net/weixin_41896770/article/details/127444808
2、GPU逻辑分区
我们知道在Windows里面的硬盘,可以将其随意划分成多个逻辑盘,C、D、E、F等,同样道理,GPU也可以做这样的设置。
import tensorflow as tf
gpus = tf.config.experimental.list_physical_devices('GPU')
#[PhysicalDevice(name='/physical_device:GPU:0', device_type='GPU')]
比如我的电脑就只有一块GPU,有时想做一些多GPU的测试,没有多余的GPU,不过很好的一点是,tensorflow等框架都支持分布式的,同时也支持对GPU做逻辑划分。
#逻辑划分
tf.config.experimental.set_virtual_device_configuration(
     gpus[0],
     [tf.config.experimental.VirtualDeviceConfiguration(memory_limit=512),
      tf.config.experimental.VirtualDeviceConfiguration(memory_limit=512),
      tf.config.experimental.VirtualDeviceConfiguration(memory_limit=512)])
logical_gpus = tf.config.experimental.list_logical_devices('GPU')
#我们看下是否将GPU成功划分逻辑分区
print(logical_gpus)
#[LogicalDevice(name='/device:GPU:0', device_type='GPU'), LogicalDevice(name='/device:GPU:1', device_type='GPU'), LogicalDevice(name='/device:GPU:2', device_type='GPU')]打印出来,我们可以看到,将本机的一块物理GPU划分成了三块逻辑GPU,名字分别是/device:GPU:0,/device:GPU:1,/device:GPU:2
其余一些实用方法可以查阅print(dir(tf.config)):
tf.debugging.set_log_device_placement(True)#打印一些变量在哪些设备
gpus = tf.config.experimental.list_physical_devices('GPU')#物理的GPU列表
tf.config.experimental.set_visible_devices(gpus[0], 'GPU')#设置GPU可见
下面有很多方法,有兴趣的可以了解它们的作用:
['LogicalDevice', 'LogicalDeviceConfiguration', 'PhysicalDevice', '__builtins__', '__cached__', '__doc__', '__file__', '__loader__', '__name__', '__package__', '__path__', '__spec__', '_sys', 'experimental', 'experimental_connect_to_cluster', 'experimental_connect_to_host', 'experimental_functions_run_eagerly', 'experimental_run_functions_eagerly', 'functions_run_eagerly', 'get_logical_device_configuration', 'get_soft_device_placement', 'get_visible_devices', 'list_logical_devices', 'list_physical_devices', 'optimizer', 'run_functions_eagerly', 'set_logical_device_configuration', 'set_soft_device_placement', 'set_visible_devices', 'threading']3、JupyterLab测试
由于这里我们是新建的一个环境,激活之后在这个虚拟环境中,我们先进行安装 :
conda install -c conda-forge jupyterlab
然后输入命令即可:jupyter lab
这样就可以在JupyterLab中写代码进行测试了
我们来实际测试下这个逻辑分区的GPU:
import tensorflow as tf

gpus = tf.config.experimental.list_physical_devices('GPU')
tf.config.experimental.set_virtual_device_configuration(
     gpus[0],
     [tf.config.experimental.VirtualDeviceConfiguration(memory_limit=512),
      tf.config.experimental.VirtualDeviceConfiguration(memory_limit=512),
      tf.config.experimental.VirtualDeviceConfiguration(memory_limit=512)])
logical_gpus = tf.config.experimental.list_logical_devices('GPU')

c = []
for gpu in logical_gpus:
    print(gpu.name)
    with tf.device(gpu.name):
        a = tf.constant([[1,2,3],[4,5,6]])
        b = tf.constant([[7,8],[9,10],[11,12]])
        c.append(tf.matmul(a, b))
print(c)
#将三块GPU计算的值,通过CPU计算相加
with tf.device('/cpu:0'):
    matmul_sum = tf.add_n(c)

print(matmul_sum)

'''
/device:GPU:0
/device:GPU:1
/device:GPU:2
[<tf.Tensor: shape=(2, 2), dtype=int32, numpy=
array([[ 58,  64],
       [139, 154]])>, <tf.Tensor: shape=(2, 2), dtype=int32, numpy=
array([[ 58,  64],
       [139, 154]])>, <tf.Tensor: shape=(2, 2), dtype=int32, numpy=
array([[ 58,  64],
       [139, 154]])>]
tf.Tensor(
[[174 192]
 [417 462]], shape=(2, 2), dtype=int32)
'''我们可以看到分别在三块逻辑GPU上面进行了矩阵的乘法计算,还可以将它们指定到CPU来计算和。所以需要使用某块GPU或CPU,我们通过使用with tf.device('GPU或CPU名称') 来指定。这种对于大模型来说是很实用的,一般一块GPU的大小是有限的,而大模型的参数是非常大的,这样就可以将不同的层使用不同的GPU来分别计算了。
