Spring+Mybatis整合【重点】
Spring学完了,主要学习Spring两个内容:IOC+AOP
利用这两个知识来完成spring和mybatis的整合
- IOC: 控制反转,用来创建对象
- XxxService
- 通过数据源创建数据库连接
- 创建SqlSessionFactory
- 创建SqlSession
- 获得XxxMapper代理对象
- AOP: 面向切面
- 控制事务
具体的整合思路
- 创建项目
- 导入依赖
- spring依赖
- aop依赖
- mybatis依赖
- 数据库驱动依赖
- 连接池依赖
- 日志依赖
专业用于spring整合mybatis依赖spring-jdbc依赖,用于Dao层支持- 配置文件
spring配置文件
- 基本的IOC,DI扫描注解配置
- 加载配置文件
- 配置数据源
- 配置关于Mybatis
- mybatis配置文件
- db配置文件
- log4j配置文件
- 具体的业务代码
- UserService+UserServiceImpl
- UserMapper.java+ UserMapper.xml
- 测试
1.1 创建项目
1.2 依赖
    <dependencies>
        <!-- spring核心依赖(4个) -->
        <dependency>
            <groupId>org.springframework</groupId>
            <artifactId>spring-context</artifactId>
            <version>5.1.6.RELEASE</version>
        </dependency>

        <!-- 切面 -->
        <dependency>
            <groupId>org.springframework</groupId>
            <artifactId>spring-aspects</artifactId>
            <version>5.1.6.RELEASE</version>
        </dependency>

        <!-- spring支持Dao -->
        <dependency>
            <groupId>org.springframework</groupId>
            <artifactId>spring-jdbc</artifactId>
            <version>5.1.6.RELEASE</version>
        </dependency>
        <!-- 单元测试 -->
        <dependency>
            <groupId>junit</groupId>
            <artifactId>junit</artifactId>
            <version>4.13.1</version>
            <scope>test</scope>
        </dependency>
        <!-- mybatis -->
        <dependency>
            <groupId>org.mybatis</groupId>
            <artifactId>mybatis</artifactId>
            <version>3.5.7</version>
        </dependency>
        <!-- 数据库驱动 -->
        <dependency>
            <groupId>mysql</groupId>
            <artifactId>mysql-connector-java</artifactId>
            <version>5.1.47</version>
        </dependency>
        <!-- 日志 -->
        <dependency>
            <groupId>log4j</groupId>
            <artifactId>log4j</artifactId>
            <version>1.2.17</version>
        </dependency>
        <!-- 分页插件 -->
        <dependency>
            <groupId>com.github.pagehelper</groupId>
            <artifactId>pagehelper</artifactId>
            <version>5.3.0</version>
        </dependency>
        <!-- 数据库连接池 -->
        <dependency>
            <groupId>com.alibaba</groupId>
            <artifactId>druid</artifactId>
            <version>1.2.8</version>
        </dependency>
        <!-- spring整合mybatis专业包 -->
        <dependency>
            <groupId>org.mybatis</groupId>
            <artifactId>mybatis-spring</artifactId>
            <version>1.3.1</version>
        </dependency>
        <!-- 小辣椒 -->
        <dependency>
            <groupId>org.projectlombok</groupId>
            <artifactId>lombok</artifactId>
            <version>1.18.12</version>
        </dependency>
    </dependencies>
1.3 配置文件
1.3.1 db.properties
jdbc.driver=com.mysql.jdbc.Driver
jdbc.url=jdbc:mysql://localhost:3306/java2217?useSSL=false
jdbc.username=root
jdbc.password=123456
jdbc.initialSize=5
jdbc.maxActive=20
jdbc.minIdle=3
jdbc.maxWait=0
jdbc.timeBetweenEvictionRunsMillis=0
jdbc.minEvictableIdleTimeMillis=0
1.3.2 log4j.properties
# ERROR是级别
# 级别从低到高: debug,info,warn,error (日志信息从详细到简单)
# stdout: standard output的缩写,标准输出,其实就是输出到控制台
log4j.rootLogger=error

# 因为整个mybatis日志太多,可以指定只输出自己项目中指定位置的日志
log4j.logger.com.qf.mapper=debug,stdout


# 上面的stdout,是跟此处的stdout一样
log4j.appender.stdout=org.apache.log4j.ConsoleAppender
log4j.appender.stdout.layout=org.apache.log4j.PatternLayout
log4j.appender.stdout.layout.ConversionPattern=%5p [%t] - %m%n
1.3.3 mybatis-config.xml
<?xml version="1.0" encoding="UTF-8" ?>
<!DOCTYPE configuration
        PUBLIC "-//mybatis.org//DTD Config 3.0//EN"
        "https://mybatis.org/dtd/mybatis-3-config.dtd">
<configuration>

    <!-- 交给spring配置的,这里可以删除 -->

    <settings>
        <!-- 设置使用log4j日志 -->
        <setting name="logImpl" value="LOG4J"/>
        <!-- 开启下划线转驼峰 -->
        <!-- 把数据库create_time,变成createTime列 -->
        <setting name="mapUnderscoreToCamelCase" value="true"/>

        <!-- 开启缓存(默认就是true) -->
        <setting name="cacheEnabled" value="true"/>
    </settings>

</configuration>
1.3.4 applicationContext.xml
<?xml version="1.0" encoding="UTF-8"?>
<beans xmlns="http://www.springframework.org/schema/beans"
       xmlns:xsi="http://www.w3.org/2001/XMLSchema-instance"
       xmlns:aop="http://www.springframework.org/schema/aop"
       xmlns:context="http://www.springframework.org/schema/context"
       xsi:schemaLocation="http://www.springframework.org/schema/beans
       https://www.springframework.org/schema/beans/spring-beans.xsd
       http://www.springframework.org/schema/aop
       http://www.springframework.org/schema/aop/spring-aop.xsd http://www.springframework.org/schema/context http://www.springframework.org/schema/context/spring-context.xsd">

    <!-- 开启注解扫描 -->
    <context:component-scan base-package="com.qf"/>

    <!-- 1 加载db.properties配置文件-->
    <context:property-placeholder location="classpath:db.properties" />

    <!-- 2 创建数据源 -->
    <bean id="dataSource" class="com.alibaba.druid.pool.DruidDataSource">
        <!-- 此处是driverClassName,不是driver -->
        <property name="driverClassName" value="${jdbc.driver}"/>
        <property name="url" value="${jdbc.url}"/>
        <property name="username" value="${jdbc.username}"/>
        <property name="password" value="${jdbc.password}"/>
        <property name="initialSize" value="${jdbc.initialSize}"/>
        <property name="maxActive" value="${jdbc.maxActive}"/>
        <property name="minIdle" value="${jdbc.minIdle}"/>
        <property name="maxWait" value="${jdbc.maxWait}"/>
        <property name="timeBetweenEvictionRunsMillis" value="${jdbc.timeBetweenEvictionRunsMillis}"/>
        <property name="minEvictableIdleTimeMillis" value="${jdbc.minEvictableIdleTimeMillis}"/>
    </bean>

    <!-- 3 创建SqlSessionFactory -->
    <bean id="sessionFactory" class="org.mybatis.spring.SqlSessionFactoryBean">
        <property name="dataSource" ref="dataSource"/>
        <!-- 这些配置,如果在mybatis-config.xml中写过,这里就不要写 -->
        <property name="typeAliasesPackage" value="com.qf.model"/>\

        <property name="plugins">
            <set>
                <bean class="com.github.pagehelper.PageInterceptor">
                    <property name="properties">
                        <props>
                            <prop key="helperDialect">mysql</prop>
                        </props>
                    </property>
                </bean>
            </set>
        </property>

        <!-- 这些配置,也可以通过mybatis-config.xml-->
        <property name="configLocation" value="mybatis-config.xml"/>
    </bean>

    <!-- 4 扫描mapper,使mapper加入spring容器 -->
    <!-- mapper加入容器后,Service中就可以注入使用mapper -->
    <bean id="mapperScannerConfigurer" class="org.mybatis.spring.mapper.MapperScannerConfigurer">
        <!-- 此处是上面工厂的id,此处是value不是ref -->
        <property name="sqlSessionFactoryBeanName" value="sessionFactory"/>

        <!-- 扫描Mapper,产生代理对象,加入spring容器 -->
        <property name="basePackage" value="com.qf.mapper"/>
    </bean>
</beans>
1.4 业务类
1.4.1 业务层
public interface UserService {
    User findUserById(int id);
}

@Service
public class UserServiceImpl implements UserService {

    // 注入Mapper
    @Autowired
    private UserMapper userMapper;


    @Override
    public User findUserById(int id) {
        return userMapper.findUserById(id);
    }
}
1.4.2 数据层
public interface UserMapper {

    User findUserById(int id);

}
<?xml version="1.0" encoding="UTF-8" ?>
<!DOCTYPE mapper
        PUBLIC "-//mybatis.org//DTD Mapper 3.0//EN"
        "https://mybatis.org/dtd/mybatis-3-mapper.dtd">
<mapper namespace="com.qf.mapper.UserMapper">
    <select id="findUserById" resultType="User">
        SELECT
            *
        FROM
            tb_user
        WHERE
            id = #{id}
    </select>
</mapper>
1.5 测试
@Test
public void test() {
    String path = "applicationContext.xml";
    ClassPathXmlApplicationContext context = new ClassPathXmlApplicationContext(path);
    UserService service = context.getBean("userServiceImpl", UserService.class);

    User user = service.findUserById(1);
    System.out.println(user );
}
2 事务
2.1 介绍
Spring管理事务,有两种方案
- 编程式事务
- 需要手动给每个方法编写事务代码
- 代码大量冗余,不灵活,对业务代码有侵入性
- 声明式事务【学习】
- 在applicationContext.xml文件中配置aop,声明哪些方法需要事务管理
- 业务代码不用做任何改变,无感的就会有事务管理
2.2 目标方法
AOP编程
- 目标方法
- 定义切面类,定义增强的方法
- 配置文件中"织入"
事务配置
- 目标方法
spring提供了事务管理器,即增强的方法- 配置文件中"织入"
需求: 转账案例
public interface UserService {
    // 演示转账
    /**
     * 由谁转给谁,转多少
     * @param outId 转出的人的id
     * @param inId  收入的人的id
     * @param money 转多少钱
     * @return 是否成功
     */
    boolean transferMoney(int outId,int inId,double money);

}
    /**
     * 由谁转给谁,转多少
     * @param outId 转出的人的id
     * @param inId  收入的人的id
     * @param money 转多少钱
     * @return 是否成功
     */
    @Override
    public boolean transferMoney(int outId, int inId, double money) {

        // 转出
        int i = userMapper.updateAccountDesc(outId,money);

        System.out.println(1/0 );// 模拟,出现故障

        // 转入
        int j = userMapper.updateAccountIncr(inId,money);

        if (i >0 && j > 0) {
            return true;
        }
        return false;
    }
}
public interface UserMapper {

    int updateAccountDesc(@Param("outId") int outId, @Param("money") double money);

    int updateAccountIncr(@Param("inId") int inId, @Param("money") double money);
}
    <!-- 转出 -->
    <update id="updateAccountDesc">
        update account set money = money - #{money} where id = #{outId}
    </update>

    <!-- 转入 -->
    <update id="updateAccountIncr">
        update account set money = money + #{money} where id = #{inId}
    </update>
2.3 配置 【重点】
<?xml version="1.0" encoding="UTF-8"?>
<beans xmlns="http://www.springframework.org/schema/beans"
       xmlns:xsi="http://www.w3.org/2001/XMLSchema-instance"
       xmlns:aop="http://www.springframework.org/schema/aop"
       xmlns:context="http://www.springframework.org/schema/context"
       xmlns:tx="http://www.springframework.org/schema/tx"
       xsi:schemaLocation="http://www.springframework.org/schema/beans
       https://www.springframework.org/schema/beans/spring-beans.xsd
       http://www.springframework.org/schema/aop
       http://www.springframework.org/schema/aop/spring-aop.xsd
       http://www.springframework.org/schema/context
       http://www.springframework.org/schema/context/spring-context.xsd
       http://www.springframework.org/schema/tx
       http://www.springframework.org/schema/tx/spring-tx.xsd">

    <!-- 开启注解扫描 -->
    <context:component-scan base-package="com.qf"/>

    <!-- 1 加载db.properties配置文件-->
    <context:property-placeholder location="classpath:db.properties" />

    <!-- 2 创建数据源 -->
    <bean id="dataSource" class="com.alibaba.druid.pool.DruidDataSource">
        <property name="driverClassName" value="${jdbc.driver}"/>
        <property name="url" value="${jdbc.url}"/>
        <property name="username" value="${jdbc.username}"/>
        <property name="password" value="${jdbc.password}"/>
        <property name="initialSize" value="${jdbc.initialSize}"/>
    </bean>

    <!-- 3 创建SqlSessionFactory -->
    <bean id="sessionFactory" class="org.mybatis.spring.SqlSessionFactoryBean">
        <property name="dataSource" ref="dataSource"/>
        <!-- 这些配置,如果再mybatis-config.xml中写过,这里就不要写 -->
        <property name="typeAliasesPackage" value="com.qf.model"/>

        <property name="plugins">
            <set>
                <bean class="com.github.pagehelper.PageInterceptor">
                    <property name="properties">
                        <props>
                            <prop key="helperDialect">mysql</prop>
                        </props>
                    </property>
                </bean>
            </set>
        </property>

        <!-- 这些配置,也可以通过mybatis-config.xml-->
        <property name="configLocation" value="mybatis-config.xml"/>
    </bean>

    <!-- 4 扫描mapper,使mapper加入spring容器 -->
    <!-- mapper加入容器后,Service中就可以注入使用mapper -->
    <bean id="mapperScannerConfigurer" class="org.mybatis.spring.mapper.MapperScannerConfigurer">
        <!-- 此处是上面工厂的id -->
        <property name="sqlSessionFactoryBeanName" value="sessionFactory"/>

        <!-- 扫描Mapper,产生代理对象,加入spring容器 -->
        <property name="basePackage" value="com.qf.mapper"/>
    </bean>

    <!-- 5 事务管理器(相当于是切面)-->
    <bean id="txManager" class="org.springframework.jdbc.datasource.DataSourceTransactionManager">
        <!-- 需要注入数据源 -->
        <property name="dataSource" ref="dataSource"/>
    </bean>

    <!-- 6 配置事务管理的增强方法(配置事务的特性) -->
    <tx:advice id="txAdvice" transaction-manager="txManager">
        <tx:attributes>
            <!--
                name: 目标方法名,还可以模糊匹配的方法名
            -->
            <tx:method name="transferMoney"/>
            <!--<tx:method name="query*"/>-->
            <tx:method name="*"/>
        </tx:attributes>
    </tx:advice>

    <!-- 7 织入(将增强的方法作用到目标方法上) -->
    <aop:config>
        <aop:pointcut id="myPointcut" expression="execution(* com.qf.service.impl.*.*(..))"/>
        <aop:advisor advice-ref="txAdvice" pointcut-ref="myPointcut"/>
    </aop:config>
</beans>
【重要】关于事务主要是第5,6,7步
2.4 测试
    @Test
    public void test2() {
        String path = "applicationContext.xml";
        ClassPathXmlApplicationContext context = new ClassPathXmlApplicationContext(path);
        UserService service = context.getBean("userServiceImpl", UserService.class);

        boolean b = service.transferMoney(1, 2, 100);
        System.out.println(b );
    }
2.5 事务属性配置【了解】
隔离级别 isolation=“DEFAULT”
| 属性值 | 解释 |
|---|---|
| DEFAULT | 采用当前数据库默认的级别(建议) |
| READ_UNCOMMITTED | 读未提交 |
| READ_COMMITTED | 读已提交(Oracle默认级别) |
| REPEATABLE_READ | 可重复读(MySQL默认级别) |
| SERIALIZABLE | 串行化 |
传播行为 propagation=“REQUIRED” (默认)
REQUIRED: 不存在外部事务时,就会开启新事物;存在外部事务,则合并事务到外部事务(适合增删改频率比较高方法)
SUPPORTS: 不存在外部事务时,不开启新事物;存在外部事务,则合并事务到外部事务(适合查询的方法)

只读 : read-only=“false” (默认)
- true: 只读,适合查询
- false: 默认值,可以增删改
超时: timeout , 当前事务所需数据被其他事务占用,就等待.
-1: 有数据库指定等待时间(默认)
100: 可以自己指定超时时间,单位是秒
回滚 rollback-for=“RuntimeException” ,默认只有抛出运行时异常,会回滚事务,其他异常会提交事务
可以指定rollback-for=“Exception”,这样所有异常都会回滚事务
3 注解开发事务
注解开发事务,不用编写aop:config和tx:advice,.即第6,7步不用再写
 <!-- 1,2,3,4步骤还是需要的,...->
<!-- 5 事务管理器(相当于是切面)-->
    <bean id="txManager" class="org.springframework.jdbc.datasource.DataSourceTransactionManager">
        <!-- 需要注入数据源 -->
        <property name="dataSource" ref="dataSource"/>
    </bean>


    <!-- 6 开启事务注解 -->
    <tx:annotation-driven transaction-manager="txManager"/>
</beans>
哪里需要事务哪里加注解
@Service
@Transactional // 注解加类上,类中所有方法都有事务,加在方法上,只是单独某个方法有事务
public class UserServiceImpl implements UserService {
}
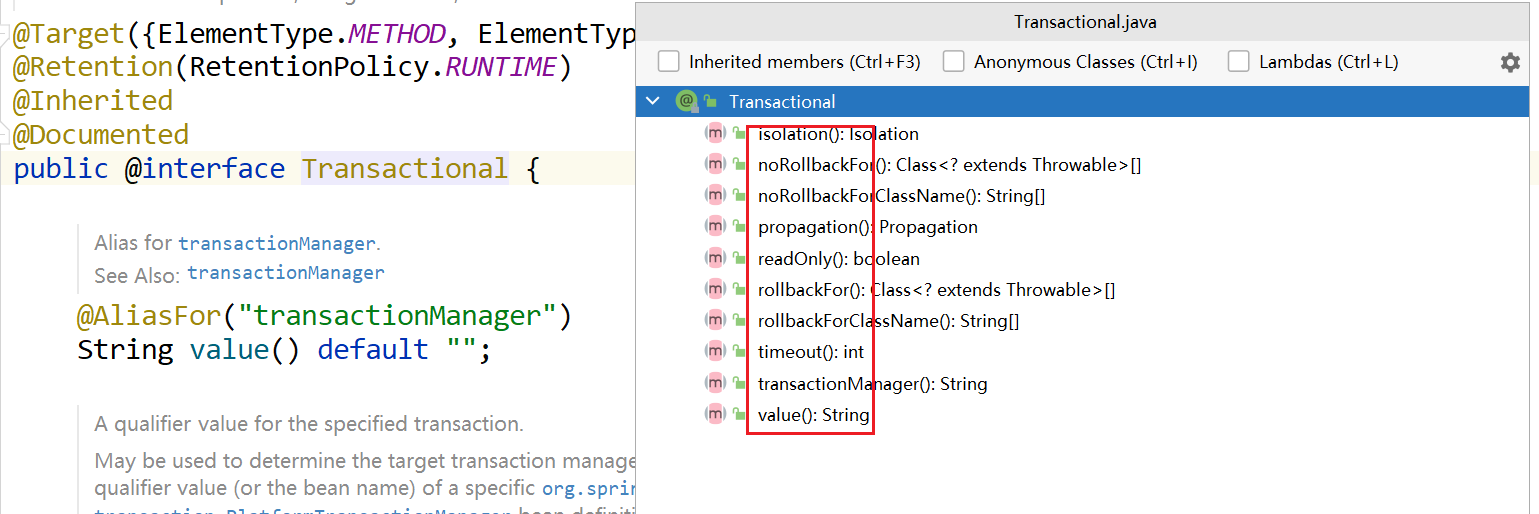
// 事务的属性,也可以在注解中配置
@Transactional(isolation = Isolation.DEFAULT,propagation = Propagation.REQUIRED)


![Linux学习[15]bash学习深入1---bash的功能---变量详解](https://img-blog.csdnimg.cn/913e214c4243444aa650209e8d104b5f.png)


![【CVE-2022-0185】Linux kernel [文件系统挂载API] 堆溢出漏洞分析与利用](https://img-blog.csdnimg.cn/img_convert/13f8301e5397416462c3f79d32f2ee30.png)