利用WSL2搭建Qemu仿真Vexpress-a9开发环境
- 开发环境搭建
- 更新软件源
- uboot-tools安装
- 交叉编译环境安装
- qemu安装
- 编译linux镜像和DBT文件
- 启动qemu仿真kernel
- busybox制作根文件系统
- 制作rootfs
- 使用u-boot启动kernel
- 下载编译u-boot
- u-boot利用tftp网络引导方式启动Linux内核
- WSL2主机网络功能设置
- QEMU与主机的网络连接
开发环境搭建
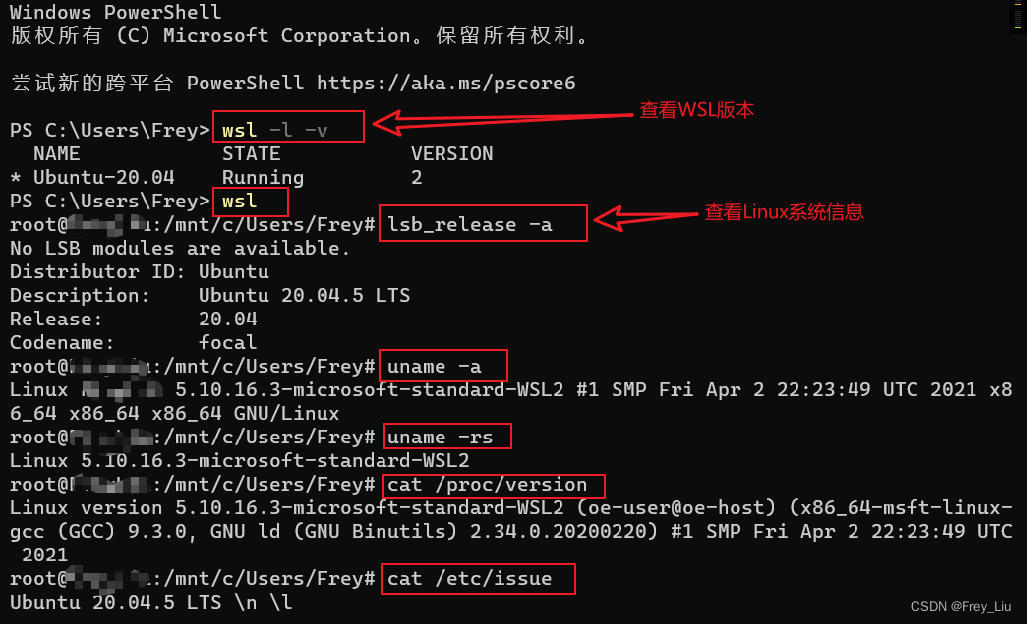
最近想熟悉下Linux开发方面的知识,由于不想安装个虚拟机,便想着利用windows自身带的linux子系统,跑qemu模拟ARM vexpress-a9开发板,过程是逐渐摸索的,参考了网上不少文章,算是做下总结吧!
本身电脑是多年前的win10 64位,性能更不上,不想安装太多软件,WSL2可以在Mircosoft Store上直接搜索ubuntu,安装即可。另外可以同时下载个Windows Terminal作为命令行终端使用。
更新软件源
国内的源更新软件更快,更新/etc/apt/sources.list文件中软件源,可以参考修改Ubuntu的源列表。
更新之后执行apt update,系统会联网查找/etc/apt/sources.list中对应的packages/source/release列表文件,下载或更新,并保存到/var/lib/apt/lists目录。
apt install下载到本地并安装,/var/lib/dpkg/available包含软件源中所有软件信息,/var/cache/apy/archives为apt install安装包的临时存放路径
uboot-tools安装
利用 dpkg -l u-boot-tools命令或 dpkg -L u-boot-tools命令查看uboot-tools是否安装,没安装的话,执行下面命令:
sudo apt install u-boot-tools
交叉编译环境安装
ABI(Application Binary Interface)for ARM Architecture 二进制应用程序接口,EABI:嵌入式ABI
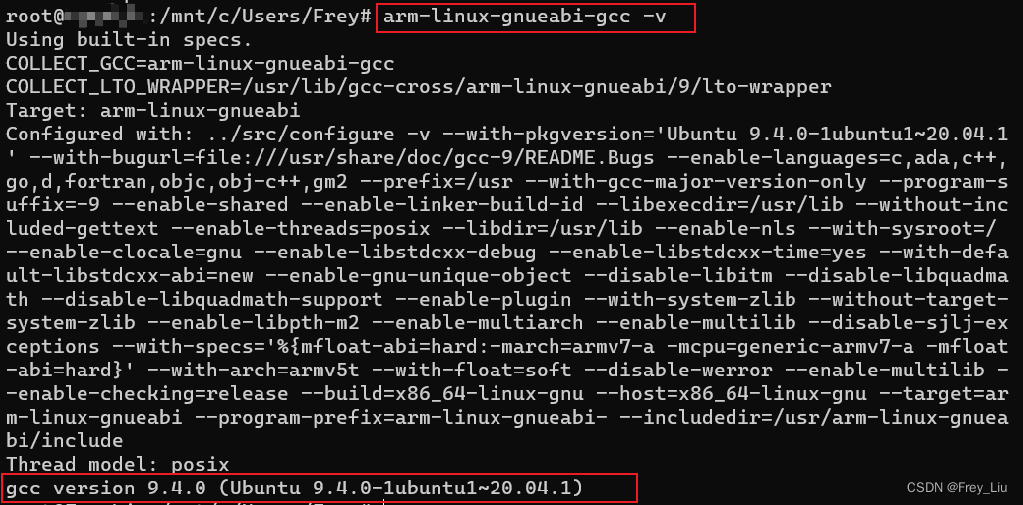
apt install gcc-arm-linux-gnueabi
apt install g++-arm-linux-gnueabi # 嵌入式c++开发时需要

arm-linux-gnueabi-gcc -v # 查看版本号

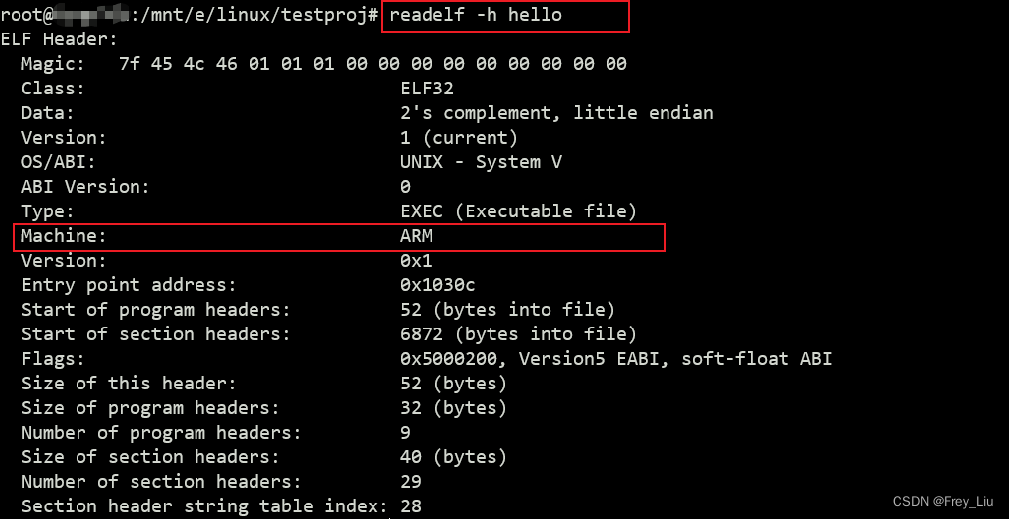
arm-linux-gnueabi-gcc -o hello main.c # 编译
readelf -h hello  # 查看ELF文件格式
qemu安装
有两种方法可以在Linux环境下安装Qemu工具,直接安装或下载源码安装,源码安装的好处是qemu比较新,支持的开发板更多,Vexpress-a9是很老的板子了,所以选择直接安装。
sudo apt install qemu-system-arm # 只安装了arm版本的

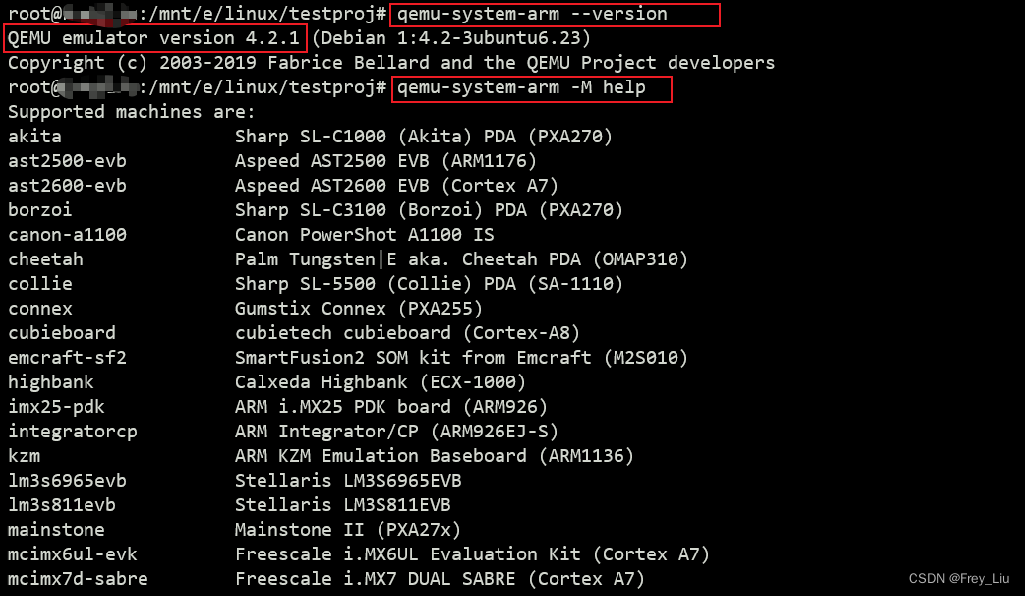
qemu-system-arm --version # 查看版本号
qemu-img -V # 同上
qemu-system-arm -M help   # 可以查看QEMU支持的ARM平台的开发板的型号
另外,Qemu源码编译安装可参考Qemu搭建ARM vexpress开发环境,具体主要下面几步:
- 安装依赖包,zlib1g-dev,libglib2.0 libglib2.0-dev,libsdl1.2-dev,libpixman-1-dev libfdt-dev
- 下载源码,
git-qemu-project.org 或 https://download.qemu.org/ - 编译配置,./configure --target-list=arm-softmmu --audio-drv-list=
- 编译安装,make; make install
编译linux镜像和DBT文件
下载linux内核:https://www.kernel.org/,并解压,下载的版本为linux-5.10.148,解压命令如下。
// tar 解包
// tar [选项] 压缩包
tar -zxvf tmp.tar.gz -C /tmp // #解压缩与解打包".tar.gz"格式到/tmp/目录下,其他格式不要-z
-x 对tar包做解打包操作。
-f 指定要解压的 tar 包的包名。
-C 目录	指定解打包位置。
-v 显示解打包的具体过程。
-t 只查看tar包中有哪些文件或目录,不对tar包做解打包操作。
下面就是编译了,/kernel/linux-5.10.148# vim Makefile打开Makefile,添加ARCH=ARM CROSS_COMPILE=arm-linux-gnueabi-,
之后编译配置内核、模块、dbt文件:
make vexpress_defconfig
make ZImage
make modules
make dtbs

# 得到编译文件:
# arch/arm/boot/zImage
# arch/arm/boot/dts/vexpress-v2p-ca9.dtb
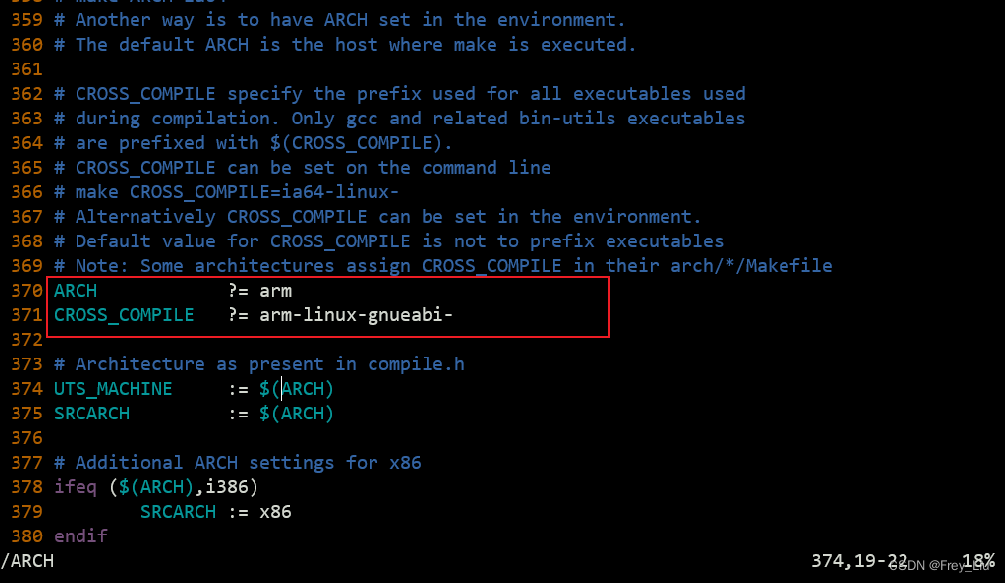
当然也可以不修改Makefile,类似下面的命令,编译时指定ARCH CROSS_COMPILE:
make ARCH=arm CROSS_COMPILE=arm-linux-gnueabi- zImage -j4
编译时可能会出现gcc找不到问题,apt install gcc安装ubuntu环境的gcc即可。

也可能出现找不到bison/flex的情况,按照指示安装对应软件即可。


启动qemu仿真kernel
qemu-system-arm -M vexpress-a9 -m 128M -kernel arch/arm/boot/ZImage -dtb arch/arm/boot/dts/vexpress-v2p-ca9.dtb -nographic -append "console=ttyAMA0"

# 这里注意文件的路径,是在linux-5.10.148源码目录执行的。
# -M vexpress-a9 模拟vexpress-a9单板,你能够使用-M ?參数来获取该qemu版本号支持的全部单板
# -m 128M 单板执行物理内存128M
# -kernel arch/arm/boot/zImage 告诉qemu单板执行内核镜像路径
# -dtb arch/arm/boot/dts/vexpress-v2p-ca9.dtb  告诉qemu单板的设备树(必须加入)
# -nographic 不使用图形化界面,仅仅使用串口
# -append "console=ttyAMA0" 内核启动參数。这里告诉内核vexpress单板执行。串口设备是哪个tty。
为了使用方便,可以将qemu命令放到shell脚本中执行。
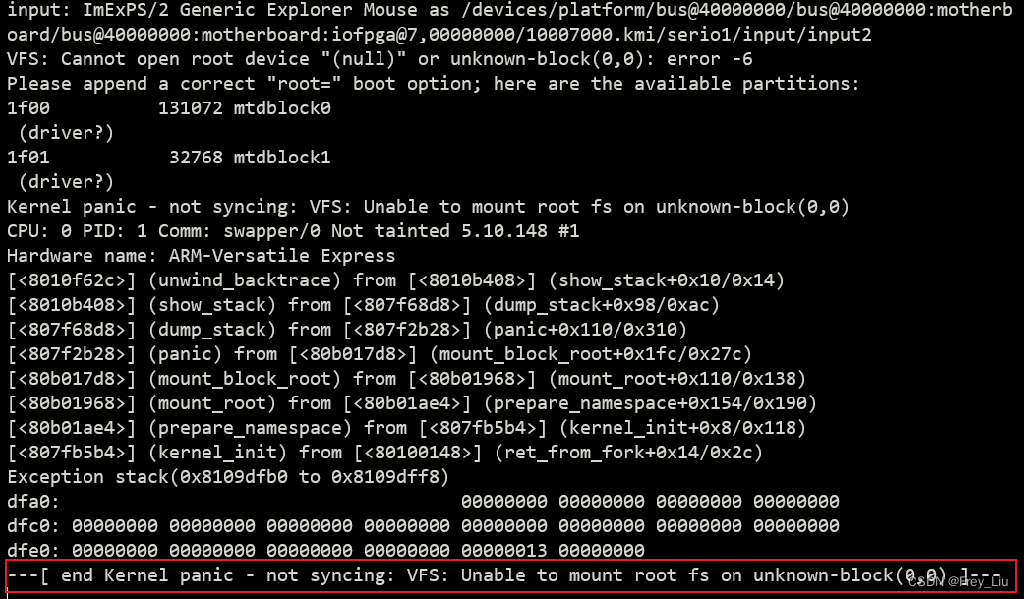
内核成功启动,运行到最后出错是因为没有挂载根文件系统。
busybox制作根文件系统
Busybox下载,https://busybox.net/downloads/,并解压,下载的busybox版本为busybox-1.35.0。
之后配置编译项,修改Makefile,添加ARCH=arm CROSS_COMPILE=arm-linux-gnueabi-,
配置:make defconfig ; make menuconfig
编译:make
安装:make install
当然,也可以在编译时制定编译选项的方式编译:
# make ARCH=arm CROSS_COMPILE=arm-linux-gnueabi- menuconfig # 配置
# make ARCH=arm CROSS_COMPILE=arm-linux-gnueabi- # 编译
# make ARCH=arm CROSS_COMPILE=arm-linux-gnueabi- install # 安装

# 直接使用CONFIG_PREFIX指定安装目录:
# make ARCH=arm CROSS_COMPILE=arm-linux-gnueabi- CONFIG_PREFIX=/.../rootfs/ install
制作rootfs
-
新建rootfs文件夹
/home/# mkdir rootfs # 将busybox编译生成的_install目录下的文件全部拷贝到根文件系统目标rootfs/目录 /home/rootfs# cp -r /mnt/e/linux/kernel/busybox-1.35.0/_install/* . # 也可以在指定busybox的安装目录直接安装 # make CONFIG_PREFIX=/home/rootfs/ install # 添加glibc库 # cp /.../busybox-1.29.3/_install/* rootfs/ -rfd /home/rootfs# mkdir lib /home/rootfs# cp -p /usr/arm-linux-gnueabi/lib/* lib -
静态创建设备文件
# 制作节点: /home/rootfs/dev# mknod -m 666 tty1 c 4 1 /home/rootfs/dev# mknod -m 666 tty2 c 4 2 /home/rootfs/dev# mknod -m 666 tty3 c 4 3 /home/rootfs/dev# mknod -m 666 tty4 c 4 4 /home/rootfs/dev# mknod -m 666 console c 5 1 /home/rootfs/dev# mknod -m 666 null c 1 3 /home/rootfs/dev# ls console null tty1 tty2 tty3 tty4 /home/rootfs# cp /mnt/e/linux/kernel/etc . -arf /home/rootfs# ls bin dev etc lib linuxrc sbin usr -
制作SD卡文件系统镜像并将rootfs烧写到SD卡
# 生成镜像: /home# dd if=/dev/zero of=rootfs.ext3 bs=1M count=64 # 格式化为ext3:共64M,注意必须大于rootfs文件夹的大小。建议用ext4,u-boot基本命令不支持ext3 /home# mkfs.ext3 rootfs.ext3 # 将各种文件拷贝到文件系统镜像中:命令用mount -t ext3 rootfs.ext3 /mnt/ -o loop也可以。 /home# ls rootfs rootfs.ext3 tftpboot tmpfs /home# mount -t ext3 rootfs.ext3 tmpfs/ -o loop /home# ls tmpfs/ lost+found /home# cp -r rootfs/* tmpfs/ # 执行umount后 /home# umount tmpfs ## 如制作的SD镜像只有32M会出出现空间不足的错误,因为rootfs文件夹有52M。 /home# dd if=/dev/zero of=rootfs.ext3 bs=1M count=32 32+0 records in 32+0 records out 33554432 bytes (34 MB, 32 MiB) copied, 0.0333199 s, 1.0 GB/s /home# mkfs.ext3 rootfs.ext3 /home# ls rootfs rootfs.ext3 tmpfs /home# mount -t ext3 rootfs.ext3 tmpfs/ -o loop /home# ls tmpfs/ lost+found /home# cp -r rootfs/* tmpfs/ cp: error writing 'tmpfs/lib/libc.a': No space left on device cp: error writing 'tmpfs/lib/libc.so': No space left on device cp: error writing 'tmpfs/lib/libc.so.6': No space left on device cp: error writing 'tmpfs/lib/libc_nonshared.a': No space left on device -
启动
输入如下命令,启动后可以看到内核运行起来了,/mnt/e/linux/kernel/linux-5.10.148# qemu-system-arm -M vexpress-a9 -m 512M -kernel arch/arm/boot/ZImage -dtb arch/arm/boot/dts/vexpress-v2p-ca9.dtb -nographic -append "root=/dev/mmcblk0 rw console=ttyAMA0" -sd /home/rootfs.ext3
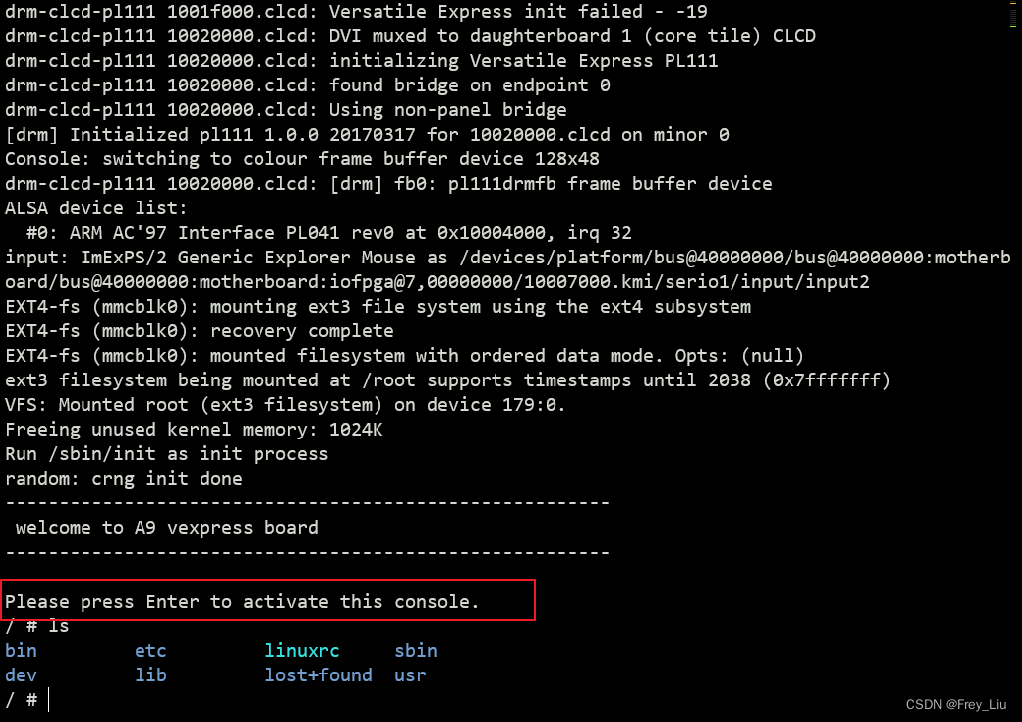
其中上面进入打印的welcome to A9 vexpress board,是在制作rootfs时,加入了/etc/init.d/rcS文件,记着修改该文件的可执行权限# chmod (a+x) /etc/init.d/rcS,文件内容可以自己写,如:echo "welcome to A9 vexpress board" 。系统启动后会执行etc下的启动配置文件。
使用u-boot启动kernel
下载编译u-boot
-
下载地址:https://ftp.denx.de/pub/u-boot/
-
修改编译Makefile,config.mk
/mnt/e/linux/kernel/u-boot-2022.10-rc5# vim Makefile # 修改CROSS_COMPILE配置如下 CROSS_COMPILE=arm-linux-gnueabi- /mnt/e/linux/kernel/u-boot-2022.10-rc5# vim config.mk # 修改ARCH配置如下 ARCH=arm # 当然你也可以不修改这些,make时直接指定参数,如下面这样的方式编译 # make ARCH=arm CROSS_COMPILE=arm-linux-gnueabi- vexpress_ca9x4_defconfig # make ARCH=arm CROSS_COMPILE=arm-linux-gnueabi- -j4 -
配置:make vexpress
/mnt/e/linux/kernel/u-boot-2022.10-rc5/configs# ls vexpress* -l -rwxrwxrwx 1 root root 1165 Sep 20 00:17 vexpress_aemv8a_juno_defconfig -rwxrwxrwx 1 root root 965 Sep 20 00:17 vexpress_aemv8a_semi_defconfig -rwxrwxrwx 1 root root 554 Sep 20 00:17 vexpress_aemv8r_defconfig -rwxrwxrwx 1 root root 1520 Sep 20 00:17 vexpress_ca9x4_defconfig /mnt/e/linux/kernel/u-boot-2022.10-rc5/configs# cd ../ /mnt/e/linux/kernel/u-boot-2022.10-rc5# make vexpress_ca9x4_defconfig -
编译
/mnt/e/linux/kernel/u-boot-2022.10-rc5# make -j4 # 编译成功之后目录中会生成u-boot、 u-boot.bin 等文件 -
测试u-boot
/mnt/e/linux/kernel/u-boot-2022.10-rc5# qemu-system-arm -M vexpress-a9 -m 512M -kernel u-boot -nographic

ALSA lib confmisc.c:767:(parse_card) cannot find card '0'
ALSA lib conf.c:4732:(_snd_config_evaluate) function snd_func_card_driver returned error: No such file or directory
ALSA lib confmisc.c:392:(snd_func_concat) error evaluating strings
ALSA lib conf.c:4732:(_snd_config_evaluate) function snd_func_concat returned error: No such file or directory
ALSA lib confmisc.c:1246:(snd_func_refer) error evaluating name
ALSA lib conf.c:4732:(_snd_config_evaluate) function snd_func_refer returned error: No such file or directory
ALSA lib conf.c:5220:(snd_config_expand) Evaluate error: No such file or directory
ALSA lib pcm.c:2642:(snd_pcm_open_noupdate) Unknown PCM default
alsa: Could not initialize DAC
alsa: Failed to open `default':
alsa: Reason: No such file or directory
ALSA lib confmisc.c:767:(parse_card) cannot find card '0'
ALSA lib conf.c:4732:(_snd_config_evaluate) function snd_func_card_driver returned error: No such file or directory
ALSA lib confmisc.c:392:(snd_func_concat) error evaluating strings
ALSA lib conf.c:4732:(_snd_config_evaluate) function snd_func_concat returned error: No such file or directory
ALSA lib confmisc.c:1246:(snd_func_refer) error evaluating name
ALSA lib conf.c:4732:(_snd_config_evaluate) function snd_func_refer returned error: No such file or directory
ALSA lib conf.c:5220:(snd_config_expand) Evaluate error: No such file or directory
ALSA lib pcm.c:2642:(snd_pcm_open_noupdate) Unknown PCM default
alsa: Could not initialize DAC
alsa: Failed to open `default':
alsa: Reason: No such file or directory
audio: Failed to create voice `lm4549.out'

U-Boot 2022.10-rc5 (Dec 03 2022 - 21:15:27 +0800)

DRAM:  512 MiB
WARNING: Caches not enabled
Core:  18 devices, 10 uclasses, devicetree: embed
Flash: 64 MiB
MMC:   mmci@5000: 0
Loading Environment from Flash... *** Warning - bad CRC, using default environment

In:    serial
Out:   serial
Err:   serial
Net:   eth0: ethernet@3,02000000
Hit any key to stop autoboot:  0
MMC Device 1 not found
no mmc device at slot 1
Card did not respond to voltage select! : -110
smc911x: detected LAN9118 controller
smc911x: phy initialized
smc911x: MAC 52:54:00:12:34:56
BOOTP broadcast 1
DHCP client bound to address 10.0.2.15 (5 ms)
*** Warning: no boot file name; using '0A00020F.img'
Using ethernet@3,02000000 device
TFTP from server 10.0.2.2; our IP address is 10.0.2.15
Filename '0A00020F.img'.
smc911x: MAC 52:54:00:12:34:56

TFTP error: trying to overwrite reserved memory...
missing environment variable: pxefile_addr_r
smc911x: detected LAN9118 controller
smc911x: phy initialized
smc911x: MAC 52:54:00:12:34:56
BOOTP broadcast 1
DHCP client bound to address 10.0.2.15 (1 ms)
Using ethernet@3,02000000 device
TFTP from server 10.0.2.2; our IP address is 10.0.2.15
Filename 'boot.scr.uimg'.
smc911x: MAC 52:54:00:12:34:56

TFTP error: trying to overwrite reserved memory...
smc911x: detected LAN9118 controller
smc911x: phy initialized
smc911x: MAC 52:54:00:12:34:56
BOOTP broadcast 1
DHCP client bound to address 10.0.2.15 (1 ms)
Using ethernet@3,02000000 device
TFTP from server 10.0.2.2; our IP address is 10.0.2.15
Filename 'boot.scr.uimg'.
Load address: 0x60100000
Loading: *
TFTP error: 'Access violation' (2)
Not retrying...
smc911x: MAC 52:54:00:12:34:56
cp - memory copy

Usage:
cp [.b, .w, .l, .q] source target count
Wrong Image Format for bootm command
ERROR: can't get kernel image!
=>
=>
=>
可以看到只是启动了u-boot, u-boot命令如
?或help可以使用。
u-boot利用tftp网络引导方式启动Linux内核
常见的启动方式:NOR/NAND FLASH启动,SD卡启动,BootLoader启动。这里使用tftp方式
# 使用u-boot引导内核镜像
# 需要将内核编译为uImage格式,制定uImage的加载地址
# 编译时制定
# make LOADADDR=0x60003000 uImage -j4

# 编译后内核目录arch/arm/boot/ 中有uImage文件
WSL2主机网络功能设置
先是按照网络上的方式操作了一遍,没法实现WSL2和Qemu网络连通,之后修改网络连接方式,可以实现qemu运行u-boot时能ping通WSL2,过程大致如下:
-
桥接方式
参见文章 配置Qemu与主机的网络连接 部分,配置方式如下:# QEMU网络功能设置 # 配置QEMU与主机的网络连接,采用桥接bridge的网络连接与host通信,需要主机内部tun/tap模块支持 # 主机安装工具包, # apt install uml-utilities bridge-utils # 创建tun设备文件:/dev/net/tun # 修改/etc/network/interfaces ,如下几行,文件重启生效 # interfaces(5) file used by ifup(8) and ifdown(8) auto lo iface lo inet loopback auto nes33 auto br0 iface br0 inet dhcp bridge_ports ens33 # # 其中,ens33是你网口 # 配置/etc/qemu-ifup、/etc/qemu-ifdown脚本,高版本不配置也行WSL无法使用root智能关闭,wsl -t Ubuntu关闭,依然无法实现桥接功能。这里按照网上常用的方式进行桥接,
输入ifconfig,没有出现想要的 br0,猜测可能WSL2本来就是桥接的原因。 -
主机安装TFTP工具
# 主机Host安装TFTP工具: 1. 安装TFTP工具: apt install tftp-hpa tftpd-hpa xinetd 2. 修改配置文件:/etc/default/tftpd-hpa TFTP_USENAME="tftp" TFTP_DIRECTORY="/home/tftpboot" TFTP_ADDRESS="0.0.0.0:69" TFTP_OPTIONS="-l -c -s" 3. 创建tftp目录:mkdir /home/tftpboot; chmod 777 tftpboot 4. 重启tftp服务器:/etc/init.d/tftpd-hpa restart /home# /etc/init.d/tftpd-hpa Usage: /etc/init.d/tftpd-hpa {start|stop|restart|force-reload|status} /home# /etc/init.d/tftpd-hpa restart * Restarting HPA's tftpd in.tftpd 5. 之后将uImage, vexpress-v2p-ca9.dtb 复制到 tftpboot中。 6. 运行,如下命令,建立在br0桥接成功的基础上,无法运行加载内核,故只是安装tftp完成。 qemu-system-arm -M vexpress-a9 -kernel u-boot -nographic -m 512M -net nic,vlan=0 -net tap,vlan=0,ifname=tap0 -sd /home/rootfs.ext3 -
修改网络连接
网上找到其他参考,如QEMU模拟开发板系列5——虚拟机和开发板之间的通信, 访问qemu虚拟机的五种姿势, 【qemu】qemu网络配置。
主机网络配置及显示效果如下:/home# tunctl -u root -t tap0 Set 'tap0' persistent and owned by uid 0 /home# ifconfig tap0 172.16.16.10 promisc up /home# ls rootfs rootfs.ext3 tftpboot tmpfs /home# ifconfig eth0: flags=4163<UP,BROADCAST,RUNNING,MULTICAST> mtu 1500 inet 172.24.100.81 netmask 255.255.240.0 broadcast 172.24.111.255 inet6 fe80::215:5dff:fe8f:f6d2 prefixlen 64 scopeid 0x20<link> ether 00:15:5d:8f:f6:d2 txqueuelen 1000 (Ethernet) RX packets 24 bytes 4324 (4.3 KB) RX errors 0 dropped 0 overruns 0 frame 0 TX packets 12 bytes 936 (936.0 B) TX errors 0 dropped 0 overruns 0 carrier 0 collisions 0 lo: flags=73<UP,LOOPBACK,RUNNING> mtu 65536 inet 127.0.0.1 netmask 255.0.0.0 inet6 ::1 prefixlen 128 scopeid 0x10<host> loop txqueuelen 1000 (Local Loopback) RX packets 0 bytes 0 (0.0 B) RX errors 0 dropped 0 overruns 0 frame 0 TX packets 0 bytes 0 (0.0 B) TX errors 0 dropped 0 overruns 0 carrier 0 collisions 0 tap0: flags=4355<UP,BROADCAST,PROMISC,MULTICAST> mtu 1500 inet 172.16.16.10 netmask 255.255.0.0 broadcast 172.16.255.255 ether 96:71:8d:e9:a2:39 txqueuelen 1000 (Ethernet) RX packets 0 bytes 0 (0.0 B) RX errors 0 dropped 0 overruns 0 frame 0 TX packets 0 bytes 0 (0.0 B) TX errors 0 dropped 0 overruns 0 carrier 0 collisions 0可以看到
ifconfig后有tap0出现。
QEMU与主机的网络连接
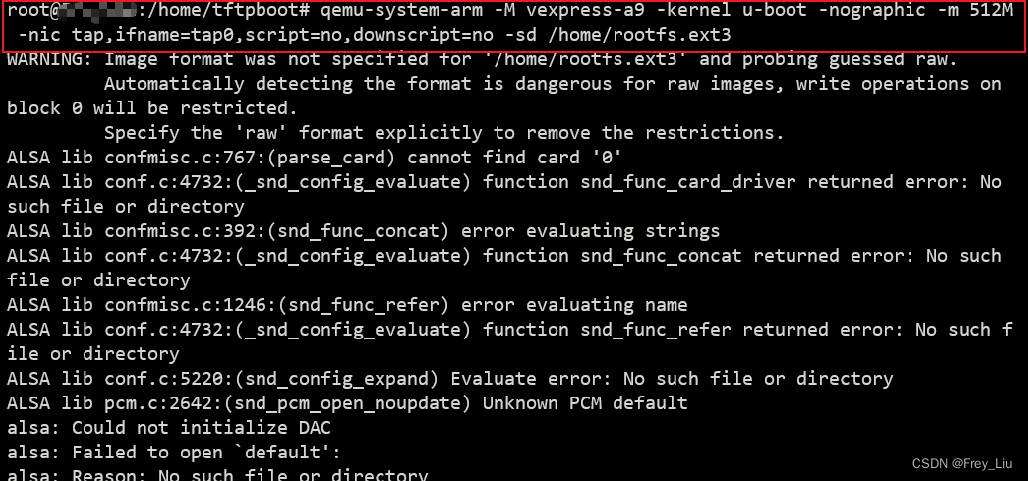
启动u-boot,输入如下命令:
/home/tftpboot# qemu-system-arm -M vexpress-a9 -kernel u-boot -nographic -m 512M -nic tap,ifname=tap0,script=no,downscript=no -sd /home/rootfs.ext3
之后再u-boot程序运行中配置ip,加载内核,如下:
=> setenv ipaddr 172.16.16.20
=> saveenc
=> setenv serverip 172.16.16.10
=> setenv netmask 255.255.240.0
=> saveenv

# 配置完上面之后,需要启动主机的tftp服务,WSL2主机上输入如下
/mnt/e/linux/kernel# service tftpd-hpa start

# 之后u-boot中加载内核镜像与设备树文件,并启动。
=> tftp 60003000 uImage
=> tftp 60500000 vexpress-v2p-ca9.dtb
=> bootm 60003000 - 60500000
WSL2 启动tftp服务后LOG(补全)如下,成功加载了linux内核。
=> ping 172.16.16.10
smc911x: detected LAN9118 controller
smc911x: phy initialized
smc911x: MAC 52:54:00:12:34:56
Using ethernet@3,02000000 device
smc911x: MAC 52:54:00:12:34:56
host 172.16.16.10 is alive
=> tftp 60003000 uImage
smc911x: detected LAN9118 controller
smc911x: phy initialized
smc911x: MAC 52:54:00:12:34:56
Using ethernet@3,02000000 device
TFTP from server 172.16.16.10; our IP address is 172.16.16.20
Filename 'uImage'.
Load address: 0x60003000
Loading: #################################################################
         #################################################################
         #################################################################
         #################################################################
         #################################################################
         #######
         5.1 MiB/s
done
Bytes transferred = 4868888 (4a4b18 hex)
smc911x: MAC 52:54:00:12:34:56
=> tftp 60500000 vexpress-v2p-ca9.dtb
smc911x: detected LAN9118 controller
smc911x: phy initialized
smc911x: MAC 52:54:00:12:34:56
Using ethernet@3,02000000 device
TFTP from server 172.16.16.10; our IP address is 172.16.16.20
Filename 'vexpress-v2p-ca9.dtb'.
Load address: 0x60500000
Loading: #
         1.4 MiB/s
done
Bytes transferred = 14171 (375b hex)
smc911x: MAC 52:54:00:12:34:56
=> bootm 60003000 - 60500000
## Booting kernel from Legacy Image at 60003000 ...
   Image Name:   Linux-5.10.148
   Image Type:   ARM Linux Kernel Image (uncompressed)
   Data Size:    4868824 Bytes = 4.6 MiB
   Load Address: 60003000
   Entry Point:  60003000
   Verifying Checksum ... OK
## Flattened Device Tree blob at 60500000
   Booting using the fdt blob at 0x60500000
   Loading Kernel Image
   Loading Device Tree to 7fb1c000, end 7fb2275a ... OK

Starting kernel ...

ALSA lib confmisc.c:767:(parse_card) cannot find card '0'
ALSA lib conf.c:4732:(_snd_config_evaluate) function snd_func_card_driver returned error: No such file or directory
ALSA lib confmisc.c:392:(snd_func_concat) error evaluating strings
ALSA lib conf.c:4732:(_snd_config_evaluate) function snd_func_concat returned error: No such file or directory
ALSA lib confmisc.c:1246:(snd_func_refer) error evaluating name
ALSA lib conf.c:4732:(_snd_config_evaluate) function snd_func_refer returned error: No such file or directory
ALSA lib conf.c:5220:(snd_config_expand) Evaluate error: No such file or directory
ALSA lib pcm.c:2642:(snd_pcm_open_noupdate) Unknown PCM default
alsa: Could not initialize DAC
还有很多问题,运行起来的kernel没有VFS,也还没能自动化引导的方式运行,先到这边吧!
参考:
使用QEMU搭建U-boot+Linux;
Qemu搭建ARM vexpress开发环境(二)----u-boot启动kernel;
使用Qemu模拟vexpress-a9搭建模拟开发板;
qemu-system-arm仿真vexpress-a9踩坑记;


![[附源码]计算机毕业设计图书馆出版物预订系统Springboot程序](https://img-blog.csdnimg.cn/162fd02ddb4746b2906be71d4ffb9a64.png)






![[附源码]计算机毕业设计JAVA疫情环境下的酒店管理系统](https://img-blog.csdnimg.cn/eeb406b6753245748189042ee8f3eeab.png)

