目录
1.新旧生命周期对比
2.常用的3个钩子函数
3.生命周期(旧)
4.生命周期(新)
React 中为我们提供了一些生命周期钩子函数,让我们能在 React 执行的重要阶段,在钩子函数中做一些事情。
1.新旧生命周期对比
新的生命周期 对于 旧的生命周期 ,废弃(即将废弃)了 三个 生命钩子: componentWillMount、componentWillReceiveProps、componentWillUpdate;
新提出了两个生命钩子:getDerivedStateFromProps(获取派生状态)、getSnapshotBeforeUpdate(存快照,比如用于存放滚动条更新前位置)
| 阶段 | 旧生命周期 | 新生命周期 |
|---|---|---|
| 初始化阶段:由ReactDOM.render() 触发 -----初次渲染 | 1. constructor() 2. componentWillMount() 3. render() 4. componentDidMount() | 1. constructor() 2. getDerivedStateFromProps() 3. render() 4. componentDidMount() |
| 更新阶段: 由组件内部this.setState() 或父组件render()触发 | 1. shouldComponentUpdate()----更新的阀门,要有return值,true或false 2. componentWillUpdate() 3. render() 4. componentDidUpdate() | 1. getDerivedStateFromProps() 2. shouldComponentUpdate() 3. render() 4. getSnapshotBeforeUpdate() 5. componentDidUpdate() |
| 卸载组件:由ReactDOM.unmount ComponentAtNode() 触发 | componentWillUnmount() | |
2.常用的3个钩子函数
- render(): 初始化渲染或更新渲染调用
- componentDidMount():一般在这做一些初始化的事,例如:开启定时器、发送ajax请求、订阅消息
- componentWillUnmount():一般在这做一些收尾的事,例如:清理定时器、取消订阅消息
3.生命周期(旧)
- componentWillMount()---组件将要挂载
- componentDidMount()---组件已经挂载
- componentWillUnmount() ---组件将要卸载
- shouldComponentUpdate()---组件是否应该更新--更新的阀门,必须return true/false.主要用于性能优化,会对 props 和 state 进行浅层比较,并减少了跳过必要更新的可能性。不建议深层比较,会影响性能。如果返回false,则不会调用componentWillUpdate、render和componentDidUpdate
- componentWillUpdate()---组件将要更新
- componentDidUpdate()---组件已经更新
- componentWillReceiveProps(props)---组件将要接收props,当父组件改变的时候,子组件会调这个钩子,初次渲染是不会执行这个钩子的。

componentWillMount、componentWillReceiveProps、componentWillUpdate生命周期方法经常被误解和滥用,新版本中并不推荐持有这三个函数,取而代之的是带有UNSAFE_ 前缀的三个函数,比如: UNSAFE_ componentWillMount。即便如此,其实React官方还是不推荐大家去使用,在以后版本中有可能会去除这几个函数。
【例子】
<!DOCTYPE html>
<html lang="en">
  <head>
    <meta charset="UTF-8" />
    <title>Document</title>
  </head>
  <body>
    <div id="app"></div>
    <script src="https://unpkg.com/react@16/umd/react.development.js"></script>
    <script src="https://unpkg.com/react-dom@16/umd/react-dom.development.js"></script>
    <script src="https://unpkg.com/babel-standalone@6.15.0/babel.min.js"></script>
    <script type="text/babel">
      class Count extends React.Component {
        constructor(props) {
          console.log("count--constructor--");
          super(props);
          this.state = { count: 0 };
        }
        // 组件将要挂载
        componentWillMount() {
          console.log("count--componentWillMount--");
        }
        // 组件已经挂载
        componentDidMount() {
          console.log("count--componentDidMount--");
        }
        // 组件将要卸载
        componentWillUnmount() {
          console.log("count--componentWillUnmount--");
        }
        // 组件是否应该更新--阀门
        shouldComponentUpdate() {
          console.log("count--shouldComponentUpdate--");
          return true;
        }
        // 组件将要更新
        componentWillUpdate() {
          console.log("count--componentWillUpdate--");
        }
        //组件已经更新
        componentDidUpdate() {
          console.log("count--componentDidUpdate--");
        }
        add = () => {
          let { count } = this.state;
          count++;
          this.setState({ count });
        };
        destroy = () => {
          ReactDOM.unmountComponentAtNode(document.getElementById("app"));
        };
        force = () => {
          this.forceUpdate();
        };
        render() {
          console.log("count--render--");
          let { count } = this.state;
          let { add, destroy, force } = this;
          return (
            <div>
              <h1>数据count:{count}</h1>
              <button onClick={add}>数据+1</button>
              <button onClick={destroy}>销毁组件</button>
              <button onClick={force}>强制更新</button>
            </div>
          );
        }
      }

      class A extends React.Component {
        state={carName:"奔驰"}
        changeCar=()=>{
          this.setState({carName:"奥拓"})
        }
        render() {
          let {carName}=this.state
          return (
            <div>
              <h1>我是A组件</h1>
              <button onClick={this.changeCar}>换车</button>
              <B carName={carName} />
            </div>
          );
        }
      }
      class B extends React.Component {
        //组件将要接收props
        componentWillReceiveProps(props){
          console.log("B--componentWillReceiveProps--",props);
        }
        shouldComponentUpdate(){
          console.log("B--shouldComponentUpdate--");
          return true
        }
        componentWillUpdate(){
          console.log("B--componentWillUpdate--");
        }
        componentDidUpdate(){
          console.log("B--componentDidUpdate-");
        }
        render() {
          console.log("B--render--");
          return (
            <div>
              <h1>我是B组件,接收的车是{this.props.carName}</h1>
            </div>
          );
        }
      }
      ReactDOM.render(<A/>, document.getElementById("app"));
    </script>
  </body>
</html>
4.生命周期(新)
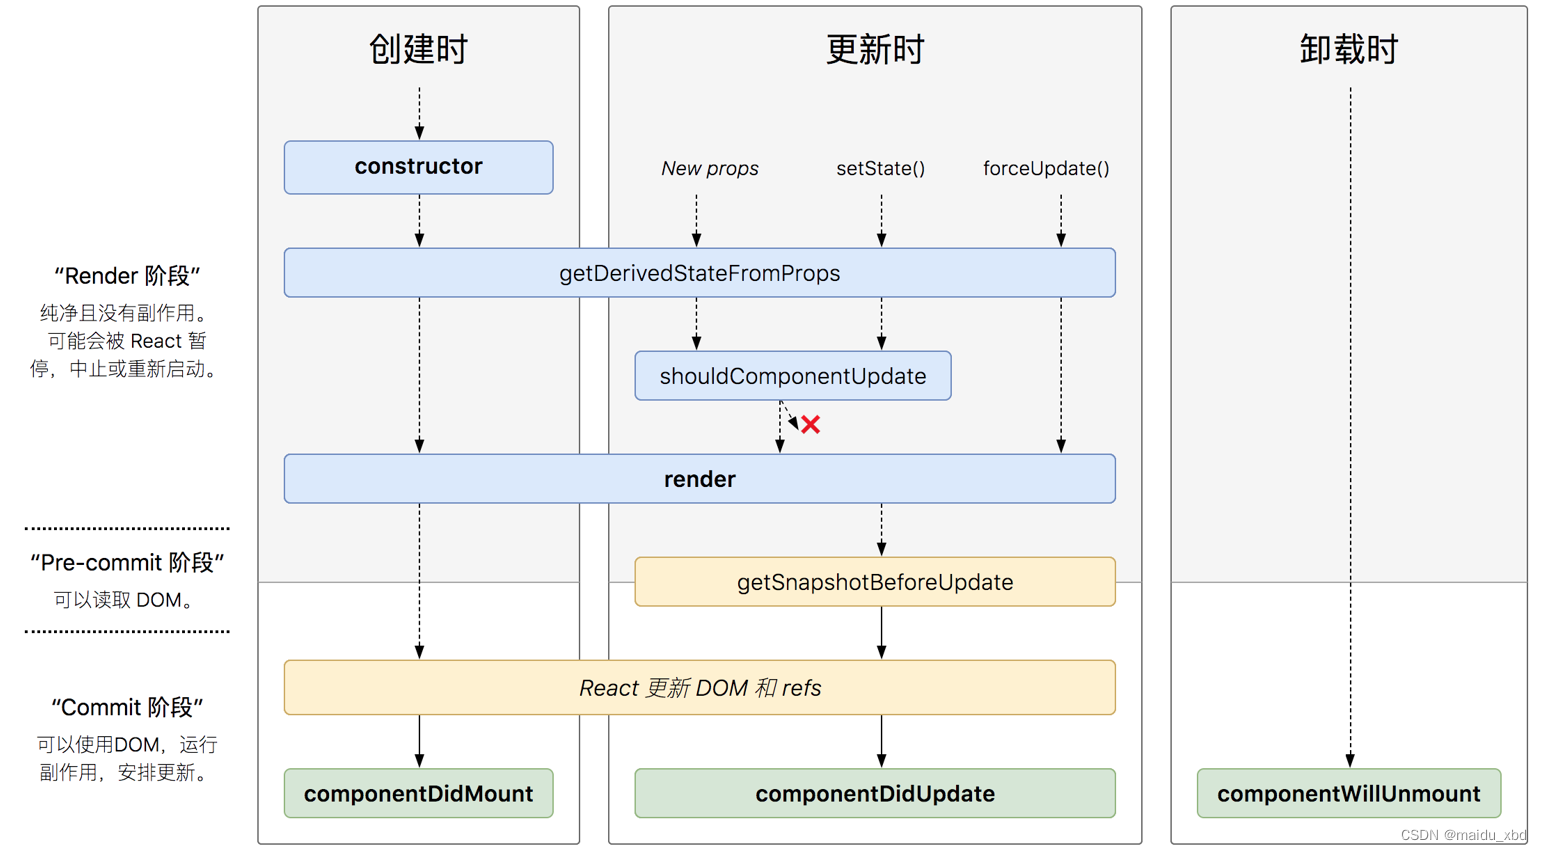
getDerivedStateFromProps
- 首先,该函数会在调用 render 方法之前调用,并且在初始挂载及后续更新时都会被调用;
- 该函数必须是静态的;
- 给组件传递的数据(props)以及组件状态(state),会作为参数到这个函数中;
- 该函数也必须有返回值,返回一个Null或者state对象。因为初始化和后续更新都会执行这个方法,因此在这个方法返回state对象,就相当于将原来的state进行了覆盖,所以倒是修改状态不起作用。
- 注意:如下代码【return props】时,state的值在任何时候都取决于传入的props,不能被改变
 // 若state值在任何时候都取决于props,那么可以使用getDerivedStateFromProps
 static getDerivedStateFromProps(props, state) {
    console.log("count--getDerivedStateFromProps--", props, state);
    // return props;
    return null
  }
....

 ReactDOM.render(<Count count={199}/>, document.getElementById("app"));
getSnapshotBeforeUpdate
可以使组件在 DOM 真正更新之前捕获一些信息(例如滚动位置),此生命周期返回的任何值都会作为参数传递给componentDidUpdate()。如不需要传递任何值,那么请返回 null
getSnapshotBeforeUpdate() {
  return this.refs.list.scrollHeight;
}
 //组件已经更新
componentDidUpdate(prevProps, prevState, snapshotValue) {
    console.log(prevProps, prevState, snapshotValue);
    this.refs.list.scrollTop+=this.refs.list.scrollHeight-snapshotValue
}
【例子-getSnapshotBeforeUpdate()用于记录上次滚动的位置】
<!DOCTYPE html>
<html lang="en">
  <head>
    <meta charset="UTF-8" />
    <title>Document</title>
    <style>
        .news-wrapper{
            background-color: aquamarine;
            height: 150px;
            overflow: auto;
        }
        .news{
            height: 30px;
        }
    </style>
  </head>
  <body>
    <div id="app"></div>
    <script src="https://unpkg.com/react@16/umd/react.development.js"></script>
    <script src="https://unpkg.com/react-dom@16/umd/react-dom.development.js"></script>
    <script src="https://unpkg.com/babel-standalone@6.15.0/babel.min.js"></script>
    <script type="text/babel">
      class NewList extends React.Component {
        state = { newArr: [] };
        componentDidMount(){
            // console.log("--componentDidMount--");
            setInterval(()=>{
                let {newArr}=this.state
                let news ='新闻'+(newArr.length+1)
                this.setState({newArr:[news,...newArr]})
            },1000)
        }
        getSnapshotBeforeUpdate() {
          return this.refs.list.scrollHeight;
        }

        //组件已经更新
        componentDidUpdate(prevProps, prevState, snapshotValue) {
           console.log(prevProps, prevState, snapshotValue);
           this.refs.list.scrollTop+=this.refs.list.scrollHeight-snapshotValue
        }
        render() {
        //   console.log("--render--");
          return (
            <div ref="list" className="news-wrapper">
              {this.state.newArr.map((item, index) => {
               return <li key={index} className="news">{item}</li>;
              })}
            </div>
          );
        }
      }
      ReactDOM.render(<NewList />, document.getElementById("app"));
    </script>
  </body>
</html>