说明:
Android这个系列中使用的开发工具为:Eclipse中配置ADT插件。

<LinearLayout – 表示使用的是线性布局管理器xmlns:android=http://schemas.android.com/apk/res/android—引用Android
    xmlns:tools="http://schemas.android.com/tools"
    android:layout_width="match_parent"—表示宽度为全屏
    android:layout_height="match_parent"—表示高低为全屏
    android:orientation="vertical" >--表示此布局下的组件以垂直的方式码放

    <TextView—定义一个文本显示组件
        android:layout_width="wrap_content"—-此组件宽度为包裹
        android:layout_height="wrap_content"—此组件的高度也是为包裹
        android:text="这是我的第一个程序" />--此组件显示的内容

    <TextView
        android:layout_width="wrap_content"
        android:layout_height="wrap_content"
        android:text="Hello World" />

</LinearLayout>
以上就是我们的布局管理器。
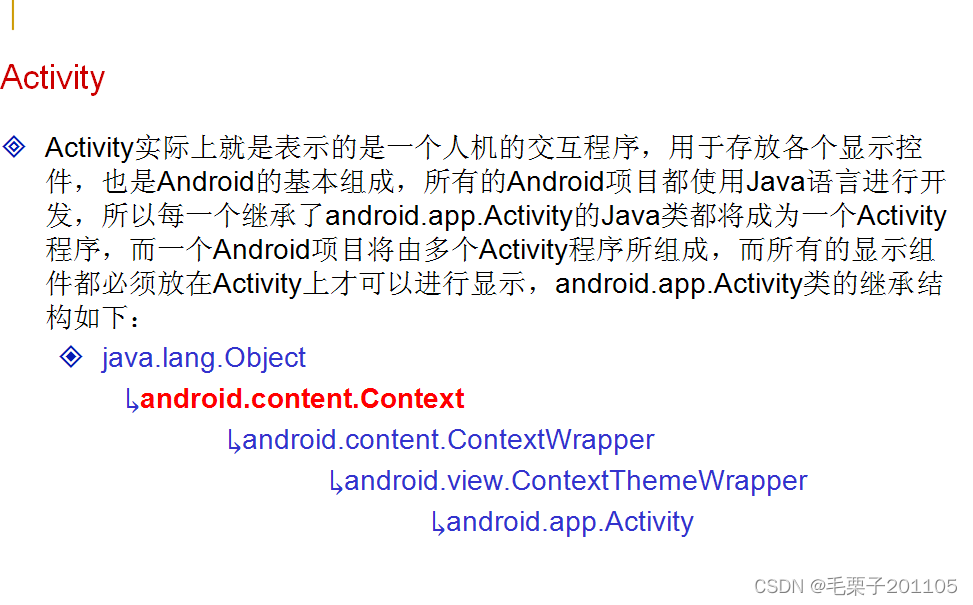
观察Activity程序,我们在开发这个程序的时候,对于Activity程序并没有做修改
package com.example.myfirstproject;

import android.app.Activity;
import android.os.Bundle;

public class MyFirstActivity extends Activity {

    @Override
    protected void onCreate(Bundle savedInstanceState) {
        super.onCreate(savedInstanceState);--调用父类的onCreate()方法
        setContentView(R.layout.activity_my_first);--设置显示的组件,这个内容是通过R.java 文件中取得的,R.java文件我们称为注册文件,不需要用户修改,是自动生成的。
    }
}
大家发现,我们在Eclipse中建立的Android程序有非常多的文件夹,那么现在不同的文件夹中放的内容又是哪些呢?

在我们的布局文件中,直接将字符串内容写在里面,这样写法是不准确的,在以后的开发中,我们的字符串都需要写在strings.xml中,这是一个规则,必须遵守,当然,在后续的博客中,可能会为了简便,直接写在布局文件中。
<?xml version="1.0" encoding="utf-8"?>
<resources>
    <string name="app_name">第一个Android程序</string>
    <string name="action_settings">Settings</string>
    <string name="hello_world">Hello world!</string>
    <string name="textcontent">这是我的第一个程序</string>
    <string name="helloworld">Hello World</string>
</resources>
对于这个资源文件,有一个编写规则,就是类似于我们Map集合,是一个键值对应的关系,键是不能重复的。
    <TextView
        android:id="@+id/mytext"
        android:layout_width="wrap_content"
        android:layout_height="wrap_content"
        android:text="@string/textcontent" />--通过键 显示值

    <TextView
        android:layout_width="wrap_content"
        android:layout_height="wrap_content"
        android:text="@string/helloworld" />
AndroidManifest.xml:是我们Android应用程序的核心配置文件
<?xml version="1.0" encoding="utf-8"?>
<manifest xmlns:android="http://schemas.android.com/apk/res/android"
    package="com.example.myfirstproject"
    android:versionCode="1"—我们这个应用的版本
    android:versionName="1.0" >--可以让用户看到的版本
    <uses-sdk
        android:minSdkVersion="10" – 这边是SDK的最低的版本
        android:targetSdkVersion="10" />--开发此应用所使用的版本
    <application
        android:allowBackup="true"
        android:icon="@drawable/ic_launcher"—程序安装之后的图标
        android:label="@string/app_name"—程序安装之后的名称
        android:theme="@style/AppTheme" >-程序所使用的主题
        <activity—配置Activity程序,以后所有的Activity程序都需要在此文件中进行配置
            android:name="com.example.myfirstproject.MyFirstActivity"
            android:label="@string/app_name" >--此Activity的名称
            <intent-filter>--配置了一个过滤器
                <action android:name="android.intent.action.MAIN" />--配置为主Activity,表示此应用已开启,就启动此Activity

                <category android:name="android.intent.category.LAUNCHER" />--配置
            </intent-filter>
        </activity>
    </application>
</manifest>
当然除了以上的配置之外,以后我们在此文件中配置比较多的就是配置权限。
继续来完成我们程序。其实我们的一个组件就是一个对象,那么对象肯定有类型,比如我们这个TextView就是一个类,此类对象表示的是一个文本的显示组件。注意,所有的组件都必须配置在Activity程序中,那么我们也可以在Activity程序中取得这些组件。
public class MyFirstActivity extends Activity {
	private TextView mytext1 = null;
	private TextView mytext2 = null;
    @Override
    protected void onCreate(Bundle savedInstanceState) {
        super.onCreate(savedInstanceState);
        setContentView(R.layout.activity_my_first);
        this.mytext1 = (TextView) super.findViewById(R.id.mytext1);//取得布局中所定义的组件
        this.mytext2 = (TextView) super.findViewById(R.id.mytext2);

        this.mytext1.setText("程序之美");//重新设置文本显示内容
        this.mytext2.setText("Android is useful");
    }
}
除了取得布局文件中组件和设置组件内容之外呢,我们还可以在Activity程序中定义一个新的组件。
public class MyFirstActivity extends Activity {
	private TextView mytext1 = null;
	private TextView mytext2 = null;
	private LinearLayout mylayout = null;
	private Button but = null;
    @Override
    protected void onCreate(Bundle savedInstanceState) {
        super.onCreate(savedInstanceState);
        setContentView(R.layout.activity_my_first);
        this.mytext1 = (TextView) super.findViewById(R.id.mytext1);//取得布局中所定义的组件
        this.mytext2 = (TextView) super.findViewById(R.id.mytext2);
        this.mylayout = (LinearLayout) super.findViewById(R.id.mylayout);
        this.mytext1.setText("程序之美");//重新设置文本显示内容
        this.mytext2.setText("Android is useful");
        this.but = new Button(this);//实例化按钮组件
        this.but.setText("你点我呀");//设置按钮组件内容
        this.mylayout.addView(this.but);//将按钮组件放置在布局管理器中
    }
以上的程序我们都使用了布局文件,当然也可以不使用布局文件。
public class MyFirstActivity extends Activity {
	private LinearLayout mylayout = null;
	private Button but = null;
    @Override
    protected void onCreate(Bundle savedInstanceState) {
        super.onCreate(savedInstanceState);
        this.mylayout = new LinearLayout(this);
        setContentView(this.mylayout);
        this.but = new Button(this);//实例化按钮组件
        this.but.setText("你点我呀");//设置按钮组件内容
        this.mylayout.addView(this.but);//将按钮组件放置在布局管理器中
    }
}
在的开发中,虽然可以不使用布局文件,但上班中正式的开发我们肯定是要使用布局文件的。
小结:
1、Android项目由若干个Activity程序所组成,每一个Activity都是一个Java类;
2、一个Android项目中所有用到的资源都保存在res文件夹之中;
3、Android中的组件需要在布局管理器中进行配置,之后在Activity程序中可以使用findViewById()方法查找并进行控制;
4、在布局管理器中定义的每一个组件都有其对应的操作类,用户可以直接实例化这些类的对象进行组件的定义显示;
5、标准的Android项目,所有的文字显示信息应该保存在strings.xml文件中保存。

