目录
前言
1.list的使用
1.2sort和unique
2.list的模拟
2.1构造函数
2.2push_back()
2.3迭代器
2.3.1简洁版
2.3.2升级版(重要)
2.4insert和erase与迭代器失效
2.4.1list的迭代器失效
2.5析构函数
2.6深拷贝构造
前言
list是我们数据结构之中的链表,它允许在链表中的任何地方进行时间复杂度O(1)的插入和删除操作。今天我们就来学习一下list这个容器的使用与模拟实现。
1.list的使用
list的使用和我们之前学的容器都差不多,要说有不同呢?它可以实现头插头删,尾插尾删
void test_list2()
	{
		list<int> lt;
		lt.push_back(1);
		lt.push_back(2);
		lt.push_back(3);
		lt.push_back(4);
		for (auto e : lt)
		{
			cout << e << " ";
		}
		cout << endl;

		lt.push_front(10);
		lt.push_front(20);
		lt.push_front(30);
		lt.push_front(40);
		for (auto e : lt)
		{
			cout << e << " ";
		}
		cout << endl;

		lt.pop_back();
		lt.pop_back();
		lt.pop_front();
		lt.pop_front();

		for (auto e : lt)
		{
			cout << e << " ";
		}
		cout << endl;
	}
1.2sort和unique
algorithm里面的sort不支持链表,可以看到algorithm头文件里面sort的定义里用到了迭代器相减,但是链表的迭代器不支持相减,且sort为快速排序,是需要三数取中,需要随机访问,但是list的迭代器不支持随机访问。

所以list这个类模板里面增加了一个sort函数:

再看到我们std里的sort,可以看到它的迭代器类型为randomaccessiterator,但是我们list构造函数里的迭代器类型为inputiterator,所以说迭代器是有分类的,

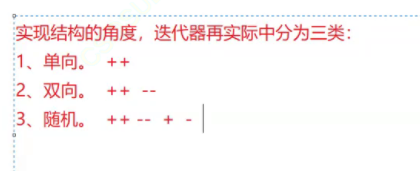
从结构来分类们可以分为三类:
- 单向,如forward_list,它仅可以支持++。
- 双向,如list,map和set,它可以实现++和--。
- 随机,如string、vector、deque,它不仅可以实现++、--,也可以实现+和-,也就是说它可以实现随机访问。
在我们使用一些采用了迭代器的库函数的时候,帮助文件常常会提醒我们,是使用什么类型的迭代器,比如algorithm的reverse,它告诉我们这与传双向的迭代器才能用:

其实传随机迭代器也是可以用的,因为随机迭代器的功能大于双向迭代器的功能。而上面所提到的list的构造函数的Inputiterator是三种迭代器都可以传过去的一种迭代器。
下面我们就来看一看list::sort是如何使用的:
	void test_list3()
	{
		list<int> lt;
		lt.push_back(1);
		lt.push_back(2);
		lt.push_back(3);
		lt.push_back(4);
		lt.push_front(10);
		lt.push_front(20);
		lt.push_front(30);
		lt.push_front(40);

		lt.push_back(1);
		lt.push_back(1);
		lt.push_back(1);

		for (auto e : lt)
		{
			cout << e << " ";
		}
		cout << endl;

		lt.sort();

		for (auto e : lt)
		{
			cout << e << " ";
		}
		cout << endl;
	}
}
tips:链表排序是很慢的,需要排序的数据不要放到链表里面
unique函数可以去重(要求先排序才能去重)
	void test_list3()
	{
		list<int> lt;
		lt.push_back(1);
		lt.push_back(2);
		lt.push_back(3);
		lt.push_back(4);
		lt.push_front(10);
		lt.push_front(20);
		lt.push_front(30);
		lt.push_front(40);

		lt.push_back(1);
		lt.push_back(1);
		lt.push_back(1);

		for (auto e : lt)
		{
			cout << e << " ";
		}
		cout << endl;

		lt.sort();//有大量数据要排序不建议用list,list底层
		for (auto e : lt)
		{
			cout << e << " ";
		}
		cout << endl;
		lt.unique();

		for (auto e : lt)
		{
			cout << e << " ";
		}
		cout << endl;
	}
}
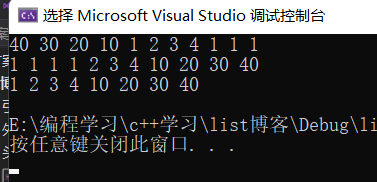
2.list的模拟
从stl_list源码里我们可以看到list一个节点的结构:

因此我们也模仿一下,写出一个节点:
template<class T>
struct list_node
{
	list_node<T>* _next;
	list_node<T>* _prev;
	T _data;

	list_node(const T& val = T())
		:_next(nullptr)
		, _prev(nullptr)
		, _data(val)
		{}
};
再看看它的迭代器位置,begin()和end()。

不难猜出,这是一个带头双向循环的链表(因为begin是哨兵位节点,而begin是哨兵位的下一个位置), 那么其实它就是下面的这个的这个结构:
所以我们可以写出它的基本结构为以下,_head为哨兵位的头节点:
template<class T>
	class list
	{
		typedef list_node<T> Node;


	private:
		Node* _head;

	};
2.1构造函数
构造函数就是初始化我们的_head,给_head分配一块物理空间,将_head的头尾都指向自己就完成了初始化。
typedef list_node<T> Node;
list()
{
	_head = new Node();
	_head->_next = _head;
	_head->_prev = _head;
}
2.2push_back()
push_back()就是尾插,即在尾部插入一个新节点,器基本逻辑为
- 找到尾巴
- 根据要尾插的值构造一个新节点
- 将新节点的头和尾与原链表连接起来
		void push_back(const T& x)
		{
			//找尾
			Node* tail = _head->_prev;
			//构造一个新节点
			Node* newnode = new Node(x);
			//将新节点与其他节点连接起来
			//_head  tail  newnode
			tail->_next = newnode;
			newnode->_next = _head;
			_head->_prev = newnode;
		}
2.3迭代器
2.3.1简洁版
链表的迭代器不是原生指针,且物理空间不一定是连续的(++操作不一定是在下一个物理位置),所以我们可以采用一个自定义类型去进行封装,用运算符重载去支持++等行为:
    template <class T>
	struct __list_iterator
	{
		typedef list_node<T> Node;
		Node* _node;

		__list_iterator(Node* node)//通过节点的指针就可以构造一个迭代器
			:_node(node)
		{}

		T& operator*()//*it,解引用,返回data的引用
		{
			return _node->_data;
		}


		__list_iterator<T>& operator++()//迭代器++,返回++之后的迭代器
		{
			_node = _node->_next;
			return *this;
		}

		bool operator!=(const __list_iterator<T>& it)
		{
			return _node != it._node;
		}

	};
那么有了迭代器,我们就要实现end(),begin()等函数返回迭代器对应的位置:
		iterator begin()
		{
            //return iterator(_head->_next);
			return _head->_next;//也可以返回这个,因为单参数的构造支持隐式类型的转换
		}

		iterator end()//注意不是_head->_next,因为end指向的是最后一个有效数据的下一个位置
		{
			return _head;
		}
现在我们就可以实验以下我们刚刚写的东西了,可见是写的没有问题的:

2.3.2升级版(重要)
刚刚的迭代器还是着实有点简陋的,一些运算符重载还没有写出来,由于我们迭代器的使用是要像指针一样的,所以还需要支持以下的函数:
	template<class T>
	struct __list_iterator
	{
		typedef list_node<T> Node;
		typedef __list_iterator<T> self;
		Node* _node;

		__list_iterator(Node* node)
			:_node(node)
		{}


		T& operator*()
		{
			return _node->_data;
		}

		T* operator->()
		{
			//return &(operator*());
			return &_node->_data;
		}

		self& operator++()
		{
			_node = _node->_next;
			return *this;
		}

		self operator++(int)
		{
			self tmp(*this);
			_node = _node->_next;
			return tmp;
		}

		self& operator--()
		{
			_node = _node->_prev;
			return *this;
		}

		self operator--(int)
		{
			self tmp(*this);
			_node = _node->_prev;
			return tmp;
		}


		bool operator!=(const self& it)
		{
			return _node != it._node;
		}

		bool operator==(const self& it)
		{
			return _node == it._node;
		}

	};
注意到,我们上面新增加了一个self,就是迭代器类模板类型本身 ,这是为了省略写__list_iterator<T>这么长一大串。
同时我们也看到上面迭代器类模板里面没有显式写出析构函数和拷贝构造。这是因为:
- 迭代器这个类模板,不需要析构函数,虽然这个类里面有Node*这个指针,但是这个指针并不属于迭代器,它不能把节点给释放了。
- 拷贝构造和赋值重载也不需要在迭代器类模板里面写出来,因为默认生成的浅拷贝就可以满足需求,因为我们在这里不需要深拷贝,我们操作的就是同一片空间。
但是我们看到stl_list里面迭代器的类模板有三个参数,这是为什么呢?我们能写成三个参数吗?

首先我们先像一个问题,如果我们不使用三个参数,而是一个,我们如何去实现const迭代器呢?我认为大多数人是直接再写一个const_list_iterator这个类模板,然后把list_iterator类模板 的成员函数再移到里面:
	template<class T>
	struct const__list_iterator
	{
		typedef list_node<T> Node;
		typedef __list_iterator<T> self;
		Node* _node;

		__list_iterator(Node* node)
			:_node(node)
		{}

		const T& operator*()
		{
			return _node->_data;
		}

		const T* operator->()
		{
			//return &(operator*());
			return &_node->_data;
		}

		self& operator++()
		{
			_node = _node->_next;
			return *this;
		}

		self operator++(int)
		{
			self tmp(*this);
			_node = _node->_next;
			return tmp;
		}

		self& operator--()
		{
			_node = _node->_prev;
			return *this;
		}

		self operator--(int)
		{
			self tmp(*this);
			_node = _node->_prev;
			return tmp;
		}


		bool operator!=(const self& it)
		{
			return _node != it._node;
		}

		bool operator==(const self& it)
		{
			return _node == it._node;
		}

	};
但是以上的代码有个问题,就是程序的复用性很差,在软件工程里面是很在意程序复用性的,如果代码的复用性不好,那么可修改性就会很差。
所以为了增强程序的复用性,大佬们增加了两个模板参数Ref和Ptr:
	template <class T,class Ref,class Ptr>
	struct __list_iterator
	{
		typedef list_node<T> Node;
		typedef __list_iterator<T,Ref,Ptr> self;
		Node* _node;
		__list_iterator(Node* node)
			:_node(node)
		{}

		Ref operator*()
		{
			return _node->_data;
		}


		self& operator++()
		{
			_node = _node->_next;
			return *this;
		}

		self operator++(int)
		{
			self tmp(*this);
			_node = _node->_next;
			return tmp;
		}

		self& operator--()
		{
			_node = _node->_prev;
			return *this;
		}

		self operator--(int)
		{
			self tmp(*this);
			_node = _node->_prev;
			return tmp;
		}

		bool operator !=(const self& it)
		{
			return _node != it._node;
		}

		bool operator ==(const self& it)
		{
			return _node == it._node;
		}

		Ptr operator ->()
		{
			return &_node->_data;
		}

	};
然后在list类模板里面再定义迭代器模板传进去的参数,如果是const迭代器就传进去const T&和const T*,const迭代器的begin和end返回const迭代器就行了:
template <class T>
	class list
	{
		typedef list_node<T> Node;

	public:
		typedef __list_iterator<T,T&,T*> iterator;
		typedef __list_iterator<T, const T&, const T*> const_iterator;

		const_iterator begin() const
		{
			return const_iterator(_head->_next);
		}

		const_iterator end() const
		{
			return const_iterator(_head);
		}
    }
2.4insert和erase与迭代器失效
前一节vector的迭代器失效里面我们已经知道insert和erase要返回迭代器,那么list需要吗?我们先写一个什么都不返回的版本:
	    //在pos的前一个位置插入一个值
        void insert(iterator pos, const T& x)
		{
			Node* newNode = new Node(x);
			Node* cur = pos._node;
			Node* prev = cur->_prev;
			//prev newnode cur
			prev->_next = newNode;
			newNode->_prev = prev;
			newNode->_next = cur;
			cur->_prev = newNode;
		}


		void erase(iterator pos)
		{
			assert(pos != end());//不能把哨兵位删掉了

			Node* cur = pos._node;
			Node* prev = cur->_prev;
			Node* next = cur->_next;

			// prev  next
			prev->_next = next;
			next->_prev = prev;
			delete cur;

		}
再依此去实现头插和尾插尾删:
		void push_front(const T& x)
		{
			insert(begin(), x);
		}

		void pop_back()
		{
			erase(--end());
		}

		void pop_front()
		{
			erase(begin());
		}
2.4.1list的迭代器失效
我们先用上节博客检验vector的insert的迭代器失效的方法去检验list的insert是否存在迭代器失效的问题:
	void test_list4()
	{
		list<int> lt;
		lt.push_back(1);
		lt.push_back(2);
		lt.push_back(2);
		lt.push_back(2);
		lt.push_back(3);
		lt.push_back(4);
		lt.push_back(5);
		lt.push_back(6);
		//要求在偶数的前面插入这个偶数*10
		auto it1 = lt.begin();
		while (it1 != lt.end())
		{
			if (*it1 % 2 == 0)
			{
				lt.insert(it1, *it1 * 10);
			}
			it1++;
		}

		for (auto e : lt)
		{
			cout << e << " ";
		}
		cout << endl;
	}
可以看到程序运行正常:

因此使用list的insert函数时不会出现迭代器失效的问题,因为list不会像vector一样发生扩容,而且它底层也是碎片化的,一个迭代器指向的就是一个节点,是不会存在野指针和意义变了的问题。但是为了和stl的其它类模板的迭代器适配呢,库里面的insert还是返回了迭代器的值,他是返回了新插入的那个元素的迭代器:

那么使用erase时,它的迭代器会不会失效呢?
void test_list5()
	{
		list<int> lt;
		lt.push_back(1);
		lt.push_back(2);
		lt.push_back(3);
		lt.push_back(4);
		lt.push_back(5);
		lt.push_back(6);

		auto it1 = lt.begin();
		while (it1 != lt.end())
		{
			if (*it1 % 2 == 0)
			{
				lt.erase(it1);
			}
			else
			{
				++it1;
			}
		}

		for (auto e : lt)
		{
			cout << e << " ";

		}
		cout << endl;
	}
可以看到程序运行出现错误,说明erase存在迭代器失效的问题。

原因在哪呢?
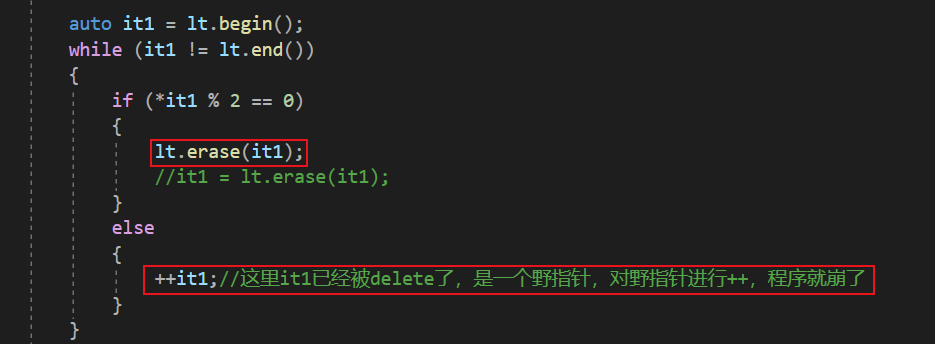
其实很简单,在erase被调用之后,it1已经被释放了,变成了野指针,对it1这个野指针进行++,程序就崩溃了,所以如何解决呢?只需要及时更新erase之后的迭代器:
		iterator erase(iterator pos)
		{
			assert(pos != end());

			Node* cur = pos._node;
			Node* prev = cur->_prev;
			Node* next = cur->_next;

			// prev  next
			prev->_next = next;
			next->_prev = prev;
			delete cur;

			return iterator(next);//返回被删除元素的下一个迭代器
		}


	void test_list5()
	{
		list<int> lt;
		lt.push_back(1);
		lt.push_back(2);
		lt.push_back(3);
		lt.push_back(4);
		lt.push_back(5);
		lt.push_back(6);

		auto it1 = lt.begin();
		while (it1 != lt.end())
		{
			if (*it1 % 2 == 0)
			{
				//lt.erase(it1);
				it1 = lt.erase(it1);
			}
			else
			{
				++it1;//这里it1已经被delete了,是一个野指针,对野指针进行++,程序就崩了
			}
		}

		for (auto e : lt)
		{
			cout << e << " ";

		}
		cout << endl;
	}
2.5析构函数
在实现析构函数时,我们不要太着急,可以先实现clear,然后析构时复用clear之后,再把哨兵位给释放掉。
		~list()
		{
			clear();
			delete _head;
			_head = nullptr;
		}

		void clear()
		{
			iterator it = begin();
			while (it != end())
			{
				it = erase(it);
			}
			//哨兵不会没有
		}
2.6深拷贝构造
传统写法:
		list(const list<T>& lt)
		{
			_head = new Node();
			_head->_next = _head;
			_head->_prev = _head;

			for (auto e : lt)
			{
				push_back(e);
			}
		}
现代写法:
		//swap
		void swap(list<T>& lt)
		{
			std::swap(lt._head, _head);
		}

		//迭代器区间构造
		template <class InputIterator>
		list(InputIterator first, InputIterator last)
		{
			_head = new Node();
			_head->_next = _head;
			_head->_prev = _head;

			while (first != last)
			{
				push_back(*first);
				++first;
			}
		}

		//深拷贝现代写法
		//lt2(lt1)
		list(const list<T>& lt)
		{
			_head = new Node();
			_head->_next = _head;
			_head->_prev = _head;
			list<T> tmp(lt.begin(), lt.end());
			swap(tmp);
		}




![【day14】【洛谷算法题】-P5711闰年判断-刷题反思集[入门2分支结构]](https://img-blog.csdnimg.cn/img_convert/6f2c3630640c9c638868c7abcbe619b7.jpeg#pic_center)

