画一张总图:

图形界面开发
本篇只介绍图形界面开发。
遇到的第一个问题就是选择什么开发语言和技术。因为我之前用Python做过Tkinter的小东西,所以这次还是用Python Tkinter + OpenCV来搞吧。
这里面需要注意几个地方:
1. Tkinter 的布局
1.1 继承
我使用了class LPRSurface(Tk):类来继承Tk,如果是这样写需要在init函数中做做super().__init__()来实现对父类的初始化。
1.2 排版
我使用了界面定宽高的方式,所以把整个界面fix大小,并且规定好了
- label:显示区域
- Entry:输出区域
- Button:按钮区域的大小和位置
使用了place而非pack。
1.3 更新
- 图片的更新只需要重新config label的image即可,但是这里要注意image一定要用self修饰,否则就会出现资源被回收,图片无法正常加载的问题。 self.labelPic.configure(image = self.imgOri, bg="pink")
- Video的更新则需要借助threading模块,重新创建线程了。
2. 路径记忆
使用了一个单独的类来记录打开过的图片路径,把这个路径存储在注册表中(这样做对Linux支持不好。。。).
需要借助winreg外部库

2.1 创建注册表
winreg.CreateKey(winreg.HKEY_CURRENT_USER, r"Software\{}\LPR".format(getpass.getuser()))2.2 写入注册表
winreg.SetValueEx(key, "LPR", 0, winreg.REG_SZ, path)2.3 读出注册表
winreg.OpenKey(winreg.HKEY_CURRENT_USER, r"Software\{}\LPR".format(getpass.getuser()))
winreg.QueryValueEx(key, "LPR")
3. OpenCV显示
3.1 格式转换
- 还记得OpenCV是反人类的BGR排列吗?可以用cv.cvtColor把OpenCV read出来的图片转换成普通的RGB。
- 然后再转换成Tkinter可以显示的数据格式,送给label中的image
imgCVRGB = cv.cvtColor(imgCV, cv.COLOR_BGR2RGB)
img = Image.fromarray(imgCVRGB)
imgTK = ImageTk.PhotoImage(image=img)
3.2 显示自适应
如果图片没有Tkinter的Lable大,则正常显示,否则就要等比例缩放,以保障整张图片可以在Lable显示完全。
widthScale = 1.0*self.labelPicWidth/picWidth
heightScale = 1.0*self.labelPicHeight/picHeight

scale = min(widthScale, heightScale)

resizeWidth = int(picWidth*scale)
resizeHeight = int(picHeight*scale)

img = img.resize((resizeWidth, resizeHeight), Image.ANTIALIAS)
3.3 Thread中的延迟
竟然可以用小数!
time.sleep(0.03)from tkinter import *
from tkinter import filedialog
from tkinter import messagebox
from tkinter import ttk
import cv2 as cv
from PIL import Image, ImageTk
import numpy as np
import sys, random, datetime, os, winreg, getpass, time, threading
# PicPath: Save the last picture file path, this picture should be opened successful.
class LPRPath:
def getPath(self):
try:
key = winreg.OpenKey(winreg.HKEY_CURRENT_USER, r"Software\{}\LPR".format(getpass.getuser()))
self.path = winreg.QueryValueEx(key, "LPR")
except:
self.path = None
return self.path
def setPath(self, path):
key = winreg.CreateKey(winreg.HKEY_CURRENT_USER, r"Software\{}\LPR".format(getpass.getuser()))
winreg.SetValueEx(key, "LPR", 0, winreg.REG_SZ, path)
self.path = path
# Main LPR surface
class LPRSurface(Tk):
labelPicWidth = 700
labelPicHeight = 700
buttonWidth = 100
buttonHeight = 50
textWidth = 10
textHeight = 50
tkWidth = labelPicWidth
tkHeigth = labelPicHeight + buttonHeight * 4
isPicProcessing = False
root = None
videoThreadRun = False
def resizePicture(self, imgCV):
if imgCV is None:
print("Read Fail!")
return None
imgCVRGB = cv.cvtColor(imgCV, cv.COLOR_BGR2RGB)
img = Image.fromarray(imgCVRGB)
imgTK = ImageTk.PhotoImage(image=img)
picWidth = imgTK.width()
picHeight = imgTK.height()
# print("Picture Size:", picWidth, picHeight)
if picWidth <= self.labelPicWidth and picHeight <= self.labelPicHeight:
return imgTK
widthScale = 1.0*self.labelPicWidth/picWidth
heightScale = 1.0*self.labelPicHeight/picHeight
scale = min(widthScale, heightScale)
resizeWidth = int(picWidth*scale)
resizeHeight = int(picHeight*scale)
img = img.resize((resizeWidth, resizeHeight), Image.ANTIALIAS)
imgTK = ImageTk.PhotoImage(image=img)
return imgTK
# Load picture
def loadPicture(self):
# Get Picture Path
if True == self.isPicProcessing:
print("Please wait until previous picture process finish!!!")
messagebox.showerror(title="PROCESSING", message="Please wait until previous picture process finish!!!")
return
self.videoThreadRun = False
LPRPic = LPRPath()
if None == LPRPic.getPath():
initPath = ""
else:
initPath = LPRPic.path
# fileName = None
fileName = filedialog.askopenfilename(title='Load Picture', \
filetypes=[('Picture File', '*.jfif *.jpg *.png *.gif'), ('All Files', '*')], \
initialdir=initPath)
print(fileName)
if not os.path.isfile(fileName):
print("Please input correct filename!")
return False
# Read Picture File.
try:
# self.imgOri = Image.open(fileName)
# imgCV = cv.imdecode(np.fromfile(fileName, dtype=np.uint8), cv.IMREAD_COLOR)
imgCV = cv.imread(fileName)
except:
print("Open file faile!")
return False
LPRPic.setPath(fileName)
self.imgOri = self.resizePicture(imgCV)
if self.imgOri is None:
print("Load picture fail!")
return False
# self.imgOri = ImageTk.PhotoImage(self.imgOri)
self.labelPic.configure(image = self.imgOri, bg="pink")
# Video Thread
def videoThread(self):
self.videoThreadRun = True
while self.videoThreadRun:
ret, imgCV = self.camera.read()
if ret is not True:
print("Camera Read Fail!")
return False
self.imgOri = self.resizePicture(imgCV)
self.labelPic.configure(image=self.imgOri, bg="pink")
time.sleep(0.03)
print("Video Thread Finish!")
self.camera.release()
# Load Video From Camera by OpenCV
def loadVideo(self):
if self.videoThreadRun == True:
print("Video Is Opening!!!")
messagebox.showerror(title="VIDEO ERROR", message="Camera Is Opening !!!")
return False
self.camera = cv.VideoCapture(0)
if not self.camera.isOpened():
print("Open Camera Fail!")
messagebox.showerror(title="CAMERA ERROR", message="Open Camera Fail !!!")
return False
self.thread = threading.Thread(target=self.videoThread)
self.thread.setDaemon(True)
self.thread.start()
self.videoThreadRun = True
def __init__(self, *args, **kw):
super().__init__()
self.title("LPR Surface")
self.geometry(str(self.tkWidth) + "x" + str(self.tkHeigth))
self.resizable(0, 0)
def labelInit():
# Picture Label:
self.labelPic = Label(self, text="Show Picture Area", font=("Arial", 24), bg="sky blue")
self.labelPic.place(x=0, y=0, width=self.labelPicWidth, height=self.labelPicHeight)
# Vehicle Plate Number Label:
self.labelPlateNum = Label(self, text="Vehicle License Plate Number:", anchor=SW)
self.labelPlateNum.place(x=0, y=self.labelPicHeight, \
width=self.textWidth * 20, height=self.textHeight)
# Vehicle Colour Label:
self.labelPlateCol = Label(self, text="Vehicle License Plate Color:", anchor=SW)
self.labelPlateCol.place(x=0, y=self.labelPicHeight + self.textHeight * 2,
width=self.textWidth * 20, height=self.textHeight)
def buttonInit():
# Picture Button
self.buttonPic = Button(self, text="Load Picture", command=self.loadPicture)
self.buttonPic.place(x=self.tkWidth - 3 * self.buttonWidth / 2,
y=self.labelPicHeight + self.buttonHeight / 2, \
width=self.buttonWidth, height=self.buttonHeight)
# Video Button
self.buttonVideo = Button(self, text="Load Video", command=self.loadVideo)
self.buttonVideo.place(x=self.tkWidth - 3 * self.buttonWidth / 2,
y=self.labelPicHeight + 5 * self.buttonHeight / 2, \
width=self.buttonWidth, height=self.buttonHeight)
def entryInit():
# Vehicle Plate Number Output
self.entryPlateNumList = []
for index in range(7):
entryPlateNum = Entry(self)
entryPlateNum.place(x=self.textWidth * index * 6, y=self.labelPicHeight + self.textHeight, \
width=self.textWidth * 5, height=self.textHeight)
self.entryPlateNumList.append(entryPlateNum)
# Vehicle Plate Color Output
self.entryPlateColor = Entry(self)
self.entryPlateColor.place(x=0, y=self.labelPicHeight + self.textHeight * 3, \
width=self.textWidth * (42 - 1), height=self.textHeight)
labelInit()
buttonInit()
entryInit()
print("-------------init success-------------")
self.mainloop()
if __name__ == '__main__':
LS = LPRSurface()
print("Finish")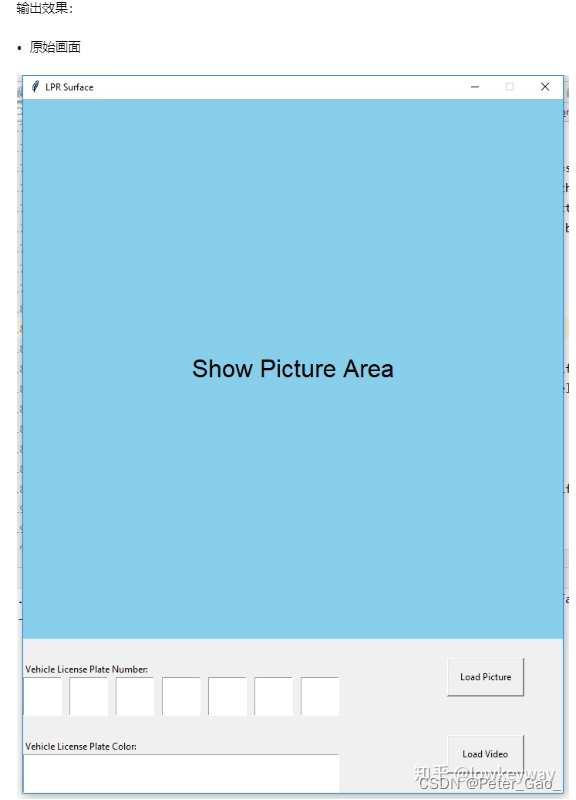
(四十九)车牌识别之界面(Tkinter + OpenCV显示Picture和Video) - 知乎


