在第一篇文章我们就熟悉了Blocks的用法,使用Blocks比Interface更加灵活,这节重点关注Blocks里面的相关操作。
1、Blocks标准例子
import gradio as gr

def greet(name):
    return "你好 " + name + "!"

with gr.Blocks() as demo:
    name = gr.Textbox(label="姓名")
    output = gr.Textbox(label="问候输出")
    greet_btn = gr.Button("生成")
    greet_btn.click(fn=greet, inputs=name, outputs=output, api_name="greet")

demo.launch()  这个大家都很熟悉了,在标准的Blocks块里面布局一些输入输出组件,然后点击按钮,添加侦听器,调用的参数也是标准的三个参数:回调函数、输入、输出
这里的输出不能交互,所以不能编辑,当然也可以指定参数gr.Textbox(label="问候输出", interactive=True)来让它有交互性。
2、事件侦听类型
上面的例子是通过按钮的点击来触发,下面看一个change()事件侦听器,输入的时候,就会进行输出操作,当然不同的组件支持不同的事件监听器。例如,Video组件支持play()事件监听器,当用户按下play键时触发。
import gradio as gr

def welcome(name):
    return f"欢迎, {name}!"

with gr.Blocks() as demo:
    gr.Markdown(
    """
    # 寅恪光潜
    输入的过程观察输出
    """)
    inp = gr.Textbox(placeholder="输入你的名字")
    out = gr.Textbox()
    inp.change(welcome, inp, out)

demo.launch()
这里没有做动态图演示了,注意的是输入更改,输出就会跟着更改 
这里在输入的时候就会触发change侦听事件,只要输入有变化就会自动进行处理与输出。另外我们也注意到,在Blocks块里面支持Markdown标记语言。
3、多个数据流
使用Blocks不像接口那样局限于单一的数据流,可以使用多个数据流,比如下面的两个文本框,可以a是输入b是输出,也可以反过来是a是输出和b为输入:
import gradio as gr

def increase(num):
    return num + 1

with gr.Blocks() as demo:
    a = gr.Number(label="a")
    b = gr.Number(label="b")
    btoa = gr.Button("a > b")
    atob = gr.Button("b > a")
    atob.click(increase, a, b)
    btoa.click(increase, b, a)

demo.launch()
点击按钮a>b的时候,将会让b作为输入,a作为输出,a=b+1,反过来,当点击b>a的时候,a作为输入,b作为输出,b=a+1
接着来看一个自动语音识别的示例,将语音转为文字的输出作为下个模型处理的输入,分析文本的情感,这里只支持英文,所以我截取了一段“The Sound of silence”音乐来看下效果
首次运行将会下载模型pytorch_model.bin,配置文件config.json,词汇vocab.txt等相关文件。
from transformers import pipeline

import gradio as gr

asr = pipeline("automatic-speech-recognition", "facebook/wav2vec2-base-960h")
classifier = pipeline("text-classification")

def speech_to_text(speech):
    text = asr(speech)["text"]
    return text

def text_to_sentiment(text):
    return classifier(text)[0]["label"]

demo = gr.Blocks()

with demo:
    audio_file = gr.Audio(type="filepath")
    text = gr.Textbox()
    label = gr.Label()

    b1 = gr.Button("Recognize Speech")
    b2 = gr.Button("Classify Sentiment")

    b1.click(speech_to_text, inputs=audio_file, outputs=text)
    b2.click(text_to_sentiment, inputs=text, outputs=label)

demo.launch()
这种音乐的识别有伴奏,识别难度稍微大点。
管道pipeline可接受的任务比较多,比如语音识别、图片分类、图片到文字、问答,摘要等等,然后这里再提供了一个预训练模型。
文本情感分类函数classifier
print(classifier("Good man"))#[{'label': 'POSITIVE', 'score': 0.9998418092727661}]4、函数输入为列表与字典
到目前为止,您看到的事件侦听器都只有一个输入组件。如果想让多个输入组件向函数传递数据,你有两个选项来决定函数如何接受输入组件的值,先来看示例(官方例子做了简单修改):
import gradio as gr

with gr.Blocks() as demo:
    a = gr.Number(label="a")
    b = gr.Number(label="b")
    with gr.Row():
        add_btn = gr.Button("求和")
        sub_btn = gr.Button("求差")
    c1 = gr.Number(label="a+b的结果")
    c2 = gr.Number(label="a-b的结果")

    def add(num1, num2):
        return num1 + num2
    add_btn.click(add, inputs=[a, b], outputs=c1)

    def sub(data):
        return data[a] - data[b]
    sub_btn.click(sub, inputs={a, b}, outputs=c2)

demo.launch()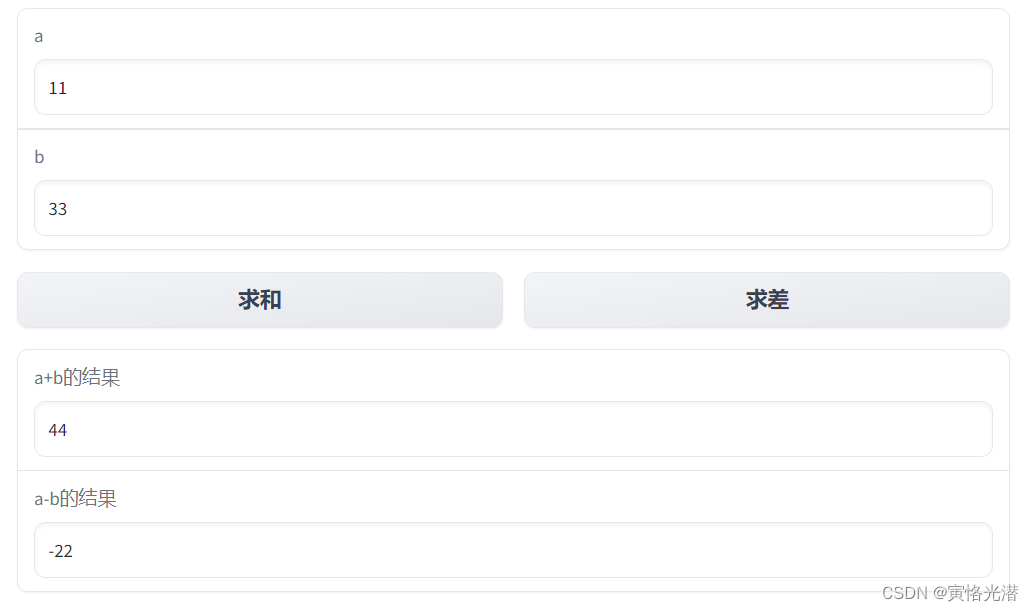
注意加法和减法的两个函数的写法和调用的不同!
add()和sub()都接受a和b作为输入。但是,这些侦听器之间的语法是不同的。
对于add_btn侦听器,我们将输入作为列表传递。add()函数将这些输入作为参数。a的值映射到实参num1, b的值映射到实参num2。
对于sub_btn侦听器,我们将输入作为一个集合传递(注意这里从中括号变为了大括号),函数sub()接受一个字典参数data,其中键是输入组件,值是这些组件的值。
5、函数返回为列表与字典
在上面我们的函数参数输入可以是列表或字典,同理,在函数的返回值中,也是可以返回列表或者字典的。
with gr.Blocks() as demo:
    food_box = gr.Number(value=10, label="Food Count")
    status_box = gr.Textbox()
    def eat(food):
        if food > 0:
            #return food - 1, "full"
            return {food_box: food - 1, status_box: "full"}
        else:
            #return 0, "hungry"
            return {status_box: "hungry"}
    gr.Button("EAT").click(
        fn=eat,
        inputs=food_box,
        outputs=[food_box, status_box]
    )
demo.launch()
这里可以看到函数返回的列表或字典,里面的值分别是食物数量以及饱腹还是饥饿状态。
6、更新组件配置
事件侦听器函数的返回值通常是对应输出组件的更新值。有时我们也想更新组件的配置,比如,可见性,这里看个示例就是看论文的长短来更新输入文本框的高度。
import gradio as gr

def change_textbox(choice):
    if choice == "short":
        return gr.update(lines=2, visible=True, value="比较短的论文...")
    elif choice == "long":
        return gr.update(lines=8, visible=True, value="比较长的论文")
    else:
        return gr.update(visible=False)

with gr.Blocks() as demo:
    radio = gr.Radio(
        ["short", "long", "none"], label="论文写作的长度?"
    )
    text = gr.Textbox(lines=2, interactive=True)
    radio.change(fn=change_textbox, inputs=radio, outputs=text)

demo.launch()当我们点击不同的单选按钮的时候,就会触发change侦听事件,然后通过change_textbox函数的用户选择,来更新文本框组件
7、连续运行事件
还可以通过使用事件侦听器的then方法连续运行事件。这将在前一个事件完成运行后运行一个事件。这对于运行分多个步骤更新组件的事件非常有用。
例如,在下面的聊天机器人示例中,我们首先使用用户消息更新聊天机器人,然后模拟延迟后使用计算机响应更新聊天机器人。
import gradio as gr
import random
import time

md = """This is some code:

hello

```py
def fn(x, y, z):
    print(x, y, z)
"""

with gr.Blocks() as demo:
    chatbot = gr.Chatbot()
    msg = gr.Textbox()
    clear = gr.Button("Clear")

    def respond(message, chat_history):
        bot_message = random.choice(["How are you?", "I love you", "I'm very hungry"])
        chat_history.append((message, md))
        time.sleep(1)
        return "", chat_history

    msg.submit(respond, [msg, chatbot], [msg, chatbot])
    clear.click(lambda: None, None, chatbot, queue=False)

demo.launch()
事件侦听器的.then()方法执行后续事件,而不管前一个事件是否引发任何错误。如果您希望仅在前一个事件成功执行时才运行后续事件,请使用.success()方法,该方法接受与.then()相同的参数。
您可以使用事件侦听器的每个参数以固定的时间表运行事件。这将在客户端连接打开时每秒钟运行一次事件。如果连接关闭,事件将在下一个迭代之后停止运行。注意,这并没有考虑事件本身的运行时。所以一个运行时间为1秒的函数在every=5的情况下,实际上是每6秒运行一次。
接下来看一个每秒更新的正弦曲线的例子:
import math
import gradio as gr
import plotly.express as px
import numpy as np

plot_end = 2 * math.pi

def get_plot(period=1):
    global plot_end
    x = np.arange(plot_end - 2 * math.pi, plot_end, 0.02)
    y = np.sin(2*math.pi*period * x)
    fig = px.line(x=x, y=y)
    plot_end += 2 * math.pi
    if plot_end > 1000:
        plot_end = 2 * math.pi
    return fig


with gr.Blocks() as demo:
    with gr.Row():
        with gr.Column():
            gr.Markdown("更改滑块的值以自动更新绘图")
            period = gr.Slider(label="Period of plot", value=1, minimum=0, maximum=10, step=1)
            plot = gr.Plot(label="Plot (updates every half second)")

    dep = demo.load(get_plot, None, plot, every=1)
    period.change(get_plot, period, plot, every=1, cancels=[dep])


if __name__ == "__main__":
    demo.queue().launch()
如果没有安装plotly模块,同样会报模块缺失的错误
ModuleNotFoundError: No module named 'plotly'
安装,依然推荐加豆瓣镜像:
pip install -i http://pypi.douban.com/simple/ --trusted-host pypi.douban.com plotly有兴趣的可以查阅其余章节:
Gradio的web界面演示与交互机器学习模型,安装和使用《1》
Gradio的web界面演示与交互机器学习模型,主要特征《2》
Gradio的web界面演示与交互机器学习模型,分享应用《3》
Gradio的web界面演示与交互机器学习模型,全局状态与会话状态《4》
Gradio的web界面演示与交互机器学习模型,接口自动刷新或连续刷新数据流《5》
Gradio的web界面演示与交互机器学习模型,高级接口特征《6》
