1. 多线程
线程与任务的关系
脱离了任务的线程是没有意义的
线程对象是通过Thread类来创建的
任务是通过Runnable接口来定义的
1.继承Thread类
2.实现Runnable接口
3.实现Callable接口 (与Runnable的区别,可以拿到返回值)
Thread线程执行的流程
线程一定要指定任务吗?
Thread构造器:无参构造器就是不需要指定任务,有参构造器可以直接指定线程的任务
 public Thread(Runnable target) {
        this(null, target, "Thread-" + nextThreadNum(), 0);
    }
创建线程对象时候直接传入它的任务
流程:
- 创建线程对象,同时指定任务
- 启动线程,start,就绪状态,等待获取CPU资源
- 一旦拿到CPU资源之后,就开始执行任务, 调用Thread的run方法
  public static void main( String[] args )
    {
       Thread thread = new Thread(() ->{
           for (int i = 0; i < 10; i++){
               System.out.println(i);
           }
       });
       thread.start();
    }

// Thread 的run方法
 @Override
    public void run() {
        if (target != null) {
            target.run(); // tager 传入的任务
        }
    }
Thread类中定义了一个Runnable tager成员变量,用来接受创建线程对象时,传入的任务
    1. 创建线程对象,传入任务
    2. 将任务赋值给tager成员变量
    3. 线程执行的时候,操作tager成员变量
实现多线程的两种形式对比
- 继承Thread ---- 继承的缺点在于直接把任务的实现写进了线程类当中,耦合度太高
public class MyThread extends Thread{

    @Override
    public void run() {
        for(int i = 0; i < 10; i++){
            System.out.println("----MyThread" + i);
        }
    }
}

public class App
{
    public static void main( String[] args )
    {
        MyThread thread = new MyThread();
        thread.start();

    }
}
- 实现接口Runnable — 实现接口的形式可以解决上述问题 实现解耦合
public class MyRunnable implements Runnable{

    @Override
    public void run() {
        for (int i = 0; i < 10; i++){
            System.out.println("myThread1:" + i);
        }
    }
}


public class MyRunnable2 implements Runnable{
    @Override
    public void run() {
        for (int i = 0; i < 10; i++){
            System.out.println("myThread2:" + i);
        }
    }
}


public class App
{
    public static void main( String[] args )
    {
        Runnable runnable1 = new MyRunnable();
        Runnable runnable2 = new MyRunnable2();

       Thread thread = new Thread(runnable1);
        thread.start();
        Thread thread1 = new Thread(runnable2);
        thread1.start();
    }
}
线程休眠
-
创建t1对象并启动
-
t1休眠1秒
-
创建t2对象并启动
      Thread t1 = new Thread(() ->{
            for(int i = 0; i < 10; i++){
                System.out.println(1);
            }
        });
        t1.start();

        try {
            t1.sleep(1000);
        } catch (InterruptedException e) {
            throw new RuntimeException(e);
        }

    Thread t2 = new Thread(()->{
        for(int i = 0; i < 10; i ++){
            System.out.println(2);
        }
    });
        t2.start();


结果先输出10个1 在输出10个2
    原因: sleep方法到底让哪个线程休眠
    不在于谁调用sleep 而在于slepp写在哪 与调用者无关  (sleep 是静态方法信息)

    放到t1里面 t1休眠
    放在t2里面 t2休眠
2. JUC并发 编程 Java-util-concurrent在并发编程中使用的工具包
1. Java多线程相关概念
- 并发
- 是在用一个实体类上的多个事件
- 是在一台机器上同时处理多个任务, 同一时刻,其实是只有一个事情在发生
- 并行
- 是在不同实体上的多个事情
- 是在多台处理器上同时处理多个任务
- 同一时刻,大家都在做事情,你做你的,我做我的,但是我们都在做
- 进程
- 简单来说,在系统中运行的一个应用程序就是一个进程,每一个进程都有它自己的内存空间和系统资源
- 线程
- 也被称为轻量级进程,在同一个进程中会有1个或者多个线程是大多数操作系统进行时序调度的基本单元
- 管程
- 俗称Monitor(监视器) 也就是平时所说的锁
- 用户线程 一般情况不做特别说明配置,默认为用户线程
- 守护线程
- 线程daemon属性 true表示守护线程,false表示用户线
- 如果用户线程全部介绍意味着程序需要完成的业务操作已经结束了,守护线程随着JVM一同结束工作,
- setDaemon(true)方法必须在start()之前设置,否则会报IllegelThreadStateException异常
2. FutureTask
基本实现使用, future+线程池异步多线程配合,能显著提高程序的执行效率
// 多线程/有返回值/异步任务
public class CompletableFutureDemo {
    public static void main(String[] args) throws ExecutionException, InterruptedException {
        FutureTask<String> futureTask = new FutureTask<>(new MyThreadCall());
        Thread t1 = new Thread(futureTask, "t1");
        t1.start();
        System.out.println(futureTask.get());

    }

}

class MyThreadCall implements Callable<String> {
    /**
     * Computes a result, or throws an exception if unable to do so.
     *
     * @return computed result
     * @throws Exception if unable to compute a result
     */
    @Override
    public String call() throws Exception {
        System.out.println("come in call()");
        return "hello callable";
    }
}


// 结合线程池使用

public class FutureThreadPoolDemo {

    public static void main(String[] args) throws ExecutionException, InterruptedException {

        Long startTime = System.currentTimeMillis();

        ExecutorService threadPool = Executors.newFixedThreadPool(3);

        FutureTask<String> futureTask = new FutureTask<>(() -> {
            try {
                TimeUnit.MILLISECONDS.sleep(500);
            } catch (InterruptedException e) {
                throw new RuntimeException(e);
            }
            return "task over";
        });
        threadPool.submit(futureTask);

        FutureTask<String> futureTask2 = new FutureTask<>(() -> {
            try {
                TimeUnit.MILLISECONDS.sleep(500);
            } catch (InterruptedException e) {
                throw new RuntimeException(e);
            }
            return "task2 over";
        });
        threadPool.submit(futureTask2);

        System.out.println(futureTask.get());
        System.out.println(futureTask2.get());


        try {
            TimeUnit.MILLISECONDS.sleep(500);
        } catch (InterruptedException e) {
            throw new RuntimeException(e);
        }

        Long end = System.currentTimeMillis();

        System.out.println("耗时" + (end - startTime));
        threadPool.shutdown();
    }

    public void m1() {
        // 3个任务 目前只有一个线程main处理,请问耗时多少

        Long startTime = System.currentTimeMillis();
        try {
            TimeUnit.MILLISECONDS.sleep(300);
        } catch (InterruptedException e) {
            throw new RuntimeException(e);
        }

        try {
            TimeUnit.MILLISECONDS.sleep(300);
        } catch (InterruptedException e) {
            throw new RuntimeException(e);
        }

        try {
            TimeUnit.MILLISECONDS.sleep(500);
        } catch (InterruptedException e) {
            throw new RuntimeException(e);
        }
        Long end = System.currentTimeMillis();

        System.out.println("耗时" + (end - startTime));
        System.out.println(Thread.currentThread().getName());
    }
}
- 缺点1:
- get()阻塞 如果没有计算完成,那么将会造成阻塞,一般建议放在程序最后
- 假如不愿意等待很长时间,我希望过时不候,可以自动离开。
public class FutureAPIDemo {
    public static void main(String[] args) throws ExecutionException, InterruptedException, TimeoutException {
        FutureTask<String> futureTask = new FutureTask<>(() -> {
            try {
                TimeUnit.MILLISECONDS.sleep(500);
            } catch (InterruptedException e) {
                throw new RuntimeException(e);
            }
            return "task over";
        });

        Thread thread = new Thread(futureTask, "t1");
		 thread.start();
//        System.out.println(futureTask.get()); // 会造成阻塞

        System.out.println(Thread.currentThread().getName() + "   " + "忙其他任务");


//        System.out.println(futureTask.get()); // 等待返回值才结束程序
        System.out.println(futureTask.get(3, TimeUnit.SECONDS)); // 等待3秒,如果没收到返回值,将抛出异常时间超时TimeoutException,并结束程序
    }
}
-
缺点2 isDone 轮询
- 轮询的方式会浪费无谓的CPU资源,而且也不见得能及时地得到计算结果,
- 如果想要异步获取结果,通过都会以轮询的方式去获取结果,尽量不要阻塞
public class FutureAPIDemo {
    public static void main(String[] args) throws ExecutionException, InterruptedException {
        FutureTask<String> futureTask = new FutureTask<>(() -> {
            try {
                TimeUnit.MILLISECONDS.sleep(500);
            } catch (InterruptedException e) {
                throw new RuntimeException(e);
            }
            return "task over";
        });

        Thread thread = new Thread(futureTask, "t1");
        thread.start();

        System.out.println(Thread.currentThread().getName() + "   " + "忙其他任务");
        while (true) {
            if (futureTask.isDone()) {
                System.out.println(futureTask.get());
                break;
            } else {
                try {
                    TimeUnit.MILLISECONDS.sleep(500);
                } catch (InterruptedException e) {
                    throw new RuntimeException(e);
                }
                System.out.println("还没好");
            }
        }

    }
}
结论: Future对于结果的获取不是很友好,只能通过阻塞或者轮询的方式得到任务的结果
3. CompletableFuture
引言:
- 对于简单的业务场景使用Future完全OK
- 回调通知:
- 应对Future的完成时间,完成了可以告诉我,也就是我们的回调通知
- 通过轮询的方式去判断任务是否完成这样非常占CPU并且代码也不优雅
- 创建异步任务,Future与线程池的配合,
- 多个任务前后依赖可以组合处理
- 想将多个异步任务的计算结合组合起来,后一个异步任务的计算结果需要前一个异步任务的值
- 将两个或多个异步计算合成一个异步计算,这几个异步计算相互独立,同时后面这个又依赖前一个处理的结果。
- 对计算结果选最快 — 当Future集合中某个任务最快介绍时,返回结果,返回第一名处理结果
CompletableFuture 创建方法  // 官方建议,不推荐使用new CompletableFuture() 直接创建
没有指定Executor的方法,直接使用默认的ForkJoinPool.commonPool()作为它的线程池执行异步代码
如果指定线程池,则使用我们自定义的或者特别指定的线程池执行异步代码
    1. 无返回值 无指定线程池,使用默认的线程池
    public static CompletableFuture<Void> runAsync(Runnable runnable) {
        return asyncRunStage(ASYNC_POOL, runnable);
    }
	2. 无返回值,指定线程池
    public static CompletableFuture<Void> runAsync(Runnable runnable,
                                                   Executor executor) {
        return asyncRunStage(screenExecutor(executor), runnable);
    }
	3. 有返回值,无指定线程池,使用默认的线程池
    public static <U> CompletableFuture<U> supplyAsync(Supplier<U> supplier) {
        return asyncSupplyStage(ASYNC_POOL, supplier);
    }

    4. 有返回值,指定线程池
    public static <U> CompletableFuture<U> supplyAsync(Supplier<U> supplier,
                                                       Executor executor) {
        return asyncSupplyStage(screenExecutor(executor), supplier);
    }

// 补充:
CompletableFuture.get() 需要抛出异常,
CompletableFuture.join() 不需要抛出异常,
// 案例1
public class CompletableFutureBuildDemo {
    public static void main(String[] args) throws ExecutionException, InterruptedException {
        // 官方建议,不推荐使用new CompletableFuture() 直接创建

        CompletableFuture<Void> completableFuture = CompletableFuture.runAsync(() -> {
            // 不指定线程池,得到的名字ForkJoinPool.commonPool-worker-19
            System.out.println(Thread.currentThread().getName());
            try {
                TimeUnit.MILLISECONDS.sleep(500);
            } catch (InterruptedException e) {
                throw new RuntimeException(e);
            }
        });
        // 结果输出为null
        System.out.println(completableFuture.get());
    }
}
// 案例2
public class CompletableFutureBuildDemo {
    public static void main(String[] args) throws ExecutionException, InterruptedException {

        Executor executor = Executors.newFixedThreadPool(3);
        CompletableFuture<Void> completableFuture = CompletableFuture.runAsync(() -> {
            // 指定线程池 输出名字为pool-1-thread-1
            System.out.println(Thread.currentThread().getName());
            try {
                TimeUnit.MILLISECONDS.sleep(500);
            } catch (InterruptedException e) {
                throw new RuntimeException(e);
            }
        }, executor);
        // 结果输出为null
        System.out.println(completableFuture.get());
    }
}
// 案例3
public class CompletableFutureBuildDemo {
    public static void main(String[] args) throws ExecutionException, InterruptedException {
        CompletableFuture<Object> completableFuture = CompletableFuture.supplyAsync(() -> {
            // 没有指定线程池线程名字为ForkJoinPool.commonPool-worker-19
            System.out.println(Thread.currentThread().getName());
            try {
                TimeUnit.MILLISECONDS.sleep(500);
            } catch (InterruptedException e) {
                throw new RuntimeException(e);
            }
            return "this is supplyAsync";
        });
       //  得到返回结果this is supplyAsync
        System.out.println(completableFuture.get());
    }
}

// 案例4
public class CompletableFutureBuildDemo {

    public static void main(String[] args) throws ExecutionException, InterruptedException {
        Executor executor = Executors.newFixedThreadPool(3);
        CompletableFuture<Object> completableFuture = CompletableFuture.supplyAsync(() -> {
              // 指定线程池 输出名字为pool-1-thread-1
            System.out.println(Thread.currentThread().getName());
            try {
                TimeUnit.MILLISECONDS.sleep(500);
            } catch (InterruptedException e) {
                throw new RuntimeException(e);
            }
            return "this is supplyAsync";
        }, executor);
     //  得到返回结果this is supplyAsync
        System.out.println(completableFuture.get());
    }
}
1. 通用功能演示,减少阻塞和轮询
// 线程返回结果是进入  传入线程返回的值和异常如下案例
public CompletableFuture<T> whenComplete(
        BiConsumer<? super T, ? super Throwable> action) {
        return uniWhenCompleteStage(null, action);
}
// 线程发生异常时进入, 用例如下
public CompletableFuture<T> exceptionally(
        Function<Throwable, ? extends T> fn) {
        return uniExceptionallyStage(fn);
}
// 案例1 使用默认线程池
public class CompletableFutureUserDemo {
    public static void main(String[] args) throws ExecutionException, InterruptedException {
        CompletableFuture<Integer> supplyAsync = CompletableFuture.supplyAsync(() -> {
            System.out.println(Thread.currentThread().getName() + "----come in");
            int result = ThreadLocalRandom.current().nextInt(10);
            try {
                TimeUnit.MILLISECONDS.sleep(1000);
            } catch (InterruptedException e) {
                throw new RuntimeException(e);
            }
            System.out.println("-----1秒后出结果:" + result);
            return result;
        }).whenComplete((v, e) -> {
            if (e == null) {
                System.out.println("-------计算完成,更新updateValue:-------" + v);
            }
        }).exceptionally(e -> {
            e.printStackTrace();
            System.out.println("异常情况处理:" + e.getCause() + "\t" + e.getMessage());
            return null;
        });

        System.out.println(Thread.currentThread().getName() + "---- 忙别的");

        // 主线程不要立刻结束,否则CompletableFuture默认使用的线程池会立刻关闭,在暂停3秒种线程(与用户进程和守护进程相关)
        try {
            TimeUnit.MILLISECONDS.sleep(3000);
        } catch (InterruptedException e) {
            throw new RuntimeException(e);
        }
    }
}

// 案例2  使用自定义线程池
public class CompletableFutureUserDemo {
    public static void main(String[] args) throws ExecutionException, InterruptedException {
        // ExecutorService Executor的子类
        ExecutorService executor = Executors.newFixedThreadPool(3);
        try {
            CompletableFuture<Integer> supplyAsync = CompletableFuture.supplyAsync(() -> {
                System.out.println(Thread.currentThread().getName() + "----come in");
                int result = ThreadLocalRandom.current().nextInt(10);
                try {
                    TimeUnit.MILLISECONDS.sleep(1000);
                } catch (InterruptedException e) {
                    throw new RuntimeException(e);
                }
                System.out.println("-----1秒后出结果:" + result);
                return result;
            }, executor).whenComplete((v, e) -> {
                if (e == null) {
                    System.out.println("-------计算完成,更新updateValue:-------" + v);
                }
            }).exceptionally(e -> {
                e.printStackTrace();
                System.out.println("异常情况处理:" + e.getCause() + "\t" + e.getMessage());
                return null;
            });

            System.out.println(Thread.currentThread().getName() + "---- 忙别的");
        } catch (Exception e) {
            e.printStackTrace();
        } finally {
            executor.shutdown();
        }


        // 主线程不要立刻结束,否则CompletableFuture默认使用的线程池会立刻关闭,在暂停3秒种线程(与用户进程和守护进程相关) 使用自定义线程池无需卡主主线程
//        try {
//            TimeUnit.MILLISECONDS.sleep(3000);
//        } catch (InterruptedException e) {
//            throw new RuntimeException(e);
//        }
    }
}
// 案例三 异常处理
public class CompletableFutureUserDemo {
    public static void main(String[] args) throws ExecutionException, InterruptedException {
        // ExecutorService Executor的子类
        ExecutorService executor = Executors.newFixedThreadPool(3);
        try {
            CompletableFuture<Integer> supplyAsync = CompletableFuture.supplyAsync(() -> {
                System.out.println(Thread.currentThread().getName() + "----come in");
                int result = ThreadLocalRandom.current().nextInt(10);
                // 创造异常
                if (result > 5) {
                    int i = 10 / 0;
                }
                try {
                    TimeUnit.MILLISECONDS.sleep(1000);
                } catch (InterruptedException e) {
                    throw new RuntimeException(e);
                }
                System.out.println("-----1秒后出结果:" + result);
                return result;
            }, executor).whenComplete((v, e) -> {
                if (e == null) {
                    System.out.println("-------计算完成,更新updateValue:-------" + v);
                }
            }).exceptionally(e -> {
                e.printStackTrace();
                System.out.println("异常情况处理:" + e.getCause() + "\t" + e.getMessage());
                return null;
            });

            System.out.println(Thread.currentThread().getName() + "---- 忙别的");
        } catch (Exception e) {
            e.printStackTrace();
        } finally {
            executor.shutdown();
        }
    }
}
输出结果:
    pool-1-thread-1----come in
main---- 忙别的
异常情况处理:java.lang.ArithmeticException: / by zero	java.lang.ArithmeticException: / by zero
java.util.concurrent.CompletionException: java.lang.ArithmeticException: / by zero
	... 3 more
2. CompletableFuture的优点
- 异步任务介绍后,会自动回调某个对象的方法;
- 主线程设置好回调后,不再关心异步任务的执行,异步任务之间可以顺序执行
- 异步任务出错时,会自动回调某个对象的方法;
3. 案例实战
![[外链图片转存失败,源站可能有防盗链机制,建议将图片保存下来直接上传(img-ld7nWmLN-1685629852456)(C:\Users\56964\AppData\Roaming\Typora\typora-user-images\1685107704454.png)]](https://img-blog.csdnimg.cn/18df9ae2477c4592879888cf06b851b3.png)
/**
 * 1需求说明
 * 1.1同一款产品,同时搜索出同款产品在各大电商平台的售价;
 * 1.2同一款产品,同时搜索出本产品在同一个电商平台下,各个入驻卖家售价是多少
 * 2输出返回:
 * 出来结果希望是同款产品的在不同地方的价格清单列表,返回一个List<String>《mysql》 in jd price is 88.05
 * 《mysql》 in dangdang price is 86.11《mysql》 in taobao price is 90.43
 * 3解决方案,比对同一个商品在各个平台上的价格,要求获得一个清单列表,1 step by step,按部就班,查完京东查淘宝,查完淘宝查天猫…...…
 * 2all in 万箭齐发,一口气多线程异步任务同时耸询。。 o o o
 *
 * @author cyh
 * @Classname CompletableFutureMallDemo
 * @Description TODO
 * @Version 1.0.0
 * @Date 2023/5/26 21:17
 **/
public class CompletableFutureMallDemo {
    static List<NetMall> netMallList = Arrays.asList(
            new NetMall("jd"),
            new NetMall("dangdang"),
            new NetMall("taobao")
    );

    /**
     * 一家家搜索 step by step
     *
     * @param list
     * @param produceName
     * @return
     */
    public static List<String> getPrice(List<NetMall> list, String produceName) {
        return list
                .stream()
                .map(netMall ->
                        String.format(produceName + "in %s price is %.2f",
                                netMall.getNetMallName(),
                                netMall.calcPrice(produceName)))
                .collect(Collectors.toList());
    }

    /**
     * all in 万箭齐发,一口气多线程异步任务同时查询
     *
     * @param list
     * @param produceName
     * @return
     */
    public static List<String> getPriceByCompletableFuture(List<NetMall> list, String produceName) {
        return list
                .stream()
                .map(netMall -> CompletableFuture.supplyAsync(() -> String.format(produceName + "in %s price is %.2f",
                        netMall.getNetMallName(),
                        netMall.calcPrice(produceName))))
                .collect(Collectors.toList())// 先获取到List<CompletableFuture<String>>
                .stream() // 在对List<CompletableFuture<String>>进行流处理获取join()得到List<String>
                .map(CompletableFuture::join)
                .collect(Collectors.toList());
    }

    public static void main(String[] args) {
        long startTime = System.currentTimeMillis();
        List<String> stringList = getPrice(netMallList, "MySQL");
        stringList.forEach(System.out::println);
        long endTime = System.currentTimeMillis();
        System.out.println("-----step by step costTime:" + (endTime - startTime) + "毫秒");

        long startTime2 = System.currentTimeMillis();
        List<String> stringList2 = getPriceByCompletableFuture(netMallList, "MySQL");
        stringList2.forEach(System.out::println);
        long endTime2 = System.currentTimeMillis();
        System.out.println("-----all in costTime:" + (endTime2 - startTime2) + "毫秒");
    }
}

@Data
@AllArgsConstructor
@NoArgsConstructor
@Accessors(chain = true)
class NetMall {

    private String netMallName;

    public Double calcPrice(String productName) {
        try {
            TimeUnit.SECONDS.sleep(1);
        } catch (InterruptedException e) {
            e.printStackTrace();
        }
        return ThreadLocalRandom.current().nextDouble() * 2 + productName.charAt(0);
    }
}


返回值:
MySQLin jd price is 78.70
MySQLin dangdang price is 77.58
MySQLin taobao price is 77.41
-----step by step costTime:3050毫秒
MySQLin jd price is 77.39
MySQLin dangdang price is 77.71
MySQLin taobao price is 78.30
-----all in costTime:1012毫秒
4. CompletableFuture常用计算
1. 获取结果
public T get();
publie get(long timeout, TimeUnit unit);
publie T join();
public T getNow(T valueIfAbsent); 获取时线程未计算完成返回valueIfAbsent, 获取时已经计算完成则正常返回值,不会阻塞
2. 主动触发计算
public boolean complete(T value); 是否打断get方法立即返回括号值 无需抛出异常 线程计算未完成时,使用打断线程返回true,调用join()获取到的值为value, 线程计算完成调用方法,返回false,调用join()时返回线程返回的值
public class CompletableFutureAPIDemo {
    public static void main(String[] args) throws ExecutionException, InterruptedException, TimeoutException {
        CompletableFuture<String> future = CompletableFuture.supplyAsync(() -> {
            try {
                TimeUnit.MILLISECONDS.sleep(1000);
            } catch (InterruptedException e) {
                throw new RuntimeException(e);
            }
            return "abc";
        });
        System.out.println(future.get()); // 阻塞输出 abc
        System.out.println(future.get(2L, TimeUnit.SECONDS)); //2秒内获取不到抛出异常,获取到输出abc
        System.out.println(future.join()); // 无需处理异常。阻塞获取输出abc
        try {
            TimeUnit.MILLISECONDS.sleep(1000);
        } catch (InterruptedException e) {
            throw new RuntimeException(e);
        }
        System.out.println(future.getNow("xxxxx")); // 调用时如果还没有计算完成,则输入xxxxx, 如果有返回值则输出abc
        System.out.println(future.complete("completeValue") + "\t" + future.join()); // 是否打算计算,是返回true, join返回completeValue 否返回false, join得到abc
    }
}
3. 对计算结果进行处理
thenApply 计算结果存在依赖关系,这两个线程串行化
    异常相关:由于存在依赖关系(当前步错,不走下一步), 当前步骤有异常的话就叫停
public class CompletableFutureAPIDemo {
    public static void main(String[] args) {
        ExecutorService executorService = Executors.newFixedThreadPool(3);
        try {
            CompletableFuture.supplyAsync(() -> {
                try {
                    TimeUnit.MILLISECONDS.sleep(1000);
                } catch (InterruptedException e) {
                    throw new RuntimeException(e);
                }
                return 1;
            }, executorService).thenApply(f -> f + 2).thenApply(f -> f + 3).whenComplete((v, e) -> {
                if (e == null) {
                    System.out.println(v);
                }
            }).exceptionally(e -> {
                e.printStackTrace();
                return null;
            });

        } catch (Exception e) {
            e.printStackTrace();
        } finally {
            executorService.shutdown();
        }

    }
}


handle 计算结果存在依赖关系,这两个线程串行化, 正常情况下 与thenApply一致
    异常相关: 有异常也可以往下一步走,根据带的异常可以进入下一步处理
    public class CompletableFutureAPIDemo {
    public static void main(String[] args) {
        ExecutorService executorService = Executors.newFixedThreadPool(3);
        try {
            CompletableFuture.supplyAsync(() -> {
                try {
                    TimeUnit.MILLISECONDS.sleep(1000);
                } catch (InterruptedException e) {
                    throw new RuntimeException(e);
                }
                return 1;
            }, executorService).handle((f, e) -> {
                int i = 10 / 0;
                return f + 2;
            }).handle((f, e) -> {
                if (e != null) {
                    return 3;
                }
                return f + 3;
            }).whenComplete((v, e) -> {
                if (e == null) {
                    System.out.println(v);
                }
            }).exceptionally(e -> {
                e.printStackTrace();
                return null;
            });

        } catch (Exception e) {
            e.printStackTrace();
        } finally {
            executorService.shutdown();
        }

    }
}
4.对计算结果进行消费
thenAccept 接受任务的处理结果,并消费处理,无返回结果
    public class CompletableFutureAPIDemo {
    public static void main(String[] args) {
        ExecutorService executorService = Executors.newFixedThreadPool(3);
        try {
            CompletableFuture.supplyAsync(() -> {
                        try {
                            TimeUnit.MILLISECONDS.sleep(1000);
                        } catch (InterruptedException e) {
                            throw new RuntimeException(e);
                        }
                        return 1;
                    }, executorService)
                    .thenApply(f -> f + 2)
                    .thenApply(f -> f + 3)
                    .thenAccept(System.out::println);

        } catch (Exception e) {
            e.printStackTrace();
        } finally {
            executorService.shutdown();
        }

    }
}
对比:
- thenRun(Runable runnable)
- 任务A执行完成执行任务B,并且B不需要A的结果
- thenAccpet(Consumer action)
- 任务A执行完执行B,B需要A的结果,但是任务B无返回值
- thenApply(Function fn)
- 任务A执行完执行任务B,B需要A的结果,同时任务B有返回值
5. CompletableFuture和线程池的说明
- 以thenRun和thenRunAsync为例,有什么区别
- 没有传入自定义线程池,都用默认的线程池ForkJoinPool;
- 传入了一个自定义的线程池
- 如果执行第一个任务的时候,传入了一个自定义的线程池;
- 调用thenRun方法执行第二个任务时,则第二个任务和第一个任务是共用一个线程池。
- 调用thenRunAsync执行第二个任务时,则第一个任务使用的是你自己传入的线程池,第二个任务使用的是ForkJoin线程池
- 备注:
- 有可能处理太快,系统优化切换原则,直接使用main线程处理
- 其他如:thenAccept和thenAccpetAsync,thenApply和thenApplyAsync等,他们之前的区别也是同理。
6. 对计算速度的选用
applyToEither
public class CompletableFuturePoolDemo {
    public static void main(String[] args) {
        ExecutorService executorService = Executors.newFixedThreadPool(5);
        try {
            CompletableFuture<String> aComeIn = CompletableFuture.supplyAsync(() -> {
                System.out.println("A come in");
                try {
                    TimeUnit.MILLISECONDS.sleep(2000);
                } catch (InterruptedException e) {
                    throw new RuntimeException(e);
                }
                return "resultA";
            }, executorService);

            CompletableFuture<String> bComeIn = CompletableFuture.supplyAsync(() -> {
                System.out.println("b come in");
                try {
                    TimeUnit.MILLISECONDS.sleep(1000);
                } catch (InterruptedException e) {
                    throw new RuntimeException(e);
                }
                return "resultB";
            }, executorService);

            CompletableFuture<String> result = aComeIn.applyToEither(bComeIn, f -> f + " is winner");

            System.out.println(result.join());
        } catch (Exception e) {
            e.printStackTrace();
        } finally {
            executorService.shutdown();
        }
    }
}
7. 对计算结果进行合并
两个CompletionStage任务都完成后,最终能把两个任务的结果一起交给thenCombine来处理,先完成的先等着,等待其他分支任务。
public class CompletableFutureAPIDemo {
    public static void main(String[] args) {
        ExecutorService executorService = Executors.newFixedThreadPool(3);
        try {
            CompletableFuture<Integer> supplyAsync1 = CompletableFuture.supplyAsync(() -> {
                System.out.println("1 come int");
                try {
                    TimeUnit.MILLISECONDS.sleep(2000);
                } catch (InterruptedException e) {
                    throw new RuntimeException(e);
                }
                return 10;
            }, executorService);


            CompletableFuture<Integer> supplyAsync2 = CompletableFuture.supplyAsync(() -> {
                System.out.println("2 come int");
                try {
                    TimeUnit.MILLISECONDS.sleep(3000);
                } catch (InterruptedException e) {
                    throw new RuntimeException(e);
                }
                return 30;
            }, executorService);

            CompletableFuture<Integer> combine = supplyAsync1.thenCombine(supplyAsync2, (x, y) -> {
                System.out.println("两个结果合并");
                return x + y;
            });

            System.out.println(combine.join());
        } catch (Exception e) {
            e.printStackTrace();
        } finally {
            executorService.shutdown();
        }

    }
}
4. 多线程锁
1. 悲观锁
- 介绍: 认为自己在使用数据的时候一定有别的线程来修改数据,因此在获取数据的时候会先加锁,确保数据不会被别的线程修改
- synchronized关键字和lock的实现类都是悲观锁
- 适合场景:
- 写操作多的场景,先加锁可以保证写操作时数据正确,显式的锁定之后再操作同步资源
2. 乐观锁
-
介绍:认为自己在使用数据时不会有别的线程修改数据或者资源,所以不会添加锁
-
在Java中是通过使用无锁编程来实现,只是在更新数据的时候去判断,之前有没有别的线程更新了这个数据
如果这个数据没有被更新,当前线程将自己修改的数据成功写入。
如果这个数据已经被其他线程更新,则根据不同的实现方式执行不用的操作,比如放弃修改,重试抢锁等等
-
判断规则:
- 版本号机制Version
- 最常用的是CAS算法,Java原子类中的递增操作就通过CAS自旋实现
-
适合场景:
- 读操作多的场景,不加锁的特点能够使其读操作的性能大幅度提升
- 乐观锁则直接去操作同步资源,是一种无锁算法
锁相关的8种案例演示code
/**
 * 题目: 谈谈对多线程锁的理解,8锁案例说明
 * 口诀: 线程, 操作, 资源类
 * 8锁案例说明:
 * 1 标准两个a, b线程,先打印发邮件还是短信 email sms
 * 2. sendEmail方法加入暂停3秒钟,请问先打印邮件还是短信 email sms
 * 3. 添加一个普通的hello方法,请问先打印邮件还是hello hello email
 * 4. 有两部手机,请问先打印手机还是邮件 sms email
 * 5. 有两个静态同步方法,有一部手机,请问先打印手机还是邮件 email sms
 * 6. 有两个静态同步方法,有两部手机,请问先打印手机还是邮件 email sms
 * 7. 有一个静态同步方法,有一个普通同步方法,有一部手机,请问先打印手机还是邮件 sms email
 * 8. 有一个静态同步方法,有一个普通同步方法,有两部手机,请问先打印手机还是邮件  sms email
 * <p>
 * <p>
 * <p>
 * 笔记总结:
 * 1-2
 * * * 一个对象里面如果有多个synchronized方法,某个时刻内,只要一个线程去调用其中一个synchronized方法了
 * * * 其它线程都只能等待,换句话说,弄一个时刻内,只能有唯一的一个线程去访问这些synchronized方法
 * * * 锁的是当前对象的this,被锁定后,其它的线程都不能进入到当前对象的其它的synchronized方法
 * 3-4
 * * * 加个普通方法后发现与同步锁无关
 * * * 换成两个对象后,不是同一把锁了
 * 5-6 都换成静态同步方法后,变成了类锁
 * * * 三种synchronized锁的内容有一些差别
 * * * 对于普通同步方法,锁的是当前实例对象,通常指this,具体的一部部手机,所有的普通同步方法用的都是同一把锁->实例对象本身本身
 * * * 对于静态同步方法,锁的是当前类Class对象,如Phone.class唯一的一个模板
 * * * 对于同步方法块,锁的是synchronized括号内的对象
 * 7-8
 * * * 当一个线程试图访问同步代码时它首先必须得到锁,正常退出或者抛出异常时必须释放锁
 * * * 所有的普通同步方法用的都是同一把锁--实例对象本身,就是new出来的具体实例对象本身,本类this
 * * * 也就是说,如果一个实例对象的普通同步方法获取锁后,该实例对象的其他普通同步方法必须等待获取锁的方法释放锁后才能获得锁
 * * *
 * * * 所有的静态同步方法用的也是 同一把锁--类本身,就是唯一模板Class
 * * * 具体实例对象this和唯一模板Class, 这两把锁是两个不同的对象,所以静态同步方法与普通同步方法之间是不会有竞态条件的
 * * * 但是一旦一个静态同步方法获得锁后,其他的静态同步方法都必须等待该方法释放锁后才能获得锁
 */
public class Lock8Demo {
    public static void main(String[] args) {
        Phone phone = new Phone();
        Phone phone1 = new Phone();
        new Thread(phone::sendEmail, "a").start();

        try {
            TimeUnit.MILLISECONDS.sleep(200);
        } catch (InterruptedException e) {
            throw new RuntimeException(e);
        }

        new Thread(() ->{
            phone.sendSms();
            phone1.hello();

        }, "b").start();
    }
}

class Phone {
    public synchronized void sendEmail() {

        try {
            TimeUnit.MILLISECONDS.sleep(3000);
        } catch (InterruptedException e) {
            throw new RuntimeException(e);
        }
        System.out.println("-----sendEmail");
    }

    public synchronized void sendSms() {
        System.out.println("-----sendSms");
    }

    public static synchronized void sendEmail() {

        try {
            TimeUnit.MILLISECONDS.sleep(3000);
        } catch (InterruptedException e) {
            throw new RuntimeException(e);
        }
        System.out.println("-----sendEmail");
    }

    public static synchronized void sendSms() {
        System.out.println("-----sendSms");
    }
    public void hello() {
        System.out.println("---------hello");
    }
}
总结:
- 作用于实例方法,当前实例加锁,进入同步代码前要获得当前实例的锁;
- 作用于代码块,对括号里配置的对象加锁
- 作用于静态代码,当前类加锁,进去同步代码前要获得当前类对象的锁
3. 公平锁
4. 非公平锁
| 公平锁 | 是指多个线程按照申请锁的顺序来获取锁。这里类似排队买票,先来的人先买后来的人在队尾排着,这是公平的 Lock lock = new ReentrantLock(true) 表示公平锁,先来先得 |
|---|---|
| 非公平锁 | 是指多个线程获取锁的顺序不是按照申请锁的顺序,有可能后申请的线程比先申请的线程优先获得锁,在高并发环境下,有可能造成优先级翻转或者饥饿状态(某个线程一直得不到锁) |
| Lock lock = new ReentrantLock(false) 表示非公平锁,后来的也可能先获得锁, Lock lock = new RenntrantLock();// 默认非公平锁 |
为什么会有公平锁和非公平锁,为什么默认设置非公平锁
- 恢复挂起的线程到真正锁的获取还是有时间差的,从开发人员来看这个时间微乎其微,但是从cpu的角度来看,这个时间差存在的还是很明显的。所以非公平锁能够更充分利用CPU的时间片,尽量减少CPU空闲状态的时间。
- 使用多线程很重要的考量点是线程切换的开销,当采用非公平锁时,当一个线程请求获取锁的同步状态,然后释放同步状态,所以刚释放的线程在此刻再次获取同步锁状态的概率就变得非常大,所以减少了线程的开销。
什么时候用公平,什么时候用非公平
- 如果是为了更高的吞吐量,很显然非公平锁时比较合适的,因为节省了很多线程切换时间,吞吐量自然就上去了。
- 否则就用公平锁,大家公平使用。
5. 可重入锁(递归锁)
介绍: 是指在同一个线程在外层方法获得到锁的时候,再进入该线程的内层方法会自动获得锁(前提,锁对象是同一个对象),不会因为之前已经获得过还没释放而阻塞
如果是1个有synchronized修饰的递归方法,程序在第二次进入被自己阻塞了出现了作茧自缚。
所以Java中的ReentrantLock和synchronized都是可重入锁,可重入锁的一个优点是可一定程度避免死锁。
可重入锁的种类:
隐式锁(synchronized关键字使用的锁,默认是可重入锁) 在一个synchronized修饰的方法或者代码块的内部调用本类其他synchronized修饰的方法或者代码块时是永远可以得到锁的
public class ReEntryLockDemo {
    public static void main(String[] args) {
        ReEntryLockDemo entryLockDemo = new ReEntryLockDemo();
        new Thread(entryLockDemo::m1, "t1").start();
    }

    public synchronized void m1() {
        System.out.println(Thread.currentThread().getName() + "come in");
        m2();
        System.out.println(Thread.currentThread().getName() + "end");
    }

    public synchronized void m2() {
        System.out.println(Thread.currentThread().getName() + "come in");
        m3();
    }

    public synchronized void m3() {
        System.out.println(Thread.currentThread().getName() + "come in");
    }

    private static void reEntrym1() {
        final Object o = new Object();

        new Thread(() -> {
            synchronized (o) {
                System.out.println(Thread.currentThread().getName() + "----外层调用");
                synchronized (o) {
                    System.out.println(Thread.currentThread().getName() + "----中层调用");
                    synchronized (o) {
                        System.out.println(Thread.currentThread().getName() + "----内层调用");
                    }
                }
            }
        }, "a").start();
    }
}
synchronized的重入的实现机理
- 每个锁对象拥有一个锁的计数器和一个指向持有该锁的线程指针。
- 当执行monitorenter时,如果目标锁对象的计算器为零,那么说明它没有被其他线程持有,Java虚拟机会将该锁对象的持有线程设置为当前线程,并且将其计数器加1
- 在目标锁对象的计数器不为零的情况下,如果锁对象的持有线程是当前线程,那么Java虚拟机可以将其计数器+1,否则需要等待,直直持有线程释放该锁。
- 当执行monitorexit时,Java虚拟机则需将锁对象的计数器-1,计数器为0表示锁已经释放。
显式锁(即Lock)也有ReentrantLock这样的可重入锁
- 使用lock() 要与unLock() 一一对应匹配,否则会造成死锁
6. 死锁
[外链图片转存失败,源站可能有防盗链机制,建议将图片保存下来直接上传(img-HzO2HPF1-1685629852457)(D:\desktop\Screenshot_20230528_150545_tv.danmaku.bilibilihd.jpg)]
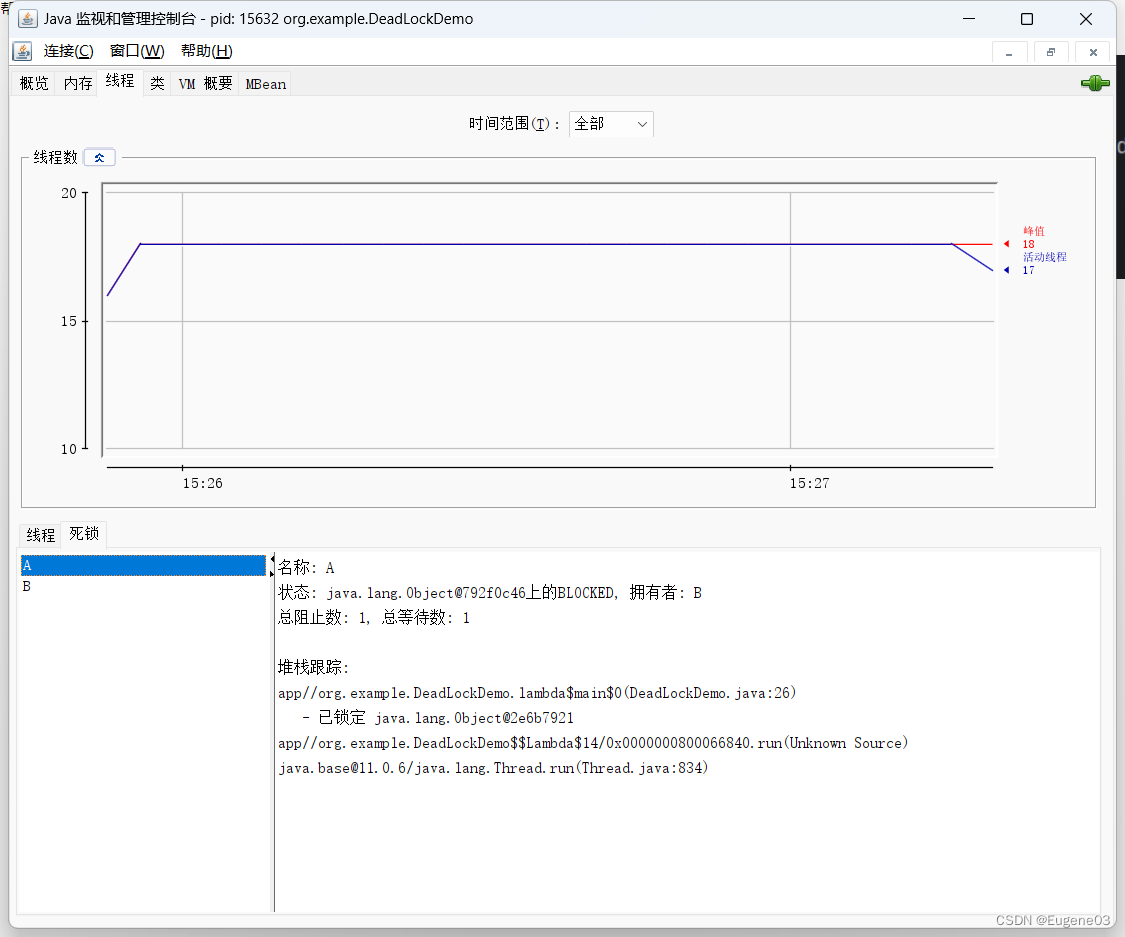
如何排查死锁:
- jps -l

- jstack 进程编号


使用图形化方法
-
window + R 输入jconsole
-
选择连接程序
-
选择线程
-
检查死锁
5. 线程中断机制
-
首先:一个线程不应该由其他线程来强制中断或者停止,而是应该由线程自己自行停止,自己来决定自己的命运。
所以Thread.shop(), Thread.suspend(), Thread.resume()都已经废弃了
-
其次:在Java中没有办法立即停止一条线程,然而停止线程确显得尤为重要,如取消一个耗时操作。
因此,Java提供了一种用于停止线程的协商机制–中断,也即中断协商机制
-
中断只是一种协作协商机制,java没有给中断加任何语法,中断的过程完全需要程序员自己实现。
-
诺要中断一个线程,你需要手动调用该线程的interrupt方法,该方法也仅仅是将线程对象的中断标识设成true;接着你需要自己写代码不断检测当前线程的标识位,如果为true,表示别的线程请求这条线程中断,此时究竟该做什么需要自己写代码实现
-
每个线程对象中都有一个中断标识位,用于表示线程是否被中断,该标识位为true表示中断,为false表示未中断;通过调用线程对象的interrupt方法将该线程的标识位设为true,可以在别的线程中调用,也可以在自己的线程中调用。
// 通过volatile
public class InterruptDemo {

    static volatile boolean isShop = false;

    public static void main(String[] args) {
        new Thread(() -> {
            while (true) {
                if (isShop) {
                    System.out.println("---- isStop = true,停止");
                    break;
                }
                System.out.println("----hello volatile");
            }
        }, "t1").start();

        try {
            TimeUnit.MILLISECONDS.sleep(20);
        } catch (InterruptedException e) {
            throw new RuntimeException(e);
        }

        new Thread(() -> {
            isShop = true;
        }).start();
    }
}

// 使用原子类 AtomicBoolean
public class InterruptDemo {

    //    static volatile boolean isStop = false;
    static AtomicBoolean isStop = new AtomicBoolean(false);

    public static void main(String[] args) {
        new Thread(() -> {
            while (true) {
                if (isStop.get()) {
                    System.out.println("---- isStop = true,停止");
                    break;
                }
                System.out.println("----hello volatile");
            }
        }, "t1").start();

        try {
            TimeUnit.MILLISECONDS.sleep(20);
        } catch (InterruptedException e) {
            throw new RuntimeException(e);
        }

        new Thread(() -> {
            isStop.set(true);
        }).start();
    }
}
通过API Interrupt
    public class InterruptDemo {

    //    static volatile boolean isStop = false;
    static AtomicBoolean isStop = new AtomicBoolean(false);

    public static void main(String[] args) {
        Thread thread = new Thread(() -> {
            while (true) {
                // 是否被中断过
                if (Thread.currentThread().isInterrupted()) {
                    System.out.println("----停止");
                    break;
                }
                System.out.println("----hello Interrupted");
            }
        }, "t1");

        thread.start();

        try {
            TimeUnit.MILLISECONDS.sleep(20);
        } catch (InterruptedException e) {
            throw new RuntimeException(e);
        }

        new Thread(() -> {
            // 设置中断标识位为true
            thread.interrupt();
        }).start();
    }
}
注意:
- 如果线程处于正常活动状态,那么会将线程的中断标识设置为true,仅此而已
- 被设置中断标识的线程将继续正常运行,不受影响。
- 所以 interrupt()并不能真正的中断线程,需要被调用的线程自己进行配合才行
- 如果线程处理被阻塞状态(例如处理Sleep,wait,join等状态)在别的线程中调用当前线程对象的interrupt方法,那么线程将立即退出被阻塞状态,并抛出异常InterruptedException异常。
- 中断标识位,默认为false,
- t2 ---->t1发出了中断协商,t2调用了t1.interrupt() 中断标识位true
- 中断标识位为true,正常情况,程序停止。
- 中断标识位true,异常情况,InterruptedException,将会把中断状态清除,并且将收到InterruptedException。中断标识位false,导致无限循环。
- 在catch快中,需要再次将中断标识位设置为true,2次调用停止程序才ok
public class InterruptDemo {

    public static void main(String[] args) {
        Thread thread = new Thread(() -> {
            while (true) {
                // 是否被中断过
                if (Thread.currentThread().isInterrupted()) {
                    System.out.println("----停止");
                    break;
                }
                System.out.println("----hello Interrupted");
                try {
                    TimeUnit.MILLISECONDS.sleep(20);
                } catch (InterruptedException e) {
                    Thread.currentThread().interrupt();
                    throw new RuntimeException(e);
                }
            }
        }, "t1");

        thread.start();

        try {
            TimeUnit.MILLISECONDS.sleep(20);
        } catch (InterruptedException e) {
            throw new RuntimeException(e);
        }

        new Thread(() -> {
            // 设置中断标识位为true
            thread.interrupt();
        }).start();
    }
}
6. LockSupport
**介绍:**是用来创建锁和其他同步类的基本线程阻塞原语
1. 线程等待唤醒机制
- 方式1:使用Object中的wait()方法让线程等待,使用Object中的notify()方法唤醒线程
正常情况
public class LockSupportDemo {

    public static void main(String[] args) {
        Object o = new Object();

        new Thread(() -> {
            synchronized (o) {
                System.out.println(Thread.currentThread().getName() + "come in");
                try {
                    o.wait(); // 会释放锁
                } catch (InterruptedException e) {
                    throw new RuntimeException(e);
                }

            }
        }, "t1").start();

        try {
            TimeUnit.MILLISECONDS.sleep(20);
        } catch (InterruptedException e) {
            Thread.currentThread().interrupt();
            throw new RuntimeException(e);
        }

        new Thread(() -> {
            synchronized (o) {
                o.notify();
                System.out.println(Thread.currentThread().getName() + "发出通知");
            }
        }, "t2").start();
    }
}
异常情况 notify没有在同步代码块
public class LockSupportDemo {

    public static void main(String[] args) {
        Object o = new Object();

        new Thread(() -> {
            synchronized (o) {
                System.out.println(Thread.currentThread().getName() + "come in");
                try {
                    o.wait(); // 会释放锁
                } catch (InterruptedException e) {
                    throw new RuntimeException(e);
                }

            }
        }, "t1").start();

        try {
            TimeUnit.MILLISECONDS.sleep(20);
        } catch (InterruptedException e) {
            Thread.currentThread().interrupt();
            throw new RuntimeException(e);
        }

        new Thread(() -> {

            o.notify();
            System.out.println(Thread.currentThread().getName() + "发出通知");

        }, "t2").start();
    }
}
报错:
Exception in thread "t2" java.lang.IllegalMonitorStateException
	at java.base/java.lang.Object.notify(Native Method)
	at org.example.LockSupportDemo.lambda$main$1(LockSupportDemo.java:38)
	at java.base/java.lang.Thread.run(Thread.java:834)
原因:wait()和notify()必须在同步代码块中使用

异常2 先notify在wait()
public class LockSupportDemo {

    public static void main(String[] args) {
        Object o = new Object();

        new Thread(() -> {
            try {
                TimeUnit.MILLISECONDS.sleep(100);
            } catch (InterruptedException e) {
                Thread.currentThread().interrupt();
                throw new RuntimeException(e);
            }
            synchronized (o) {
                System.out.println(Thread.currentThread().getName() + "come in");
                try {
                    o.wait(); // 会释放锁
                } catch (InterruptedException e) {
                    throw new RuntimeException(e);
                }

            }
        }, "t1").start();

        new Thread(() -> {
            synchronized (o) {
                o.notify();
                System.out.println(Thread.currentThread().getName() + "发出通知");
            }
        }, "t2").start();
    }
}
无报错,但是程序没办法正常退出直接卡死,
- 方式2:使JUC包中的Condition的await()方法让线程等待,使用signal()方法唤醒线程
正常情况:
public class LockSupportDemo {
    public static void main(String[] args) {
        Lock lock = new ReentrantLock();
        Condition condition = lock.newCondition();

        new Thread(() -> {
            lock.lock();
            try {
                System.out.println(Thread.currentThread().getName() + "come in");
                condition.await();
                System.out.println(Thread.currentThread().getName() + "被唤醒");
            } catch (InterruptedException e) {
                throw new RuntimeException(e);
            } finally {
                lock.unlock();
            }

        }, "t1").start();

        try {
            TimeUnit.MILLISECONDS.sleep(1000);
        } catch (InterruptedException e) {
            throw new RuntimeException(e);
        }

        new Thread(() -> {
            lock.lock();
            try {
                condition.signal();
                System.out.println(Thread.currentThread().getName() + "发出通知");
            } finally {
                lock.unlock();
            }
        }, "t2").start();
    }
}
异常情况1 取消锁,直接使用await()和signal()
public class LockSupportDemo {
    public static void main(String[] args) {
        Lock lock = new ReentrantLock();
        Condition condition = lock.newCondition();

        new Thread(() -> {
//            lock.lock();
            try {
                System.out.println(Thread.currentThread().getName() + "come in");
                condition.await();
                System.out.println(Thread.currentThread().getName() + "被唤醒");
            } catch (InterruptedException e) {
                throw new RuntimeException(e);
            } finally {
//                lock.unlock();
            }

        }, "t1").start();

        try {
            TimeUnit.MILLISECONDS.sleep(1000);
        } catch (InterruptedException e) {
            throw new RuntimeException(e);
        }

        new Thread(() -> {
//            lock.lock();
            try {
                condition.signal();
                System.out.println(Thread.currentThread().getName() + "发出通知");
            } finally {
//                lock.unlock();
            }
        }, "t2").start();
    }
}
结果报错:
Exception in thread "t1" java.lang.IllegalMonitorStateException
Exception in thread "t2" java.lang.IllegalMonitorStateException

异常情况2 先signal()在await()
public class LockSupportDemo {
    public static void main(String[] args) {
        Lock lock = new ReentrantLock();
        Condition condition = lock.newCondition();

        new Thread(() -> {
            try {
                TimeUnit.MILLISECONDS.sleep(1000);
            } catch (InterruptedException e) {
                throw new RuntimeException(e);
            }
            lock.lock();
            try {
                System.out.println(Thread.currentThread().getName() + "come in");
                condition.await();
                System.out.println(Thread.currentThread().getName() + "被唤醒");
            } catch (InterruptedException e) {
                throw new RuntimeException(e);
            } finally {
                lock.unlock();
            }

        }, "t1").start();

        new Thread(() -> {
            lock.lock();
            try {
                condition.signal();
                System.out.println(Thread.currentThread().getName() + "发出通知");
            } finally {
                lock.unlock();
            }
        }, "t2").start();
    }
}
无报错,但是程序没办法正常退出直接卡死,
**结论:**上面两种方法线程先要获取并持有锁,必须在锁块(synchronized或者lock)中,必须要先等待后唤醒,线程才能够被唤醒。
- 方式3: LockSupport类可以阻塞当前线程以唤醒指定被阻塞的线程
- 通过park()和unpark(Thread)方法来实现阻塞和唤醒线程的操作
- LockSupport类使用了一种叫Permit(许可)的概率来做到阻塞和唤醒线程的功能,每个线程都有一个许可。(与Semaphore)不同的是,许可的累加上限是1)
正常情况:
public class LockSupportDemo {
    public static void main(String[] args) {

        Thread t1 = new Thread(() -> {
            System.out.println(Thread.currentThread().getName() + "come in");
            LockSupport.park();
            System.out.println(Thread.currentThread().getName() + "被唤醒");

        }, "t1");
        t1.start();
        new Thread(() -> {
            try {
                TimeUnit.MILLISECONDS.sleep(1000);
            } catch (InterruptedException e) {
                throw new RuntimeException(e);
            }
            LockSupport.unpark(t1);
            System.out.println(Thread.currentThread().getName() + "发出通知");
        }, "t2").start();
    }
}
先唤醒后等待
public class LockSupportDemo {
    public static void main(String[] args) {

        Thread t1 = new Thread(() -> {
            try {
                TimeUnit.MILLISECONDS.sleep(1000);
            } catch (InterruptedException e) {
                throw new RuntimeException(e);
            }
            System.out.println(Thread.currentThread().getName() + "come in");
            LockSupport.park();
            System.out.println(Thread.currentThread().getName() + "被唤醒");

        }, "t1");
        t1.start();
        new Thread(() -> {

            LockSupport.unpark(t1);
            System.out.println(Thread.currentThread().getName() + "发出通知");
        }, "t2").start();
    }
}
结论: 正常+无锁块要求,之前错误的先唤醒后等待,LockSupport照样支持, 都必须要成双成对
问题:
- 为什么可以突破wait/natify原有调用顺序
- 因为unpark获得了一个凭证,之后在调用park方法,就可以名正言顺的凭证消费,所以不会阻塞
- 为什么唤醒两次后阻塞两次,但是最终结果还是会阻塞线程呢
- 现在凭证的数量最多为1,连续调用两次unpark和调用一个unpark效果一样,只会整加一个凭证;
- 而调用两次park缺需要消费两个凭证,证不够,不能放行
7. volatile 禁止重排序(后续补充)
8. 原子类
1. 基本类型原子类
- AtomicInteger
- AtomicBoolean
- AtomicLong
case:
ublic class AtomicIntegerDemo {

    public static final int SIZE = 50;

    public static void main(String[] args) throws InterruptedException {

        MyNumber myNumber = new MyNumber();
        CountDownLatch countDownLatch = new CountDownLatch(SIZE);
        for (int i = 0; i < SIZE; i++) {
            new Thread(() -> {
                try {
                    for (int j = 1; j <= 1000; j++) {
                        myNumber.addPlusPlus();
                    }
                } finally {
                    countDownLatch.countDown();
                }

            }).start();
        }
        countDownLatch.await();
        System.out.println(Thread.currentThread().getName() + "result :" + myNumber.atomicInteger.get());
    }
}
class MyNumber {
    AtomicInteger atomicInteger = new AtomicInteger();

    public void addPlusPlus() {
        atomicInteger.getAndIncrement();
    }
}
2. 数组类型原子类
- AtomicIntgerArray
- AtomicLongArray
- AtomicRefrenceArray
public class AtomicIntegerArrayDemo {

    public static void main(String[] args) {
        //AtomicIntegerArray atomicIntegerArray = new AtomicIntegerArray(new int[5]);
        //AtomicIntegerArray atomicIntegerArray = new AtomicIntegerArray(5);
        AtomicIntegerArray atomicIntegerArray = new AtomicIntegerArray(new int[]{1, 2, 3, 4, 5});

        for (int i = 0; i < atomicIntegerArray.length(); i++) {
            System.out.println(atomicIntegerArray.get(i));
        }

        int tempInt = 0;

        tempInt = atomicIntegerArray.getAndSet(0, 11112);
        System.out.println(tempInt + "\t" + atomicIntegerArray.get(0));

        tempInt = atomicIntegerArray.getAndIncrement(0);
        System.out.println(tempInt + "\t" + atomicIntegerArray.get(0));
    }
}
3. 引用类型的原子类
-
AtomicRefrence
-
AtomicStampedReference
- 写单版本号的引用类型原子类,可以解决ABA问题
- 解决修改过几次
- 状态戳原子引用 ABADemo
-
AtomicMarkableReference
- 原子更新带有标记位的引用类型对象
- 解决是否被修改过,
- 他的定义就是将状态戳简化位true|false
- 类似于一次性筷子
- 状态戳(true|false)原子引用
public class AtomicMarkAbleReferenceDemo {

    static AtomicMarkableReference<Integer> atomicMarkableReference = new AtomicMarkableReference<>(100, false);

    public static void main(String[] args) {
        new Thread(() -> {
            boolean marked = atomicMarkableReference.isMarked();
            System.out.println("t1默认标识位置:" + marked);
            try {
                TimeUnit.MILLISECONDS.sleep(1000);
            } catch (InterruptedException e) {
                throw new RuntimeException(e);
            }
            atomicMarkableReference.compareAndSet(100, 1000, marked, !marked);

        }, "t1").start();


        new Thread(() -> {
            boolean marked = atomicMarkableReference.isMarked();
            System.out.println("t2默认标识位置:" + marked);
            try {
                TimeUnit.MILLISECONDS.sleep(2000);
            } catch (InterruptedException e) {
                throw new RuntimeException(e);
            }
            boolean b = atomicMarkableReference.compareAndSet(100, 2000, marked, !marked);
            System.out.println("t2线程CASresult:" + b);
            System.out.println("t2:" + atomicMarkableReference.isMarked());
            System.out.println("t2:" + atomicMarkableReference.getReference());
        }, "t2").start();
    }
}
4. 对象的属性修改原子类
-
AtomicIntegerFieldUpdater 更新对象中int类型字段的值
-
AtomicLongFieldUpdater 更新对象中Long类型字段的值
-
AtomicReferenceFieldUpdater 更新引用类型字段的值
-
使用目的:
- 以一种线程安全的方式操作非线程安全对象内的某些字段
-
使用要求:
- 更新的对象属性必须 使用public volatile修饰符
- 因为对象的属性修改类型原子类都是抽象类,所以每次使用都必须使用静态方法newUpdater()创建一个更新器,并且需要设置想要更新的和属性。
/**
 * @author cyh
 * @Classname AtomicIntegerFieldUpdaterDemo
 * @Description TODO
 * @Version 1.0.0
 * @Date 2023/6/1 16:49
 * <p>
 * <p>
 * 需求:10个线程,每个线程转账1000,
 * 不使用synchronized ,尝试使用AtomicIntegerFieldUpdater
 **/
class BankAccount {
    String bankName = "CCB";
    public volatile int money = 0;

    // 使用synchronized 方法
//    public synchronized void add() {
//        money++;
//    }

    public void add() {
        money++;
    }

    AtomicIntegerFieldUpdater<BankAccount> updater = AtomicIntegerFieldUpdater.newUpdater(BankAccount.class, "money");

    // 不加synchronized
    public void transMoney(BankAccount account) {
        updater.getAndIncrement(account);
    }
}

public class AtomicIntegerFieldUpdaterDemo {
    public static void main(String[] args) throws InterruptedException {
        BankAccount bankAccount = new BankAccount();
        CountDownLatch countDownLatch = new CountDownLatch(10);

        for (int i = 1; i <= 10; i++) {
            new Thread(() -> {
                try {
                    for (int j = 1; j <= 1000; j++) {
//                        bankAccount.add();
                        bankAccount.transMoney(bankAccount);
                    }
                } finally {
                    countDownLatch.countDown();
                }
            }, "t" + i).start();
        }
        countDownLatch.await();

        System.out.println(Thread.currentThread().getName() + "\t" + "result:" + bankAccount.money);
    }
}

/**
 * @author cyh
 * @Classname AtomicRefrenceFieldUpdaterDemo
 * @Description TODO
 * @Version 1.0.0
 * @Date 2023/6/1 21:05
 * <p>
 * 需求:多线程并发调用一个类的初始化方法,如果未被初始化过,将执行初始化工作
 * 要求只能被初始化一次,只有一个线程操作成功
 **/

class MyVar {
    public volatile Boolean isInit = Boolean.FALSE;

    AtomicReferenceFieldUpdater<MyVar, Boolean> updater = AtomicReferenceFieldUpdater.newUpdater(MyVar.class, Boolean.class, "isInit");

    public void init(MyVar myVar) {
        if (updater.compareAndSet(myVar, Boolean.FALSE, Boolean.TRUE)) {
            System.out.println(Thread.currentThread().getName() + "\t" + "init");
            try {
                TimeUnit.MILLISECONDS.sleep(2000);
            } catch (InterruptedException e) {
                throw new RuntimeException(e);
            }
            System.out.println(Thread.currentThread().getName() + "\t" + "over");
        } else {
            System.out.println(Thread.currentThread().getName() + "\t" + "已经初始化完成");
        }
    }
}

public class AtomicReferenceFieldUpdaterDemo {
    public static void main(String[] args) {
        MyVar myVar = new MyVar();
        for (int i = 0; i <= 5; i++) {
            new Thread(() -> {
                myVar.init(myVar);
            }, "t" + i).start();
        }
    }
}
5. 原子操作增强类
- DoubleAccumulator
- DoubleAdder
- LongAccumulator
- LongAdder
- LongAdder只能用来计算加法,且从零开始计算
- LongAccumulator提供了自定义的函数操作
DEMO:
public class LongAdderDemo {

    public static void main(String[] args) {
        // 只能加减
        LongAdder longAdder = new LongAdder();// 初始化为0
        // 整加1
        longAdder.increment();
        // 添加给定值
        longAdder.add(6);
        // 或者结果
        System.out.println(longAdder.sum());

        // 传入在自定义操作,这里传入乘法 第二位参数代表x
        LongAccumulator accumulator = new LongAccumulator((x, y) -> x * y, 1);
        // 这里参数代表y
        accumulator.accumulate(5);

        System.out.println(accumulator.get());
    }
}
案例: 50个线程,100W次点赞
结论: LongAccumulator > LongAdder > AtomicLong > synchronized

class ClickNumber {
    int number = 0;

    public synchronized void clickBySynchronized() {
        number++;
    }

    AtomicLong atomicLong = new AtomicLong(0);

    public void clickByAtomicLong() {
        atomicLong.getAndIncrement();
    }

    LongAdder longAdder = new LongAdder();

    public void clickByLongAdder() {
        longAdder.increment();
    }

    LongAccumulator accumulator = new LongAccumulator(Long::sum, 0);

    public void clickByLongAccumulator() {
        accumulator.accumulate(1);
    }
}

public class AccumulatorCompareDemo {

    public static final int SIZE = 1000000;

    public static final int TREAD_SIZE = 50;

    public static void main(String[] args) throws InterruptedException {

        ClickNumber number = new ClickNumber();

        long startTime = 0;
        long endTime = 0;

        CountDownLatch latch1 = new CountDownLatch(TREAD_SIZE);
        CountDownLatch latch2 = new CountDownLatch(TREAD_SIZE);
        CountDownLatch latch3 = new CountDownLatch(TREAD_SIZE);
        CountDownLatch latch4 = new CountDownLatch(TREAD_SIZE);

        startTime = System.currentTimeMillis();
        for (int i = 0; i < TREAD_SIZE; i++) {
            new Thread(() -> {
                try {
                    for (int j = 0; j < SIZE; j++) {
                        number.clickBySynchronized();
                    }
                } finally {
                    latch1.countDown();
                }
            }, "t" + i).start();
        }
        latch1.await();
        endTime = System.currentTimeMillis();
        System.out.println("costTime: " + (endTime - startTime) + "毫秒" + "result:" + number.number);

        startTime = System.currentTimeMillis();
        for (int i = 0; i < TREAD_SIZE; i++) {
            new Thread(() -> {
                try {
                    for (int j = 0; j < SIZE; j++) {
                        number.clickByAtomicLong();
                    }
                } finally {
                    latch2.countDown();
                }
            }, "t" + i).start();
        }
        latch2.await();
        endTime = System.currentTimeMillis();
        System.out.println("costTime: " + (endTime - startTime) + "毫秒" + "result:" + number.atomicLong.get());

        startTime = System.currentTimeMillis();
        for (int i = 0; i < TREAD_SIZE; i++) {
            new Thread(() -> {
                try {
                    for (int j = 0; j < SIZE; j++) {
                        number.clickByLongAdder();
                    }
                } finally {
                    latch3.countDown();
                }
            }, "t" + i).start();
        }
        latch3.await();
        endTime = System.currentTimeMillis();
        System.out.println("costTime: " + (endTime - startTime) + "毫秒" + "result:" + number.longAdder.sum());

        startTime = System.currentTimeMillis();
        for (int i = 0; i < TREAD_SIZE; i++) {
            new Thread(() -> {
                try {
                    for (int j = 0; j < SIZE; j++) {
                        number.clickByLongAccumulator();
                    }
                } finally {
                    latch4.countDown();
                }
            }, "t" + i).start();
        }
        latch4.await();
        endTime = System.currentTimeMillis();
        System.out.println("costTime: " + (endTime - startTime) + "毫秒" + "result:" + number.accumulator.get());
    }
}
nally {
latch1.countDown();
}
}, “t” + i).start();
}
latch1.await();
endTime = System.currentTimeMillis();
System.out.println("costTime: " + (endTime - startTime) + “毫秒” + “result:” + number.number);
    startTime = System.currentTimeMillis();
    for (int i = 0; i < TREAD_SIZE; i++) {
        new Thread(() -> {
            try {
                for (int j = 0; j < SIZE; j++) {
                    number.clickByAtomicLong();
                }
            } finally {
                latch2.countDown();
            }
        }, "t" + i).start();
    }
    latch2.await();
    endTime = System.currentTimeMillis();
    System.out.println("costTime: " + (endTime - startTime) + "毫秒" + "result:" + number.atomicLong.get());

    startTime = System.currentTimeMillis();
    for (int i = 0; i < TREAD_SIZE; i++) {
        new Thread(() -> {
            try {
                for (int j = 0; j < SIZE; j++) {
                    number.clickByLongAdder();
                }
            } finally {
                latch3.countDown();
            }
        }, "t" + i).start();
    }
    latch3.await();
    endTime = System.currentTimeMillis();
    System.out.println("costTime: " + (endTime - startTime) + "毫秒" + "result:" + number.longAdder.sum());

    startTime = System.currentTimeMillis();
    for (int i = 0; i < TREAD_SIZE; i++) {
        new Thread(() -> {
            try {
                for (int j = 0; j < SIZE; j++) {
                    number.clickByLongAccumulator();
                }
            } finally {
                latch4.countDown();
            }
        }, "t" + i).start();
    }
    latch4.await();
    endTime = System.currentTimeMillis();
    System.out.println("costTime: " + (endTime - startTime) + "毫秒" + "result:" + number.accumulator.get());
}
}
