目录
1.博客自动化测试用例
2.准备工作
3.将手工测试用例转化为自动化测试用例
3.1 初始化动作
3.2 登录
3.3 博客列表博客数量
3.4 查看全文
3.5 写博客&发表博客
3.6 删除
3.7 注销
4.总代码
🌈这节文章我们讲解一个实战项目——博客系统。首先我们需要熟悉项目、针对核心流程设计测试用例(手工测试用例)、将手工测试用例转换成自动化测试、部署
1.博客自动化测试用例

2.准备工作
1️⃣首先需要创建一个 maven 项目
2️⃣接下来引入依赖:selenium、commons-io、junit、suite、engine;记得放在标签 dependencies 里面
<!-- https://mvnrepository.com/artifact/org.seleniumhq.selenium/selenium-java -->
<dependency>
    <groupId>org.seleniumhq.selenium</groupId>
    <artifactId>selenium-java</artifactId>
    <version>3.141.59</version>
</dependency>
    <dependency>
    <groupId>commons-io</groupId>
    <artifactId>commons-io</artifactId>
    <version>2.11.0</version>
</dependency>
<!-- https://mvnrepository.com/artifact/org.junit.jupiter/junit-jupiter-params -->
<dependency>
    <groupId>org.junit.jupiter</groupId>
    <artifactId>junit-jupiter-params</artifactId>
    <version>5.9.2</version>
</dependency>
<!-- https://mvnrepository.com/artifact/org.junit.platform/junit-platform-suite -->
<dependency>
    <groupId>org.junit.platform</groupId>
    <artifactId>junit-platform-suite</artifactId>
    <version>1.9.1</version>
</dependency>
<!-- https://mvnrepository.com/artifact/org.junit.jupiter/junit-jupiter-engine -->
<dependency>
    <groupId>org.junit.jupiter</groupId>
    <artifactId>junit-jupiter-engine</artifactId>
    <version>5.9.1</version>
</dependency>
3.将手工测试用例转化为自动化测试用例
3.1 初始化动作
1️⃣在 java 文件下创建一个 Blog 包(进行初始化):创建 InitAndEnd.java 文件
在初始化当中,首先我们创建一个驱动,并且使用一个注释 @BeforeAll 打开浏览器;使用 @AfterAll 关闭浏览器
InitAndEnd.java 代码:
package Blog;
import org.junit.jupiter.api.AfterAll;
import org.junit.jupiter.api.BeforeAll;
import org.openqa.selenium.WebDriver;
import org.openqa.selenium.chrome.ChromeDriver;
public class InitAndEnd {
//创建驱动
static WebDriver webDriver;
//初始化
@BeforeAll
static void SetUp() {
//打开浏览器
webDriver = new ChromeDriver();
}
//关闭浏览器
@AfterAll
static void TearDown() {
webDriver.quit();
}
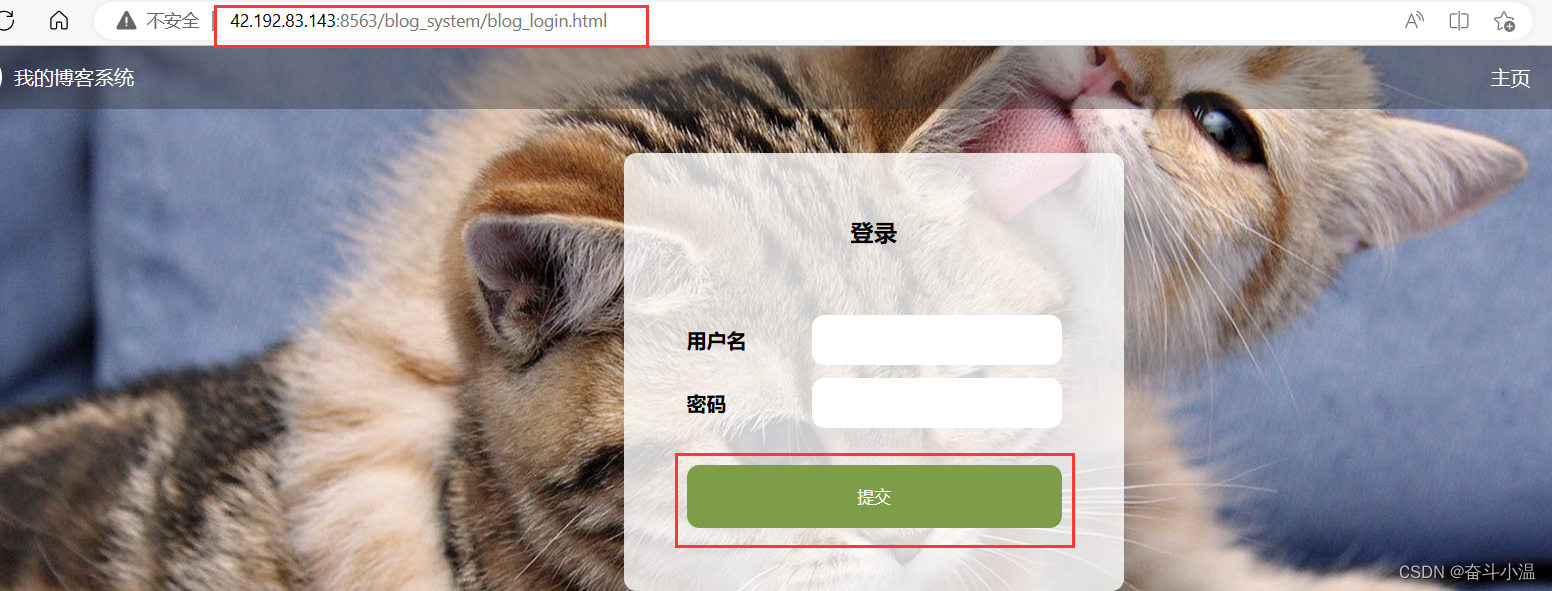
}3.2 登录

1️⃣在Blog 包下进行测试:创建 BlogCases.java 文件
2️⃣在 resources 下创建 LoginSuccess.csv
登录页面的测试用例:
- 打开登录页面
- 输入账号 admin:我们通过 css 选择器寻找用户名的 id 元素
- 输入密码 123:在这里我们继续通过 css 选择器寻找密码框的 id 元素
- 点击提交按钮:通过 css 选择器提交按钮的 id 元素
- 跳转到列表页面:获取当前页面的 url 如果 url 与 登陆页面的地址相同,那么测试用例通过,否则测试用例不通过
- 列表页展示用户信息是 admin:同样的测试方式用户名是 admin ,测试通过,否则测试不通过
在这里每一步操作我们进行一个显式等待:webDriver.manage().timeouts().implicitlyWait(3, TimeUnit.SECONDS);
LoginSuccess.csv 代码:
admin, 123, http://42.192.83.143:8563/blog_system/blog_list.htmlBlogCases.java 代码:
package Blog;
import org.junit.jupiter.api.Assertions;
import org.junit.jupiter.api.Test;
import org.junit.jupiter.params.ParameterizedTest;
import org.junit.jupiter.params.provider.CsvFileSource;
import org.junit.jupiter.params.provider.ValueSource;
import org.openqa.selenium.By;
import java.util.concurrent.TimeUnit;
import static java.lang.Thread.sleep;

//继承  InitAndEnd,让每个测试用例有驱动
public class BlogCases extends InitAndEnd{
    //第一个测试用例:登录
    /**
     * 输入正确的账号密码,登录成功
     */
    @ParameterizedTest
    @CsvFileSource(resources = "LoginSuccess.csv")
    void LoginSuccess(String username, String password, String blog_list_url) {
        //1.打开登陆页面
        webDriver.get("http://42.192.83.143:8563/blog_system/blog_login.html");
        webDriver.manage().timeouts().implicitlyWait(3, TimeUnit.SECONDS);//显式等待
        //2.输入账号admin——通过css选择器找用户名框的id元素
        webDriver.findElement(By.cssSelector("#username")).sendKeys(username);
        webDriver.manage().timeouts().implicitlyWait(3, TimeUnit.SECONDS);//显式等待
        //3.输入密码123——通过css选择器寻找密码框的id元素
        webDriver.findElement(By.cssSelector("#password")).sendKeys(password);
        webDriver.manage().timeouts().implicitlyWait(3, TimeUnit.SECONDS);//显式等待
        //4.点击提交按钮——通过css选择器寻找提交按钮的id元素
        webDriver.findElement(By.cssSelector("#submit")).click();
        webDriver.manage().timeouts().implicitlyWait(3, TimeUnit.SECONDS);//显式等待

        //5.跳转到列表页
        //获取当前页面的url
        String cur_url = webDriver.getCurrentUrl();
        //如果 url = http://42.192.83.143:8563/blog_system/blog_list.html,测试通过;否则测试不通过
        Assertions.assertEquals(blog_list_url, cur_url);
        webDriver.manage().timeouts().implicitlyWait(3, TimeUnit.SECONDS);//显式等待

        //6.列表页展示用户信息是admin
        //用户名是 admit 测试通过,否则测试不通过——通过css选择器获取admin元素
        String cur_admin = webDriver.findElement(By.cssSelector("body > div.container > div.left > div > h3")).getText();
        Assertions.assertEquals(username, cur_admin);
    }
}
3.3 博客列表博客数量
博客列表博客数量测试用例:
- 打开博客列表页
- 获取页面上所有博客标题对应的元素:注意找的是一批元素,使用 findElements 获取
- 如果元素数量不为0,测试通过
此时我们在 BlogCases.java 文件中继续编写代码
BlogCases.java 代码:
package Blog;
import org.junit.jupiter.api.Assertions;
import org.junit.jupiter.api.Test;
import org.junit.jupiter.params.ParameterizedTest;
import org.junit.jupiter.params.provider.CsvFileSource;
import org.junit.jupiter.params.provider.ValueSource;
import org.openqa.selenium.By;
import java.util.concurrent.TimeUnit;
import static java.lang.Thread.sleep;

//继承  InitAndEnd,让每个测试用例有驱动
public class BlogCases extends InitAndEnd{
    //第一个测试用例:登录
    /**
     * 输入正确的账号密码,登录成功
     */
    @ParameterizedTest
    @CsvFileSource(resources = "LoginSuccess.csv")
    void LoginSuccess(String username, String password, String blog_list_url) {
        //1.打开登陆页面
        webDriver.get("http://42.192.83.143:8563/blog_system/blog_login.html");
        webDriver.manage().timeouts().implicitlyWait(3, TimeUnit.SECONDS);//显式等待
        //2.输入账号admin——通过css选择器找用户名框的id元素
        webDriver.findElement(By.cssSelector("#username")).sendKeys(username);
        webDriver.manage().timeouts().implicitlyWait(3, TimeUnit.SECONDS);//显式等待
        //3.输入密码123——通过css选择器寻找密码框的id元素
        webDriver.findElement(By.cssSelector("#password")).sendKeys(password);
        webDriver.manage().timeouts().implicitlyWait(3, TimeUnit.SECONDS);//显式等待
        //4.点击提交按钮——通过css选择器寻找提交按钮的id元素
        webDriver.findElement(By.cssSelector("#submit")).click();
        webDriver.manage().timeouts().implicitlyWait(3, TimeUnit.SECONDS);//显式等待

        //5.跳转到列表页
        //获取当前页面的url
        String cur_url = webDriver.getCurrentUrl();
        //如果 url = http://42.192.83.143:8563/blog_system/blog_list.html,测试通过;否则测试不通过
        Assertions.assertEquals(blog_list_url, cur_url);
        webDriver.manage().timeouts().implicitlyWait(3, TimeUnit.SECONDS);//显式等待

        //6.列表页展示用户信息是admin
        //用户名是 admit 测试通过,否则测试不通过——通过css选择器获取admin元素
        String cur_admin = webDriver.findElement(By.cssSelector("body > div.container > div.left > div > h3")).getText();
        Assertions.assertEquals(username, cur_admin);
    }


    /**
     * 博客列表博客数量
     */
    @Test
    void BlogList() {
        //1.打开博客列表页
        webDriver.get("http://42.192.83.143:8563/blog_system/blog_list.html");
        //2.获取页面上所有博客标题对应的元素——找的是一批元素,所以是 findElements
        webDriver.manage().timeouts().implicitlyWait(3, TimeUnit.SECONDS);//显式等待
        int title_num = webDriver.findElements(By.cssSelector(".title")).size();
        //如果元素数量不为0,测试通过(断言)
        Assertions.assertNotEquals(0, title_num);
    }
}
3.4 查看全文

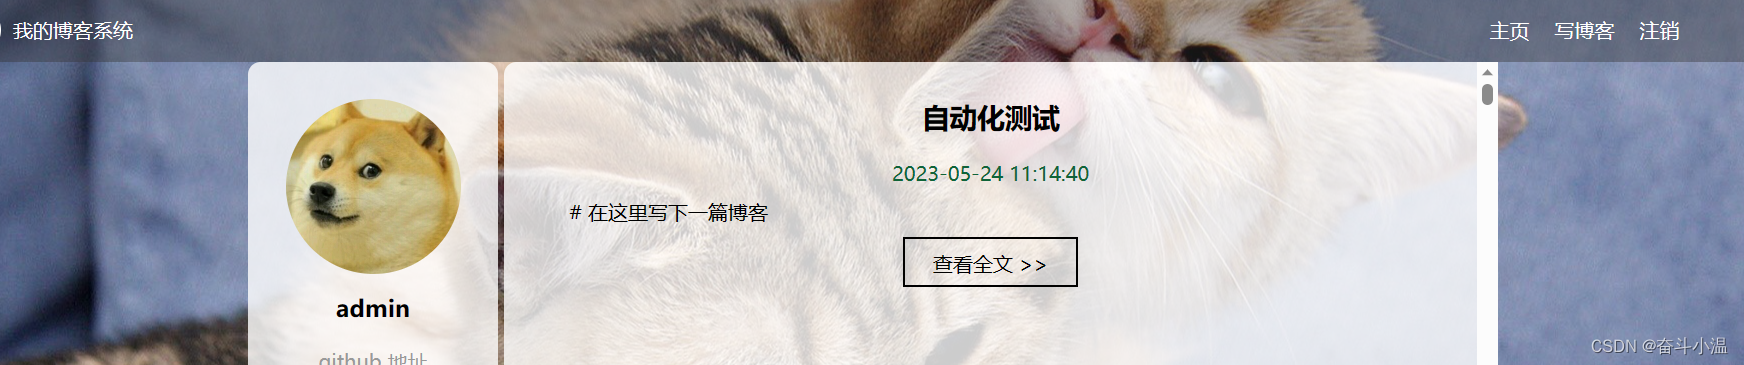
查看全文测试用例:
- 找到第一篇博客对应的查看全文按钮:使用xpath 定位
- 获取当前页面的 url
- 获取当前页面的 title
- 获取博客标题:使用css 选择器
- 检验(断言)
在这里我们使用 顺序执行:@TestMethodOrder(MethodOrderer.OrderAnnotation.class)
此时我们在 BlogCases.java 文件中继续编写代码
BlogCases.java 代码:
package Blog;
import org.junit.jupiter.api.*;
import org.junit.jupiter.params.ParameterizedTest;
import org.junit.jupiter.params.provider.Arguments;
import org.junit.jupiter.params.provider.CsvFileSource;
import org.junit.jupiter.params.provider.MethodSource;
import org.openqa.selenium.By;
import java.util.concurrent.TimeUnit;
import java.util.stream.Stream;
import static java.lang.Thread.sleep;

@TestMethodOrder(MethodOrderer.OrderAnnotation.class)
//继承  InitAndEnd,让每个测试用例有驱动
public class BlogCases extends InitAndEnd{
    //第一个测试用例:登录
    /**
     * 输入正确的账号密码,登录成功
     */
    @Order(1)
    @ParameterizedTest
    @CsvFileSource(resources = "LoginSuccess.csv")
    void LoginSuccess(String username, String password, String blog_list_url) {
        //1.打开登陆页面
        webDriver.get("http://42.192.83.143:8563/blog_system/blog_login.html");
        webDriver.manage().timeouts().implicitlyWait(3, TimeUnit.SECONDS);//显式等待
        //2.输入账号admin——通过css选择器找用户名框的id元素
        webDriver.findElement(By.cssSelector("#username")).sendKeys(username);
        webDriver.manage().timeouts().implicitlyWait(3, TimeUnit.SECONDS);//显式等待
        //3.输入密码123——通过css选择器寻找密码框的id元素
        webDriver.findElement(By.cssSelector("#password")).sendKeys(password);
        webDriver.manage().timeouts().implicitlyWait(3, TimeUnit.SECONDS);//显式等待
        //4.点击提交按钮——通过css选择器寻找提交按钮的id元素
        webDriver.findElement(By.cssSelector("#submit")).click();
        webDriver.manage().timeouts().implicitlyWait(3, TimeUnit.SECONDS);//显式等待

        //5.跳转到列表页
        //获取当前页面的url
        String cur_url = webDriver.getCurrentUrl();
        //如果 url = http://42.192.83.143:8563/blog_system/blog_list.html,测试通过;否则测试不通过
        Assertions.assertEquals(blog_list_url, cur_url);
        webDriver.manage().timeouts().implicitlyWait(3, TimeUnit.SECONDS);//显式等待

        //6.列表页展示用户信息是admin
        //用户名是 admit 测试通过,否则测试不通过——通过css选择器获取admin元素
        String cur_admin = webDriver.findElement(By.cssSelector("body > div.container > div.left > div > h3")).getText();
        Assertions.assertEquals(username, cur_admin);
    }


    /**
     * 博客列表博客数量
     */
    @Order(2)
    @Test
    void BlogList() {
        //1.打开博客列表页
        webDriver.get("http://42.192.83.143:8563/blog_system/blog_list.html");
        //2.获取页面上所有博客标题对应的元素——找的是一批元素,所以是 findElements
        webDriver.manage().timeouts().implicitlyWait(3, TimeUnit.SECONDS);//显式等待
        int title_num = webDriver.findElements(By.cssSelector(".title")).size();
        //如果元素数量不为0,测试通过(断言)
        Assertions.assertNotEquals(0, title_num);
    }


    /**
     * 博客详情页校验
     * url
     * 博客标题
     * 页面 title 是博客详情页
     */
    @Order(4)
    @ParameterizedTest
    @MethodSource("Generator")
    void BlogDetail(String expected_url, String expected_title, String expected_blog_title) {
        //1.找到第一篇博客对应的查看全文按钮——xpath 定位
        webDriver.manage().timeouts().implicitlyWait(3, TimeUnit.SECONDS);//显式等待
        webDriver.findElement(By.xpath("/html/body/div[2]/div[2]/div[1]/a")).click();
        //2.获取当前页面的 url
        webDriver.manage().timeouts().implicitlyWait(3, TimeUnit.SECONDS);//显式等待
        String cur_url = webDriver.getCurrentUrl();
        //3.获取当前页面的 title
        webDriver.manage().timeouts().implicitlyWait(3, TimeUnit.SECONDS);//显式等待
        String cur_title = webDriver.getTitle();
        //4.获取博客标题——css 选择器
        webDriver.manage().timeouts().implicitlyWait(3, TimeUnit.SECONDS);//显式等待
        String cur_blog_title = webDriver.findElement(By.cssSelector("body > div.container > div.right > div > h3")).getText();
        //5.检验(断言)
        webDriver.manage().timeouts().implicitlyWait(3, TimeUnit.SECONDS);//显式等待
        Assertions.assertEquals(expected_url, cur_url);
        Assertions.assertEquals(expected_title, cur_title);
        Assertions.assertEquals(expected_blog_title, cur_blog_title);

    }

    public static Stream<Arguments> Generator() {
        return Stream.of(Arguments.arguments("http://42.192.83.143:8563/blog_system/blog_detail.html",
                "博客详情页", "自动化测试"));
    }
}
3.5 写博客&发表博客

    /**
     * 写博客
     */
    @Order(3)
    @Test
    void EditBlog() throws InterruptedException {
        //1.找到写博客按钮并点击——css选择器
        webDriver.findElement(By.cssSelector("body > div.nav > a:nth-child(5)")).click();
        webDriver.manage().timeouts().implicitlyWait(3, TimeUnit.SECONDS);//显式等待
        //2.通过 Js 将标题进行输入
        ((JavascriptExecutor)webDriver).executeScript("document.getElementById(\"title\").value=\"自动化测试\"");
        sleep(3000);
        webDriver.findElement(By.cssSelector("title"));
        //3.点击发布
        webDriver.findElement(By.cssSelector("#submit")).click();
        sleep(3000);
        //4.获取当前页面的 url
        String cur_url = webDriver.getCurrentUrl();
        Assertions.assertEquals("http://42.192.83.143:8563/blog_system/blog_list.html", cur_url);
    }

    /**
     * 检验已发布博客标题
     * 校验已发布博客时间
     */
    @Order(5)
    @Test
    void BlogInfoChecked() {
        //1.打开博客列表页
        webDriver.get("http://42.192.83.143:8563/blog_system/blog_list.html");
        //2.获取第一篇博客标题
        String first_blog_title =
                webDriver.findElement(By.cssSelector("body > div.container > div.right > div:nth-child(1) > div.title")).getText();
        //3. 获取第一篇博客发表时间
        String first_blog_time = webDriver.findElement(By.xpath("/html/body/div[2]/div[2]/div[1]/div[2]")).getText();
        //4.校验博客标题是不是自动化测试
        Assertions.assertEquals("自动化测试", first_blog_title);
        //5.如果时间是 2023-05-31 发布的,测试通过
        if (first_blog_title.contains("2023-05-31")) {
            System.out.println("测试通过");
        } else {
            System.out.println("当前时间是:" + first_blog_time);
            System.out.println("测试不通过");
        }
    }
3.6 删除
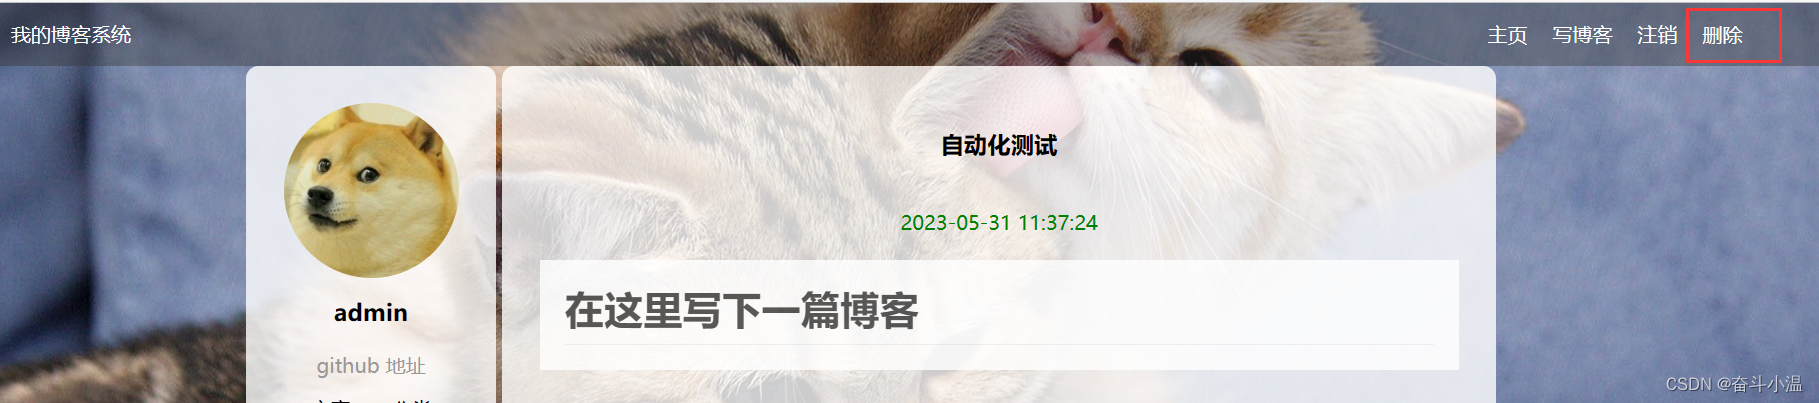
    /**
     *
     * 删除和刚才发布的博客
     */
    @Order(6)
    @Test
    void DeleteBlog() throws InterruptedException {
        // 1.打开博客列表页面
        webDriver.get("http://42.192.83.143:8563/blog_system/blog_list.html");
        // 2.点击全文按钮
        webDriver.manage().timeouts().implicitlyWait(3, TimeUnit.SECONDS);
        webDriver.findElement(By.cssSelector("body > div.container > div.right > div:nth-child(1) > a")).click();
        // 3.点击删除按钮
        webDriver.manage().timeouts().implicitlyWait(3, TimeUnit.SECONDS);
        webDriver.findElement(By.cssSelector("body > div.nav > a:nth-child(7)")).click();
        sleep(3000);
        // 4.博客列表页第一篇博客标题不是“自动化测试”
        String first_blog_title = webDriver.findElement(By.xpath("/html/body/div[2]/div[2]/div[1]/div[1]")).getText();
        // 5.校验当前博客标题不等于“自动化测试”
        webDriver.manage().timeouts().implicitlyWait(3, TimeUnit.SECONDS);
        Assertions.assertNotEquals(first_blog_title, "自动测试");
    }
3.7 注销

注销验证包含:当前页面的 url 和 提交按钮
    /**
     * 注销
     */
    @Order(7)
    @Test
    void Logout() {
        //1.找到注销按钮
        webDriver.manage().timeouts().implicitlyWait(3, TimeUnit.SECONDS);
        webDriver.findElement(By.cssSelector("body > div.nav > a:nth-child(6)")).click();
        //2.校验 url(登录的 url)
        webDriver.manage().timeouts().implicitlyWait(3, TimeUnit.SECONDS);
        String cur_url = webDriver.getCurrentUrl();
        Assertions.assertEquals("http://42.192.83.143:8563/blog_system/blog_login.html", cur_url);
        //3.检验提交按钮
        WebElement webElement = webDriver.findElement(By.cssSelector("#submit"));
        Assertions.assertNotNull(webElement);
    }
4.总代码
pom.xml:
<?xml version="1.0" encoding="UTF-8"?>
<project xmlns="http://maven.apache.org/POM/4.0.0"
         xmlns:xsi="http://www.w3.org/2001/XMLSchema-instance"
         xsi:schemaLocation="http://maven.apache.org/POM/4.0.0 http://maven.apache.org/xsd/maven-4.0.0.xsd">
    <modelVersion>4.0.0</modelVersion>

    <groupId>org.example</groupId>
    <artifactId>blogging</artifactId>
    <version>1.0-SNAPSHOT</version>

    <dependencies>
        <!-- https://mvnrepository.com/artifact/org.seleniumhq.selenium/selenium-java -->
        <dependency>
            <groupId>org.seleniumhq.selenium</groupId>
            <artifactId>selenium-java</artifactId>
            <version>3.141.59</version>
        </dependency>
        <dependency>
            <groupId>commons-io</groupId>
            <artifactId>commons-io</artifactId>
            <version>2.11.0</version>
        </dependency>
        <!-- https://mvnrepository.com/artifact/org.junit.jupiter/junit-jupiter-params -->
        <dependency>
            <groupId>org.junit.jupiter</groupId>
            <artifactId>junit-jupiter-params</artifactId>
            <version>5.9.2</version>
        </dependency>
        <!-- https://mvnrepository.com/artifact/org.junit.platform/junit-platform-suite -->
        <dependency>
            <groupId>org.junit.platform</groupId>
            <artifactId>junit-platform-suite</artifactId>
            <version>1.9.1</version>
        </dependency>
        <!-- https://mvnrepository.com/artifact/org.junit.jupiter/junit-jupiter-engine -->
        <dependency>
            <groupId>org.junit.jupiter</groupId>
            <artifactId>junit-jupiter-engine</artifactId>
            <version>5.9.1</version>
        </dependency>
    </dependencies>
    <properties>
        <maven.compiler.source>8</maven.compiler.source>
        <maven.compiler.target>8</maven.compiler.target>
    </properties>

</project>
LoginSuccess.csv:
admin,123,http://42.192.83.143:8563/blog_system/blog_list.htmlInitAndEnd.java:
package Blog;
import org.junit.jupiter.api.AfterAll;
import org.junit.jupiter.api.BeforeAll;
import org.openqa.selenium.WebDriver;
import org.openqa.selenium.chrome.ChromeDriver;
public class InitAndEnd {
    //创建驱动
    static WebDriver webDriver;
    //初始化
    @BeforeAll
    static void SetUp() {
        //打开浏览器
        webDriver = new ChromeDriver();
    }

    //关闭浏览器
    @AfterAll
    static void TearDown() {
        webDriver.quit();
    }
}
BlogCases.java:
package Blog;
import org.junit.jupiter.api.*;
import org.junit.jupiter.params.ParameterizedTest;
import org.junit.jupiter.params.provider.Arguments;
import org.junit.jupiter.params.provider.CsvFileSource;
import org.junit.jupiter.params.provider.MethodSource;
import org.openqa.selenium.By;
import org.openqa.selenium.JavascriptExecutor;
import org.openqa.selenium.WebElement;
import java.util.concurrent.TimeUnit;
import java.util.stream.Stream;
import static java.lang.Thread.sleep;
@TestMethodOrder(MethodOrderer.OrderAnnotation.class)

//继承  InitAndEnd,让每个测试用例有驱动
public class BlogCases extends InitAndEnd{
    //第一个测试用例:登录
    /**
     * 输入正确的账号密码,登录成功
     */
    @Order(1)
    @ParameterizedTest
    @CsvFileSource(resources = "LoginSuccess.csv")
    void LoginSuccess(String username, String password, String blog_list_url) {
        //1.打开登陆页面
        webDriver.get("http://42.192.83.143:8563/blog_system/blog_login.html");
        webDriver.manage().timeouts().implicitlyWait(3, TimeUnit.SECONDS);//显式等待
        //2.输入账号admin——通过css选择器找用户名框的id元素
        webDriver.findElement(By.cssSelector("#username")).sendKeys(username);
        webDriver.manage().timeouts().implicitlyWait(3, TimeUnit.SECONDS);//显式等待
        //3.输入密码123——通过css选择器寻找密码框的id元素
        webDriver.findElement(By.cssSelector("#password")).sendKeys(password);
        webDriver.manage().timeouts().implicitlyWait(3, TimeUnit.SECONDS);//显式等待
        //4.点击提交按钮——通过css选择器寻找提交按钮的id元素
        webDriver.findElement(By.cssSelector("#submit")).click();
        webDriver.manage().timeouts().implicitlyWait(3, TimeUnit.SECONDS);//显式等待

        //5.跳转到列表页
        //获取当前页面的url
        String cur_url = webDriver.getCurrentUrl();
        //如果 url = http://42.192.83.143:8563/blog_system/blog_list.html,测试通过;否则测试不通过
        Assertions.assertEquals(blog_list_url, cur_url);
        webDriver.manage().timeouts().implicitlyWait(3, TimeUnit.SECONDS);//显式等待

        //6.列表页展示用户信息是admin
        //用户名是 admit 测试通过,否则测试不通过——通过css选择器获取admin元素
        String cur_admin = webDriver.findElement(By.cssSelector("body > div.container > div.left > div > h3")).getText();
        Assertions.assertEquals(username, cur_admin);
    }


    /**
     * 博客列表博客数量
     */
    @Order(2)
    @Test
    void BlogList() {
        //1.打开博客列表页
        webDriver.get("http://42.192.83.143:8563/blog_system/blog_list.html");
        //2.获取页面上所有博客标题对应的元素——找的是一批元素,所以是 findElements
        webDriver.manage().timeouts().implicitlyWait(3, TimeUnit.SECONDS);//显式等待
        int title_num = webDriver.findElements(By.cssSelector(".title")).size();
        //如果元素数量不为0,测试通过(断言)
        Assertions.assertNotEquals(0, title_num);
    }


    /**
     * 博客详情页校验
     * url
     * 博客标题
     * 页面 title 是博客详情页
     */
    @Order(4)
    @ParameterizedTest
    @MethodSource("Generator")
    void BlogDetail(String expected_url, String expected_title, String expected_blog_title) {
        //1.找到第一篇博客对应的查看全文按钮——xpath 定位
        webDriver.manage().timeouts().implicitlyWait(3, TimeUnit.SECONDS);//显式等待
        webDriver.findElement(By.xpath("/html/body/div[2]/div[2]/div[1]/a")).click();
        //2.获取当前页面的 url
        webDriver.manage().timeouts().implicitlyWait(3, TimeUnit.SECONDS);//显式等待
        String cur_url = webDriver.getCurrentUrl();
        //3.获取当前页面的 title
        webDriver.manage().timeouts().implicitlyWait(3, TimeUnit.SECONDS);//显式等待
        String cur_title = webDriver.getTitle();
        //4.获取博客标题——css 选择器
        webDriver.manage().timeouts().implicitlyWait(3, TimeUnit.SECONDS);//显式等待
        String cur_blog_title = webDriver.findElement(By.cssSelector("body > div.container > div.right > div > h3")).getText();
        //5.检验(断言)
        webDriver.manage().timeouts().implicitlyWait(3, TimeUnit.SECONDS);//显式等待
        Assertions.assertEquals(expected_title, cur_title);
        Assertions.assertEquals(expected_blog_title, cur_blog_title);
        if (cur_url.contains(expected_blog_title)) {
            System.out.println("测试通过");
        } else {
            System.out.println(cur_url);
            System.out.println("测试不通过 ");
        }
    }

    public static Stream<Arguments> Generator() {
        return Stream.of(Arguments.arguments("http://42.192.83.143:8563/blog_system/blog_detail.html",
                "博客详情页", "自动化测试"));
    }

    /**
     * 写博客
     */
    @Order(3)
    @Test
    void EditBlog() throws InterruptedException {
        //1.找到写博客按钮并点击——css选择器
        webDriver.findElement(By.cssSelector("body > div.nav > a:nth-child(5)")).click();
        webDriver.manage().timeouts().implicitlyWait(3, TimeUnit.SECONDS);//显式等待
        //2.通过 Js 将标题进行输入
        ((JavascriptExecutor)webDriver).executeScript("document.getElementById(\"title\").value=\"自动化测试\"");
        sleep(3000);
        webDriver.findElement(By.cssSelector("title"));
        //3.点击发布
        webDriver.findElement(By.cssSelector("#submit")).click();
        sleep(3000);
        //4.获取当前页面的 url
        String cur_url = webDriver.getCurrentUrl();
        Assertions.assertEquals("http://42.192.83.143:8563/blog_system/blog_list.html", cur_url);
    }

    /**
     * 检验已发布博客标题
     * 校验已发布博客时间
     */
    @Order(5)
    @Test
    void BlogInfoChecked() {
        //1.打开博客列表页
        webDriver.get("http://42.192.83.143:8563/blog_system/blog_list.html");
        //2.获取第一篇博客标题
        String first_blog_title =
                webDriver.findElement(By.cssSelector("body > div.container > div.right > div:nth-child(1) > div.title")).getText();
        //3. 获取第一篇博客发表时间
        String first_blog_time = webDriver.findElement(By.xpath("/html/body/div[2]/div[2]/div[1]/div[2]")).getText();
        //4.校验博客标题是不是自动化测试
        Assertions.assertEquals("自动化测试", first_blog_title);
        //5.如果时间是 2023-05-31 发布的,测试通过
        if (first_blog_title.contains("2023-05-31")) {
            System.out.println("测试通过");
        } else {
            System.out.println("当前时间是:" + first_blog_time);
            System.out.println("测试不通过");
        }
    }

    /**
     *
     * 删除和刚才发布的博客
     */
    @Order(6)
    @Test
    void DeleteBlog() throws InterruptedException {
        // 1.打开博客列表页面
        webDriver.get("http://42.192.83.143:8563/blog_system/blog_list.html");
        // 2.点击全文按钮
        webDriver.manage().timeouts().implicitlyWait(3, TimeUnit.SECONDS);
        webDriver.findElement(By.cssSelector("body > div.container > div.right > div:nth-child(1) > a")).click();
        // 3.点击删除按钮
        webDriver.manage().timeouts().implicitlyWait(3, TimeUnit.SECONDS);
        webDriver.findElement(By.cssSelector("body > div.nav > a:nth-child(7)")).click();
        sleep(3000);
        // 4.博客列表页第一篇博客标题不是“自动化测试”
        String first_blog_title = webDriver.findElement(By.xpath("/html/body/div[2]/div[2]/div[1]/div[1]")).getText();
        // 5.校验当前博客标题不等于“自动化测试”
        webDriver.manage().timeouts().implicitlyWait(3, TimeUnit.SECONDS);
        Assertions.assertNotEquals(first_blog_title, "自动测试");
    }


    /**
     * 注销
     */
    @Order(7)
    @Test
    void Logout() {
        //1.找到注销按钮
        webDriver.manage().timeouts().implicitlyWait(3, TimeUnit.SECONDS);
        webDriver.findElement(By.cssSelector("body > div.nav > a:nth-child(6)")).click();
        //2.校验 url(登录的 url)
        webDriver.manage().timeouts().implicitlyWait(3, TimeUnit.SECONDS);
        String cur_url = webDriver.getCurrentUrl();
        Assertions.assertEquals("http://42.192.83.143:8563/blog_system/blog_login.html", cur_url);
        //3.检验提交按钮
        WebElement webElement = webDriver.findElement(By.cssSelector("#submit"));
        Assertions.assertNotNull(webElement);
    }
}