关于VUE3的一些基础知识点笔记
VUE3
vue2与vue3的一个重要区别是vue2是选项式API(composition API)而vue3是组合式API(option API)。
组合式API就是所有逻辑都在
setup函数中,使用ref、watch等函数来组织代码,而不像vue2中分别写在data、methods、watch等配置选项中。有可复用、易于维护等优点。
vue3的生命周期
与vue2对比:created钩子变成setup函数了,其他的都加了on
![[外链图片转存失败,源站可能有防盗链机制,建议将图片保存下来直接上传(img-Qv5xKhAR-1685463643360)(C:\Users\28132\AppData\Roaming\Typora\typora-user-images\1685460357487.png)]](https://img-blog.csdnimg.cn/d697321e79834c36a9d3bec159f921ba.png)
用的时候需要先导入函数
如:
<template>
  <div>生命周期函数</div>
</template>
<script setup>
  import { onMounted } from "vue";
  // 生命周期函数:组件渲染完毕
  onMounted(()=>{
    console.log('onMounted触发了')
  })

  onMounted(()=>{
    console.log('onMounted也触发了')
  })
</script>
1.setup函数
setup函数是Vue3特有的选项,作为组合式API的起点- 从组件生命周期看,它在
beforeCreate之前执行 - 函数中
this不是组件实例,是undefined,所有的vue3项目中几乎没有this,都是通过函数来获取 - 下面的例子可以先只看setup部分,15行的setup函数里面写的所有逻辑都需要用
return来返回出来才可以在模板中使用
<template>
  <div>
    {{ name }}
    num: {{ obj.num }}
    <br>ref: {{ refNum }}
    <br>
    refObj:{{ refObj.name }}
    <button @click="btn">按钮</button>
  </div>
</template>

<script >
import { reactive, ref } from 'vue'
export default {
  setup () {
    // 普通对象不是双向绑定
    let name = "嘻嘻嘻"
    // reactive将里面的数据变成响应式数据 ,注意要导入,一般解决复杂数据类型转换响应式数据
    const obj = reactive({
      num: 1
    })
    // ref 定义简单数据类型和复杂数据类型为响应式数据
    //  ref简单数据类型
    const refNum = ref(1)
    //  ref复杂数据类型
    const refObj = ref({ name: 'jack' })
    /**
     * 是对象建议用reactive 其他用ref
     */

    const btn = function () {
      obj.num++
      refNum.value++
    }
    return { name, obj, btn, refNum, refObj }
  },

}
</script>

<style>

</style>
setup语法糖的使用来简化代码
- 下面的写法是在script标签中写,定义的num可以直接使用
- 在
script setup中的顶层变量都可以在模板使用,数据,函数,组件。
<template>
  <div>
    {{ num }}
  </div>
</template>

<script lang="ts" setup>
let num = 1

</script>

<style>

</style>
2. reactive函数
reactive函数通常定义复杂类型的响应式数据,参数必须是对象或者数组,如果要让对象的某个元素实现响应式时比较麻烦。需要使用toRefs(后面会说)- reactive的响应式是深层次的,reactive方法内部是利用ES6的
Proxy API来实现的,底层本质是将传入的数据转换为Proxy对象
使用步骤:
- 从
vue中导出reactive函数 - 在
setup函数中,使用reactive函数,传入一个普通对象,返回一个响应式数据对象 - 最后
setup函数返回一个对象,包含该响应式对象即可,模板中可使用
<template>
  <div>
    <p>姓名:{{state.name}}</p>
    <p>年龄:{{state.age}}</p>
  </div>
</template>

<script>
// 1. 导入函数
import { reactive } from "vue";
export default {
  setup() {
    // 2. 创建响应式数据对象
    const state = reactive({ name: 'sunny', age: 24 })
    // 3. 返回数据
    return { state }
  }
};
</script>
toRefs函数 保持响应式
- 在使用reactive创建的响应式数据被展开或解构的时候使用toRefs保持响应式
<template>
  <div>
    这是vue3的框架!
    <br> obj: {{ name }}{{ age }}
    <br> <button @click="btn">变</button>
  </div>
</template>
<script setup>
import { reactive, toRefs } from "vue";
let obj = reactive({
  name: 'jack',
  age: 1
})
// obj是reactive的响应式数据,
// 使用了解构后就不是响应式的了
// 用toRefs转换成响应式数据
const { name, age } = toRefs(obj)

const btn = function () {
  name.value = 'rose',
    age.value++
}
</script>
<style>

</style>
3.ref 函数
3.1 ref定义数据
- ref通常用来定义响应式数据,不限类型
- ref响应式原理是依赖于
Object.defineProperty()的get()和set()的。 - ref参数一般接收简单数据类型,若ref接收对象为参数,本质上会转变为reactive方法,系统会自动根据我们给ref传入的值转换成ref(1)->reactive({value:1}) ,ref函数只能操作浅层次的数据,把基本数据类型当作自己的属性值;深层次依赖于reactive
使用步骤:
- 从
vue中导出ref函数 - 在
setup函数中,使用ref函数,传入普通数据(简单or复杂),返回一个响应式数据 - 最后
setup函数返回一个对象,包含该响应式数据即可 - 注意:在template中访问,系统会自动添加.value;在
js中需要手动.value
<template>
  <div>
    <p>
      计数器:{{ count }}
      <button @click="count++">累加1</button>
      <!-- template中使用可省略.value -->
      <button @click="increment">累加10</button>
    </p>
  </div>
</template>

<script>
// 1. 导入函数
import { ref } from "vue";
export default {
  setup() {
    // 2. 创建响应式数据对象
    const count = ref(0);
    const increment = () => {
      // js中使用需要.value
      count.value += 10;
    };
    // 3. 返回数据
    return { count, increment };
  },
};
</script>
- reactive与ref该如何选择?
如果能确定数据是对象且字段名称也确定,可使用
reactive转成响应式数据,其他一概使用ref。
ref使用起来有点麻烦呀,需要.value 增加代码量,所以确认是复杂数据类型咱就用reactive
3.2 ref 获取DOM元素
- 元素上使用 ref属性关联响应式数据,获取DOM元素
<script setup>
import { ref } from 'vue'
const hRef = ref(null)
//在onMounted钩子中来获取dom元素
onMounted(()=>{
    console.log(dom)
})

</script>

<template>
  <div>
    <h1 ref="dom">我是盒子</h1>
  </div>
</template>
3.3 ref操作组件-defineExpose
- 组件上使用 ref属性关联响应式数据,获取组件实例
- 使用
<script setup>的组件是默认关闭的,组件实例使用不到顶层的数据和函数。 - 需要配合
defineExpose暴露给组件实例使用,暴露的响应式数据会自动解除响应式。
子组件:将数据与方法暴露出去
<template>
  <div>
    <h1>son</h1>
  </div>
</template>
<script setup>

// 子向父传数据
let num = 1
let str = 'son'
const handle = function () {
  return '123son321'
}
// 要让父组件获取数据与方法,需要用defineExpose({})将数据暴露出去,参数是对象
defineExpose({ num, str, handle })
</script>
<style>

</style>
父组件:使用子组件暴露出来的方法与数据
<template>
  <div>
    这是父组件
    <Son ref="sonDom"></Son>
  </div>
</template>
<script setup>
import Son from './components/son.vue'
import { ref, onMounted } from "vue";
// 获取子组件的数据与方法
const sonDom = ref()
onMounted(() => {
  console.log(sonDom.value);
  console.log('Son的num值:', sonDom.value.num); //1
  console.log('Son的str值:', sonDom.value.str); //son
  console.log('Son的handle方法:', sonDom.value.handle()); //123son321
})
</script>
<style>

</style>
4. computed函数
- 定义计算属性
大致步骤:
- 从
vue中导出computed函数 - 在
setup函数中,使用computed函数,传入一个函数,函数返回计算好的数据 - 最后
setup函数返回一个对象,包含该计算属性数据即可,然后模板内使用
<template>
  <div>
    {{ total }}4111

  </div>
</template>
<script setup>
import { computed } from 'vue'
// 计算属性
let arr = [12, 45, 65, 32, 12]
const total = computed(() => {
  return arr.reduce((sum, item) => sum + item, 0)
})
console.log(total);
</script>
<style>

</style>
小例子:动态求和:
<template>
  <div>
    {{ arr }} 和:{{ total }}
    <input v-model="num" type="text" @change="handle" placeholder="请输入数字" />
  </div>
</template>
<script setup>
import { computed, ref } from 'vue'
// 计算属性
let arr = ref([12, 45, 65, 32, 12])
const total = computed(() => {
  return arr.value.reduce((sum, item) => (sum += Number(item)), 0)
})

let num = ref(0)
const handle = () => {
  arr.value.push(num.value)
}
// console.log(total);
</script>
<style>

</style>
5.watch函数
- 使用watch函数监听数据的变化
watch(需要监听的数据,数据改变执行函数,配置对象)来进行数据的侦听- 数据:单个数据,多个数据,函数返回对象属性,属性复杂需要开启深度监听
- 配置对象:
deep深度监听immediate默认执行
见代码中的注释:
<template>
  <div>
    num:{{ num }} <br>
    obj:{{ obj }} <br>
    <button @click="btn">点我加1</button>
  </div>
</template>
<script setup>
import { ref, reactive, watch } from 'vue'
let num = ref(0)
const btn = function () {

  return num.value++, obj.id++
}
let obj = reactive({ id: 1, name: 'jack' })
// watch监听数据 watch(基本数据类型 || 数组 || 回调函数, 回调函数 , 配置项)

// 1. 监听基本数据类型
// watch(num, (newVal, oldVal) => {
//   console.log('newVal:', newVal, '===oldVal', oldVal);
// })

// 2.监听整个复杂数据类型 只能监听到新值,旧值无法显示
// watch(obj, (newVal, oldVal) => {
//   console.log('newVal:', newVal, '===oldVal', oldVal);
// })

// 3.监听复杂数据类型的某一项数据,第一项改为函数
// watch(() => obj.id, (newVal, oldVal) => {
//   console.log('newVal:', newVal, '===oldVal', oldVal);
// })

// 4.同时监听简单数据类型和复杂数据类型,第一项改为数组
watch([() => obj.id, num], (newVal, oldVal) => {
  console.log('newVal:', newVal, '===oldVal', oldVal);
})
/**i
 *
 * newVal: (2) [2, 1] ===oldVal (2) [1, 0]
   newVal: (2) [3, 2] ===oldVal (2) [2, 1]
   newVal: (2) [4, 3] ===oldVal (2) [3, 2]
   newVal: (2) [5, 4] ===oldVal (2) [4, 3]
 */
</script>
<style>

</style>
-
使用
watch监听,配置默认执行: -
  {
    // 开启深度监听
    deep: true,
    // 默认执行一次
    immediate: true
}
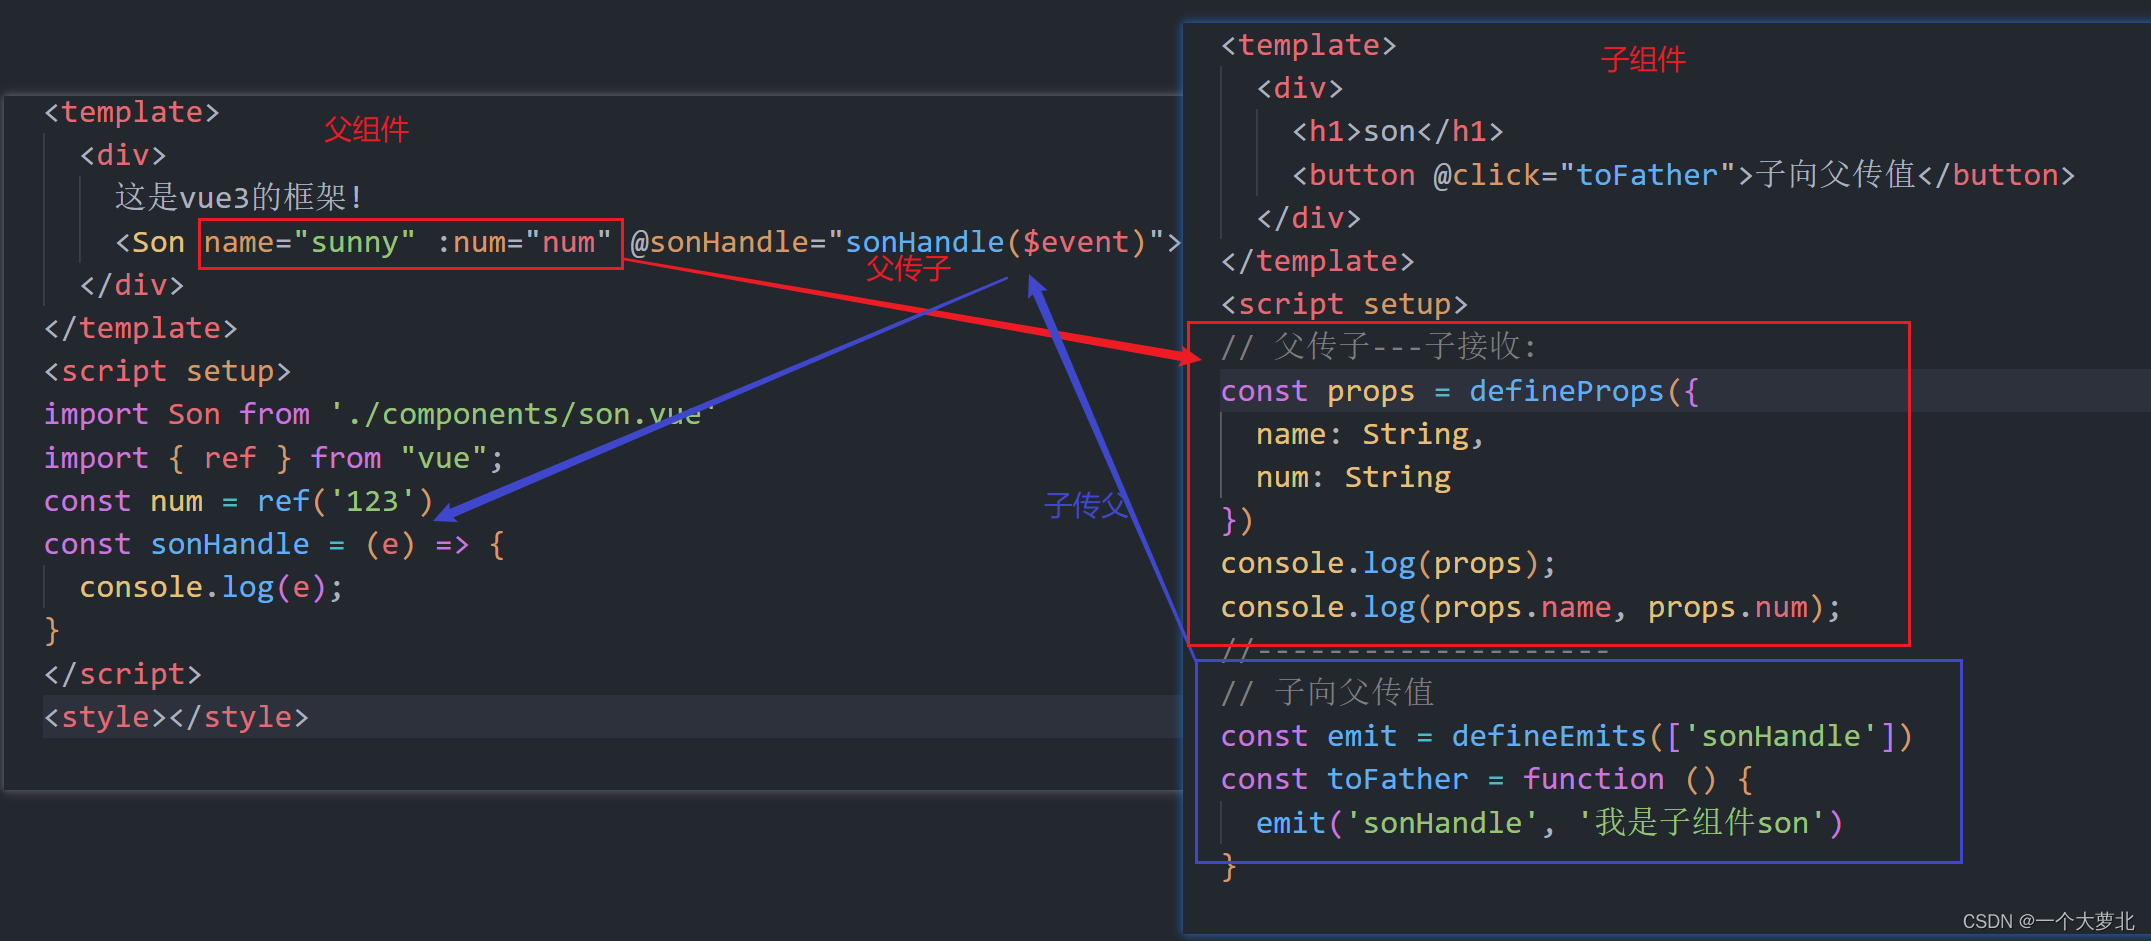
6. 父传子与子传父(defineProps与defineEmits)
- 实现组件通讯中的父子组件通讯
子组件:
<template>
  <div>
    <h1>son</h1>
    <button @click="toFather">子向父传值</button>
  </div>
</template>
<script setup>
// 父传子---子接收:
const props = defineProps({
  name: String,
  num: String
})
console.log(props);
console.log(props.name, props.num);
//--------------------
// 子向父传值
const emit = defineEmits(['sonHandle'])
const toFather = function () {
  emit('sonHandle', '我是子组件son')
}

</script>
<style>

</style>
父组件:
<template>
  <div>
    <Son name="sunny" :num="num" @sonHandle="sonHandle($event)"></Son>===
  </div>
</template>
<script setup>
import Son from './components/son.vue'
import { ref } from "vue";
const num = ref('123')
const sonHandle = (e) => {
  console.log(e);
}
</script>
<style></style>
