1. 响应式基础
1.1 init
<!DOCTYPE html>
<html lang="en">

<head>
    <meta charset="UTF-8">
    <meta name="viewport" content="width=device-width, initial-scale=1.0">
    <meta http-equiv="X-UA-Compatible" content="ie=edge">
    <title>Document</title>
    <!--
        0. 页面的布局会随着屏幕的大小变化而发生了响应,做出了不同的布局模式,此之为响应式布局;
        1. 响应式开发原理:
                就是使用媒体查询针对不同宽度的设备进行布局和样式的设置, 从而适配不同设备的目的;
                设备划分:
                    超小屏幕(手机):          <768px
                    小屏设备(平板):          >=768px ~ <992px
                    中等屏幕(桌面显示器):    >=992px ~ <1200px
                    宽屏设备(大桌面显示器):  >=1200px
     -->
    <!--
        2. 响应式布局容器:
                响应式需要一个父级作为布局容器, 来配合子级元素来实现变化效果;
                原理就是在不同屏幕下, 通过媒体查询来改变这个布局容器的大小, 再改变里面子元素的排列方式和大小,
                从而实现不同屏幕下, 看到不同的页面布局和样式变化;
     -->
    <style>
        .container {
            height: 150px;
            background-color: pink;
            margin: 0 auto;
        }
        /* 1. 超小屏幕下  小于 768  布局容器的宽度为 100% */
        @media screen and (max-width: 767px) {
            .container {
                width: 100%;
            }
        }

        /* 2. 小屏幕下  大于等于768  布局容器改为 750px */
        @media screen and (min-width: 768px) {
            .container {
                width: 750px;
            }
        }

        /* 3. 中等屏幕下 大于等于 992px   布局容器修改为 970px */
        @media screen and (min-width: 992px) {
            .container {
                width: 970px;
            }
        }

        /* 4. 大屏幕下 大于等于1200 布局容器修改为 1170 */
        @media screen and (min-width: 1200px) {
            .container {
                width: 1170px;
            }
        }
    </style>
</head>

<body>
    <!-- 响应式开发里面,首先需要一个布局容器 -->
    <div class="container"></div>
</body>

</html>

1.2 响应式导航
<!DOCTYPE html>
<html lang="en">

<head>
    <meta charset="UTF-8">
    <meta name="viewport" content="width=device-width, initial-scale=1.0">
    <meta http-equiv="X-UA-Compatible" content="ie=edge">
    <title>Document</title>
    <style>
        * {
            margin: 0;
            padding: 0;
        }

        ul {
            list-style: none;
        }

        .container {
            width: 750px;
            margin: 0 auto;
        }

        .container ul li {
            float: left;
            width: 93.75px;
            height: 30px;
            background-color: green;
        }

        @media screen and (max-width: 767px) {
            .container {
                width: 100%;
            }
            .container ul li {
                width: 33.33%;
            }
        }
    </style>
</head>

<body>
    <div class="container">
        <ul>
            <li>导航栏</li>
            <li>导航栏</li>
            <li>导航栏</li>
            <li>导航栏</li>
            <li>导航栏</li>
            <li>导航栏</li>
            <li>导航栏</li>
            <li>导航栏</li>
        </ul>
    </div>
</body>

</html>

2. 栅格系统
2.1 init
<!DOCTYPE html>
<html lang="en">

<head>
    <meta charset="UTF-8">
    <!-- 要求当前网页使用IE浏览器最高版本的内核来渲染 -->
    <meta http-equiv="X-UA-Compatible" content="IE=edge">
    <!-- 视口的设置:视口宽度和设备一致,默认的缩放比例和PC端一致,用户不能自行缩放 -->
    <meta name="viewport" content="width=device-width, initial-scale=1.0">
    <!-- HTML5 shim 和 Respond.js 是为了让IE9以下浏览器支持 HTML5新增元素和媒体查询(media queries)功能 -->
    <!--[if lt IE 9]>
      <script src="https://cdn.jsdelivr.net/npm/html5shiv@3.7.3/dist/html5shiv.min.js"></script>
      <script src="https://cdn.jsdelivr.net/npm/respond.js@1.4.2/dest/respond.min.js"></script>
    <![endif]-->
    <!-- 引入Bootstrap样式文件 -->
    <link rel="stylesheet" href="../Bootstrap/css/bootstrap.min.css">
    <title>Document</title>
    <style>
        .login {
            width: 100px;
            height: 100px;
        }
    </style>
</head>

<body>
    <div class="btn btn-success">123</div>
    <button type="button" class="btn btn-success login">(成功)Success</button>
</body>

</html>
2.2 布局容器
<!DOCTYPE html>
<html lang="en">

<head>
    <meta charset="UTF-8">
    <meta http-equiv="X-UA-Compatible" content="IE=edge">
    <meta name="viewport" content="width=device-width, initial-scale=1.0">
    <!--[if lt IE 9]>
      <script src="https://cdn.jsdelivr.net/npm/html5shiv@3.7.3/dist/html5shiv.min.js"></script>
      <script src="https://cdn.jsdelivr.net/npm/respond.js@1.4.2/dest/respond.min.js"></script>
    <![endif]-->
    <link rel="stylesheet" href="../Bootstrap/css/bootstrap.min.css">
    <title>Document</title>
    <!--
        Bootstrap布局容器:
            Bootstrap需要为页面内容和栅格系统包裹一个.container容器, BS预先定义好了这个类, 叫.container;
                1. container类:
                    响应式布局的容器, 固定宽度;
                    大屏(>=1200px) 宽度固定为1170px;
                    中屏(>-992px)  宽度固定为970px;
                    小屏(>=768px)  宽度固定为750px;
                    超小屏 (100%)

                2. container-fluid类:
                    流式布局容器百分百宽度;
                    占据全部视口(viewport)的容器;
                    适合于单独做移动端开发;
     -->
    <style>

    </style>
</head>

<body>
    <div class="container">123</div>
    <div class="container-fluid">456</div>
</body>

</html>
2.3 列组合
<!DOCTYPE html>
<html lang="en">

<head>
    <meta charset="UTF-8">
    <meta http-equiv="X-UA-Compatible" content="IE=edge">
    <meta name="viewport" content="width=device-width, initial-scale=1.0">
    <!--[if lt IE 9]>
      <script src="https://cdn.jsdelivr.net/npm/html5shiv@3.7.3/dist/html5shiv.min.js"></script>
      <script src="https://cdn.jsdelivr.net/npm/respond.js@1.4.2/dest/respond.min.js"></script>
    <![endif]-->
    <link rel="stylesheet" href="../Bootstrap/css/bootstrap.min.css">
    <title>Document</title>
    <style>
        [class^="col-lg"] {
            border: 1px solid red;
        }
        .container .row:nth-child(1) {
            background-color: green;
        }
    </style>
</head>

<body>
    <div class="container">
        <!-- 1. 如果孩子的份数相加 等于 12, 则孩子能占满整个的container的宽度; -->
        <!-- 可以同时为一列指定多个设备的类名, 以便划分不同的份数, 例如 class="col-md-4 col-sm-6" -->
        <div class="row">
            <div class="col-lg-3 col-md-4 col-sm-6 col-xs-12">3</div>
            <div class="col-lg-3 col-md-4 col-sm-6 col-xs-12">3</div>
            <div class="col-lg-3 col-md-4 col-sm-6 col-xs-12">3</div>
            <div class="col-lg-3 col-md-4 col-sm-6 col-xs-12">3</div>
        </div>
        <div class="row">
            <div class="col-lg-6">6</div>
            <div class="col-lg-2">2</div>
            <div class="col-lg-2">2</div>
            <div class="col-lg-2">2</div>
        </div>
        <!-- 2. 如果孩子的份数相加 小于 12, 则占不满整个container的宽度, 会有空白; -->
        <div class="row">
            <div class="col-lg-6">6</div>
            <div class="col-lg-2">2</div>
            <div class="col-lg-2">2</div>
            <div class="col-lg-1">1</div>
        </div>
        <!-- 3. 如果孩子的份数相加 大于 12, 多余的那一列会另起一行显示; -->
        <div class="row">
            <div class="col-lg-6">6</div>
            <div class="col-lg-2">2</div>
            <div class="col-lg-2">2</div>
            <div class="col-lg-3">3</div>
        </div>
    </div>
</body>

</html>

2.4 列嵌套
<!DOCTYPE html>
<html lang="en">

<head>
    <meta charset="UTF-8">
    <meta http-equiv="X-UA-Compatible" content="IE=edge">
    <meta name="viewport" content="width=device-width, initial-scale=1.0">
    <!--[if lt IE 9]>
      <script src="https://cdn.jsdelivr.net/npm/html5shiv@3.7.3/dist/html5shiv.min.js"></script>
      <script src="https://cdn.jsdelivr.net/npm/respond.js@1.4.2/dest/respond.min.js"></script>
    <![endif]-->
    <link rel="stylesheet" href="../Bootstrap/css/bootstrap.min.css">
    <title>Document</title>
    <!--
        Bootstrap的栅格系统支持列的嵌套: 可以在一个列中添加一个或者多个行容器, 然后在这个行容器中插入列;
        为了使用内置的栅格系统将内容再次嵌套,可以通过添加一个新的.row元素和一系列.col-sm-*元素到已经存在的.col-sm-*元素内。
        被嵌套的行(row)所包含的列(column)的个数不能超过12(其实,没有要求你必须占满12列)。
     -->
    <style>
        .row>div {
            height: 50px;
            background-color: green;
        }
    </style>
</head>

<body>
    <div class="container">
        <!-- ```行 ```-->
        <div class="row">
            <!-- 第一列 -->
            <div class="col-md-4">
                <div class="row">
                    <div class="col-md-4" style="background-color: red;">a</div>
                    <div class="col-md-8" style="background-color: yellow;">b</div>
                </div>
            </div>
            <!-- 第二列 -->
            <div class="col-md-4" style="background-color: green;">2</div>
            <!-- 第三列 -->
            <div class="col-md-4" style="background-color: purple;">3</div>
        </div>
    </div>
</body>

</html>

2.5 列偏移
<!DOCTYPE html>
<html lang="en">

<head>
    <meta charset="UTF-8">
    <meta http-equiv="X-UA-Compatible" content="IE=edge">
    <meta name="viewport" content="width=device-width, initial-scale=1.0">
    <!--[if lt IE 9]>
      <script src="https://cdn.jsdelivr.net/npm/html5shiv@3.7.3/dist/html5shiv.min.js"></script>
      <script src="https://cdn.jsdelivr.net/npm/respond.js@1.4.2/dest/respond.min.js"></script>
    <![endif]-->
    <link rel="stylesheet" href="../Bootstrap/css/bootstrap.min.css">
    <title>Document</title>
    <!--
        列偏移:
            如果我们不希望相邻的两个列紧靠在一起, 但又不想使用margin或者其他手段, 那么此时就可以使用列偏移来实现;
            使用.col-md-offset-*可以将该列向右侧偏移;
            这些类实际是通过使用*选择器为当前元素增加了左侧边距(margin);
     -->
    <style>
        .row div {
            height: 50px;
            background-color: green;
        }
    </style>
</head>

<body>
    <div class="container">
        <!-- 第一行 -->
        <div class="row">
            <div class="col-md-4">左侧</div>
            <div class="col-md-4 col-md-offset-4">右侧</div>
        </div>

        <!-- 第二行 -->
        <div class="row">
            <div class="col-md-8 col-md-offset-2">中间</div>
        </div>
    </div>
</body>

</html>

2.6 列排序
<!DOCTYPE html>
<html lang="en">

<head>
    <meta charset="UTF-8">
    <meta http-equiv="X-UA-Compatible" content="IE=edge">
    <meta name="viewport" content="width=device-width, initial-scale=1.0">
    <!--[if lt IE 9]>
      <script src="https://cdn.jsdelivr.net/npm/html5shiv@3.7.3/dist/html5shiv.min.js"></script>
      <script src="https://cdn.jsdelivr.net/npm/respond.js@1.4.2/dest/respond.min.js"></script>
    <![endif]-->
    <link rel="stylesheet" href="../Bootstrap/css/bootstrap.min.css">
    <title>Document</title>
    <!--
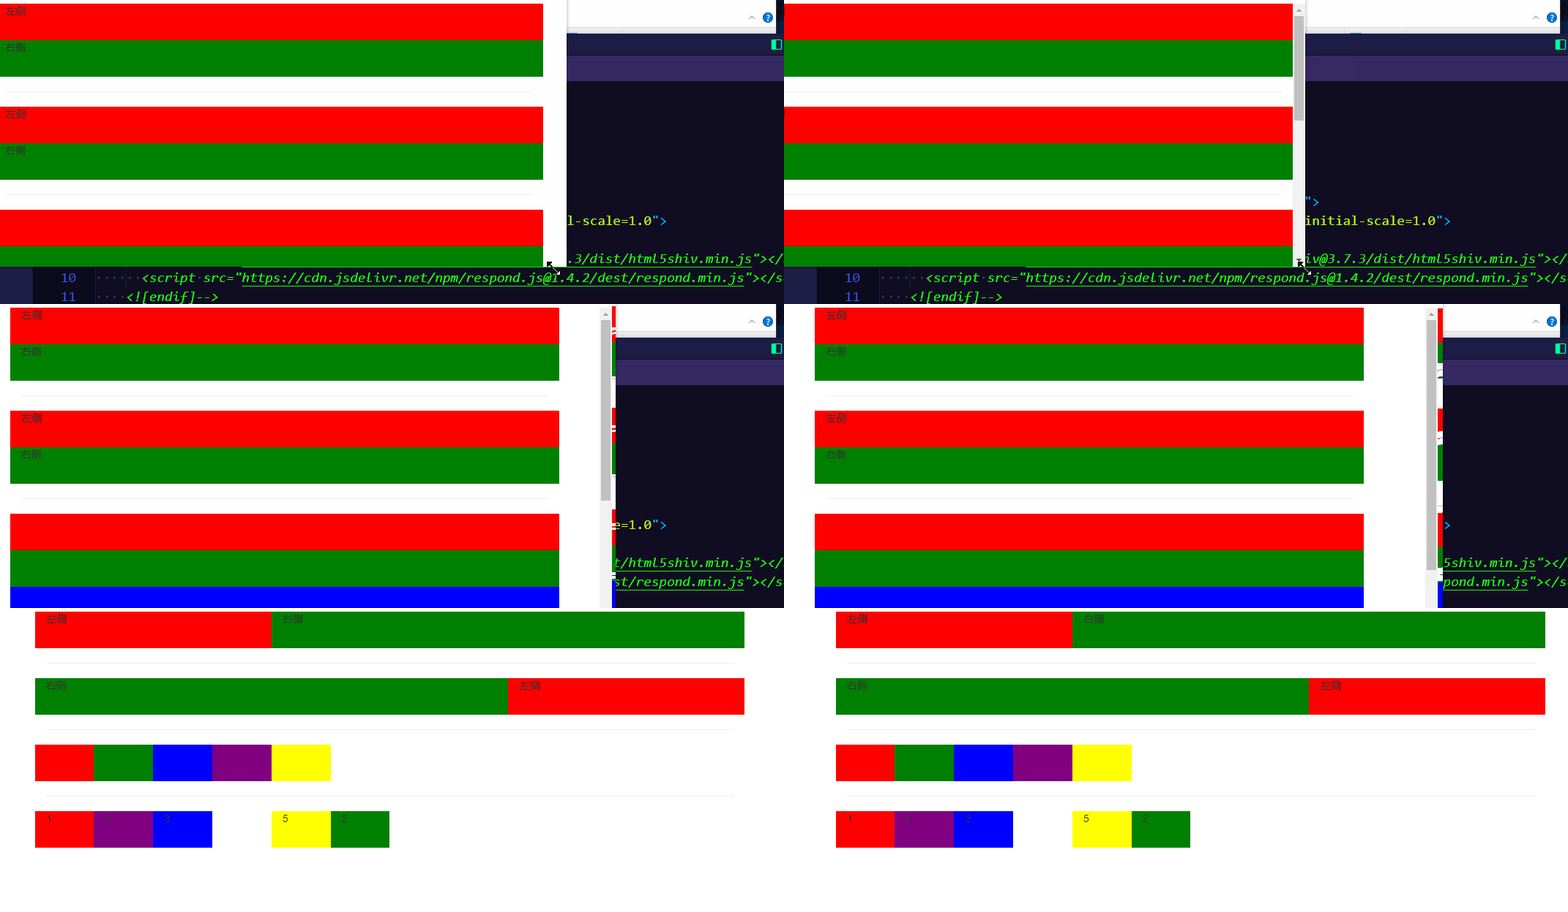
        列排序:
            使用.col-md-push-* 和 .col-md-pull-*类可以很容易的改变列的顺序;
            列排序实际上就是改变列的方向, 也即是改变列的浮动, 并且设置浮动的距离;
            向右移动用push, 向左移动用pull;
     -->
    <style>
        .row div {
            height: 50px;
            background-color: green;
        }
    </style>
</head>

<body>
    <div class="container">
        <div class="row">
            <div class="col-md-4" style="background-color: red;">左侧</div>
            <div class="col-md-8" style="background-color: green;">右侧</div>
        </div>
        <hr>

        <!-- 将左侧的给拉到右侧; 将右侧的给推到左侧; -->
        <div class="row">
            <div class="col-md-4 col-md-push-8" style="background-color: red;">左侧</div>
            <div class="col-md-8 col-md-pull-4" style="background-color: green;">右侧</div>
        </div>
        <hr>

        <!--  -->
        <div class="row">
            <div class="col-md-1" style="background-color: red;"></div>
            <div class="col-md-1" style="background-color: green;"></div>
            <div class="col-md-1" style="background-color: blue;"></div>
            <div class="col-md-1" style="background-color: purple;"></div>
            <div class="col-md-1" style="background-color: yellow;"></div>
        </div>
        <hr>

        <div class="row">
            <div class="col-md-1" style="background-color: red;">1</div>
            <div class="col-md-1 col-md-push-4" style="background-color: green;">2</div>
            <div class="col-md-1" style="background-color: blue;">3</div>
            <div class="col-md-1 col-md-pull-2" style="background-color: purple;">4</div>
            <div class="col-md-1" style="background-color: yellow;">5</div>
        </div>
    </div>
</body>

</html>
3. 排版
<!DOCTYPE html>
<html lang="en">

<head>
    <meta charset="UTF-8">
    <meta http-equiv="X-UA-Compatible" content="IE=edge">
    <meta name="viewport" content="width=device-width, initial-scale=1.0">
    <!--[if lt IE 9]>
      <script src="https://cdn.jsdelivr.net/npm/html5shiv@3.7.3/dist/html5shiv.min.js"></script>
      <script src="https://cdn.jsdelivr.net/npm/respond.js@1.4.2/dest/respond.min.js"></script>
    <![endif]-->
    <link rel="stylesheet" href="../Bootstrap/css/bootstrap.min.css">
    <title>Document</title>
    <!--
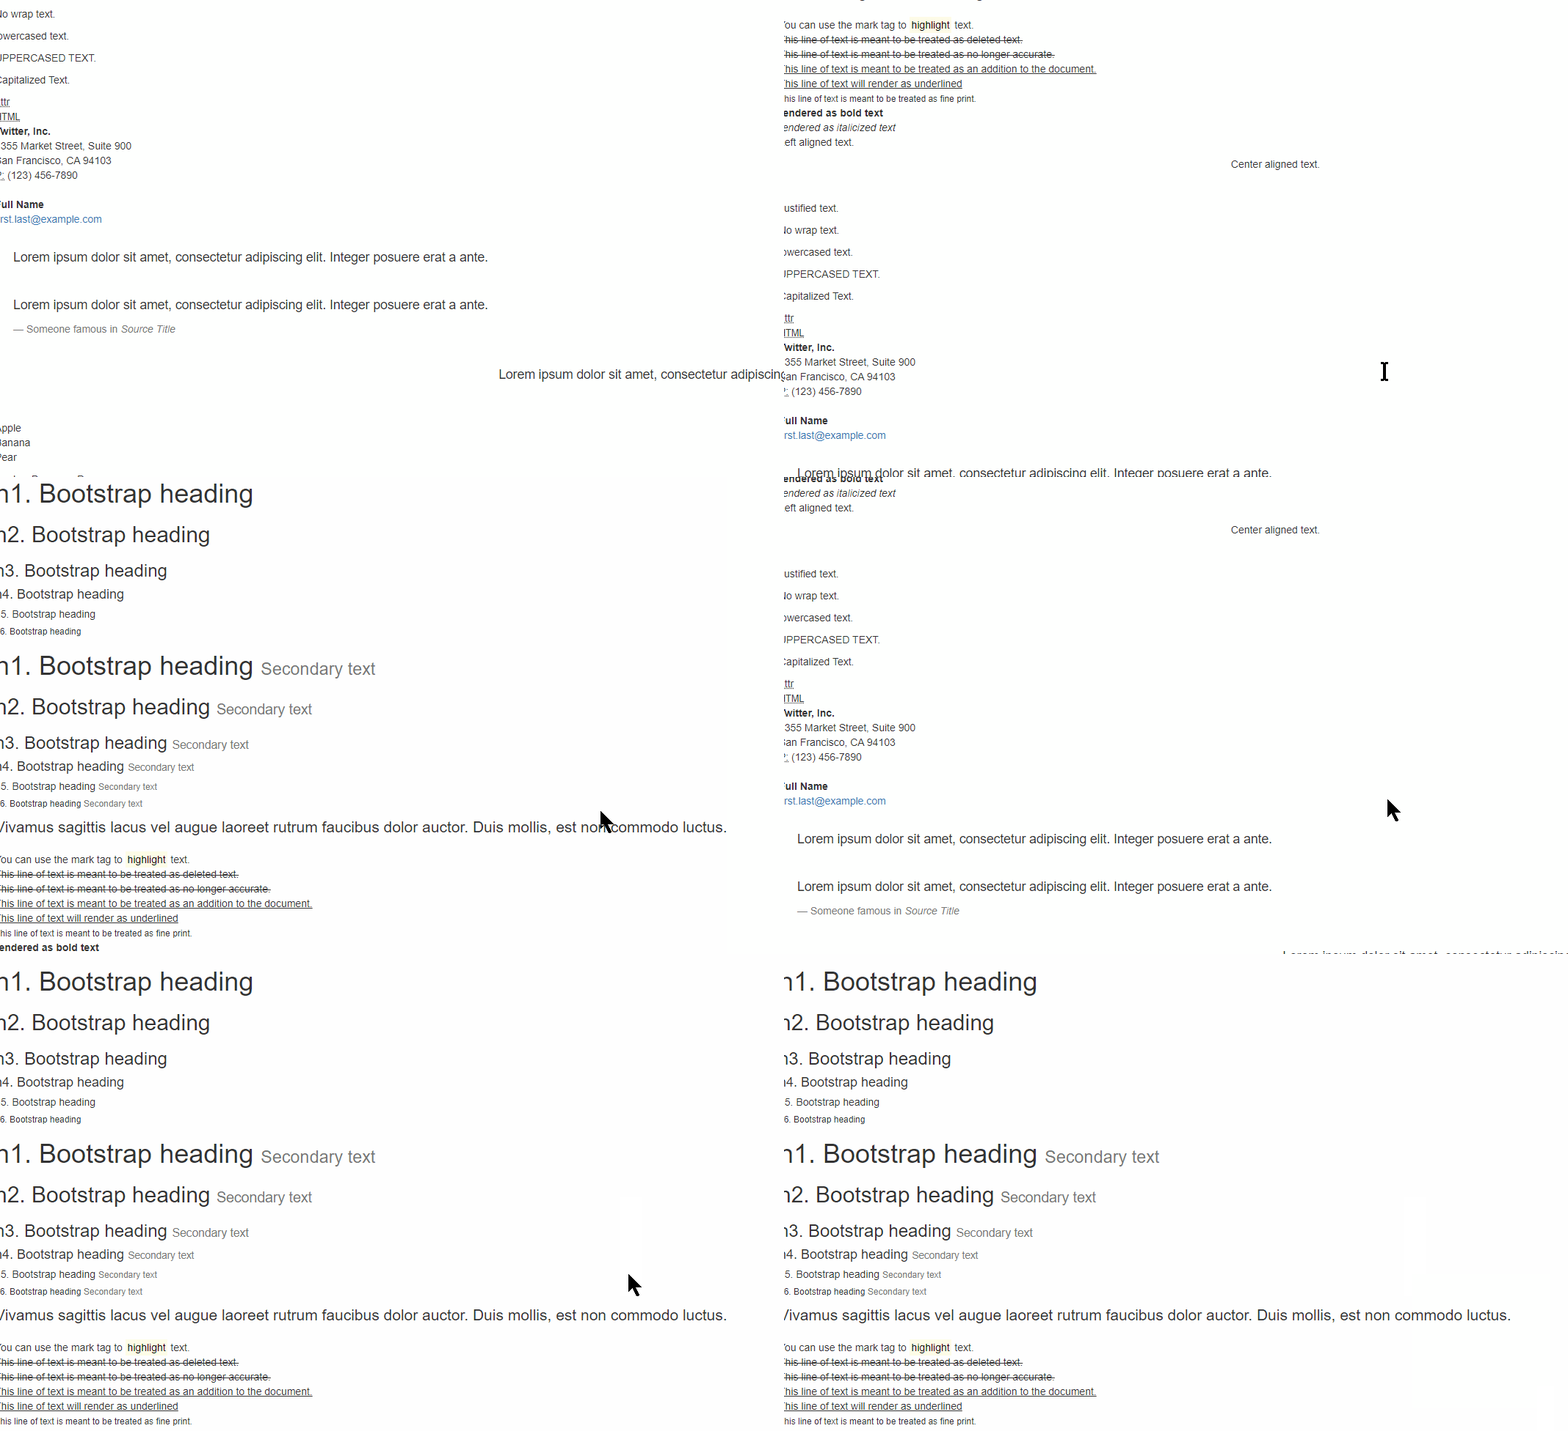
        1. HTML中的所有标题标签,<h1>到<h6>均可使用。另外,还提供了 .h1 到 .h6 类,为的是给内联(inline)属性的文本赋予标题的样式;
        2. 在标题内还可以包含 <small> 标签或赋予 .small 类的元素,可以用来标记副标题;
        3. 通过添加 .lead 类可以让段落突出显示;
        4. :
            (1) Marked text:<mark>...</mark>
            (2) 被删除的文本:对于被删除的文本使用 <del> 标签;
            (3) 无用文本:对于没用的文本使用 <s> 标签;
            (4) 插入文本:额外插入的文本使用 <ins> 标签;
            (5) 带下划线的文本:为文本添加下划线, 使用<u>标签;
            (6) 小号文本:
                    对于不需要强调的inline或block类型的文本,使用 <small> 标签包裹,其内的文本将被设置为父容器字体大小的 85%。
                    标题元素中嵌套的 <small> 元素被设置不同的 font-size 。
            (7) 着重: 通过增加 font-weight 值强调一段文本;
            (8) 斜体:用斜体强调一段文本;
            (10) 对齐:通过文本对齐类,可以简单方便的将文字重新对齐; (text-left, text-center, text-right, text-justify, text-nowrap)
            (11) 改变大小写: 通过这几个类可以改变文本的大小写; (text-lowercase, text-uppercase, text-capitalize)
            (12) 缩略语:
                        当鼠标悬停在缩写和缩写词上时就会显示完整内容,Bootstrap 实现了对 HTML 的 <abbr> 元素的增强样式。
                        缩略语元素带有 title 属性,外观表现为带有较浅的虚线框,鼠标移至上面时会变成带有“问号”的指针。
                        如想看完整的内容可把鼠标悬停在缩略语上(对使用辅助技术的用户也可见), 但需要包含 title 属性。
                        为缩略语添加 .initialism 类,可以让 font-size 变得稍微小些。
            (13) 地址: 让联系信息以最接近日常使用的格式呈现。在每行结尾添加 <br> 可以保留需要的样式;
            (14) 引用:在你的文档中引用其他来源的内容;
                       a. 默认样式的引用: 将任何 HTML 元素包裹在 <blockquote> 中即可表现为引用样式。对于直接引用,我们建议用 <p> 标签;
                       b. 多种引用样式: 对于标准样式的 <blockquote>,可以通过几个简单的变体就能改变风格和内容; 添加 <footer> 用于标明引用来源。来源的名称可以包裹进 <cite>标签中;
                       c. 另一种展示风格: 通过赋予 .blockquote-reverse 类可以让引用呈现内容右对齐的效果;
            (15) 列表:无序列表, 有序列表, 无样式列表, 内联列表;
            (16) 描述:...;
     -->

    <!--
         代码:
         表格:
         表单:
         按钮:
         图片:
         辅助类:
         响应式工具:
         使用less:
         使用sass:
         具体见官网即可;
      -->
</head>

<body>
    <h1>h1. Bootstrap heading</h1>
    <h2>h2. Bootstrap heading</h2>
    <h3>h3. Bootstrap heading</h3>
    <h4>h4. Bootstrap heading</h4>
    <h5>h5. Bootstrap heading</h5>
    <h6>h6. Bootstrap heading</h6>


    <!-- 在标题内还可以包含 <small> 标签或赋予 .small 类的元素,可以用来标记副标题;  -->
    <h1>
        h1. Bootstrap heading
        <small>Secondary text</small>
    </h1>
    <h2>h2. Bootstrap heading <small>Secondary text</small></h2>
    <h3>h3. Bootstrap heading <small>Secondary text</small></h3>
    <h4>h4. Bootstrap heading <small>Secondary text</small></h4>
    <h5>h5. Bootstrap heading <small>Secondary text</small></h5>
    <h6>h6. Bootstrap heading <small>Secondary text</small></h6>


    <!-- 通过添加 .lead 类可以让段落突出显示。 -->
    <p class="lead">Vivamus sagittis lacus vel augue laoreet rutrum faucibus dolor auctor. Duis mollis, est non commodo
        luctus.</p>

    You can use the mark tag to <mark>highlight</mark> text.<br>
    <del>This line of text is meant to be treated as deleted text.</del><br>
    <s>This line of text is meant to be treated as no longer accurate.</s><br>
    <ins>This line of text is meant to be treated as an addition to the document.</ins><br>
    <u>This line of text will render as underlined</u><br>
    <small>This line of text is meant to be treated as fine print.</small><br>
    <strong>rendered as bold text</strong><br>
    <em>rendered as italicized text</em><br>

    <p class="text-left">Left aligned text.</p>
    <p class="text-center">Center aligned text.</p>
    <p class="text-right">Right aligned text.</p>
    <p class="text-justify">Justified text.</p>
    <p class="text-nowrap">No wrap text.</p>

    <p class="text-lowercase">Lowercased text.</p>
    <p class="text-uppercase">Uppercased text.</p>
    <p class="text-capitalize">Capitalized text.</p>

    <abbr title="attribute">attr</abbr><br>
    <abbr title="HyperText Markup Language" class="initialism">HTML</abbr>

    <address>
        <strong>Twitter, Inc.</strong><br>
        1355 Market Street, Suite 900<br>
        San Francisco, CA 94103<br>
        <abbr title="Phone">P:</abbr> (123) 456-7890
    </address>

    <address>
        <strong>Full Name</strong><br>
        <a href="mailto:#">first.last@example.com</a>
    </address>

    <blockquote>
        <p>Lorem ipsum dolor sit amet, consectetur adipiscing elit. Integer posuere erat a ante.</p>
    </blockquote>
    <blockquote>
        <p>Lorem ipsum dolor sit amet, consectetur adipiscing elit. Integer posuere erat a ante.</p>
        <!-- 添加 <footer> 用于标明引用来源。来源的名称可以包裹进 <cite>标签中。 -->
        <footer>Someone famous in
            <cite title="Source Title">Source Title</cite>
        </footer>
    </blockquote>
    <blockquote class="blockquote-reverse">
        Lorem ipsum dolor sit amet, consectetur adipiscing elit. Integer posuere erat a ante.
        <footer>Someone famous in <cite title="Source Title">Source Title</cite></footer>
    </blockquote>

    <!-- 无样式列表。 -->
    <ul class="list-unstyled">
        <li>Apple</li>
        <li>Banana</li>
        <li>Pear</li>
    </ul>
    <!-- 将所有元素放置于同一行。 -->
    <ul class="list-inline">
        <li>Apple</li>
        <li>Banana</li>
        <li>Pear</li>
    </ul>
    <!-- .dl-horizontal 可以让 <dl> 内的短语及其描述排在一行。 -->
    <dl class="dl-horizontal">
        <dt>first step</dt>
        <dd>learn singing...</dd>
        <dd>learn studying...</dd>
        <dt>seconde step</dt>
        <dd>sing a song...</dd>
        <dd>start a record...</dd>
        <dt>third step</dt>
        <dd>finish do work...</dd>
    </dl>
</body>

</html>
4. 代码
<!DOCTYPE html>
<html lang="en">
<head>
<meta charset="UTF-8">
<meta http-equiv="X-UA-Compatible" content="IE=edge">
<meta name="viewport" content="width=device-width, initial-scale=1.0">
<!--[if lt IE 9]>
<script src="https://cdn.jsdelivr.net/npm/html5shiv@3.7.3/dist/html5shiv.min.js"></script>
<script src="https://cdn.jsdelivr.net/npm/respond.js@1.4.2/dest/respond.min.js"></script>
<![endif]-->
<link rel="stylesheet" href="../Bootstrap/css/bootstrap.min.css">
<title>Document</title>
</head>
<body>
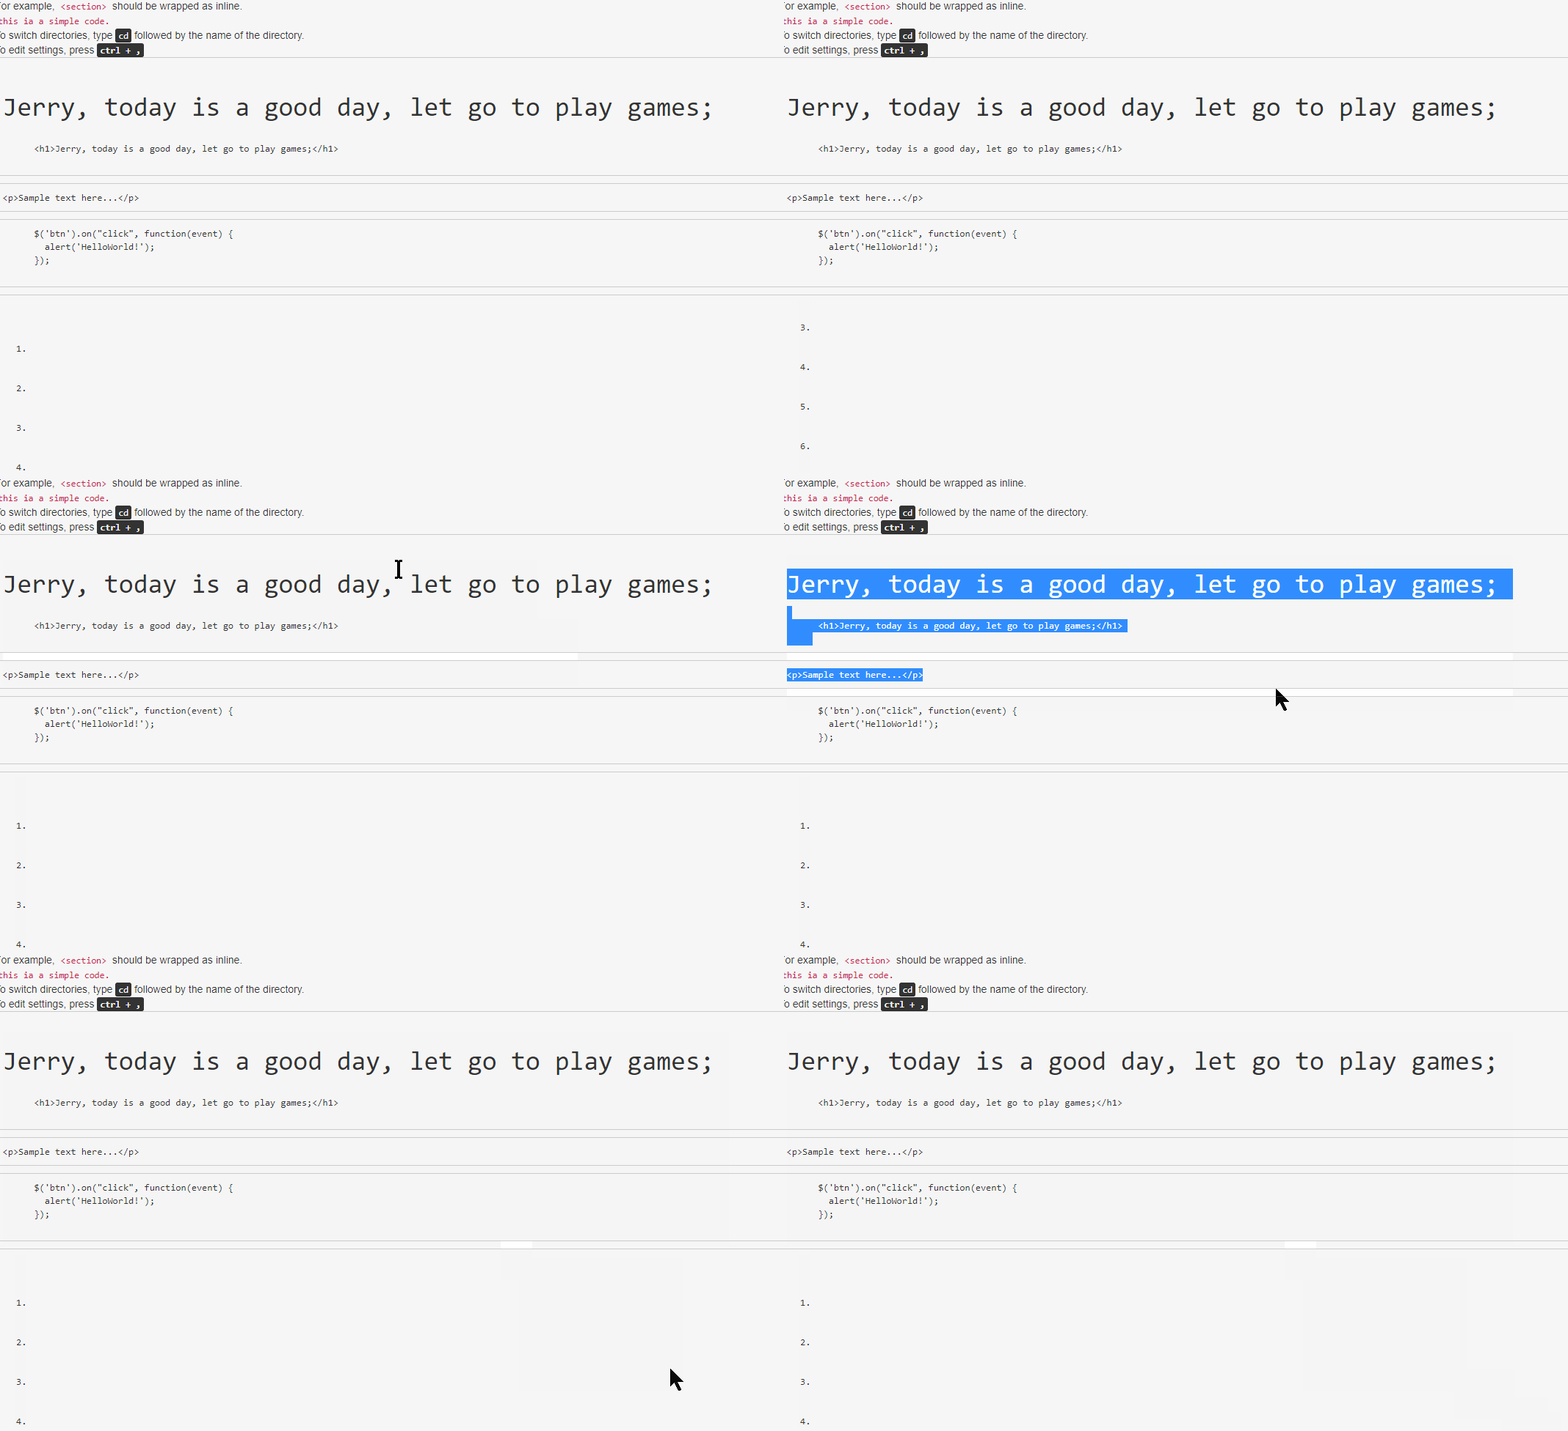
<!-- <code>用来表示代码片段, 底部与有一层浅红背景色 -->
For example, <code><section></code> should be wrapped as inline.<br>
<code>this ia a simple code.</code><br>
<!-- <kbd>用来高亮这种类似快捷键的这种 -->
To switch directories, type <kbd>cd</kbd> followed by the name of the directory.<br>
To edit settings, press <kbd><kbd>ctrl</kbd> + <kbd>,</kbd></kbd><br>
<!-- <pre>标签保留源代码格式; 注意将尖括号做转义处理; 滚动条: pre-scrollable-->
<pre>
<h1>Jerry, today is a good day, let go to play games;</h1>
<h1>Jerry, today is a good day, let go to play games;</h1>
</pre>
<pre><p>Sample text here...</p></pre>
<pre>
$('btn').on("click", function(event) {
alert('HelloWorld!');
});
</pre>
<pre class="pre-scrollable">
<ol>
<li></li>
<li></li>
<li></li>
<li></li>
<li></li>
<li></li>
<li></li>
<li></li>
</ol>
</pre>
<var>y</var> = <var>m</var><var>x</var> + <var>b</var><br>
<samp>This text is meant to be treated as sample output from a computer program.</samp>
</body>
</html>
5. 表格
<!DOCTYPE html>
<html lang="en">

<head>
    <meta charset="UTF-8">
    <meta http-equiv="X-UA-Compatible" content="IE=edge">
    <meta name="viewport" content="width=device-width, initial-scale=1.0">
    <!--[if lt IE 9]>
      <script src="https://cdn.jsdelivr.net/npm/html5shiv@3.7.3/dist/html5shiv.min.js"></script>
      <script src="https://cdn.jsdelivr.net/npm/respond.js@1.4.2/dest/respond.min.js"></script>
    <![endif]-->
    <link rel="stylesheet" href="../Bootstrap/css/bootstrap.min.css">
    <title>Document</title>
    <!--
        1. 基本实例:为任意 <table> 标签添加 .table 类可以为其赋予基本的样式 — 少量的内补(padding)和水平方向的分隔线;
            <table class="table"> ... </table>
        2. 条纹状表格:通过 .table-striped 类可以给 <tbody> 之内的每一行增加斑马条纹样式;
            <table class="table table-striped"> ... </table>
        3. 带边框的表格:添加 .table-bordered 类为表格和其中的每个单元格增加边框;
            <table class="table table-bordered"> ... </table>
        4. 鼠标悬停: 通过添加 .table-hover 类可以让 <tbody> 中的每一行对鼠标悬停状态作出响应;
            <table class="table table-hover"> ... </table>
        5. 紧缩表格:通过添加 .table-condensed 类可以让表格更加紧凑,单元格中的内补(padding)均会减半;
            <table class="table table-condensed "> ... </table>
        6. 状态类: 通过这些状态类可以为 行或单元格 设置颜色;
            .active:    鼠标悬停在行或单元格上时所设置的颜色
            .success:   标识成功或积极的动作
            .info:      标识普通的提示信息或动作
            .warning:   标识警告或需要用户注意
            .danger:    标识危险或潜在的带来负面影响的动作
            <tr class="danger"> ... </tr>
            <td class="warning"> ... </td>
        7. 响应式表格:
            将任何 .table 元素包裹在 .table-将任何 .table 元素包裹在 .table-responsive 元素内,即可创建响应式表格,其会在小屏幕设备上(小于768px)水平滚动。当屏幕大于 768px 宽度时,水平滚动条消失。 元素内,即可创建响应式表格,其会在小屏幕设备上(小于768px)水平滚动。当屏幕大于 768px 宽度时,水平滚动条消失;
            <div class="table-responsive">
                <table class="table">
                    ...
                </table>
            </div>
     -->
</head>

<body>
    <!-- 表格 -->
    <div class="table-responsive">
        <table class="table">
            <caption>Results of the 2011 Fruit Survey</caption>
            <thead>
                <tr>
                    <th>等级</th>
                    <th>名字</th>
                    <th>颜色</th>
                    <th>大小</th>
                    <th>高兴</th>
                </tr>
            </thead>
            <tbody>
                <tr class="danger">
                    <th>Favorite:</th>
                    <td>Apples</td>
                    <td>Green</td>
                    <td>Medium</td>
                    <td>aaa</td>
                </tr>
                <tr class="active">
                    <th>2nd Favorite:</th>
                    <td>Oranges</td>
                    <td>Orange</td>
                    <td>Large</td>
                    <td>ggg</td>
                </tr>
                <tr class="info">
                    <th>3rd Favorite:</th>
                    <td>Pomegranate</td>
                    <td>A kind of greeny-red Varies from medium to large</td>
                    <td class="warning">Small</td>
                    <td class="danger">sss</td>
                </tr>
            </tbody>
            <tfoot>
                <tr>
                    <th colspan="5">Adam Freeman Fruit Data Enterprises</th>
                </tr>
            </tfoot>
        </table>
    </div>
</body>

</html>

6. 表单
<!DOCTYPE html>
<html lang="en">
<head>
<meta charset="UTF-8">
<meta http-equiv="X-UA-Compatible" content="IE=edge">
<meta name="viewport" content="width=device-width, initial-scale=1.0">
<!--[if lt IE 9]>
<script src="https://cdn.jsdelivr.net/npm/html5shiv@3.7.3/dist/html5shiv.min.js"></script>
<script src="https://cdn.jsdelivr.net/npm/respond.js@1.4.2/dest/respond.min.js"></script>
<![endif]-->
<link rel="stylesheet" href="../Bootstrap/css/bootstrap.min.css">
<title>Document</title>
</head>
<body>
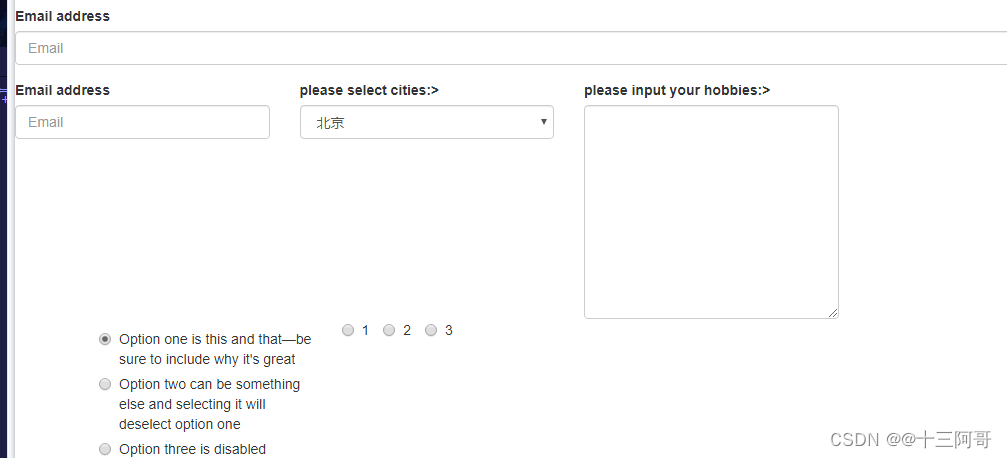
<form>
<!-- 1. input, select, textarea -->
<!-- 所有设置了 .form-control 类的 <input>、<textarea> 和 <select> 元素都将被默认设置宽度属性为 width: 100%;。 -->
<div class="form-group">
<label for="exampleInputEmail1">Email address</label>
<input type="email" class="form-control" id="exampleInputEmail1" placeholder="Email">
</div>
<!-- 可以通过栅格系统将宽度变小 -->
<div class="row">
<div class="col-md-3">
<label for="exampleInputEmail1">Email address</label>
<input type="email" class="form-control" id="exampleInputEmail1" placeholder="Email">
</div>
<div class="col-md-3">
<label for="">please select cities:></label>
<select class="form-control" name="" id="">
<option value="">北京</option>
<option value="">上海</option>
<option value="">广东</option>
<option value="">深圳</option>
</select>
</div>
<div class="col-md-3">
<label for="">please input your hobbies:></label>
<textarea class="form-control" name="" id="" cols="30" rows="10"></textarea>
</div>
</div>
</form>
<!-- 2. 水平/竖直排布的复选按钮, 单选按钮; -->
<div class="container">
<div class="row">
<div class="col-md-3">
<div class="radio">
<label>
<input type="radio" name="optionsRadios" id="optionsRadios1" value="option1" checked>
Option one is this and that—be sure to include why it's great
</label>
</div>
<div class="radio">
<label>
<input type="radio" name="optionsRadios" id="optionsRadios2" value="option2">
Option two can be something else and selecting it will deselect option one
</label>
</div>
<div class="radio">
<label>
<input type="radio" name="optionsRadios" id="optionsRadios3" value="option3">
Option three is disabled
</label>
</div>
</div>
<div class="col-md-3">
<label class="radio-inline">
<input type="radio" name="inlineRadioOptions" id="inlineRadio1" value="option1"> 1
</label>
<label class="radio-inline">
<input type="radio" name="inlineRadioOptions" id="inlineRadio2" value="option2"> 2
</label>
<label class="radio-inline">
<input type="radio" name="inlineRadioOptions" id="inlineRadio3" value="option3"> 3
</label>
</div>
</div>
</div>
</body>
</html>
