list
- 1. list的介绍及使用
- 1.1 list的介绍
- 1.2 list的使用
- 1.2.1 list的构造
- 1.2.2 list iterator的使用
- 1.2.3 list capacity
- 1.2.4 list element access
- 1.2.5 list modifiers
- 1. resize
- 2. push_back/pop_back/push_front/pop_front
- 3. insert /erase
- 4. swap/clear
- 1.2.6 list operations
- 1. splice
- 2.remove_if
- 3.sort/reverse
- 1.2.7 list的迭代器失效
- 2. list的深度剖析及模拟实现
- 2.1 list_node
- 2.2 __list_iterator
- 2.3 list
- 2.3 __list_const_iterator

1. list的介绍及使用
1.1 list的介绍
C++中的list是一个双向链表,它是一个STL容器,可以用来存储任何类型的数据。list容器中的元素可以在任何位置插入或删除,而不会影响其他元素。list容器中的元素按照它们在容器中出现的顺序进行排序。可以使用STL算法对list容器进行排序、查找和操作。可以使用迭代器访问list容器中的元素。
1.2 list的使用
list中的接口比较多,此处类似,只需要掌握如何正确的使用,然后再去深入研究背后的原理,已达到可扩展的能力。以下为list中一些常见的重要接口。
1.2.1 list的构造
default (1) explicit list ()); //构造空的list
fill (2) explicit list (size_type n, const value_type& val = value_type(), const allocator_type& alloc = allocator_type()); //构造的list中包含n个值为val的元素
range (3) template < class InputIterator >
list (InputIterator first, InputIterator last, const allocator_type & alloc = allocator_type()); //用[first, last)区间中的元素构造list
copy (4) list (const list& x); //拷贝构造函数
1.2.2 list iterator的使用

【注意】
- begin与end为正向迭代器,对迭代器执行++操作,迭代器向后移动
- rbegin(end)与rend(begin)为反向迭代器,对迭代器执行++操作,迭代器向前移动
list迭代器是一个双向迭代器,list的迭代器支持前置和后置自增运算符,以及前置和后置自减运算符。list的迭代器还支持解引用运算符,可以返回指向当前元素的引用。此外,list的迭代器还支持比较运算符,可以比较两个迭代器是否相等。
#include <iostream>
using namespace std;
#include <list>

int main()
{
    list<int> l1;                         // 构造空的l1
    list<int> l2(4, 100);                 // l2中放4个值为100的元素
    list<int> l3(l2.begin(), l2.end());  // 用l2的[begin(), end())左闭右开的区间构造l3
    list<int> l4(l3);                    // 用l3拷贝构造l4

    // 以数组为迭代器区间构造l5
    int array[] = { 5,6,7,8,9 };
    list<int> l5(array, array + sizeof(array) / sizeof(int));

    // 列表格式初始化C++11
    list<int> l6{ 1,2,3,4,5 };

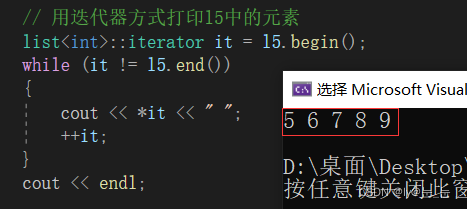
    // 用迭代器方式打印l5中的元素
    list<int>::iterator it = l5.begin();
    while (it != l5.end())
    {
        cout << *it << " ";
        ++it;
    }
    cout << endl;

	return 0;
}
#include <iostream>
using namespace std;
#include <list>

int main()
{
	list<int> lt = { 1,2,3,4,5 };
	list<int>::iterator it = lt.begin();
	while (it != lt.end())
	{
		cout << *it << ' ';
		(*it) *= 2;
		++it;
	}
	cout << endl;
	//反向迭代器
	list<int>::reverse_iterator rit = lt.rbegin();
	while (rit != lt.rend())
	{
		cout << *rit << ' ';
		++rit;
	}
	cout << endl;
	return 0;
}

1.2.3 list capacity

list没有容量概念,但是有可以容纳的最大元素数。
#include <iostream>
using namespace std;
#include <list>

int main()
{
	list<int> l1;
	list<int> l2 = { 1,2,3,4,5 };
	cout << "l1.empty:" << l1.empty() << endl;
	cout << "l1.size:" << l1.size() << endl;
	cout << "l1.max_size:" << l1.max_size() << endl;
	cout << "l2.empty:" << l2.empty() << endl;
	cout << "l2.size:" << l2.size() << endl;
	cout << "l2.max_size:" << l2.max_size() << endl;
	return 0;
}

1.2.4 list element access

front :返回list的第一个节点中值的引用
back :返回list的最后一个节点中值的引用
int main()
{
	list<int> mylist = { 77,12,23,22 };
	// now front equals 77, and back 22
	mylist.front() -= mylist.back();
	cout << "mylist.front() is now " << mylist.front() << '\n';

	return 0;
}

1.2.5 list modifiers
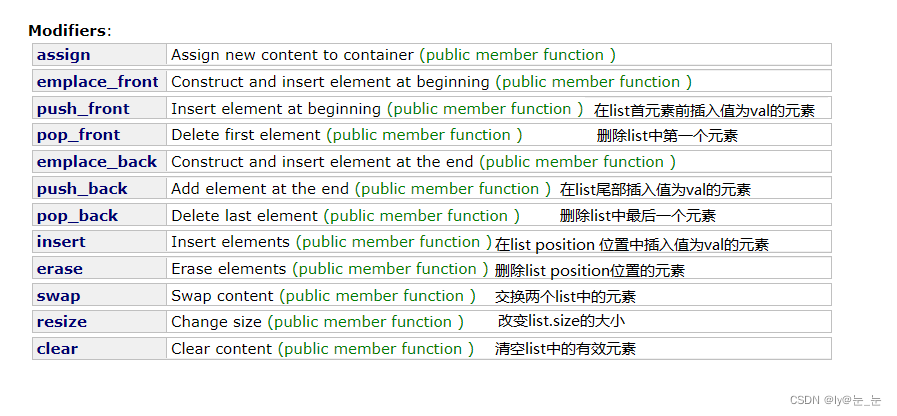
1. resize
int main()
{
    list<int> mylist;
    // set some initial content:
    for (int i = 1; i < 10; ++i)
        mylist.push_back(i);
    mylist.resize(5);
    mylist.resize(8, 100);
    mylist.resize(12);

    cout << "mylist contains:";
    for (list<int>::iterator it = mylist.begin(); it != mylist.end(); ++it)
        cout << ' ' << *it;
    cout << endl;

    return 0;
}

2. push_back/pop_back/push_front/pop_front
int main()
{
    int array[] = { 1, 2, 3 };
    list<int> L(array, array + sizeof(array) / sizeof(array[0]));

    // 在list的尾部插入4,头部插入0
    L.push_back(4);
    L.push_front(0);
    list<int>::iterator it = L.begin();
    while (it != L.end())
    {
        cout << *it << ' ';
        ++it;
    }
    cout << endl;

    // 删除list尾部节点和头部节点
    L.pop_back();
    L.pop_front();
    it = L.begin();
    while (it != L.end())
    {
        cout << *it << ' ';
        ++it;
    }
    cout << endl;
}

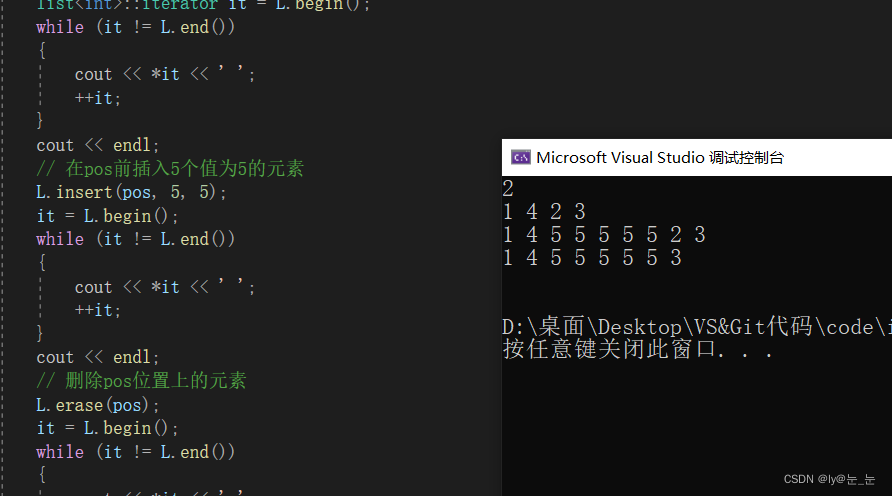
3. insert /erase
int main()
{
    int array1[] = { 1, 2, 3 };
    list<int> L(array1, array1 + sizeof(array1) / sizeof(array1[0]));
    // 获取链表中第二个节点
    auto pos = ++L.begin();
    cout << *pos << endl;
    // 在pos前插入值为4的元素
    L.insert(pos, 4);
    list<int>::iterator it = L.begin();
    while (it != L.end())
    {
        cout << *it << ' ';
        ++it;
    }
    cout << endl;
    // 在pos前插入5个值为5的元素
    L.insert(pos, 5, 5);
    it = L.begin();
    while (it != L.end())
    {
        cout << *it << ' ';
        ++it;
    }
    cout << endl;
    // 删除pos位置上的元素
    L.erase(pos);
    it = L.begin();
    while (it != L.end())
    {
        cout << *it << ' ';
        ++it;
    }
    cout << endl;
    // 删除list中[begin, end)区间中的元素,即删除list中的所有元素
    L.erase(L.begin(), L.end());
    it = L.begin();
    while (it != L.end())
    {
        cout << *it << ' ';
        ++it;
    }
    cout << endl;
	return 0;
}
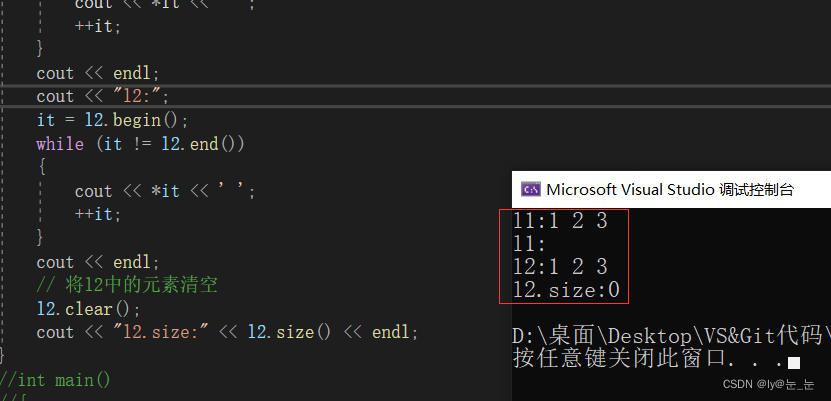
4. swap/clear
int main()
{
    // 用数组来构造list
    int array1[] = { 1, 2, 3 };
    list<int> l1(array1, array1 + sizeof(array1) / sizeof(array1[0]));
    list<int>::iterator it = l1.begin();
    cout << "l1:";
    while (it != l1.end())
    {
        cout << *it << ' ';
        ++it;
    }
    cout << endl;
    // 交换l1和l2中的元素
    list<int> l2;
    l1.swap(l2);
    it = l1.begin();
    cout << "l1:";
    while (it != l1.end())
    {
        cout << *it << ' ';
        ++it;
    }
    cout << endl;
    cout << "l2:";
    it = l2.begin();
    while (it != l2.end())
    {
        cout << *it << ' ';
        ++it;
    }
    cout << endl;
    // 将l2中的元素清空
    l2.clear();
    cout << "l2.size:" << l2.size() << endl;
}
1.2.6 list operations
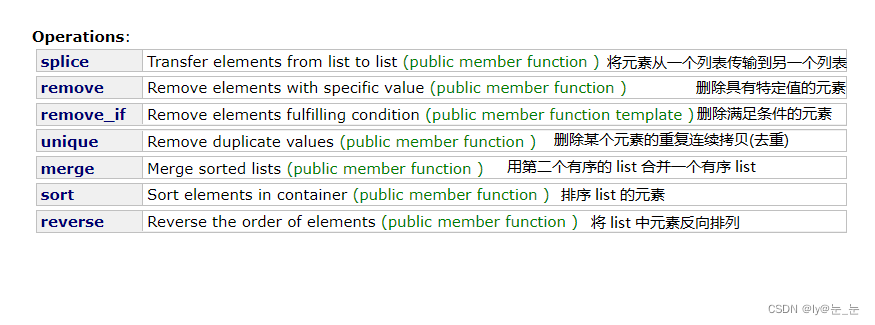
1. splice
splice()函数用于将元素从一个列表传输到另一个列表。它有三个重载版本:
- list1.splice(position, list2):将list2中的所有元素剪贴到list1的position位置;
- list1.splice(position, list2, iter):将list2中某个位置的迭代器iter指向的元素剪贴到list1中的position位置;
- list1.splice(position, list2, first, last):将list2中[first,last)区间内的元素剪贴到list1中的position位置。
int main()
{
	//list1.splice(position, list2, first, last):将list2中[first, last)区间内的元素剪贴到list1中的position位置
	list<int> l1 = { 1,2,3,4,5 };
	list<int> l2 = { 6,7,8,9,10 };
	list<int>::iterator position = l1.begin(); ++position; //2
	list<int>::iterator first = l2.begin(); ++first; //7
	list<int>::iterator last = l2.end(); --last; //10
	l1.splice(position, l2, first, last);
	list<int>::iterator it = l1.begin();
	while (it != l1.end())
	{
		cout << *it << ' ';
		++it;
	}
	cout << endl;
	return 0;
}

2.remove_if
remove_if()用于从范围[first,last)中删除满足特定条件的所有元素,并返回新范围的超尾迭代器。已删除的元素不会从容器中物理删除,它们的内存仍然分配。该函数仅在删除后返回容器的新结尾迭代器。
int main()
{
    list<int> v{ 1, 2, 3, 4, 5 };
    v.erase(remove_if(v.begin(), v.end(), [](int i) {return i % 2 == 0; }), v.end());
    for (auto i : v)
    {
        cout << i << " ";
    }
    cout << endl;
    return 0;
}
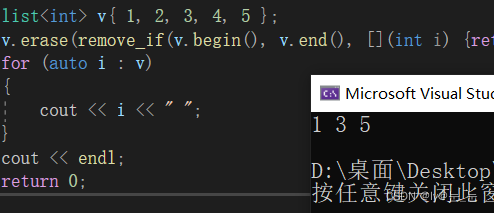
在此示例中,我们有一个包含1到5的整数list。我们使用remove_if()从向量中删除所有偶数。lambda函数[](int i){return i % 2 == 0;}检查整数是否为偶数。该函数返回一个迭代器,指向删除后向量的新结尾。然后我们使用erase()将所有元素从返回的迭代器到向量末尾删除。
3.sort/reverse
int main()
{
	list<int> l = { 3,5,2,1,4 };
	l.sort(); //默认升序
	list<int>::iterator it = l.begin();
	while (it != l.end())
	{
		cout << *it << ' ';
		++it;
	}
	cout << endl;
	l.sort(greater<int>());//降序
	it = l.begin();
	while (it != l.end())
	{
		cout << *it << ' ';
		++it;
	}
	cout << endl;
	l.reverse();//翻转链表
	it = l.begin();
	while (it != l.end())
	{
		cout << *it << ' ';
		++it;
	}
	cout << endl;
}

1.2.7 list的迭代器失效
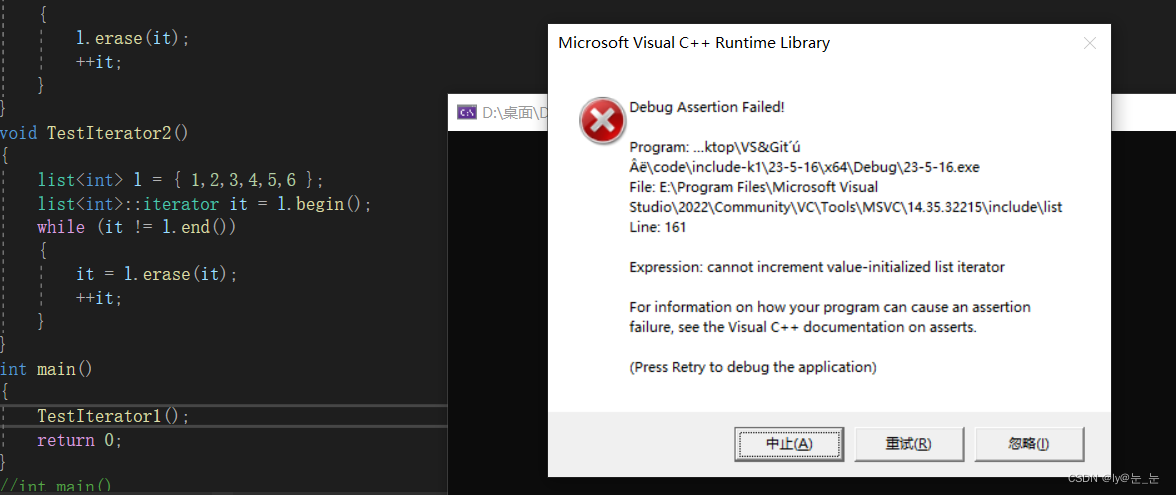
在C++中,当使用std::list容器的迭代器时,可能会遇到迭代器失效的问题。迭代器失效是指,当修改容器时,指向容器元素的迭代器可能会失效。以下是一些导致迭代器失效的常见情况:
当使用erase()方法删除元素时,指向被删除元素的迭代器将失效。
当使用insert()方法插入元素时,指向插入位置之后的所有元素的迭代器将失效。
当容器扩容时,所有指向容器元素的迭代器都将失效。
void TestIterator1()
{
	list<int> l = { 1,2,3,4,5,6 };
	list<int>::iterator it = l.begin();
	while (it != l.end())
	{
		l.erase(it);
		++it;
	}
}
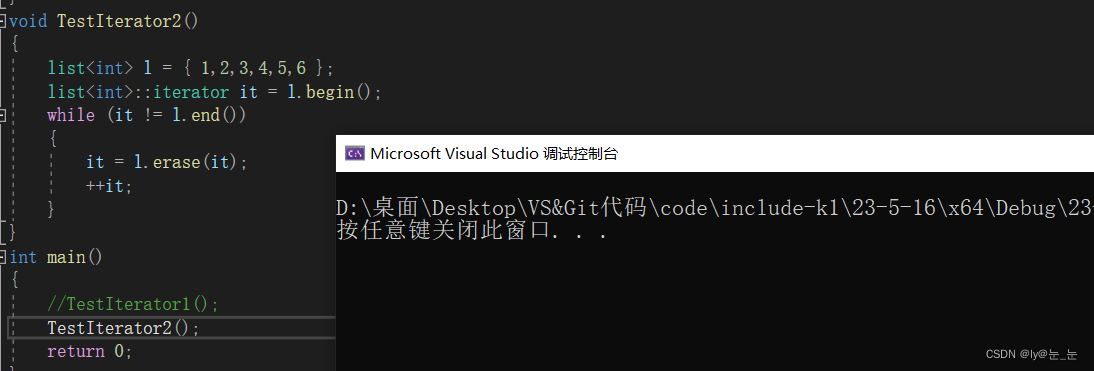
void TestIterator2()
{
	list<int> l = { 1,2,3,4,5,6 };
	list<int>::iterator it = l.begin();
	while (it != l.end())
	{
		it = l.erase(it);
		++it;
	}
}
TestIterator1():
TestIterator2():
2. list的深度剖析及模拟实现
模拟实现list时要先构造一个命名空间,防止调用的时候调用库函数中的内容。
2.1 list_node
模拟实现list,首先需要定义list_node,c++中任何一种结构,都是从空开始,然后用数学方式慢慢搭建而成,所以数学还是很重要的。
	template<class T>
	struct list_node
	{
		list_node<T>* _next;
		list_node<T>* _prev;
		T _data;

		list_node(const T& x = T())
			:_next(nullptr)
			,_prev(nullptr)
			,_data(x)
		{}
	};
2.2 __list_iterator
接下来实现迭代器,list会调用是个迭代器
	//迭代器的封装
	// 1、迭代器要么就是原生指针
	// 2、迭代器要么就是自定义类型对原生指针的封装,模拟指针的行为
	template<class T>
	struct __list_iterator
	{
		typedef list_node<T> node;
		typedef __list_iterator<T> self; //self这个就是迭代器
		node* _node;

		__list_iterator(node* n)
			:_node(n)
		{}
		T& operator*()
		{
			return _node->_data;
		}
		//下面就是完成对self(迭代器)的一些操作,如:it++,it--等
		self& operator++()
		{
			_node = _node->_next;
			return *this;
		}
		self operator++(int) //前置++
		{
			self tmp(*this);
			_node = _node->_next;
			return tmp;
		}
		self& operator--()
		{
			_node = _node->_prev;

			return *this;
		}
		self operator--(int) //前置--
		{
			self tmp(*this);
			_node = _node->_prev;

			return tmp;
		}
		bool operator!=(const self& s)
		{
			return _node != s._node;
		}
		bool operator==(const self& s)
		{
			return _node == s._node;
		}
	};
这个迭代器的实现较简单,但是这只是迭代器中的一部分,后面还有补充
2.3 list
	template<class T>
	class list
	{
		typedef list_node<T> node;
	public:
		typedef __list_iterator<T> iterator;
		iterator begin()
		{
			return iterator(_head->_next);
		}
		iterator begin() const
		{
			return iterator(_head->_next);
		}
		iterator end()
		{
			return iterator(_head);
		}
		iterator end() const
		{
			return iterator(_head);
		}
		void empty_init()
		{
			_head = new node;
			_head->_next = _head;
			_head->_prev = _head;
		}
		list()
		{
			empty_init();
		}
		list(int n, const T& x = T())
		{
			empty_init();//先初始化_head,否则_head为空
			while (n)
			{
				node* new_node = new node(x);
				node* tail = _head->_prev;

				_head->_prev = new_node;
				tail->_next = new_node;
				new_node->_prev = tail;
				new_node->_next = _head;
				--n;
			}
		}
		void swap(list<T>& tmp)
		{
			//在nampspace k这个命名空间中,需要使用的是c库中的swap(就近原则)
			std::swap(_head, tmp._head);
		}
		list(const list<T>& lt)
		{
			empty_init();
			list<T> tmp(lt.begin(), lt.end());
			swap(tmp);
		}
		template<class iterator>
		list(iterator first, iterator last)
		{
			empty_init(); //先初始化_head,否则_head为空
			while (first != last)
			{
				push_back(*first);
				++first;
			}
		}
		// lt1 = lt2
		list<T>& operator=(list<T> lt)
		{
			swap(lt);
			return *this;
		}
		~list()
		{
			clear();
			delete _head;
			_head = nullptr;
		}
		void clear()
		{
			iterator it = begin();
			while (it != end())
			{
				//it = erase(it);
				erase(it++);
			}
		}
		iterator insert(iterator pos,  const T& x)
		{
			node* cur = pos._node;
			node* prev = cur->_prev;
			node* new_node = new node(x);

			prev->_next = new_node;
			new_node->_prev = prev;
			new_node->_next = cur;
			cur->_prev = new_node;

			return iterator(new_node);
		}
		iterator erase(iterator pos)
		{
			assert(pos != end());
			node* prev = pos._node->_prev;
			node* next = pos._node->_next;

			prev->_next = next;
			next->_prev = prev;
			delete pos._node;

			return iterator(next);
		}
		void push_back(const T& x = T())
		{
			insert(end(), x);
		}
		void push_front(const T& x = T())
		{
			insert(begin(), x);
		}
		void pop_back()
		{
			erase(--end());
		}

		void pop_front()
		{
			erase(begin());
		}
	private:
		node* _head;
	};
list的构造中,需要注意的就是先初始化_head,否则_head为空,对head的一些操作(如:_head->_prev = new_node)就会导致空指针的使用;list(const list& lt)这个构造的思路挺好,剩下的就是一些基本操作。
2.3 __list_const_iterator
__list_const_iterator与__list_iterator的区别就是是否可以修改链表中的内容,所以对T& operator*() 时,返回const T& operator* 即可。
	template<class T>
	struct __list_const_iterator
	{
		typedef list_node<T> node;
		typedef __list_const_iterator<T> self;
		node* _node;

		__list_const_iterator(node* n)
			:_node(n)
		{}
		const T& operator*()
		{
			return _node->_data;
		}
		.......省略

	};
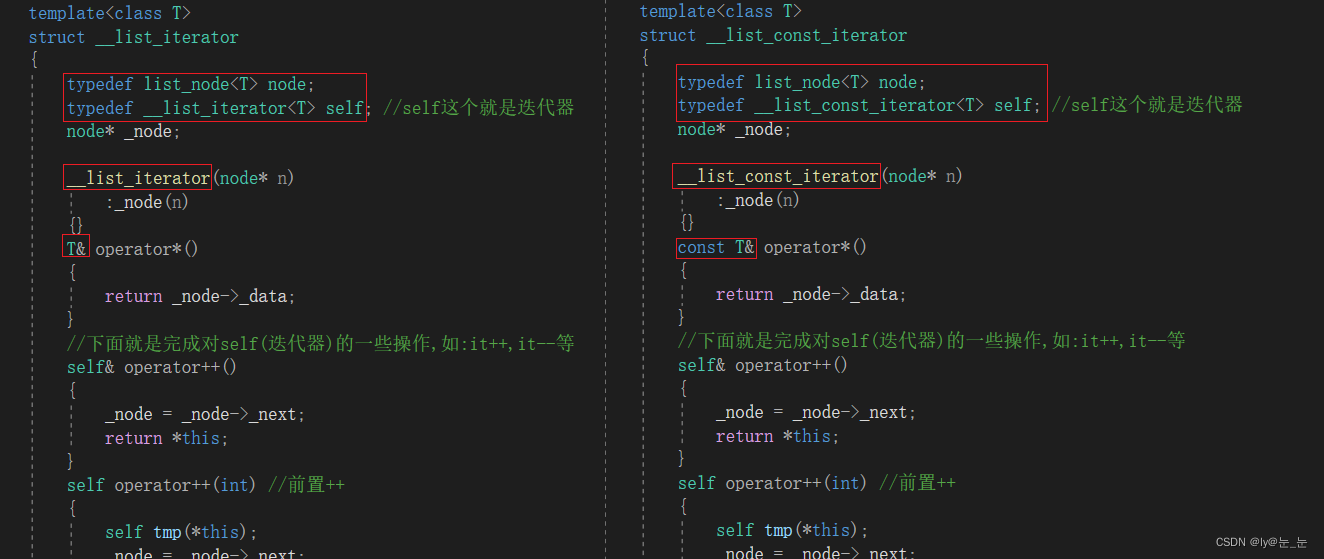
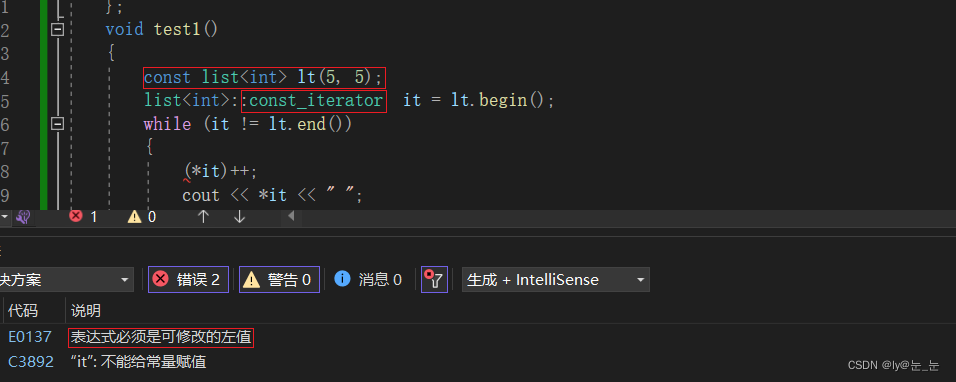
所以当调用iterator时,调用的是T&;当调用const_iterator时,调用的是const T&
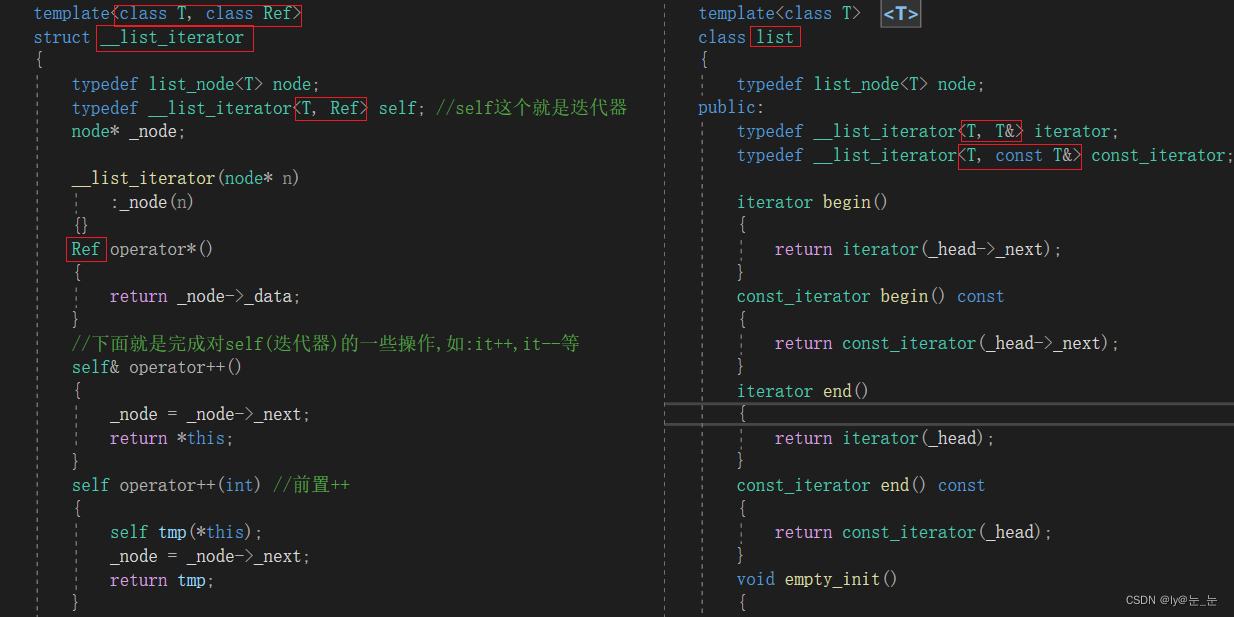
然后再加一个const T*,完整代码如下:
namespace k
{
	template<class T>
	struct list_node
	{
		list_node<T>* _next;
		list_node<T>* _prev;
		T _data;

		list_node(const T& x = T())
			:_next(nullptr)
			,_prev(nullptr)
			,_data(x)
		{}
	};
	//迭代器的封装
	// 1、迭代器要么就是原生指针
	// 2、迭代器要么就是自定义类型对原生指针的封装,模拟指针的行为
	template<class T, class Ref, class Ptr>
	struct __list_iterator
	{
		typedef list_node<T> node;
		typedef __list_iterator<T, Ref, Ptr> self; //self这个就是迭代器
		node* _node;

		__list_iterator(node* n)
			:_node(n)
		{}
		Ref operator*()
		{
			return _node->_data;
		}
		Ptr operator->()
		{
			return &_node->_data;
		}
		//下面就是完成对self(迭代器)的一些操作,如:it++,it--等
		self& operator++()
		{
			_node = _node->_next;
			return *this;
		}
		self operator++(int) //前置++
		{
			self tmp(*this);
			_node = _node->_next;
			return tmp;
		}
		self& operator--()
		{
			_node = _node->_prev;

			return *this;
		}
		self operator--(int) //前置--
		{
			self tmp(*this);
			_node = _node->_prev;

			return tmp;
		}
		bool operator!=(const self& s)
		{
			return _node != s._node;
		}
		bool operator==(const self& s)
		{
			return _node == s._node;
		}
	};
	template<class T>
	class list
	{
		typedef list_node<T> node;
	public:
		typedef __list_iterator<T, T&, T*> iterator;
		typedef __list_iterator<T, const T&, const T*> const_iterator;

		iterator begin()
		{
			return iterator(_head->_next);
		}
		const_iterator begin() const
		{
			return const_iterator(_head->_next);
		}
		iterator end()
		{
			return iterator(_head);
		}
		const_iterator end() const
		{
			return const_iterator(_head);
		}
		void empty_init()
		{
			_head = new node;
			_head->_next = _head;
			_head->_prev = _head;
		}
		list()
		{
			empty_init();
		}
		list(int n, const T& x = T())
		{
			empty_init();//先初始化_head,否则_head为空
			while (n)
			{
				node* new_node = new node(x);
				node* tail = _head->_prev;

				_head->_prev = new_node;
				tail->_next = new_node;
				new_node->_prev = tail;
				new_node->_next = _head;
				--n;
			}
		}
		void swap(list<T>& tmp)
		{
			//在nampspace k这个命名空间中,需要使用的是c库中的swap(就近原则)
			std::swap(_head, tmp._head);
		}
		list(const list<T>& lt)
		{
			empty_init();
			list<T> tmp(lt.begin(), lt.end());
			swap(tmp);
		}
		template<class iterator>
		list(iterator first, iterator last)
		{
			empty_init(); //先初始化_head,否则_head为空
			while (first != last)
			{
				push_back(*first);
				++first;
			}
		}
		// lt1 = lt2
		list<T>& operator=(list<T> lt)
		{
			swap(lt);
			return *this;
		}
		~list()
		{
			clear();
			delete _head;
			_head = nullptr;
		}
		void clear()
		{
			iterator it = begin();
			while (it != end())
			{
				//it = erase(it);
				erase(it++);
			}
		}
		iterator insert(iterator pos,  const T& x)
		{
			node* cur = pos._node;
			node* prev = cur->_prev;
			node* new_node = new node(x);

			prev->_next = new_node;
			new_node->_prev = prev;
			new_node->_next = cur;
			cur->_prev = new_node;

			return iterator(new_node);
		}
		iterator erase(iterator pos)
		{
			assert(pos != end());
			node* prev = pos._node->_prev;
			node* next = pos._node->_next;

			prev->_next = next;
			next->_prev = prev;
			delete pos._node;

			return iterator(next);
		}
		void push_back(const T& x = T())
		{
			insert(end(), x);
		}
		void push_front(const T& x = T())
		{
			insert(begin(), x);
		}
		void pop_back()
		{
			erase(--end());
		}

		void pop_front()
		{
			erase(begin());
		}
	private:
		node* _head;
	};
	void test1()
	{
		list<int> lt(5, 5);
		list<int>::iterator  it = lt.begin();
		while (it != lt.end())
		{
			//(*it)++;
			cout << *it << " ";
			++it;
		}
		cout << endl;
	}
}

