1. 整合配置
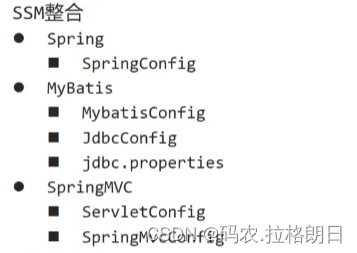
首先创建maven模块,导入相应的坐标
  <dependencies>
    <dependency>
      <groupId>org.springframework</groupId>
      <artifactId>spring-webmvc</artifactId>
      <version>5.2.10.RELEASE</version>
    </dependency>

    <dependency>
      <groupId>org.springframework</groupId>
      <artifactId>spring-jdbc</artifactId>
      <version>5.2.10.RELEASE</version>
    </dependency>

    <dependency>
      <groupId>org.springframework</groupId>
      <artifactId>spring-test</artifactId>
      <version>5.2.10.RELEASE</version>
    </dependency>

    <dependency>
      <groupId>org.mybatis</groupId>
      <artifactId>mybatis</artifactId>
      <version>3.5.6</version>
    </dependency>

    <dependency>
      <groupId>org.mybatis</groupId>
      <artifactId>mybatis-spring</artifactId>
      <version>1.3.0</version>
    </dependency>

    <dependency>
      <groupId>mysql</groupId>
      <artifactId>mysql-connector-java</artifactId>
      <version>5.1.47</version>
    </dependency>

    <dependency>
      <groupId>com.alibaba</groupId>
      <artifactId>druid</artifactId>
      <version>1.1.16</version>
    </dependency>

    <dependency>
      <groupId>junit</groupId>
      <artifactId>junit</artifactId>
      <version>4.12</version>
      <scope>test</scope>
    </dependency>

    <dependency>
      <groupId>javax.servlet</groupId>
      <artifactId>javax.servlet-api</artifactId>
      <version>3.1.0</version>
      <scope>provided</scope>
    </dependency>

    <dependency>
      <groupId>com.fasterxml.jackson.core</groupId>
      <artifactId>jackson-databind</artifactId>
      <version>2.9.0</version>
    </dependency>
  </dependencies>
  <build>
    <finalName>springmvc_08_ssm</finalName>
    <plugins>
      <plugin>
        <groupId>org.apache.tomcat.maven</groupId>
        <artifactId>tomcat7-maven-plugin</artifactId>
        <version>2.1</version>
        <configuration>
          <port>80</port>
          <path>/</path>
        </configuration>
      </plugin>
    </plugins>
  </build>
然后创建相应的包结构
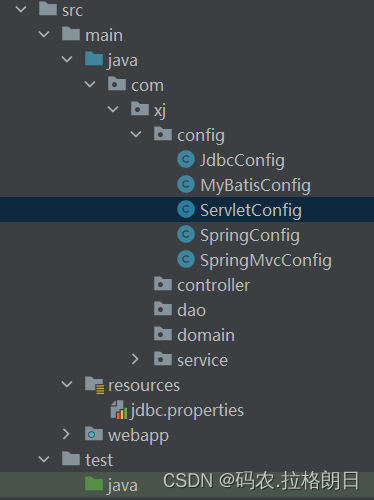
整合Mybatis内容参考https://blog.csdn.net/qq_45681515/article/details/130609553?spm=1001.2014.3001.5502
整合mvc内容参考https://blog.csdn.net/qq_45681515/article/details/130768992?spm=1001.2014.3001.5502
和https://blog.csdn.net/qq_45681515/article/details/130820654?spm=1001.2014.3001.5502
注释参考
@Import注释,并将JdbcConfig类和MyBatisConfig类引入当前配置类中。这样可以在SpringConfig中访问JdbcConfig和MyBatisConfig中定义的任何bean或方法定义;
在配置类上使用了@EnableWebMvc注释。这意味着应用程序将使用Spring MVC来处理Web请求,并启用了MVC Java配置支持。Spring MVC将自动注册注解处理器、消息转换器和其他必要的组件,以便可以处理controller类方法上的注解@RequestMapping
2. 功能模块开发

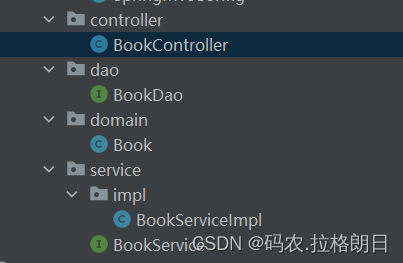
请求参数、映射路径、REST快速开发等内容参考
https://blog.csdn.net/qq_45681515/article/details/130823967?spm=1001.2014.3001.5502
https://blog.csdn.net/qq_45681515/article/details/130882852?spm=1001.2014.3001.5502
问题一:在service的实现类中自动注入bookDao报错
这是因为dao目录下的文件采用了自动代理,并没有定义为bean,且idea此处报错并不是真的出现了错误
3. 接口测试
首先使用Junit对service层进行测试
参考:https://blog.csdn.net/qq_45681515/article/details/130618999?spm=1001.2014.3001.5502
@RunWith(SpringJUnit4ClassRunner.class)
@ContextConfiguration(classes = SpringConfig.class)
public class BookServiceTest {

    @Autowired
    private BookService bookService;

    @Test
    public void testGetById(){
        Book byId = bookService.getById(1);
        System.out.println(byId);
    }

    @Test
    public void testGetAll(){
        List<Book> all = bookService.getAll();
        System.out.println(all);
    }
}
其次对controller层进行测试;
采用postman发送请求,示例save()操作;
启动Tomcat,然后咋子postman里面发送请求;
最后查看数据库表单是否更新

最后数据库实现了数据更新;
这里插入的数据为null是因为在BooKController中,save方法的参数中没有加@RequestBody,而@RequestBody主要用来接收前端传递给后端的json字符串中的数据的,所以没写之前得到是null

最后加入Spring事务,具体内容参考:
https://blog.csdn.net/qq_45681515/article/details/130766093?spm=1001.2014.3001.5502

