前言
对于Android中的触摸事件即指手指触摸到屏幕时产生的点击事件;
类型如下:
MotionEvent.ACTION_DOWNMotionEvent.ACTION_UPMotionEvent.ACTION_MOVEMotionEvent.ACTION_CANCEL

Android事件处理流程
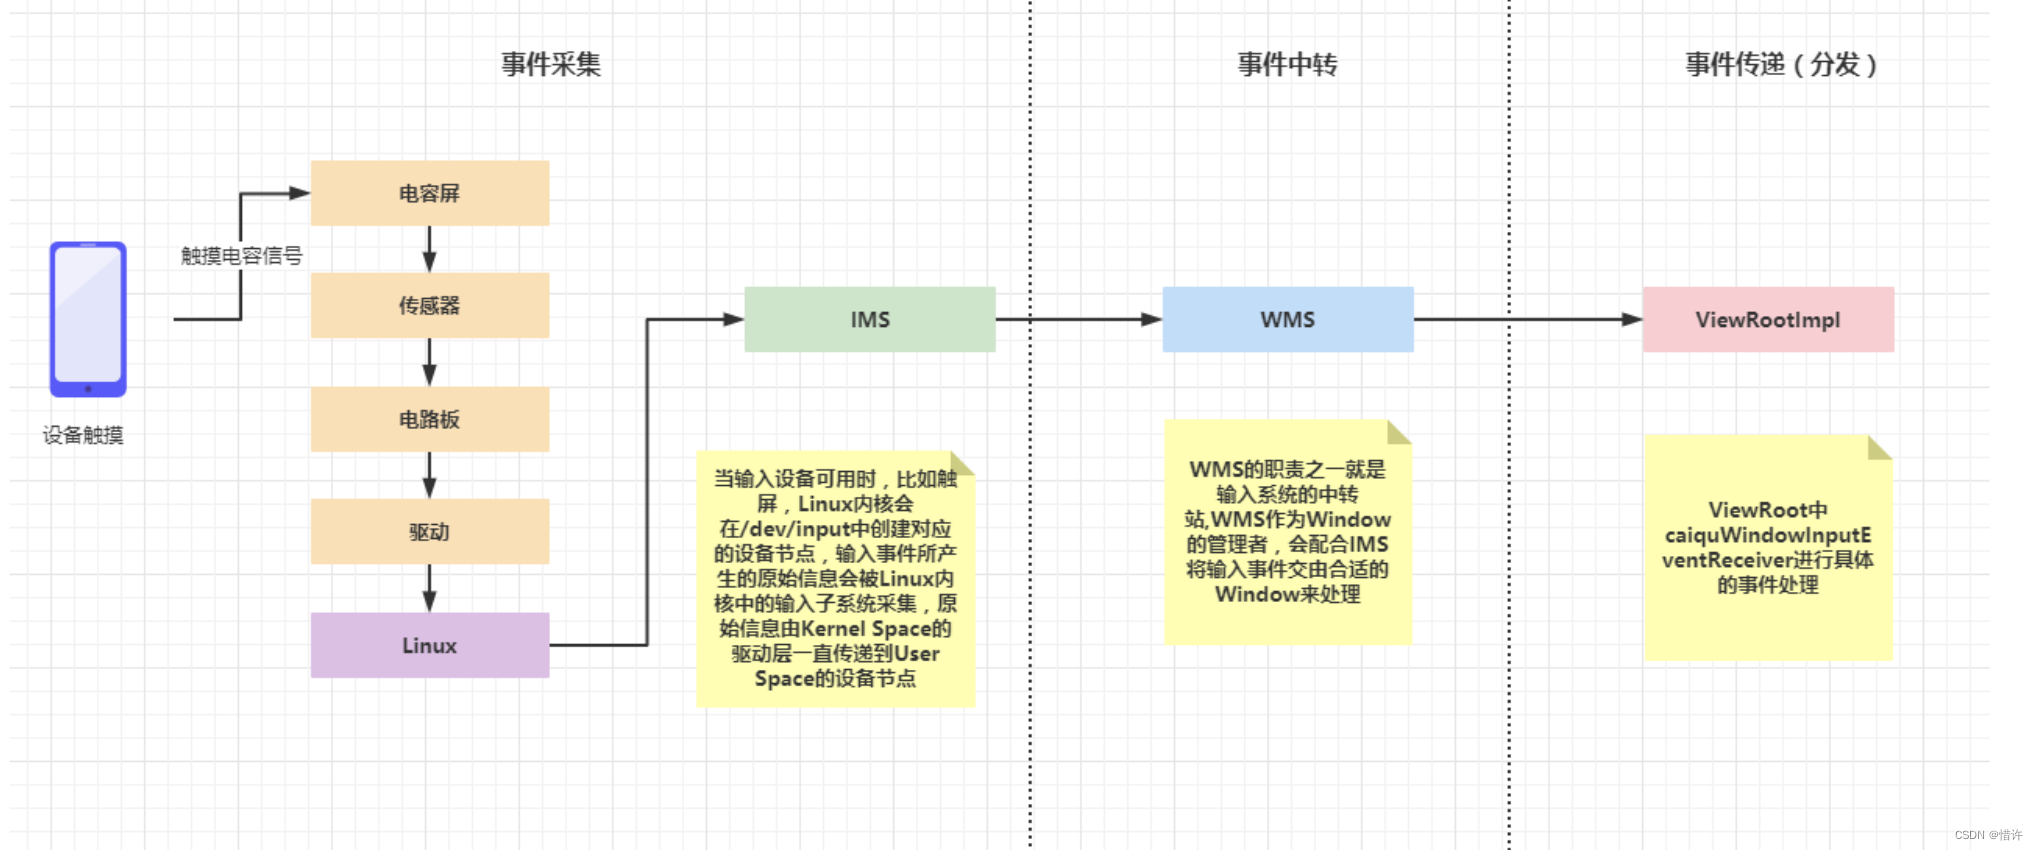
主要涉及三个流程:事件采集、事件中转以及事件分发;
在Android中,Touch事件的分发分服务端和应用端。在服务端由WindowManagerService(借助InputManagerService)负责采集和分发的,在应用端则是由ViewRootImpl(内部有一个mView变量指向View树的根,负责控制View树的UI绘制和事件消息的分发)负责分发的。
当输入设备可用时,比如触屏,Linux内核会在dev/input中创建对应的设备节点,输入事件所产生的原始信息会被Linux内核中的输入子系统采集,原始信息由Kernel Space的驱动层一直传递到User Space的设备节点;
IMS所做的工作就是监听/dev/input/下的所有设备节点,当设备节点有数据时会将数据进行加工处理并找到合适的Window,将输入事件分发给它;
Linux相关函数简介
IMS监听/dev/input设备节点,具体实现需要借助Linux相关函数,这里简单介绍下:
- epoll函数【更多详解请参考:epoll详解】
-
epoll_create:创建 epoll 对象,会占用一个fd值,在linux下可以通过查看/proc/进程id/fd/,可以看到具体的fd,在epoll使用完毕后,需要调用close()进行关闭; -
epoll_ctl:epoll的事件注册函数,它不同于select()函数是在监听事件时告诉内核要监听什么类型的事件,而是在这里先注册要监听的事件类型; -
epoll_wait:收集在epoll监控的事件中已经发送的事件;函数调用成功,返回对应I/O上已准备好的文件描述符数目。返回0表示已超时;
- iNotify函数【更多详解请参考:Linux inotify详解】
它是一个内核用于通知用户空间程序文件系统变化的机制;
在用户态,inotify 通过三个系统调用和在返回的文件描述符上的文件 I/ 操作来使用,使用 inotify 的第一步是创建 inotify 实例:
int fd = inotify_init ();
每一个 inotify 实例对应一个独立的排序的队列。
文件系统的变化事件被称做 watches 的一个对象管理,每一个 watch 是一个二元组(目标,事件掩码),目标可以是文件或目录,事件掩码表示应用希望关注的 inotify 事件,每一个位对应一个 inotify 事件。Watch 对象通过 watch描述符引用,watches 通过文件或目录的路径名来添加。目录 watches 将返回在该目录下的所有文件上面发生的事件。
下面函数用于添加一个 watch:
int wd = inotify_add_watch (fd, path, mask);
fd 是 inotify_init() 返回的文件描述符,path 是被监视的目标的路径名(即文件名或目录名),mask 是事件掩码, 在头文件 linux/inotify.h 中定义了每一位代表的事件。可以使用同样的方式来修改事件掩码,即改变希望被通知的inotify 事件。Wd 是 watch 描述符。
下面的函数用于删除一个 watch:
int ret = inotify_rm_watch (fd, wd);
fd 是 inotify_init() 返回的文件描述符,wd 是 inotify_add_watch() 返回的 watch 描述符。Ret 是函数的返回值。
源码分析
从内核到IMS过程
我们从SystemServer.startOtherServices()方法出发:
#SystemServer.startOtherServices
			....
            inputManager = new InputManagerService(context);
            ...
            inputManager.setWindowManagerCallbacks(wm.getInputManagerCallback());
            inputManager.start();
     		...
这里会启动InputManagerService,我们看下InputManagerService的构造方法以及start方法都做了些什么?
    public InputManagerService(Context context) {
        this.mContext = context;
        this.mHandler = new InputManagerHandler(DisplayThread.get().getLooper());
        mStaticAssociations = loadStaticInputPortAssociations();
		...
        mPtr = nativeInit(this, mContext, mHandler.getLooper().getQueue());//调用nativeInit方法
       ...
    }


    public void start() {
    	...
        nativeStart(mPtr);//调用nativeStart方法
		...
    }
我们找到InputManagerService.cpp文件里的nativeInit以及nativeStart方法:

找到InputManager.cpp文件,对应构造方法以及start方法如下:
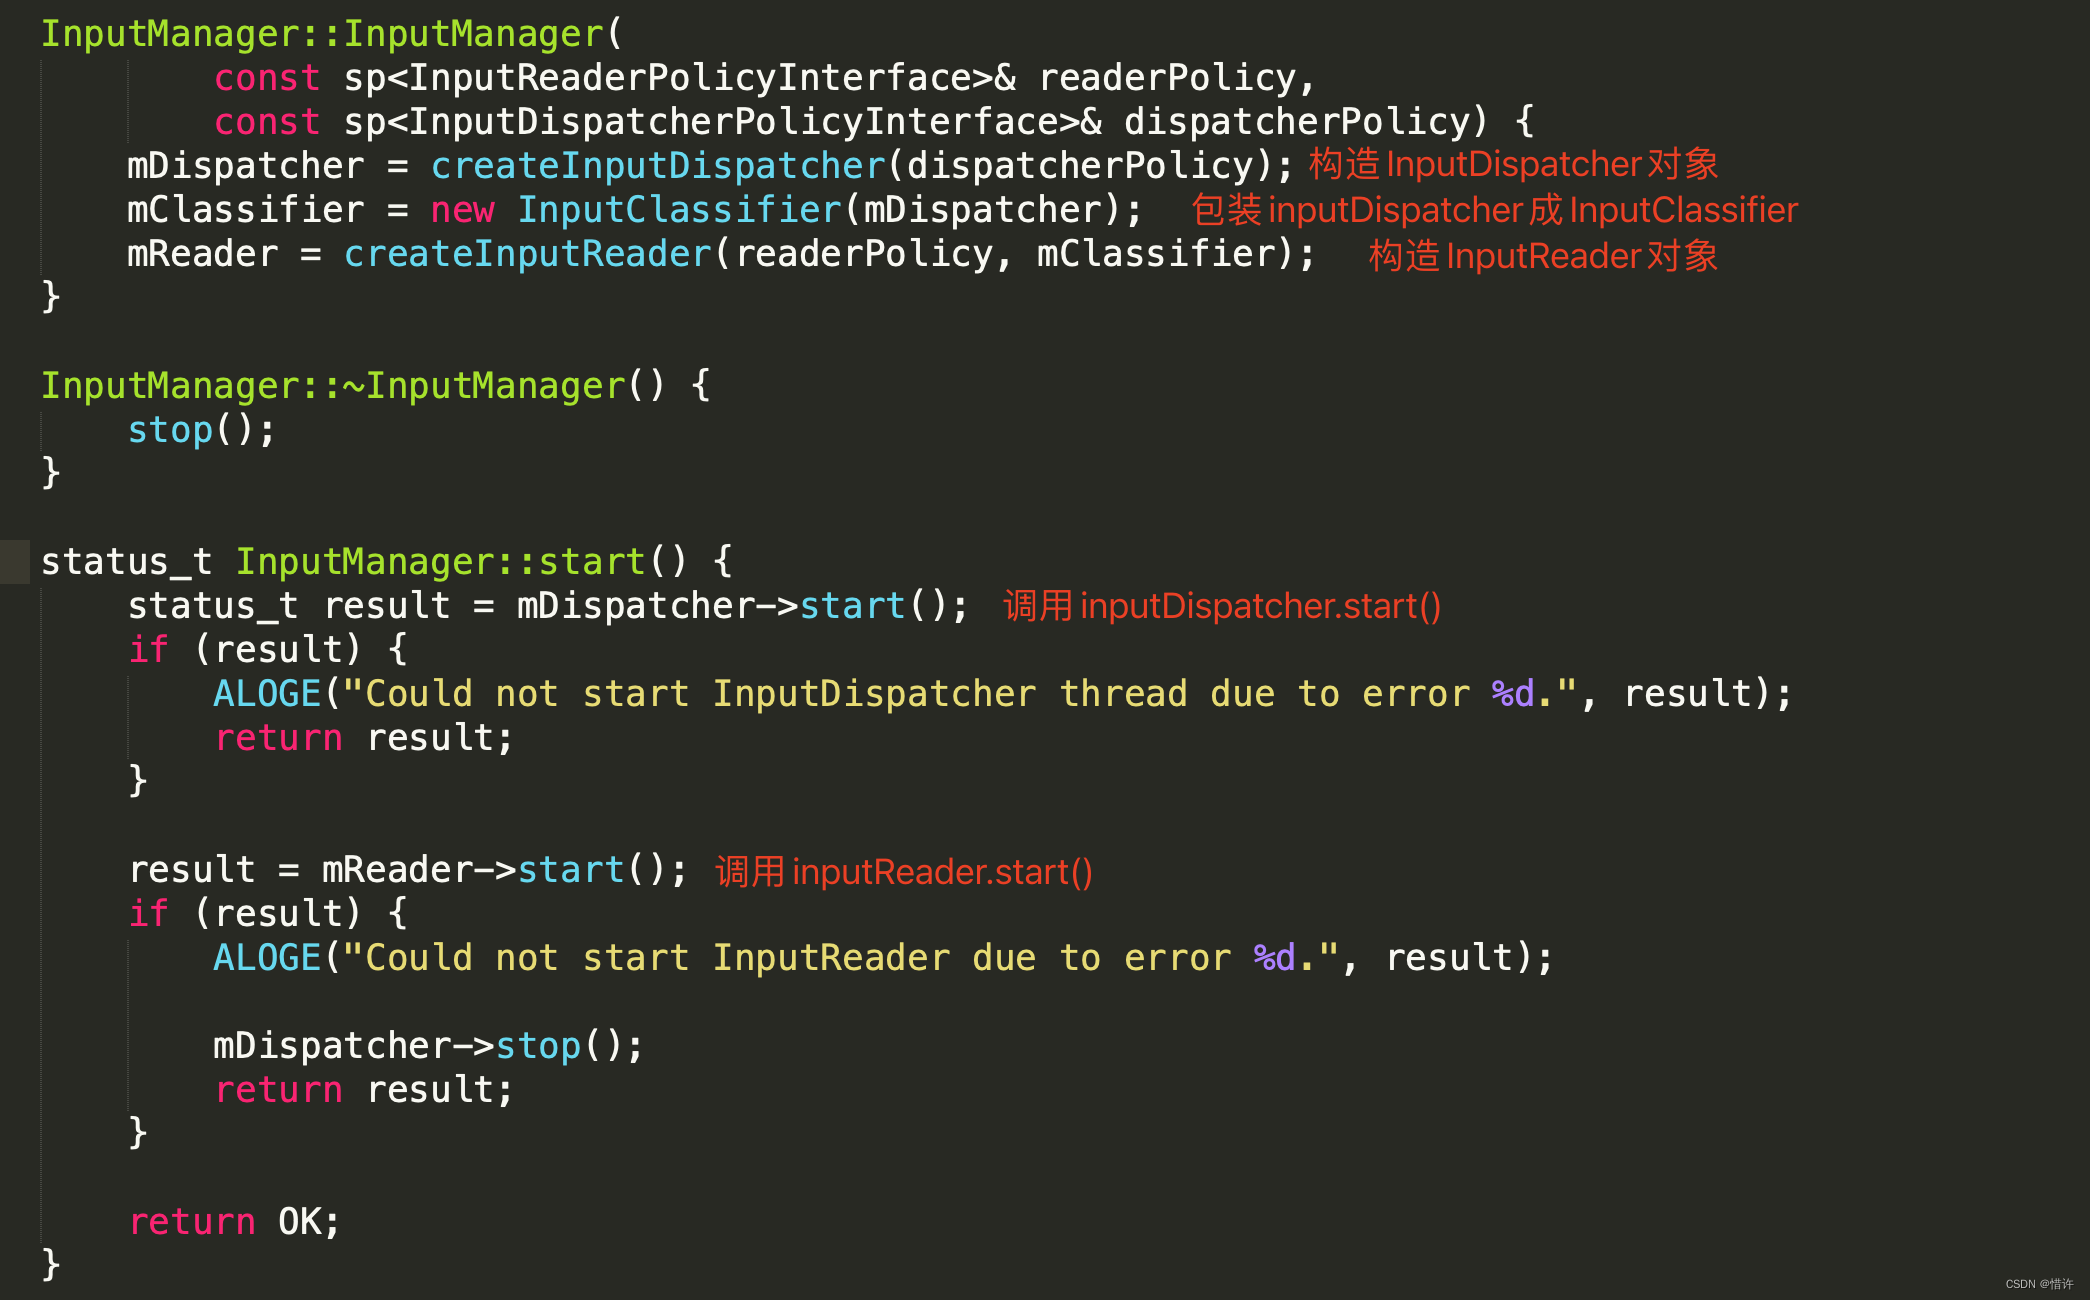
可以看到InputManager主要做以下几件事:
- 构造InputDispatcher对象;(用于后续事件分发处理)
- 构造InputReader对象;(用于事件输入监听)
- 调用InputDispatcher和InputReader的start()方法;
Q:那InputReader是如何监听事件输入的呢?
我们从InputReader::start方法入手!

我们看下loopOnce函数做了什么?
void InputReader::loopOnce() {
    int32_t oldGeneration;
    int32_t timeoutMillis;
    bool inputDevicesChanged = false;
    std::vector<InputDeviceInfo> inputDevices;
    {
    ...
    size_t count = mEventHub->getEvents(timeoutMillis, mEventBuffer, EVENT_BUFFER_SIZE); //从EventHub中读取事件,需要注意内部使用epoll机制实现,调用了epoll_wait进行阻塞,当fd发生变化的时候执行后面的代码
    {
    	....
        if (count) {
            processEventsLocked(mEventBuffer, count); //处理事件
        }

    ...

    // 当输入设备的描述更改时发送一个消息
    if (inputDevicesChanged) {
        mPolicy->notifyInputDevicesChanged(inputDevices);
    }

    //将事件传递给InputDispatcher
    mQueuedListener->flush();
}
先不着急分析 processEventsLocked方法是如何来处理事件的,我们先了解下EventHub
先看下EventHub的构造方法:
EventHub::EventHub(void)
      : mBuiltInKeyboardId(NO_BUILT_IN_KEYBOARD),
        mNextDeviceId(1),
        mControllerNumbers(),
        mOpeningDevices(nullptr),
        mClosingDevices(nullptr),
        mNeedToSendFinishedDeviceScan(false),
        mNeedToReopenDevices(false),
        mNeedToScanDevices(true),
        mPendingEventCount(0),
        mPendingEventIndex(0),
        mPendingINotify(false) {
    ensureProcessCanBlockSuspend();

    mEpollFd = epoll_create1(EPOLL_CLOEXEC);//调用epoll_create创建 eventpoll 对象
    mINotifyFd = inotify_init(); //调用inotify_init
    mInputWd = inotify_add_watch(mINotifyFd, DEVICE_PATH, IN_DELETE | IN_CREATE);  	//调用inotify_add_watch设置监听目标路径为DEVICE_PATH,即/dev/input/
 	...
    int result = epoll_ctl(mEpollFd, EPOLL_CTL_ADD, mINotifyFd, &eventItem);//调用epoll_ctl注册监听事件
	...
}
再看下mEventHub->getEvents()方法:
size_t EventHub::getEvents(int timeoutMillis, RawEvent* buffer, size_t bufferSize) {
  ...
    for (;;) {
     	...
        int pollResult = epoll_wait(mEpollFd, mPendingEventItems, EPOLL_MAX_EVENTS, timeoutMillis);//调用epoll_wait监听事件输入

        if (pollResult == 0) {
            // Timed out.
            mPendingEventCount = 0;
            break;
        }

        if (pollResult < 0) {
            // An error occurred.
            mPendingEventCount = 0;

            // Sleep after errors to avoid locking up the system.
            // Hopefully the error is transient.
            if (errno != EINTR) {
                ALOGW("poll failed (errno=%d)\n", errno);
                usleep(100000);
            }
        } else {
            // Some events occurred.
            mPendingEventCount = size_t(pollResult);
        }
    }

    return event - buffer;
}
可以看到EventHub内部使用epoll函数以及inotify函数实现事件监听回调!
我们继续跟进事件处理函数:processEventsLocked(mEventBuffer, count)
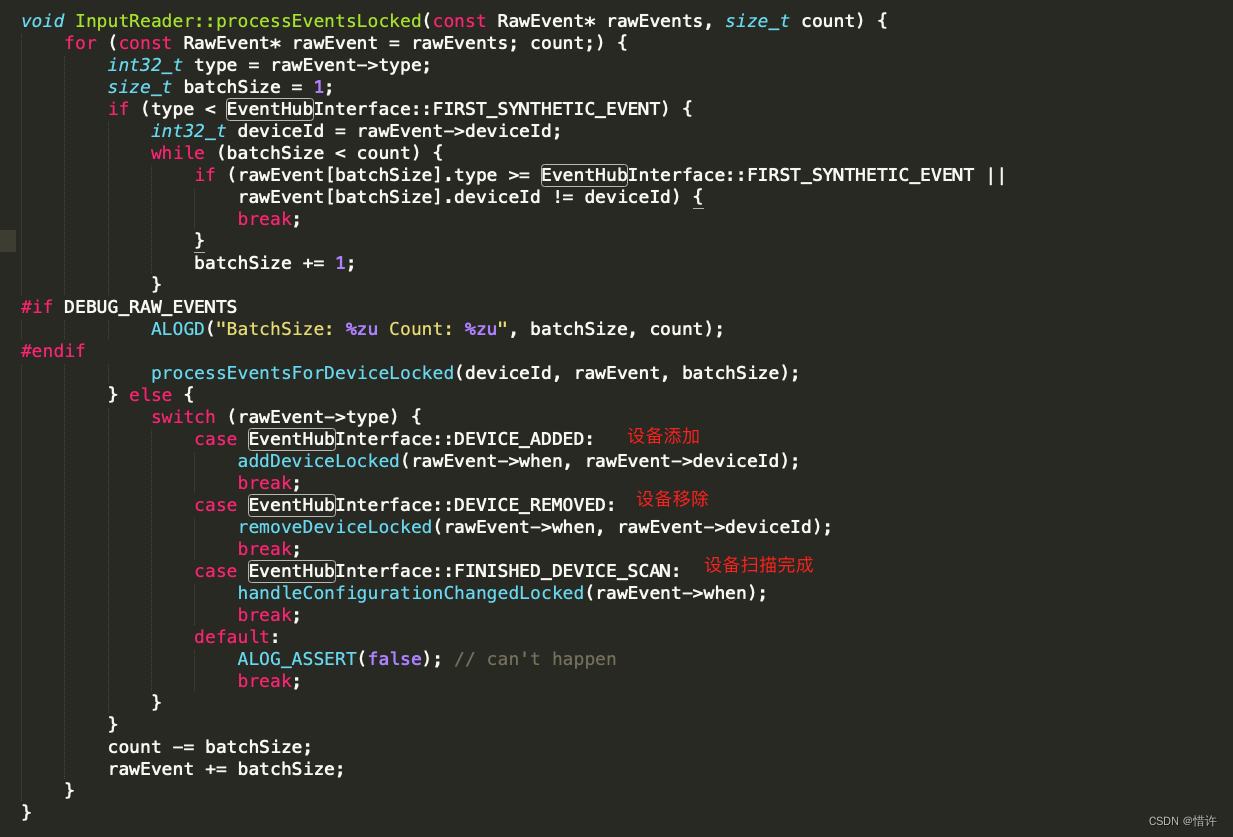
继续跟进processEventsForDeviceLocked()

可以看到会交给device-->process方法处理:
我们找到InputDevice.cpp文件对应的process函数

而mapper.process会交给TouchInputMapper::process处理:
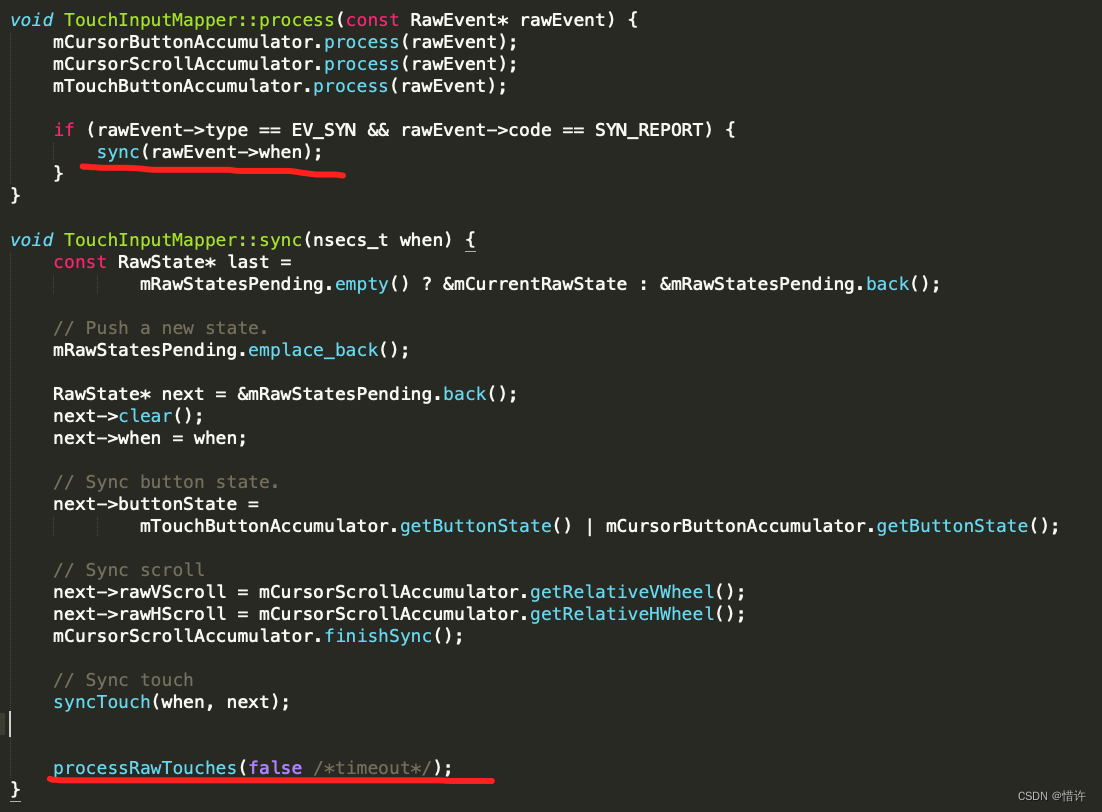
紧接着调用processRawTouches方法
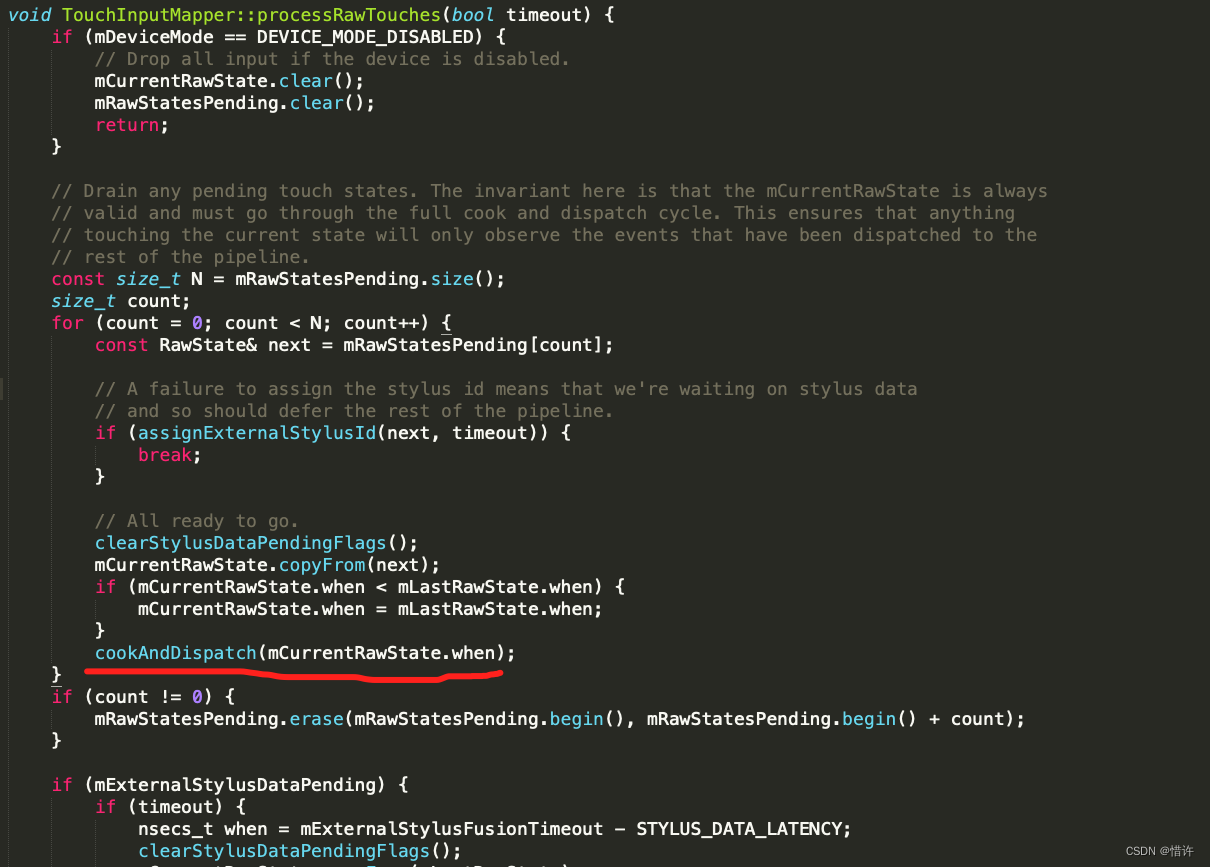
调用cookAndDispatch方法,最终会调用TouchInputMapper::dispatchMotion方法
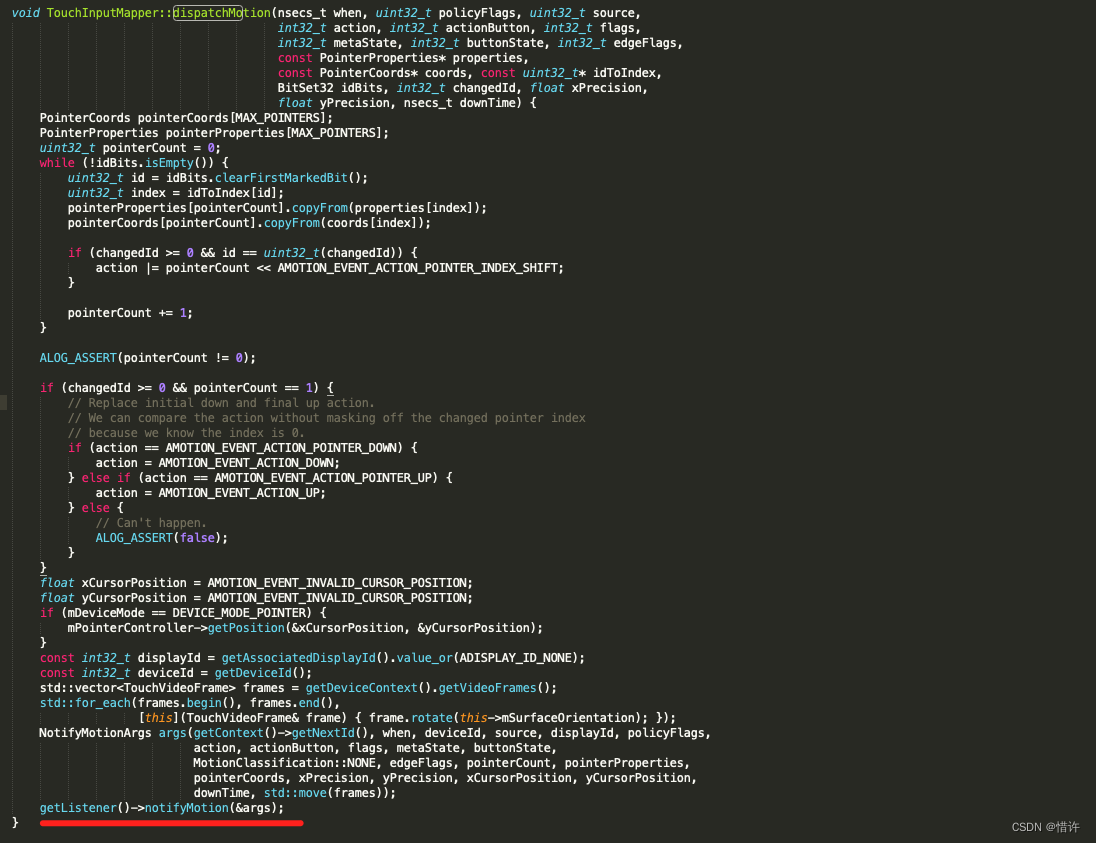
最终会执行getListener()-->notifyMotion方法,那这里的getListener()是谁呢?
InputListenerInterface* InputReader::ContextImpl::getListener() {
    return mReader->mQueuedListener.get();
}
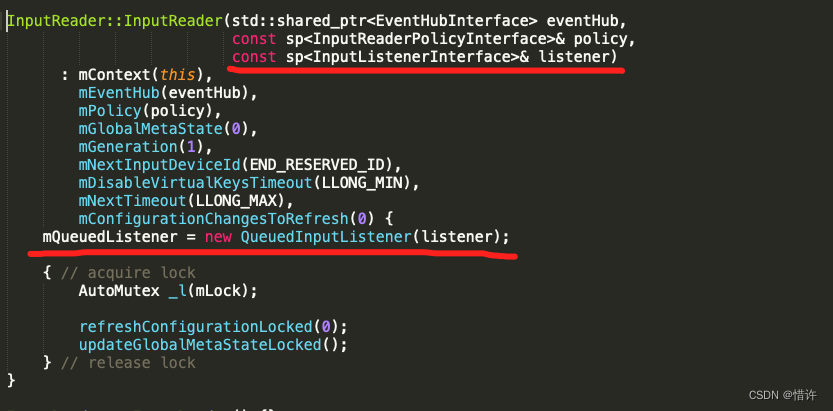

几者结合可以得出结论:getListener()即为InputDispatcher对象!
至此,InputReader完成事件的监听工作并后续交给InputDispatcher进行分发!
InputReader监听输入整体流程
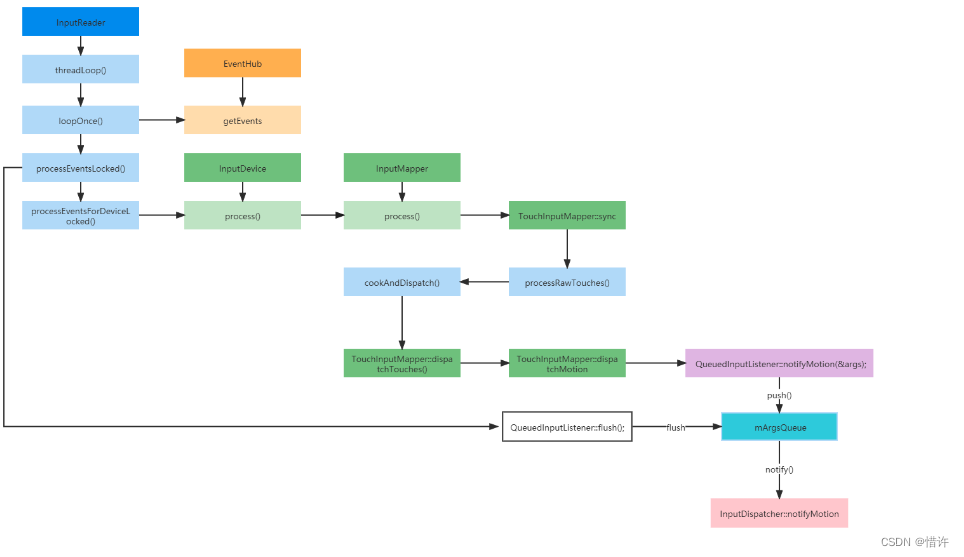
Q:InputDispatcher又是如何进行事件分发的呢?
我们先看下InputDispatcher::notifyMotion方法:
void InputDispatcher::notifyMotion(const NotifyMotionArgs* args) {
	...
    if (needWake) {
        mLooper->wake(); //会调用mLooper->wake()唤醒InputDispatcher线程
    }
}
和InputReader类似,InputDispatcher::start方法同样会开启一个线程,并执行dispatchOnce()函数

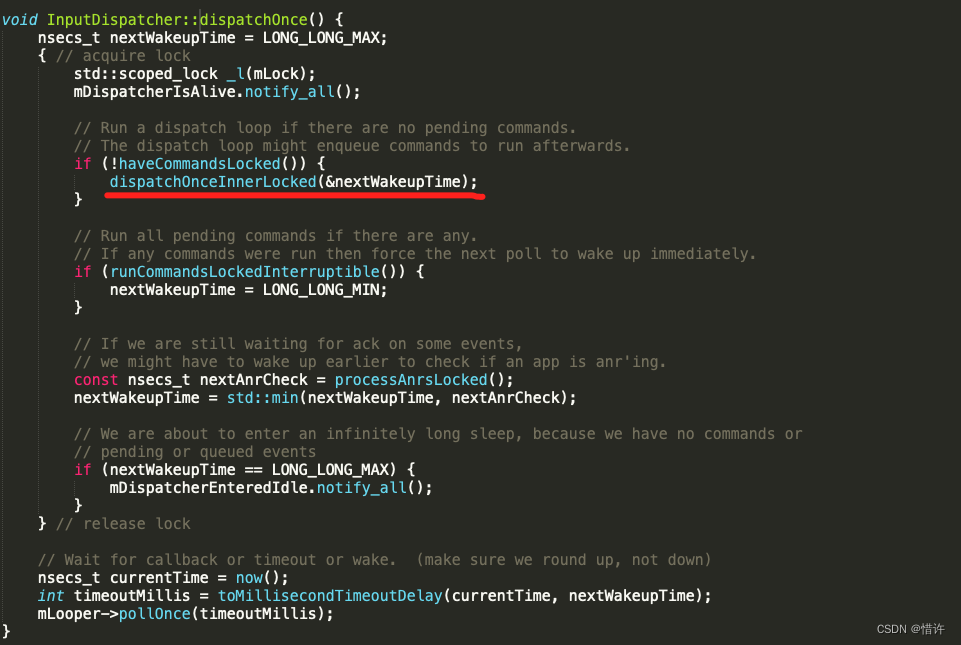
我们看下dispatchOnceInnnerLocked函数
void InputDispatcher::dispatchOnceInnerLocked(nsecs_t* nextWakeupTime) {

	...
    switch (mPendingEvent->type) {
    		...
    		//这里我们只关注motion事件
        case EventEntry::Type::MOTION: {
            MotionEntry* typedEntry = static_cast<MotionEntry*>(mPendingEvent);
            if (dropReason == DropReason::NOT_DROPPED && isAppSwitchDue) {
                dropReason = DropReason::APP_SWITCH;
            }
            if (dropReason == DropReason::NOT_DROPPED && isStaleEvent(currentTime, *typedEntry)) {
                dropReason = DropReason::STALE;
            }
            if (dropReason == DropReason::NOT_DROPPED && mNextUnblockedEvent) {
                dropReason = DropReason::BLOCKED;
            }
            done = dispatchMotionLocked(currentTime, typedEntry, &dropReason, nextWakeupTime);
            break;
        }
    }
	...
    }
}
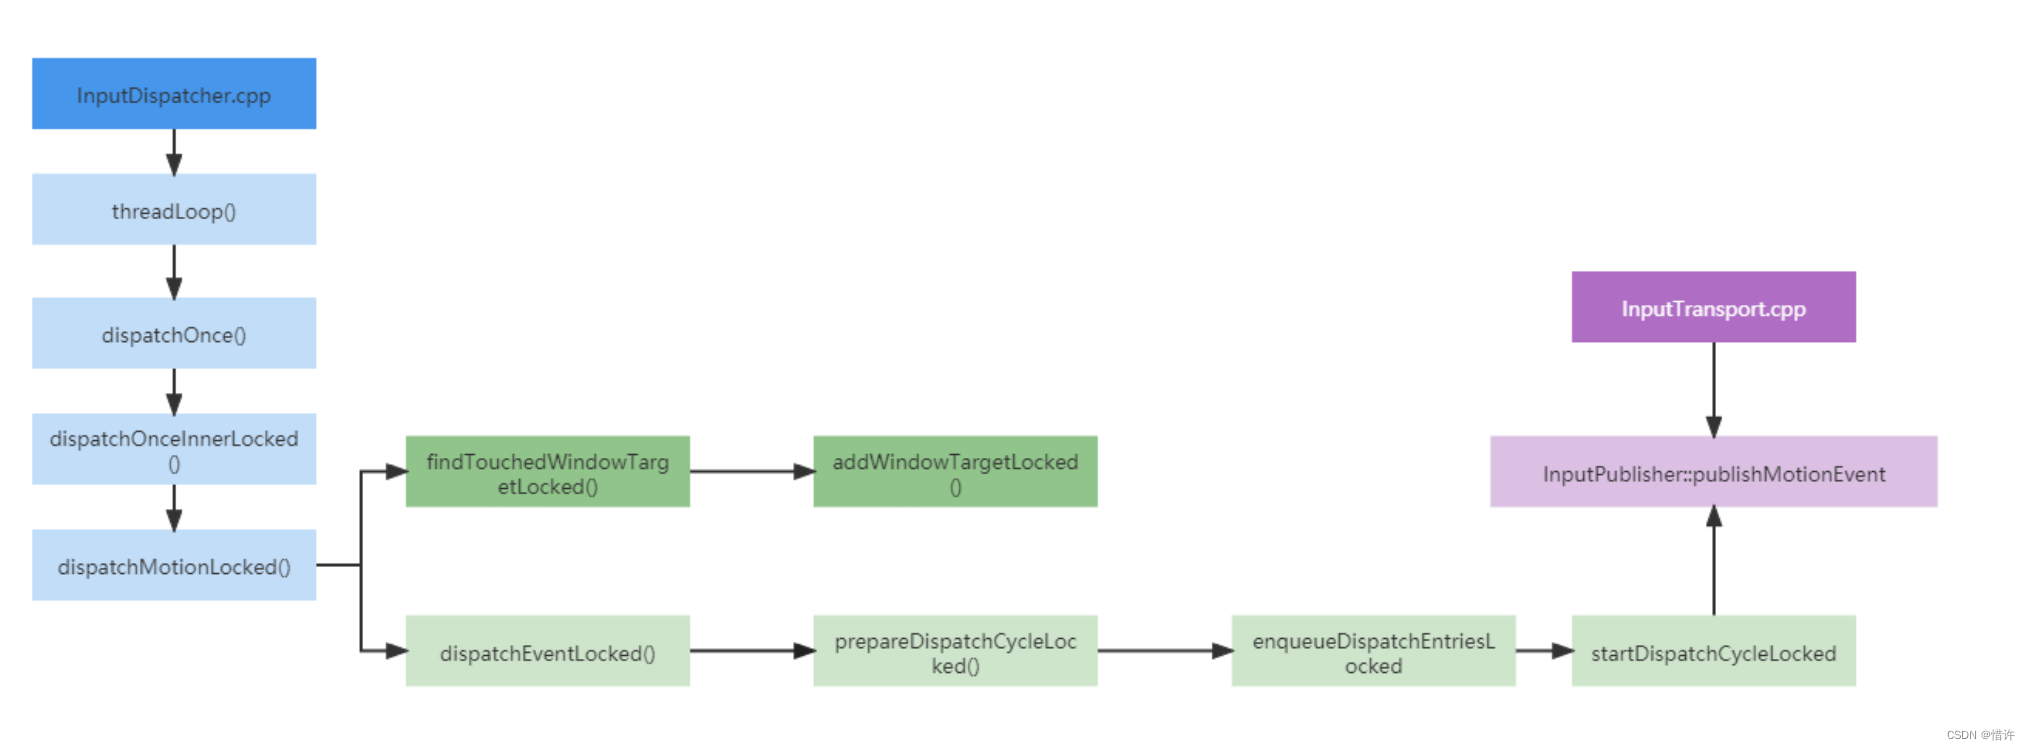
在dispatchOnceInnerLocked函数中会调用dispatchMotionLocked方法
bool InputDispatcher::dispatchMotionLocked(nsecs_t currentTime, MotionEntry* entry,
                                           DropReason* dropReason, nsecs_t* nextWakeupTime) {
   bool InputDispatcher::dispatchMotionLocked(nsecs_t currentTime, MotionEntry* entry,
                                           DropReason* dropReason, nsecs_t* nextWakeupTime) {
    ATRACE_CALL();
  	...
    if (isPointerEvent) {
        // 1.findTouchedWindowTargetsLocked 负责找到要进行分发的window
        injectionResult =findTouchedWindowTargetsLocked(currentTime, *entry, inputTargets, nextWakeupTime,
                                               &conflictingPointerActions);
    } else {
        injectionResult = findFocusedWindowTargetsLocked(currentTime, *entry, inputTargets, nextWakeupTime);
    }
    if (injectionResult == INPUT_EVENT_INJECTION_PENDING) {
        return false;
    }

    setInjectionResult(entry, injectionResult);
  	...
  	//2.具体事件分发
    dispatchEventLocked(currentTime, entry, inputTargets);
    return true;
}
}
会调用dispatchEventLocked方法,后续又经过层层调用最终会调用InputDispatcher::startDispatchCycleLocked方法
void InputDispatcher::startDispatchCycleLocked(nsecs_t currentTime,
                                               const sp<Connection>& connection) {
    	 ...
    	 case EventEntry::Type::MOTION: { //这里,只关注Motion事件
                MotionEntry* motionEntry = static_cast<MotionEntry*>(eventEntry);
                // Publish the motion event.
                status = connection->inputPublisher.publishMotionEvent(...);
                break;
            }
		...
    }
}
而inputPublisher.publishMotionEvent会执行InputPublisher::publishMotionEvent方法
status_t InputPublisher::publishMotionEvent(
        uint32_t seq, int32_t eventId, int32_t deviceId, int32_t source, int32_t displayId,
        std::array<uint8_t, 32> hmac, int32_t action, int32_t actionButton, int32_t flags,
        int32_t edgeFlags, int32_t metaState, int32_t buttonState,
        MotionClassification classification, float xScale, float yScale, float xOffset,
        float yOffset, float xPrecision, float yPrecision, float xCursorPosition,
        float yCursorPosition, nsecs_t downTime, nsecs_t eventTime, uint32_t pointerCount,
        const PointerProperties* pointerProperties, const PointerCoords* pointerCoords) {

	...
    InputMessage msg;
    msg.header.type = InputMessage::Type::MOTION;
    msg.body.motion.seq = seq;
    msg.body.motion.eventId = eventId;
    msg.body.motion.deviceId = deviceId;
    msg.body.motion.source = source;
    msg.body.motion.displayId = displayId;
    msg.body.motion.hmac = std::move(hmac);
    msg.body.motion.action = action;
    msg.body.motion.actionButton = actionButton;
    msg.body.motion.flags = flags;
    msg.body.motion.edgeFlags = edgeFlags;
    msg.body.motion.metaState = metaState;
    msg.body.motion.buttonState = buttonState;
    msg.body.motion.classification = classification;
    msg.body.motion.xScale = xScale;
    msg.body.motion.yScale = yScale;
    msg.body.motion.xOffset = xOffset;
    msg.body.motion.yOffset = yOffset;
    msg.body.motion.xPrecision = xPrecision;
    msg.body.motion.yPrecision = yPrecision;
    msg.body.motion.xCursorPosition = xCursorPosition;
    msg.body.motion.yCursorPosition = yCursorPosition;
    msg.body.motion.downTime = downTime;
    msg.body.motion.eventTime = eventTime;
    msg.body.motion.pointerCount = pointerCount;
    for (uint32_t i = 0; i < pointerCount; i++) {
        msg.body.motion.pointers[i].properties.copyFrom(pointerProperties[i]);
        msg.body.motion.pointers[i].coords.copyFrom(pointerCoords[i]);
    }

    return mChannel->sendMessage(&msg);
}

status_t InputPublisher::publishFocusEvent(uint32_t seq, int32_t eventId, bool hasFocus,
                                           bool inTouchMode) {
    if (ATRACE_ENABLED()) {
        std::string message =
                StringPrintf("publishFocusEvent(inputChannel=%s, hasFocus=%s, inTouchMode=%s)",
                             mChannel->getName().c_str(), toString(hasFocus),
                             toString(inTouchMode));
        ATRACE_NAME(message.c_str());
    }

    InputMessage msg;
    msg.header.type = InputMessage::Type::FOCUS;
    msg.body.focus.seq = seq;
    msg.body.focus.eventId = eventId;
    msg.body.focus.hasFocus = hasFocus ? 1 : 0;
    msg.body.focus.inTouchMode = inTouchMode ? 1 : 0;
    return mChannel->sendMessage(&msg);
}
可以看到主要是将数据进行封装成InputMessage对象,并最终交给InputChannel进行发送;
InputDispatcher分发事件流程
从IMS到WMS过程
从上面可以知道:InputReaderThread和InputDispatcherThread是运行在SystemServer进程中的;
和用户进程并不在同一个进程中,那中间一定存在进程间通信机制;
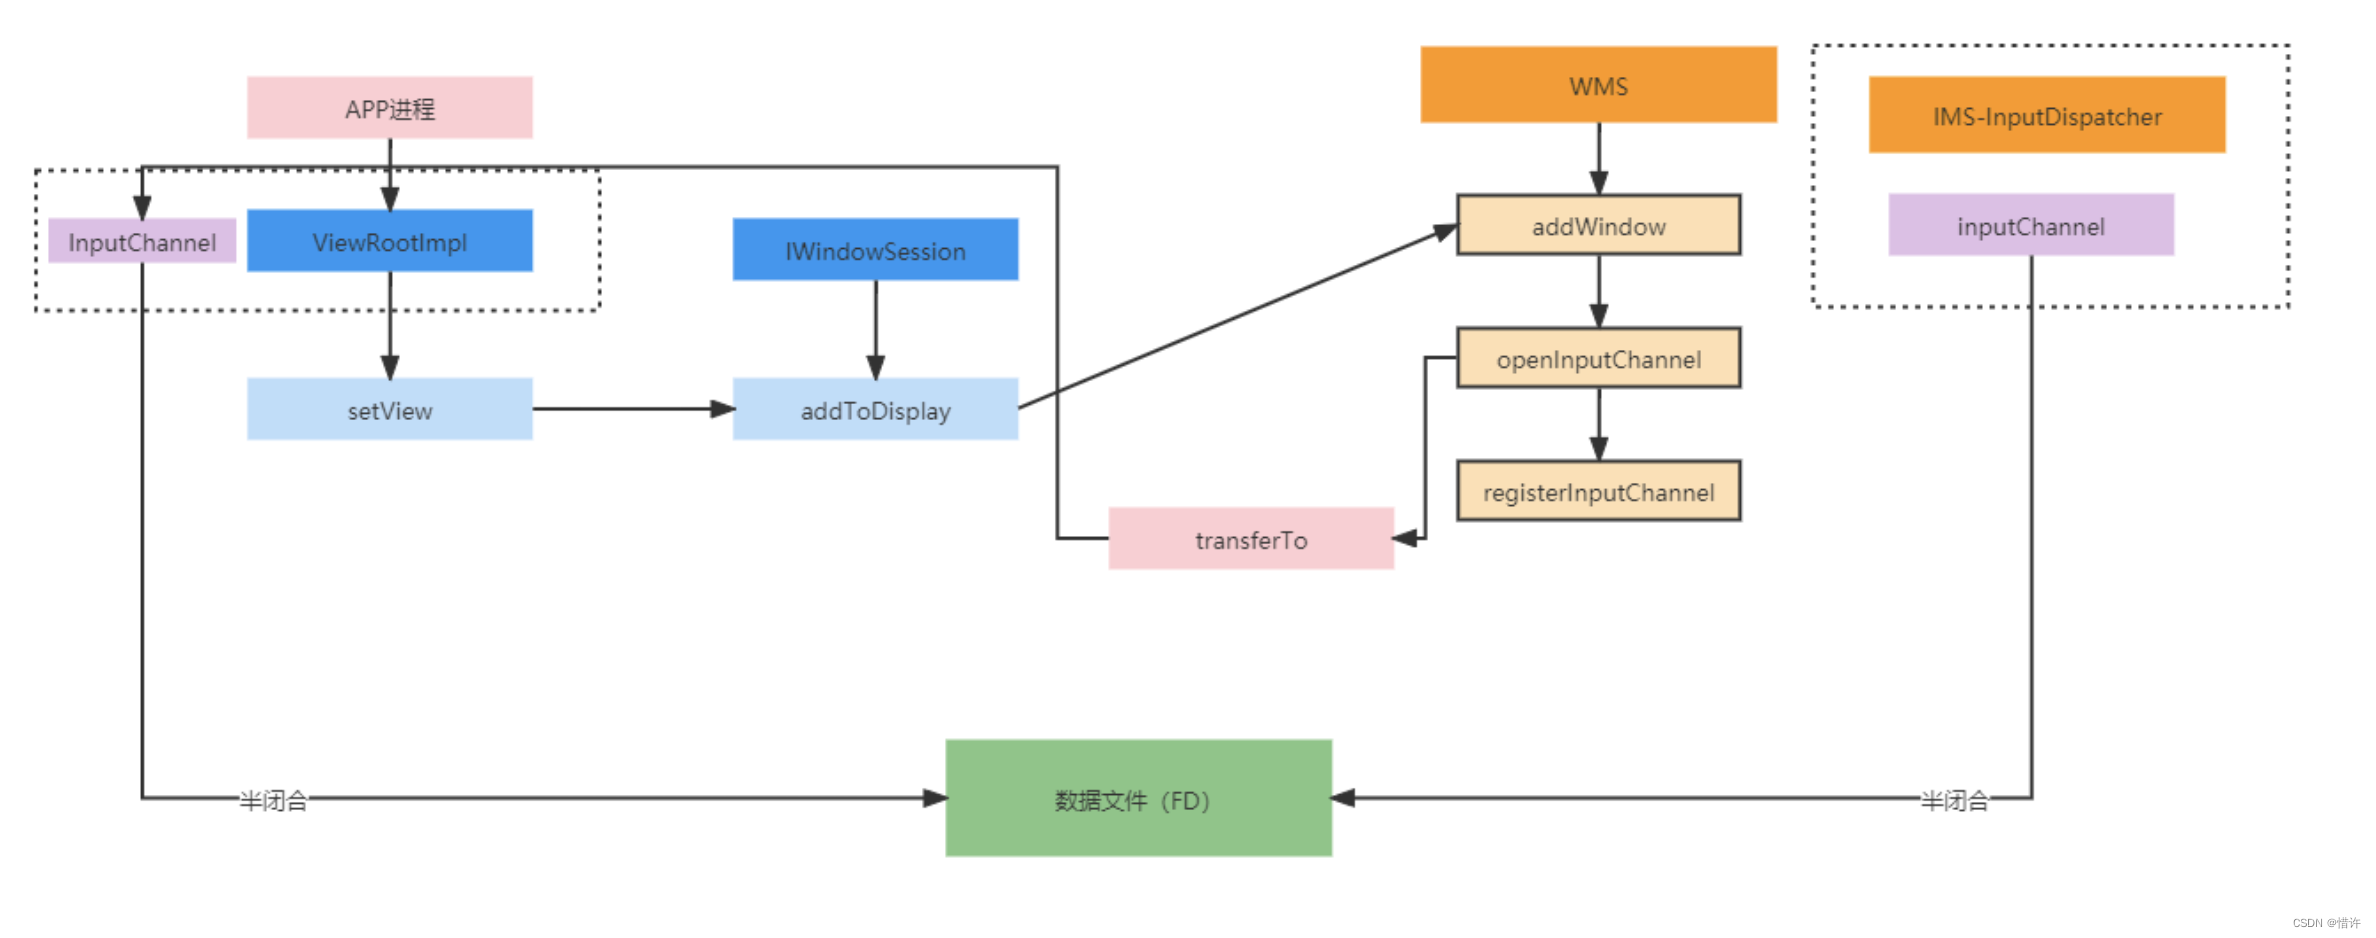
InputChannel目的正是为了与用户进程进行通信,InputChannel是由WMS管理,触发构建生成;
-
首先,在ViewRootImpl中的setView函数中会调用
mWindowSession.addToDisplayAsUser()方法;

这里在java层面构建了一个InputChannel对象; -
addToDisplayAsUser会调用到WindowlessWindowManager.addToDisplay()方法;
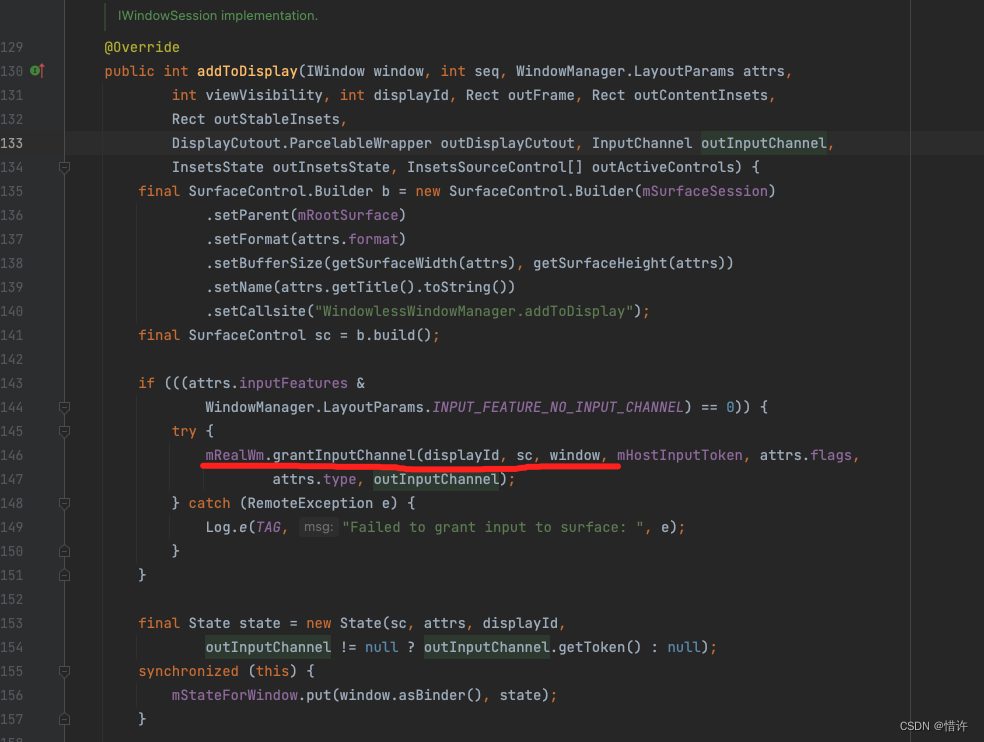
这里mRealWm是IWindowSession,我们知道它其实是WMS的代理,mRealWm.grantInputChannel()方法实际上调用的是WindowManagerService.grantInputChannel()方法;
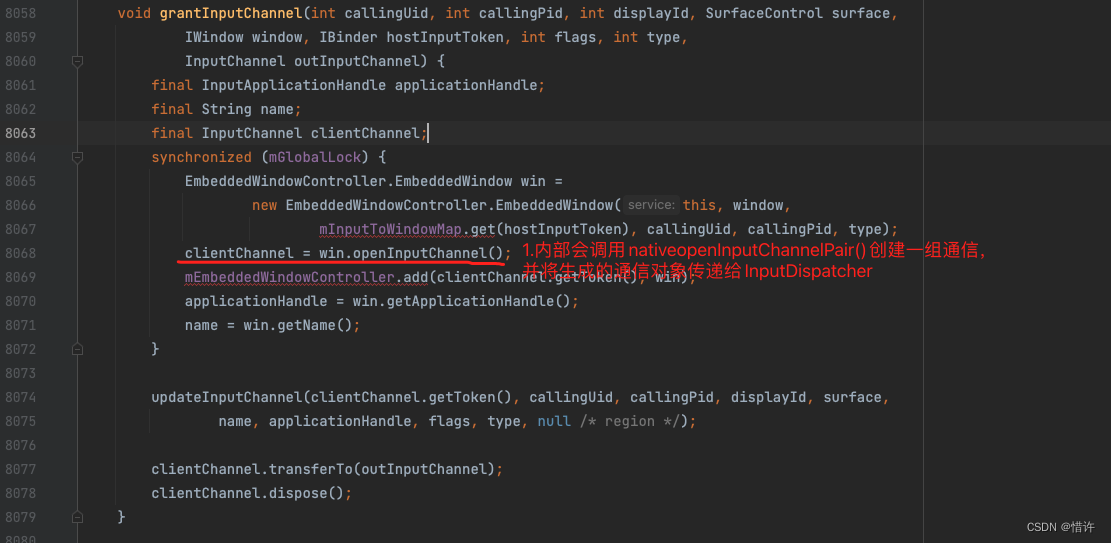
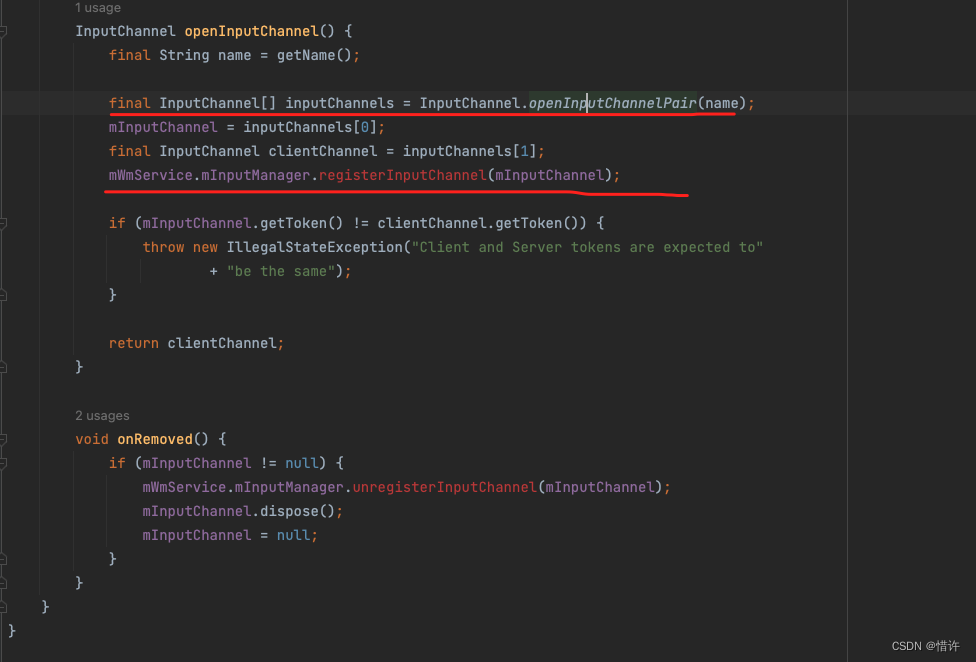
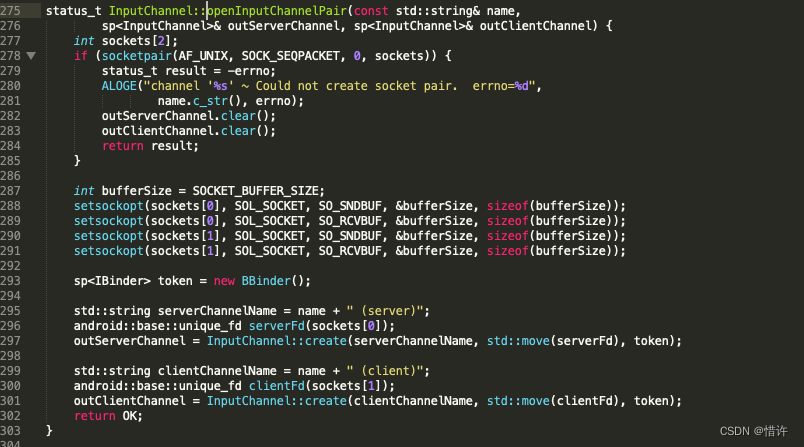

SocketPair:Linux实现了一个socketpair调用支持在同一个文件描述符中进行读写功能;
简单理解下:InputChannel内部使用Linux的socketpair实现不同进程间通信机制; -
继续回到setView中,在创建了
InputChannel之后,就开启了对InputChannel中输入事件的监听:

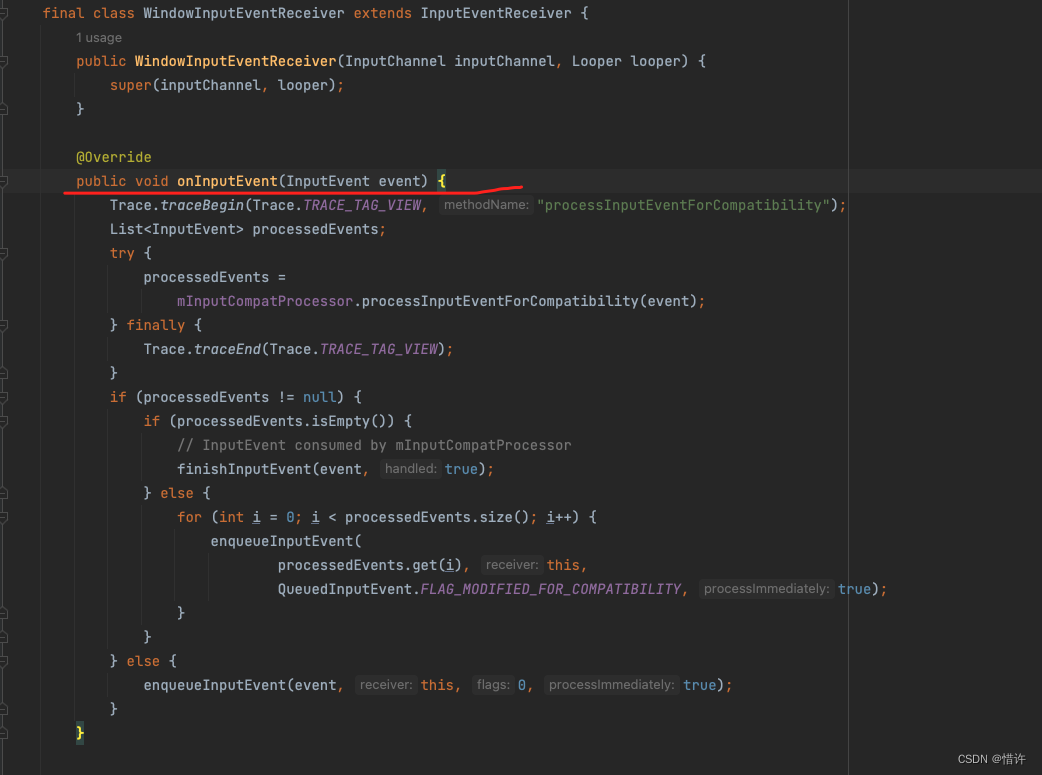
WindowInputEventReceiver继承于InputEventReceiver

我们看下InputEventReceiver的构造方法:
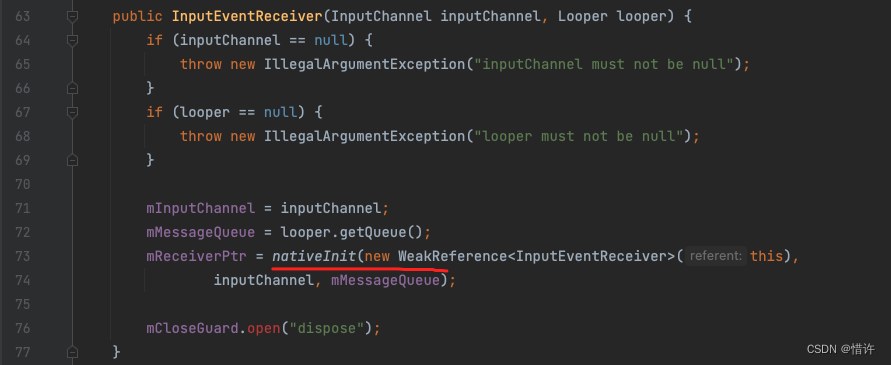
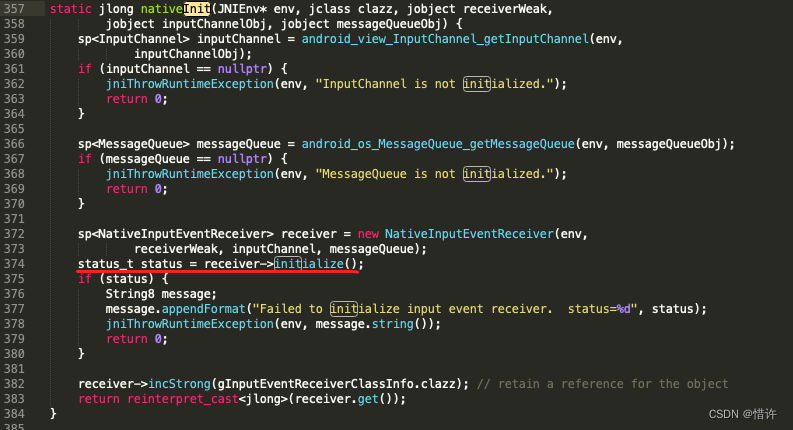


最终会调用Looper::addFd():该方法会对传递的fd添加epoll监控,Looper会循环调用pollOnce 方法,会等待消息的到来,当消息到来后,会根据消息类型一些判断处理,然后调用对应的callback函数;
这里我们当前是对开启的socket进行监听,当有数据到来时,我们会执行对应的回调,这里对于InputChannel的回调对应NativeInputEventReceiver::handleEvent方法:
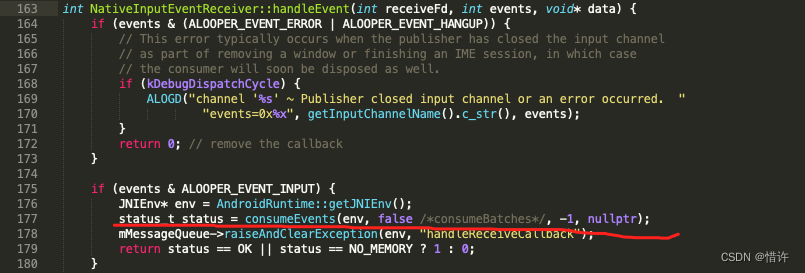
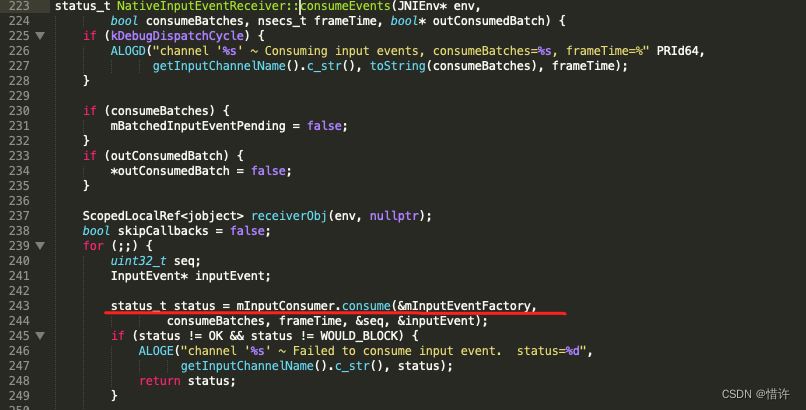
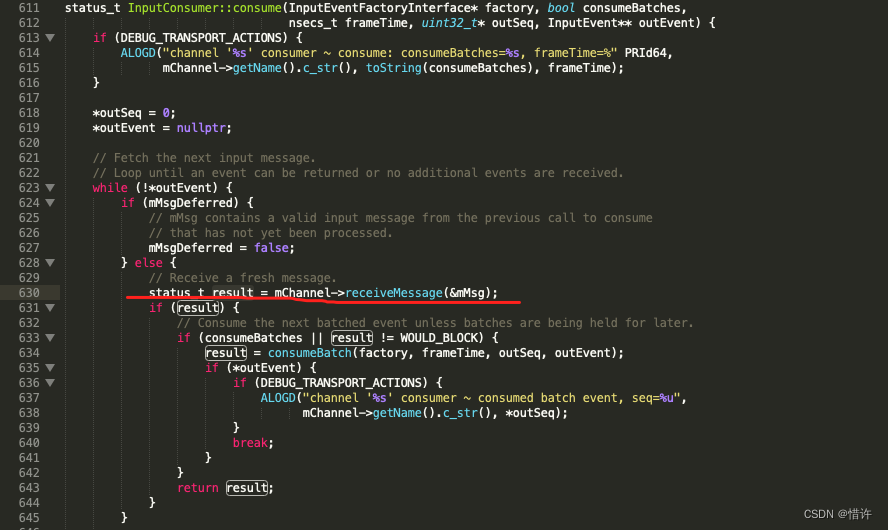
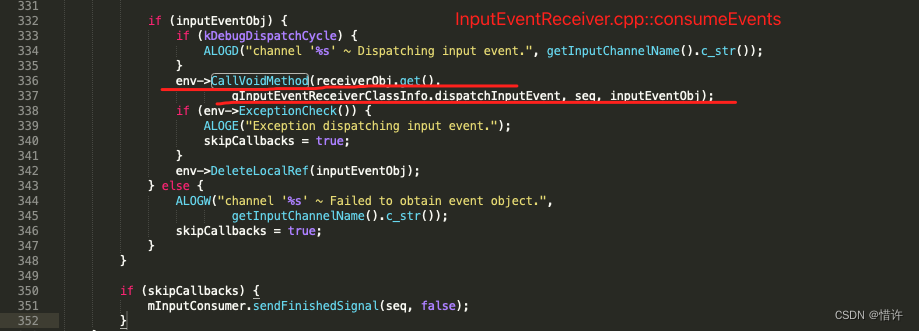
当mChannel->receiveMessage接收完毕后回到consumeEvent方法中,进行数据相关判断,最终会执行CallVoidMethod方法,回调JAVA函数:dispatchInputEvent

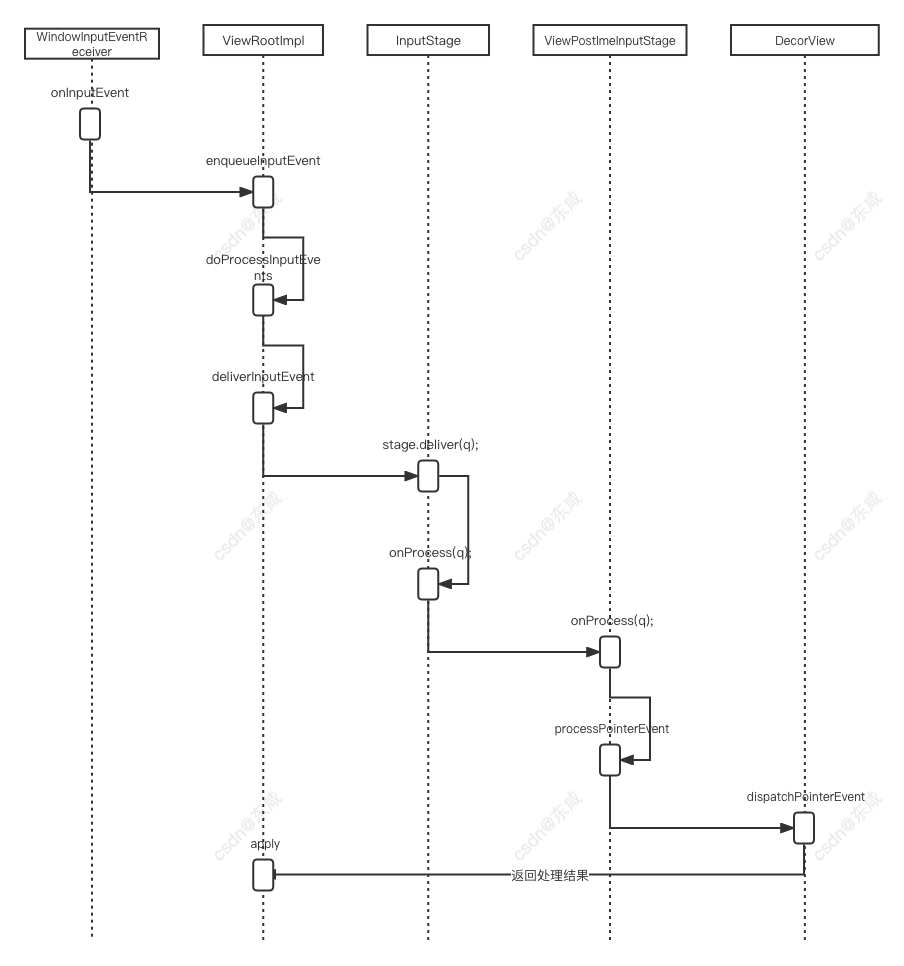
最终交给WindowInputEventReceiver.onInputEvent方法完成后续逻辑处理
IMS到WMS流程图
从WMS到ViewRootImpl过程
这一块相关流程之前在Android WMS工作原理浅析(二)分析过,这里不在赘述;
结语
如果以上文章对您有一点点帮助,希望您不要吝啬的点个赞加个关注,您每一次小小的举动都是我坚持写作的不懈动力!ღ( ´・ᴗ・` )

