Android进阶 View事件体系(二):从源码解析View的事件分发
内容概要
本篇文章为总结View事件体系的第二篇文章,前一篇文章的在这里:Android进阶 View事件体系(一):概要介绍和实现View的滑动
本篇文章将专注于介绍View的点击事件的分发,介绍的内容主要有:
- 点击事件的传递原则
- 解析Activity的构成
- 源码解析View的事件分发
- 源码解析View对点击事件的处理
- 关于事件分发的一些结论
点击事件的传递原则
前一篇文章中,我们介绍了MotionEvent中的一系列点击事件,那么触发了这一系列事件,系统是如何将其传递分发给不同的View进行处理的呢?本节就将介绍View的事件传递规则。
点击事件的分发过程将由三个很重要的方法共同协作完成:
- public boolean dispatchTouchEvent(MotionEvent event) :用于分发事件。如果时间能够传递给当前View,那么此方法一定会被调用,返回结果受当前View的onTouchEvent和下级的dispatchTouchEvent方法的影响,表示是否消耗当前事件。
- public boolean onInterceptTouchEvent(MotionEvent event):用于拦截事件。用来判断是否拦截某个事件,如果当前View拦截了某个事件,那么在同一个事件序列中,此方法不会被再次调用,返回结果表示是否拦截当前事件。
- public boolean onTouchEvent(MotionEvent event):用于处理事件。在上一篇文章也见到过了,用于处理各种点击事件。返回结果表示是否消耗当前事件,如果不消耗,则在同一个事件序列当中,当前View无法再次接受到事件。
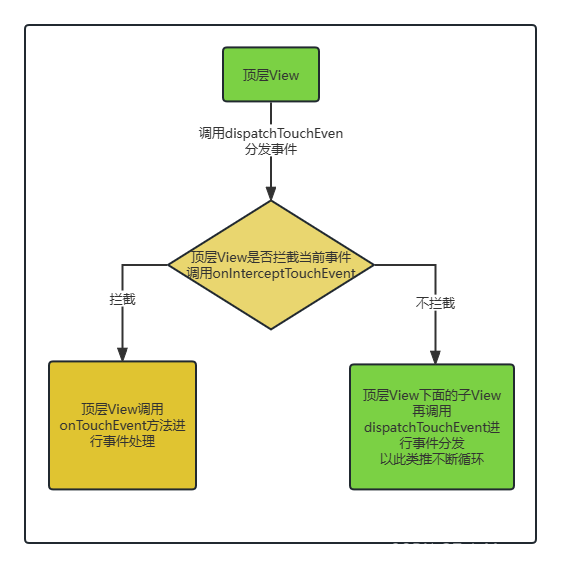
流程如下图所示:
当然也可以用下面的伪代码表示:
public boolean dispatchTouchEvent(MotionEvent ev){  //伪代码来自于<<Android开发艺术探索>>
	boolean consume = false;
	if(onInterceptTouchEvent(ev)){
		consume = onTouchEvent(ev);
	}else{
		consume = child.dispatchTouchEvent(ev);
	}
	return consume;
}
我们也可以对上述流程进行简要说明:对于一个根ViewGroup来说,点击事件产生后,首先会传递给它,此时它的dispatchTouchEvent就会被调用,如果这个ViewGroup的onInterceptTouchEvent方法决定拦截当前事件的话,就会返回true,
接着事件就会被传递到ViewGroup的onTouchEvent方法中进行处理;如果这个ViewGroup不进行拦截的话,则会返回false,接着事件会被传递到其子View中,子View重新进行dispatchTouchEvent进行事件分发,然后重复上述过程。
补充:当一个View需要处理事件时,如果它设置了OnTouchListener,那么OnTouchListener中的onTouch方法就会被调用。这时dispatchTouchEvent该如何处理事件还需要参考onTouch方法的返回值,如果返回true,那么onTouchEvent方法将不会被调用,反之就会被调用。而我们最常用的onClick事件则是在onTouchEvent方法中调用的
这是View中dispatchTouchEvent源码,我们可以重点看中间的那段代码
 public boolean dispatchTouchEvent(MotionEvent event) {
        // If the event should be handled by accessibility focus first.
        if (event.isTargetAccessibilityFocus()) {
            // We don't have focus or no virtual descendant has it, do not handle the event.
            if (!isAccessibilityFocusedViewOrHost()) {
                return false;
            }
            // We have focus and got the event, then use normal event dispatch.
            event.setTargetAccessibilityFocus(false);
        }
        boolean result = false;

        if (mInputEventConsistencyVerifier != null) {
            mInputEventConsistencyVerifier.onTouchEvent(event, 0);
        }

        final int actionMasked = event.getActionMasked();
        if (actionMasked == MotionEvent.ACTION_DOWN) {
            // Defensive cleanup for new gesture
            stopNestedScroll();
        }

        if (onFilterTouchEventForSecurity(event)) {
            if ((mViewFlags & ENABLED_MASK) == ENABLED && handleScrollBarDragging(event)) {
                result = true;
            }
            //noinspection SimplifiableIfStatement
            ListenerInfo li = mListenerInfo;
            if (li != null && li.mOnTouchListener != null
                    && (mViewFlags & ENABLED_MASK) == ENABLED
                    && li.mOnTouchListener.onTouch(this, event)) {
                result = true;
            }

            if (!result && onTouchEvent(event)) {
                result = true;
            }
        }

        if (!result && mInputEventConsistencyVerifier != null) {
            mInputEventConsistencyVerifier.onUnhandledEvent(event, 0);
        }

        // Clean up after nested scrolls if this is the end of a gesture;
        // also cancel it if we tried an ACTION_DOWN but we didn't want the rest
        // of the gesture.
        if (actionMasked == MotionEvent.ACTION_UP ||
                actionMasked == MotionEvent.ACTION_CANCEL ||
                (actionMasked == MotionEvent.ACTION_DOWN && !result)) {
            stopNestedScroll();
        }

        return result;
    }
另外,onClick方法的回调是在onTouchEvent方法中调用的:
public boolean onTouchEvent(MotionEvent event) {
        final float x = event.getX();
        final float y = event.getY();
        final int viewFlags = mViewFlags;
        final int action = event.getAction();

        final boolean clickable = ((viewFlags & CLICKABLE) == CLICKABLE
                || (viewFlags & LONG_CLICKABLE) == LONG_CLICKABLE)
                || (viewFlags & CONTEXT_CLICKABLE) == CONTEXT_CLICKABLE;

        if ((viewFlags & ENABLED_MASK) == DISABLED
                && (mPrivateFlags4 & PFLAG4_ALLOW_CLICK_WHEN_DISABLED) == 0) {
            if (action == MotionEvent.ACTION_UP && (mPrivateFlags & PFLAG_PRESSED) != 0) {
                setPressed(false);
            }
            mPrivateFlags3 &= ~PFLAG3_FINGER_DOWN;
            // A disabled view that is clickable still consumes the touch
            // events, it just doesn't respond to them.
            return clickable;
        }
        if (mTouchDelegate != null) {
            if (mTouchDelegate.onTouchEvent(event)) {
                return true;
            }
        }

        if (clickable || (viewFlags & TOOLTIP) == TOOLTIP) {
            switch (action) {
                case MotionEvent.ACTION_UP:
                    mPrivateFlags3 &= ~PFLAG3_FINGER_DOWN;
                    if ((viewFlags & TOOLTIP) == TOOLTIP) {
                        handleTooltipUp();
                    }
                    if (!clickable) {
                        removeTapCallback();
                        removeLongPressCallback();
                        mInContextButtonPress = false;
                        mHasPerformedLongPress = false;
                        mIgnoreNextUpEvent = false;
                        break;
                    }
                    boolean prepressed = (mPrivateFlags & PFLAG_PREPRESSED) != 0;
                    if ((mPrivateFlags & PFLAG_PRESSED) != 0 || prepressed) {
                        // take focus if we don't have it already and we should in
                        // touch mode.
                        boolean focusTaken = false;
                        if (isFocusable() && isFocusableInTouchMode() && !isFocused()) {
                            focusTaken = requestFocus();
                        }

                        if (prepressed) {
                            // The button is being released before we actually
                            // showed it as pressed.  Make it show the pressed
                            // state now (before scheduling the click) to ensure
                            // the user sees it.
                            setPressed(true, x, y);
                        }

                        if (!mHasPerformedLongPress && !mIgnoreNextUpEvent) {
                            // This is a tap, so remove the longpress check
                            removeLongPressCallback();

                            // Only perform take click actions if we were in the pressed state
                            if (!focusTaken) {
                                // Use a Runnable and post this rather than calling
                                // performClick directly. This lets other visual state
                                // of the view update before click actions start.
                                if (mPerformClick == null) {
                                    mPerformClick = new PerformClick();
                                }
                                if (!post(mPerformClick)) {
                                    performClickInternal();
		...
    }
通过最后一行的performClickInternal方法将会最终执行onClick回调方法。这里也可以看出onTouch方法,onTouchEvent方法和我们设置的onClick方法的优先级:
onTouch > onTouchEvent > onClick
实际上,当一个点击事件产生后,其最先会传递给Activity,具体来说,他的传递过程会遵循以下顺序:
Activity -> Window -> View ,即会先传递给Activity,再传递给Window,最后再由Window传递给顶级View,顶级View接收到事件之后,就会按照事件分发机制去分发事件。
不过,如果一个ViewGroup之下的所有的子View都处理不了这个点击事件该怎么办呢,就是说,当一个ViewGroup之下的所有View的onTouchEvent方法都返回false,那么该怎么办呢?最终这个事件将重新交由ViewGroup处理,ViewGroup的onTouchEvent方法将被调用,如果该ViewGroup还处理不了,那么就再将其抛给ViewGroup的父ViewGroup处理,依次类推,直到传递给Activity处理为止。
其实总结来说,点击事件的分发规则就是遵循从Activity开始自顶向下传递,如果底下的所有子View都处理不了,再重新自底向上传递直到传递给Activity处理。
解析Activity的构成
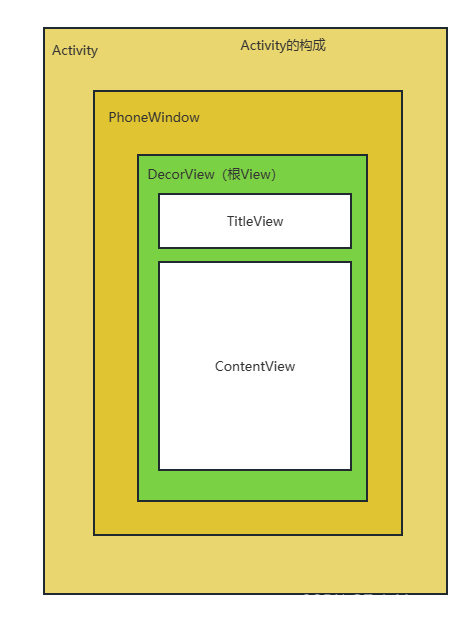
由于事件都是先传递给Activity的,所以我们有必要先解析一下Activity的构成,主要是解析其View的构成。先说结论:Activity内部有一个Window,Window中又有DecorView,这是视图的根视图。
在使用Activity时,我们需要用到setContentView方法来设置需要在Activity中显示的内容,那么我们先来看setContentView的源码部分:
    public void setContentView(@LayoutRes int layoutResID) {
        getWindow().setContentView(layoutResID);
        initWindowDecorActionBar();
    }
该方法又调用了getWindow的setContentView方法,第二行代码是用来初始化ActionBar的,我们先不管。getWindow方法将会返回一个Window对象,我们看这个getWindow方法:
    public Window getWindow() {
        return mWindow;
    }
明显返回的是Activity的一个成员变量,类型为Window类,而实际上这个Window类是个抽象类,关于这个类的介绍,文档里是这么写的:
Abstract base class for a top-level window look and behavior policy. An instance of this class should be used as the top-level view added to the window manager. It provides standard UI policies such as a background, title area, default key processing, etc.
The framework will instantiate an implementation of this class on behalf of the application.
简单来说,就是这个Window抽象类规定了Window类可以控制顶级View的外观和行为,并且系统框架将会提供此类的具体实现,那具体实现类究竟是什么呢?可以在Activity中的attach发现这个:
mWindow = new PhoneWindow(this, window, activityConfigCallback);
这个Window的具体实现类就是PhoneWindow,所以我们接下来看PhoneWindow的setContentView做了什么:
    public void setContentView(int layoutResID) {
        // Note: FEATURE_CONTENT_TRANSITIONS may be set in the process of installing the window
        // decor, when theme attributes and the like are crystalized. Do not check the feature
        // before this happens.
        if (mContentParent == null) {
            installDecor();
        } else if (!hasFeature(FEATURE_CONTENT_TRANSITIONS)) {
            mContentParent.removeAllViews();
        }

        if (hasFeature(FEATURE_CONTENT_TRANSITIONS)) {
            final Scene newScene = Scene.getSceneForLayout(mContentParent, layoutResID,
                    getContext());
            transitionTo(newScene);
        } else {
            mLayoutInflater.inflate(layoutResID, mContentParent);
        }
        mContentParent.requestApplyInsets();
        final Callback cb = getCallback();
        if (cb != null && !isDestroyed()) {
            cb.onContentChanged();
        }
        mContentParentExplicitlySet = true;
    }
主要看这个installDecor()方法做了什么,从名字来看,这应该是实现了DecorView的初始化,显而易见,PhoneWindow类中也有一个DecorView类型的成员变量且将会在installDecor方法中进行初始化:
private DecorView mDecor;
...
private void installDecor() {
        mForceDecorInstall = false;
        if (mDecor == null) {
            mDecor = generateDecor(-1); //1
            mDecor.setDescendantFocusability(ViewGroup.FOCUS_AFTER_DESCENDANTS);
            mDecor.setIsRootNamespace(true);
            if (!mInvalidatePanelMenuPosted && mInvalidatePanelMenuFeatures != 0) {
                mDecor.postOnAnimation(mInvalidatePanelMenuRunnable);
            }
        } else {
            mDecor.setWindow(this);
        }
        if (mContentParent == null) {
            mContentParent = generateLayout(mDecor);//2

            // Set up decor part of UI to ignore fitsSystemWindows if appropriate.
            mDecor.makeFrameworkOptionalFitsSystemWindows();

            final DecorContentParent decorContentParent = (DecorContentParent) mDecor.findViewById(
                    R.id.decor_content_parent);

 		...
    }
在这里的注释1处,通过generateDecor方法生成了根视图DecorView。我们再捋一遍,首先Activity包含中有一个Window,这个Window实际的实现类是PhoneWindow类,这个PhoneWindow中又有一个DecorView,即Activity的根视图。通过Activity的setContentView方法实际上会调用到PhoneWindow类的installDecor方法,该方法最终调用generateDecor方法实现了DecorView的初始化。
实际上,这个DecorView类是继承了FrameLayout布局的,既然是继承了布局,那么肯定也有其布局结构,我们接着来看注释2处的generateLayout方法,该方法生成了DecorView的布局结构,这里截取generateLayout方法里我们关注的一部分代码:
        int layoutResource;
        int features = getLocalFeatures();
        // System.out.println("Features: 0x" + Integer.toHexString(features));
        if ((features & ((1 << FEATURE_LEFT_ICON) | (1 << FEATURE_RIGHT_ICON))) != 0) {
            if (mIsFloating) {
                TypedValue res = new TypedValue();
                getContext().getTheme().resolveAttribute(
                        R.attr.dialogTitleIconsDecorLayout, res, true);
                layoutResource = res.resourceId;
            } else {
                layoutResource = R.layout.screen_title_icons;
            }
            // XXX Remove this once action bar supports these features.
            removeFeature(FEATURE_ACTION_BAR);
            // System.out.println("Title Icons!");
        } else if ((features & ((1 << FEATURE_PROGRESS) | (1 << FEATURE_INDETERMINATE_PROGRESS))) != 0
                && (features & (1 << FEATURE_ACTION_BAR)) == 0) {
            // Special case for a window with only a progress bar (and title).
            // XXX Need to have a no-title version of embedded windows.
            layoutResource = R.layout.screen_progress;
            // System.out.println("Progress!");
        } else if ((features & (1 << FEATURE_CUSTOM_TITLE)) != 0) {
            // Special case for a window with a custom title.
            // If the window is floating, we need a dialog layout
            if (mIsFloating) {
                TypedValue res = new TypedValue();
                getContext().getTheme().resolveAttribute(
                        R.attr.dialogCustomTitleDecorLayout, res, true);
                layoutResource = res.resourceId;
            } else {
                layoutResource = R.layout.screen_custom_title;
            }
            // XXX Remove this once action bar supports these features.
            removeFeature(FEATURE_ACTION_BAR);
        } else if ((features & (1 << FEATURE_NO_TITLE)) == 0) {
            // If no other features and not embedded, only need a title.
            // If the window is floating, we need a dialog layout
            if (mIsFloating) {
                TypedValue res = new TypedValue();
                getContext().getTheme().resolveAttribute(
                        R.attr.dialogTitleDecorLayout, res, true);
                layoutResource = res.resourceId;
            } else if ((features & (1 << FEATURE_ACTION_BAR)) != 0) {
                layoutResource = a.getResourceId(
                        R.styleable.Window_windowActionBarFullscreenDecorLayout,
                        R.layout.screen_action_bar);
            } else {
                layoutResource = R.layout.screen_title;
            }
            // System.out.println("Title!");
        } else if ((features & (1 << FEATURE_ACTION_MODE_OVERLAY)) != 0) {
            layoutResource = R.layout.screen_simple_overlay_action_mode;
        } else {
            // Embedded, so no decoration is needed.
            layoutResource = R.layout.screen_simple;
            // System.out.println("Simple!");
        }

        mDecor.startChanging();
        mDecor.onResourcesLoaded(mLayoutInflater, layoutResource);

		ViewGroup contentParent = (ViewGroup)findViewById(ID_ANDROID_CONTENT);
        if (contentParent == null) {
            throw new RuntimeException("Window couldn't find content container view");
        }
这个方法的作用简而言之就是根据不同的情况来加载不同的布局。
第一行的layoutResource 参数就是要加载的布局结构,就相当于我们在Activity中调用setContentView后面跟的那个R.layout.main 是一个作用。在倒数第三行中还出现了findViewById方法,显然这个布局中划分了许多的View区域。具体我们就不再往下探讨了,大致划分如下图所示:
源码解析View的事件分发
点击事件是从Activity->Window->DecorView->View传递的,所以我们先看Activity的dispatchTouchEvent的分发方法:
    public boolean dispatchTouchEvent(MotionEvent ev) {
        if (ev.getAction() == MotionEvent.ACTION_DOWN) {
            onUserInteraction();
        }
        if (getWindow().superDispatchTouchEvent(ev)) {
            return true;
        }
        return onTouchEvent(ev);
    }
onUserInteraction方法用于通知应用程序用户正在与应用程序进行交互。当用户执行任何交互操作时(如触摸屏幕、按下按钮等),系统会自动调用onUserInteraction()方法。主要是为了使屏幕保持交互状态等效果。
之后会先通过Window来分发事件,如果Window中一旦有子View将点击事件消耗了,将会直接返回true而不会执行Activity的onTouchEvent方法;反之,当其与所有子View都处理不了点击事件时将会将其传递给Activity进行处理。
接着看superDispatchTouchEvent方法:
   public boolean superDispatchTouchEvent(MotionEvent event) {
        return mDecor.superDispatchTouchEvent(event);
    }
所以可以看出,Window实际上是将分发事件交给了DecorView这个根ViewGroup进行,而DecorView的superDispatchTouchEvent方法就直接进行事件分发了:
    public boolean superDispatchTouchEvent(MotionEvent event) {
        return super.dispatchTouchEvent(event);
    }
到此为止就正式开始了我们之前所说的事件分发的基本流程,接下来就继续看ViewGroup的dispatchTouchEvent方法,这段代码比较关键也比较长,需要我们耐心分析一下,我们一段一段地看:
public boolean dispatchTouchEvent(MotionEvent ev) {
        if (mInputEventConsistencyVerifier != null) {
            mInputEventConsistencyVerifier.onTouchEvent(ev, 1);
        }

        // If the event targets the accessibility focused view and this is it, start
        // normal event dispatch. Maybe a descendant is what will handle the click.
        if (ev.isTargetAccessibilityFocus() && isAccessibilityFocusedViewOrHost()) {
            ev.setTargetAccessibilityFocus(false);
        }

        boolean handled = false;
        if (onFilterTouchEventForSecurity(ev)) {
            final int action = ev.getAction();
            final int actionMasked = action & MotionEvent.ACTION_MASK;

            // Handle an initial down.
            if (actionMasked == MotionEvent.ACTION_DOWN) { //1
                // Throw away all previous state when starting a new touch gesture.
                // The framework may have dropped the up or cancel event for the previous gesture
                // due to an app switch, ANR, or some other state change.
                cancelAndClearTouchTargets(ev);
                resetTouchState();
            }

            // Check for interception.
            final boolean intercepted;   //2
            if (actionMasked == MotionEvent.ACTION_DOWN
                    || mFirstTouchTarget != null) {
                final boolean disallowIntercept = (mGroupFlags & FLAG_DISALLOW_INTERCEPT) != 0;
                if (!disallowIntercept) {
                    intercepted = onInterceptTouchEvent(ev);
                    ev.setAction(action); // restore action in case it was changed
                } else {
                    intercepted = false;
                }
            } else {
                // There are no touch targets and this action is not an initial down
                // so this view group continues to intercept touches.
                intercepted = true;
            }

          ...
        return handled;
    }
我们看注释1处,首先,当接收到Down事件后,View会清除之前正在处理的事件并重置View处理事件的初始状态。比如说,Down事件会清除FLAG_DISALLOW_INTERCEPT标志位,这个标志位是由子View给父View设置的,详细我们到后面再说。
接着我们来看注释2及其以后的代码段,很显然intercepted标志是用来记录是否需要拦截事件的标志位,需要说明的是onIntercept方法默认是返回的false,也就是说ViewGroup默认不拦截事件。这里的mFirstTouchTarget变量是什么呢?当事件由ViewGroup的子元素成功处理时,mFirstTouchTarget会指向子元素,换句话来说,当ViewGroup不拦截事件并将其交由子View成功处理时,mFirstTouchTarget != null成立。一旦事件被ViewGroup拦截时,mFirstTouchTarget == null就成立。
这里的FLAG_DISALLOW_INTERCEPT标志就是之前提到的由子View给父View设置的标志位,一旦设置了,父View就无法拦截除Down之外的其他事件了。具体来说,我们可以总结出几种情况下ViewGroup将会拦截事件:
- 当前事件为Down,FLAG_DISALLOW_INTERCEPT为false且其onInterceptTouchEvent方法将Down事件拦截处理了。
- 其子View处理不了Down事件
这里我们就可以得出三条结论:
- 1.当ViewGroup决定拦截事件之后,那么后续的一系列事件都会交由其处理且不会调用onInterceptTouchEvent方法
- 2.当ViewGroup的onInterceptTouchEvent不捕获Down事件时,设置FLAG_DISALLOW_INTERCEPT可以确保ViewGroup不再拦截事件
- 3.子View处理不了Down事件时,就会将其交给其父View处理
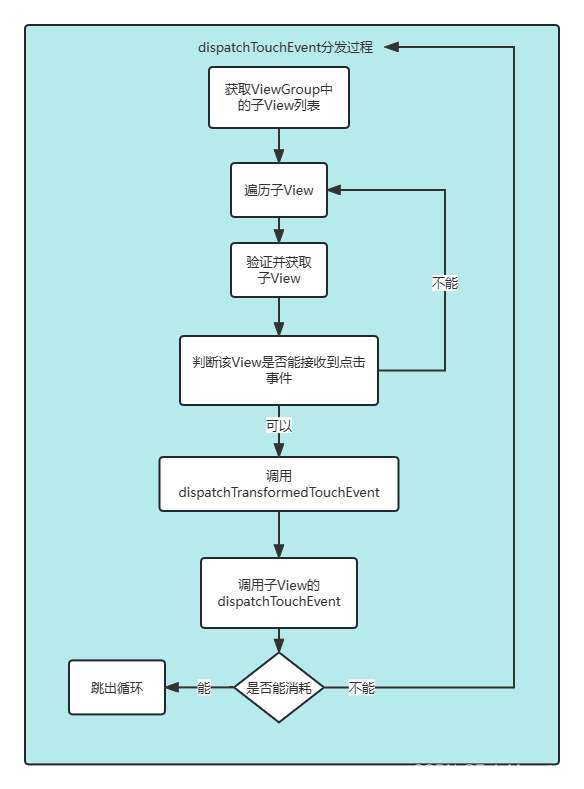
接着再看当ViewGroup不拦截事件时,事件会向下分发交由它的子View进行处理
    public boolean dispatchTouchEvent(MotionEvent ev) {
      		...
			...
			final ArrayList<View> preorderedList = buildTouchDispatchChildList();
            final boolean customOrder = preorderedList == null && isChildrenDrawingOrderEnabled();
             final View[] children = mChildren;
                for (int i = childrenCount - 1; i >= 0; i--) {
                      final int childIndex = getAndVerifyPreorderedIndex(
                                    childrenCount, i, customOrder);
                      final View child = getAndVerifyPreorderedView(
                                    preorderedList, children, childIndex);

                       // If there is a view that has accessibility focus we want it
                       // to get the event first and if not handled we will perform a
                       // normal dispatch. We may do a double iteration but this is
                       // safer given the timeframe.
                       if (childWithAccessibilityFocus != null) {
                           if (childWithAccessibilityFocus != child) {
                               continue;
                           }
                           childWithAccessibilityFocus = null;
                           i = childrenCount;
                         }

                       if (!child.canReceivePointerEvents()
                             || !isTransformedTouchPointInView(x, y, child, null)) {
                            ev.setTargetAccessibilityFocus(false);
                            continue;
                       }

                      newTouchTarget = getTouchTarget(child);
                      if (newTouchTarget != null) {
                      // Child is already receiving touch within its bounds.
                      // Give it the new pointer in addition to the ones it is handling.
                      newTouchTarget.pointerIdBits |= idBitsToAssign;
                      break;
                      }
					resetCancelNextUpFlag(child);
                    if (dispatchTransformedTouchEvent(ev, false, child, idBitsToAssign)) {
                   // Child wants to receive touch within its bounds.
                    mLastTouchDownTime = ev.getDownTime();
                    if (preorderedList != null) {
                    // childIndex points into presorted list, find original index
                    for (int j = 0; j < childrenCount; j++) {
                        if (children[childIndex] == mChildren[j]) {
                           mLastTouchDownIndex = j;
                           break;
                        }
                   }
                  } else {
                    mLastTouchDownIndex = childIndex;
                   }
                    mLastTouchDownX = ev.getX();
                    mLastTouchDownY = ev.getY();
                    newTouchTarget = addTouchTarget(child, idBitsToAssign);
                    alreadyDispatchedToNewTouchTarget = true;
                    break;
                  }

                  // The accessibility focus didn't handle the event, so clear
                  // the flag and do a normal dispatch to all children.
                  ev.setTargetAccessibilityFocus(false);
     		 }
		...
      return handled;
    }
首先会调用buildTouchDispatchChildList方法,这个方法是用来构建触摸事件分发的子视图列表的。
接下来的:
final boolean customOrder = preorderedList == null && isChildrenDrawingOrderEnabled();
是用来确定是否开启自定义绘制顺序的,如果返回true,则表示已启用自定义绘制顺序;如果返回false,则表示使用默认的绘制顺序。通过这段代码,我们可以根据需要在绘制子视图时选择使用自定义的绘制顺序,以实现特定的绘制效果或交互逻辑。不过这里分析原理就不过多深入了。
接下来就会获取子view的列表并开始遍历,
final int childIndex = getAndVerifyPreorderedIndex(childrenCount, i, customOrder);
final View child = getAndVerifyPreorderedView(preorderedList, children, childIndex);
这一段是用来获取子View的索引和视图,并进行有效性验证的。
接下来是判断子元素能否接收到点击事件:
  if (childWithAccessibilityFocus != null) {
       if (childWithAccessibilityFocus != child) {
           continue;
       }
       childWithAccessibilityFocus = null;
       i = childrenCount;
   }

   if (!child.canReceivePointerEvents()
           || !isTransformedTouchPointInView(x, y, child, null)) {
       ev.setTargetAccessibilityFocus(false);
       continue;
   }
-
如果childWithAccessibilityFocus不为空且与当前处理的子视图child不相等,说明当前子视图不是具有无障碍焦点的子视图,那么继续下一次循环,跳过该子视图的处理。
-
如果childWithAccessibilityFocus不为空且与当前处理的子视图child相等,说明当前子视图是具有无障碍焦点的子视图,将childWithAccessibilityFocus设为null,且将循环索引i设为childrenCount,这样在后续循环中将会结束循环。
-
接下来将会判断子元素是否能接受到点击事件,主要由两点来衡量:
- 子元素是否在播放动画
- 点击事件的坐标是否落在子元素的区域内
如果某个子元素满足这两个条件,那么事件就会交给它处理。
最后我们来最后的一点代码:
 newTouchTarget = getTouchTarget(child);
                      if (newTouchTarget != null) {
                      // Child is already receiving touch within its bounds.
                      // Give it the new pointer in addition to the ones it is handling.
                      newTouchTarget.pointerIdBits |= idBitsToAssign;
                      break;
                      }
					resetCancelNextUpFlag(child);
                    if (dispatchTransformedTouchEvent(ev, false, child, idBitsToAssign)) {
                   // Child wants to receive touch within its bounds.
                    mLastTouchDownTime = ev.getDownTime();
                    if (preorderedList != null) {
                    // childIndex points into presorted list, find original index
                    for (int j = 0; j < childrenCount; j++) {
                        if (children[childIndex] == mChildren[j]) {
                           mLastTouchDownIndex = j;
                           break;
                        }
                   }
                  } else {
                    mLastTouchDownIndex = childIndex;
                   }
                    mLastTouchDownX = ev.getX();
                    mLastTouchDownY = ev.getY();
                    newTouchTarget = addTouchTarget(child, idBitsToAssign);
                    alreadyDispatchedToNewTouchTarget = true;
                    break;
                  }

                  // The accessibility focus didn't handle the event, so clear
                  // the flag and do a normal dispatch to all children.
                  ev.setTargetAccessibilityFocus(false);
     		 }
这里我们看的最重要的方法就是dispatchTransformedTouchEvent(ev, false, child, idBitsToAssign),实际上就是会调用了子View的dispatchTouchEvent方法:
private boolean dispatchTransformedTouchEvent(MotionEvent event, boolean cancel,
            View child, int desiredPointerIdBits) {
        final boolean handled;

        // Canceling motions is a special case.  We don't need to perform any transformations
        // or filtering.  The important part is the action, not the contents.
        final int oldAction = event.getAction();
        if (cancel || oldAction == MotionEvent.ACTION_CANCEL) {
            event.setAction(MotionEvent.ACTION_CANCEL);
            if (child == null) {
                handled = super.dispatchTouchEvent(event);
            } else {
                handled = child.dispatchTouchEvent(event);
            }
            event.setAction(oldAction);
            return handled;
        }

        ...
    }
这里我们只要看这么一小段方法就行了,dispatchTransformedTouchEvent方法用于分发经过转换的触摸事件给子视图,并处理事件的取消、坐标转换等逻辑。
首先,方法会根据cancel参数和原始事件的动作类型判断是否需要取消事件。如果需要取消事件,则将事件的动作类型设置为ACTION_CANCEL,然后将事件分发给子视图或父视图,并返回处理结果。如果被选中的View不为空,就交由View继续进行事件分发,否则就仍交给其父ViewGroup重新进行事件分发。
这里如果返回了true,那么就会跳出父ViewGroup的循环,完成了一轮事件分发了:
	newTouchTarget = addTouchTarget(child, idBitsToAssign);
	alreadyDispatchedToNewTouchTarget = true;
	break;
之前我们提到过mFirstTouchTarget这个变量,那其究竟是在哪里赋值的呢?答案是addTouchTarget方法:
    private TouchTarget addTouchTarget(@NonNull View child, int pointerIdBits) {
        final TouchTarget target = TouchTarget.obtain(child, pointerIdBits);
        target.next = mFirstTouchTarget;
        mFirstTouchTarget = target;
        return target;
    }
很容易看出来这是一个链表结构,该方法通过调用TouchTarget.obtain(child, pointerIdBits)方法创建一个TouchTarget对象,该对象持有传入的View对象和指针ID位集合。将其插入到链表中。 我们可以看一下上一段的代码,也就是说,如果dispatchTransformedTouchEvent(ev, false, child, idBitsToAssign)中成功地处理了事件,那么就会在child后面添加一个TouchTarget对象,最后mFirstTouchTarget 会被赋值为mFirstTouchTarget = next,也就是mFirstTouchTarget不会为空了,这就说明了之前我们总结的结论之一。
至此,就在源码中解析完了事件分发的过程了。
给出大体流程图:
源码解析View对点击事件的处理
我们接下来看View的dispatchTouchEvent方法:
public boolean dispatchTouchEvent(MotionEvent event) {
        // If the event should be handled by accessibility focus first.
        if (event.isTargetAccessibilityFocus()) {
            // We don't have focus or no virtual descendant has it, do not handle the event.
            if (!isAccessibilityFocusedViewOrHost()) {
                return false;
            }
            // We have focus and got the event, then use normal event dispatch.
            event.setTargetAccessibilityFocus(false);
        }
        boolean result = false;

        if (mInputEventConsistencyVerifier != null) {
            mInputEventConsistencyVerifier.onTouchEvent(event, 0);
        }

        final int actionMasked = event.getActionMasked();
        if (actionMasked == MotionEvent.ACTION_DOWN) {
            // Defensive cleanup for new gesture
            stopNestedScroll();
        }

        if (onFilterTouchEventForSecurity(event)) {
            if ((mViewFlags & ENABLED_MASK) == ENABLED && handleScrollBarDragging(event)) {
                result = true;
            }
            //noinspection SimplifiableIfStatement
            ListenerInfo li = mListenerInfo;
            if (li != null && li.mOnTouchListener != null
                    && (mViewFlags & ENABLED_MASK) == ENABLED
                    && li.mOnTouchListener.onTouch(this, event)) {
                result = true;
            }

            if (!result && onTouchEvent(event)) {
                result = true;
            }
        }

        if (!result && mInputEventConsistencyVerifier != null) {
            mInputEventConsistencyVerifier.onUnhandledEvent(event, 0);
        }

        // Clean up after nested scrolls if this is the end of a gesture;
        // also cancel it if we tried an ACTION_DOWN but we didn't want the rest
        // of the gesture.
        if (actionMasked == MotionEvent.ACTION_UP ||
                actionMasked == MotionEvent.ACTION_CANCEL ||
                (actionMasked == MotionEvent.ACTION_DOWN && !result)) {
            stopNestedScroll();
        }

        return result;
    }
View对点击事件的处理过程就比较简单了,因为View是一个单独的元素,它不需要向下传递消息事件,所以它只能自己处理事件,首先他会判断View是否设置了onTouchListener,如果设置了,就会调用onTouch回调方法并消耗掉事件,那么后面的onTouchEvent方法也将不会被调用了,和我们之前提到的优先级一致。
接下来我们就紧接着看View的onTouchEvent方法:
    public boolean onTouchEvent(MotionEvent event) {
        final float x = event.getX();
        final float y = event.getY();
        final int viewFlags = mViewFlags;
        final int action = event.getAction();

        final boolean clickable = ((viewFlags & CLICKABLE) == CLICKABLE
                || (viewFlags & LONG_CLICKABLE) == LONG_CLICKABLE)
                || (viewFlags & CONTEXT_CLICKABLE) == CONTEXT_CLICKABLE;

        if ((viewFlags & ENABLED_MASK) == DISABLED
                && (mPrivateFlags4 & PFLAG4_ALLOW_CLICK_WHEN_DISABLED) == 0) {
            if (action == MotionEvent.ACTION_UP && (mPrivateFlags & PFLAG_PRESSED) != 0) {
                setPressed(false);
            }
            mPrivateFlags3 &= ~PFLAG3_FINGER_DOWN;
            // A disabled view that is clickable still consumes the touch
            // events, it just doesn't respond to them.
            return clickable;
        }
        if (mTouchDelegate != null) {
            if (mTouchDelegate.onTouchEvent(event)) {
                return true;
            }
        }

        if (clickable || (viewFlags & TOOLTIP) == TOOLTIP) {
            switch (action) {
                case MotionEvent.ACTION_UP:
                    mPrivateFlags3 &= ~PFLAG3_FINGER_DOWN;
                    if ((viewFlags & TOOLTIP) == TOOLTIP) {
                        handleTooltipUp();
                    }
                    if (!clickable) {
                        removeTapCallback();
                        removeLongPressCallback();
                        mInContextButtonPress = false;
                        mHasPerformedLongPress = false;
                        mIgnoreNextUpEvent = false;
                        break;
                    }
                    boolean prepressed = (mPrivateFlags & PFLAG_PREPRESSED) != 0;
                    if ((mPrivateFlags & PFLAG_PRESSED) != 0 || prepressed) {
                        // take focus if we don't have it already and we should in
                        // touch mode.
                        boolean focusTaken = false;
                        if (isFocusable() && isFocusableInTouchMode() && !isFocused()) {
                            focusTaken = requestFocus();
                        }

                        if (prepressed) {
                            // The button is being released before we actually
                            // showed it as pressed.  Make it show the pressed
                            // state now (before scheduling the click) to ensure
                            // the user sees it.
                            setPressed(true, x, y);
                        }

                        if (!mHasPerformedLongPress && !mIgnoreNextUpEvent) {
                            // This is a tap, so remove the longpress check
                            removeLongPressCallback();

                            // Only perform take click actions if we were in the pressed state
                            if (!focusTaken) {
                                // Use a Runnable and post this rather than calling
                                // performClick directly. This lets other visual state
                                // of the view update before click actions start.
                                if (mPerformClick == null) {
                                    mPerformClick = new PerformClick();
                                }
                                if (!post(mPerformClick)) {
                                    performClickInternal();
                                }
                            }
                        }

	...
    }
这里我们可以看到,只要CLICKABLE或LONG_CLICKABLE有一个为true,那么click属性就是true:
final boolean clickable = ((viewFlags & CLICKABLE) == CLICKABLE
          || (viewFlags & LONG_CLICKABLE) == LONG_CLICKABLE)
          || (viewFlags & CONTEXT_CLICKABLE) == CONTEXT_CLICKABLE;
且即使DISABLE被设置了,但是只要clickable属性为true,View也会消耗事件:
   if ((viewFlags & ENABLED_MASK) == DISABLED
             && (mPrivateFlags4 & PFLAG4_ALLOW_CLICK_WHEN_DISABLED) == 0) {
         if (action == MotionEvent.ACTION_UP && (mPrivateFlags & PFLAG_PRESSED) != 0) {
             setPressed(false);
         }
         mPrivateFlags3 &= ~PFLAG3_FINGER_DOWN;
         // A disabled view that is clickable still consumes the touch
         // events, it just doesn't respond to them.
         return clickable;
     }
且在UP事件中,将会调用performClickInternal方法,这个方法最终将会调用onClickListener的回调方法,我们一个一个来看:
    private boolean performClickInternal() {
        // Must notify autofill manager before performing the click actions to avoid scenarios where
        // the app has a click listener that changes the state of views the autofill service might
        // be interested on.
        notifyAutofillManagerOnClick();

        return performClick();
    }

	public boolean performClick() {
        // We still need to call this method to handle the cases where performClick() was called
        // externally, instead of through performClickInternal()
        notifyAutofillManagerOnClick();

        final boolean result;
        final ListenerInfo li = mListenerInfo;
        if (li != null && li.mOnClickListener != null) {
            playSoundEffect(SoundEffectConstants.CLICK);
            li.mOnClickListener.onClick(this);
            result = true;
        } else {
            result = false;
        }

        sendAccessibilityEvent(AccessibilityEvent.TYPE_VIEW_CLICKED);

        notifyEnterOrExitForAutoFillIfNeeded(true);

        return result;
    }
可以看到,performClickInternal()方法会调用performClick()方法,这个performClick方法中将会调用OnClickListener的onClick回调方法,这就是我们之前所说的在onTouchEvent中触发onClick回调方法。
所以说优先级就是:onTouch > onTouchEvent >onClick
另外来说,setOnClickListener方法将自动将View的CLICKABLE设置为true,setOnLongClickListener方法将自动将View的LONG_CLICKABLE设置为true:
    public void setOnClickListener(@Nullable OnClickListener l) {
        if (!isClickable()) {
            setClickable(true);
        }
        getListenerInfo().mOnClickListener = l;
    }

	public void setOnLongClickListener(@Nullable OnLongClickListener l) {
        if (!isLongClickable()) {
            setLongClickable(true);
        }
        getListenerInfo().mOnLongClickListener = l;
    }
这里为止,View处理点击事件的流程就走完了。
事件传递的结论总结
根据前面我们介绍的事件传递的规则和源码的解析,我们就可以总结出一些关于事件传递的结论:
- 1.同一个事件序列是以一个ACTION_DOWN事件开始,中间穿插着许多别的事件,最后以一个ACTION_UP事件结束。
也就是:
ACTION_DOWN -> ......... -> ACTION_UP
- 2.正常情况下,一个事件序列只能被一个View拦截并消耗。因为一旦一个元素拦截了某此事件,那么同一事件序列内的所有事件都会直接交给它处理,因此同一个事件序列中的事件不能分别由两个View同时处理,但是也可以通过其他特殊手段实现。
- 3.某个View一旦决定拦截事件,那么这一个事件序列都只能由它来处理(如果事件序列能够传递给它的话),并且它的onInterceptTouchEvent不会再被调用。也就是说当一个View决定拦截事件的时候,那么系统会把同一个事件序列内的其他事件都直接交由它处理,而且不再需要调用其onInterceptTouchEvent方法。
- 4.某个View一旦开始处理事件,如果他不能消耗Down事件,那么同一事件序列中的其他事件都不会再交由他处理,并且事件将重新交由它的父View处理。意思是事件一旦交给View处理,那么它就必须消耗掉,否则同一事件序列中剩下的事件就不再交由它来处理了。
- 5.如果View不消耗除Down以外的其他事件,那么这个点击事件将会消失,此时父View的onTouchEvent方法将不会被调用,并且当前的View可以持续收到后续的事件,最终这些消失的事件将会被交付给Activity处理。
- 6.ViewGroup默认不拦截任何事件。
- 7.View没有onInterceptTouchEvent方法,一旦有时间传递给他,那么它就会直接处理该事件。(ViewGroup是View,但是View却不一定是ViewGroup,换句话说,如果一个控件是View,说明这是最底层的View了,也没必要继续向下传递了)
- 8.View的onTouchEvent方法默认都是返回true,也就是默认都消耗事件,除非它是不可点击的(clickable和longClickable同时为false)。View的longClickable属性默认都为false,clickable属性则是分情况的,比如Button的clickable属性默认为true,而TextView默认为false。
- 9.View的enable属性不影响onTouchEvent的默认返回值。哪怕一个View是disable状态的,只要它的clickable或者longClickable为true,那么它的onTouchEvent就会返回true。
- 10.onClick会发生的前提是View是可点击的,并且他收到了Down和Up事件。
- 11.事件传递过程是由外向内的,即事件总是先传递给父元素,然后再由父元素分发给子View,通过requestDisallowInterceptTouchEvent方法可以在子元素中干预父元素的分发过程,但是Down事件除外。