目 录
1 Android系统开发背景与意义 1
1.1 Android系统平台的出现 1
1.2 Android系统的发展 1
1.3 Android系统架构的介绍 1
1.4 Android开放系统 3
1.5 Android系统的特点 3
2 二维码识别系统背景介绍 3
2.1 二维码识别系统背景 3
2.1.1 二维码技术产生的背景 3
2.1.2 二维码分类及其特点 4
2.1.3 二维码技术国内外的发展 5
2.2 二维码技术研究的意义和应用 6
2.2.1 二维码技术的应用 6
2.2.2 二维码研究的意义 7
3 需求分析 8
3.1 系统需求分析 8
3.1.1 课题可行性分析 8
3.1.2 课题功能需求分析 9
3.1.3 课题功能需求分析说明 9
3.1.4 系统界面需求 9
3.1.5 系统性能需求 9
3.1.6 运行环境需求 9
3.2 系统需要解决的问题 9
3.3 系统关键技术分析 10
3.4 本章总结 10
4 系统设计 10
4.1 课题需要解决的问题 10
4.1.1 界面布局 10
4.1.2 条形码二维码解码功能 10
4.2 系统总体设计 11
4.2.1 课题功能框架 11
4.2.2 课题总体流程图 12
4.2.3 数据库的概念结构设计 13
4.3 系统详细设计 13
4.3.1 系统模块设计 13
4.3.2 系统界面详细设计 16
4.3.3 数据库详细设计 16
4.4 本章小结 17
5 编码与实现 17
5.1 开发环境搭配 17
5.1.1 软件下载安装 17
5.1.2 配置环境变量 17
5.2 二维码识别系统功能实现 17
5.2.1 二维码识别系统界面设计 17
5.2.2 二维码功能的设计与实现 19
5.2.3 查看扫描历史记录功能实现 21
5.2.4 分享功能实现 22
5.3 本章小结 22
6 系统测试与运行 22
6.1 测试目的 22
6.2 测试环境 23
6.3 测试的流程和测试 23
6.3.1 基于Android模拟器的运行测试 23
6.3.2 基于Android移动设备的运行测试 24
6.4 本章小结 27
结束语 28
参考文献 29
附录 30
致谢 31
3 需求分析
3.1 系统需求分析
3.1.1 课题可行性分析
随着Android的快速发展和不断完善,Android的应用是越发的广泛。所以基于Android平台的手机小程序也是越来越多、越来越受欢迎。
Java是一种跨平台的,面向对象的,分布式的,解释的,健壮的安全的,结构的中立的,可移植的,性能很优异的多线程的,动态的语言。XML(Extensible Markup Language)即可扩展标记语言,它与HTML一样,都是SGML(Standard Generalized Markup Language,标准通用标记语言)。Xml是Internet环境中跨平台的,依赖于内容的技术,是当前处理结构化文档信息的有力工具。扩展标记语言XML是一种简单的数据存储语言,使用一系列简单的标记描述数据,而这些标记可以用方便的方式建立。
随着Android移动设备大部分都带有自动调焦作用,这就对Android二维码系统的应用带来了更广阔的市场。又各国对二维码的发展和研究,也产生了很多稳定和安全的二维码系统,并且Google根据每种条形码二维码的标准开发了开源项目Zxing。根据Zxing核心库的基础,该系统可以根据核心库提供的二维码标准,依据编码解码原理实该项目的条码、二维码识别。这对二维码的开发和研究带来了更多发展前景[7]。
3.1.2 课题功能需求分析
本次的毕业设计主要就是在基于Android平台下设计并开发一个条码二维码识别系统。运用当前Google提供的Android SDK来以及开源项目Zxing核心库编码解码原理为基础,来实现二位码识别系统。
本课题的总体的功能业务可以主要描述为以下几点:
(1) 主界面上显示出主要的功能
(2) 进行一维条行码的识别
(3) 进行二维QR码的识别
(4) 进行二维DM矩阵码识别
(5) 对二维码进行分享
(6) 软件使用帮助
3.1.3 课题功能需求分析说明
根据对本课题的主要需求的分析做如下说明:
(1) 主界面上主要就是显示该系统所能够进行的动作和所能实现的功能,也是用户进行软件操作的主要界面。
(2) 本软件最强大的功能是实现当前主流的条码、QR码和DM矩阵码的识别功能。
(3) 可以分享二维码。
(4) 对扫描历史进行查看。
(5) 对软件使用提供帮助。
3.1.4 系统界面需求
本系统的界面需要布局合理、美观,需要体现系统的友好性。
3.1.5 系统性能需求
本系统需要扫描速度快、安全性高、处理结果速度快,尽可能为用户节省时间。
3.1.6 运行环境需求
系统运行环境:基于Android操作系统移动设备
系统支持版本:Android 1.5及以上版本
开发环境:Eclipse 3.5 ADT16-16.0.1 JDK-7u3-windows-i586
3.2 系统需要解决的问题
开发基于Android二维码识别系统需要解决一下几个问题:
(1)数据库问题
本系统需要用到SQLite轻量级数据库。用SQLite数据库来实现历史记录数据的存放。
(2)布局问题
在Android平台下开发该应用软件,一个非常重要问题的是要解决布局问题。android平台中采用的是xml文件来设置布局。SDK提供了包括图片、文字显示、以及xml文件的设计方法。该系统需要用到FrameLayout布局来调用摄像头。
3.3 系统关键技术分析
(1)SQLite轻量级数据库的使用。
该系统需要使用到Android自身的数据库系统,使用SQLite数据创建存放扫描结果的历史记录表。
(2)移动设备Camera摄像头的调用。
该系统要是使用摄像头才能进行二维码的扫描和处理,通过摄像头来进行二维码图片数据的输入。
3.4 本章总结
通过对Android平台的架构的分析和对毕业设计课题的需求的分析,我们基本可以了解到该课题的主要功能。为下一阶段的设计的研究打下好的基础。
4 系统设计
4.1 课题需要解决的问题
4.1.1 界面布局
一个Android软件的好坏很大程度上并不是功能如何强大,而是友好易操作的界面的好坏。一个友好的界面不仅让用户更容易操作和使用软件,也让用户感觉到很舒服的感觉。Android系统正是考虑到这一点,为开发人员提供了强大的布局实现,并提供了很多布局方式包括:LinearLayout水平布局、FrameLayout框架布局、RelativeLayout相对布局、TableLayout表单布局和TAbWidget切换卡、AbsoluteLayout绝对布局。
本软件需要用调用Camera来实现扫描功能,需要用到框架布局FrameLayout能重叠控件,实现“范围框”的效果。
4.1.2 条形码二维码解码功能
本系统是根据Google研究开源项目Zxing核心库为基础,通过二维码发布的标准,就是为了实现二维码扫描功能,当前最流行条形码,日韩所使用最多的QR码和美国的DM矩阵码。Zxing不仅对最主要的二维码扫描功能做了详细的分析,同时也实现了国际化的操作,针对不同国家,使用不同的语言,由于QRcode二维码的广泛应用且QRcode支持中文,所以在此我们主要使用QRcode二维码识别,语言为简体中文[9]。
系统用例图如图4-1所示:
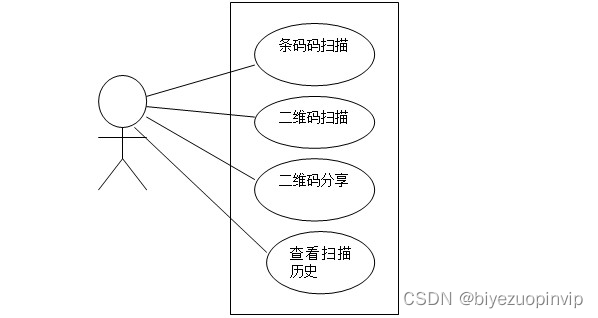
图4-1 系统功能用例图
4.2 系统总体设计
4.2.1 课题功能框架
基于Android二维码系统功能主要包括:一位条码扫描、二位QR码扫描、DM矩阵码扫描和分享二维码扫描。功能框架如图4-2所示:
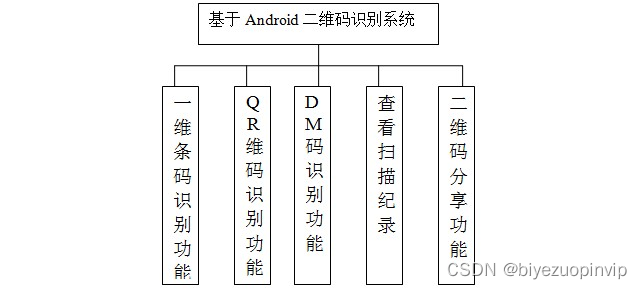
图4-2 系统功能模块图
/*
 * Copyright (C) 2008 ZXing authors
 *
 * Licensed under the Apache License, Version 2.0 (the "License");
 * you may not use this file except in compliance with the License.
 * You may obtain a copy of the License at
 *
 *      http://www.apache.org/licenses/LICENSE-2.0
 *
 * Unless required by applicable law or agreed to in writing, software
 * distributed under the License is distributed on an "AS IS" BASIS,
 * WITHOUT WARRANTIES OR CONDITIONS OF ANY KIND, either express or implied.
 * See the License for the specific language governing permissions and
 * limitations under the License.
 */

package com.google.zxing.client.android;

import com.google.zxing.ResultPoint;
import com.google.zxing.client.android.camera.CameraManager;

import android.content.Context;
import android.content.res.Resources;
import android.graphics.Bitmap;
import android.graphics.Canvas;
import android.graphics.Paint;
import android.graphics.Rect;
import android.util.AttributeSet;
import android.view.View;

import java.util.Collection;
import java.util.HashSet;

/**
 * This view is overlaid on top of the camera preview. It adds the viewfinder rectangle and partial
 * transparency outside it, as well as the laser scanner animation and result points.
 *
 * @author dswitkin@google.com (Daniel Switkin)
 */
public final class ViewfinderView extends View {

  private static final int[] SCANNER_ALPHA = {0, 64, 128, 192, 255, 192, 128, 64};
  private static final long ANIMATION_DELAY = 100L;
  private static final int OPAQUE = 0xFF;

  private final Paint paint;
  private Bitmap resultBitmap;
  private final int maskColor;
  private final int resultColor;
  private final int frameColor;
  private final int laserColor;
  private final int resultPointColor;
  private int scannerAlpha;
  private Collection<ResultPoint> possibleResultPoints;
  private Collection<ResultPoint> lastPossibleResultPoints;

  // This constructor is used when the class is built from an XML resource.
  public ViewfinderView(Context context, AttributeSet attrs) {
    super(context, attrs);

    // Initialize these once for performance rather than calling them every time in onDraw().
    paint = new Paint();
    Resources resources = getResources();
    maskColor = resources.getColor(R.color.viewfinder_mask);
    resultColor = resources.getColor(R.color.result_view);
    frameColor = resources.getColor(R.color.viewfinder_frame);
    laserColor = resources.getColor(R.color.viewfinder_laser);
    resultPointColor = resources.getColor(R.color.possible_result_points);
    scannerAlpha = 0;
    possibleResultPoints = new HashSet<ResultPoint>(5);
  }

  @Override
  public void onDraw(Canvas canvas) {
    Rect frame = CameraManager.get().getFramingRect();
    if (frame == null) {
      return;
    }
    int width = canvas.getWidth();
    int height = canvas.getHeight();

    // Draw the exterior (i.e. outside the framing rect) darkened
    paint.setColor(resultBitmap != null ? resultColor : maskColor);
    canvas.drawRect(0, 0, width, frame.top, paint);
    canvas.drawRect(0, frame.top, frame.left, frame.bottom + 1, paint);
    canvas.drawRect(frame.right + 1, frame.top, width, frame.bottom + 1, paint);
    canvas.drawRect(0, frame.bottom + 1, width, height, paint);

    if (resultBitmap != null) {
      // Draw the opaque result bitmap over the scanning rectangle
      paint.setAlpha(OPAQUE);
      canvas.drawBitmap(resultBitmap, frame.left, frame.top, paint);
    } else {

      // Draw a two pixel solid black border inside the framing rect
      paint.setColor(frameColor);
      canvas.drawRect(frame.left, frame.top, frame.right + 1, frame.top + 2, paint);
      canvas.drawRect(frame.left, frame.top + 2, frame.left + 2, frame.bottom - 1, paint);
      canvas.drawRect(frame.right - 1, frame.top, frame.right + 1, frame.bottom - 1, paint);
      canvas.drawRect(frame.left, frame.bottom - 1, frame.right + 1, frame.bottom + 1, paint);

      // Draw a red "laser scanner" line through the middle to show decoding is active
      paint.setColor(laserColor);
      paint.setAlpha(SCANNER_ALPHA[scannerAlpha]);
      scannerAlpha = (scannerAlpha + 1) % SCANNER_ALPHA.length;
      int middle = frame.height() / 2 + frame.top;
      canvas.drawRect(frame.left + 2, middle - 1, frame.right - 1, middle + 2, paint);

      Collection<ResultPoint> currentPossible = possibleResultPoints;
      Collection<ResultPoint> currentLast = lastPossibleResultPoints;
      if (currentPossible.isEmpty()) {
        lastPossibleResultPoints = null;
      } else {
        possibleResultPoints = new HashSet<ResultPoint>(5);
        lastPossibleResultPoints = currentPossible;
        paint.setAlpha(OPAQUE);
        paint.setColor(resultPointColor);
        for (ResultPoint point : currentPossible) {
          canvas.drawCircle(frame.left + point.getX(), frame.top + point.getY(), 6.0f, paint);
        }
      }
      if (currentLast != null) {
        paint.setAlpha(OPAQUE / 2);
        paint.setColor(resultPointColor);
        for (ResultPoint point : currentLast) {
          canvas.drawCircle(frame.left + point.getX(), frame.top + point.getY(), 3.0f, paint);
        }
      }

      // Request another update at the animation interval, but only repaint the laser line,
      // not the entire viewfinder mask.
      postInvalidateDelayed(ANIMATION_DELAY, frame.left, frame.top, frame.right, frame.bottom);
    }
  }

  public void drawViewfinder() {
    resultBitmap = null;
    invalidate();
  }

  /**
   * Draw a bitmap with the result points highlighted instead of the live scanning display.
   *
   * @param barcode An image of the decoded barcode.
   */
  public void drawResultBitmap(Bitmap barcode) {
    resultBitmap = barcode;
    invalidate();
  }

  public void addPossibleResultPoint(ResultPoint point) {
    possibleResultPoints.add(point);
  }

}


