深度学习训练营
- 原文链接
- 环境介绍
- 前言
- 设计理念
- 网络结构
- 实验结果和讨论
- pytorch实现DenseNet
- 附录
原文链接
- 🍨 本文为🔗365天深度学习训练营 中的学习记录博客
- 🍦 参考文章:365天深度学习训练营-第J3周:Densenet网络学习
- 🍖 原作者:K同学啊|接辅导、项目定制
环境介绍
- 语言环境:Python3.9.13
- 编译器:jupyter notebook
- 深度学习环境:TensorFlow2
前言
在计算机视觉领域当中,卷积神经网络(CNN)已经成为最主流的方法.CNN当中十分重要的就在于ResNet的出现,ResNet可以训练出更深的CNN模型,实现较高的准确度,有助于训练过程当中梯度的反向传播,从而训练出更深的CNN网络,
DenseNet(Densely connected convolutional networks),其基本思路和ResNet一致,重要的在于其将前面所有层与后面层的密集连接.
其一大特色在于通过特征在channel上实现特征重用(feature reuse)
设计理念
相较于ResNet,DenseNet提出了更加激进的密集连接机制,简单的来说,就是当前层是会接受前面所有的层作为额外的输入,也正是因为如此表现的更加紧密
对于一个
L
L
L 层的网络,DenseNet共包含
L
(
L
+
1
)
2
\frac{L(L+1)}{2}
2L(L+1)个连接,这相较于ResNet,这是一种密集连接。而且DenseNet是直接concat来自不同层的特征图,这可以实现特征重用,提升效率,这一特点也是DenseNet与ResNet最主要的区别。
标准神经网络:
传统的网络在
l
l
l层的输出为
x
l
=
H
l
(
x
l
−
1
)
x_l=H_l (x_{l-1})
xl=Hl(xl−1)

ResNet:
对于ResNet来说,增加了来自上一层的输入的
i
d
e
n
t
i
t
y
identity
identity函数:
x
l
=
H
l
(
x
l
−
1
)
+
x
l
−
1
x_l=H_l(x _{l−1})+x_{l−1}
xl=Hl(xl−1)+xl−1

DenseNet:
在DenseNet当中会连接到所有的层作为输入:
x
l
=
H
l
(
[
x
0
,
x
1
,
⋅
,
x
l
−
1
]
)
x_l=H_l([x_0,x_1,\cdot,x_{l-1}])
xl=Hl([x0,x1,⋅,xl−1])

需要注意到的是
H
l
(
⋅
)
H_l(⋅)
Hl(⋅)表示非线性转化函数(
n
o
n
−
l
i
n
e
a
r
t
r
a
n
s
f
o
r
m
a
t
i
o
n
non-linear \\ transformation
non−lineartransformation)
,这当中是包括像
B
N
BN
BN,
R
e
L
U
ReLU
ReLU等格式各样的卷积层的组合操
DenseNet的密集连接方式要求了其需要保证特征图的一致,为解决这样的问题,使用到
D
e
n
s
B
l
o
c
k
+
T
r
a
n
s
i
t
i
o
n
DensBlock+Transition
DensBlock+Transition的结构,其中
D
e
n
s
e
B
l
o
c
k
DenseBlock
DenseBlock包含多个层的模块,保证每一层的特征图一样,可以实现层与层之间的密集连接

网络结构
D
e
n
s
e
N
e
t
DenseNet
DenseNet的网络结构主要利用
D
e
n
s
e
B
l
o
c
k
DenseBlock
DenseBlock和
T
r
a
n
s
i
t
i
o
n
Transition
Transition组成

在
D
e
n
s
e
B
l
o
c
k
DenseBlock
DenseBlock当中,每一个层的特征图大小一致,可以在
c
h
a
n
n
e
l
channel
channel维度上链接,
D
e
n
s
e
B
l
o
c
k
DenseBlock
DenseBlock的非线性组合函数
H
(
⋅
)
H(⋅)
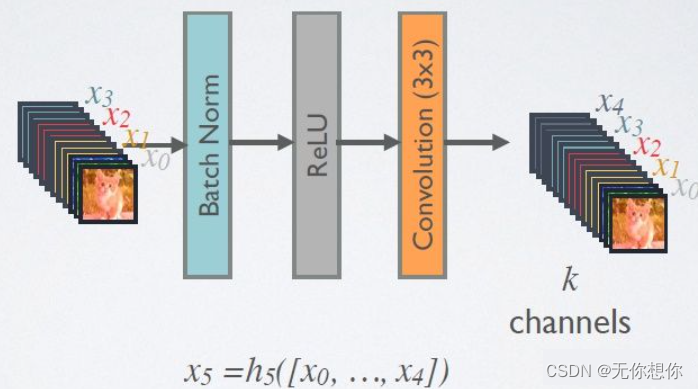
H(⋅)采用
B
N
+
R
e
L
U
+
3
∗
3
C
o
n
v
BN+ReLU+3*3Conv
BN+ReLU+3∗3Conv的结构,
注意所有的
D
e
n
s
e
B
l
o
c
k
DenseBlock
DenseBlock中各个层卷积之后会输出
k
k
k个特征图,即得到的特征图的
c
h
a
n
n
e
l
channel
channel数为
k
k
k,由于本身
D
e
n
s
e
B
l
o
c
k
DenseBlock
DenseBlock随着深度的不断增加,其输入会不断增多,这样
k
k
k在不需要设置过高的情况下就可以得到很好的训练效果
为了减少计算量,
D
e
n
s
e
B
l
o
c
k
DenseBlock
DenseBlock内部采用bottleneck层减少计算量,即
B
N
+
R
e
L
U
+
1
∗
1
C
o
n
v
+
B
N
+
R
e
L
U
+
3
∗
3
C
o
n
v
BN+ReLU+1*1 Conv+BN+ReLU+3*3Conv
BN+ReLU+1∗1Conv+BN+ReLU+3∗3Conv,称为
D
e
n
s
e
N
e
t
−
B
DenseNet-B
DenseNet−B结构 ,其中
1
∗
1
C
o
n
v
1*1Conv
1∗1Conv可以得到
4
k
4k
4k个特征图,做到了降低特征数量,缩短了计算所需时间

对于Transition层,使用两个相邻的DenseBlock,从而降低特征图大小,结构为
B
N
+
R
e
L
U
+
1
x
1
C
o
n
v
+
2
x
2
A
v
g
P
o
o
l
i
n
g
BN+ReLU+1x1 Conv+2x2 AvgPooling
BN+ReLU+1x1Conv+2x2AvgPooling,另外,Transition层起到了压缩模型的作用,假定Transition上接
D
e
n
s
e
B
l
o
c
k
DenseBlock
DenseBlock得到的特征图
c
h
a
n
n
e
l
channel
channel数为
m
m
m,使用Transition层产生
θ
m
\theta m
θm个特征(经过卷积层,
θ
∈
(
0
,
1
]
\theta \in(0,1]
θ∈(0,1]是压缩系数,只要
θ
<
1
\theta <1
θ<1就相当于对特征个数经过Transition层发生了变化),文章中
θ
=
0.5
\theta=0.5
θ=0.5,对于bottleneck层的DenseBlock结构和压缩系数小于1的Transition结构称为DenseNet-BC
论文当中ImageNet数据集所采用的网络配置如下图所示: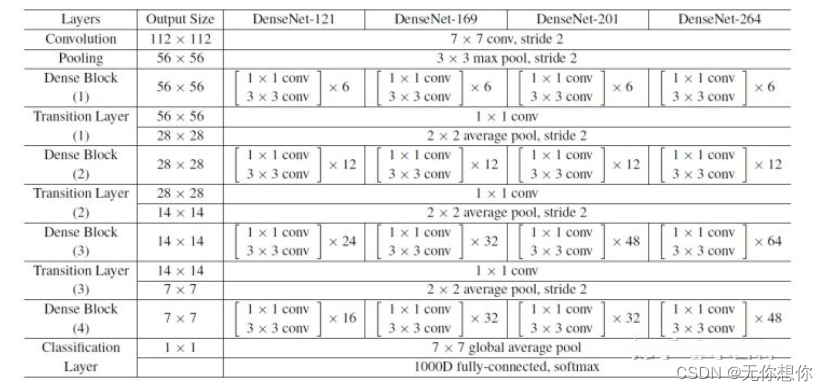
实验结果和讨论
给出了DenseNet在CIFAR-100和ImagetNet数据集上与ResNet的对比结果,如下图,可以看得出来DenseNet的网络性能成功在更小的参数下超越了 ResNet-1001

在ImageNet数据集上ResNet和DenseNet之间的比较
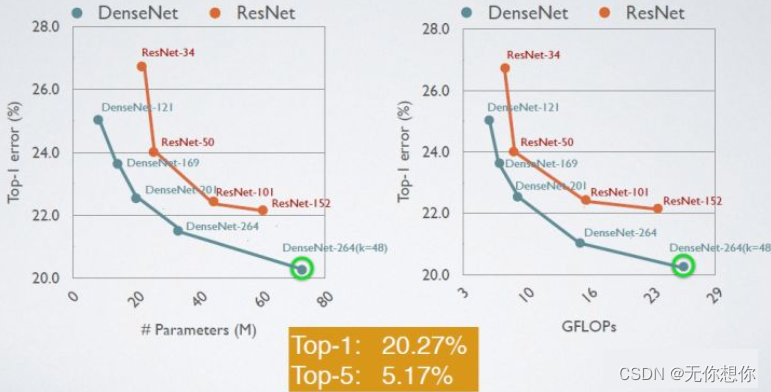
综合来看,DenseNet的优势如下;
- 由于密集连接方式,DenseNet提升了梯度的反向传播,使得模型更加容易训练,由于每层可以直接到达最后的误差信号,实现了隐式的"deep supervision"
- 参数更小且计算更高效,这有点违反直觉,由于DenseNet是通过concat特征来实现短路连接,实现了特征重用,并且采用较小的growth rate,每个层所独有的特征图是比较小的
- 由于特征复用,最后的分类器使用了低级特征
pytorch实现DenseNet
B N + R e L U + 1 x 1 C o n v + B N + R e L U + 3 x 3 C o n v BN+ReLU+1x1 Conv+BN+ReLU+3x3 Conv BN+ReLU+1x1Conv+BN+ReLU+3x3Conv结构
class _DenseLayer(nn.Sequential):
    """Basic unit of DenseBlock (using bottleneck layer) """
    def __init__(self, num_input_features, growth_rate, bn_size, drop_rate):
        super(_DenseLayer, self).__init__()
        self.add_module("norm1", nn.BatchNorm2d(num_input_features))
        self.add_module("relu1", nn.ReLU(inplace=True))
        self.add_module("conv1", nn.Conv2d(num_input_features, bn_size*growth_rate,
                                           kernel_size=1, stride=1, bias=False))
        self.add_module("norm2", nn.BatchNorm2d(bn_size*growth_rate))
        self.add_module("relu2", nn.ReLU(inplace=True))
        self.add_module("conv2", nn.Conv2d(bn_size*growth_rate, growth_rate,
                                           kernel_size=3, stride=1, padding=1, bias=False))
        self.drop_rate = drop_rate

    def forward(self, x):
        new_features = super(_DenseLayer, self).forward(x)
        if self.drop_rate > 0:
            new_features = F.dropout(new_features, p=self.drop_rate, training=self.training)
        return torch.cat([x, new_features], 1)
实现DenseBlock模块,内部是密集连接方式:
class _DenseBlock(nn.Sequential):
    """DenseBlock"""
    def __init__(self, num_layers, num_input_features, bn_size, growth_rate, drop_rate):
        super(_DenseBlock, self).__init__()
        for i in range(num_layers):
            layer = _DenseLayer(num_input_features+i*growth_rate, growth_rate, bn_size,
                                drop_rate)
            self.add_module("denselayer%d" % (i+1,), layer)
Transition层
class _Transition(nn.Sequential):
    """Transition layer between two adjacent DenseBlock"""
    def __init__(self, num_input_feature, num_output_features):
        super(_Transition, self).__init__()
        self.add_module("norm", nn.BatchNorm2d(num_input_feature))
        self.add_module("relu", nn.ReLU(inplace=True))
        self.add_module("conv", nn.Conv2d(num_input_feature, num_output_features,
                                          kernel_size=1, stride=1, bias=False))
        self.add_module("pool", nn.AvgPool2d(2, stride=2))
最后是实现DenseNet网络
class DenseNet(nn.Module):
    "DenseNet-BC model"
    def __init__(self, growth_rate=32, block_config=(6, 12, 24, 16), num_init_features=64,
                 bn_size=4, compression_rate=0.5, drop_rate=0, num_classes=1000):
        """
        :param growth_rate: (int) number of filters used in DenseLayer, `k` in the paper
        :param block_config: (list of 4 ints) number of layers in each DenseBlock
        :param num_init_features: (int) number of filters in the first Conv2d
        :param bn_size: (int) the factor using in the bottleneck layer
        :param compression_rate: (float) the compression rate used in Transition Layer
        :param drop_rate: (float) the drop rate after each DenseLayer
        :param num_classes: (int) number of classes for classification
        """
        super(DenseNet, self).__init__()
        # first Conv2d
        self.features = nn.Sequential(OrderedDict([
            ("conv0", nn.Conv2d(3, num_init_features, kernel_size=7, stride=2, padding=3, bias=False)),
            ("norm0", nn.BatchNorm2d(num_init_features)),
            ("relu0", nn.ReLU(inplace=True)),
            ("pool0", nn.MaxPool2d(3, stride=2, padding=1))
        ]))

        # DenseBlock
        num_features = num_init_features
        for i, num_layers in enumerate(block_config):
            block = _DenseBlock(num_layers, num_features, bn_size, growth_rate, drop_rate)
            self.features.add_module("denseblock%d" % (i + 1), block)
            num_features += num_layers*growth_rate
            if i != len(block_config) - 1:
                transition = _Transition(num_features, int(num_features*compression_rate))
                self.features.add_module("transition%d" % (i + 1), transition)
                num_features = int(num_features * compression_rate)

        # final bn+ReLU
        self.features.add_module("norm5", nn.BatchNorm2d(num_features))
        self.features.add_module("relu5", nn.ReLU(inplace=True))

        # classification layer
        self.classifier = nn.Linear(num_features, num_classes)

        # params initialization
        for m in self.modules():
            if isinstance(m, nn.Conv2d):
                nn.init.kaiming_normal_(m.weight)
            elif isinstance(m, nn.BatchNorm2d):
                nn.init.constant_(m.bias, 0)
                nn.init.constant_(m.weight, 1)
            elif isinstance(m, nn.Linear):
                nn.init.constant_(m.bias, 0)

    def forward(self, x):
        features = self.features(x)
        out = F.avg_pool2d(features, 7, stride=1).view(features.size(0), -1)
        out = self.classifier(out)
        return out
选择不同的网络参数可以实现不同深度的DenseNet
def densenet121(pretrained=False, **kwargs):
    """DenseNet121"""
    model = DenseNet(num_init_features=64, growth_rate=32, block_config=(6, 12, 24, 16),
                     **kwargs)

    if pretrained:
        # '.'s are no longer allowed in module names, but pervious _DenseLayer
        # has keys 'norm.1', 'relu.1', 'conv.1', 'norm.2', 'relu.2', 'conv.2'.
        # They are also in the checkpoints in model_urls. This pattern is used
        # to find such keys.
        pattern = re.compile(
            r'^(.*denselayer\d+\.(?:norm|relu|conv))\.((?:[12])\.(?:weight|bias|running_mean|running_var))$')
        state_dict = model_zoo.load_url(model_urls['densenet121'])
        for key in list(state_dict.keys()):
            res = pattern.match(key)
            if res:
                new_key = res.group(1) + res.group(2)
                state_dict[new_key] = state_dict[key]
                del state_dict[key]
        model.load_state_dict(state_dict)
    return model
附录
参考内容连接:
详解DenseNet(密集连接的卷积网络)


