文章目录
- 0 前言
- 1 课题背景
- 2 实现效果
- 3 文本区域检测网络-CTPN
- 4 文本识别网络-CRNN
- 5 最后
0 前言
🔥 Hi,大家好,这里是丹成学长的毕设系列文章!
🔥 对毕设有任何疑问都可以问学长哦!
这两年开始,各个学校对毕设的要求越来越高,难度也越来越大… 毕业设计耗费时间,耗费精力,甚至有些题目即使是专业的老师或者硕士生也需要很长时间,所以一旦发现问题,一定要提前准备,避免到后面措手不及,草草了事。
为了大家能够顺利以及最少的精力通过毕设,学长分享优质毕业设计项目,今天要分享的新项目是
🚩 基于深度学习OCR中文识别系统
🥇学长这里给一个题目综合评分(每项满分5分)
- 难度系数:4分
- 工作量:4分
- 创新点:3分
🧿 选题指导, 项目分享:
https://gitee.com/yaa-dc/BJH/blob/master/gg/cc/README.md
1 课题背景
在日常生产生活中有大量的文档资料以图片、PDF的方式留存,随着时间推移 往往难以检索和归类 ,文字识别(Optical Character Recognition,OCR )是将图片、文档影像上的文字内容快速识别成为可编辑的文本的技术。
高性能文档OCR识别系统是基于深度学习技术,综合运用Tensorflow、CNN、Caffe 等多种深度学习训练框架,基于千万级大规模文字样本集训练完成的OCR引擎,与传统的模式识别的技术相比,深度学习技术支持更低质量的分辨率、抗干扰能力更强、适用的场景更复杂,文字的识别率更高。
本项目基于Tensorflow、keras/pytorch实现对自然场景的文字检测及OCR中文文字识别。
2 实现效果
公式检测
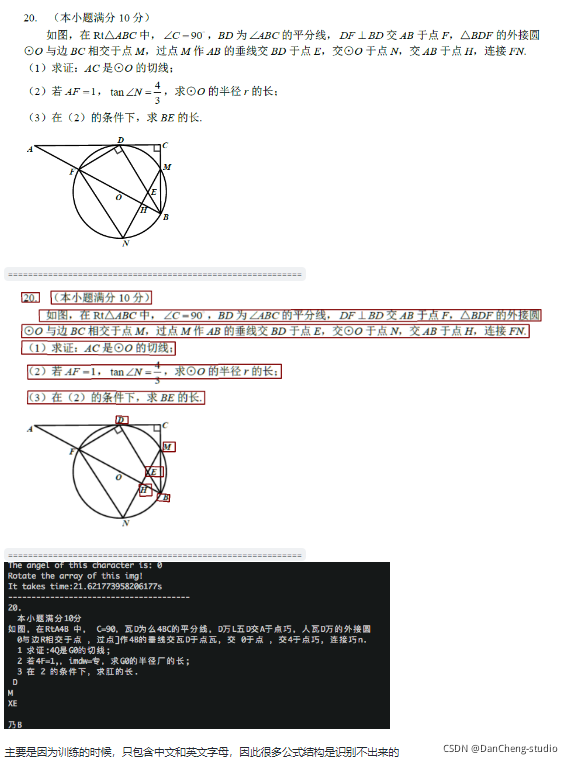
纯文字识别
3 文本区域检测网络-CTPN
对于复杂场景的文字识别,首先要定位文字的位置,即文字检测。
简介
CTPN是在ECCV 2016提出的一种文字检测算法。CTPN结合CNN与LSTM深度网络,能有效的检测出复杂场景的横向分布的文字,效果如图1,是目前比较好的文字检测算法。由于CTPN是从Faster RCNN改进而来,本文默认读者熟悉CNN原理和Faster RCNN网络结构。

相关代码
def main(argv):
    pycaffe_dir = os.path.dirname(__file__)

    parser = argparse.ArgumentParser()
    # Required arguments: input and output.
    parser.add_argument(
        "input_file",
        help="Input txt/csv filename. If .txt, must be list of filenames.\
        If .csv, must be comma-separated file with header\
        'filename, xmin, ymin, xmax, ymax'"
    )
    parser.add_argument(
        "output_file",
        help="Output h5/csv filename. Format depends on extension."
    )
    # Optional arguments.
    parser.add_argument(
        "--model_def",
        default=os.path.join(pycaffe_dir,
                "../models/bvlc_reference_caffenet/deploy.prototxt.prototxt"),
        help="Model definition file."
    )
    parser.add_argument(
        "--pretrained_model",
        default=os.path.join(pycaffe_dir,
                "../models/bvlc_reference_caffenet/bvlc_reference_caffenet.caffemodel"),
        help="Trained model weights file."
    )
    parser.add_argument(
        "--crop_mode",
        default="selective_search",
        choices=CROP_MODES,
        help="How to generate windows for detection."
    )
    parser.add_argument(
        "--gpu",
        action='store_true',
        help="Switch for gpu computation."
    )
    parser.add_argument(
        "--mean_file",
        default=os.path.join(pycaffe_dir,
                             'caffe/imagenet/ilsvrc_2012_mean.npy'),
        help="Data set image mean of H x W x K dimensions (numpy array). " +
             "Set to '' for no mean subtraction."
    )
    parser.add_argument(
        "--input_scale",
        type=float,
        help="Multiply input features by this scale to finish preprocessing."
    )
    parser.add_argument(
        "--raw_scale",
        type=float,
        default=255.0,
        help="Multiply raw input by this scale before preprocessing."
    )
    parser.add_argument(
        "--channel_swap",
        default='2,1,0',
        help="Order to permute input channels. The default converts " +
             "RGB -> BGR since BGR is the Caffe default by way of OpenCV."

    )
    parser.add_argument(
        "--context_pad",
        type=int,
        default='16',
        help="Amount of surrounding context to collect in input window."
    )
    args = parser.parse_args()

    mean, channel_swap = None, None
    if args.mean_file:
        mean = np.load(args.mean_file)
        if mean.shape[1:] != (1, 1):
            mean = mean.mean(1).mean(1)
    if args.channel_swap:
        channel_swap = [int(s) for s in args.channel_swap.split(',')]

    if args.gpu:
        caffe.set_mode_gpu()
        print("GPU mode")
    else:
        caffe.set_mode_cpu()
        print("CPU mode")

    # Make detector.
    detector = caffe.Detector(args.model_def, args.pretrained_model, mean=mean,
            input_scale=args.input_scale, raw_scale=args.raw_scale,
            channel_swap=channel_swap,
            context_pad=args.context_pad)

    # Load input.
    t = time.time()
    print("Loading input...")
    if args.input_file.lower().endswith('txt'):
        with open(args.input_file) as f:
            inputs = [_.strip() for _ in f.readlines()]
    elif args.input_file.lower().endswith('csv'):
        inputs = pd.read_csv(args.input_file, sep=',', dtype={'filename': str})
        inputs.set_index('filename', inplace=True)
    else:
        raise Exception("Unknown input file type: not in txt or csv.")

    # Detect.
    if args.crop_mode == 'list':
        # Unpack sequence of (image filename, windows).
        images_windows = [
            (ix, inputs.iloc[np.where(inputs.index == ix)][COORD_COLS].values)
            for ix in inputs.index.unique()
        ]
        detections = detector.detect_windows(images_windows)
    else:
        detections = detector.detect_selective_search(inputs)
    print("Processed {} windows in {:.3f} s.".format(len(detections),
                                                     time.time() - t))

    # Collect into dataframe with labeled fields.
    df = pd.DataFrame(detections)
    df.set_index('filename', inplace=True)
    df[COORD_COLS] = pd.DataFrame(
        data=np.vstack(df['window']), index=df.index, columns=COORD_COLS)
    del(df['window'])

    # Save results.
    t = time.time()
    if args.output_file.lower().endswith('csv'):
        # csv
        # Enumerate the class probabilities.
        class_cols = ['class{}'.format(x) for x in range(NUM_OUTPUT)]
        df[class_cols] = pd.DataFrame(
            data=np.vstack(df['feat']), index=df.index, columns=class_cols)
        df.to_csv(args.output_file, cols=COORD_COLS + class_cols)
    else:
        # h5
        df.to_hdf(args.output_file, 'df', mode='w')
    print("Saved to {} in {:.3f} s.".format(args.output_file,
                                            time.time() - t))
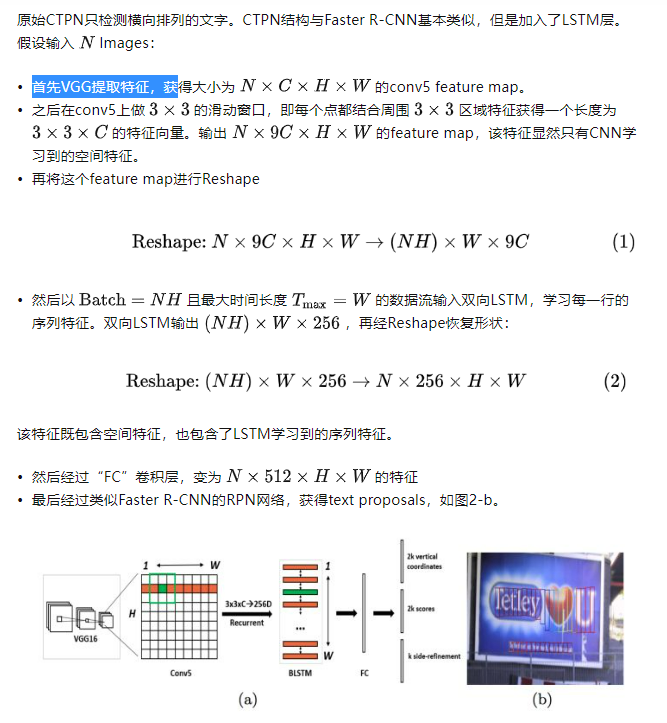
CTPN网络结构
4 文本识别网络-CRNN
CRNN 介绍
CRNN 全称为 Convolutional Recurrent Neural Network,主要用于端到端地对不定长的文本序列进行识别,不用先对单个文字进行切割,而是将文本识别转化为时序依赖的序列学习问题,就是基于图像的序列识别。
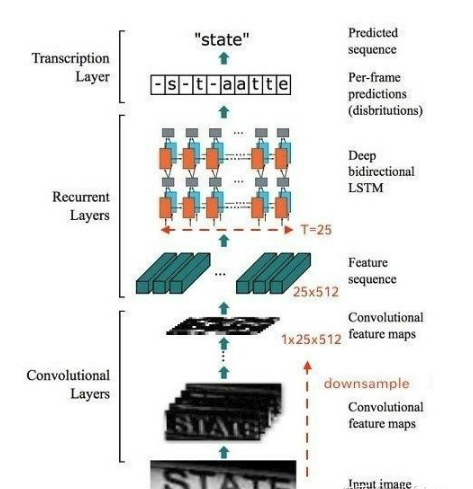
整个CRNN网络结构包含三部分,从下到上依次为:
- CNN(卷积层),使用深度CNN,对输入图像提取特征,得到特征图;
- RNN(循环层),使用双向RNN(BLSTM)对特征序列进行预测,对序列中的每个特征向量进行学习,并输出预测标签(真实值)分布;
- CTC loss(转录层),使用 CTC 损失,把从循环层获取的一系列标签分布转换成最终的标签序列。
CNN
卷积层的结构图:
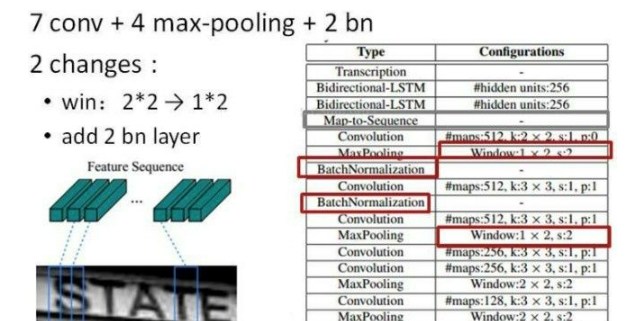
这里有一个很精彩的改动,一共有四个最大池化层,但是最后两个池化层的窗口尺寸由 2x2 改为 1x2,也就是图片的高度减半了四次(除以 2^4 ),而宽度则只减半了两次(除以2^2),这是因为文本图像多数都是高较小而宽较长,所以其feature map也是这种高小宽长的矩形形状,如果使用1×2的池化窗口可以尽量保证不丢失在宽度方向的信息,更适合英文字母识别(比如区分i和l)。
CRNN 还引入了BatchNormalization模块,加速模型收敛,缩短训练过程。
输入图像为灰度图像(单通道);高度为32,这是固定的,图片通过 CNN 后,高度就变为1,这点很重要;宽度为160,宽度也可以为其他的值,但需要统一,所以输入CNN的数据尺寸为 (channel, height, width)=(1, 32, 160)。
CNN的输出尺寸为 (512, 1, 40)。即 CNN 最后得到512个特征图,每个特征图的高度为1,宽度为40。
Map-to-Sequence
我们是不能直接把 CNN 得到的特征图送入 RNN 进行训练的,需要进行一些调整,根据特征图提取 RNN 需要的特征向量序列。

现在需要从 CNN 模型产生的特征图中提取特征向量序列,每一个特征向量(如上图中的一个红色框)在特征图上按列从左到右生成,每一列包含512维特征,这意味着第 i 个特征向量是所有的特征图第 i 列像素的连接,这些特征向量就构成一个序列。
由于卷积层,最大池化层和激活函数在局部区域上执行,因此它们是平移不变的。因此,特征图的每列(即一个特征向量)对应于原始图像的一个矩形区域(称为感受野),并且这些矩形区域与特征图上从左到右的相应列具有相同的顺序。特征序列中的每个向量关联一个感受野。
如下图所示:

这些特征向量序列就作为循环层的输入,每个特征向量作为 RNN 在一个时间步(time step)的输入。
RNN
因为 RNN 有梯度消失的问题,不能获取更多上下文信息,所以 CRNN 中使用的是 LSTM,LSTM 的特殊设计允许它捕获长距离依赖,不了解的话可以看一下这篇文章 对RNN和LSTM的理解。
LSTM 是单向的,它只使用过去的信息。然而,在基于图像的序列中,两个方向的上下文是相互有用且互补的。将两个LSTM,一个向前和一个向后组合到一个双向LSTM中。此外,可以堆叠多层双向LSTM,深层结构允许比浅层抽象更高层次的抽象。
这里采用的是两层各256单元的双向 LSTM 网络:
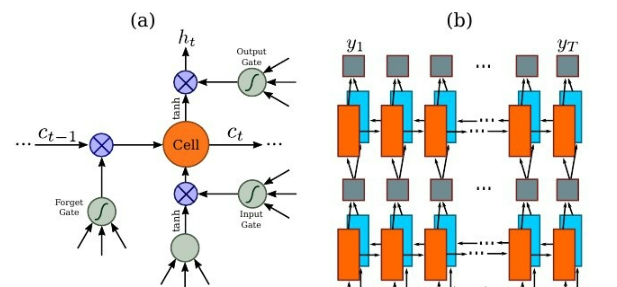
通过上面一步,我们得到了40个特征向量,每个特征向量长度为512,在 LSTM 中一个时间步就传入一个特征向量进行分类,这里一共有40个时间步。
我们知道一个特征向量就相当于原图中的一个小矩形区域,RNN 的目标就是预测这个矩形区域为哪个字符,即根据输入的特征向量,进行预测,得到所有字符的softmax概率分布,这是一个长度为字符类别数的向量,作为CTC层的输入。
因为每个时间步都会有一个输入特征向量 x^T ,输出一个所有字符的概率分布 y^T ,所以输出为 40 个长度为字符类别数的向量构成的后验概率矩阵。
如下图所示:

然后将这个后验概率矩阵传入转录层。
CTC loss
这算是 CRNN 最难的地方,这一层为转录层,转录是将 RNN 对每个特征向量所做的预测转换成标签序列的过程。数学上,转录是根据每帧预测找到具有最高概率组合的标签序列。
端到端OCR识别的难点在于怎么处理不定长序列对齐的问题!OCR可建模为时序依赖的文本图像问题,然后使用CTC(Connectionist Temporal Classification, CTC)的损失函数来对 CNN 和 RNN 进行端到端的联合训练。
相关代码
    def inference(self, inputdata, name, reuse=False):
        """
        Main routine to construct the network
        :param inputdata:
        :param name:
        :param reuse:
        :return:
        """
        with tf.variable_scope(name_or_scope=name, reuse=reuse):
            # centerlized data
            inputdata = tf.divide(inputdata, 255.0)
            #1.特征提取阶段
            # first apply the cnn feature extraction stage
            cnn_out = self._feature_sequence_extraction(
                inputdata=inputdata, name='feature_extraction_module'
            )
            #2.第二步,  batch*1*25*512  变成 batch * 25 * 512
            # second apply the map to sequence stage
            sequence = self._map_to_sequence(
                inputdata=cnn_out, name='map_to_sequence_module'
            )
            #第三步,应用序列标签阶段
            # third apply the sequence label stage
            # net_out width, batch, n_classes
            # raw_pred   width, batch, 1
            net_out, raw_pred = self._sequence_label(
                inputdata=sequence, name='sequence_rnn_module'
            )

        return net_out


![[附源码]计算机毕业设计JAVA星期八酒店管理系统](https://img-blog.csdnimg.cn/52021a7846294b9699949bd245c170f5.png)


![[附源码]JAVA毕业设计基于web的公益募捐网站(系统+LW)](https://img-blog.csdnimg.cn/bf355f2556f847d5abff9f617694f487.png)

![[附源码]计算机毕业设计springboot校园疫情管理系统](https://img-blog.csdnimg.cn/692f626044cb464ca53d10685b1aa585.png)
