本系列博客为记录笔者在学习GAMES101课程时遇到的问题与思考。
- GAMES101:课程官网
- GAMES101:B站视频
- GAMES101:相关文件下载(百度网盘)
一、基础题
通过Assignment1.pdf可以知道基础题的任务就是填充完整两个函数
get_model_matrix()get_projection_matrix()
而其他的模块函数框架中都已经给定,只需要自己仔细阅读Assignment1.pdf中的内容并自己看源码尝试理解,本文不再赘述,理解不了也没事,知道是干啥用的就可以,不影响最后的作业结果。
接下来按MVP的顺序讲解本题需要填充的函数。
-
get_model_matrix():
由于题目要求是绕z轴旋转,由作业0可知旋转矩阵为:

先理解函数传入形参的含义,通过观察mian()函数可知rotation_angle传入的是旋转角度:Eigen::Matrix4f get_model_matrix(float rotation_angle) { Eigen::Matrix4f model = Eigen::Matrix4f::Identity(); // TODO: Implement this function // Create the model matrix for rotating the triangle around the Z axis. // Then return it. float Radian_angle = rotation_angle / 180 * MY_PI; //Radian Eigen::Matrix4f Rz; Rz << cos(Radian_angle), -sin(Radian_angle), 0, 0, sin(Radian_angle), cos(Radian_angle), 0, 0, 0, 0, 1, 0, 0, 0, 0, 1; model = Rz * model; return model; }其中
float Radian_angle = rotation_angle / 180 * MY_PI;语句是因为math库中的sin和cos等三角函数是使用的弧度制,而传入的rotation_angle是角度制,需要先把角度转换为弧度。 -
get_view_matrix():
此函数作业框架已经给出,通过观察mian()函数可知eye_pos传入的是视角位置,也就是相机位置,接下来简单分析一下函数的作用:Eigen::Matrix4f get_view_matrix(Eigen::Vector3f eye_pos) { Eigen::Matrix4f view = Eigen::Matrix4f::Identity(); Eigen::Matrix4f translate; translate << 1, 0, 0, -eye_pos[0], 0, 1, 0, -eye_pos[1], 0, 0, 1, -eye_pos[2], 0, 0, 0, 1; view = translate * view; return view; }视图矩阵的作用其实是将相机移到标准源点的过程,由此分析可以知道其实上述代码中的
translate矩阵就是做了这么一件事,因为通过听课可知,其实平移操作就是在四阶矩阵的最后一列分别表示平移的距离。

由于eye_pos中存储的就是相机当前位置,但是要平移到源点必须要平移负值的参数,就比如(1, 0, 0)想要平移到源点必须在x轴平移-1的距离,所以由此可以轻松理解translate矩阵所作的相机平移操作。 -
get_projection_matrix():
最后是投影矩阵,通过闫教授的分析可以知道,投影矩阵首先是要压缩图像,也就是将一个高分辨率的图像挤压成一个可以放入相机大小的图像,这样之后再进行正交投影就可以获得远处的物体投影至相机的图像了。对应的其实就是 M p e r s p → o r t h o M_{persp\rightarrow ortho} Mpersp→ortho矩阵进行图像压缩和 M o r t h o M_{ortho} Mortho矩阵进行正交投影。通过闫教授的分析可以知道两个矩阵分别是:
M p e r s p → o r t h o = ( n 0 0 0 0 n 0 0 0 0 n + f − n f 0 0 1 0 ) M_{persp\rightarrow ortho}=\left( \begin{matrix} n& 0& 0& 0\\ 0& n& 0& 0\\ 0& 0& n+f& -nf\\ 0& 0& 1& 0\\ \end{matrix} \right) Mpersp→ortho= n0000n0000n+f100−nf0
M o r t h o = ( 2 r − l 0 0 0 0 2 t − b 0 0 0 0 2 n − f 0 0 0 0 1 ) ( 1 0 0 − r + l 2 0 1 0 − t + b 2 0 0 0 − n + f 2 0 0 0 1 ) M_{ortho}=\left( \begin{matrix} \frac{2}{r-l}& 0& 0& 0\\ 0& \frac{2}{t-b}& 0& 0\\ 0& 0& \frac{2}{n-f}& 0\\ 0& 0& 0& 1\\ \end{matrix} \right) \left( \begin{matrix} 1& 0& 0& -\frac{r+l}{2}\\ 0& 1& 0& -\frac{t+b}{2}\\ 0& 0& 0& -\frac{n+f}{2}\\ 0& 0& 0& 1\\ \end{matrix} \right) Mortho= r−l20000t−b20000n−f200001 100001000000−2r+l−2t+b−2n+f1
首先分析一下投影矩阵的形参含义eye_fov:为可视角度,也就是GAMES101_Lecture_04.pdf第30页中所示的张角aspect_ratio:为宽高比,本题为1,也就是相机是正方形的zNear和zFar:为眼睛到相机的距离和眼睛到视图的距离,对应GAMES101_Lecture_04.pdf第30页中所示的 n n n和 f f f
Eigen::Matrix4f get_projection_matrix(float eye_fov, float aspect_ratio,
                                      float zNear, float zFar)
{
    zNear = -zNear;
    zFar = -zFar;
    // Students will implement this function

    Eigen::Matrix4f projection = Eigen::Matrix4f::Identity();

    // TODO: Implement this function
    // Create the projection matrix for the given parameters.
    // Then return it.

    Eigen::Matrix4f Mpersp_to_ortho;
    Mpersp_to_ortho <<
        zNear, 0, 0, 0,
        0, zNear, 0, 0,
        0, 0, zNear+zFar, -zNear*zFar,
        0, 0, 1, 0;

    float eye_fov_havle = eye_fov / 2 / 180 * MY_PI;
    float top = tan(eye_fov_havle) * -zNear; //because zNear is a nagetive number, but top is positive number
    float bottle = -top;
    float right = top * aspect_ratio;
    float left = -right;
    Eigen::Matrix4f Mortho, translation, canonical;
    translation <<
        1, 0, 0, -(right+left)/2,
        0, 1, 0, -(top+bottle)/2,
        0, 0, 1, -(zNear+zFar)/2,
        0, 0, 0, 1;
    canonical <<
        2/(right-left), 0, 0, 0,
        0, 2/(top-bottle), 0, 0,
        0, 0, 2/(zNear-zFar), 0,
        0, 0, 0, 1;
    Mortho = canonical * translation;
    projection = Mortho * Mpersp_to_ortho;
    return projection;
}
首先是最开始的两句
zNear = -zNear;和zFar = -zFar;,因为闫教授上课所推导的公式是基于我们处于z轴的正方向看向负方向的,所以式子中的 n n n和 f f f都是负数,而观察main()函数可知,调用该函数时传入的是正数,也就是这两个形参的含义是距离大小,所以我们要手动的将其调整为负值。下面的代码非常简单,上课认真听讲应该都能看懂,对应GAMES101_Lecture_04.pdf第23页和24页中的转换过程。
然后根据作业0相同的步骤,先在对应的代码框架中新建build文件夹,再将run0.sh复制到该build文件夹中,并更改名字为run1.sh,并按照Assignment1.pdf中的步骤,将其中的内容更改为
#/bin/bash
cmake ..
make -j4
./Rasterizer
修改完成后执行
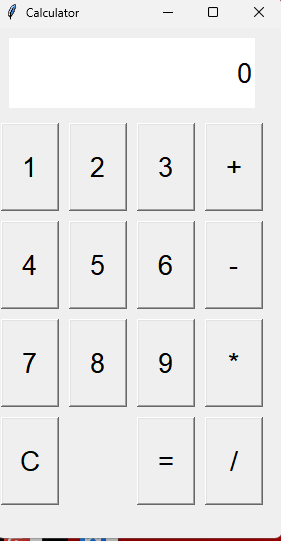
./run1.sh,出现以下结果代表运行正确:

按A和D键可以将三角形绕z轴旋转,因为我们是往z轴负方向看的,所以按A键增大角度三角形应该是往逆时针旋转才对。
二、提高题
根据Assignment1.pdf中可知提高题需要构建get_rotation()函数实现绕任意轴的旋转。
闫教授上课讲到过的Rodrigues’ Rotation Formula可以实现该功能,位于课件GAMES101_Lecture_04.pdf的第10页,但是说实话我没有看懂这个公式的原理,只是依葫芦画瓢的实现了get_rotation()函数,也不清楚答案是否正确,先挖个坑,今后有时间再填吧[doge.jpg]。
Eigen::Matrix4f get_rotation(Vector3f axis, float angle)
{
    Eigen::Matrix4f model = Eigen::Matrix4f::Identity();

    // TODO: Implement this function
    // Create the model matrix for rotating the triangle around the Z axis.
    // Then return it.

    float Radian_angle = rotation_angle / 180 * MY_PI; //Radian

    Eigen::Matrix4f I, N, Rod;
    Eigen::Vector4f n(axis.x(), axis.y(), axis.z(), 0);
    Eigen::RowVector4f nT(axis.x(), axis.y(), axis.z(), 0);
    I <<
        1, 0, 0, 0,
        0, 1, 0, 0,
        0, 0, 1, 0,
        0, 0, 0, 1;
    N <<
        0, -axis.z(), axis.y(), 0,
        axis.z(), 0, -axis.x(), 0,
        -axis.y(), axis.x(), 0, 0,
        0, 0, 0, 1;

    Rod = cos(Radian_angle) * I + (1 - cos(Radian_angle)) * n * nT + sin(Radian_angle) * N;
    Rod(3, 3) = 1; //Ensure correct proportion

    return Rod;
}


![05- redis集群模式搭建(上) (包含云服务器[有坑])](https://img-blog.csdnimg.cn/9f6f10ec1a8c4c2385205c9f4cbd4039.png)